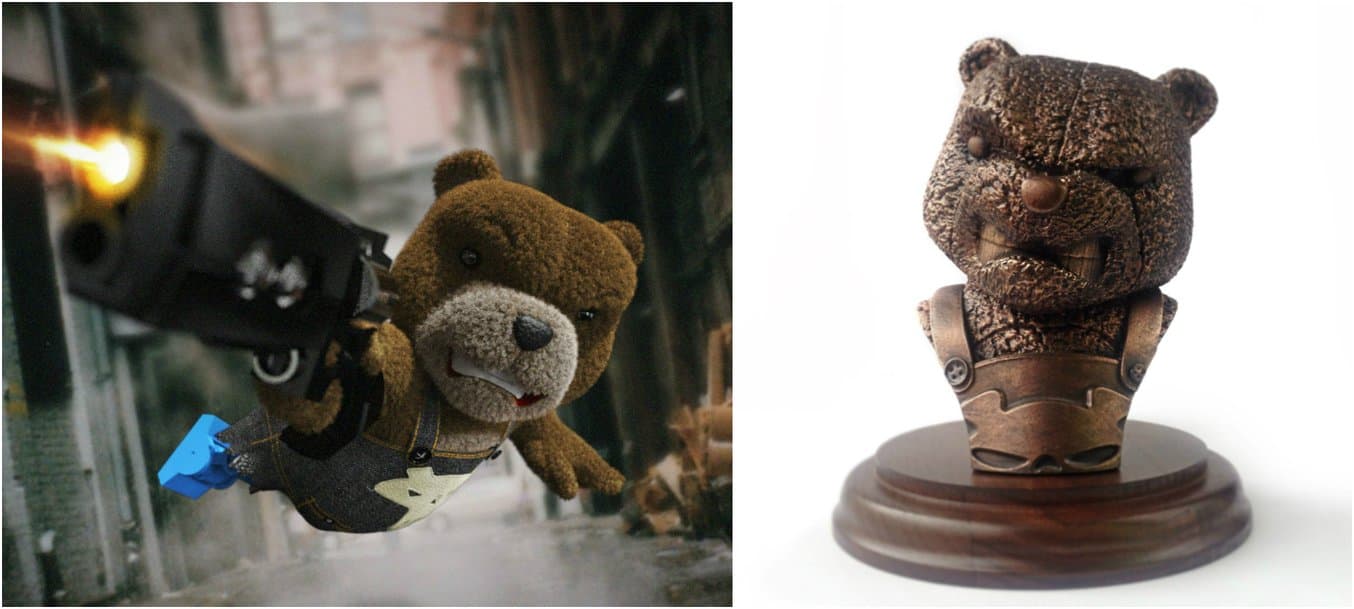
With its menacing gun and blue mechanical leg, Matt Burniston’s Mega Bear is no ordinary plush toy. Starring in Matt’s The Mega Plush short film series, which features the story of a gang of plush vigilantes, this Mega Bear has expanded its presence beyond the virtual world and made an appearance as a Form 1 3D-printed bust!
Matt’s background in graphic design and as a web designer eventually led him to “find his true calling as a 3D artist” at a design agency in New York. Now he works as a freelancer, creating everything from product renders to full-blown animation sequences for a variety of clients and for his own personal projects. Impressed by his busts and statuettes, we asked him a few questions to learn more about his design and print process.
Formlabs: What made you pick the Form 1? How does it play into your design process?
Matt Burniston: I wanted a 3D printer as soon as I heard about them many years ago. I had been using Shapeways to get my 3D creations printed, but always wanted something which I could do more experimentation with. When I heard about the Form 1, I knew it was exactly what I had been looking for. The high-resolution/detail printing is something that was at the very top of my list of demands.
Having a desktop 3D printer enables me to experiment, which with online services is a lot more difficult, as their turnaround time from submitting to receiving the print is often more than a week. The constant waiting doesn't lend itself too kindly to testing what works and what doesn't. But now I can shoot a file to my Form 1, print, make some tweaks and try it again - pretty much within the same day. The more I experiment, the more I learn, and the more I learn the more I push the boundaries of what I can create.

3D printed models of another character in The Mega Plush series
F: What is your software workflow like?
MB: My main software is Modo. I also love to jump in to Zbrush and get sculpting. Sometimes it’s a combination of both, like the Mega Plush busts I recently created. All the modelling was done in Modo, but for the film they are covered with a fur material, which cannot be exported as geometry for print data. The underlying models are quite simple, so to mimic the fur texture for 3D print, I took them over in to Zbrush and reapplied a fur looking surface texture to them. Then it is just a case of hollowing them out and scaling them to size, and exporting .stl files ready for PreForm.
F: What are you currently working on?
MB: I'm always doing work for clients, but I take time off to work on my personal project, The Mega Plush. What started out as a small idea about 5-6 years ago has now grown into something much larger. The first episode I created to “test the waters”, I wasn't really ready for the kind of response that it got. Within 2 days of putting it online, it got a staff pick on Vimeo, over 40k views and 3k likes, and some pretty awesome write-ups, including one on Gizmodo. People were asking to see Episode II, which I hadn't even thought about writing, let alone animating and rendering… Earlier this year I … managed to get the second episode wrapped up and out, with the help of my (now) writing partner Kyle DeBoer. That episode also proved to be a success, so we have written two more episodes. But now we are trying to find some funding to get them made. The first two were quite a strain to do by myself so I would love to be able to build a small team to help with the modeling and animation to speed up the process.
As for printing, my latest print was a fun idea… It was recently my wife's birthday, so what better gift that a copper bust of me! Let's just say she wasn't too impressed… jewelry would have been a better idea!

F: Can you walk us through your finishing process? How do you end up with the metallic look of the statuettes and busts?
MB: The finishing process is actually quite simple. After getting my print out and cleaned up, I fill the hollow shell with Plaster of Paris. I had been reading online that people were using a 2 part epoxy or urethane, and had commented that it was quite pricey, so I figured that Plaster of Paris is a super cheap, rock solid alternative.

Once it is all filled in and dry, I use Rustoleum 2X Ultra Cover flat black primer. This stuff is amazing. One coat is all you need to take the grey resin (which is what I have been using) to a super solid matte black surface. It sticks to the print really well and I haven’t had any issues with it so far.

After that I use Rub 'n' Buff, which is kind of like a metallic shoe polish. And you do exactly what it says - rub it on and buff it up - and boom you have a metallic looking surface. I've experimented with a few techniques of application, including a cloth, finger and brush. I find that a brush works the best, but you have to make sure you only have the tiniest amount loaded on the bristles at any time. To do this I dab the brush into the Rub 'n' Buff, then use a rag to wipe off the excess, then very lightly rub that over the surface of the print. By only applying the metallic color onto the high parts of the model, it leaves the black base color in all of the creases, which simulates dirt build-up and giving the model really nice dimension. Once it is dry I then go in and buff it up for a nice shine.

For all of you Form Fans that are as excited about Matt’s prints as we are, be sure to check out the first two episodes of The Mega Plush or to visit his online store for t-shirts and screen prints as well as his statuettes and busts. In the meantime, don’t forget to visit our forums to see what other users are up to or to share your own awesome prints, or check out our stories to see what else Formlabs and Form users are up to. And to learn more about how you can start printing your own designs, visit our store to learn more about our brand new Form 1+!