
MBS Robotics is used to rapid design iterations and 3D printing, but this spring they were faced with a new challenge. They were dealing with Hollywood and, once approved, had only six weeks to transform their designs into two fighting robots…and one of them had to fly. For the first time in BattleBots history, robots would be leaving the floor of the BattleBox in controlled flight.
To help get their drone off the ground, MBS Robotics turned to the Form 2. They took us behind the scenes to show how they did it:
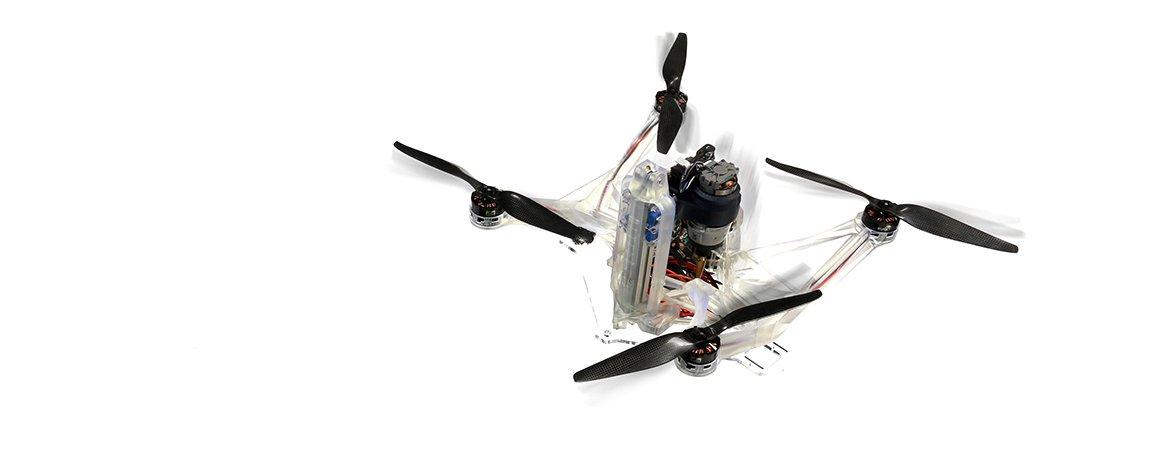
MBS Robotics Builds a Flying BattleBot

For the early prototypes, we used fused deposition modeling (FDM) printers. Our prototypes were produced using aluminum arms and a 3D-printed acrylonitrile-butadiene-styrene (ABS) body.
One of the first builds successfully took flight and handled its 6 lbs of weight quite well, but it was immediately obvious that this iteration would not handle the stress of battle. Even the slightest bumps resulted in the 3D-printed body splitting, as the aluminum arms transferred their leverage. The boxy FDM-printed body was retired and a new Form 2-friendly design was created.
Make a mini version of the MBS Robotics’ AfterByte drone: Download the .STL files on Pinshape.

The weaknesses between layers of FDM systems was instantly resolved. Even the aluminum of the original design was replaced with Form 2 3D-printed components, and the incredible accuracy of stereolithography allowed for details that couldn't have been imagined with the FDM printers. The first Form 2 prototype was easily strong enough to handle the entire 10 lbs payload. AfterByte was born.
Learn more about the differences between FDM and SLA 3D printing in this free webinar replay.
The use of the Form 2 also allowed for far greater freedom of design. The dexterity and accuracy of the printer allowed for perfect mating surfaces so they could create a single body by “welding” multiple parts together. Many of the wires could also be hidden in channels throughout the body of the drone. These parts would be nearly impossible to create using traditional manufacturing techniques–even the vast majority of 3D printers today would be unable to handle the complexity of these prints.

Putting the ‘Battle’ in the Bot
A BattleBot is nothing without its arsenal, and Formlabs had the materials to help here, too. AfterByte has a two-stage weapon. For the first stage, we used Flexible Resin to create a landing pad with walls that resemble a suction cup. A large hole on one side formed the seat where a Dyson vacuum motor sits, pulling more than 4 psi and allowing AfterByte to secure itself onto any flat surface with surprising force.
A second, smaller hole, with matching suction-cup walls, is for the second stage: the drill. Mounted vertically above this hole is a segment of aluminum rail, a dismantled Dewalt impact drill, and a 3D-printed Tough Resin mount holding everything in place. Once AfterByte has mounted itself on a victim, the team powers up the 120 lbs impact driver and slowly lowers the self-starting titanium stepper bit towards and into its target.

Ultimately, AfterByte did not come out on top in the BattleBox, but we’re proud that it was the first ever flying BattleBot to compete—a feat that would not have been possible without the Form 2.
See AfterByte in its TV debut on ABC's season 2 teaser episode “BATTLEBOTS: The Gears Awaken.”