
One of the coolest end results of the Form 1’s technology is that its pieces can be finished pretty much however you want - we’ve seen lacquers, dyes, metallic spray paint, even electroplating.
Our forums host many a fascinating finishing process, and one of the most extensive breakdowns is “Print to Paint” by Brian Anderson. We’re huge fans of Brian’s V.e.r.a.1 design here at Formlabs, and we’re super excited to have interviewed the artist himself - after a very busy New York ComicCon appearance - about his modeling and finishing processes!
What’s your work history like?
I started doing computer animation at a very young age, and by around 1995 I was so enthralled with it that I dropped out of high school, took a short 8 month course to learn the industry standard software, and began working straight away at age 19 in Toronto, Canada. The very next year I was nominated for a Gemini award for Best Visual Effects for work done on the film “The Planet of Junior Brown”, which screened at the Toronto International Film Festival.
From there, things swayed into horror film projects where I worked on titles such as Silent Hill, Resident Evil: Apocalypse, Dawn of the Dead, and District 9, among others. I provided rigging, character animation, effects work, modeling, etc. as a generalist focused on character creation.
After having my fill of animating zombie deaths and alien attacks, I moved to New York and switched into new territory where I currently act as Character Technical Director working on fully animated features including Rio, Ice Age: Continental Drift, Epic, and Rio 2, bringing complex animated characters to life.__
I really enjoyed the contrast of horror films and animated kids’ movies. The work is completely different in style and especially in technique, which really helps keep me engaged at work.
Tell us about PolyopticsLABs. We hear you had a display at NYCC last weekend!
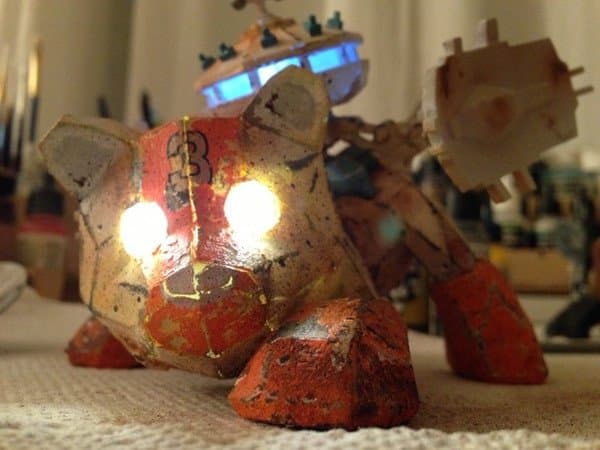
PolyopticsLABs is a government organization that I do a lot of contract work with. They create advanced biologically-inspired exploration rovers. You know, checking out other planets and stuff. For the V.e.r.a.1 project they are using fox (Vulpes vulpes) DNA and combining it with high level operating systems and state of the art robotics to create this awesome fox robot. You can basically just launch off one of these V.e.r.a.1s to another planet and let it sniff around for you, while you sit back and monitor progress and set tactical goals. It’s probably the coolest thing I could ever imagine.

I was contracted to do the concept work, to help bring this little guy to life. I guess they didn't want it to freak people out, so creating an appealing design was paramount for the project. I was able to go down to their headquarters and see progress as the prototype developed. Seeing it run around was totally mind blowing; I would swear it was completely natural. If only I had a few billion dollars I would definitely try and snag one of these guys!
I was able to talk them into creating some scale models to help promote the project and commemorate the launch of this unit. So I started working on them right away and built a bunch to show at NYCC. They all sold out in the first two days, before the weekend even started!

I was really happy to get so much positive feedback, and I am currently filling pre-orders for another short run of the models.
How did you get into art toy production?
Being an animator and character artist, I've always loved strong character design and a product that tells a bit of a story. Designer toys really take this to heart and are one of my favorite things to collect. I am very selective but there are so many amazing artists producing top quality work in this area, it's awesome! So for me, it’s really a perfect platform to exhibit my own characters and get my artwork out into the world.
My first project was a huge learning curve where I worked with a Chinese manufacturer. The end result was satisfying, but the process was unbearably frustrating, and at the end of the project I decided that I wanted to create my designs from scratch, myself, to keep control over all aspects of the process, which is how the V.e.r.a.1 was born.
What excited you about 3D printing?
I have been creating characters in a virtual space for so long, and have been waiting patiently all the while for the day to come when I could take my designs out of the machine and into the real world. 3D printing has been on the top of my mind for about 8 years, and watching the development over the last 2 has been extremely exciting. I've been on the edge of my seat waiting for a machine that can match the resolution of a store bought final product. When I saw the Form 1 Kickstarter, I didn't hesitate and jumped in with both feet.

How did the Form 1 change your design process?

Creating a character for animation is completely different from creating one to be 3D printed. I have physical components that need to be integrated, surfaces that need actual thickness, etc. Designing with the Form1 gives me the ability to do test prints and see the results overnight or even in a few hours.
Since my final products are 3D prints, I am also free of many of the traditional manufacturing limitations imposed on toy design. Many toys have basic poses with arms to the side and standing straight up. These poses are sympathetic to traditional casting techniques, which makes them cost effective, but they’re definitely lacking something. It takes quite a lot of skill to overcome these limitations using a traditional casting process, and since I work completely digitally, for me, that was one of the distinct advantages of the 3D printing process.
Can you outline your finishing process?
First, all parts are sanded and testing for fittings:

Next I mask the eyes with model tape and begin by airbrushing a basic gray paint primer, adding blotches of dark red rust areas. I paint a few coats of varnish on to help set this layer, and then I paint over the first white colour layer:

After that, I take a small file (and lots of other scraping tools) and scrape away layers of the white colour, paying special attention to the edges. This gives a worn and rusted look of chipped paint:

Next I add the orange accents with some more masking, varnish and scraping:

Then the electronic components are added and tested to make sure everything is working. I wanted the model to seem like a real machine, so here is where the inner workings come into play. Each piece is printed separately and then assembled and fit into the head cavity. After completion, one side of the head is removable, so you can imagine how it would be to service this machine, make upgrades and patch in new software directly to the memory core:


After that, paint pigments are rubbed into the surface to add to the worn look, as well as faint red and brown washes to break up the solid colouring:

Finally, paint splatters and hand painted rust spots and details are added, including fine touches such as highlights to pop out some specific spots:

In the end I have a collection of models whose subtle differences contribute to a unique look on each piece:

Here's the squad, ready to go where no fox has gone before!
The point of it all is to create something that seems as if it could really have been used on another world, and to inspire your imagination – Where has it been and where it will go next?
Where do you get your finishing supplies? Any recommendations or resources for beginners?
I get everything online and personally use Vallejo brand paints. I find they work well with my airbrush, and the dropper-style bottles make it easy to mix new colours and recreate those mixes at a later date. For beginners, I would definitely recommend YouTube! There are examples of so many different techniques, you can dig in and start experimenting immediately. I haven't been much of a model painter in the past, and see myself as a beginner as well. There are some amazingly talented painters out there on the web!
What comes after V.e.r.a.1?
A V.e.r.a.2 is definitely possible. I am currently working on several concepts for PolyopticsLABs and am unable to comment on their next project as I am under a strict confidentiality agreement. However I can say that I would really love to try an articulated model project and have been thinking a lot about how to accomplish this. The next design will depend heavily on the newest technology from PolyopticsLABs. One thing for sure, is that the Form1 will be instrumental in completing my next project!
Again, thank you very much for your interest in my work and process behind it. I am constantly trying to improve my workflow and am excited to share with others!
Thanks for talking with us, Brian, and best of luck with your future projects!
All photos and sketches by Brian Anderson and PolyopticsLABs. Check out more from PolyopticsLABs on Facebook and Instagram.

Have finishing experiments of your own? Share them in the forums - we’d love to see what you get up to!