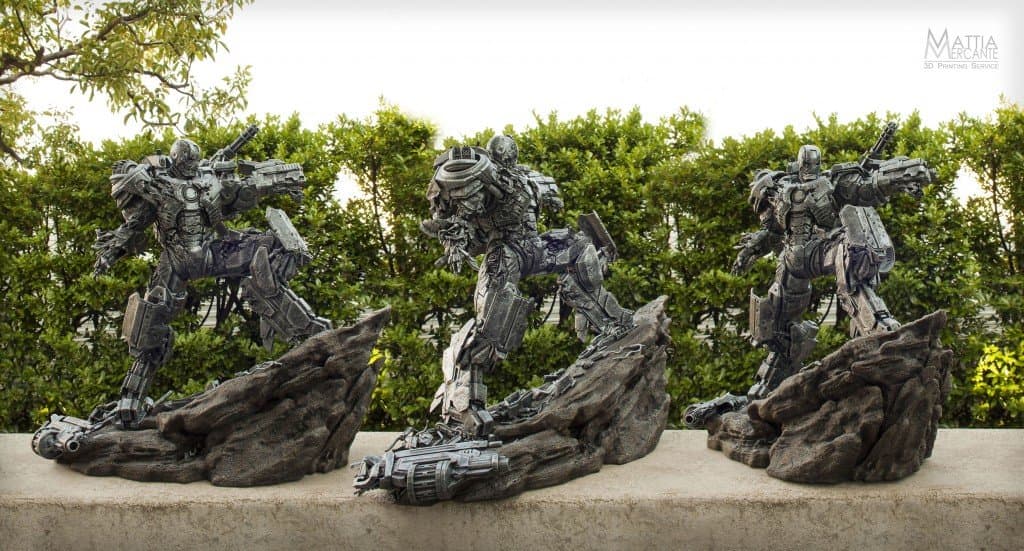
When he saw 3D Artist Joe Grundfast’s digital model of War Machine, a character from Marvel’s Iron Man series, Mattia Mercante, an art restorer from Milan, Italy, couldn’t pass up the opportunity to put his Form 1+ SLA 3D printer to the test.
Mattia discovered the digital model of War Machine on a thread by Joe Grundfast on the ZBrushCentral forum. Inspiration for the model came both from the comics and from real life military equipment. Joe Grundfast, whose credits now include Avengers: Age of Ultron as a result of his incredible War Machine depiction, offered the file for free and was looking to see people’s 3D printed models of his complex design.

Mattia walked us through each step he took to prepare the model for 3D printing.
- Adjust the scale of the sculpture. My goal was to make the model larger than 40 cm. The final model is 45.5 cm tall, approximately 18 inches.
- Increase the volume of all the thinner parts that could fail during printing (the smaller thickness I had in some areas was a little less than 0.5 mm), then remove the parts of the model that are too thin.
- Decimate the mesh in order to cut out details that aren't useful.
- Divide the model. I divided War Machine into main 28 parts, plus the pieces on the rock and ended up with a little more than 50 small pieces.
- Create the joints between the pieces and hollow them out from 1.25 to 1.5 mm wall thickness.
- Create holes in strategic points, mainly in the hidden areas, in order to let the air flow out during printing. This helps avoid the vacuum effect and lets the uncured resin slip out during the finishing process.
- Fix problem areas that have bad overlaps or poor shapes for 3D printing.
- Orient the pieces in PreForm in order to make the layer lines as invisible as possible.
- Generate and check the supports. This is an especially important steps for all prints on the Form 1+ desktop 3D printer. In two cases, my prints failed because some areas weren't supported correctly. Make sure to check the model layer by layer and find the weak areas that could create a fragile support or generate floating pieces that will increase the possibility of a partial print fail.

After adjusting the model for 3D printing, Mattia decided to use Formlabs Black Resin, one of our Standard Resins. He used print settings of 0.1 mm for everything on the model, except the head, which he printed at 0.05 mm. Total printing time for the Form 1+ portion of the model was approximately 97.5 hours, plus another 67.5 hours for the rock, which was printed on an FDM machine, for a total of almost seven continuous printing days. After the model was printed, Mattia cleaned the pieces in isopropyl alcohol and removed supports, smoothing the surface with a rotary tool and sandpaper. He then used a small soft brush and a mix of baking soda and a few drops of IPA to buff the surface finish. To color the piece, he used a dry brush to apply an aluminum-colored paint and a varnish.
Mattia is an active participant on our forum, sharing projects like this statue of Giuseppe Sirtori, which he scanned and 3D printed with the Form 1 and this Samurai sculpture designed by digital artist Dan Ulrich. If you have any other questions for Mattia on his War Machine project, check out his forum thread. He doesn’t use the forum just to post his own projects. Mattia has followed the Formlabs forum since October 2013 and has found it very useful to his 3D printing process.
“The community is full of great suggestions and skilled people that inspire me to learn more about the Form 1+.” - Mattia Mercante