One of Norway’s largest chain of laboratories, SINTEF Norlab specializes in environmental measurements, drinking water, microbiological, and chemical analysis as well as material testing. The company has been in business since 1955 and currently employs a staff of 110 working in 13 laboratories across the country.
Jørn Røssvoll has worked at the headquarters in Mo I Rana, a small town just below the Arctic Circle, for a little over 20 years. His work involves doing examinations in scanning electron microscopes (SEM), keeping the IT-systems and various instruments, such as X-ray machines and SEMs up and running. As a part of his role (and passion), Mr. Røssvoll is known for inventing new tools and appliances to make work operations quicker and easier.
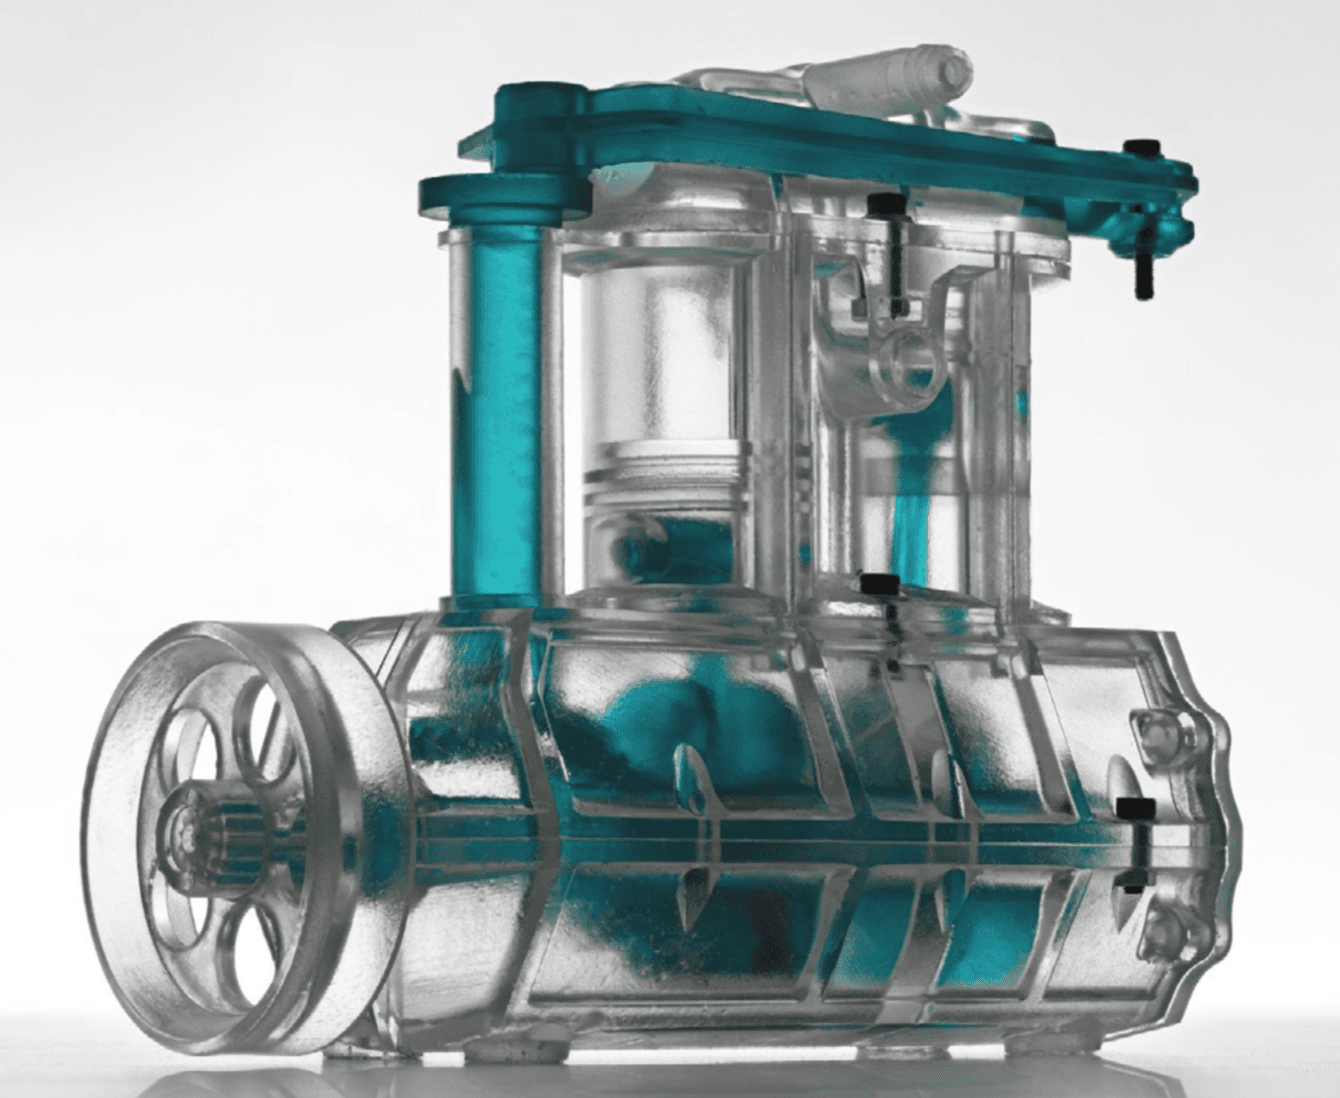
These diverse projects require many custom parts, which he previously used lathes and molds to create. However, in 2016, he learned CAD design and convinced the company to buy a Form 2 stereolithography (SLA) 3D printer to speed up the work. Since then, he has expanded his fleet with a new Form 3 as well and has produced 328 print jobs with more than 2600 parts on the two printers.
Read on to learn how Mr. Røssvoll created some truly impressive appliances and complex custom assemblies that solve everyday challenges across the laboratories.
Why Use 3D Printing in a Laboratory?
To maintain different instruments and measurement devices and adapt them to the requirements of specific projects, Mr. Røssvoll often requires custom or replacement parts.
“We're located in the northern part of Norway, so we're far away from everything. It can be difficult to find parts. Especially in the laboratory business, if you have to order some specialty parts they cost an arm and leg. Once, we had to buy some small plastic cones with threads, 15 of them, and they were about $100 apiece. And I sort of thought, ‘Hmm, I can do that,’ so I printed it out and found out the material we use was about two and a half dollars,” said Mr. Røssvoll.
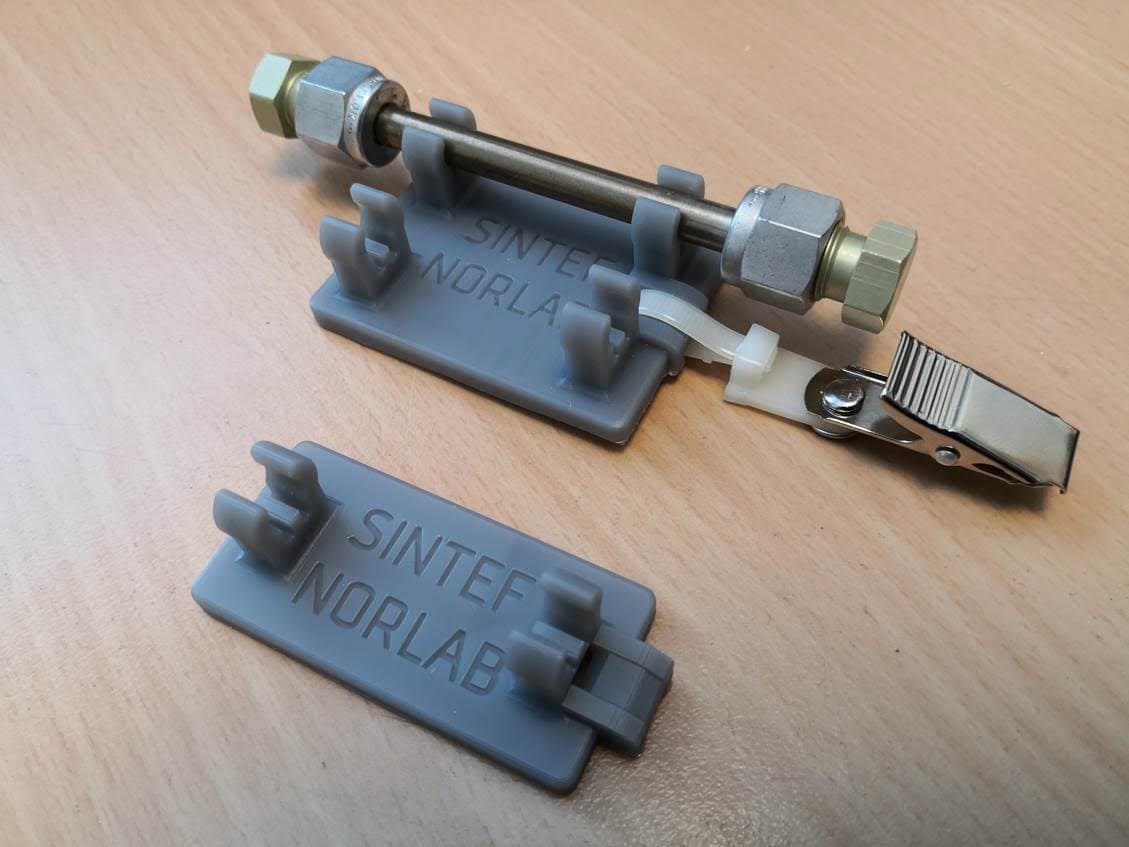
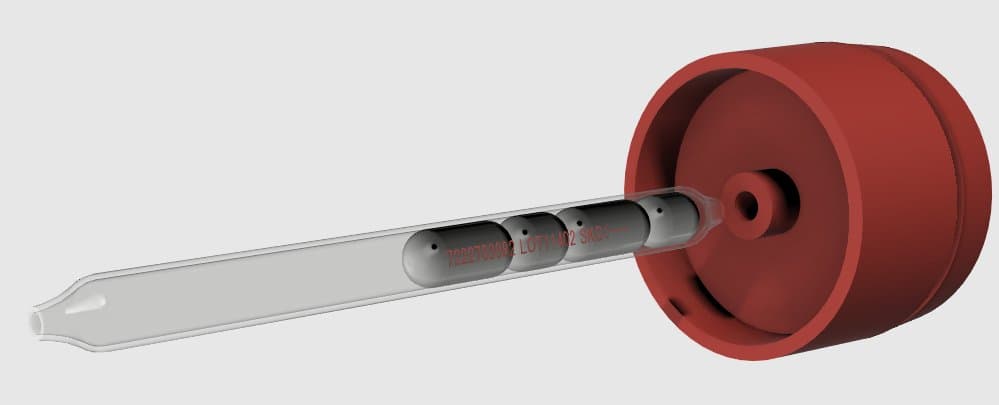
This holder attaches to a worker's pocket and carries steel tubes with chemicals that measure hydrocarbons in the work environment. The original holders often got lost and they were expensive to replace. The 3D printed replacement parts cost less than a dollar to make.
Printing most parts only takes a couple of hours. If Mr. Røssvoll had to order them, some instruments might be out of service for a couple of weeks. When parts are shipped from abroad, they have to go through customs, which can be a tedious process. In many cases, it’s just easier and cheaper to make them himself.
“Before 3D printing came along, I had to do a lot of my parts production on a lathe or I had to make a mold in silicone so I could make parts with epoxy. This was time-consuming, so when proper SLA printers became affordable, I was quick to get approval from my boss to get a Form 2 printer. Mostly because the SLA method makes isotropic parts, so they have the same properties in all directions,” said Mr. Røssvoll.
“I've had some series when I had to print a lot of parts in a short time, because we had a huge contract with a company and we had to get all this equipment ready before a set date to send it out. I didn’t have a lot of time to print out all the necessary parts, so when I had only the Form 2 printer, sometimes I had to come in at 2:00 at night to pick out some pieces and start a new session. So to double the production, it was quite easy to get the allowance to get the Form 3 printer,” said Mr. Røssvoll.
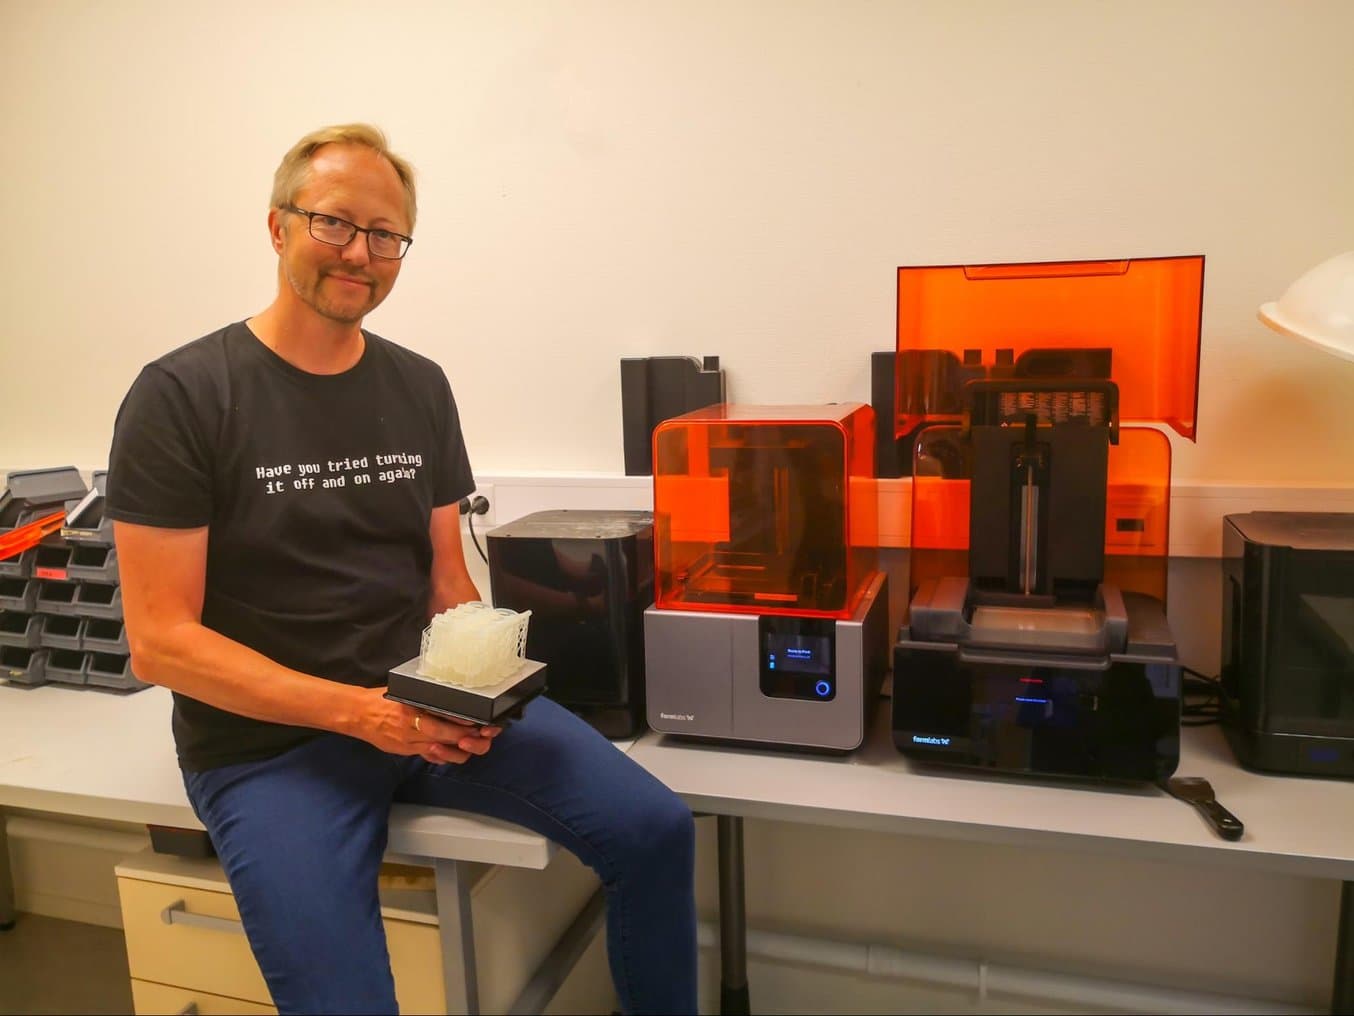
Mr. Røssvoll has two SLA 3D printers in his office, a Form 2 and a Form 3. He’s printed over 2600 parts for more than 100 different projects.
“I really like them because they very seldom have errors and the outputs are consistent. They're really, really good. Sometimes the printers have a week or two off, but then something happens and they are running almost 24/7 for a week or two. So it's a bit on and off, but they do get used a lot,” said Mr. Røssvoll.
Optimizing Design for Functional 3D Printed Assemblies
SLA 3D printing offers a wide range of engineering materials, from high temperature resin for moldmaking to resin designed to withstand high stress and strain or resist wear over time. Download our white paper for specific recommended design tolerances.
Download the White PaperApplications and Inventions at SINTEF Norlab Laboratories
Colleagues from SINTEF Norlab’s 13 laboratories come to Mr. Røssvoll when they have some challenges to solve. See an overview of some of the most interesting and innovative tools he created over the years.
Assembling Machine for Corks and Plates
In SINTEF Norlab’s Oslo laboratory, analysts carry out tests that require plastic soda corks with plates in the middle that they can insert a needle through. When the company purchases these parts, they receive bags of corks and plates separately and the analysts have to use their thumbs to press the plates into the cork before use. Having to assemble thousands of corks in some cases is not just inefficient, but also causes pain in the thumbs.
One of Mr. Røssvoll’s colleagues in the lab asked if he could create something that would make this process easier. He started to design a device in Fusion 360, which evolved over a few months into a compact, but highly complex miniature assembling machine that can fit on the table. It consists of an array of 3D printed parts and even some one-way bearings salvaged from the sheet feeder of an old dismantled inkjet printer.
“I figured out that by using the one-way bearings I could translate the back and forth motion on the handle into a circular motion. One bearing stops the motion one way, and the other one stops the other way. So the two wheels that I made, they can only turn in one direction,” said Mr. Røssvoll.
“The plates should drop into the holes, but not drop through. So I made small tabs on the bottom to stop them going right through the hole. But they are flexible so when they are met with the piston, they get pushed through and then they end up in the corks. I also made grooves around an axle with a steel ball that's pressed into the groove to make the two wheels stop at the exact right location,” said Mr. Røssvoll.
“It took some time and it got a lot bigger than I thought at first, but they are very happy with it and they have been using it now for a couple of months. They say it's a very joyful operation,” said Mr. Røssvoll.
Flushing Tool for Cleaning Pipes
Some of the lab’s clients need to add crushed limestone to rivers or lakes to balance the acidity. Whenever a new type of limestone is being used, they have to conduct tests to evaluate the pH levels at different depths. For this type of analysis, Mr. Røssvoll made a set of five huge pipes, about 20 centimeters in diameter and two and a half meters tall, that can contain 69 liters of water. Testing is done by getting samples from various depths in the water column.
When the tests are finished, there’s limestone residue stuck to the inside of the polycarbonate pipes, making it hard to see the scales. As the pipes are so tall and there’s not much room below the ceiling, cleaning the inside of the pipes with a brush would be quite complicated, so Mr. Røssvoll designed a tool that could simplify the process.
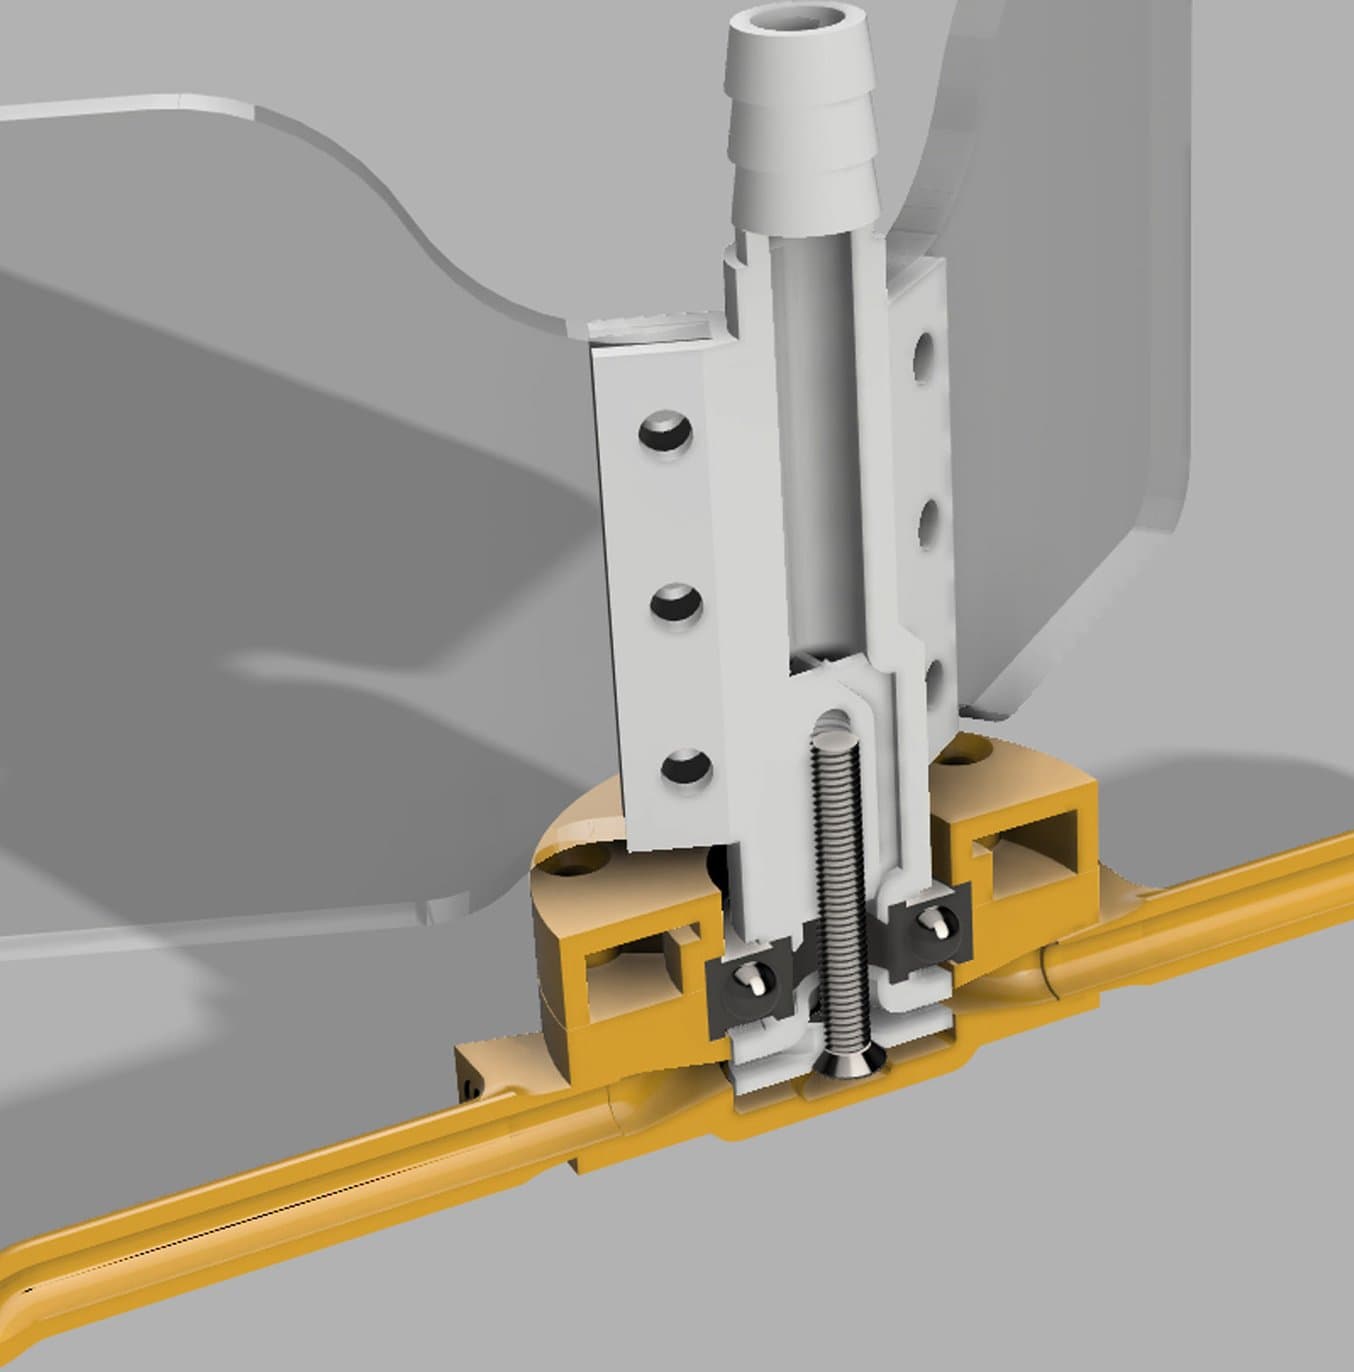
The fins keep the device at the center of the tube while the water flows down through the inside of the tool and the rotating ends, cleaning the inside of the tube.
“We just connect a water hose to the water outlet, and the fins keep it in the center of the pipe. When the water starts to flow, the end rotates and flushes the inside of the pipe with clean water. The tricky part was how to get the ball bearing to work and get water through the center at the same time. It was a bit of thinking, but when you can do everything with 3D printing, you can really do everything. It works perfectly,” said Mr. Røssvoll.
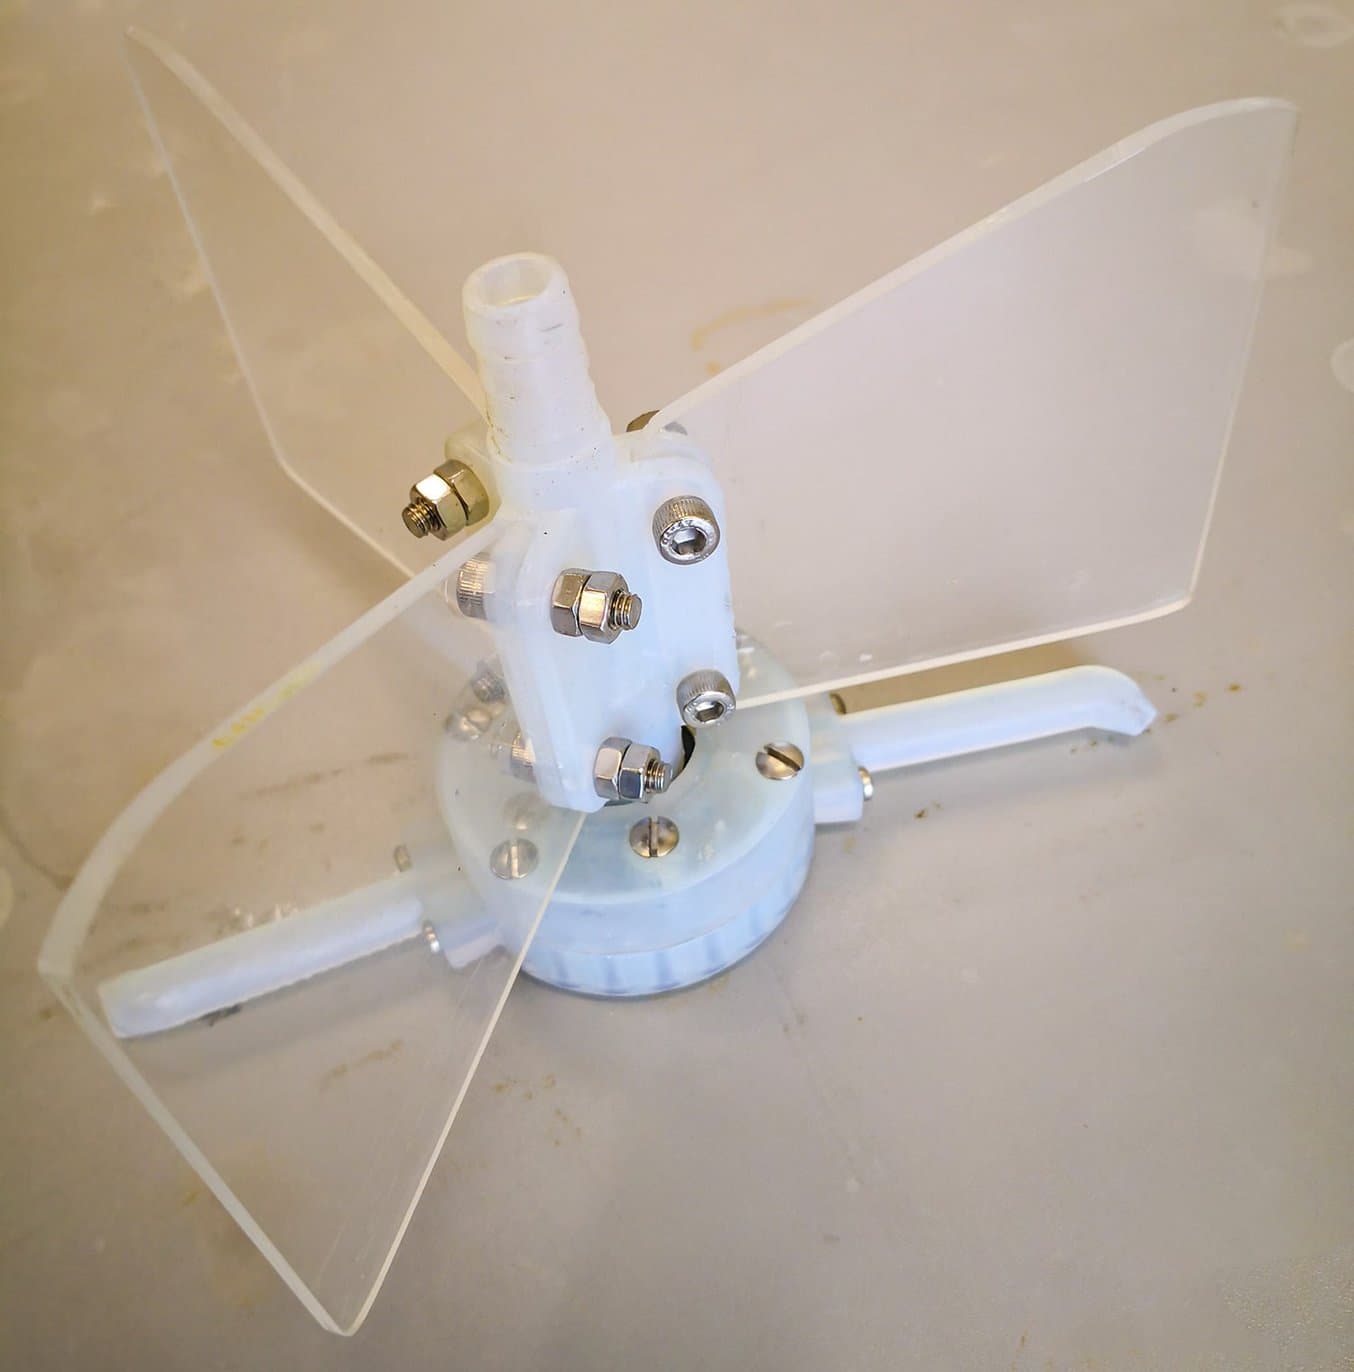
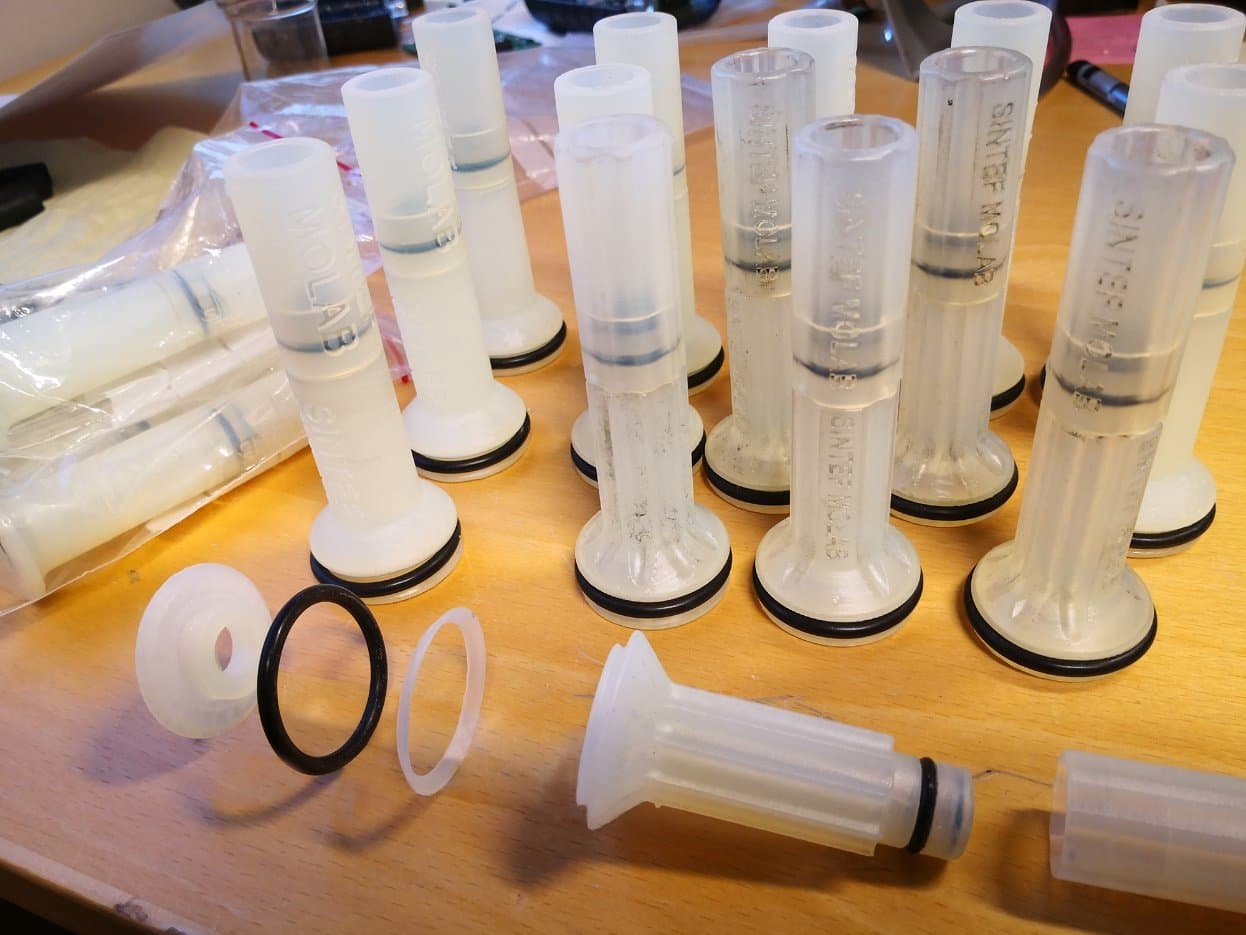
Twist and Lock Ampoule and Air Filter Holder
SINTEF Norlab’s team often tests air for various contaminants. One of these tests requires the air to pass through a filter first and then through a small glass ampoule filled with chemicals that react to the presence of hydrocarbons.
These chemicals cannot be exposed to UV radiation from the sun during the measurements and there has to be an airtight connection between the filter and the ampoule. The analysts would normally use silicone hoses and tape to connect the parts. However, the sampling time can be one to two hours and as workers carry the device around while they're working, the parts often detached, rendering the tests invalid.
“After some construction time, I came up with a twist and lock ampoule holder to the filter box, where there are O-rings to make the seals. Everything is 3D printed with the Durable Resin and it works perfectly. I made about 50 of these and we shipped them out to customers. They mostly use them on platforms in the North Sea for measuring work environments. And they have had no mishaps after starting to use this connector,” said Mr. Røssvoll.
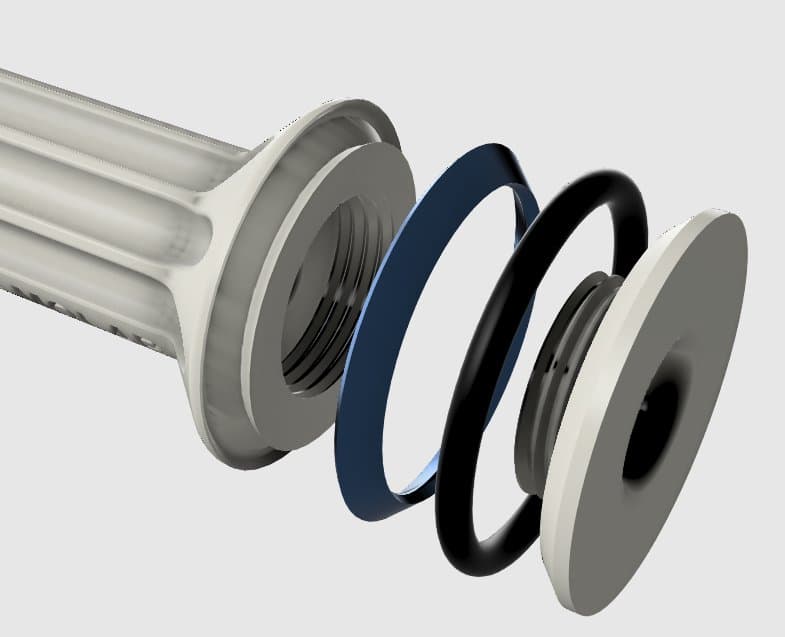
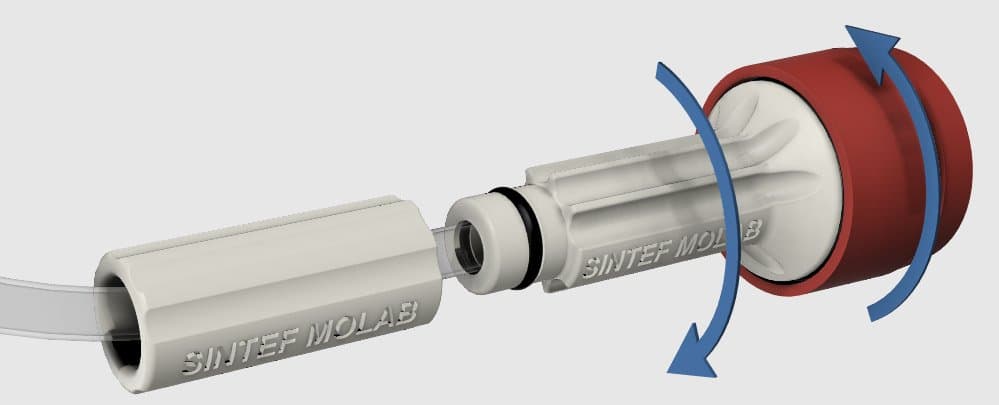
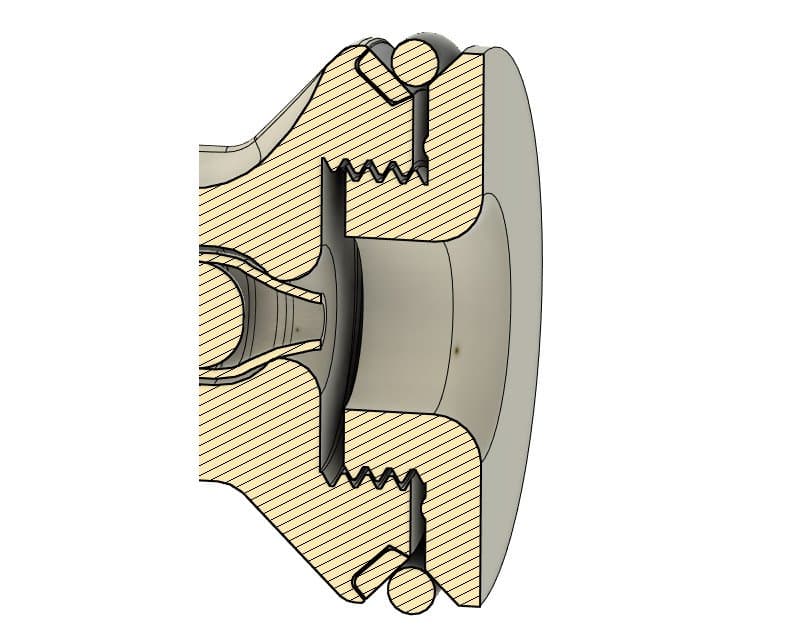
An oblique ring snaps into the ampoule holder, stopping the O-ring and bottom part from rotating when inserted into the filter’s bottom. This makes it easy to attach the filter box on the end. When twisted, the O-ring expands due to the slanted sides, pressing against the inner wall of the filter box to make a firm connection. When sampling is complete, the analysts just need to twist it the other way to release the filter box from the ampoule holder.
+1: 3D Printing Missing Parts of a Whale Skeleton
Of course, a story from Norway wouldn't be complete without an authentic local twist.
Last year Mr. Røssvoll was contacted by a museum in Mo I Rana that had a small skeleton of a minke whale, but some of its bones were missing.
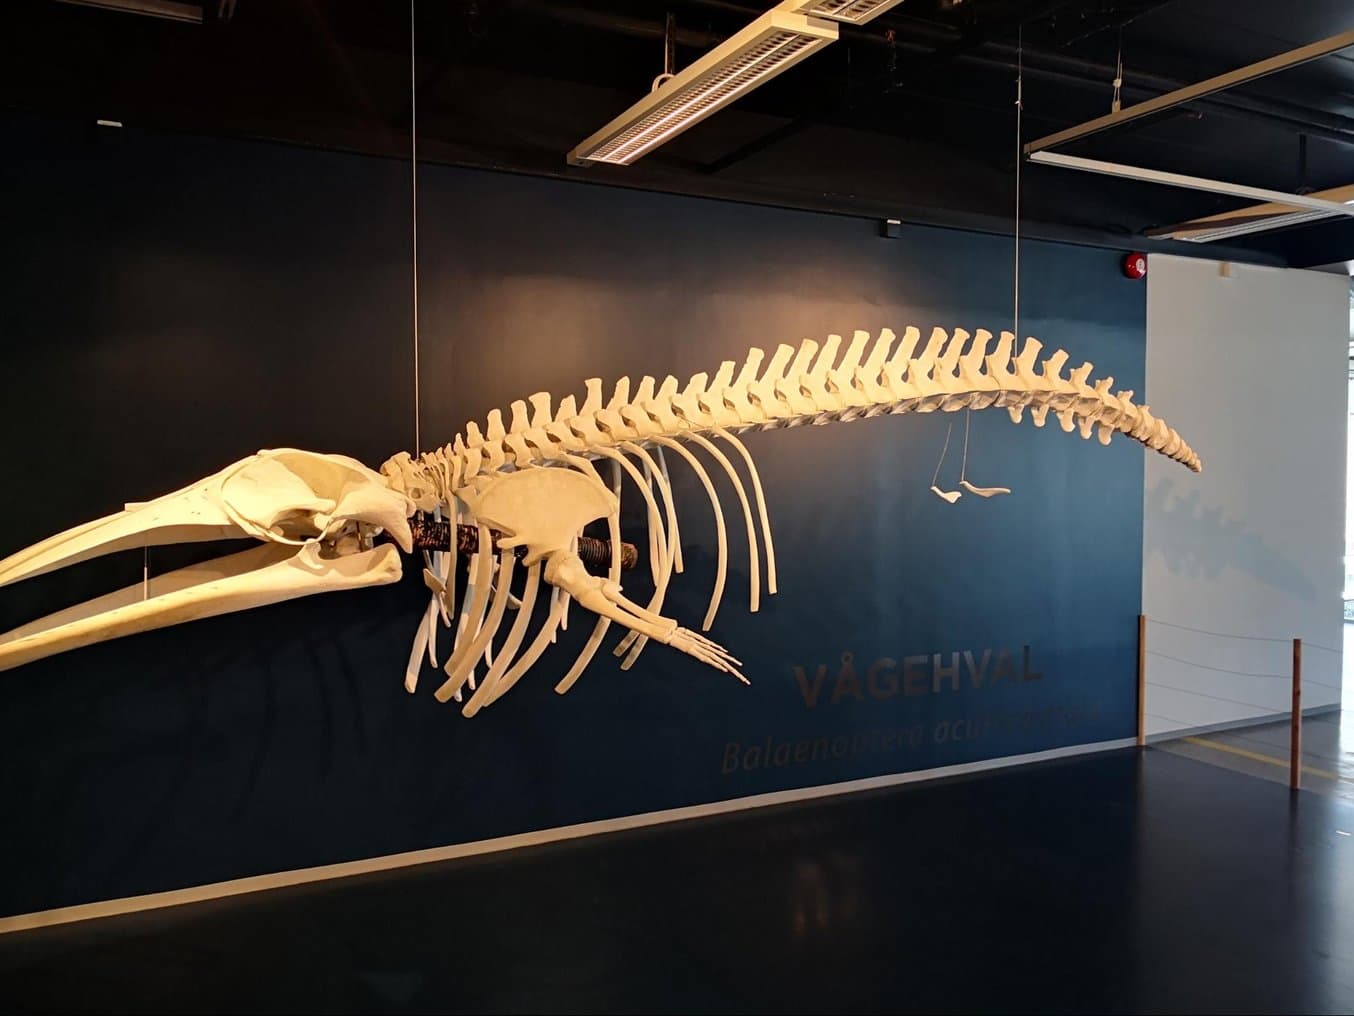
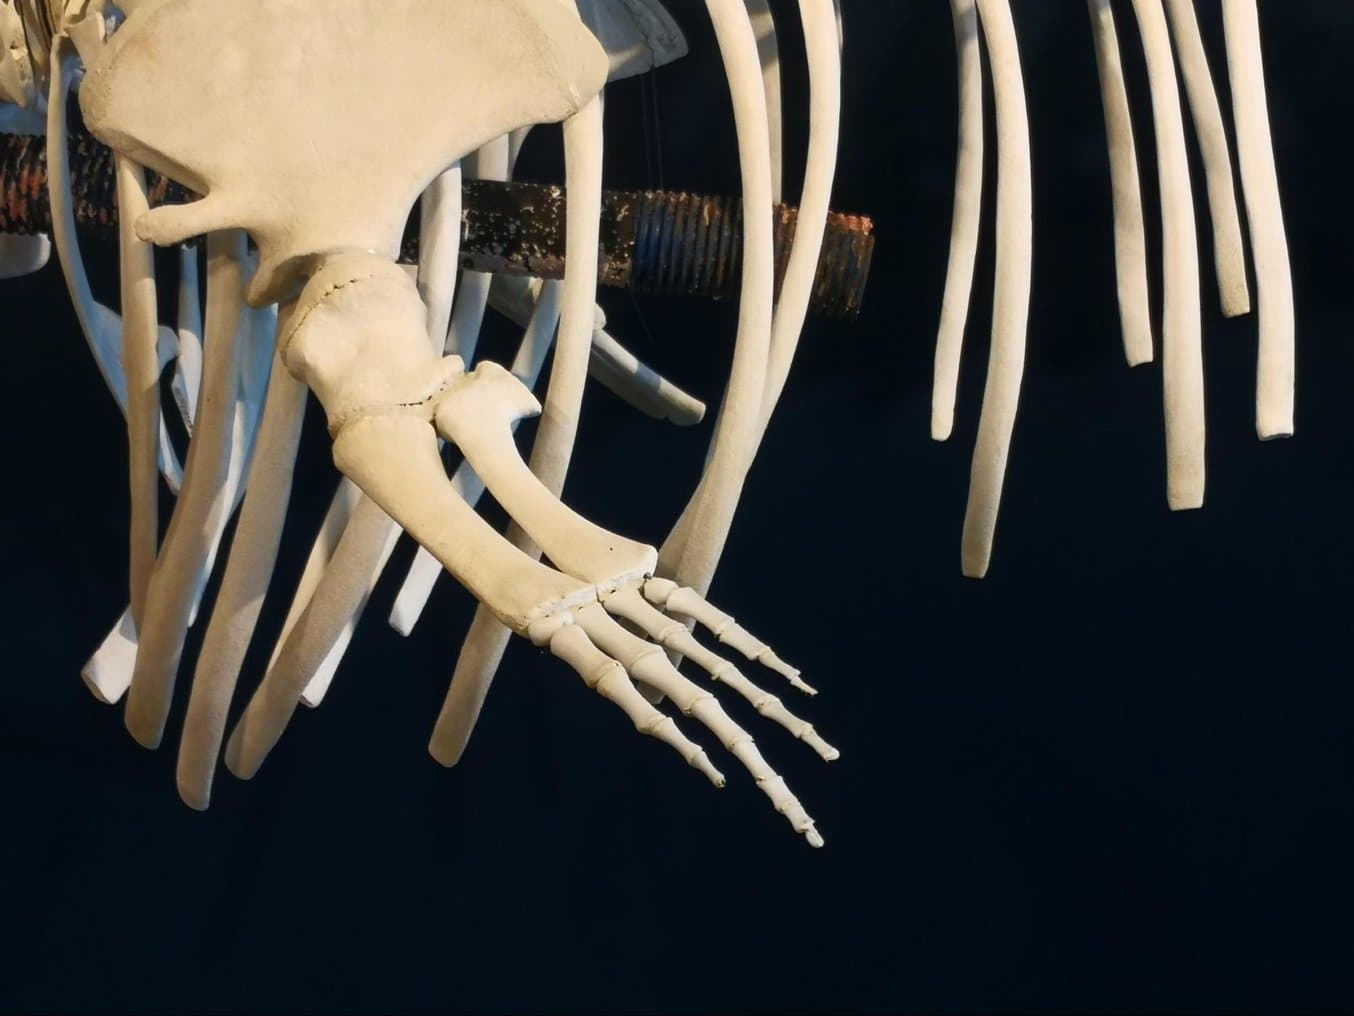
The complete set of small bones of the flippers of this whale skeleton was 3D printed.
The museum got 3D scans of the missing parts from another whale skeleton located in Copenhagen. After a few tweaks to the 3D scans to eliminate the scan lines, Mr. Røssvoll printed out 57 pieces, including two complete sets of bones of the flippers and two hip bones.
“I printed out the whale parts using Rigid Resin. The color is almost perfect to the whale bones, so it's not possible to see the difference,” said Mr. Røssvoll.