Consejo:
Formlabs sugiere utilizar acondicionadores de línea o SAI en regiones con fluctuaciones de tensión.


La Alumina 4N Resin tiene unos requisitos de diseño, impresión y posacabado únicos en comparación con otras resinas de Formlabs. Sigue las buenas prácticas de Formlabs para diseñar, imprimir y cocer las piezas, y lee y sigue las instrucciones del artículo de asistencia Recomendaciones de diseño para la Alumina 4N Resin.
Preparación de la impresora para imprimir con la Alumina 4N Resin
Generación Form 3
Asegúrate de que estás usando la última versión de PreForm y el firmware más reciente. Formlabs recomienda encarecidamente realizar las siguientes comprobaciones en tu impresora antes de imprimir con la Alumina 4N Resin:
Accede a estas funciones pulsando Settings > Maintenance > Calibration (Ajustes > Mantenimiento > Calibración).
Consejo:
Formlabs sugiere utilizar acondicionadores de línea o SAI en regiones con fluctuaciones de tensión.
Impresoras de la generación Form 4
Las impresoras de la generación Form 4 no requieren ninguna preparación especial para imprimir con la Alumina 4N Resin.
Impresión con la Alumina 4N Resin
Impresoras de la generación Form 3
Después de leer todas las recomendaciones, revisa esta lista de verificación previa a la impresión cuando inicies una impresión con la Alumina 4N Resin. Es posible que la impresión falle si omites uno o más de estos pasos:
Las primeras capas de la Alumina 4N Resin tardan más que las de otras resinas de Formlabs. La primera capa puede tardar hasta 15 minutos en completarse. Formlabs recomienda revisar la impresora después de aproximadamente una hora, ya que los problemas de impresión más comunes se producen en las etapas iniciales. Formlabs también recomienda revisar la impresión en la capa 150, que es cuando se muestran visiblemente los fallos de impresión debidos a un soporte insuficiente.
Si se produce algún problema durante la impresión, comprueba si hay restos u obstrucciones en el tanque y retíralos.
Generación Form 4
Imprimir con la Alumina 4N Resin en una impresora de la generación Form 4 no requiere una calibración especial, comprobaciones especiales o hardware adicional.
Lavado de las piezas impresas con la Alumina 4N Resin
Lava únicamente la Alumina 4N Resin en la Ceramic Wash Solution. No permitas que las piezas de Alumina 4N Resin entren en contacto con agua o alcohol isopropílico, ya que esto provocará grietas.
Lava las piezas impresas durante 2 minutos en la Ceramic Wash Solution. Usa una cubeta de lavado distinta para evitar que las partículas de cerámica sueltas se adhieran a las piezas impresas con otro tipo de resina. Si utilizas un Finish Kit, los cepillos son muy eficaces para eliminar la resina.
Secar la pieza a una velocidad agresiva puede provocar grietas. Seca con cuidado las piezas con aire, centrando el flujo de aire en los rincones y las rendijas. Seca las superficies accesibles con un papel absorbente.
Si es necesario, lava las piezas impresas durante otros 2 minutos en Ceramic Wash Solution limpia para eliminar cualquier partícula extraña. Si trabajas con piezas pequeñas o que tienen rasgos delicados, aplica directamente la Ceramic Wash Solution mediante una botella con pulverizador para aclarar eficazmente la pieza impresa. Vuelve a secar las piezas impresas con un secador o con papeles absorbentes.
Reduce al mínimo la cantidad de tiempo que la pieza impresa pasa cubierta de Ceramic Wash Solution para evitar que se agriete.
Aunque la Alumina 4N Resin tiñe rápidamente de blanco la Ceramic Wash Solution, esto es normal y no afecta a su eficacia. Reemplaza la Ceramic Wash Solution cuando alcance una concentración de resina del 8-12 %, después de aproximadamente 6-8 meses de uso intensivo, 1 año de uso moderado, o 30-50 l de resina.
La Ceramic Wash Solution puede conservarse durante 24 meses.
La Ceramic Wash Solution no es peligrosa ni inflamable. Dado que los guantes de nitrilo pueden hincharse al entrar en contacto con la Ceramic Wash Solution, se recomienda llevar dos pares de guantes al mismo tiempo cuando se laven piezas durante un período prolongado.
Posacabado
Después de imprimir y retirar los soportes, alisa la superficie de la pieza con papel de lija de grano 320 para eliminar las marcas de los soportes. Los puntos de contacto de los soportes que se hayan lijado desaparecerán durante la cocción de bizcocho.
Las piezas impresas con la Alumina 4N Resin son fáciles de lijar cuando no están poscuradas. El lijado en húmedo es la forma más rápida de eliminar las marcas de los soportes, pero se debe realizar inmediatamente después de lavar la pieza impresa. No lijes en húmedo una pieza impresa seca.
Para lijar una pieza en húmedo:
Si la pieza impresa se ha secado, no la lijes en húmedo. Lija en seco para eliminar las marcas de los soportes que queden.
También puedes optar por lijar con una Dremel, lijadoras u otras herramientas de acabado. Mantén las velocidades bajas y ten cuidado de no dañar la pieza impresa mientras lijas. La alúmina suspendida en la Alumina 4N Resin embota las brocas de las herramientas con el paso del tiempo.
Una vez cocida, la alúmina del interior de la resina se endurece y es muy difícil posacabar las piezas impresas con la Alumina 4N Resin. Formlabs recomienda encarecidamente retirar los soportes y lijar los puntos de contacto antes de la cocción de la pieza, ya que después de la cocción, lijar solo será posible con herramientas de alta velocidad o de diamante.
Secado de las piezas
La Alumina 4N Resin no requiere poscurado, pero las piezas deben estar completamente secas antes de la cocción. Deja que las piezas se sequen por completo durante la noche.
Formlabs recomienda secar las impresiones encima de un tamiz o malla para aumentar el flujo de aire alrededor de la pieza impresa. Las piezas necesitan una temperatura ambiente cálida de 20-30 °C con un 30-45 % de humedad para secarse completamente.
Seca las piezas en un horno a 45 °C durante 8-24 horas cuando sea necesario. Mantén un flujo de aire adecuado al secar las piezas en el horno. Mantén un flujo de aire uniforme en toda la pieza impresa y limita el flujo de aire si el secado se realiza en un horno. Formlabs recomienda aplicar deflectores a los ventiladores y colocar las piezas impresas en una caja con agujeros pequeños para secar las piezas en un horno de aire forzado.
Las piezas sin cocer son duraderas y se pueden almacenar o enviar según sea necesario. Formlabs recomienda tiempos de secado prolongados para reducir la probabilidad de que se agrieten las piezas.
Cocción de la Alumina 4N Resin
La creación de piezas cerámicas cocidas con la Alumina 4N Resin requiere un horno en el que la matriz polimérica se quema y el modelo se transforma en una pieza cerámica maciza. Formlabs proporciona un programa de cocción y una explicación de cada fase del proceso de cocción. Estas instrucciones son recomendaciones. Modificar el proceso de trabajo puede dar mejor resultado en algunas situaciones.
Las piezas de Alumina 4N Resin pueden deformarse durante el proceso de quemado, pero no son propensas a combarse. Una vez cocidos, los soportes son difíciles de retirar de las piezas de Alumina 4N Resin. Retira los soportes y los puntos de contacto que queden antes de la cocción.
Carga del horno
Al igual que ocurre con los materiales cerámicos tradicionales, las piezas impresas con la Alumina 4N Resin se deben colocar sobre placas de sinterización para el proceso de cocción dentro del horno. Formlabs recomienda encarecidamente utilizar placas de sinterización de alúmina para cocer las piezas impresas. Las placas de sinterización de circonio, magnesia fundida o carburo de silicio son alternativas aceptables. Asegúrate de que las placas son compatibles con tu horno y de que soportan un mínimo de 1700 °C.
Aviso:
No utilices placas de sinterización de sílice, cemento, nitruro de boro u otros metales con puntos de fusión o reblandecimiento inferiores a 1700 °C, ya que podrían fundirse con tus piezas o derretirse por completo durante el proceso de cocción.
Coloca las piezas sobre las placas de sinterización con al menos 1 milímetro de espacio para evitar que las piezas se fusionen o fallen durante el proceso de cocción. Las piezas también se pueden cocer en una caja refractaria cerrada para aumentar la uniformidad térmica, pero hay que asegurarse de que haya una ventilación adecuada para evacuar los gases del quemado.
Programas e instrucciones de cocción
Formlabs recomienda cocer dos veces las piezas impresas con la Alumina 4N Resin: primero en un horno de quemado y luego en un horno de sinterizado. A continuación, se recomiendan varios programas de cocción. Descarga la última versión en PDF (solo en inglés) para conocer con detalle los tiempos y las temperaturas.
Aviso:
Las piezas son muy frágiles cuando están en su estado marrón. Ten especial cuidado al manipular las piezas después del primer paso de cocción.
Los usuarios son libres de probar sus propios ciclos de cocción, teniendo en cuenta los siguientes requisitos:
Programa de dos hornos
Formlabs recomienda utilizar un programa de cocción con un quemado de 4,5 días y un sinterizado de 2 días para conseguir las propiedades mecánicas indicadas en la ficha técnica (TDS).
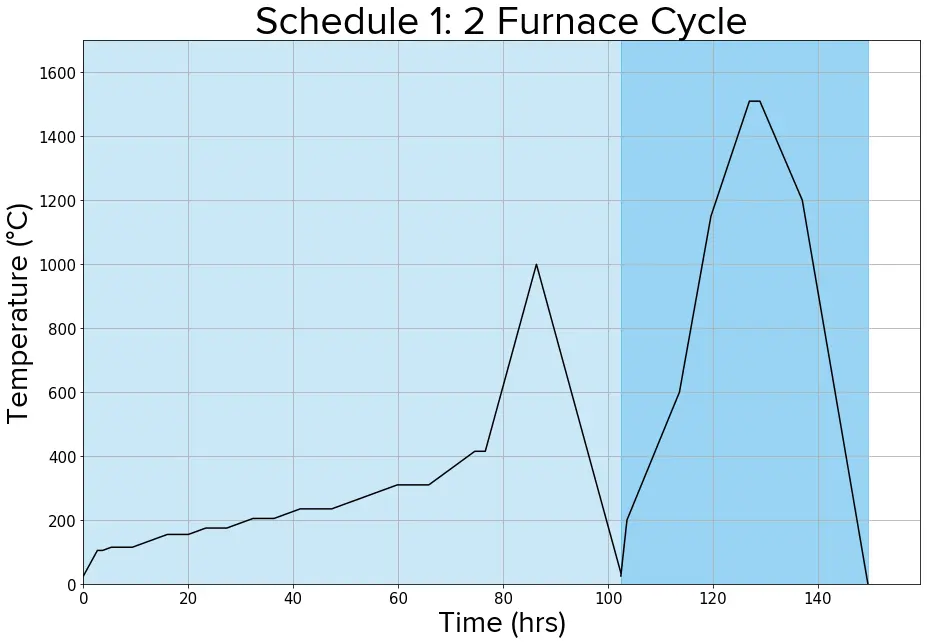
| PASO DE TIEMPO (min) | TIEMPO TOTAL (h) | END TEMP (Temperatura final) °C | RATE °C/min (VELOCIDAD °C/min) |
|---|---|---|---|
| 0 | 0 | 25 | |
| 160 | 2.67 | 105 | 0,5 |
| 60 | 3.67 | 105 | 0 |
| 100 | 5.33 | 115 | 0,1 |
| 240 | 9.33 | 115 | 0 |
| 400 | 16 | 155. | 0,1 |
| 240 | 20 | 155. | 0 |
| 200 | 23.33 | 175 | 0,1 |
| 240 | 27.33 | 175 | 0 |
| 300 | 32.33 | 205 | 0,1 |
| 240 | 36.33 | 205 | 0 |
| 300 | 41.33 | 235. | 0,1 |
| 360º | 47.33 | 235. | 0 |
| 750 | 59.83 | 310 | 0,1 |
| 360º | 65.83 | 310 | 0 |
| 525 | 74.58 | 415 | 0,2 |
| 120 | 76.58 | 415 nm | 0 |
| 585 | 86.33 | 1000 | 1 |
| 965. | 102.42 | 35 | 1 |
| 0 | 102,42 | 25 | |
| 70 | 103.58 | 200 | 2,5 |
| 600 | 113.58 | 600 | 0,67 |
| 360º | 119.58 | 1150 | 1,53 |
| 440 | 126.92 | 1510 | 0,82 |
| 120 | 128.92 | 1510 | 0 |
| 485 | 137.00 | 1200 | -0,64 |
| 750 | 149.50 | 0 | -1,6 |
Programa de un solo horno
Si se realiza la cocción únicamente en un horno de sinterizado, Formlabs sugiere un programa de cocción rápida con 2,5 días de quemado y 2 días de sinterizado. El uso de un único horno elimina el riesgo de romper piezas en estado marrón al pasar de un horno de quemado a un horno de sinterizado. El uso repetido de un programa de un solo horno puede limitar la vida útil de algunos elementos en algunos hornos, además de tener un quemado algo menos preciso.
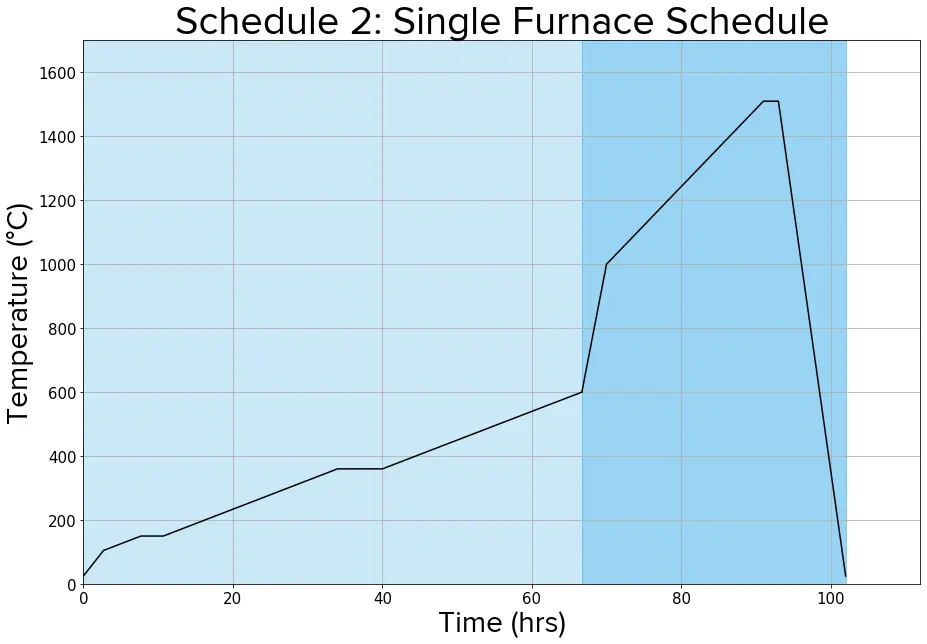
| PASO DE TIEMPO (min) | TIEMPO TOTAL (h) | END TEMP (Temperatura final) °C | RATE °C/min (VELOCIDAD °C/min) |
|---|---|---|---|
| 0 | 0 | 25 | |
| 160 | 2,7 | 105 | 0,5 |
| 300 | 7.7 | 150 | 0,15 |
| 180 | 10,7 | 150 | 0 |
| 1400 | 34,0 | 360º | 0,15 |
| 360º | 40.0 | 360º | 0 |
| 1600 | 66.7 | 600 | 0,15 |
| 200 | 70.0 | 1000 | 2 |
| 1260 | 91.0 | 1510 | 0,40 |
| 120 | 93.0 | 1510 | 0 |
| 540 | 102.0 | 25 | 2,75 |
Programa de cocción rápida
Para piezas extremadamente finas, Formlabs sugiere un programa de cocción rápida con 2 días de quemado y 2 días de sinterizado. Utiliza este programa únicamente para piezas extremadamente finas que no necesiten un tiempo de quemado prolongado para evacuar la materia orgánica.
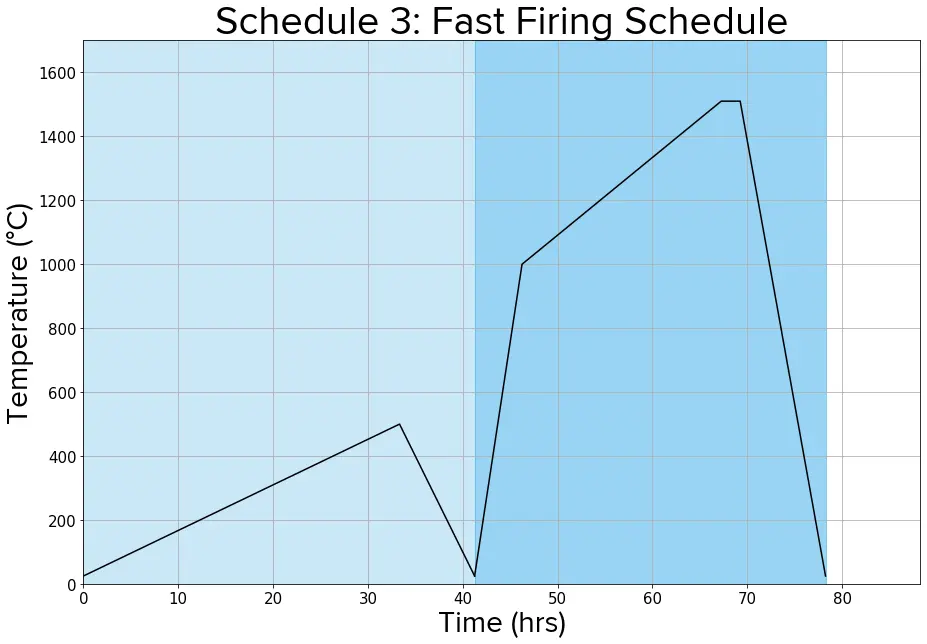
| PASO DE TIEMPO (min) | TIEMPO TOTAL (h) | END TEMP (Temperatura final) °C | RATE °C/min (VELOCIDAD °C/min) |
|---|---|---|---|
| 0 | 0 | 25 | |
| 2000 | 33.33 | 500 | 0,25 |
| 475 nm | 41.25 | 25 | 1 |
| 0 | 41,25 | 25 | |
| 300 | 46.25 | 1000 | 3.25. |
| 1260ºC | 67.25 | 1510 | 0,40 |
| 120 | 69.25 | 1510. | 0 |
| 540 | 78.25 | 25 | 2,75 |
Procesamiento de piezas cocidas
Una vez que estén cocidas, inspecciona las piezas visualmente en busca de grietas o delaminaciones. Ilumina la pieza para poder realizar una inspección más minuciosa. Las grietas aparecen como líneas más brillantes cuando se observan bajo una luz intensa.
La Alumina 4N Resin es extremadamente dura después de la cocción y no se mecaniza con facilidad. Las lijas estándar de carburo de silicio o alúmina solo son eficaces cuando se utilizan con herramientas de alta velocidad y se desgastan con rapidez. Formlabs recomienda herramientas de diamante si una pieza necesita un tratamiento posterior.
Elimina la deformación de las piezas planas con una cocción adicional. Coloca una placa de sinterización pesada y plana por encima y por debajo de la pieza plana y calienta la pieza rápidamente hasta los 1400 °C durante 30 minutos. La pieza se aplanará con cambios limitados en sus propiedades mecánicas.
Recursos adicionales