
This post was written by Jon Bryant, Formlabs Customer Development Team Lead, who shares insights gleaned from working with hundreds of industry professionals on better ways to evaluate 3D printer solutions.
When the 3D printing industry exploded in 2014, a myriad of new companies rushed in, claiming to be the next revolution in 3D printing. Every week, I’d see a new professional 3D printing company crop up—each of them touting a product with a “new” feature or a “unique” specification.
Naturally, all of this novelty caught the attention of consumers and business buyers. With each product launch, more and more people became interested in applications for 3D printing, particularly in industrial engineering and design prototyping. However, as that interest grew, so did the use of meaningless marketing jargon in professional 3D printer specification charts.
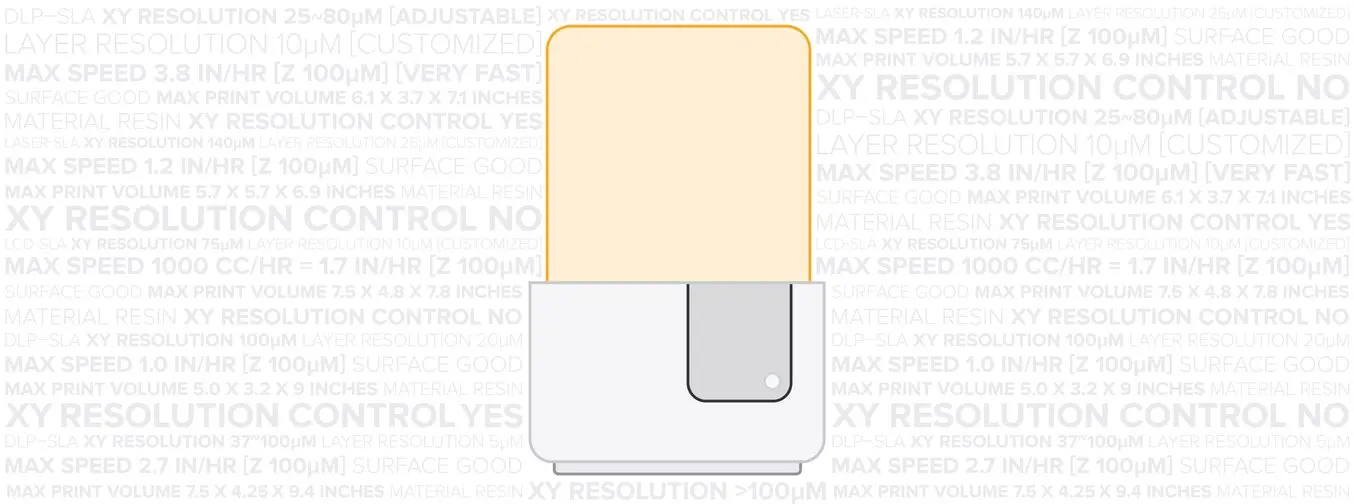
To illustrate that trend, here’s a common specification comparison chart:
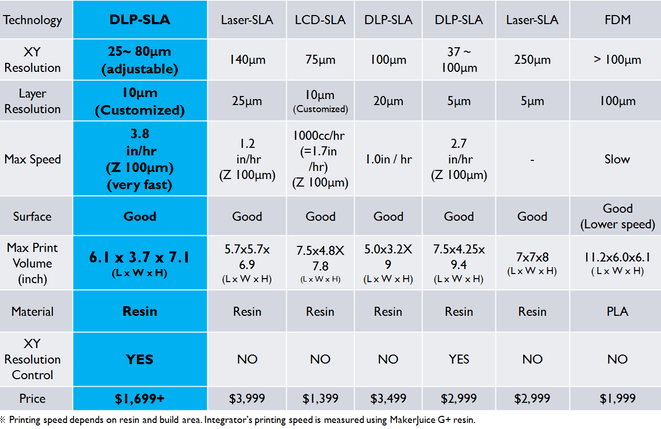
What do you notice about it? For me, what stands out is all of the capital letters, numbers, and parentheses. If I didn’t know better, I might look at this information and assume that I needed the highlighted printer. After all, it has the best specs and the most impressive (albeit confusing) set of numbers.
The problem? That chart doesn’t actually say much of anything.
If I were buying a professional 3D printer, this chart wouldn't help me understand what really matters: how the part will come out. That approach doesn’t help customers choose the right 3D printer for their needs and, in the long run, it doesn’t help the professional 3D printing industry grow.
This post isn’t meant to be a super technical breakdown of every 3D printer specification out there. Instead, my goal is to shed light on what some commonly discussed 3D printer specifications really mean and help businesses understand what they should actually be looking for.
Let’s start by diving into some of the individual specs listed in the chart above:
XY Resolution
XY resolution is the most talked about specification for stereolithography (SLA) 3D printers. In many circumstances, it also happens to be the most useless.
Typically, XY resolution is used to describe the details or features of a part. In the chart above, the XY resolution listed for this digital light processing (DLP)-SLA printer (25-80 microns) is amazing, but what does that number actually describe?
In all likelihood, it’s the resolution of the actual projector (which is why it’s a variable range). That number doesn’t really tell the whole story. Ultimately, there are a plethora of variables that can affect a printer’s output. By looking only at XY resolution, we’re led to believe that there’s a 1:1 ratio between the size of a pixel on the projector and the cured resin of the part.
Here’s why that’s a faulty calculation: It doesn’t take into account the material itself, the print process, the software used, or numerous other variables (professional 3D printers have over 100 different settings that impact part quality). As a result, this spec doesn’t tell us anything about what you could actually produce with this machine.
Layer Thickness
Layer thickness is typically used to describe the surface finish of a part. While the thickness of a layer is often better at lower layer heights, the issue is that the roughness of a surface is not standard in relation to the layer height.
To illustrate this, I printed a few parts on the Form 2 to show that the relationship between layer thickness and surface finish is not what one might expect. In the picture below, you’ll see two rings—one printed in Castable Resin and the other in Black Resin. The Castable Resin has a slightly smoother surface finish and the micro pavé is a bit crisper.
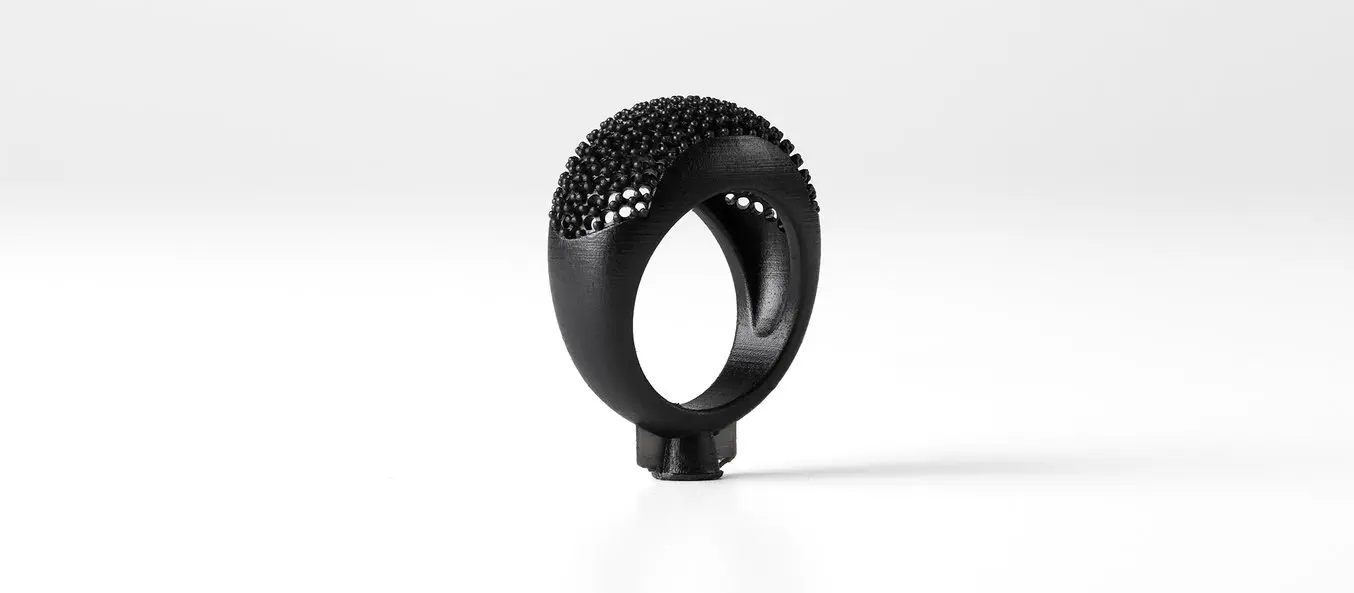
Black Resin (25 microns layer height).
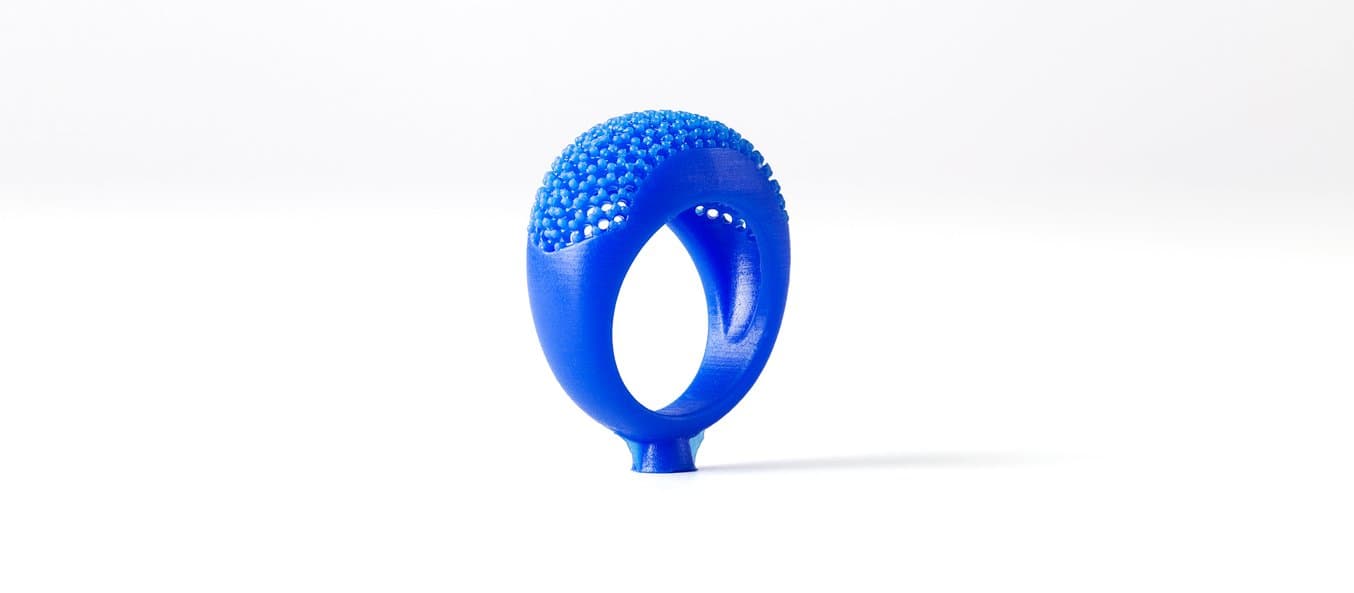
Castable Resin (50 microns layer height).
Here’s the catch: the ring printed in Castable Resin was actually printed at 50 microns, whereas the ring printed in Black Resin was printed at 25 microns.
The reason the ring printed in Castable Resin looks better at 50 microns is because this resin was designed to produce the best results at 50 microns. Also, the Formlabs team dialed in the print/material settings on the Form 2 to make sure it produced the best results for casting.
Some companies list Z-axis resolution instead of layer height, which has the same usefulness as XY resolution because it speaks to the distance the Z-axis motor can mechanically move/step.
Formlabs recently introduced OpenFL, giving researchers access to an API for more control over the Form 1+. With OpenFL, the smallest Z-axis step for the Form 1+ is 2.5 µm, which you won’t see listed on Formlabs’ website. The reason that this information isn’t included is because it is a maximum of the motor, not the type of layer that can be printed.
The bottom line: just because a printer manufacturer claims “X” layer height, doesn’t mean that printer will have a better surface finish.
Maximum Speed
Maximum speed is a hard metric to quantify, particularly across different printers. Again, there’s not enough information for us to really understand how these printers will perform when producing parts. Not only do the standard variables impact print time, so too do factors like geometry and orientation of the part.
For instance, a taller part will take more time than one oriented closer to the build plate because there are more layers to print. Also, the way that an object is oriented and supported will change the time it takes to print the part.
A common benchmark is how fast a printer can produce a one-inch cube. The problem with that example is that it’s very specific. Unless you’re a dice manufacturer, one-inch cubes aren’t a great way to estimate how long your part will take to print.
Surface Finish
Don’t get me started on this one. Decisions in life would be so much easier if “good” and “bad” were the only ways of quantifying specifications. Surface finish was discussed earlier in relation to layer thickness, but one thing to keep in mind: there is no real specification for surface finish. Surface finish can differ depending on the geometry (curved vs. straight surfaces) and orientation. The only way to compare surface finish between printers is if every 3D printing company published results from an industry standard part and profilometer. Probably not going to happen anytime soon.
Accuracy
Accuracy isn’t included in the chart in the introduction, but it is something that a few 3D printer companies have been publishing recently. The mistake that a lot of 3D printer buyers make is assuming that XY resolution or layer thickness will determine the accuracy of the final part.
The truth is that global accuracy is hard to determine, largely because it can be impacted by length, geometry, and orientation. Here’s an example of an accuracy statement for a large industrial machine:

Accuracy for a large industrial printer (priced around $100,000).
At first it seems all parts will be within 25-50 microns but the footnote references just about every aspect of producing a part.
A Better Way to Evaluate Professional 3D Printers
I don’t want you to walk away thinking everyone in our industry is misleading you.
The truth is, the 3D printing industry as a whole lacks a set of standard specifications that adequately describes what you can expect from a 3D printer. Even with established technology, specifications don’t tell the whole story. I’ve seen speed tests where a higher spec Windows computer is slower than a Mac with lesser specs.
Output is truly dependent on hardware, operating system, application, and several other factors.
With that said, all hope is not lost. Here are four tips that will help you effectively evaluate different 3D printers:
Talk to the company. You’re investing in something to help you iterate faster and build better products. The best way to better understand a company’s technology and how its products work is to talk to its team.
Request a sample part. We’ve established that 3D printer specifications aren’t a great way to evaluate what a printer can actually produce. To see if a specific printer will meet your needs, ask the 3D printing manufacturer to send you a sample part, such as this free sample part from Formlabs. Once you receive the sample, ask the company to provide more information. For example:
- How long did it take to print?
- How much material was used?
- What’s the layer thickness?
If you do this a few times with a few different companies, you’ll see that surface finish from different printers can vary, even at the same layer height.
Ask for custom sample parts. Not all companies will do this, but it doesn’t hurt to ask. Seeing your design printed will help you to understand what you can expect when you begin running the machine. If most of your parts are protected IP, try designing a part with similar features to avoid worrying about confidentiality agreements.
When sending a design for a custom sample, make sure the design is representative of your business or use case. For most prototyping applications, I typically recommend sending a design that represents roughly 80 percent of your business. Sending a complicated part that is a small percentage of what you’ll be printing can lead to purchasing a solution that doesn’t really make sense for your work.
Look for design guides. Most 3D printing manufacturers have published design guides that help customers understand how to better use and design models for their printers. Guides like the Formlabs design guide provide specifications for different types of features.