Materiales necesarios:
Formlabs:
- Conjunto de la pantalla de recambio
- Cable plano de recambio
De otros fabricantes:
- Llave Allen de 2,5 mm
- Llave Allen de 1,5 mm
- Llave de 5,5 mm
- Guantes de nitrilo


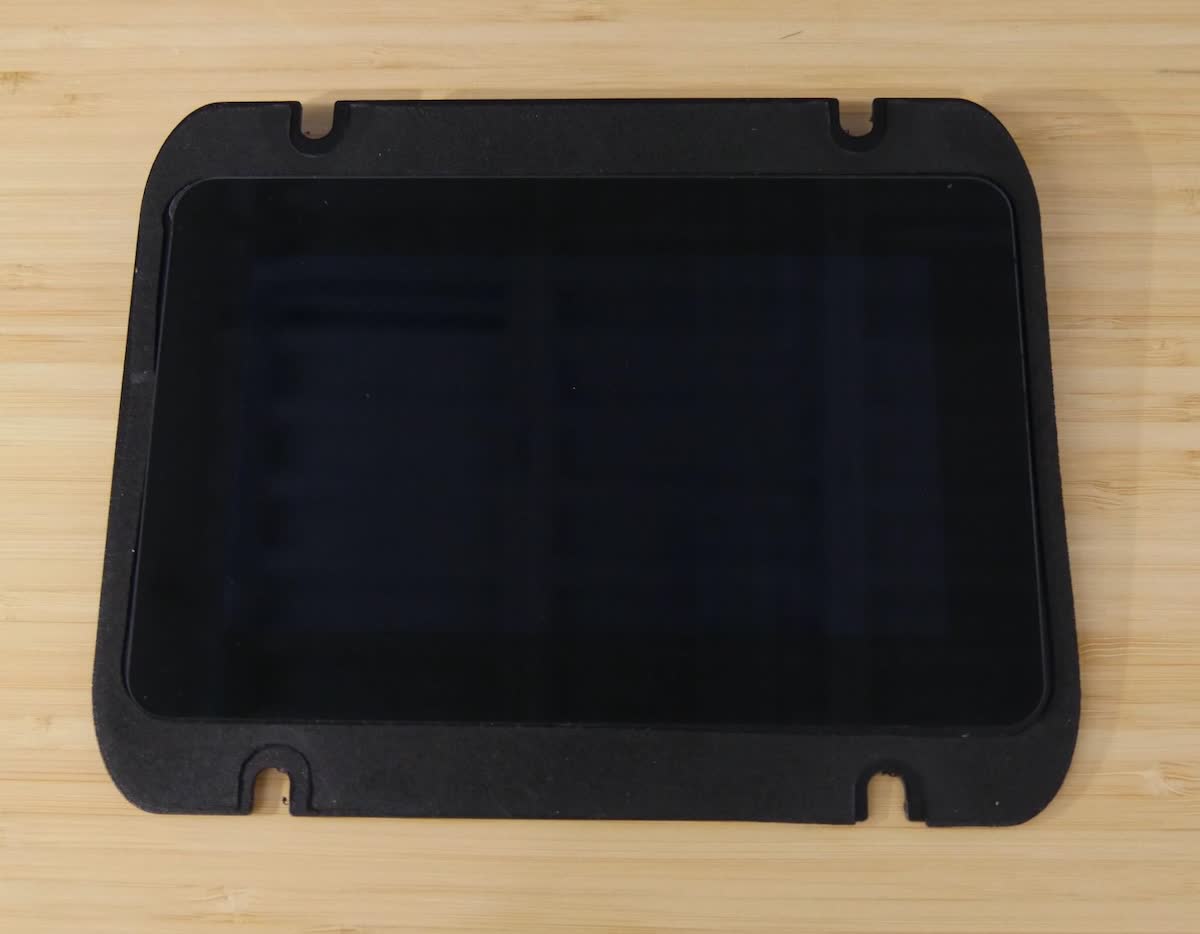
La Form Cure L tiene una pantalla táctil en su carcasa frontal. La pantalla táctil es el principal medio de interacción y control de la máquina, por lo que una pantalla táctil rota o que no funcione correctamente puede impedir el uso normal de la Form Cure L.
Utiliza esta guía para retirar y reemplazar el conjunto de la pantalla de la Form Cure L V1.
Materiales necesarios:
Formlabs:
De otros fabricantes:
Tiempo estimado: 20 minutos
PELIGRO:
Lee y sigue todas las instrucciones de seguridad y las advertencias del manual del usuario. El uso de piezas incorrectas como repuestos puede provocar quemaduras, descargas eléctricas, incendios o explosiones. Desecha todas las piezas de acuerdo con la normativa local.
Preparación del espacio de trabajo
Resumen: Prepara la Form Cure L y un espacio de trabajo libre de polvo para reemplazar el conjunto de la pantalla.
Paso 1: Desconecta los cables de red
Desconecta los cables Ethernet y USB de la unidad.
Paso 2: Desconecta la máquina
Desconecta el cable de alimentación antes de continuar con el mantenimiento. No realices el mantenimiento de la máquina mientras esté enchufada a la corriente. Espera cinco minutos después de desenchufar la máquina de la alimentación antes de proseguir. Si la máquina se ha utilizado recientemente, los módulos de calefacción estarán calientes. Espera al menos dos horas para que los calentadores se enfríen.
PELIGRO:
Realizar el mantenimiento de la máquina mientras está enchufada aumenta el riesgo de descarga eléctrica. No retires nunca los paneles de la máquina mientras esté enchufada. Nunca vuelvas a conectar la máquina a la alimentación si los paneles están retirados.
Retirada de la carcasa superior
Resumen: Retira la carcasa superior de la máquina.
AVISO:
La Form Cure L contiene componentes electrónicos sensibles. Asegúrate de tener una toma de tierra antes de tocar cualquier componente electrónico de la máquina, sea mediante una cinta de toma de tierra o tocando un trozo de metal con su propia toma de tierra.
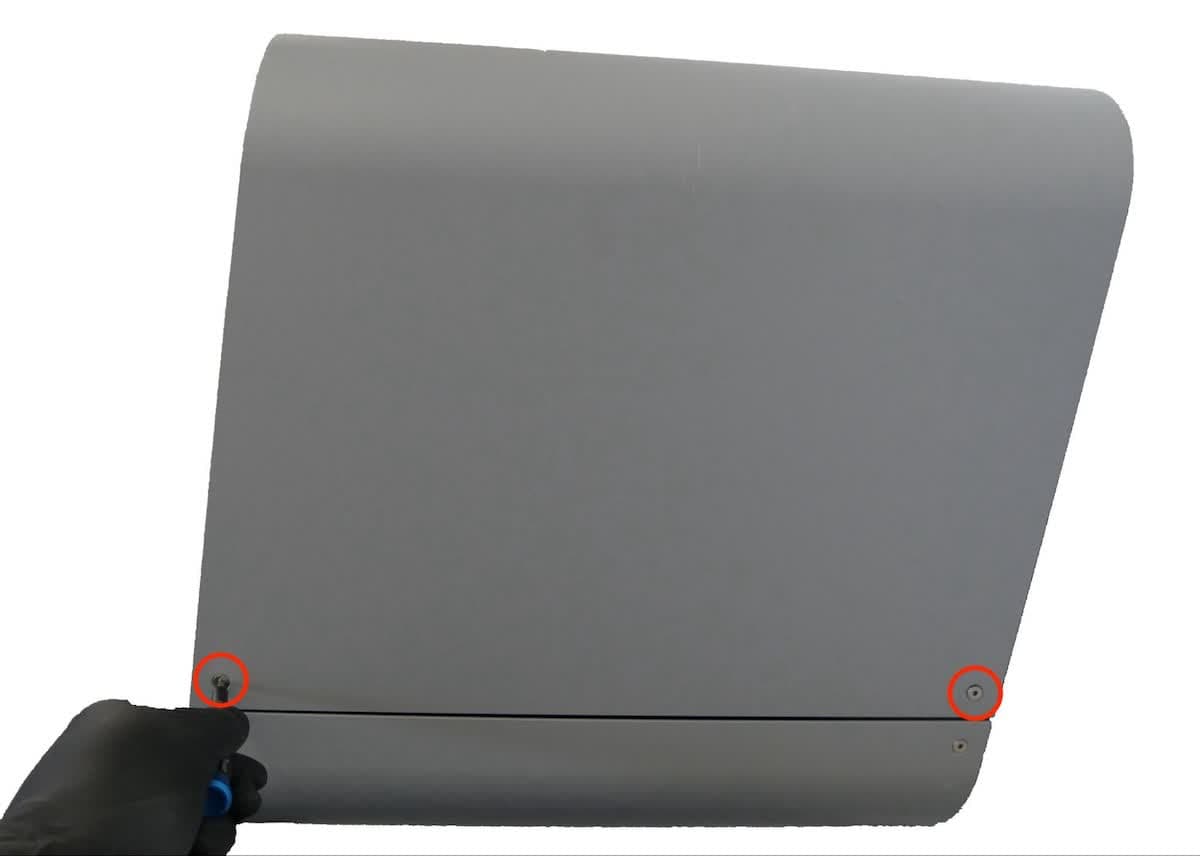
Utiliza una llave Allen de 2,5 mm para desenroscar los dos tornillos del lado derecho de la carcasa superior. Deja aparte los tornillos.
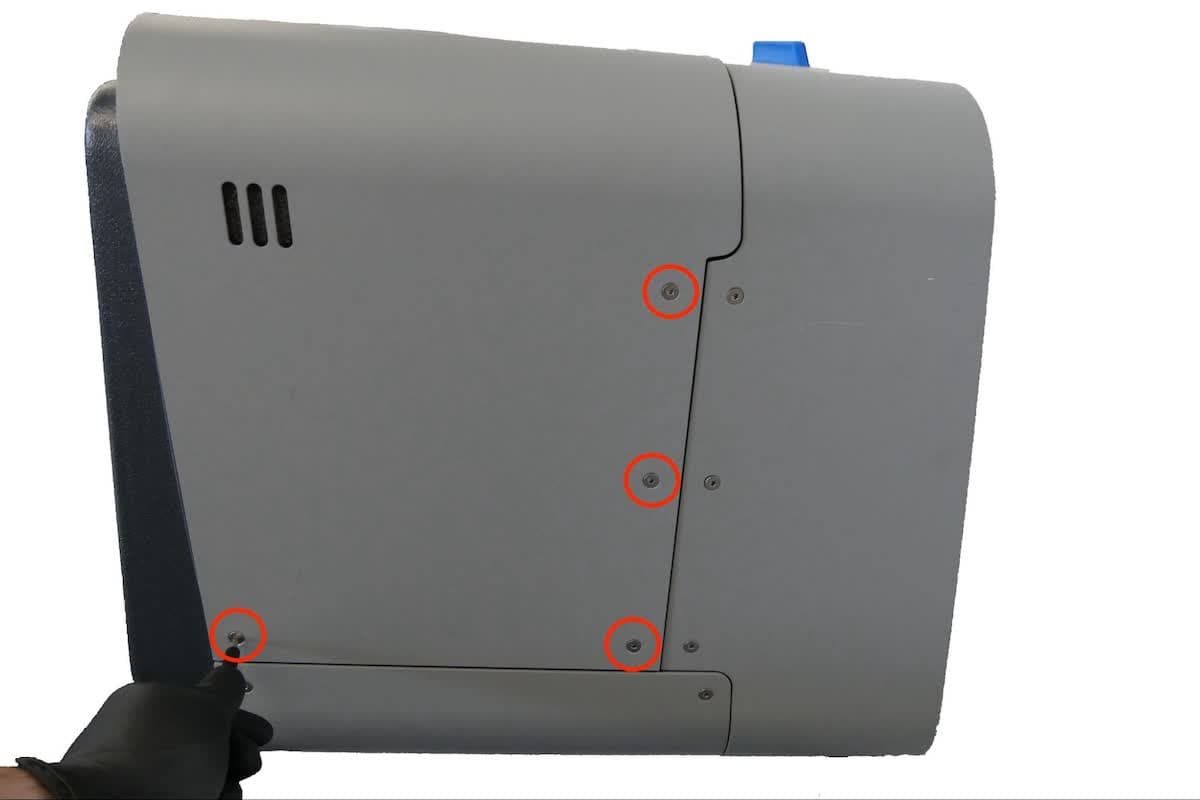
Utiliza una llave Allen de 2,5 mm para desenroscar los cuatro tornillos del lado izquierdo de la carcasa superior. Deja aparte los tornillos.
Paso 3: Retira la carcasa superior
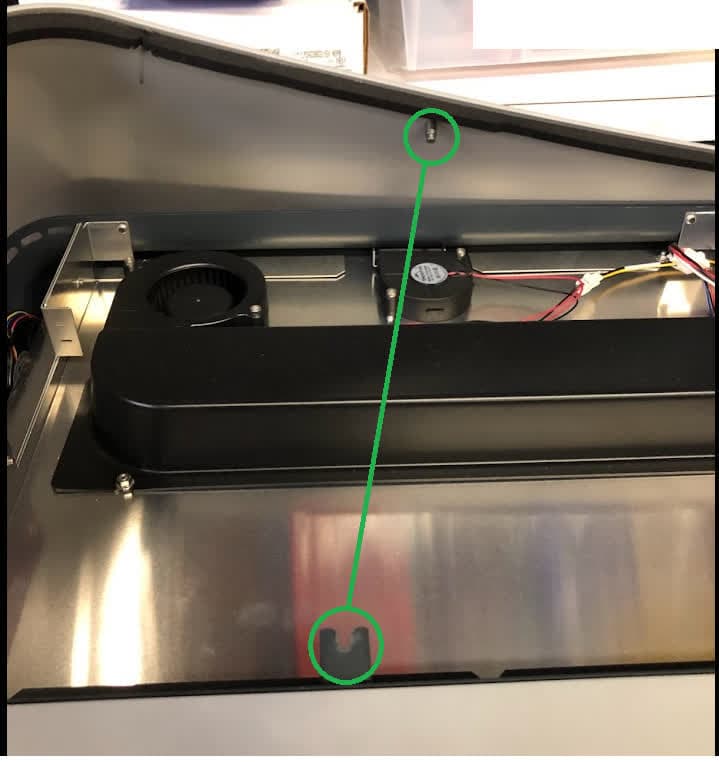
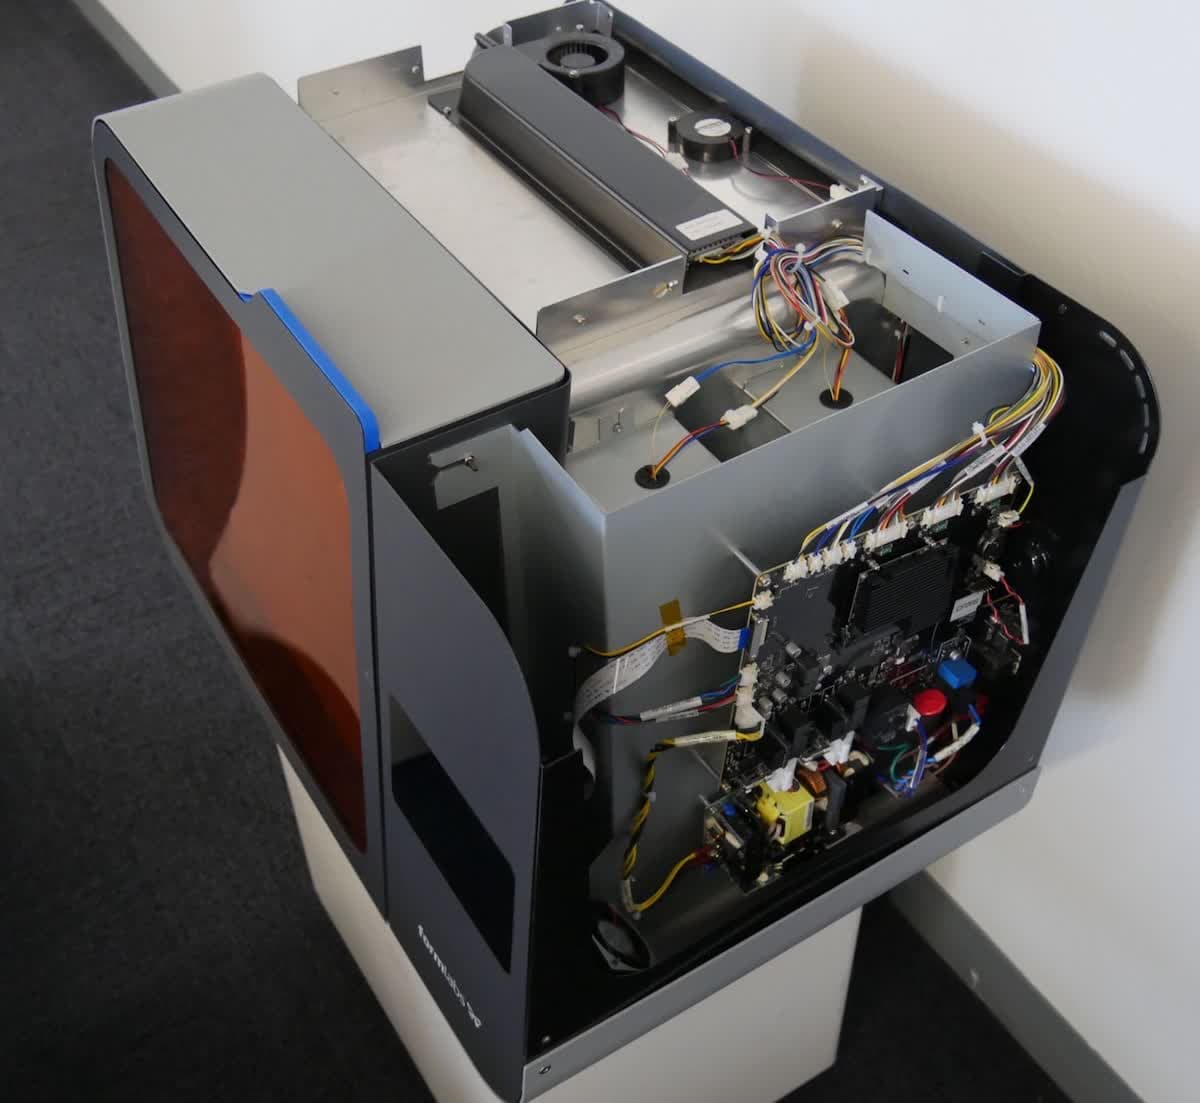
Empuja la cubierta hacia la parte posterior de la Form Cure L para desengancharla y, a continuación, retira completamente la cubierta levantándola hacia arriba. Deja a un lado la cubierta.
Retirada del conjunto de la pantalla
Resumen: Retira el conjunto de la pantalla desconectándolo del cable plano.
AVISO:
La Form Cure L contiene componentes electrónicos sensibles. Asegúrate de tener una toma de tierra antes de tocar cualquier componente electrónico de la máquina, sea mediante una cinta de toma de tierra o tocando un trozo de metal con su propia toma de tierra.
Utiliza una llave Allen de 1,5 mm para desatornillar los dos tornillos que sujetan el clip de retención del cable plano al conjunto de la pantalla. Coloca a un lado los tornillos y el clip.
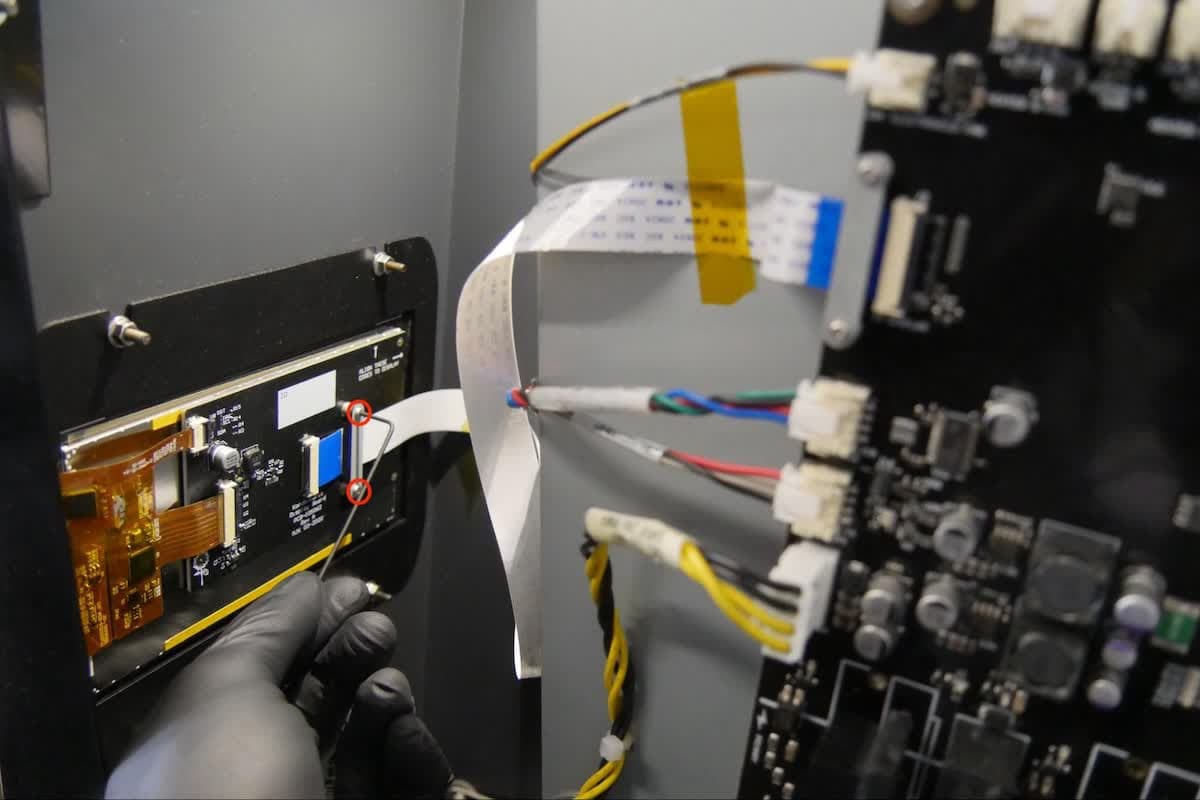
El cable plano de la pantalla está asegurado a su conector con un pasador. Levanta el pasador del conjunto de la pantalla para liberar el cable plano de la pantalla. El pasador está desbloqueado cuando está perpendicular al conjunto de la pantalla. Una vez que el pasador está en la posición vertical, se desbloquea y se puede desconectar el cable plano. Toma nota de la orientación original del cable plano.
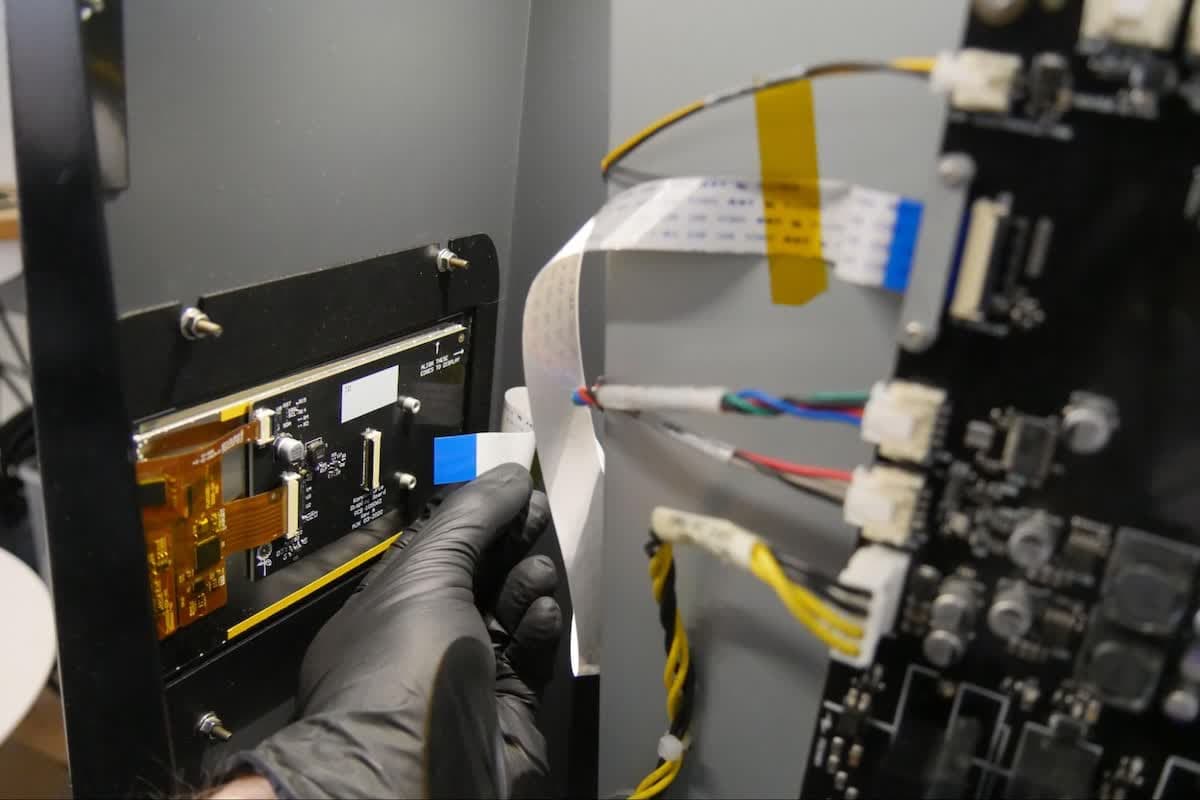
Paso 3: Retira las tuercas hexagonales del conjunto de la pantalla
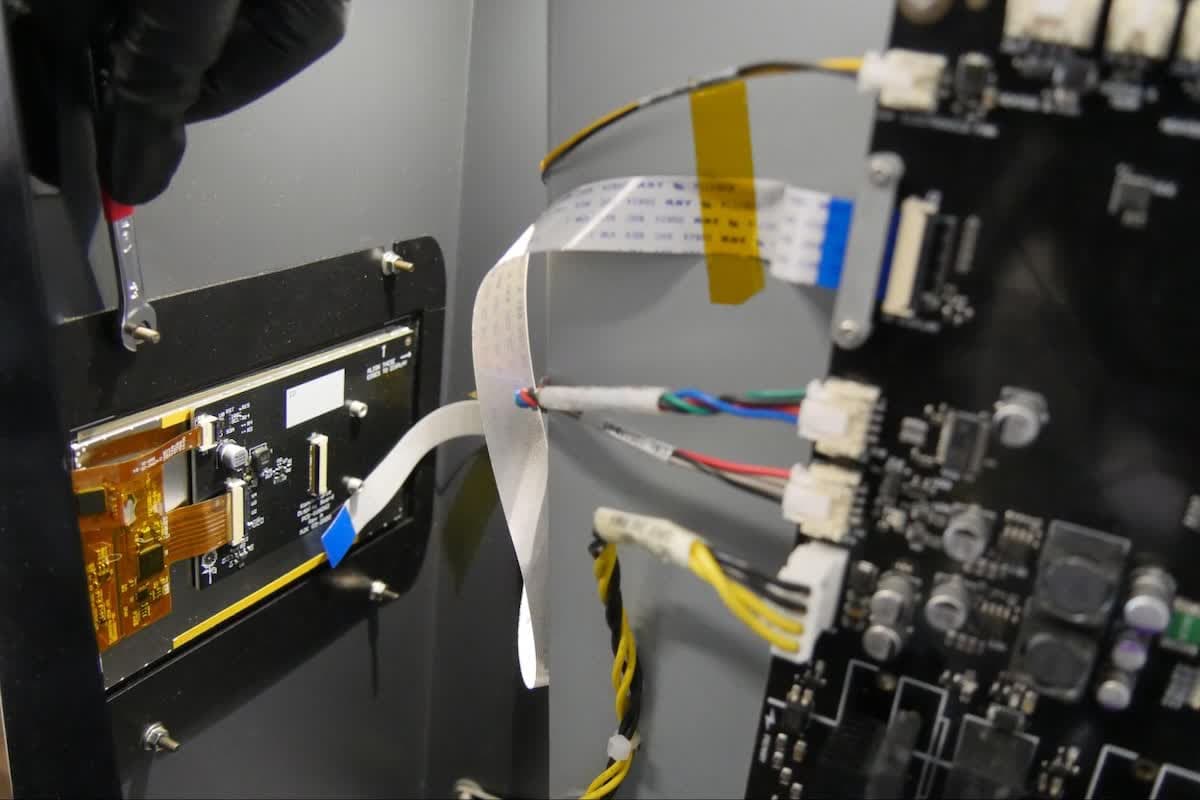
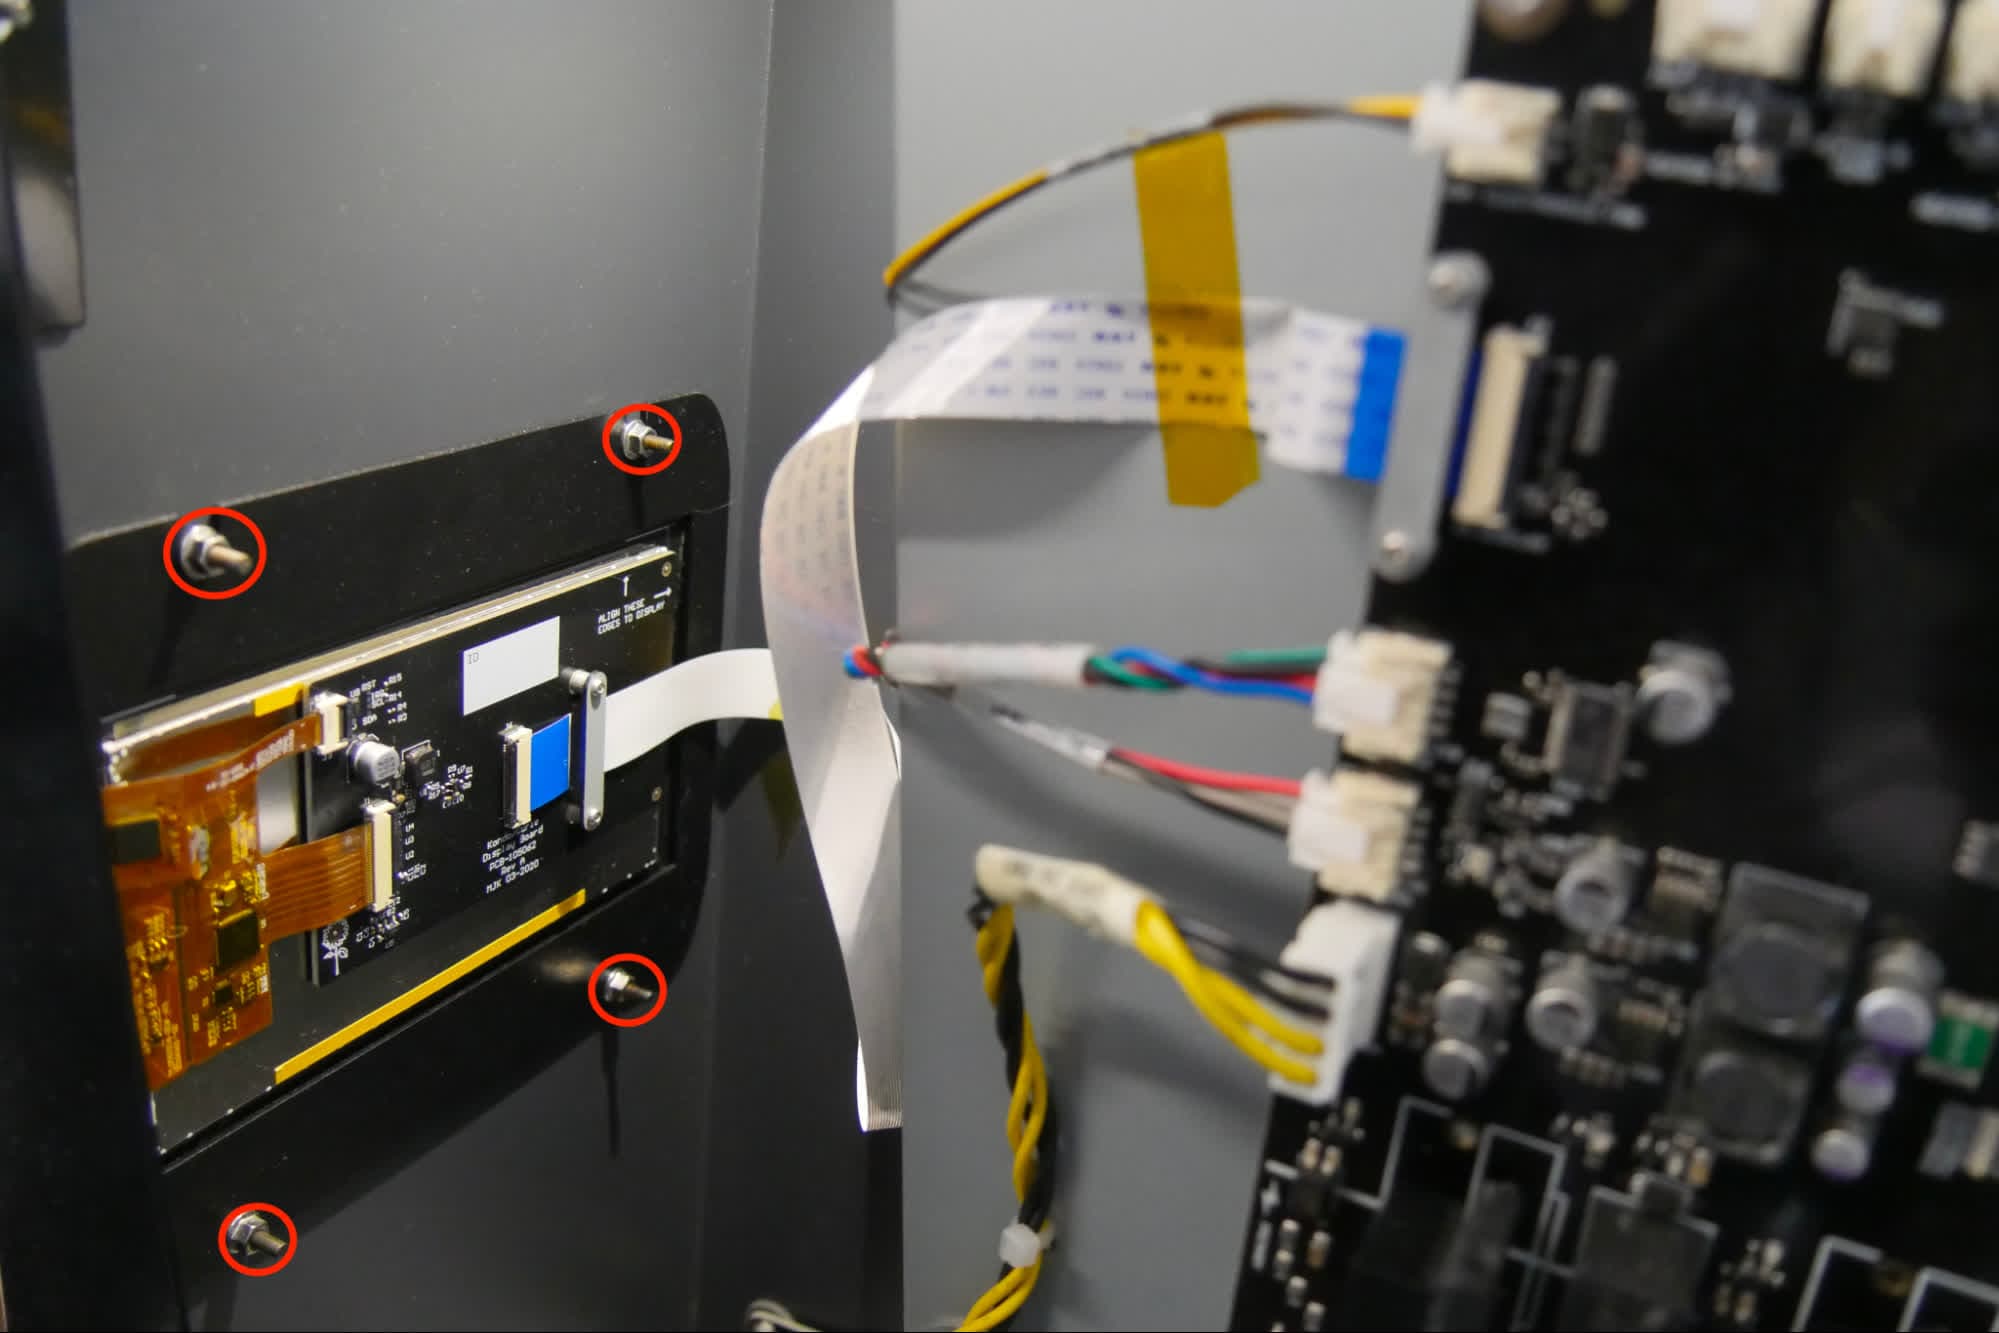
Utiliza una llave de 5,5 mm para retirar las cuatro tuercas hexagonales que fijan el conjunto de la pantalla a la Form Cure L. Coloca las tuercas hexagonales a un lado.
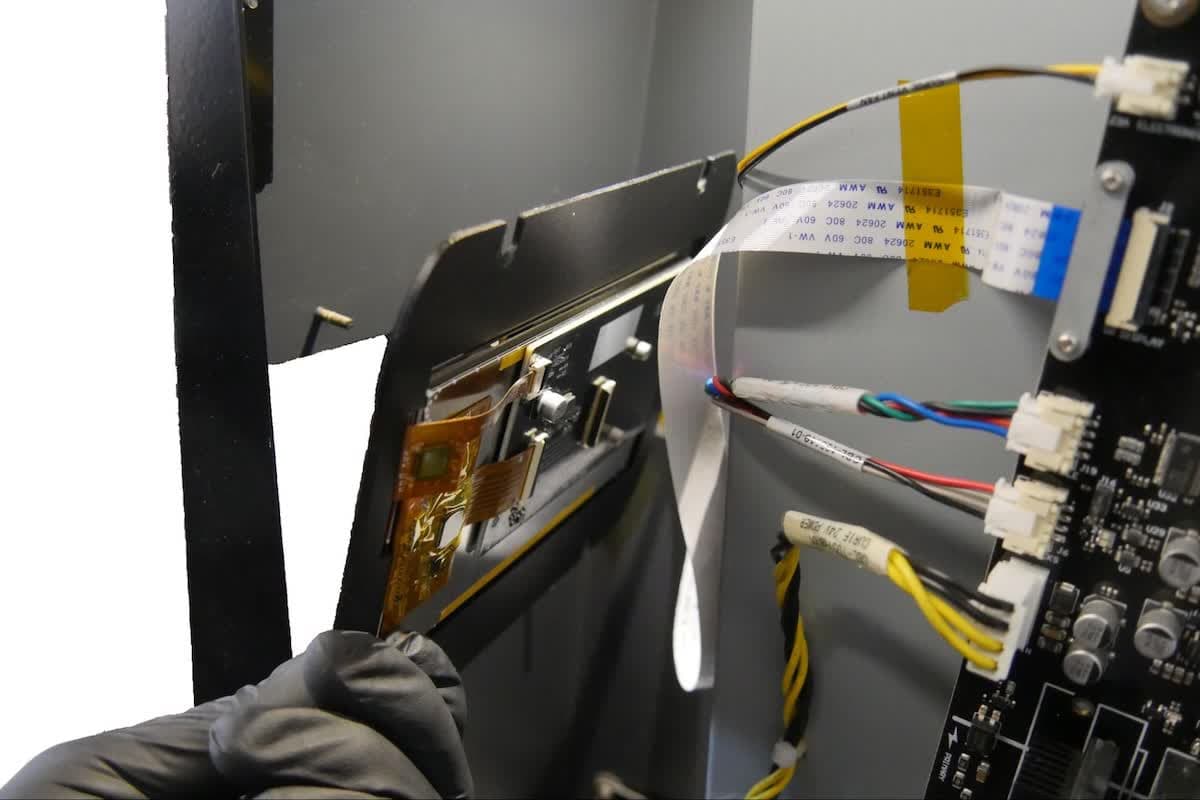
Cuando estén retiradas las tuercas hexagonales, extrae con cuidado el conjunto de la pantalla de la Form Cure L. Coloca el conjunto de la pantalla a un lado.
Sustitución del cable plano (opcional)
Resumen: Si te lo indica el servicio de asistencia de Formlabs o si el cable de cinta está dañado, reemplaza el cable de cinta.
Paso 1: Desatornilla el clip de retención del cable plano de la placa base
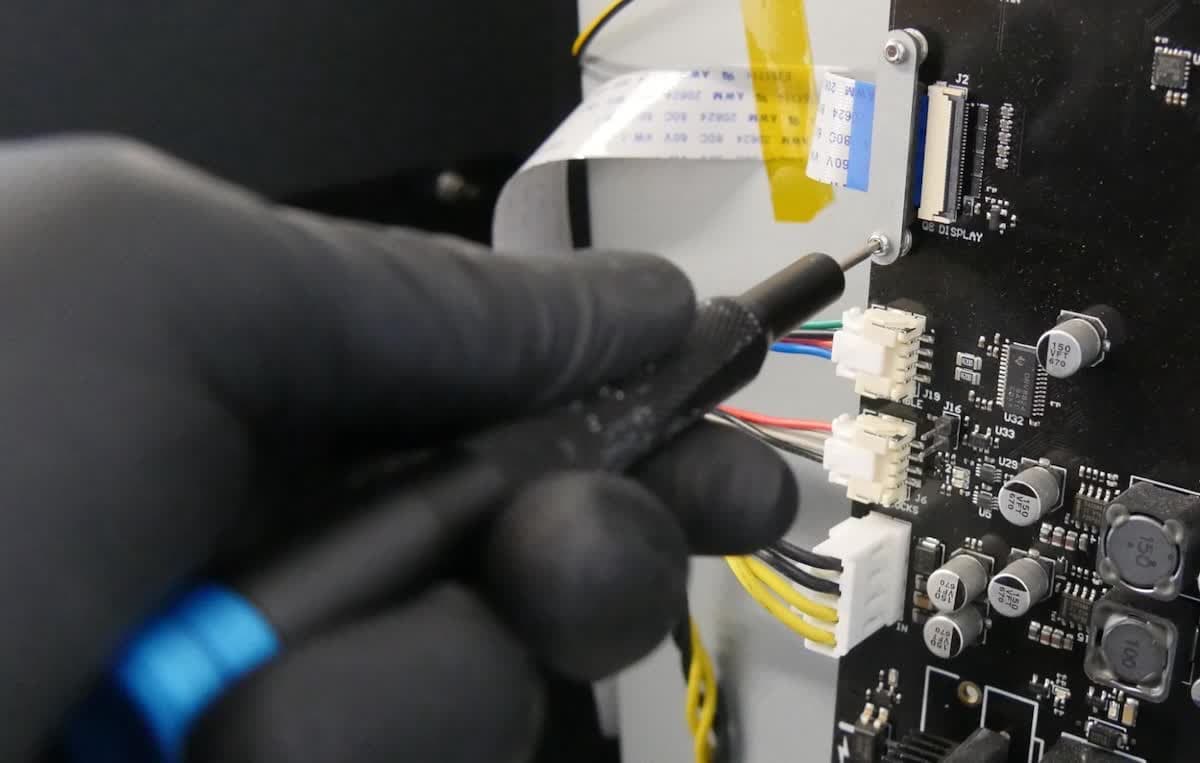
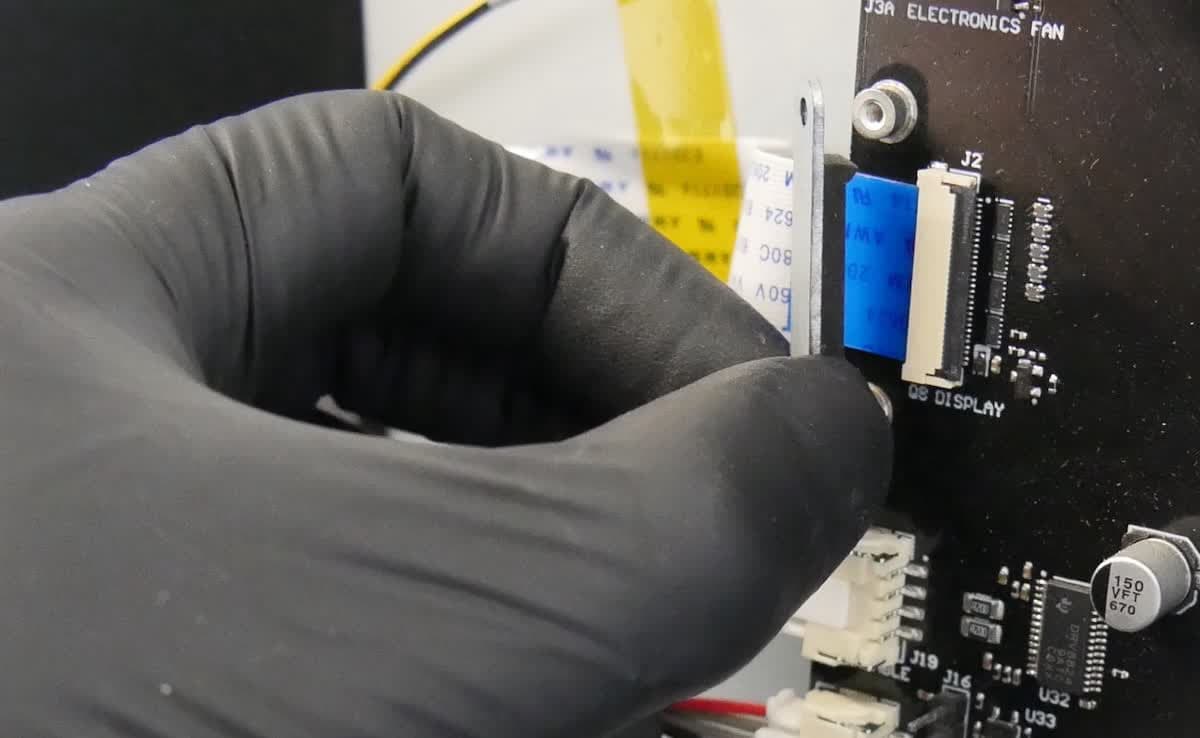
Utiliza una llave Allen de 1,5 mm para desenroscar y retirar los dos tornillos de 1,5 mm que sujetan el clip de retención del cable plano a la placa base de la Form Wash L. Coloca a un lado los tornillos y el clip.
Paso 2: Retira el cable plano de la placa base
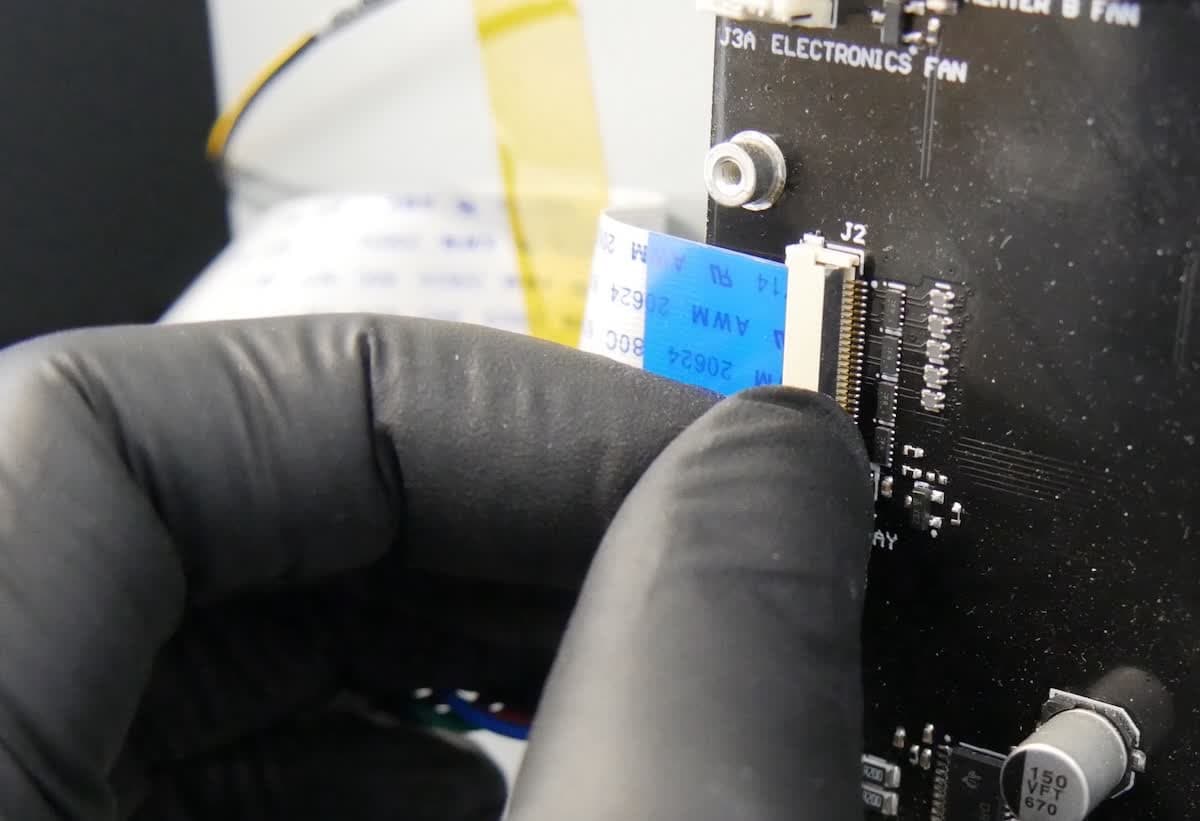
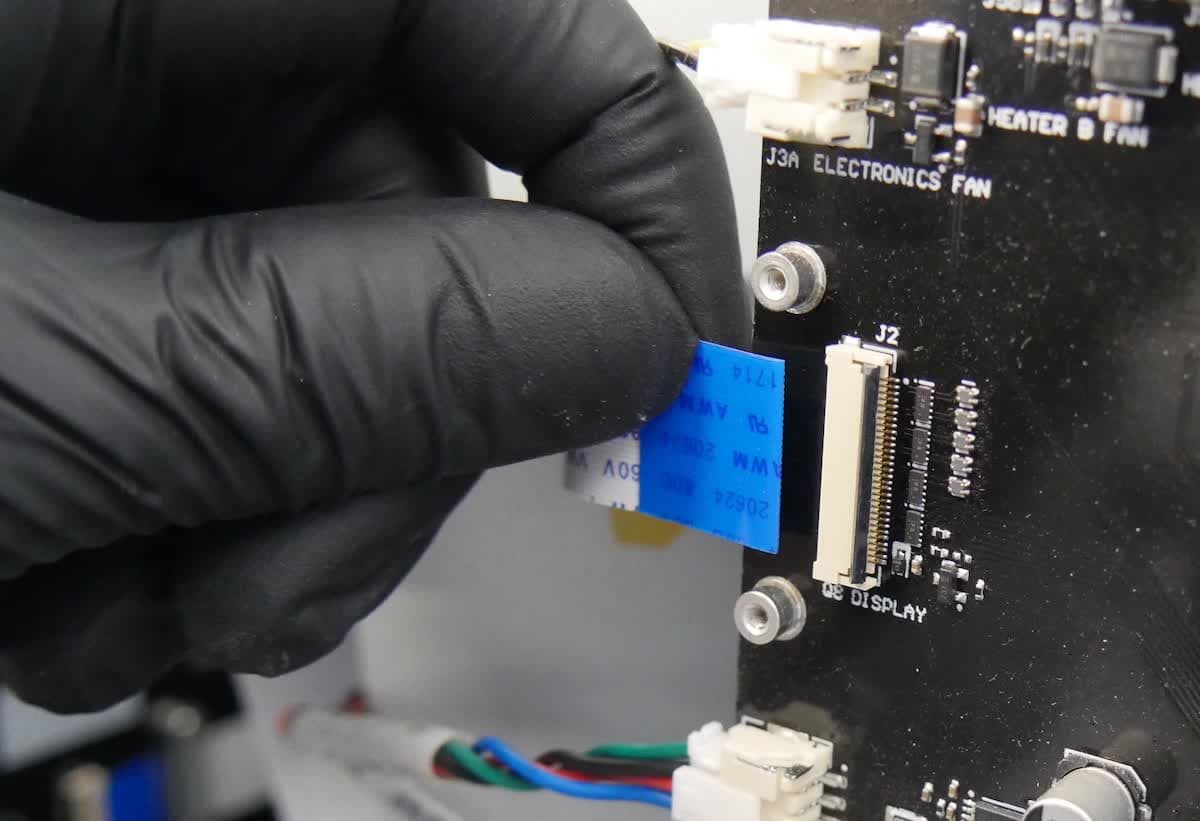
El cable plano de la pantalla está asegurado a su conector con un pasador. Levanta el pasador del conjunto de la pantalla para liberar el cable plano de la pantalla. El pasador está desbloqueado cuando está perpendicular al conjunto de la pantalla. Una vez que el pasador está en la posición vertical, se desbloquea y se puede desconectar el cable plano. Toma nota de la orientación original del cable plano. Deja a un lado el cable plano.
Paso 3: Conecta el nuevo cable plano a la placa base
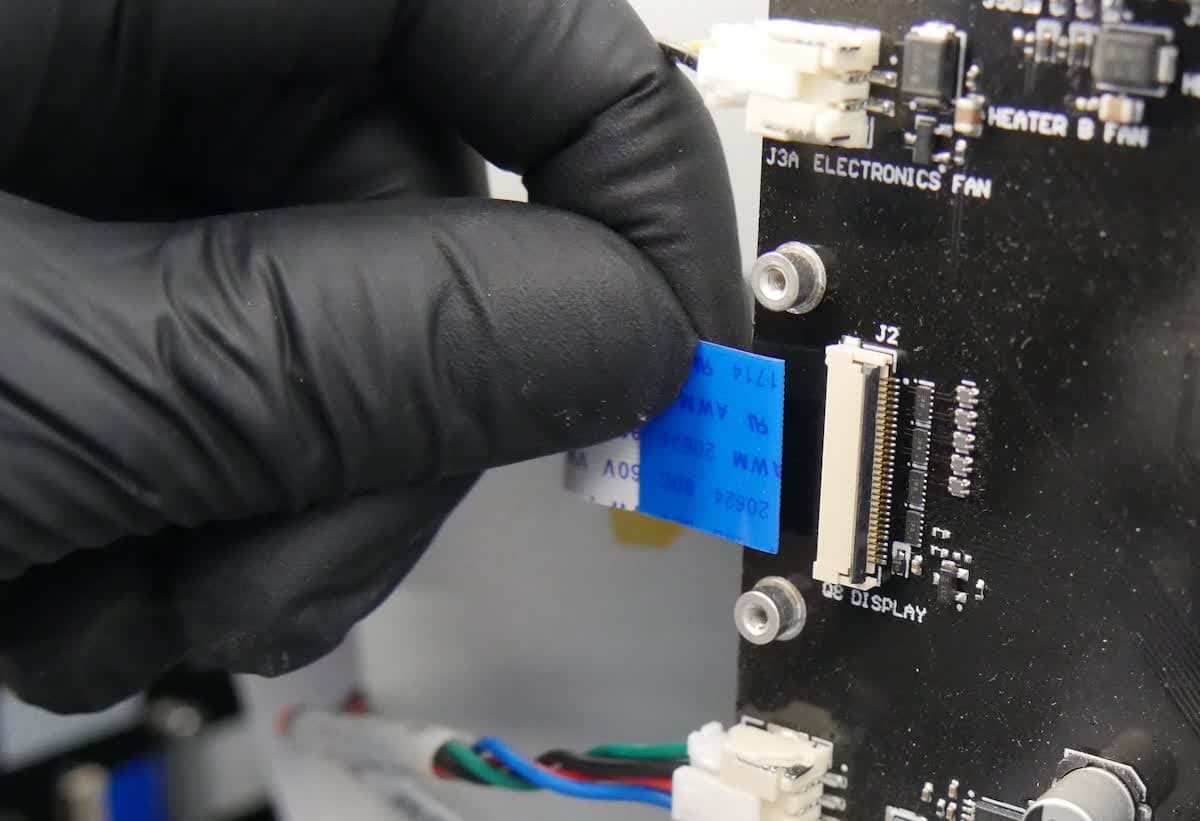
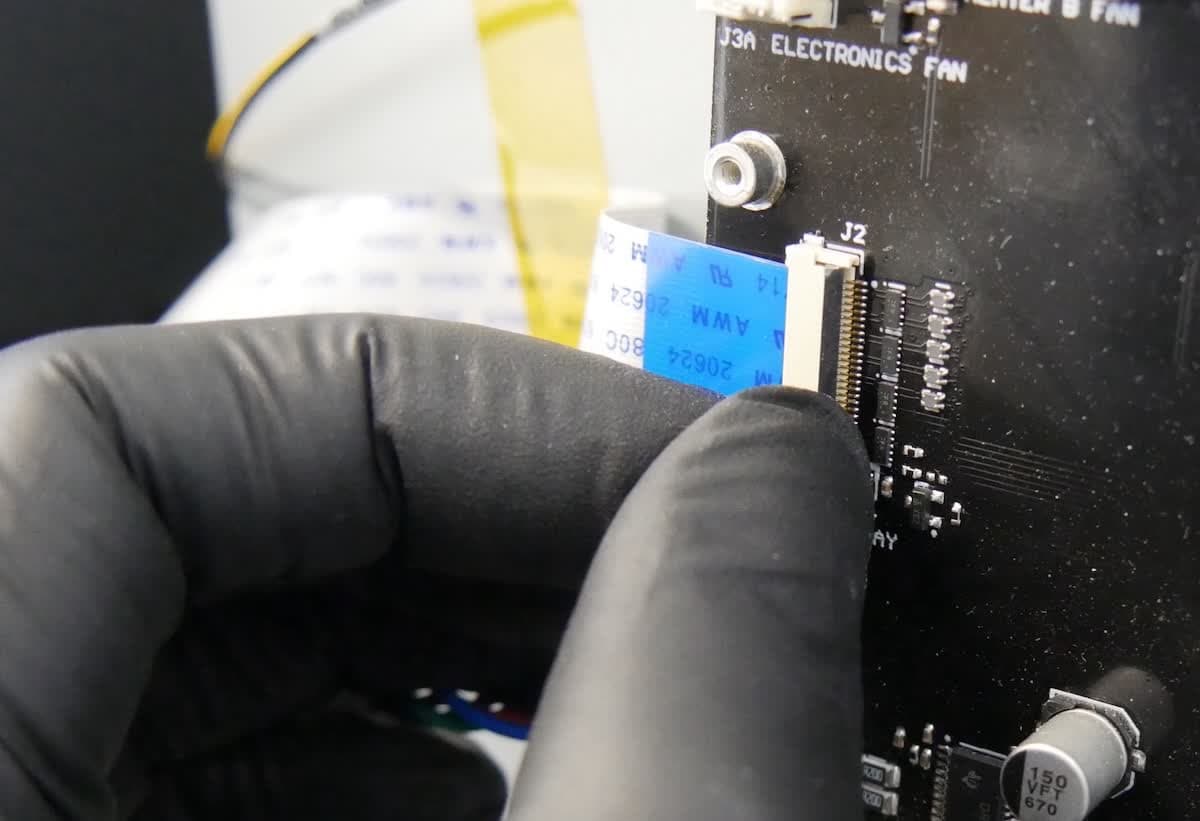
Vuelve a insertar el cable plano de la pantalla en el conector de la placa base, orientando los contactos expuestos del cable plano como estaban colocados anteriormente. Asegúrate de que el cable plano no esté retorcido ni doblado. Gira el pasador hacia el conjunto de la pantalla para bloquear el cable plano de la pantalla en su sitio. El pasador estará bloqueado cuando esté paralelo a la placa base.
Paso 4: Instala el clip de retención del cable plano
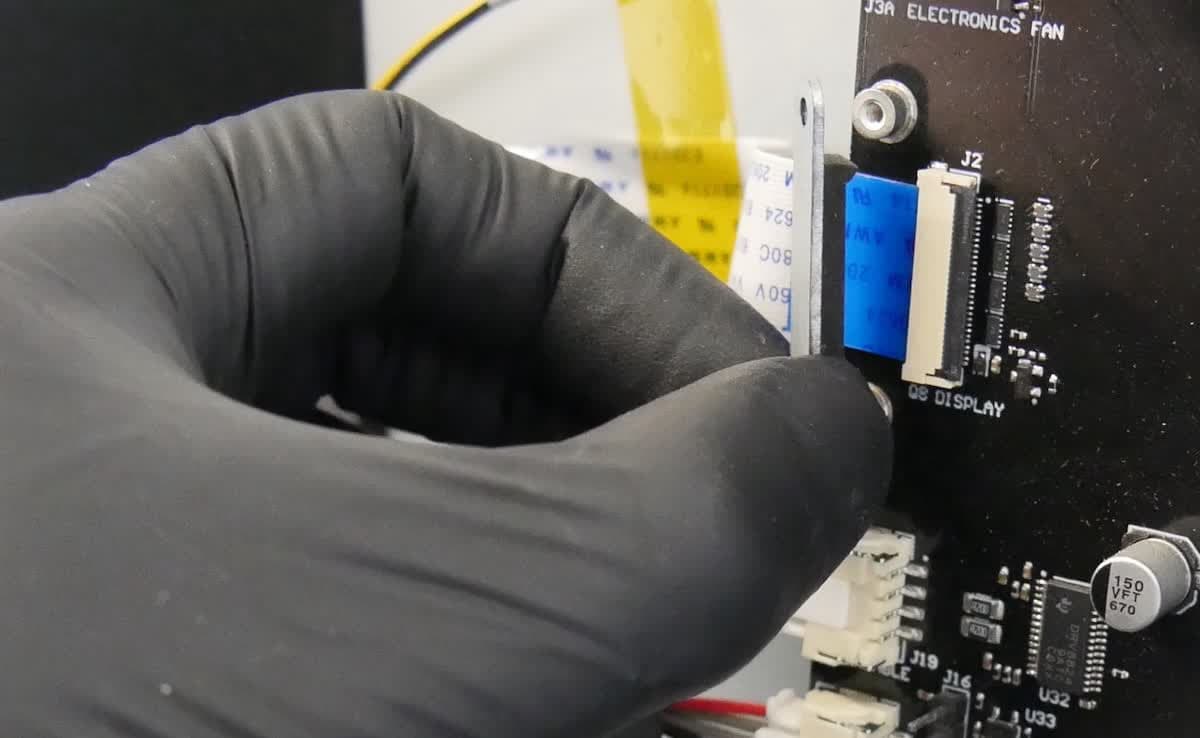
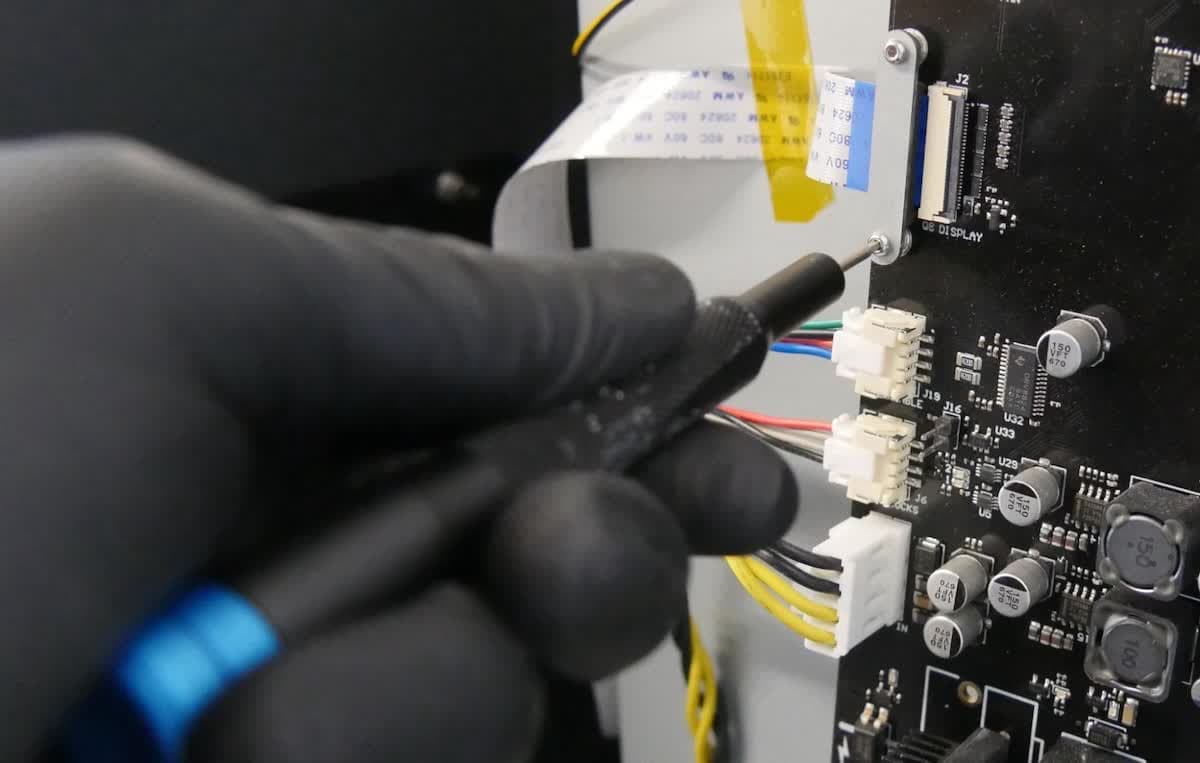
Alinea el clip de retención del cable plano de la pantalla con sus puntos de montaje en la placa base, asegurándote de que mantiene el cable plano sujeto contra la placa base. Introduce un tornillo hexagonal de 1,5 mm en cada uno de los dos orificios del clip de retención. Utiliza una llave Allen de 1,5 mm para fijar los dos tornillos que sujetan el clip de retención del cable plano al chasis de la máquina. Aprieta ambos tornillos hasta que estén bien ajustados.
Instalación del nuevo conjunto de la pantalla
Resumen: Conecta el nuevo conjunto de la pantalla al cable plano para instalar el nuevo conjunto de la pantalla.
Paso 1: Inserta el conjunto de la pantalla
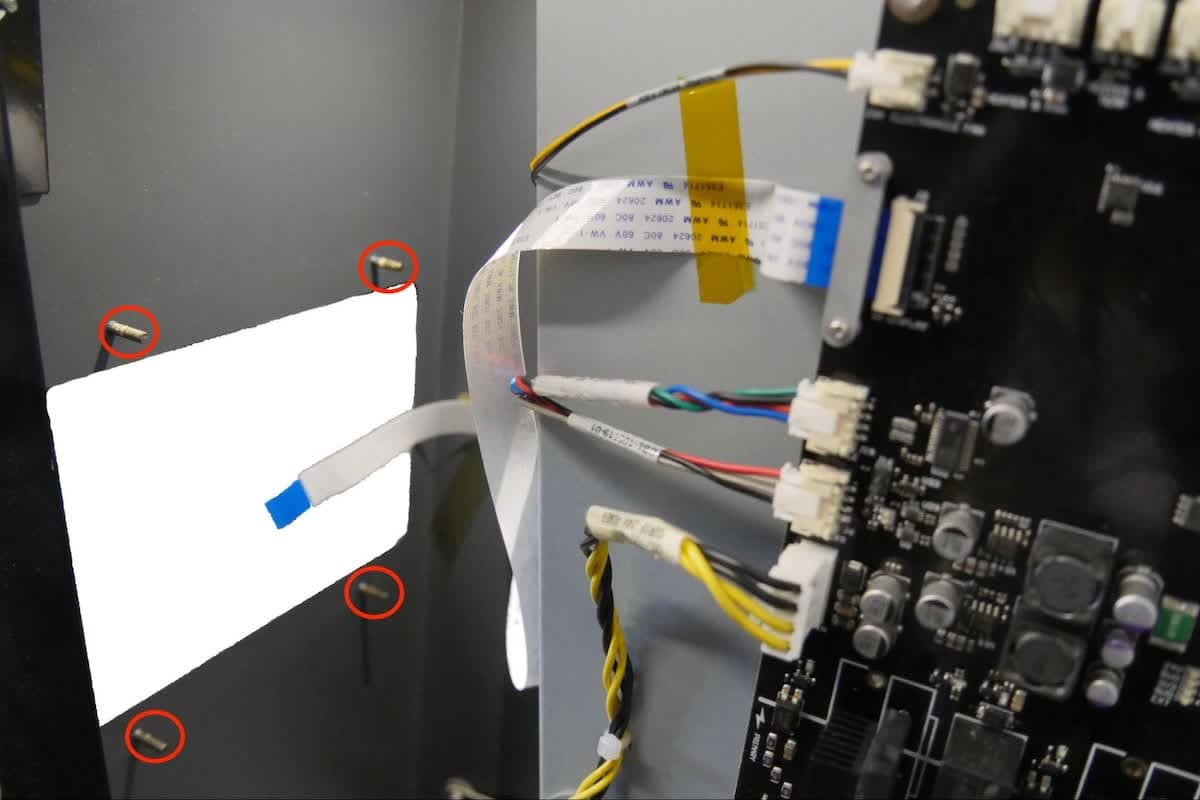
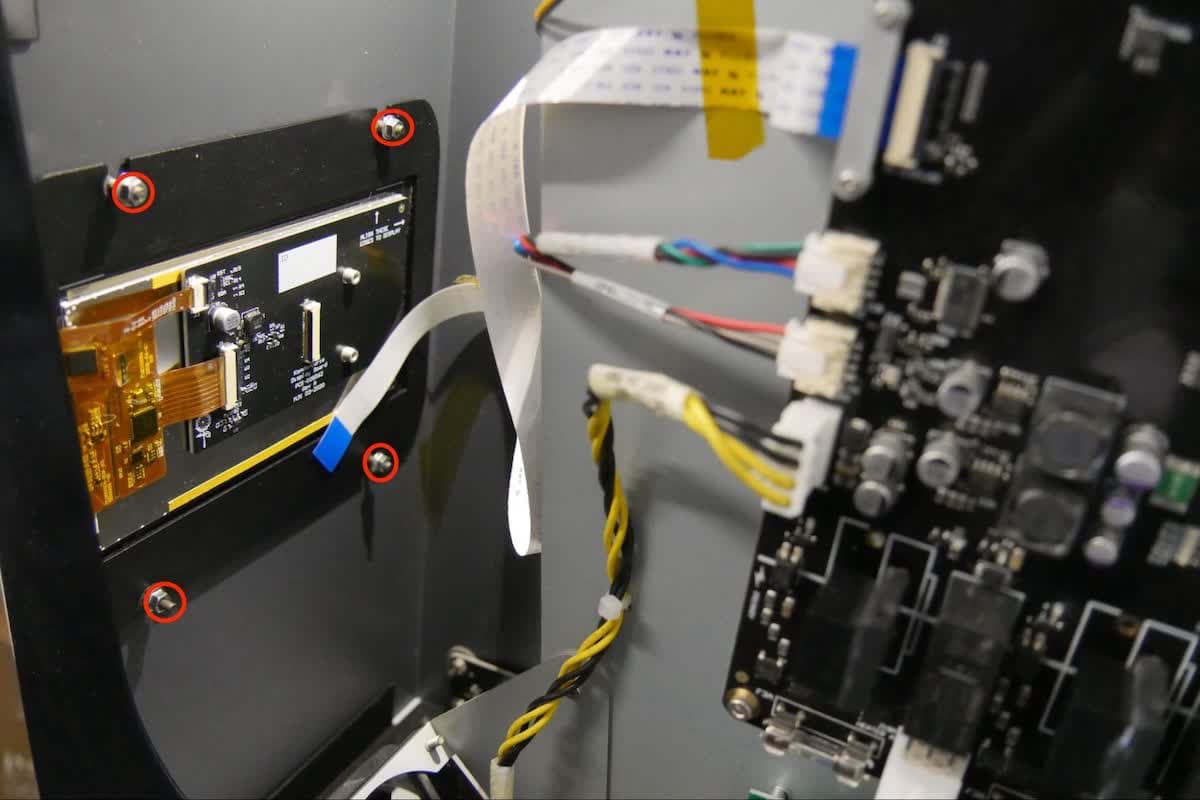
Introduce el nuevo conjunto de la pantalla en la Form Cure L alineando las ranuras del conjunto de la pantalla con los cuatro tornillos del interior de la cavidad de la Form Cure L.
Enrosca una tuerca de 5,5 mm en cada uno de los postes de los tornillos. Aprieta las tuercas con una llave de 5,5 mm hasta que queden ajustadas.
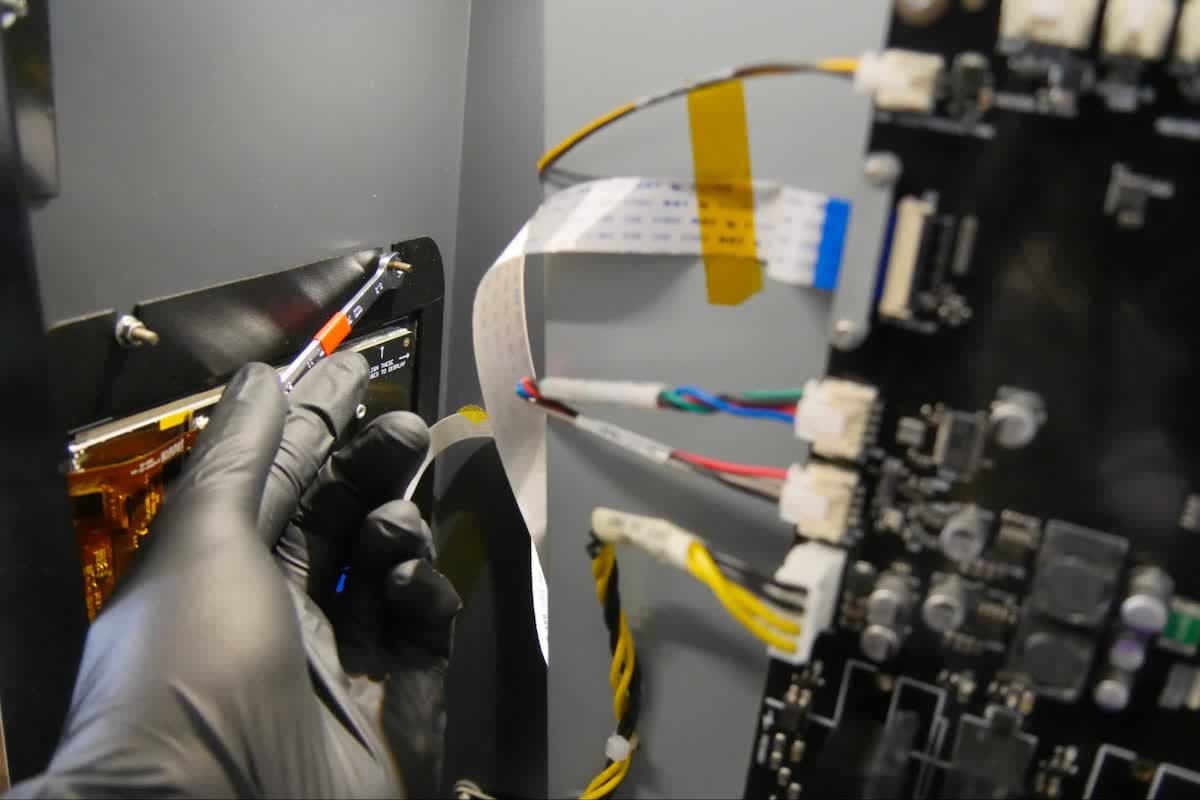
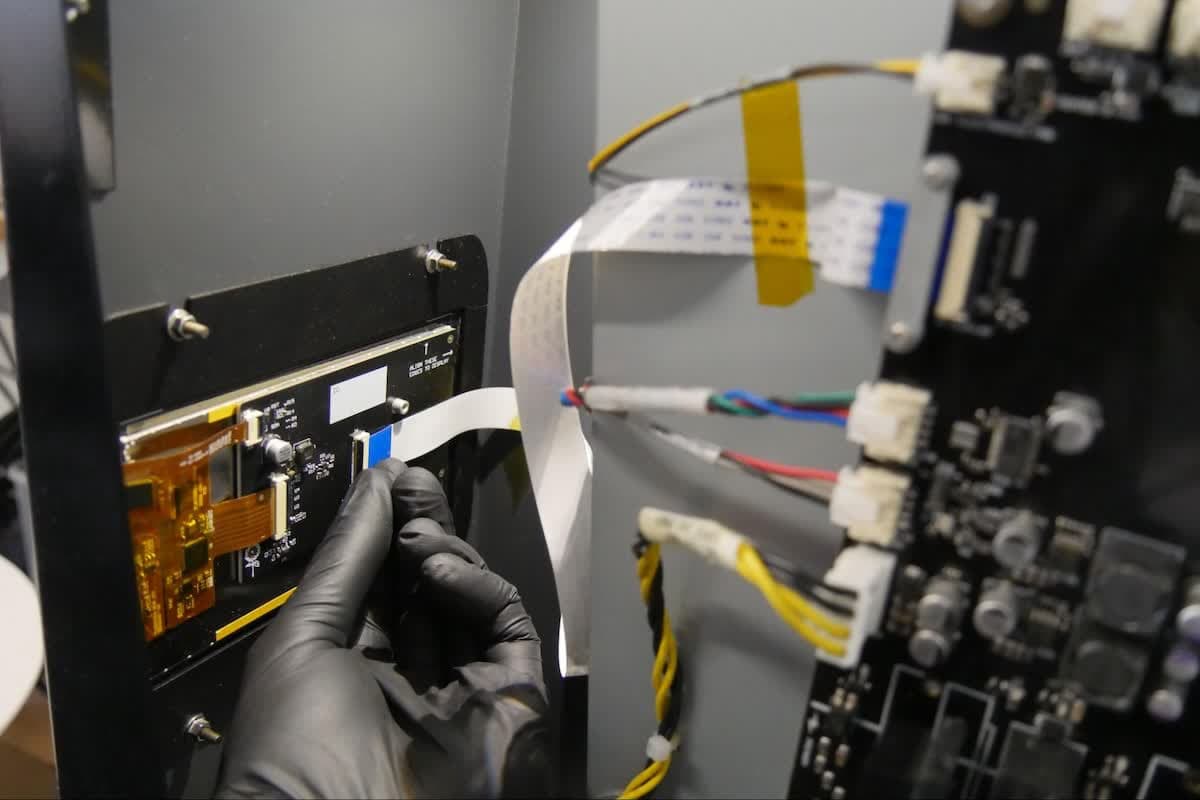
Inserta el cable plano de la pantalla en el conector del nuevo conjunto de la pantalla, orientando los contactos expuestos del cable plano tal y como estaban en el antiguo conjunto de la pantalla. Asegúrate de que el cable plano no esté retorcido ni doblado.
Gira el pasador hacia el conjunto de la pantalla para bloquear el cable plano de la pantalla en su sitio. El pasador estará bloqueado cuando esté paralelo al conjunto de la pantalla.
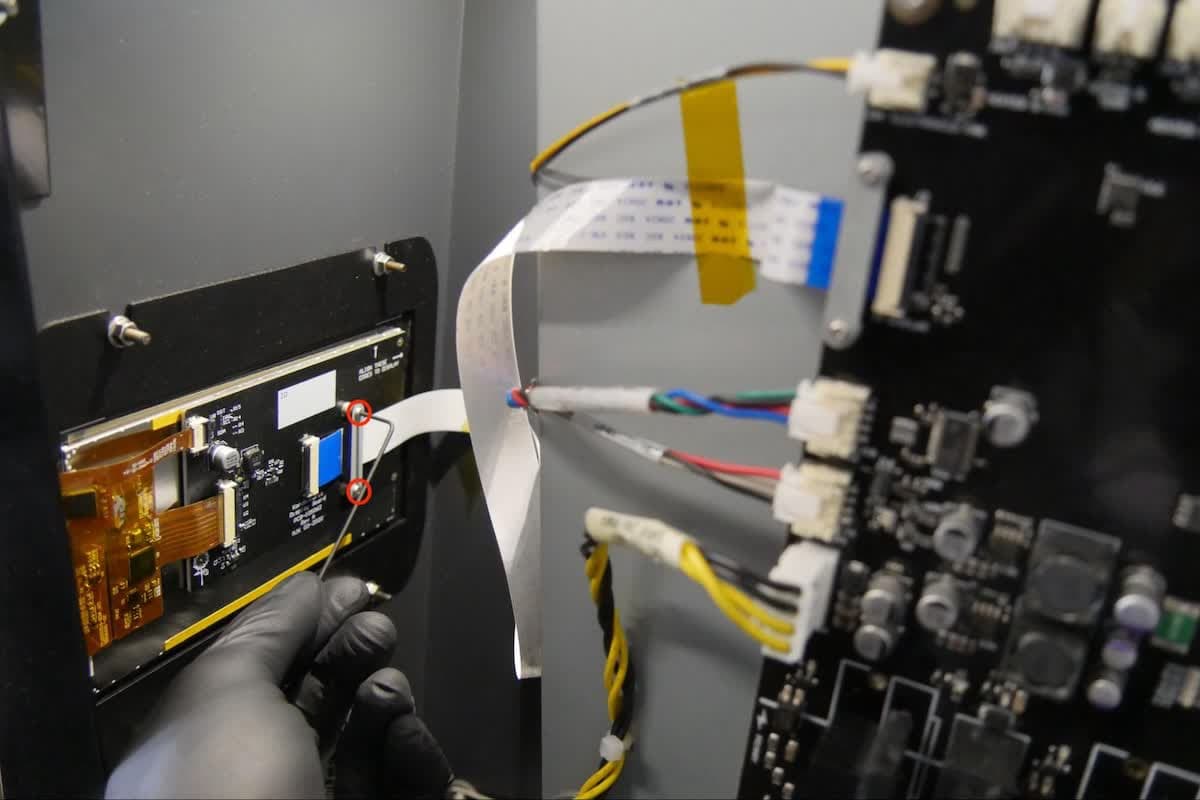
Alinea el clip de retención del cable plano de la pantalla con sus puntos de montaje en el conjunto de la pantalla, asegurándote de que el clip mantiene el cable plano sujeto contra el conjunto de la pantalla. Introduce un tornillo hexagonal de 1,5 mm en cada uno de los dos orificios del clip de retención. Aprieta los tornillos con la llave Allen de 1,5 mm hasta que no puedan moverse con los dedos.
Reinstalación de la carcasa superior
Resumen: Después de instalar el nuevo conjunto de la pantalla, vuelve a instalar la carcasa superior.
Paso 1: Vuelve a instalar la carcasa superior
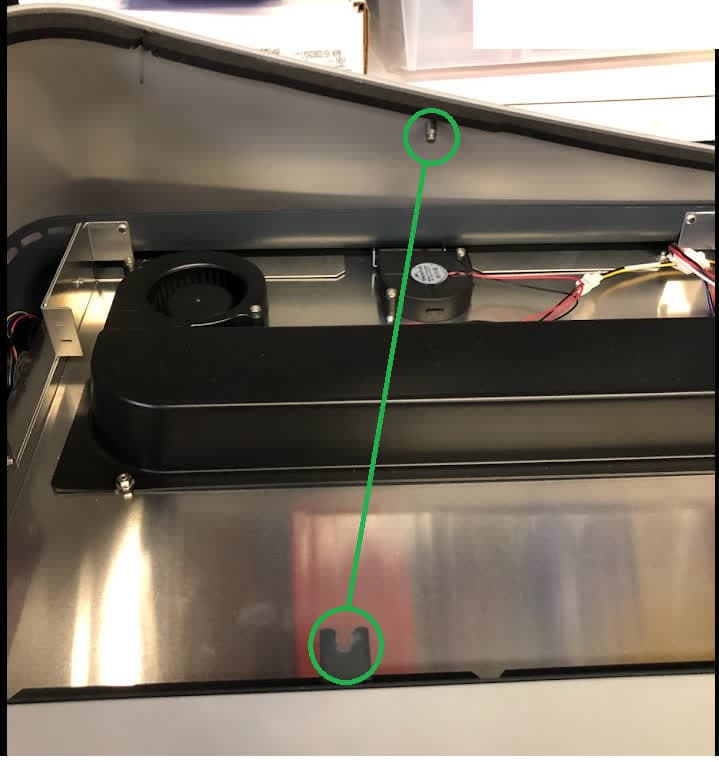
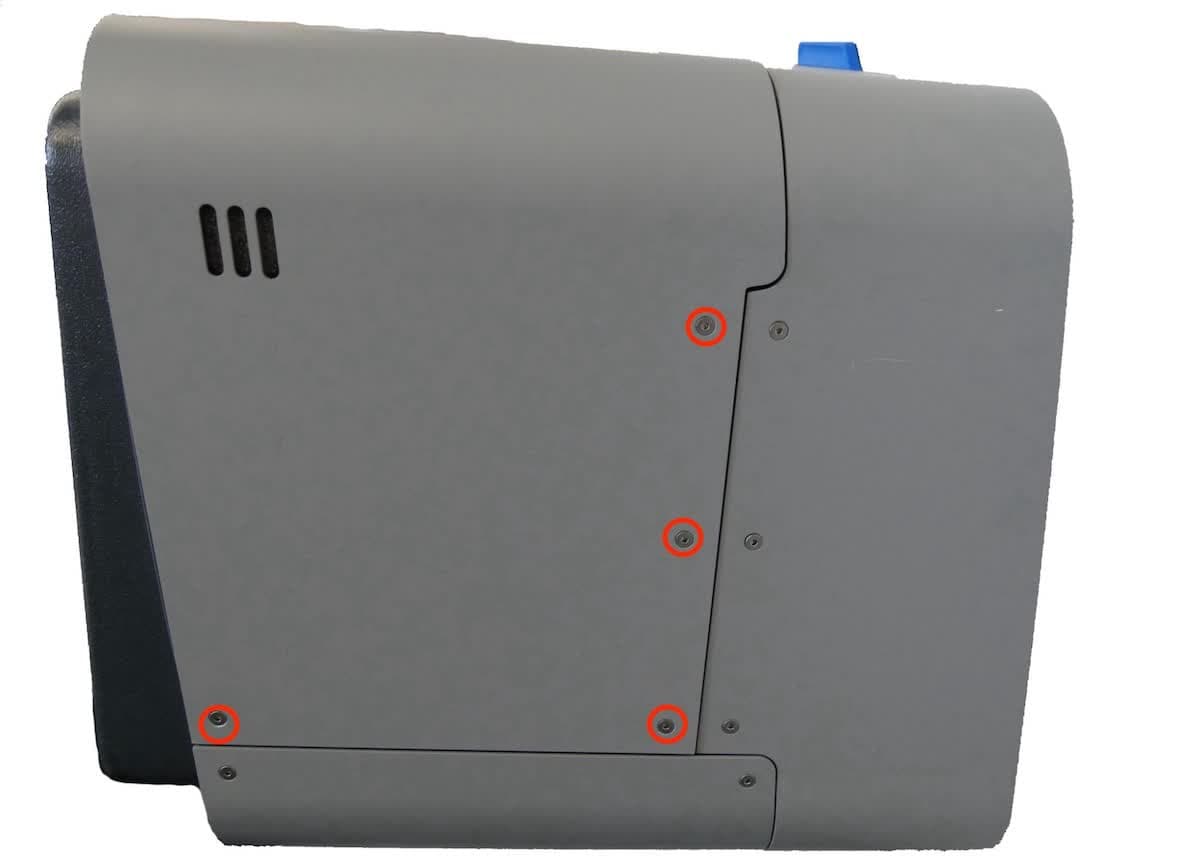
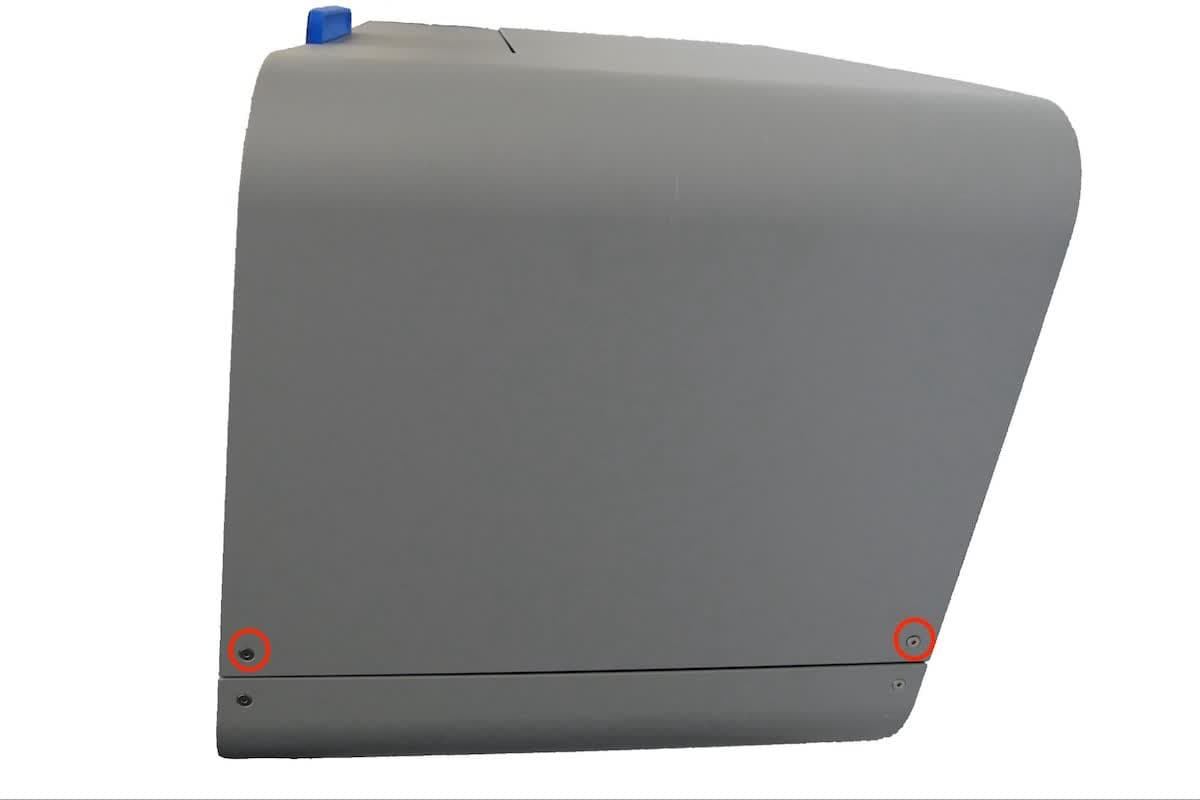
Baja la carcasa superior hasta que esté encima de la Form Cure L. Asegúrate de no pellizcar ningún cable entre la carcasa y el chasis de la máquina. Desliza la carcasa superior hacia la parte frontal de la máquina para engancharla en su sitio.
Asegúrate de alinear los dos agujeros para tornillos de la parte derecha de la máquina y los cuatro tornillos de la parte izquierda de la máquina en la carcasa superior con los correspondientes agujeros para tornillos del chasis de la máquina.
Paso 2: Asegura los tornillos de la derecha de la carcasa superior
Utiliza una llave Allen de 2,5 mm para volver a instalar los dos tornillos del lado derecho de la carcasa superior. Apriétalos hasta que estén ajustados.
Paso 3: Asegura los tornillos de la izquierda de la carcasa superior
Utiliza una llave Allen de 2,5 mm para volver a instalar los cuatro tornillos del lado izquierdo de la carcasa superior. Apriétalos hasta que estén ajustados.
Finalización de la reparación
Resumen: Después de reemplazar el conjunto de la pantalla, enciende la máquina y realiza las comprobaciones finales.
Paso 1: Conecta los cables de red
Conecta los cables Ethernet y USB a la unidad.
Paso 2: Enciende la máquina
Conecta el cable de alimentación a la Form Cure L y a la toma de corriente. Coloca el interruptor de la parte posterior de la unidad en la posición ON (ENCENDIDO) para encender la máquina.
Paso 3: Probar la reparación
Supervisa la máquina mientras se enciende y comprueba que la pantalla funciona con normalidad. Prueba a realizar varias acciones, como cambiar los ajustes o iniciar un ciclo de poscurado. Contacta con el servicio de asistencia de Formlabs o con tu revendedor autorizado para compartir los resultados del procedimiento.