
We were blown away when we first saw the incredibly life-like insects by Austrian artist and model-maker Klaus Leitl posted on our forums. His insect models—printed on the Form 1+ SLA 3D Printer—are scaled some 30 times, with some measuring up to 53 inches (135cm) long, and comprised of up to 22 printed parts.
In the following interview, he shares his techniques on achieving his beautiful, showcase-quality prints on the Form 1+.
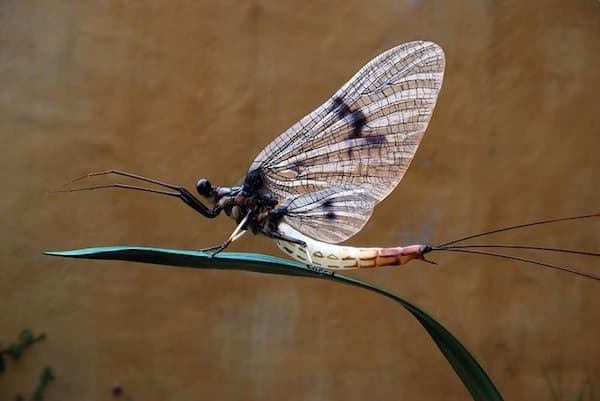
 Mayfly; Ephemera danica; Length 135 cm including antennas; without antennas 40 cm; printed in 9 parts; antennas, wings, and grass made of different materials.
How do you capture each insect in such incredible detail?
The important thing is to collect as many representations of the object as possible. I also draw sketches by hand using a binocular microscope so that I can recognize special features better and present them more clearly. Hand-drawn sketches are still the best way for me to really understand a model. Then I make the model on the computer using software such as zBrush, and Lightwave.


Your models have a translucent, almost shimmering quality—do you have any tips on finishing techniques for Form 1+ users?
My post-processing techniques are very simple: I use 2k epoxy glue to glue the individual parts together as needed. I think that the 2k epoxy glue holds better than laser (or light) cured resin. I sand very little and only where necessary, for instance, around the support structures. My models don't require a lot of sanding because I remove liquid resin residues from the models in the IPA bath using a soft brush which also makes the surface a lot smoother.
The color which I apply with an airbrush (Schmincke, artists' colors) does the rest, and of course a suitable finish coat which is extremely important depending on the model. For this, I use a regular water-soluble acrylic coating (matte, satin or gloss), the same as 2K automotive paint (high-gloss or matte) or enamel varnishes. The very last step is adding hair and the final assembly of the model.

 The final insect model displayed in the exhibition, Life Under Water, in Salzburg, Austria.
What inspires you?
Nature. There is nothing better.
Why did you choose to use the Form 1+ 3D printer for your work?
I've been interested in 3D printing for a number of years. But the price was much too high for the ordinary user. Since I was following the developments on the market, the Form 1 caught my attention on Kickstarter. I thought to myself: “If the printer delivers on its promises, it would be useful for many of my projects.” The transparent printing material was also especially important for me. So I became a Kickstarter backer. At the same time, I started to learn the inevitable zBrush software. At the end of June, I upgraded from the early-stage Form 1 to the Form 1+.

 Net-winged-midges-larva - 24 cm; 14 printed parts
How does production using the Form 1+ compare to more conventional methods of model-making?
Overall, the production time is considerably shorter than with conventional manual methods. This is especially true of translucent models where a mold would have to be made. Since my models are usually checked by scientists, any corrections can be made much more easily and quickly on the computer. This reduces the amount of work quite a bit.
I can also print the models again anytime without much effort, even in a different size. This is the great advantage of desktop 3D printing. I can build a model on the computer and print it out multiple times in different shapes and sizes thereby creating completely new, awesome, and impressive sceneries which would have been much more expensive or even impossible with conventional methods.
 _
_
Finally: any tips for how to optimize prints on the Form 1+?
Since I’ve been working with the Form 1+, any misprints have been my own fault. When you use a new resin tank, run a small test print so that you can adjust the build platform precisely. It is important to check the model very carefully for any overhangs that may not have a support structure. In locations with a “suction cup effect,“ it is absolutely necessary to provide small air vents.
Make sure the orientation is correct. When printing, use the smallest possible wall thickness and make a hollow print, if possible. And it is very important to perform the cleaning and maintenance routines after each printing. (Filter the plastic resin and mix well, let the silicone layer breathe and check optical quality, examine mirrors for dust; after filling the resin tank, wait 30 minutes until most of the air bubbles are gone). But you also find all these suggestions on the Support pages and in the Forum.
 _
_