
Despite a move from the drawing board to digital screens, physical architectural models still play a significant role in helping architects visualize blueprints.
3D printing technologies help bridge the gap between digital and physical worlds and empower architects and model makers to create high-precision architectural models quickly and cost-effectively directly from digital drawings.
This guide provides comprehensive information about using 3D printing to produce architectural models, the different 3D printing processes for architecture, and the workflow for creating 3D printed models from architectural computer-aided design (CAD) software.
Book a Free Consultation
Get in touch with our 3D printing experts for a 1:1 consultation to find the right solution for your business, receive ROI analyses, test prints, and more.
3D Printing Architectural Models: A Guide to Modeling Strategy and Software Workflow
This white paper covers how to make smart modeling decisions, from choosing scale to designing for assembly to post-processing, and how to use these strategies in common software ecosystems.
Why 3D Print Architectural Models?
Since the age of the Pharaohs, architectural models have served as physical representations during structures’ development to help sell a project, support fundraising efforts, and solve construction challenges.
Traditionally, model-making is a manual craft that involves working with materials such as wood, ceramic, cardboard, or clay, which can be extremely time-consuming and repetitive. Architecture studios and practices today have access to a wider range of tools, including CNC milling machines, laser cutters, and 3D printers that can reduce labor needs and speed up the workflow.
Modern 3D printing processes provide architects and model makers with the means to revolutionize how models are made. They do this by:
-
Speeding up the architectural model making process.
-
Translating CAD drawing directly into physical 3D models with a high level of precision.
-
Developing intricately designed parts that’d be hard or impossible to produce by hand.
-
Simplify communication and showcase specific areas that would be hard to convey through conventional 2D drawings.
-
Creating more design iterations at reduced production costs.
For example, model makers Renzo Piano Building Workshop (RPBW), founded by the Pritzker Prize laureate architect, use an SLA 3D printer to quickly develop and fabricate accurate models.
“Our models change every day or even every hour. Because the architects change the project very quickly, most of the time, we don't have enough time to do it by hand. Therefore, we have to find a way to do it quicker,” said Francesco Terranova, model maker at RPBW.
3D printers can create models within a few hours and even operate overnight to save time. “The good thing is that we can launch the printer in the night, and when we come back in the morning, we find the model done. This way, we don't lose time during the day,” said Mr. Terranova.
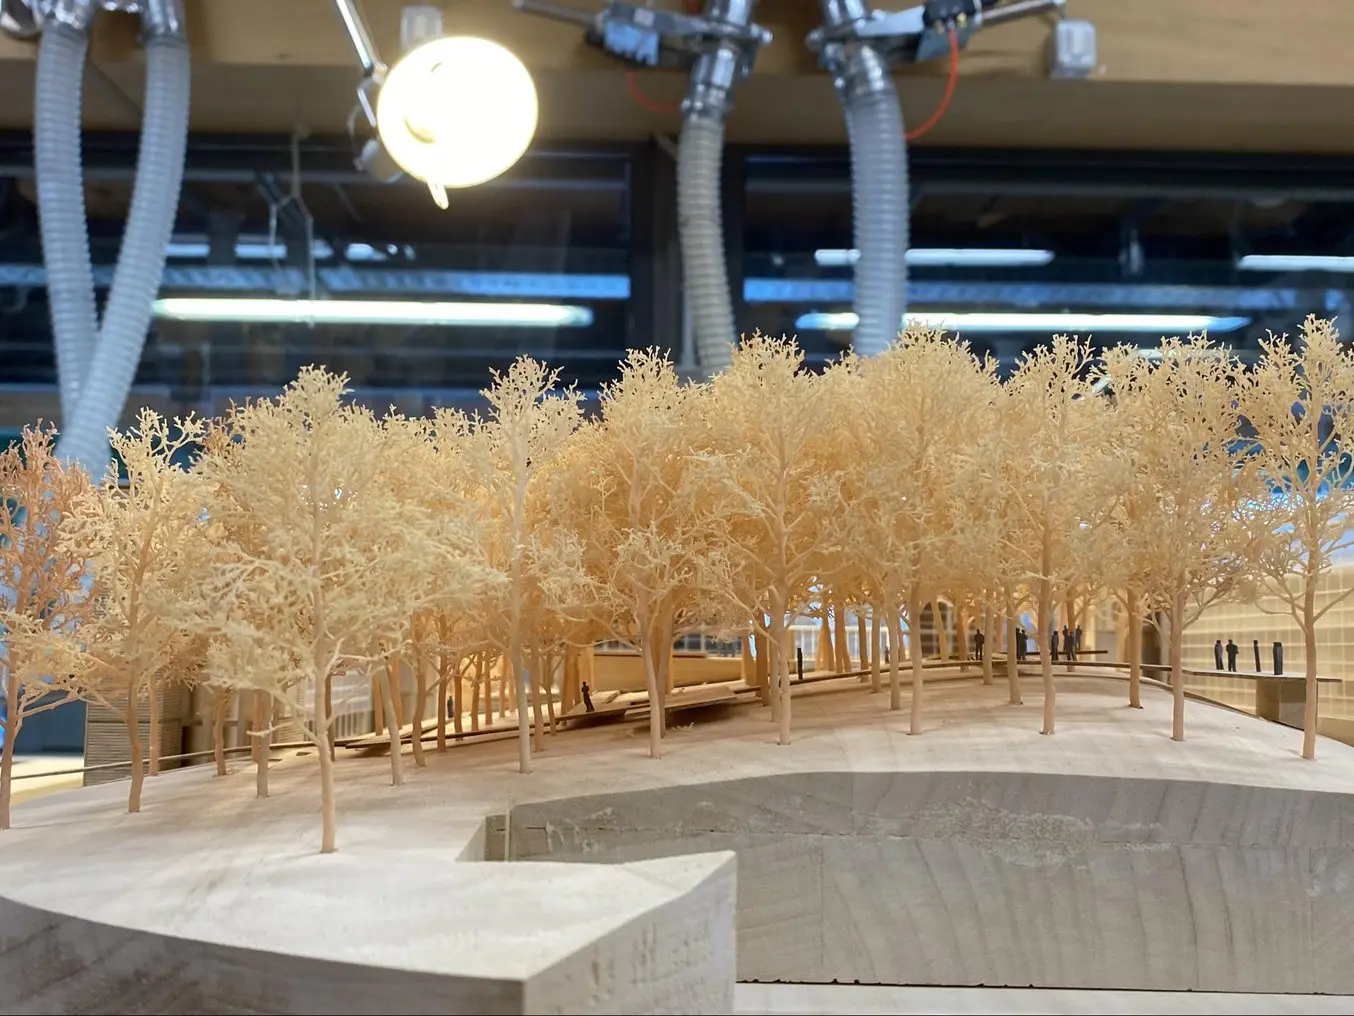
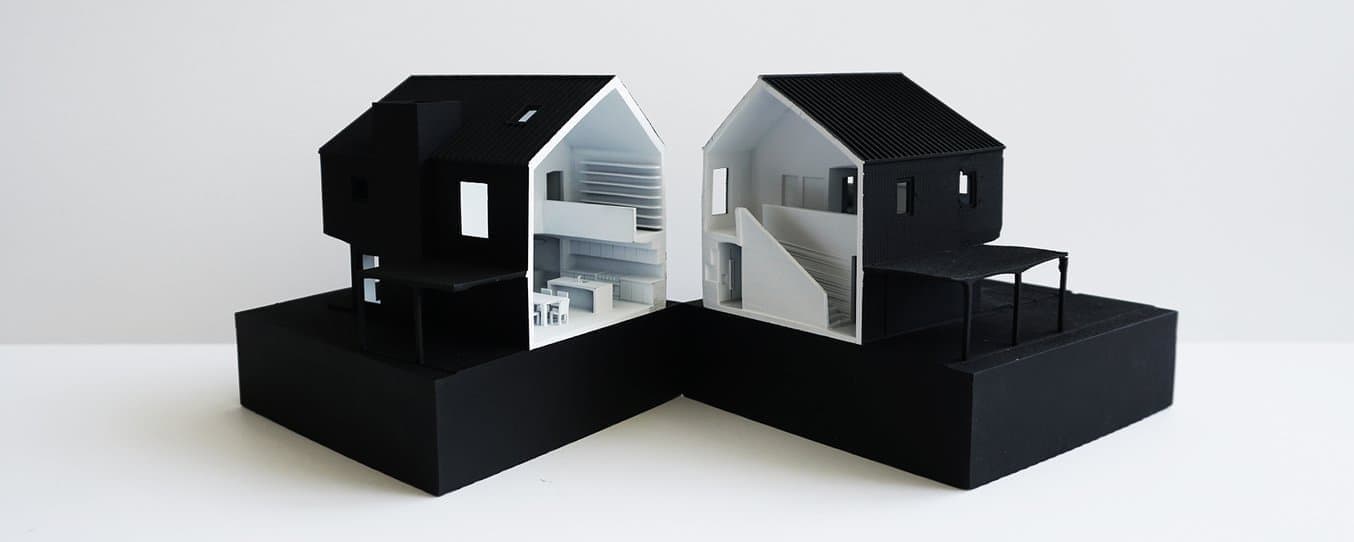
3D printing in architecture is ideal for intricate parts—the trees on this model were 3D printed on a Formlabs SLA 3D printer.
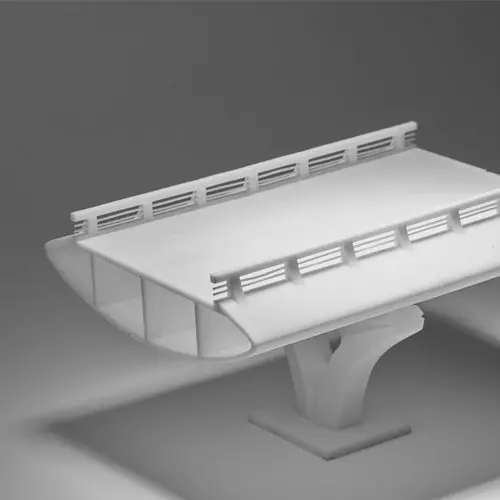
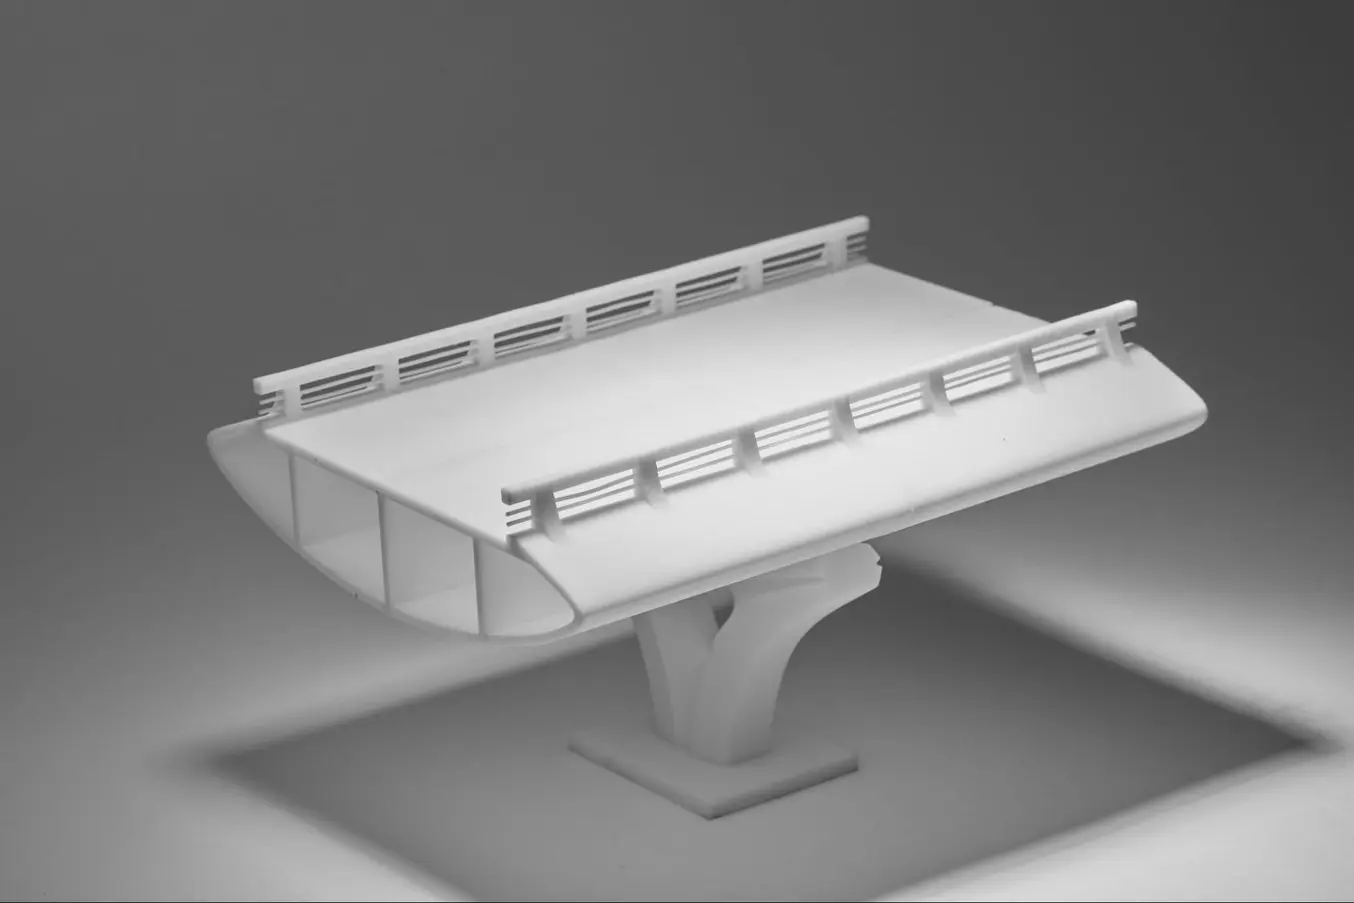
3D printing can be used to produce architectural models of entire buildings, but also in combination with other tools and processes. RPBW’s model builders may use CNC machining or laser cutting to produce the base parts of their architectural models and a 3D printer to develop more complex or intricate components like stairs, trees, spheres, and curved surfaces, which would be time-consuming to manufacture by hand. For example, the RPBW team 3D printed the complex joints of the columns for the model of the new San-Giorgio motorway bridge in Genoa that has recently replaced the Morandi bridge that collapsed in 2018. This combination of 3D printing alongside traditional manufacturing solutions speeds up the creative process and increases the accuracy levels of architectural models.
One of the main goals of 3D architecture models is to simplify communication between architects and to make it easier to showcase plans to clients. Los Angeles-based design firm Laney LA’s projects are mostly custom homes, so communicating the scale of a home or structure is particularly important. Architect Paul Choi and his team use 3D printing to showcase specific areas of the project that can be more complicated to convey through conventional 2D drawings.
Laney LA’s architects use 3D printing to create models that allow them to view the project from a fresh perspective while simultaneously providing vantage points.
“It's fun to always try to depict a certain idea about the project and isolate that through the model, whether it's a certain room or a space that we want to highlight through a section cut of the model, or even the topography of the site,” Choi said.
RPBW’s model makers use a Form 3 SLA printer to speed up the production of scale models.
Choosing a 3D Printer for Architectural Models
When it comes to 3D printing architectural models, not all methods are created equal. It is important to choose the right printing technology for specific use cases.
The most popular 3D printing technologies for architectural models include stereolithography (SLA), fused deposition modeling (FDM), selective laser sintering (SLS), and binder jetting.
Stereolithography (SLA)
Stereolithography was the world’s first 3D printing technology, invented in the 1980s, and is still one of the most popular technologies for professionals. SLA resin 3D printers use a laser to cure liquid resin into hardened plastic in a process called photopolymerization.
SLA parts have the highest resolution and accuracy of all plastic 3D printing technologies. SLA parts also offer the smoothest surface finish that is easy to paint.
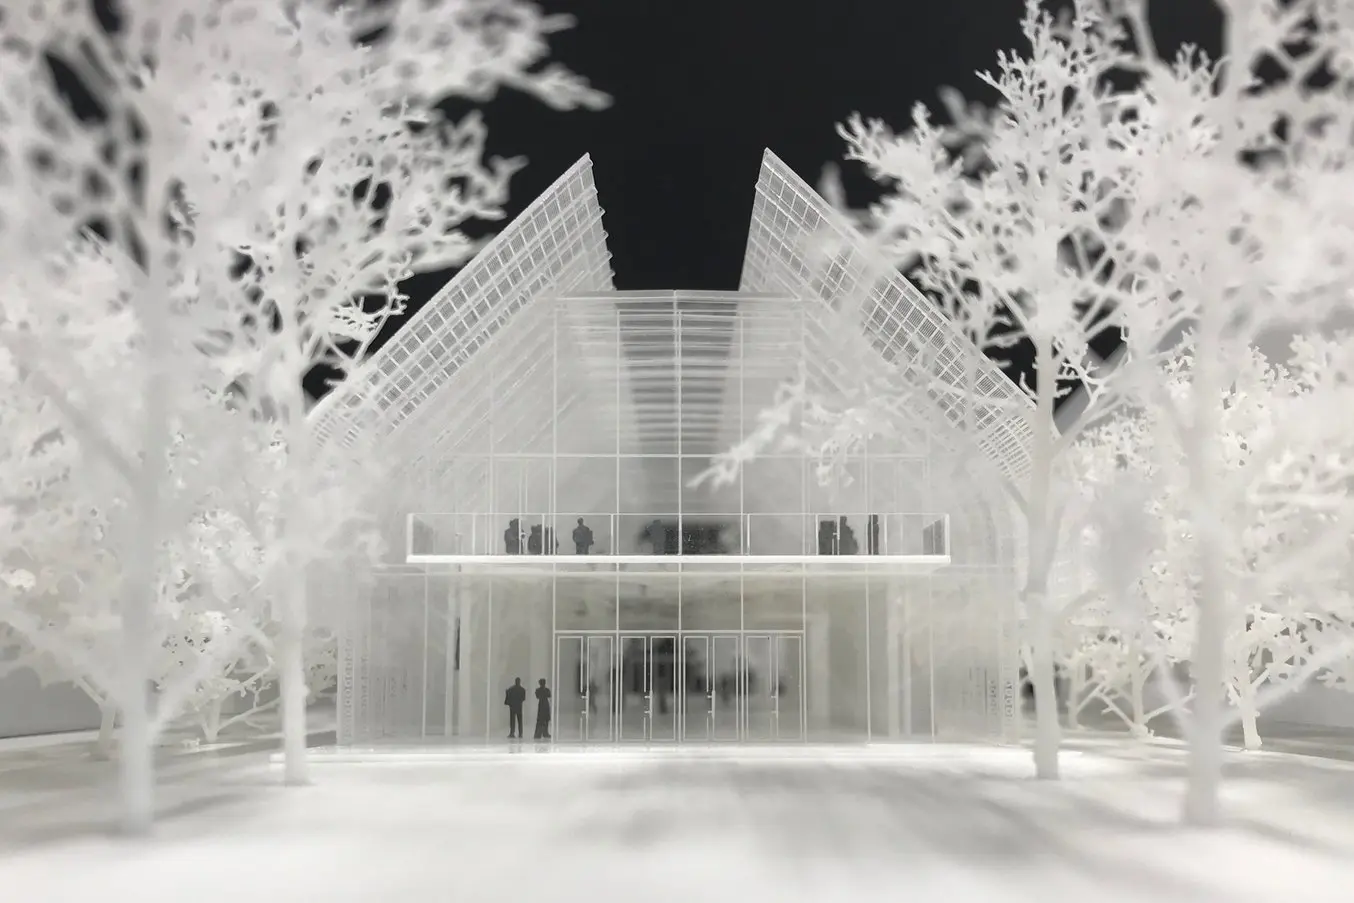
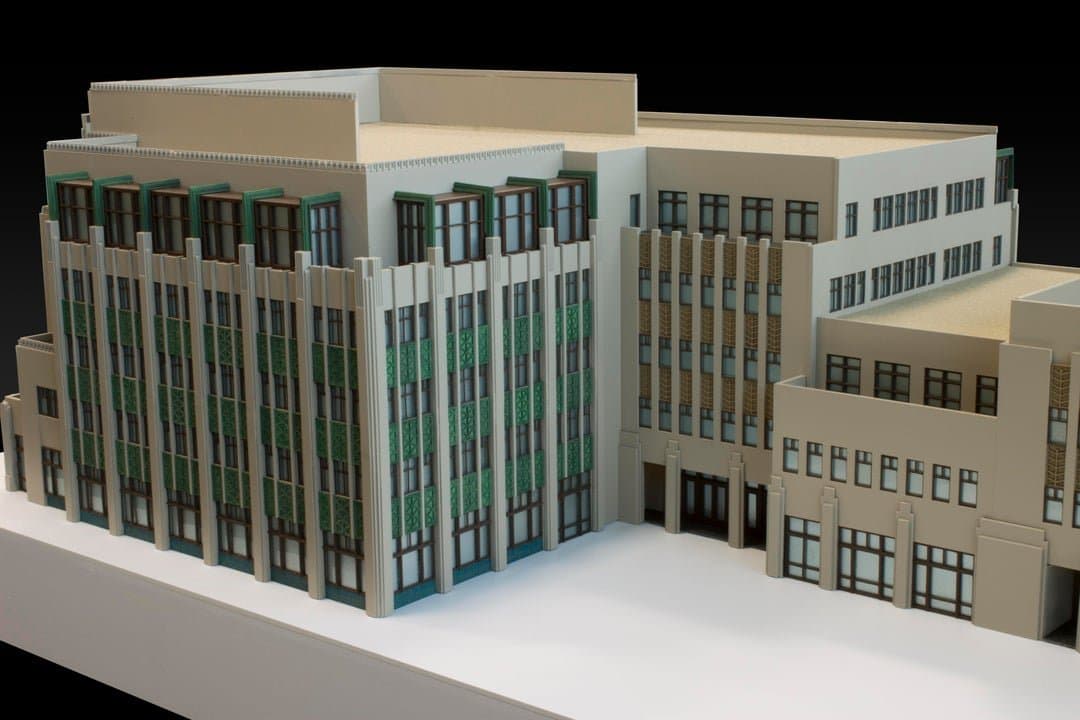
SLA parts have sharp edges, a smooth surface finish, and minimal visible layer lines that are ideal for highly detailed presentation models. This model was printed on a Form 3 SLA printer.
SLA is a great option for highly detailed presentation models for presenting concepts and ideas to clients or the public.
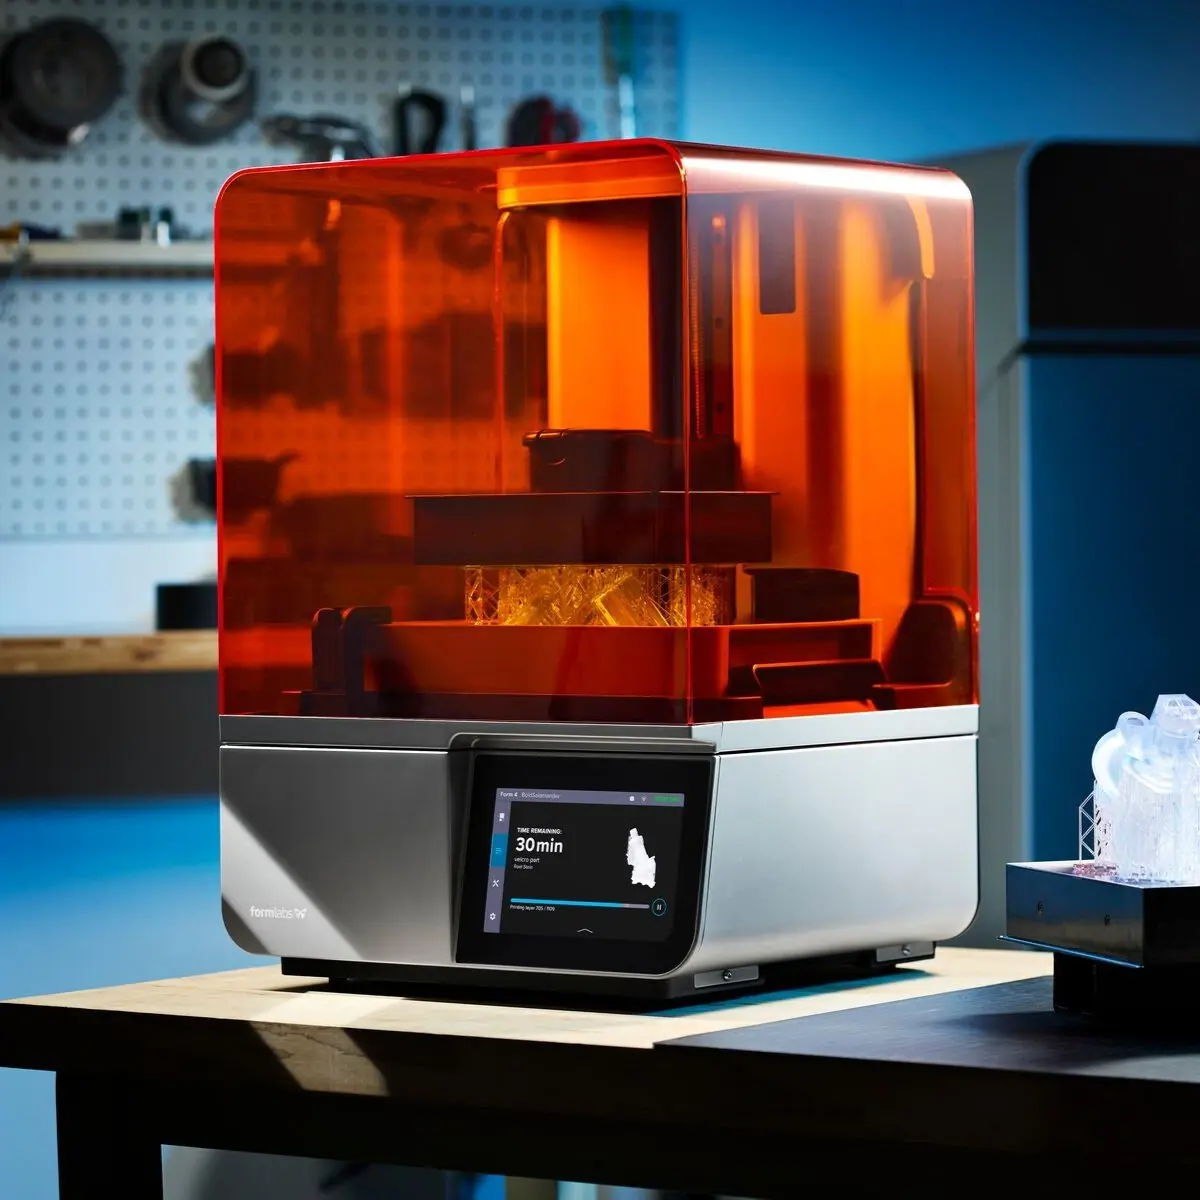
Thanks to fast-printing materials like Fast Model Resin, SLA is also the fastest 3D printing process for most parts. While desktop SLA printers offer a more compact build capacity, with large-format 3D printers like the Form 4L, architects and model makers can create truly large-scale models.
Request a Free 3D Printed Architecture Model Sample Part
See and feel Formlabs quality firsthand. We’ll ship a free sample part to your office.
Fused Deposition Modeling (FDM)
Fused deposition modeling (FDM), also known as fused filament fabrication (FFF), is the most widely used form of 3D printing at the consumer level, fueled by the emergence of hobbyist 3D printers. FDM 3D printers build parts by melting and extruding thermoplastic filament, which a printer nozzle deposits layer by layer in the build area.
FDM has the lowest resolution and accuracy from the four 3D printing processes and is not the best option for printing complex designs or parts with intricate features. It is ideal for basic concept design models produced during the initial stages of design as it can create relatively large models fast and at a low cost.

FDM printers struggle with complex designs or parts with intricate features (left), compared to SLA printers (right).
Selective Laser Sintering (SLS)
Selective laser sintering is the most common additive manufacturing technology for industrial applications. SLS 3D printers use a high-powered laser to fuse small particles of polymer powder. The unfused powder supports the part during printing and eliminates the need for dedicated support structures.
SLS printing is ideal for complex geometries, including interior features, undercuts, thin walls, and negative features. Parts produced with SLS printers have excellent mechanical characteristics that make them suitable also for structural parts.
SLS is ideal for complex geometries and intricate details. The details on this model were printed on a Fuse 1 SLS printer.
Binder Jetting
Binder jetting 3D printing technology is similar to SLS printing but uses a colored binding agent to bond powdered sandstone material instead of heat. Binder jetting printers can produce vivid, full-color 3D architecture models.
Parts produced with binder jetting have a porous surface and are very brittle, which means that this process is recommended only for static applications.
Binder jetting printers can produce vivid, full-color architecture models.
Compare 3D Printers for Architecture
| Stereolithography (SLA) | Fused Deposition Modeling (FDM) | Selective Laser Sintering (SLS) | Binder Jetting | |
|---|---|---|---|---|
| Resolution | ★★★★★ | ★★☆☆☆ | ★★★★☆ | ★★★☆☆ |
| Accuracy | ★★★★★ | ★★★★☆ | ★★★★★ | ★★★☆☆ |
| Surface finish | ★★★★★ | ★★☆☆☆ | ★★★★☆ | ★★★☆☆ |
| Ease of use | ★★★★★ | ★★★★★ | ★★★★☆ | ★★★★☆ |
| Complex designs | ★★★★☆ | ★★★☆☆ | ★★★★★ | ★★★☆☆ |
| Build volume | Up to 300 x 335 x 200 mm (desktop and benchtop 3D printers) | Up to 300 x 300 x 600 mm (desktop and benchtop 3D printers) | Up to 165 x 165 x 300 mm (benchtop industrial 3D printers) | Up to 254 x 381 x 203 mm (industrial 3D printers) |
| Price range | Professional desktop printers start at $3,500, large-format benchtop printers are available from $11,000. | Budget printers and 3D printer kits start at a few hundred dollars. Higher quality mid-range desktop printers start around $2,000, and industrial systems are available from $15,000. | Benchtop industrial systems start at $18,500, and traditional industrial printers are available from $100,000. | Binder jetting 3D printers are expensive industrial machines, with prices ranging from $30,000 to $100,000+. |
How To 3D Print Architectural Models
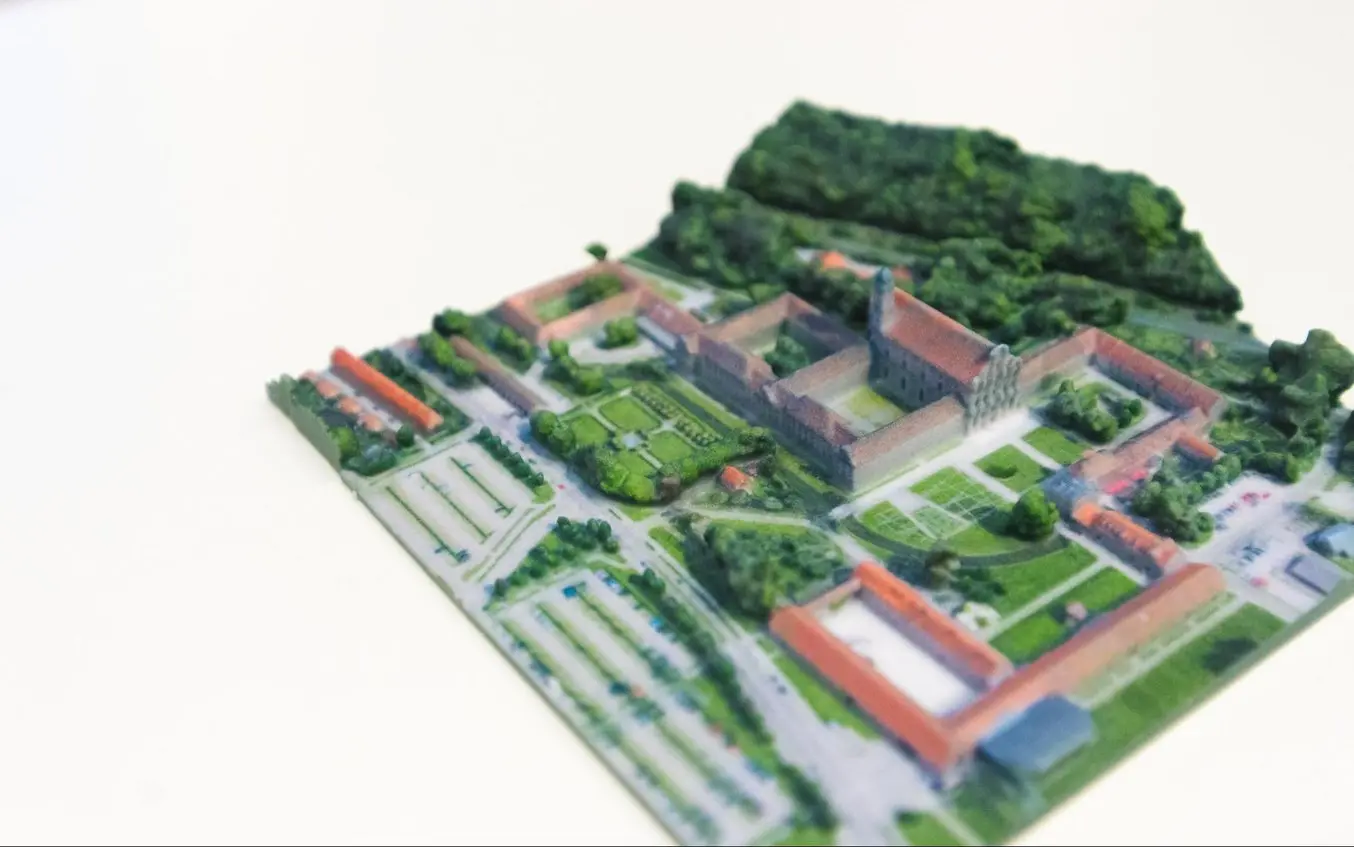
A team from the Institute of Architecture at the Hochschule Mainz - University of Applied Sciences reconstructed the medieval german cities of Worms, Speyer, and Mainz with large-scale 3D printed models.
Most architects today already work in the digital space, using architectural CAD software like BIM (Revit and ArchiCAD), Rhino 3D, or SketchUp to create digital CAD designs. However, these digital files cannot always be used to create the physical scale models directly with 3D printing.
A successful transition from a CAD model to a 3D printable file relies on a baseline understanding of design for 3D printing, how regular modelmaking constraints relate to preparing a file for 3D printing, and how to approach and make smart modeling decisions, from choosing the right scale to designing for assembly to post-processing.
1. Modeling Strategy
Architectural models are conventionally assembled with a variety of materials and components. 3D printers help fuse these components into as few individual parts as possible, but some assembly is still required for two reasons:
-
The constraints of the build volume: Unless you’re using a large-format 3D printer such as the Form 4L, you might need to divide the model into multiple parts to fit it inside the build volume of the 3D printer.
-
The need to show interior detail or materiality: Certain models require components that come apart to reveal more information about the design.
The size and geometry of different components within an architectural model are key considerations when preparing an architectural model for 3D printing. Generally, large models, models with multiple components, and models with intricate features are split into 3D printable components for assembly. Parts can then be easily joined together through chemical adhesion or mechanical assembly; the high accuracy of the prints with technologies like SLA and SLS ensures that the parts join together seamlessly.
Getting the best results requires applying modeling strategies for assembly, including:
-
Splitting models by seam: Splitting models or components by the seams create more manageable components that are easily assembled once printed. The simplest method for splitting a model is with a straight cut. Another approach is to add features to your design that will allow the prints to align themselves.
- Splitting models by component: Some models lend themselves to being split up by their structural components or broken down by the program into a kit of parts. Print these components separately and then assemble them with mating features, or simply print one component of the entire building separate from the rest.

Since each housing unit followed the same design, it made sense to simply print one removable unit that would allow the client to understand the generic unit typology. Model by Stanley Saitowitz | Natoma Architects Inc.
2. Software Workflow
Advancements in CAD technology have drastically simplified the process of developing 3D printable files. Modern CAD platforms have dedicated 3D printing modules to help architects convert a CAD design into a printable model. However, do remember that you are still working at a 1:1 scale–some quick conversions will be required to achieve the correct dimensions at the print scale.
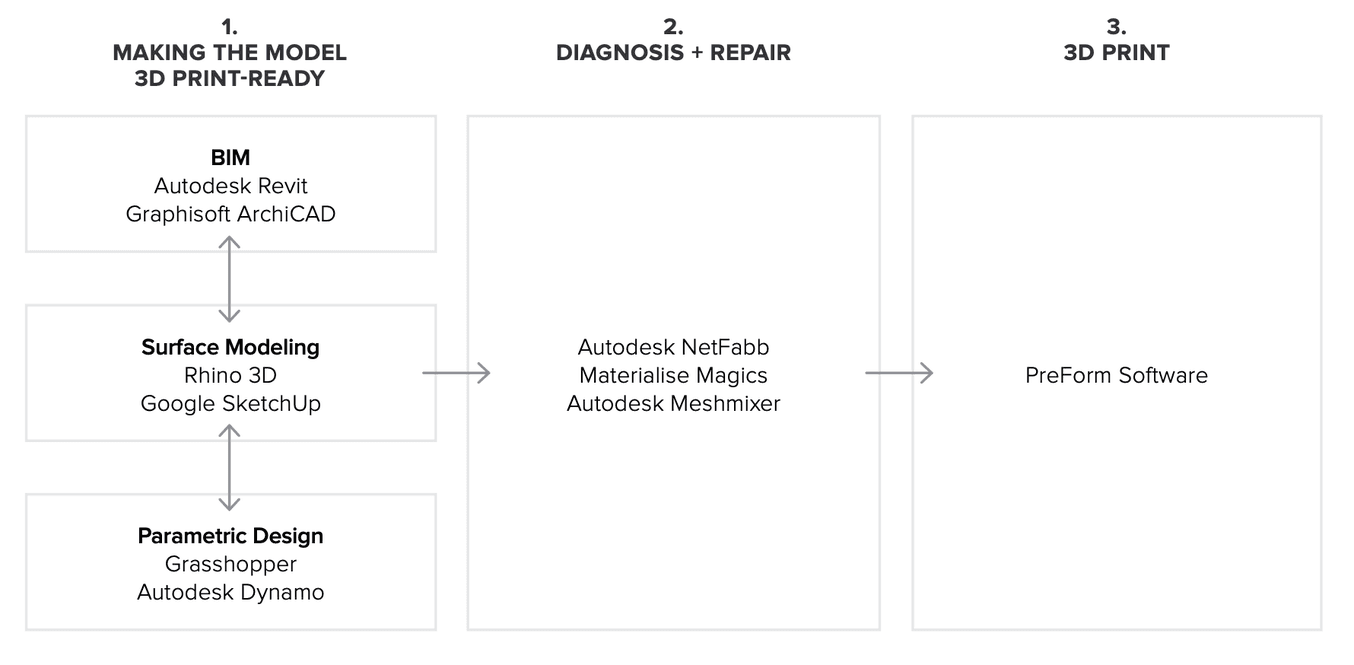
Developing architectural models require some important considerations depending on the CAD platform used. These CAD-specific considerations include:
-
BIM Workflow: Developing 3D printable models with BIM software that leverages parametric modeling such as Autodesk Revit or Graphisoft ArchiCAD requires some component management. Components such as ductworks, double glazed windows, and HVAC systems do not translate in 3D prints and must be removed, while other parts such as doors, windows, walls, slabs need to be thickened.
-
Surface Modeling Workflow: This workflow is often an easier approach, starting from 2D drawings solely with the intention to 3D print. It involves exporting a simplified drawing, scaling it down, and extruding and trimming until there’s an external shell.
Download our white paper for step-by-step workflows in common architectural CAD software ecosystems.
3. Printing and Post-processing an Architectural Model
The next step in 3D printing architectural models is transcribing your digital 3D model into a language your 3D printer understands. Accomplishing this requires the use of slicing or print preparation software, such as PreForm. Whether you’re new or experienced, slicing software is generally intuitive to use. The software highlights details such as walls that may require strengthening, unsupported areas, and closed volumes that affect the structure of the 3D print, which can be addressed before printing. Using the software, you can also optimize settings such as resolution, build platform position, and support structures.
Materials play an important role in conveying the underlying concept of a design. It isn’t always imperative to simulate the exact color and texture of a material, but it can help to distinguish between different materials. Splitting a model by its components makes it possible to display materiality, as parts can be produced with various 3D printing materials, or individually painted with different colors.
Post-processing differs depending on your specific 3D printing technology, but generally includes sanding, bonding, and painting models.
Here’s an overview by 3D printing process:
| Post Processing Technique | Stereolithography (SLA) | Fused Deposition Modeling (FDM) | Selective Laser Sintering (SLS) | Binder Jetting |
|---|---|---|---|---|
| Sanding | Light sanding is recommended to remove support marks. | The lower quality of FDM prints means sanding is required to get a smooth finish. | No sanding is required due to the quality of the finished parts. | No sanding is required. |
| Bonding | Bonding of SLA components is done with super glue or liquid resins. | FDM components can be assembled using adhesives such as super glue. | SLA components can be assembled using adhesives such as super glue. | Components printed using binder jetting printers can be bonded using super glue. |
| Priming and painting | SLA components can be painted to achieve the desired finish. | FDM components can be painted to achieve the desired finish. | SLS components can be painted to achieve the desired finish. | No painting is required for full-color parts. |
Get Started with 3D Printing Architectural Models
Professional SLA and SLS 3D printers empower architects with the tools to create accurate and attractive 3D architectural models. Choose the Form 4 for a compact solution that can fit on a desktop, the Form 4L for high resolution large-format models, and the Fuse 1 for structural parts and the most complex shapes.
Download our white paper for an in-depth overview of modeling strategies, step-by-step workflows in common architectural CAD software ecosystems, as well as printing and post-processing recommendations.
Not sure which 3D printing solution fits your business best? Book a 1:1 consultation to compare options, evaluate ROI, try out test prints, and more.