
The Future of Props and Make-Up Effects: 3D Printing Large Props and Molds With the Form 3L for “Raised by Wolves” Season 2
In 2020, we interviewed Jaco Snyman, founder of award-winning practical prosthetic make-up effects and prop-making company Dreamsmith Studio, and Lead Prosthetics Designer of the sci-fi series “Raised by Wolves.” At the time, Snyman told us about his workflow to produce 3D printed molds and end-use models, displayed on-screen for the first season of the show.
The HBO Max series, created by Aaron Guzikowski and produced by Ridley Scott, centers on two androids, Father and Mother, with the mission of raising human children. The show returned for its second season in February 2022, featuring an even wider range of props and prosthetics made with the help of 3D printing—this time printed on a fleet of large-format Form 3L stereolithography (SLA) printers.
“Raised By Wolves” Season 2 Teaser
In this article, written by Snyman and his team, they show us how Dreamsmith used the Form 3L to print large molds and models to bring aliens, androids, and other props to life in the apocalyptic world of “Raised by Wolves.”
Revolutionizing Props and Make-Up Effects: Five Case Studies From “Raised by Wolves” Season 2
3D printing promises to be a game-changer in the fast-paced and deadline-driven world of the film industry. Not only does it unlock all the benefits of a digital workflow, reliably and accurately reproducing those assets in the physical world, but it also frees up the workforce so that they can focus on more creative tasks. On paper, this is nothing short of revolutionary and we were eager to incorporate 3D printing into our workflow. Unfortunately, like all emergent technologies, there were some growing pains.
For 3D printing to work for us we needed three specific things. First, we required it to match the details that we can achieve with traditional techniques. It also needed to reproduce these details at a big enough scale to be useful—a build volume large enough to accommodate a full human head, for example. And lastly, it had to be reliable, accurate, and easy to use. With short deadlines and budget constraints, failures and troubleshooting needed to be at a minimum.
Finding a printer that met all these requirements and that wasn’t prohibitively expensive proved extremely difficult. Printers on the market that could achieve everything at an affordable price proved unreliable, and the more reliable options were unable to achieve the detail at a scale that was useful. After a few years of trial and error, we became resigned to the fact that for the time being 3D printing would just be another tool in our arsenal and not the complete revolution we were hoping for. Then, along came the Form 3L.
The Form 3L ticked all the boxes. It has a massive 33.5 x 20.0 x 30 cm build volume with a resolution of 25 microns, all enabled by PreForm software that makes the package extremely reliable and easy to use. All this coupled with the impressive variety of resins makes the Form 3L an incredibly powerful tool, one tool that has completely revolutionized our workflow in two short years.
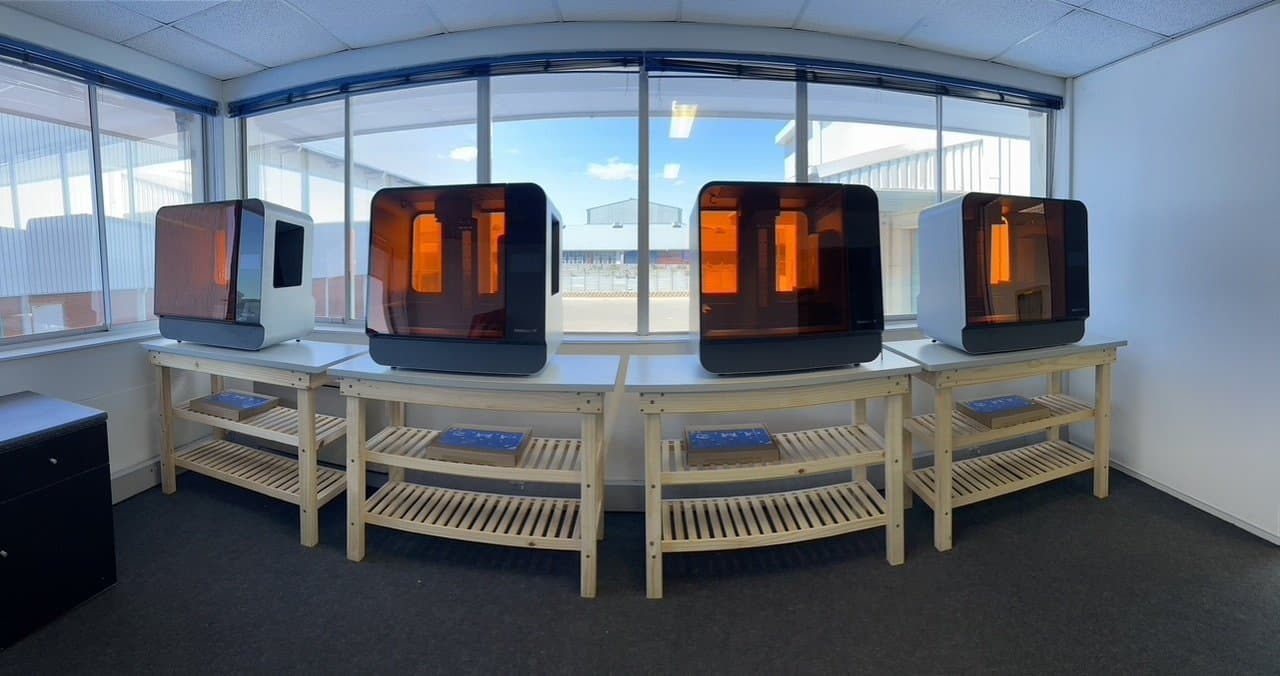
Form 3L 3D printers at Dreamsmith’s workspace in Cape Town, South Africa.
It is hard to explain exactly how much of a game-changer the Form 3L is without going into detail about how it has affected the way we approach creative problems. In the following examples, we will break down our workflow and hopefully shed some light on why we feel this particular printer is so revolutionary in our industry.
Form 3L Ecosystem Demo
Want to learn more about the Form 3L and Form 3BL ecosystem, and the new large format post-processing machines? In this demo, Kyle and Chris will expain how to navigate the Form 3L end-to-end workflow, including post-processing.
#1: Replacing Life-Casting - Actress Duplicate, Likeness Dummy
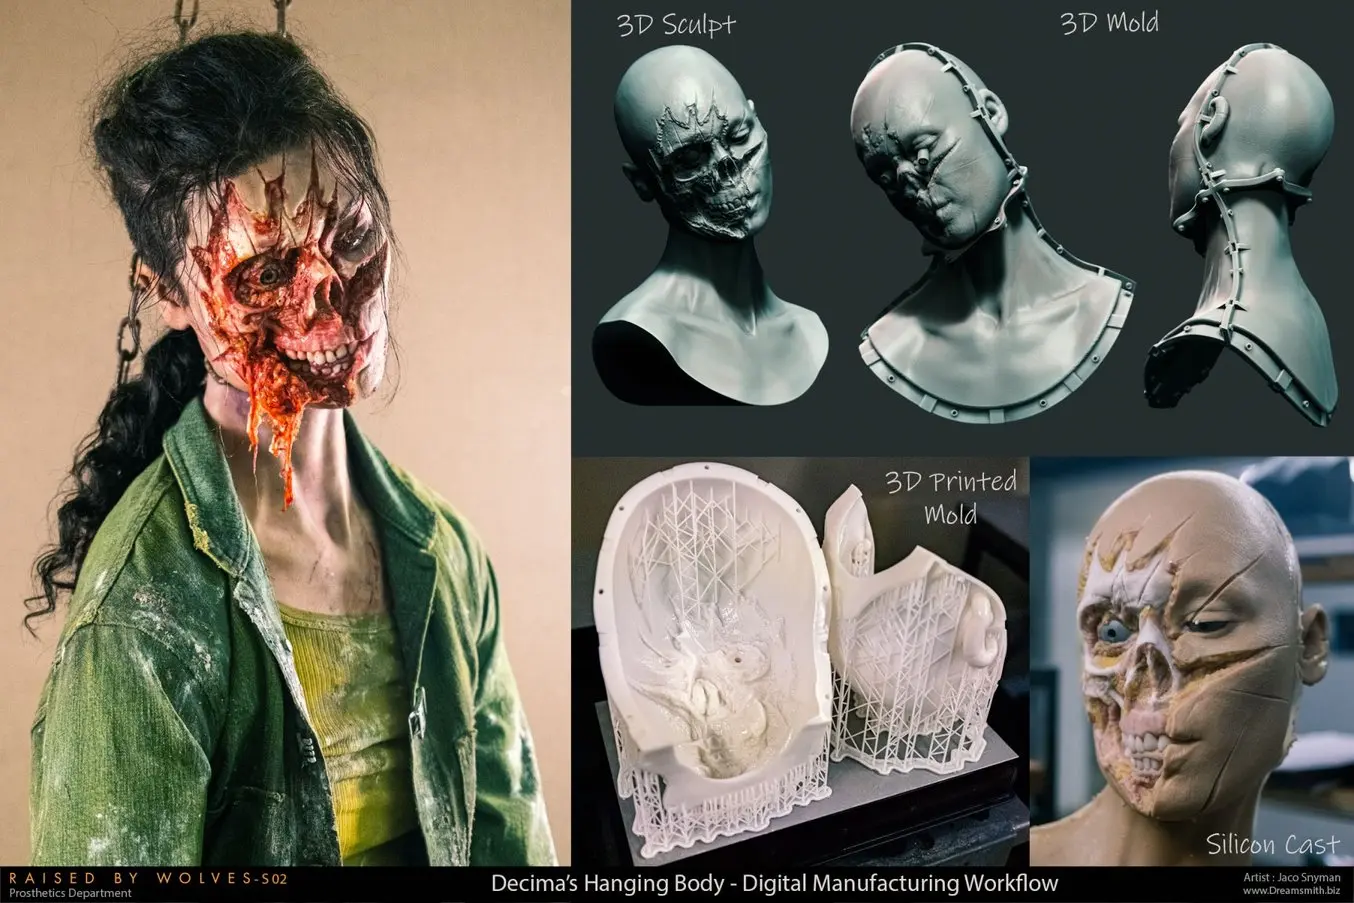
Making a hyper-realistic silicone replica of an actress’s face, with molds digitally designed and 3D printed on the Form 3L in Rigid 10K Resin.
In this example, we were tasked with creating a hyper-realistic silicone replica of an actress’s body. The catch being that she needed to be hanging from her neck with half of her face missing.
Traditionally we would make a silicone life-cast of the actress where we would physically cover her face with silicone and plaster bandage to create a disposable mold of her face. From this life-cast, we would create a clay cast on which we would sculpt the extra details required for the scene by hand. In this case, this meant elongating her neck and removing parts of her face.
This clay sculpture would then be remolded using epoxy resin and fiberglass. From this final mold, we would then create the final silicone replica head. This would have been a three-week process that would have to be overseen by at least three experienced artists and technicians—and the replica head is still just raw silicone needing to be painted, and have hair painstakingly punched in to achieve the hyper-realism required. In total, this process would have taken about a month from start to finish.
“The Form 3L can print the entire final mold of the head with enough detail for the final cast to be indistinguishable from one made with traditional techniques. This enabled us to switch to a digital pipeline, working from a highly accurate 3D scan of the actress. It eliminated the need for the invasive life-cast process, making everything far more comfortable for the actress.”
Jaco Snyman, founder of Dreamsmith Studio
We could then use ZBrush to digitally add the extra sculptural details required. This entire process is non-invasive and repeatable, and remains entirely fluid, enabling us to make big creative changes with ease as we receive feedback from the director.
We then designed the digital mold, with the large build volume of the Form 3L allowing us to split the mold up into bigger pieces for a final product with fewer seamlines. The mold was then printed overnight, and with a bit of clean-up, it was ready to be processed the following day.
Step by Step Process
This entire workflow can be done by a single person in a fraction of the time it would have taken traditionally, thus freeing up the workforce to focus on the most important step in terms of final production value—the finishing touches. This more effective workflow prevents us from rushing the final stages of the product; something that was almost always rushed because of how labor-intensive the traditional workflow used to be.
With this one example, it’s easy to see why 3D printing can be such a game-changer. We are able to work in a shorter amount of time, be more productive, and save on traditional materials and manpower. The Form 3L made our workflow faster, better, and cheaper.
#2: Creating Complex Shapes - Silicone Mask
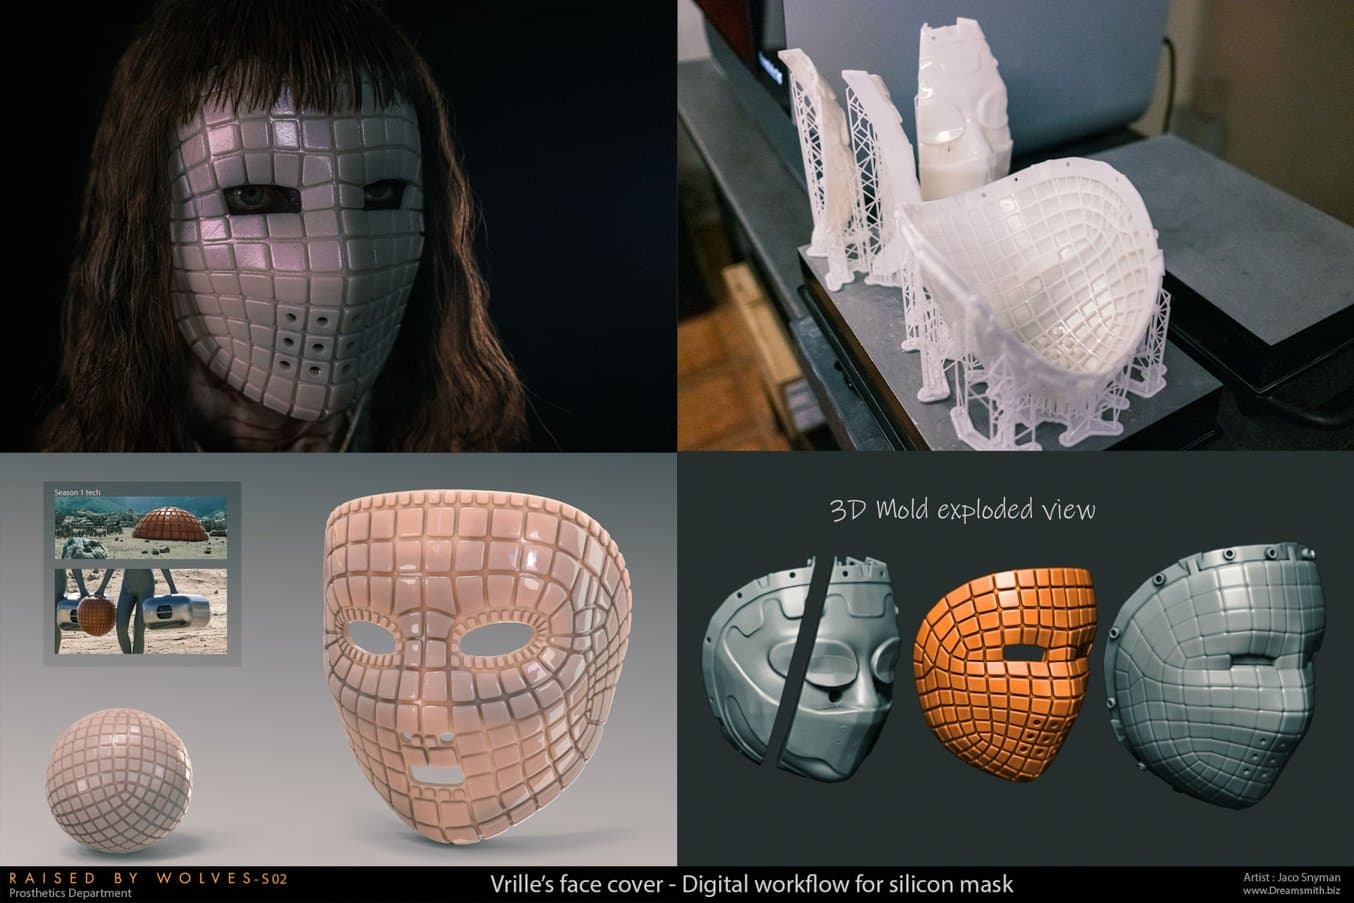
Designing and printing a complex shape and highly-detailed silicone mask with 3D printing.
There are certain design elements that greatly benefit from computer-aided design (CAD). Sometimes a brief is just impossible to create by hand or so impractical and time-consuming that it might as well be. Traditionally, we would have to rely on outsourcing these parts to a machine shop or simply passing the job on entirely. 3D printing always promised to solve these problems, but the technology had to improve to a point where the print quality and affordability were on par.
For us, the Form 3L was this improvement. We are now far less limited by traditional manufacturing techniques and can achieve far more in-house without relying on expensive outsourcing. Our biggest hurdle now is the limits of our creativity and that’s an exciting place to be!
In the example above, we had a brief that would have been very difficult to achieve without 3D printing. The Vrille Mask had two unique problems to solve.
Firstly, it needed to combine both organic and geometric detail; It needed to have a pristine outer layer of geometric shapes, all based on the organic and asymmetrical shape of the actress’s face.
Secondly, there was a material problem: The final mask had to be made from silicone, requiring the need for a mold as we are unable to print in silicone.
Step by Step Process
This specific brief exemplifies how different technological advances needed to coincide. We required a 3D scan of the actress, the software to create the digital asset and design the digital mold, and a 3D printer large and accurate enough to print the mold.
Looking at the progress breakdown above you can see that we were able to fit the entire mold onto one build plate, drastically cutting down on our print time. The advancements in printing materials also played a huge role. By printing with Formlabs Rigid 10K Resin, the final mold was extremely precise, resulting in the near-perfect final mask seen above.
Request a Rigid 10K Resin Sample 3D Print
See and feel Formlabs quality firsthand. We’ll ship a free sample part to your office.
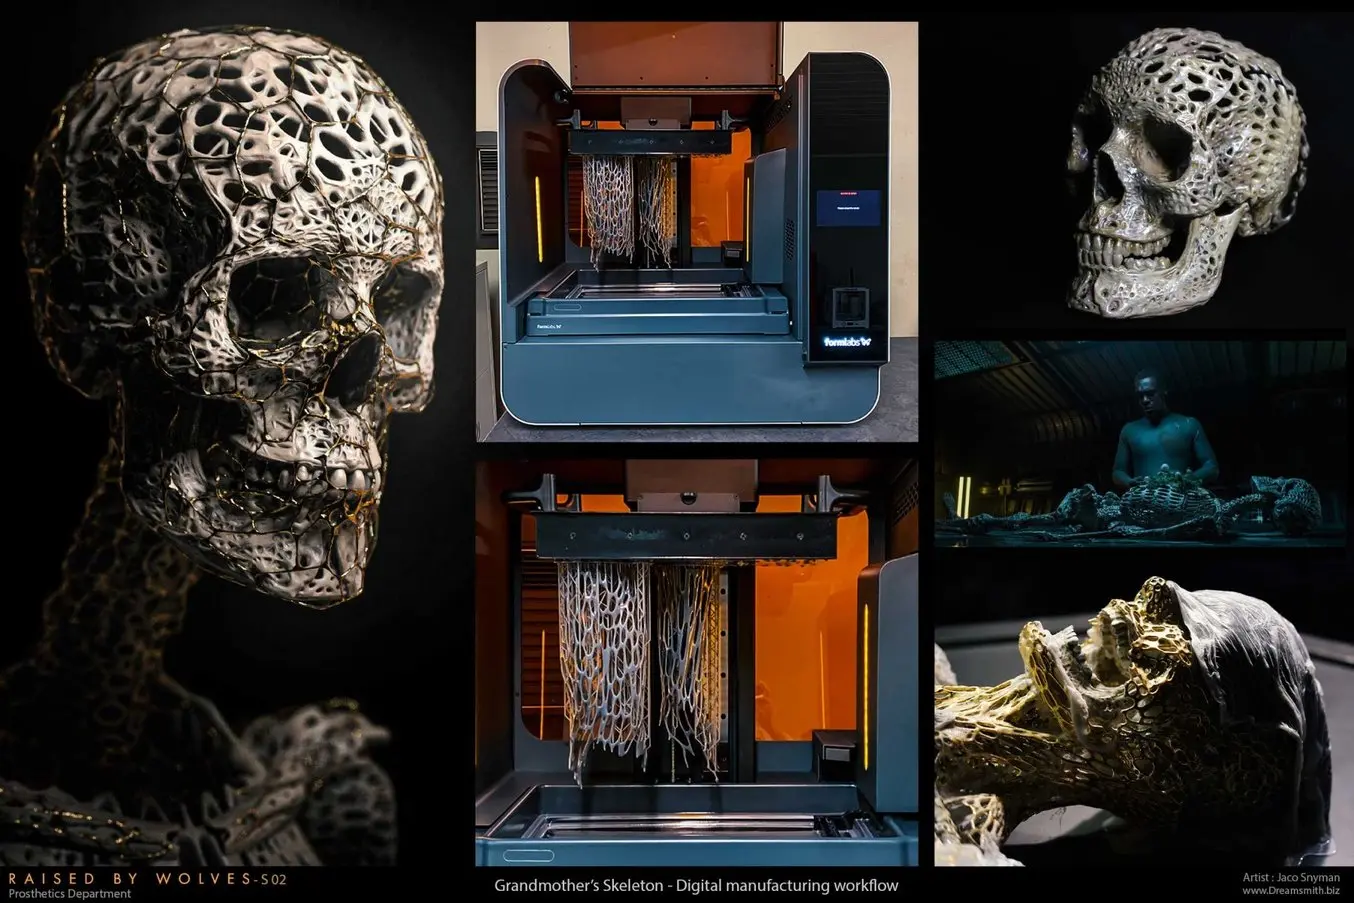
#3: Printing Impossible Shapes - Biomechanical Skeleton
A large biomechanical skeleton organic shape, 3D printed on the Form 3L.
Some designs are made easier with 3D printing and some are enabled by it entirely.
For example, the design above is of a life-size biomechanical skeleton. An intricately detailed prop with a geometric flow that would have been agonizingly difficult to sculpt out of clay and basically impossible to mold with traditional techniques.
The Grandmother Skeleton is a perfect example of a design created purely because we were able to 3D print it. Impossible shapes and interlocking gears have been printed for a while now, but what we needed was the ability to be precise at a useful scale. We needed a life-sized skeleton! The build volume of the Form 3L allowed us to print this entire prop in practical chunks at high resolution.
Step by Step Process
This is a prop that would have been practically and financially impossible to create without the use of the Form 3L.
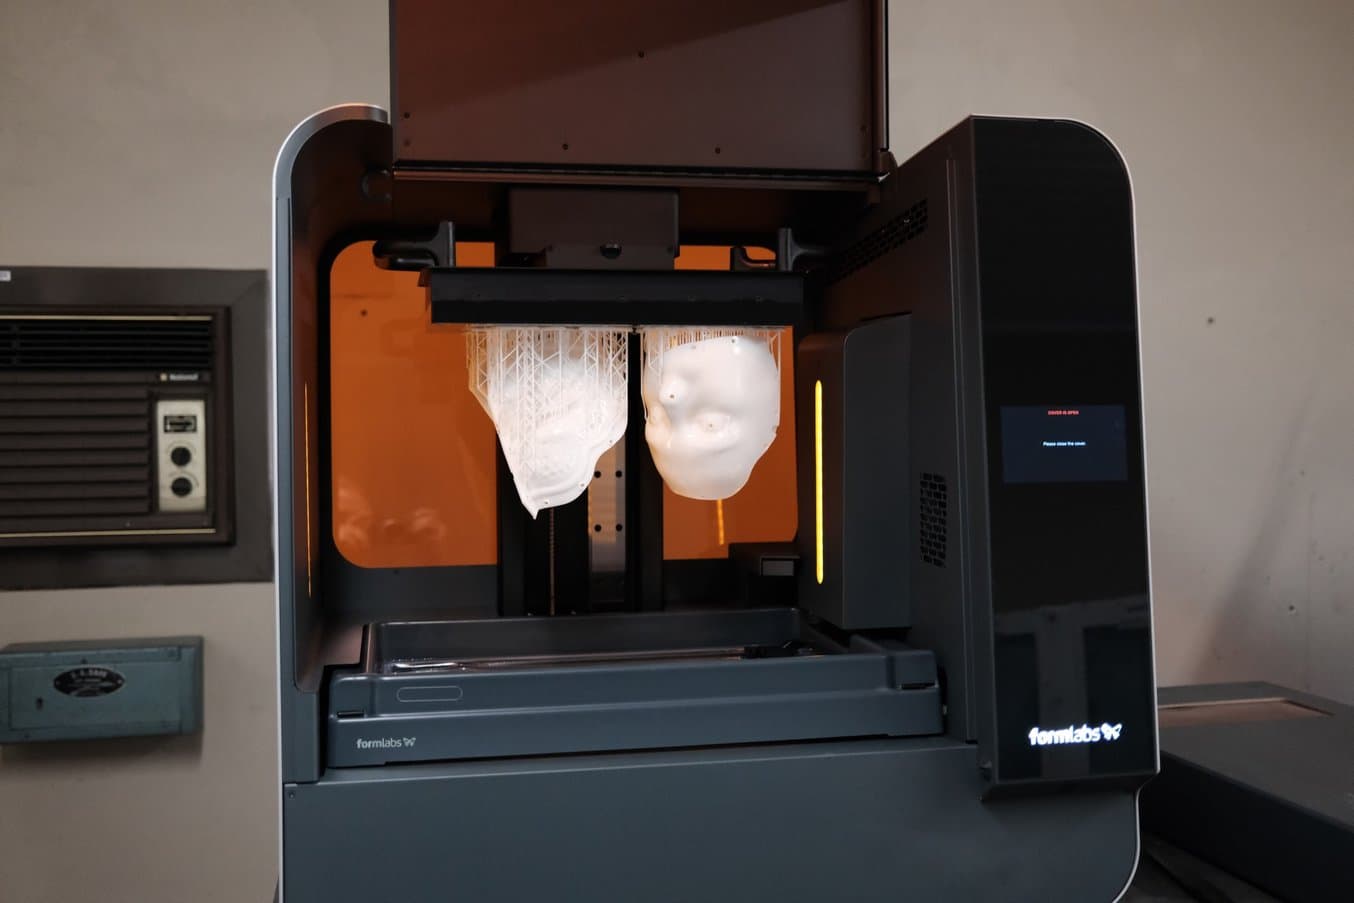
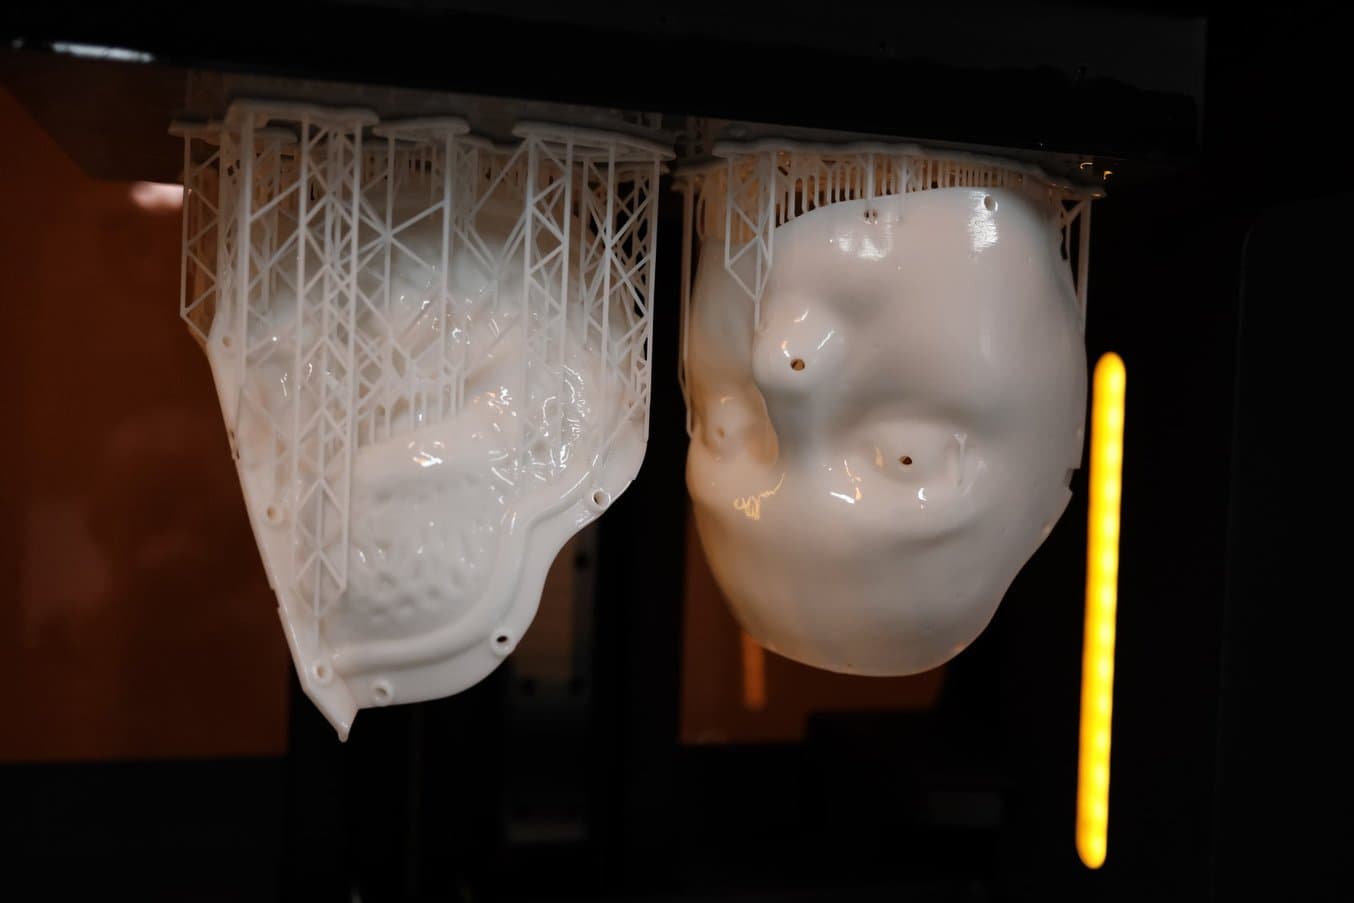
#4: Printing Big Parts Fast - Actress Duplicate, Likeness Dummy
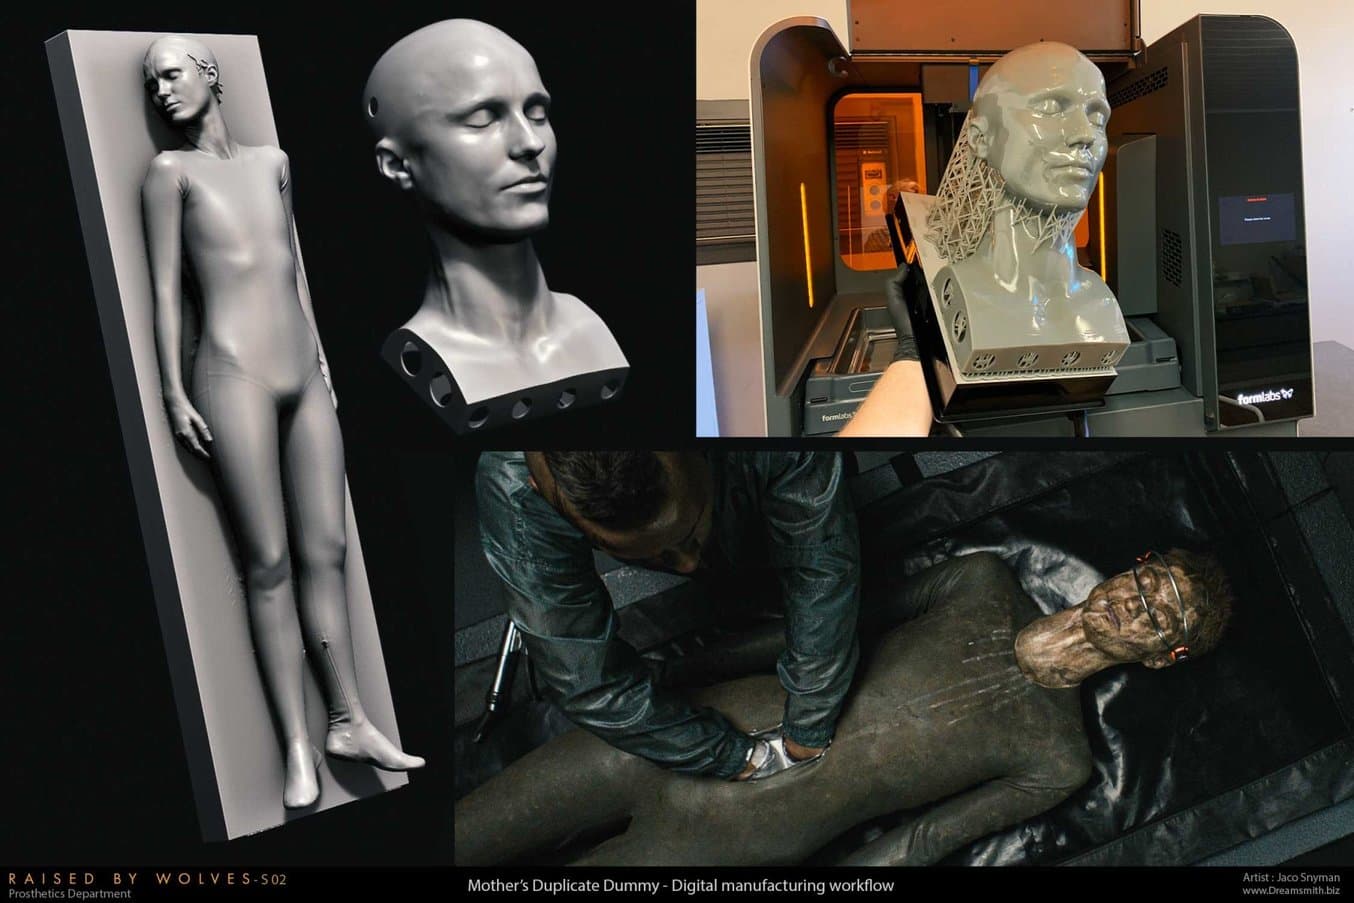
The head of the actress Amanda Collin, 3D printed in 12 hours using Draft Resin on the Form 3L.
Size matters especially when it comes to build volume. One of the prerequisites we had when choosing a printer was that it needed to be able to print an entire human head. Every time you split something up into smaller pieces, you are creating more work in the finishing process. Each join or mold seamline needs to be carefully finished off and retextured to create the final seamless prop.
The Mother Duplicate Dummy above is a perfect example. We were able to print her head in one go on the Form 3L, leaving us with a perfect resin replica of the actress’s face that we could carefully paint to match.
Traditionally, this process would have been extremely time-consuming, involving a life cast, and incorporating handmade epoxy molds and a final silicone cast. For comparison, before we had access to the Form 3L, we had to create another replica dummy that took our entire team a month to finish. This time, we were able to print Mother’s face and CNC her body in one week and have the final prop painted and ready for set in under two.
Step by Step Process
It is important to note that this prop would not have held up in a close-up, it was made especially for the final shot you see above. This allowed us to use the resin print straight from the printer; it was just detailed enough to hold up at this distance. This saved us a huge amount of time, materials, and money.
With traditional molding and casting techniques, this dummy would have taken the same amount of time to create regardless of the final details of the finished product. The Form 3L made our medium detail approach possible; We could make a prop that would especially meet the needs of the scene. This allows us to promise more in less time and at a cheaper price; something that is invaluable in the budget-conscious world of the film industry.
#5: Hybrid Workflows - Paul’s Bio-Attack Make-Up
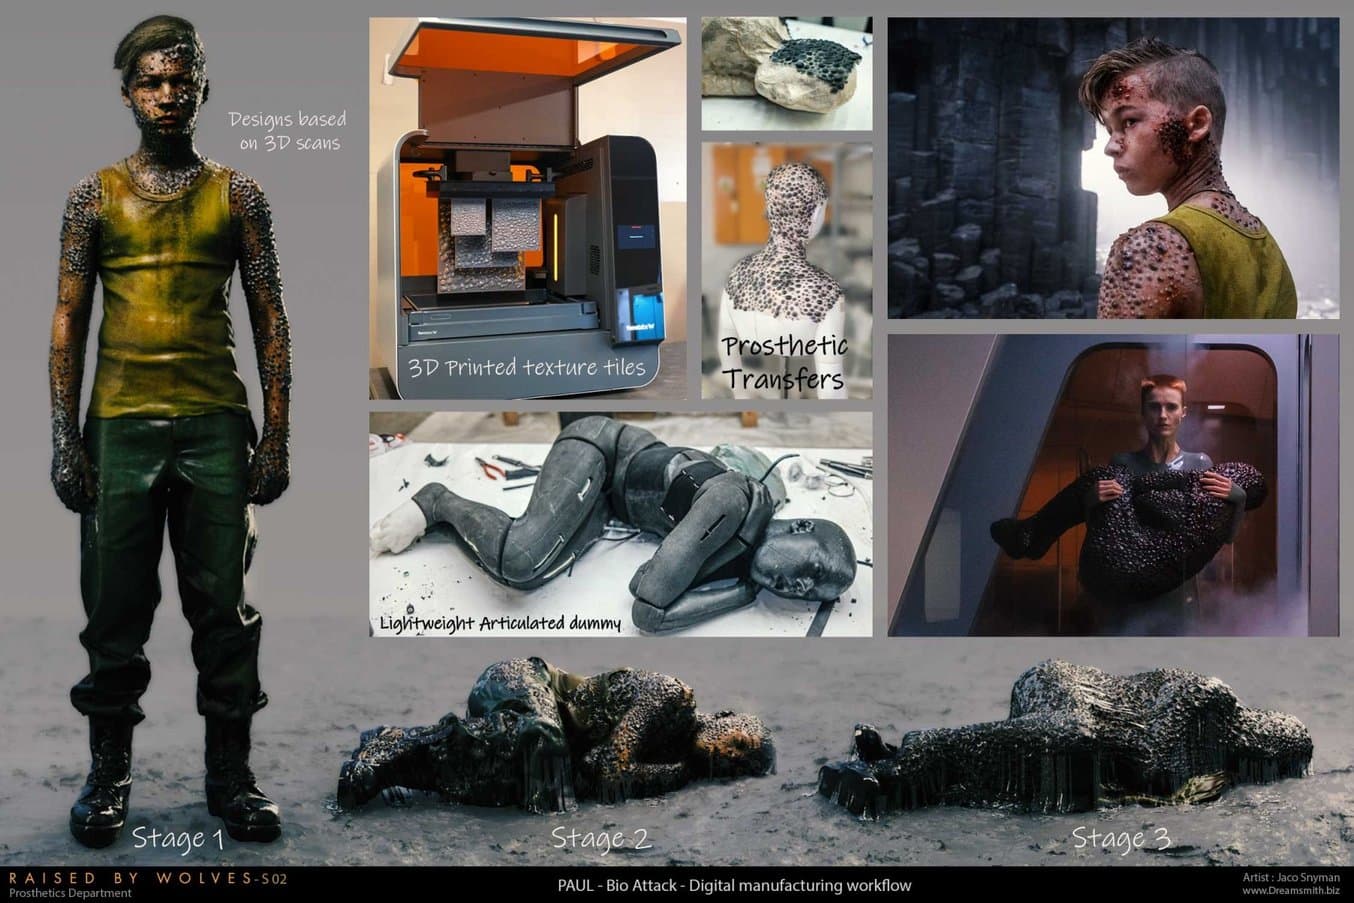
Combining 3D printing texture tiles with traditional dummy making techniques.
3D printing doesn’t always have to completely replace conventional techniques. We enjoyed having the Form 3L at our disposal and being able to come up with new hybrid workflows that utilize the benefits of both approaches.
"The Paul Cocoon exemplifies how we combined both traditional fabrication techniques and 3D printing to create something that would have been very difficult with either discipline alone."
Jaco Snyman, founder of Dreamsmith Studio
The Cocoon required a malleable scaley skin that could move with the articulated dummy inside. This would usually require a very large and costly mold but since the scales are organic and can be fitted together like a puzzle, it made sense to fabricate skin over the dummy by hand, thus eliminating the need for an expensive mold.
We would, however, need a large supply of scale texture tiles to piece the cocoon puzzle together. For this stage of the process, 3D printing was the obvious solution because of its ability to accurately and quickly reproduce intricate details. We printed a series of flat-scale texture molds of different sizes which we could use to cast silicone scale tiles. We then used these silicone tiles to fabricate the Cocoon.
Step by Step Process
Having the Form 3L with a variety of resins at our disposal makes these types of hybrid workflows possible and is an immensely powerful tool when faced with the everyday problem solving that the film industry demands.
Behind The Scenes in Raised By Wolves Season 2: Dreamsmith’s Takeaways
Raised By Wolves Season 2 was a watershed moment for us: It was the first time we heavily relied on 3D printing workflows. Many of the examples above were only considered in theory before we attempted them under the deadline.
This is usually territory that is fraught with mistakes and unforeseen consequences, and while we did encounter plenty of both, our overall experience with the Form 3L was exemplary and our confidence in the hardware grew with each successful project.
The reliability of the platform proved to us that we can move forward and apply what we’ve learned to bigger and more demanding projects. We have since added four Form 3L’s into our fleet and with this increased bandwidth, we have been able to achieve a level of productivity that we would have previously considered impossible.
This completely digital workflow allows us to work remotely. We can 3D scan, design, sculpt and mold full character prosthetics and send them anywhere in the world without the need for our team to physically travel or the client having to wait for fragile packages to arrive. If you would like to know more about this service, feel free to contact us at [email protected].
We have since built on our experience working on Raised By Wolves Season 2 and are incredibly excited to share some of the new developments we have since been working on when the time is right. Looking back now at these first few experiments and seeing how much we currently rely on 3D printing, it’s obvious that the Form 3L really has revolutionized the way we work.
Follow Dreamsmith on Instagram (@dreamsmith_) to keep up with their latest productions.
Special thanks to Jaco Snyman and Mathew Howard-Tripp for writing this article, and to our South African partner BuildVolume.
A Look Into the Future: A Completely Digital Design Process For Make-Up Prosthetics
After adopting the Form 3L and experimenting with multiple materials from the Formlabs resin library, Snyman and his team have cracked the code to make prosthetic make-up molds for their current secret project which is coming out in 2023.
They moved on to a completely digital process for making prosthetic makeup effects, starting with a 3D scan of the actor, digitally sculpting the prosthetic makeup and using a hybrid silicon casting technique with a thin layer of silicone sandwiched in between a 3D printed mold shell and 3D printed corrected base.
They claim this method is completely revolutionizing the way they work, as they can now produce make-up prosthetics in one-sixth of the time, at an affordable price. Other benefits include being able to scan actors’ faces from anywhere across the globe, which facilitates remote work in advance of the busy shooting schedules.
Experimenting with Rigid 10K Resin and the Form 3L 3D printer to make prosthetic make-up molds.
Snyman and his team are tirelessly working to uncover all the possibilities of SLA 3D printing in the entertainment industry. Dreamsmith’s team is excited to continue using 3D printing in their workflow in future projects. Stay tuned to see their upcoming work using the Form 3L.