
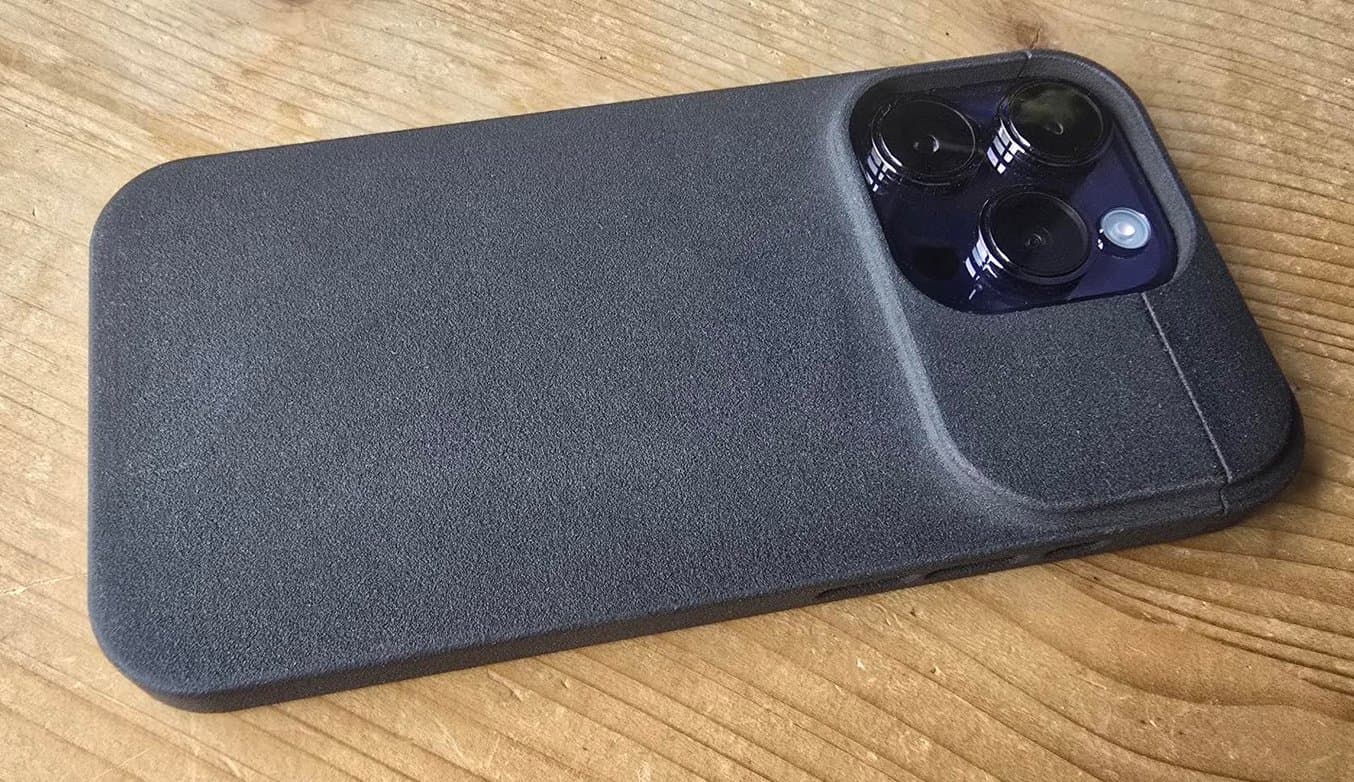
Ken Pillonel, engineer and founder of popular YouTube channel Exploring the Simulation, had an idea — he would design an AirPods case that would not only protect the headphones, but make it possible to use a USB-C connector to charge them, instead of the old Lightning connector.
The forced obsolescence of consumer products and the impediments to user repairability have frustrated Pillonel for years. “It is troubling to see design choices like non-replaceable batteries, glued-in components, and a lack of transparency in public information leading to the rise of ‘fast electronics,'” Pillonel told Will Shanklin from Engadget.
It seems Pillonel was not alone in his frustrations; when he announced the AirPods charging case project, he received thousands of orders from customers all over the world. To fulfill those orders and deliver thousands of products — while working out of his apartment and with zero employees — Pillonel needed a manufacturing solution that worked as hard as he did.
“My goal was to handle as much of my hardware development in-house as possible, allowing me to turn my ideas into reality. With this [Fuse Series] set-up, I think I’m set in terms of 3D printing,” says Pillonel.
The Limitations of Legacy Manufacturing
Legacy manufacturing methods, like injection molding, are still (and probably will be for some time) the cheapest way to mass produce most consumer products like Pillonel’s (or Apple’s) AirPods case. They make these most sense for big manufacturers with pre-set demand and supply numbers. The main issue for small manufacturers like Pillonel, however, are the limitations they impose on an agile product design process.
To be financially feasible, injection molding requires completely finalized ideas and no wiggle room or space to improve upon designs, whereas what made Pillonel’s idea so attractive to thousands of customers was his responsiveness, agility, and ability to respond to customer feedback.
“I didn’t go with injection molding because first, I love to iterate and to improve, to get customer feedback and just make it as best as I can. With molding, it’s very costly to change or produce designs. The tooling for just one case was $15,000, and I wanted to have six different case designs.”
Ken Pillonel, Engineer and Founder, Exploring the Simulation
Familiar with obsolescence, Pillonel recognized that any mold he ordered would be out of date in a few years anyway, as his customers would move on to a new type of headphones and case. In the consumer products world, especially as an aftermarket manufacturer, you can’t bet on the longevity of any design or tool. “After all those funds that I would put in the mold, in some years, it's just gonna be like a nice paperweight. So, I didn't really wanna invest my money this way.”
Another issue with molding would be the design constraints placed upon him by the molding process — his case design was complex, with several features that couldn’t be easily machined into a tool for molding. “There are inner cavities. There are holes. There is engraved text. If I wanted to injection mold that part, it wouldn't be just a simple two-part mold. It would be a really complicated mold with sliders, and so the cost would go up exponentially.”
One pitfall of offshoring the manufacturing of a new product may not even be on the radar of entrepreneurs or engineers with a new design — ghost shifts. One commenter on Pillonel’s videos pointed out the possibility of ghost shifts, where offshore injection molding partners will produce more than they’re contracted for, then resell the surplus for added profit.
Urethane casting — where a silicone mold is injected with liquid plastic that cures and hardens — was another possibility, but the molds only last for around 50 shots, so the solution wasn’t scalable.
Bringing 3D printing in-house would let Pillonel maintain complete control over the design, production, quality control, fulfillment, and support of his product, making him a true one-man plastics factory.
FDM, SLA, Legacy Molding, Or Something Else?
Pillonel has been 3D printing for years, using both fused deposition modeling (FDM) and stereolithography (SLA) processes, the latter with a Form 3+ desktop printer. While he believes there’s a space for each technology in certain situations, he had reservations about moving forward with this project using either FDM or SLA. After prototyping with his FDM 3D printers, Pillonel decided to try other routes for the final product.
“I started with the cheapest method that I knew, which is FDM printing with filament, but I told myself it wouldn’t be good enough for my product… it’s not good enough for a consumer product that you might sell in a store, it just doesn’t have a premium feel to it,” says Pillonel.
With his Form 3+ SLA printer, Pillonel had fewer reservations about quality and surface finish, but more reservations about workflow. Though he loved the quality and finish of resin parts for prototyping, when he thought about the post-processing and volume he’d need to get orders out the door, it wasn’t a viable solution.
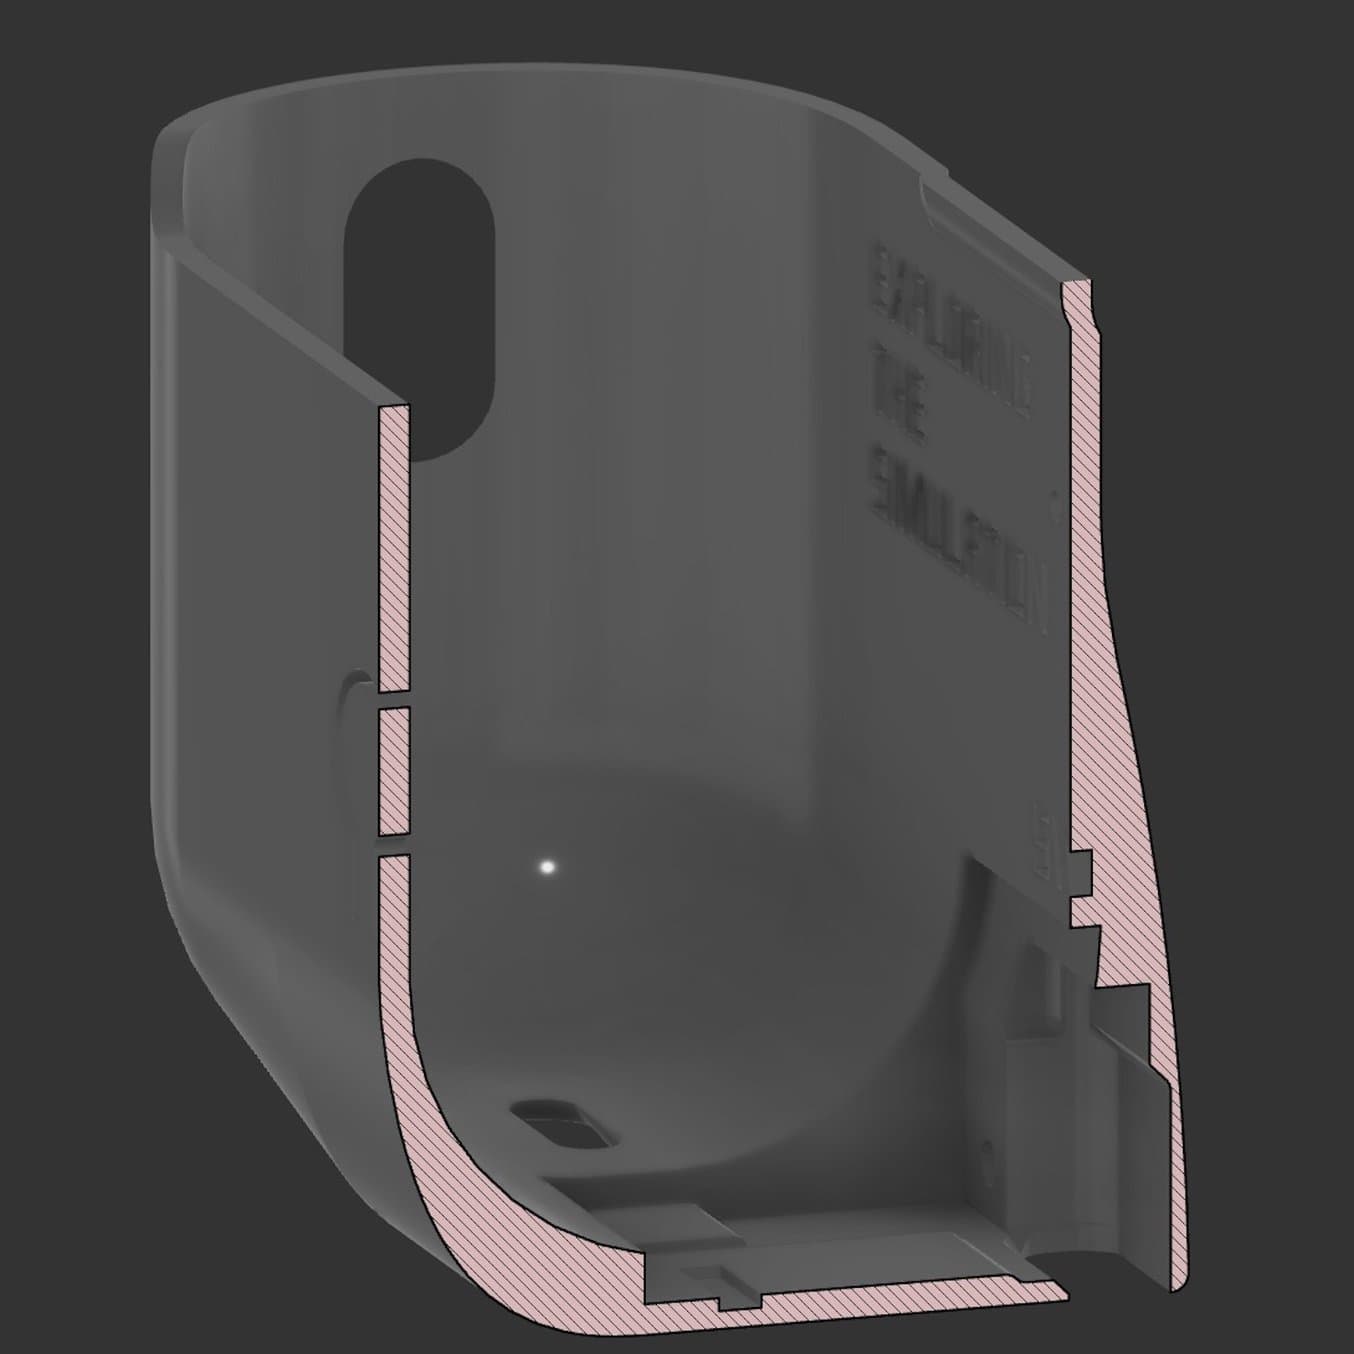
Pillonel needed a manufacturing method that could easily accomplish the complex design, which includes engraved text, narrow channels, undercuts, and thin walls.
Curved, organically shaped surfaces like these are particularly hard to print on FDM 3D printers because they can show more obvious layer lines.
“The resolution of SLA, it’s the best. But there are a few things that made me choose a different route. The first is post-processing and handling the resin, chemicals, and disposing of the cleaning solution. Then the biggest point is the supports, and the marks they leave on the surface. Painting and sanding the cases would be a lot of work at this volume, I couldn’t be a one-man plastics factory this way,” says Pillonel.
Selective laser sintering (SLS) was the only 3D printing option for making thousands of end-use quality parts. The self-supporting nature of the powder bed eliminates the need for supports, while the mechanical properties of nylon ensure that the cases would be durable enough for everyday consumer use — they could be dropped, bent, bumped, or squeezed, all in a day’s work. The powder bed technology also meant that parts could be stacked on top of each other in the build chamber, so Ken could make hundreds of parts each day with just one printer.
His Only Employee: Fuse 1+ 30W
Pillonel utilizes two build chambers to get the most of out his workflow. The first build he starts in the morning, utilizing only about half the capacity the build chamber has, so that the print finishes by the end of the day.
When he takes out the first (half-packed) build chamber at the end of his working day, he starts an overnight print with this full build chamber. It'll be ready for him when he comes in the next morning. His only employee, the Fuse 1+ 30W, works around the clock!
When it came time to hire his only employee, Pillonel knew he couldn’t rely on his FDM or SLA printers for the volume of orders pouring in, and legacy fabrication like molding was definitely ruled out. SLS was the only way to go, but he needed an accessible solution that still churned out end-use quality products.
There are multiple powder bed 3D printing options on the market, though nearly none that are accessibly priced for new businesses or single entrepreneurs. Pillonel deemed the inexpensive options too unreliable, while the legacy options like large MJF machines were too expensive and too large to fit into Pillonel’s apartment, where his workshop is. While acknowledging that the Fuse Series isn’t affordable enough for a hobbyist or most single-person enterprises, he knew that it would be the best option to earn his investment back.
“The Fuse printers are still the most affordable on the market right now. The way I saw it was, it costs the same as a few molds. So, if I had to outsource a few molds, it would be the same price as my setup. But with in-house SLS, I have a way to make parts for years — and can make an infinite amount of new designs. So if this product doesn't work out, I can just try to make a new one and, hopefully, make back my investment later.”
Ken Pillonel, Engineer and Founder, Exploring the Simulation
Pillonel’s initial set-up was just the Fuse 1+ 30W printer, a single build chamber, and the Fuse Sift, along with 12 kg of Nylon 12 Powder. Even with a fully industrial-quality SLS ecosystem, Pillonel could get safely and easily set up in a few hours in his apartment to begin production.
“After unboxing and plugging in the machines, I could begin the initial set-up, which proved to be quite straightforward. I simply followed the onscreen instructions, and that was it,” says Pillonel.
It was time to start production, and after just a couple of months of designing, a few test runs of fully packed chambers, and initial rounds of customer feedback, Pillonel was able to produce in earnest, get parts shipped, and optimize his manufacturing workflow.
Production Volume Recommendations
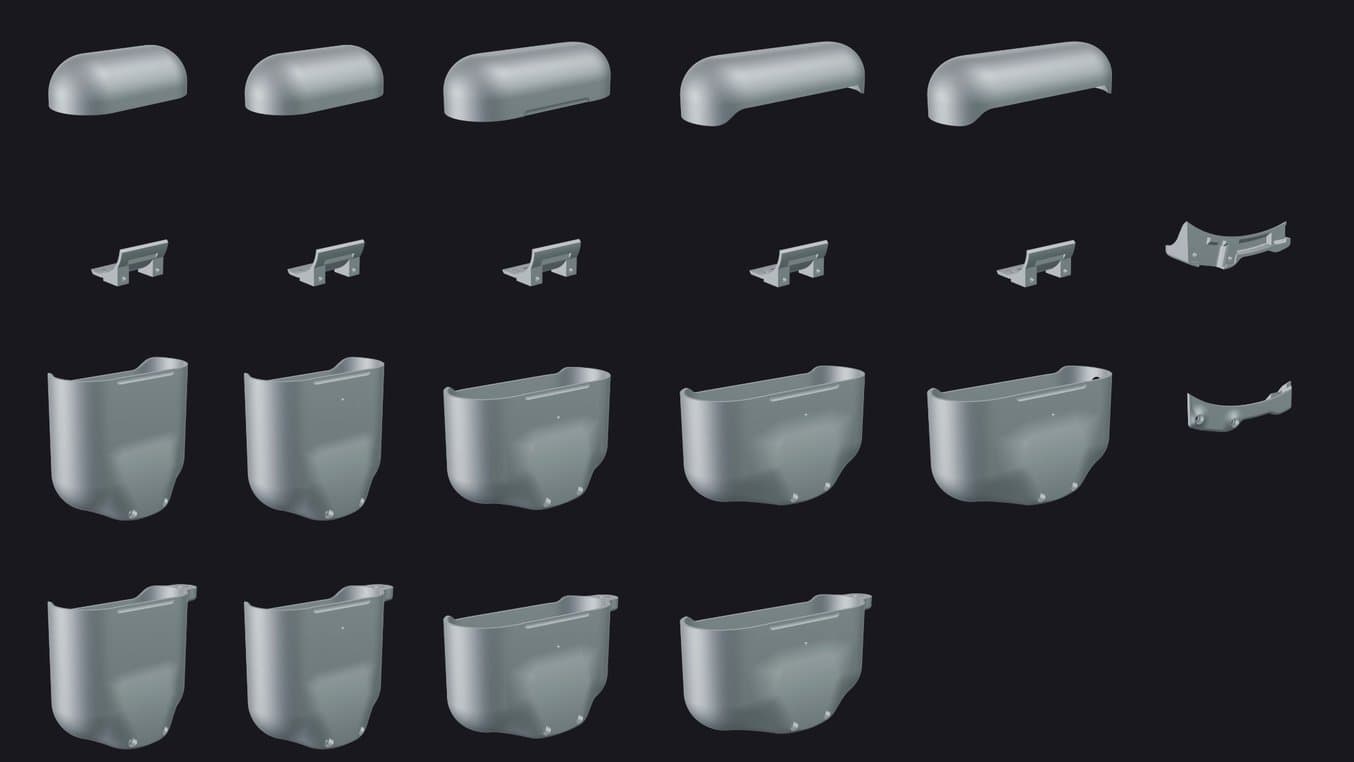
Pillonel offers multiple versions of his product, some with lanyard features, textures, or slightly different ports. The number of versions improves his customers' experience and enhances the product value, but makes it complex to organize production, processing, and shipping systems.
After printing with the Fuse 1+ 30W and the entire Formlabs SLS Ecosystem, here are Pillonel’s major takeaways and recommendations for end-use production on the Fuse Series.
-
Get the glovebox. The Fuse Sift Glovebox is an additional accessory for the Fuse Sift (the printer’s powder recycling and reclamation system). The Fuse Sift can be used without a glovebox — the negative air pressure and suction do a good job of keeping extra powder from the cake from getting into your workspace — but the Glovebox is an added layer of confidence and protection. “I would really recommend getting the glovebox add-on because it kind of closes the Sift. And before, I didn't have it, and I was always worried that, I would open a window and some wind would come and blow some powder out in my workshop… They listened to the customers, and they came up with that,” says Pillonel.
-
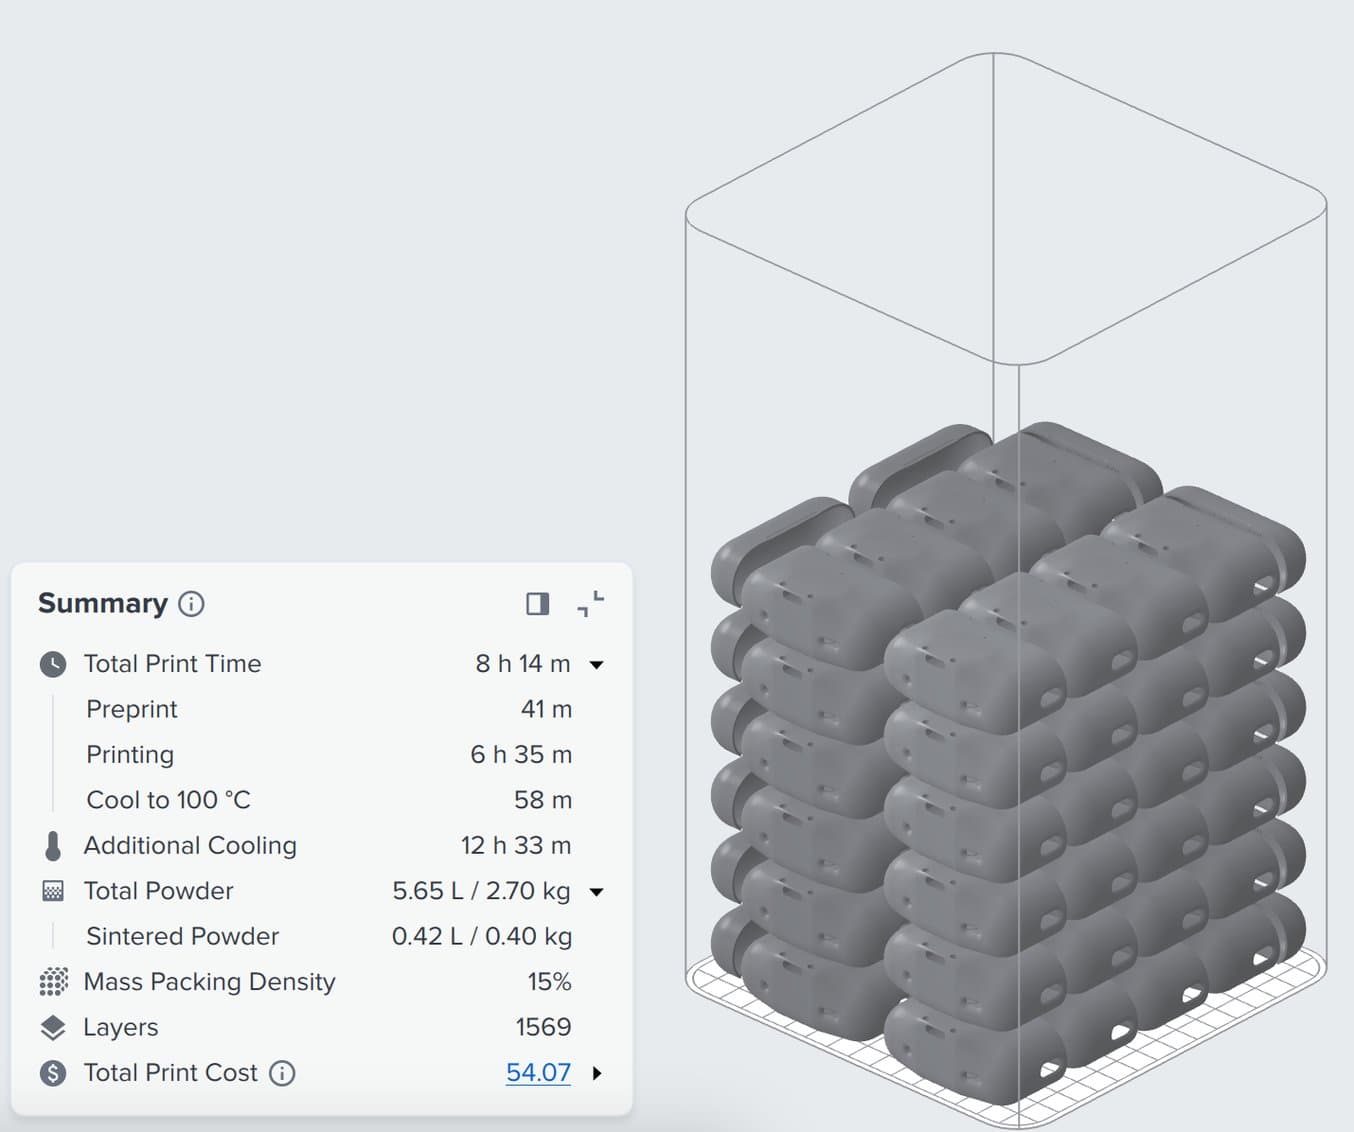
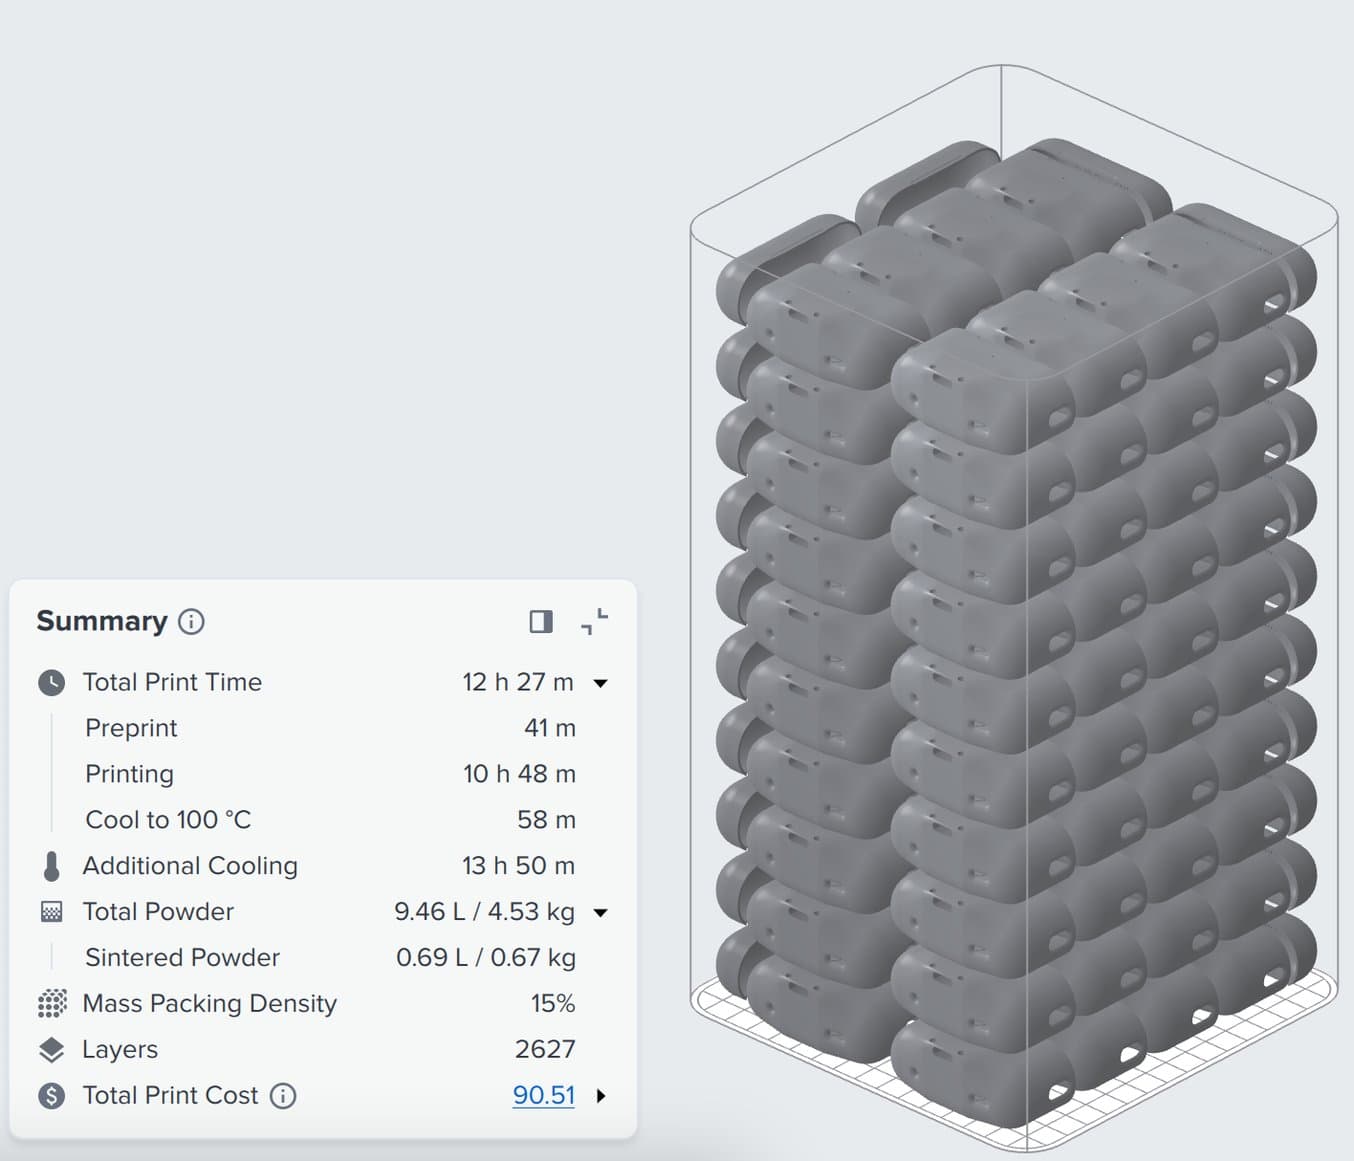
Pack as densely as possible. Packing your build chambers as densely as possible lowers your cost per part. Aim to pack your build chambers to match the refresh rate of your powder — that way, any unsintered powder can be reclaimed and recycled into a new build chamber, reducing waste and keeping your material costs to just what the part itself uses.
-
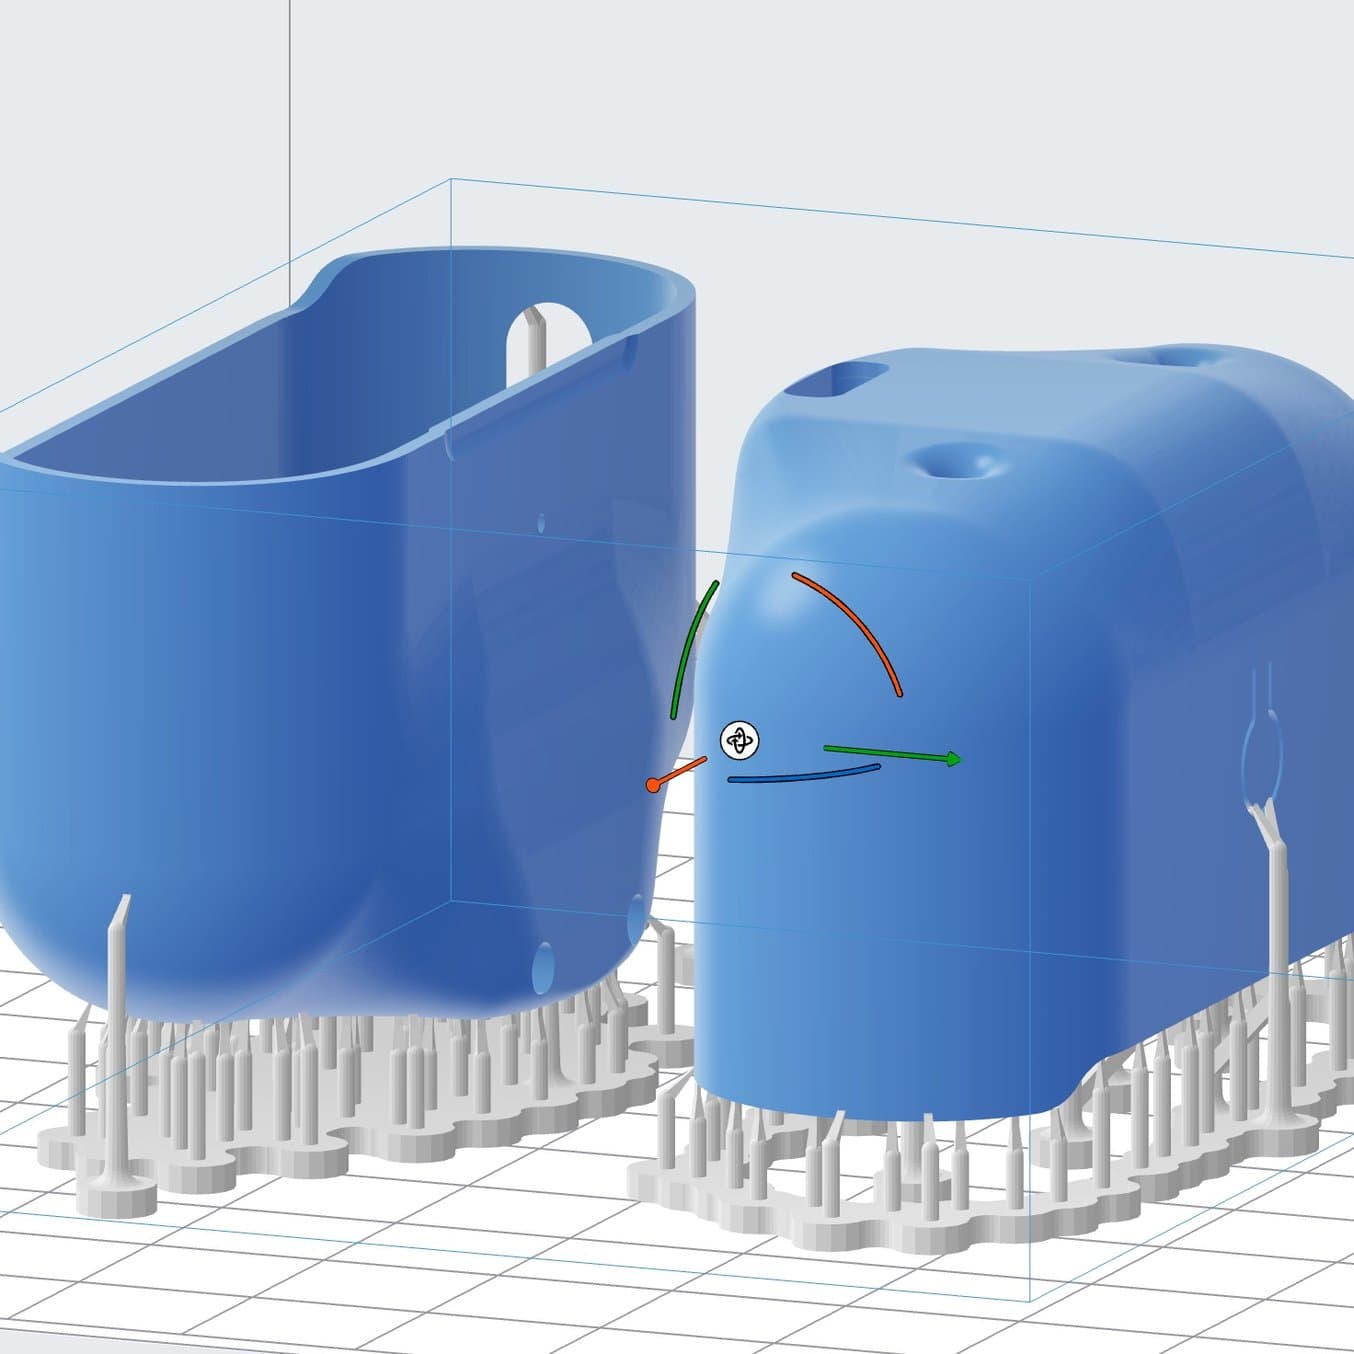
Lock your orientation throughout design and production. During iterative design and testing, trying out a few different orientations makes sense — you can see how print orientation affects tolerancing across your part, and where you want to optimize for print time vs. packing as densely as possible, stacking, part cages, etc.. Once you’ve settled on a design and the optimal orientation, lock that orientation for production volumes, using orientation lock in PreForm.
-
Compare manual packing to auto-packing. “There are two ways to go about it. Auto packing works great, you select everything, press “pack selected models”, and it’s like magic. But for production, if you have the same part that you print a lot of, it can be interesting to pack it manually.” Pillonel experimented with fitting one small plastic part inside another, then locking it and scaling it on the Z-axis, and was able to improve pack density by a few percentage points compared to the auto-pack method. “But if you have multiple different parts that are always coming in, then I probably wouldn’t spend much time doing that, and just use auto-pack instead.”
-
Do one full run of your build at the end of your development cycle. When Pillonel was ready to move into production, his first full build chamber showed slight pitting on the top layer — which he diagnosed as a common error fixed by a more recent firmware update. After running a successful build, he was able to set up subsequent production timelines without wasting material.
-
Calculate an optimal production schedule and electrical costs. Pillonel found that each full build volume across the entire ecosystem only costs about 5.8 kilowatt hours, amounting to less than $1.80 in Switzerland, where electricity costs about $0.30 per kilowatt hour ($0.18 on average in the US). Though it costs marginally less at night, costs are insignificant to his operating schedule, and printing during the day is preferable. Pillonel found a way to print nonstop and most efficiently, getting rid of any dead time, by printing slightly less than full build chambers at 9 am, then switching the build chambers out at 5 pm for a second, overnight build, ensuring the printer is always being productive (this requires two build chambers).
-
Test out optimal post-processing with the Fuse Blast. Though the easiest thing may have been to put entire build chambers directly into the Fuse Blast, Pillonel found that multiple, shorter cycles got the parts cleanest, rather than a single longer cycle for every part from a full build. Additionally, separating parts of the same size into one batch together (e.g. small parts together and then another cycle with big parts) improves results and efficiency.
Next Steps for Exploring the Simulation
At the end of his webinar, Pillonel gave a little preview for what other projects he's working on.
The preview included new products and new colorways using Formlabs Nylon 12 White Powder, above (undyed and dyed).
Pillonel is still receiving and fulfilling orders for his AirPods charging case, and his Fuse Series ecosystem is working around the clock — as is he — as a one-man design, production, customer service, and fulfillment operation. Looking ahead, he has some exciting projects planned, including exploring dyeing methods and maybe even some new products.
The Fuse Series ecosystem has made it possible for Exploring the Simulation to scale up from an idea for a new product to a fully realized manufacturing workflow. 3D printing, especially powerful, accessible SLS 3D printing, has created an answer to at least one part of the forced obsolescence problem with modern technology.
To learn more about Pillonel’s process, watch the webinar in full, or request a sample of one of Formlabs’ SLS Powders to test the quality for yourself.