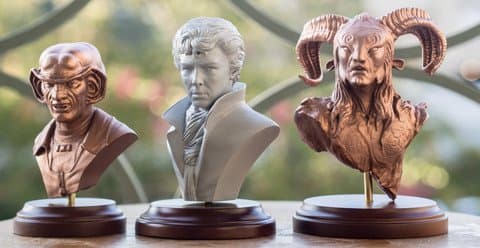
If you’ve spent any time in our forums, you may have spotted some of Robert Vignone’s spectacular work. He's a prolific poster, providing other users with advice and tips about getting the most out of the Form 1. We highlighted some of his amazingly detailed sculpts in our first user prints roundup, and we admit, we’re more than a little starstruck.
Robert has worked as a visual effects artist for years, and you’ve seen his work in Avatar, Hellboy, Jumper, and PS3 games like The Last of Us, among others. He uses his Form 1 to bring his digital art into reality.
We’re really excited that Robert generously shared some of his Form 1 builds with us, which we displayed at our booth at the World MakerFaire.
We asked him a few questions about his work, his setup, and how he achieves his mindblowing sculpts.

Formlabs: What's your day job?
Robert Vignone: I have been working with the fantastic team at DreamWorks Animation for about 2 years now. My credits here include How to Train Your Dragon 2 (for June 2014) and a film called Home(for March 2015) so be sure to catch those epic films!
F: How do you use the Form 1?
RV: Last year when I saw the Kickstarter for the Form 1, I got really excited to finally find a printer that would allow me to print out anything I create at incredible detail. Digital sculpting is a major passion of mine; the opportunity to print out those models and bring them into a physical medium has been a dream come true. For right now, printing is just a hobby, but I believe this is a great and disruptive technology that will really start to change the world in the next decade.
F: What does your workstation look like?
**RV: **As someone who has been an enthusiastic computer builder since I was a teenager, I have always enjoyed tinkering and upgrading my workstation. Also, because it is my primary tool for my creative endeavors, keeping it fast and stable is really important to me.

F: What's your software workflow like?
** RV:** I generally have two different ways of approaching a model depending on what style I am going for. I will break them both down a bit for you here.
If I am making a sculpture of a person, specifically a likeness sculpt, I will start my workflow off in Mudbox using a generic head mesh that has no defining features. I will use several photographs of that person from different angles to match their likeness as much as possible. Once I have a likeness that is of a high enough quality (I try to keep my standards really high) I will finish it off with my standard detailing process to give it life. That generally includes things like wrinkles, pores, eyes, hair and asymmetry.
Once the face is done I jump over to ZBrush and create clothing using a sphere and Dynamesh. Once the character is complete for a bust/statue I will use the clipping tools in ZBrush to clean up the edges and carve it out to make it look more like a classical bust sculpt. I then do all the necessary preparations to get it ready for printing. That generally includes mesh reduction, filling spaces and getting rid of non-manifold polygon cleanup.
Other workflows start off more inspiration based, which generally include some things that don’t exist or the shapes are not strictly described in any artworks. I will begin my process using ZBrush with a basic sphere and use the power of ZBrush’s Dynamesh to iterate the shape changes quickly while I design in 3D. Once I am happy with my model I will generally run it through QRemesher and bring it back into Mudbox for final detailing, refinement and shape cleaning up.
Each program has very different lighting environments, shaders and perspective cameras which helps give me a fresh perspective while sculpting. I often jump between the two for that exact reason. Once I am finished with all my details I will do the same process to the model as mentioned above and make it ready for printing!
F: What are you working on now?
RV: I am working on a female character that is a blend of a mermaid, a seahorse, and coral. She will be the largest print I’ve made and I will be partitioning the character into sections to create something in the 12-16” range once she is finished and posed. But rather than me trying to explain it all, here is a peek at a work-in-progress image of the character sculpt!

Thanks for talking us through your process, Robert! Form fans, we’ll see you at booth MP62 at MakerFaire. And so will this guy:

Update: Robert Vignone currently runs Mold3D, a site dedicated to artists who share an interest in 3D printing and want to learn how to master this exciting medium.


