

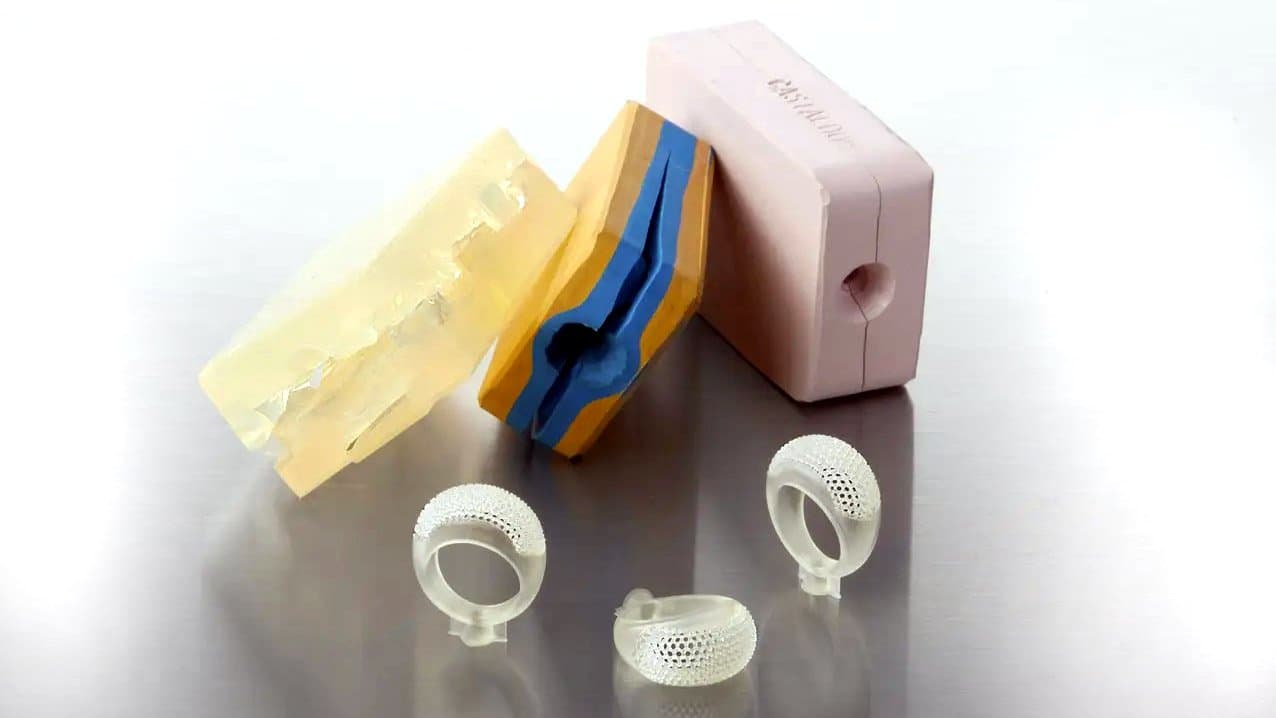
A prototype produced with urethane casting. Source: Fictiv
Vacuum casting is a common manufacturing method for creating small-batch production runs for market-testing prototypes, personalized products, made-to-fit medical devices, and more.
This guide will dive deeper into the specifics of the vacuum casting process, how it compares to other production techniques, the best urethane casting equipment, and how to produce 3D printed patterns for vacuum casting.
What is Vacuum Casting or Urethane Casting?
Vacuum casting is a manufacturing process similar to injection molding where urethane resin is cast in a cavity between two silicone mold halves.
The process replicates a master model by pouring a silicone mold around it. In a highly skilled procedure, the mold is sliced into two halves, the master model is removed, and then a gating and ventilation system is added. Subsequently, the model maker casts a urethane-based resin into the resulting cavity and cures it under a vacuum to prevent air bubble intrusion.
The result: a highly accurate reproduction of the original object.
Note: Vacuum casting is better known as urethane casting or polyurethane casting in the US. This article will use these terms interchangeably.
Vacuum Casting Applications
Vacuum casting is an ideal manufacturing process for creating low-volume batches of items that need to approach production-grade quality.
The process creates highly detailed models that are virtuallyindistinguishable from the final product. This makes urethane-cast models outstanding for investor-pitch presentations, trade shows, and commercial photography. Because one silicone mold can produce roughly 50 casts, vacuum casting also allows companies to launch the first series of their product for early market testing.
In case the project demands a higher quantity, clients have a few different options:
-
The same master model can be reused for creating multiple silicone molds.
-
Multiple master models can be used for creating a multi-cavity mold.
-
Instead of room-temperature vulcanization (RTV) silicone, mold makers can use high-temperature vulcanization (HTV) silicone or rubber. This results in a more durable mold, extending its lifetime to as many as 300-500 casts per mold.
With only about 10 days lead time from the production of the master model to receiving the cast products, vacuum casting is not only useful for rapid prototyping, but also for bridge production, without requiring the substantial upfront investment that comes with industrial-level manufacturing processes like injection molding, thermoforming, and spin casting.
As vacuum casting creates extremely detailed models with a perfect surface finish and in a wide variety of materials with a vast range of mechanical properties, it is applicable for end-use products in low volumes, such as:
-
Custom-fit medical devices such as prostheses, orthoses, hearing aids
-
Automotive parts: dashboard panels, knobs, gauges, emblems, hood ornaments, lighting lenses, inlet manifolds
-
Consumer electronics: enclosures, controllers, user interface panels, sensor integration
-
Critical components and spare parts for robots and industrial machinery
-
Consumer goods: limited edition sunglasses, pens, phone cases
-
Musical instruments
-
Scientific instruments
-
Sports equipment add-ons
-
Art, figurines, scale models, props
Vacuum casting is also a common solution to copy existing objects without having to resort to a complicated reverse engineering workflow. These are often rare or discontinued items, such as sculptures, fossils, historical relics, antiques, collectibles, and craft models, for which no CAD model or other form of blueprint is available.

Electronics housing for wearable breath sensor, made with silicone overmolding through vacuum casting. Source: IDZone Product Design. Casting: Venture Rapid Technologies.
Urethane Casting vs. Alternatives
Vacuum Casting vs. Injection Molding
Product designers and engineers often turn to 3D printing for design validation, and make the immediate leap to injection molding for production validation. But the problem is that the cost of an injection mold, made out of CNC machined high-grade steel and good for millions of parts, can cost between $5,000 and $100,000 depending on part size and complexity.
That’s why lower-grade tools are often used as an intermediate step to hard tooling. An aluminum mold still ensures up to 1,000-5,000 molding cycles at a much-reduced cost. Because soft tooling processes are much faster and allow for a simplified mold design, they also roughly halves the lead time when compared to injection molding.
An acrylic mold or low-volume injection molding with 3D printed molds can be an option, depending on the quantities and part quality needed. A 3D printed mold created with a Formlabs SLA printer typically costs under $100 and delivers 100+ pieces without significant loss of quality.
However, product developers regularly overlook the fact that vacuum casting is often a smarter approach to cross the bridge from prototyping to production. Of all early-stage prototyping methods, the resin casting process bears the most similarities to injection molding. Additionally, it’s highly cost-effective; molds cost between $200 and $1,000, and a typical per-unit price is $10-$100.
A silicone mold for urethane casting is constructed in a similar fashion to an injection mold in that it has two halves—one forming the core, the other the cavity, and the liquefied material is injected in between those to form the final product. However, there are a few differences:
-
In injection molding, molten polymer is pushed into the mold cavity under high pressure and high temperature using a hopper and lead screw. Vacuum casting operates at low temperatures. Instead of molten plastic, it works with liquid resins that are drawn into the mold under a vacuum, much like the capillary action inside a plant stem. So while there are many different resins available to mimic various polymers, prototyping in the final injection-molded material is not possible.
-
After oven-curing, parts still undergo some post-curing for up to a week and remain vulnerable to UV radiation and high temperatures.
-
Because the mold is flexible, there are limits to part size and shape. Still, there are specific techniques to enable exceptions. For example, phased casting is the use of metal supports to counteract gravity for casting elongated parts in a three or four-part mold.
-
Vacuum casting handles variable wall thickness better than injection molding, because there is no heating-cooling cycle of the cast material. This results in less part distortion.
-
A silicone mold allows for significant undercuts in the part design. However, when testing for injection molding, it’s recommended to stick to the injection molded design as much as possible and build in the required draft angles of the final product.
-
Vacuum casting results in nearly zero waste, whereas in injection molding up to 20% of the used polymer is lost due to scrap rates, residues, and overproduction.
The high fidelity between a vacuum-cast model and a final product that pops out of an injection mold allows engineers to optimize the design for manufacturing. It provides them with a high-quality product preview without having to burden upper management with the astronomical fixed costs that can come with contract manufacturing at an injection molding factory.
Vacuum Casting vs. 3D Printing
It is a common misunderstanding that 3D printing is restricted to one-offs only. On the contrary, it is a viable method for low volume manufacturing of end-use parts. It is also increasingly popular for companies to invest in an in-house print farm. Such an array of 3D printers can handle low-volume batches of hundreds or even thousands of products.
The main factor influencing a choice between 3D printing and vacuum casting is product geometry. Vacuum casting is explicitly intended to simulate injection-molded parts. As a low-investment alternative to full-scale injection molding, it can even combine flexible and rigid materials in an overmold or add metal components directly in the prototype through insert molding. For creating a small series of injection-moldable components, vacuum casting is more cost-effective than 3D printing.
Another advantage of vacuum casting is that bigger parts can be created much faster and cheaper than 3D printing. It allows for mold sizes of roughly 50 cm (20 inches) for the longest dimension, and casting weight up to 1.5kg (3.3 lbs).
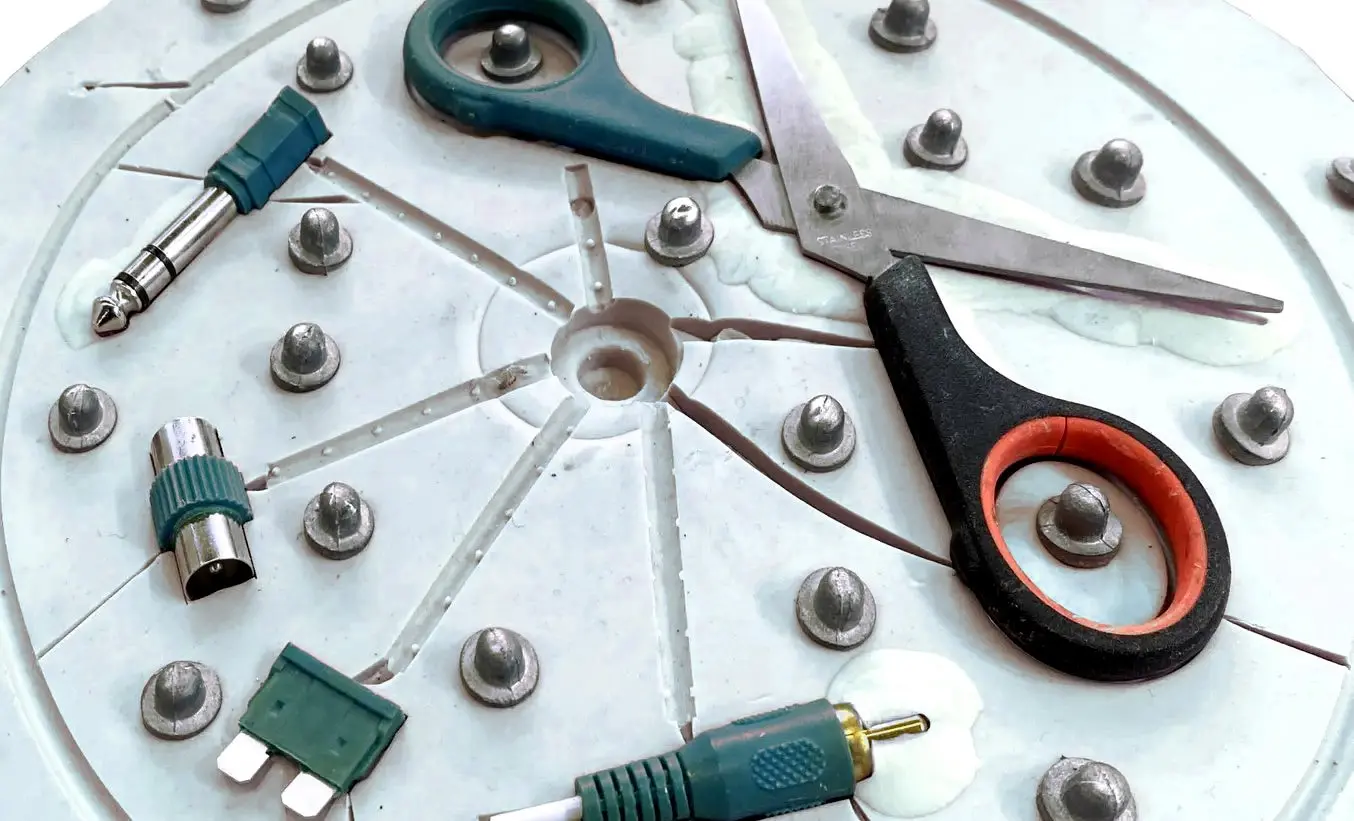
Vacuum casting in a silicone mold with metal inserts.
Stress Testing 3D Printed Parts for End-Use Applications
This white paper presents Formlabs 3D printing hardware and material solutions for end-use part production including case studies and stress testing results to verify the suitability of 3D printing materials for end-use applications.
Comparison: Vacuum Casting vs. Alternative Production Methods
Let’s look at the pros and cons of different fabrication techniques:
| Vacuum Casting | Injection Molding | 3D Printing | Rapid Tooling | Machining | Handmaking | ||
|---|---|---|---|---|---|---|---|
| Design freedom | ★★★☆☆ | ★★☆☆☆ | ★★★★★ | ★★☆☆☆ | ★★★★☆ | ★★★☆☆ | |
| Part size | ★★★★☆ | ★★★★☆ | ★★★☆☆ | ★★★☆☆ | ★★★★☆ | ★★★★★ | |
| Throughput | ★★★☆☆ | ★★★★★ | ★★★☆☆ | ★★★★☆ | ★★☆☆☆ | ★☆☆☆☆ | |
| Material range | ★★★☆☆ | ★★★★☆ | ★★★★☆ | ★★★★☆ | ★★★★★ | ★★★☆☆ | |
| Investment cost | ★★★☆☆ | ★☆☆☆☆ | ★★★☆☆ | ★★☆☆☆ | ★★★★★ | ★★☆☆☆ | |
| Cost per part | ★★★★☆ | ★★★★★ | ★★★☆☆ | ★★★★☆ | ★★★☆☆ | ★★★☆☆ | |
| Lead time | ★★★★☆ | ★☆☆☆☆ | ★★★★★ | ★★★☆☆ | ★★★★☆ | ★★☆☆☆ |
Vacuum Casting Process
Vacuum casting is a highly skilled procedure that consists of four steps.
1. CAD Design
A designer or engineer creates a digital representation of the object to be produced using a CAD software environment like Fusion 360 or SolidWorks. This should be done keeping in mind the following guidelines in designing for urethane casting:
-
Wall thicknesses between 1.5 mm - 4 mm. The absolute minimum thickness is 1 mm.
-
Ribs can be thinner at 60% of wall thickness.
-
Use generous radii > 3 mm.
-
Avoid 90-degree walls to improve part strength.
-
Build in a 0.5 mm groove between two shells that fit together to improve the look of the product.
-
Screw boss wall thickness should be equal to hole diameter.
-
Engraved letters work best at 0.25 mm depth.
When complete, the CAD model gets exported to STL format for producing the pattern.
2. Making the Master Pattern
The master pattern is the positive model from which the copies will be derived through casting. Because a silicone vacuum casting mold delivers the exact replica of the master pattern, it is paramount that the 3D printed pattern accurately embodies the original CAD model, especially in terms of ultra-smooth surface quality. Some secondary characteristics of a good master pattern are hardness, chemical and temperature resistance, as well as durability to prevent degradation over time.
CNC-milled master patterns used to be the standard, but they are costly and time-consuming to produce. They also come with limitations regarding holes, channels, internal radii, and organic surfaces. 3D printing is the cutting-edge alternative and currently prevailing method for producing master models.
There are multiple 3D printer types available to both mainstream and commercial customers, but the most commonly used processes for urethane casting are SLA and SLS 3D printing.
SLA 3D printing produces parts with the smoothest surface finish, which is ideal for vacuum casting patterns. While SLA prints are already smooth with the right print settings, they will still require some sanding and polishing to remove supports and achieve an absolutely flawless finish. Some advanced materials like Rigid 10K Resin also offer superior mechanical properties, temperature resistance, and durability.
SLS 3D printing with nylon results in strong, temperature-resistant, and precise prints. As this technique doesn’t require supports, it’s also ideal for intricate features like thin walls, engraved details, snap fits, hinges, and nested or interlocking parts. The surface finish of printed parts is a bit too coarse for printing master patterns for urethane casting, so SLS 3D printed parts can benefit from media blasting or vibratory tumbling to reduce surface roughness.
Request a Free Sample Part
See and feel Formlabs quality firsthand. We’ll ship a free sample part to your office.
3. Making the Mold
In this most labor-intensive stage of the process, the model maker crafts a mold box out of melamine board and hot glue. They then secure the master pattern to the bottom with small drops of CA-glue. Sometimes, pockets are created using a rotary tool where lips designed onto the master model will fit into for extra fixation.
For a tight parting line between the two mold halves, all holes between the master pattern and the bottom panel need to be filled up. Styrene blocks and Plastalina modeling clay are preferred materials to do this. Then, add dowel pins and registration bars for perfect alignment with the other mold half.
After vigorously mixing the two-component silicone, it is poured and degassed inside a vacuum chamber. But before doing so, the model maker craftily fills up all tiny gaps in the master pattern with the silicone mixture using an acid brush in order to prevent air traps, and then back-pours the silicone to form the first half of the mold.
After curing for several hours, the mold half is released from the mold box and flipped upside down. The mold maker expertly installs acrylic vents, risers, and a fill port for the second half of the process. Spray mold release on top of the silicone and brush it inside deeper areas. Then, a new mold box is constructed for pouring the second mold half in a similar fashion.
To prepare the mold for vacuum casting, release it from the mold box and spray it with an even coat of E236 urethane mold release. Recombine the mold halves to form a single block, and reinsert the dowel pins and registration keys for alignment.
4. Vacuum Urethane Casting
In this step, the original master pattern is replicated through casting in a vacuum chamber. First, the mold is taped to a wooden board and vent straws plus a pouring funnel are added to it.
The two-component resin is measured and mixed with a coloring agent for pigmentation. Then, the casting material is degassed in a vacuum chamber for a few minutes.
The polyurethane blend is now ready for pouring. The riser straws will indicate when the cavity is completely filled up. After curing at 70˚C, the mold is opened to reveal a carbon copy of the original model with all details and surface textures preserved.
The finalization consists of trimming the edges of flash material, an extra polishing cycle with 1000-grit sandpaper, and oven-curing to improve the part’s material properties.
Pro Tips
The above procedure applies mostly to thin-walled prototypes, such as housings for electronics, storage containers, and other cases where we would like to avoid a visible split line on the product’s A-surface.
For other items where this is less critical, it suffices simply to encapsulate the master pattern in a silicone block and manually cut it open. The cutting is done in a sine-wave manner, which requires some experience and dexterity.
Here are some best practices to enhance urethane casting results:
-
Be careful with using spray release directly on the model, as it can imbue a slight surface texture that will be visible in the casting
-
Preheat resins to 40˚C, preferably a day before use, and occasionally flipping the bottle to prevent crystallization.
-
Prevent moisture from creeping into resin bottles, because this acts as a blowing agent for PU. One way to do this is to backfill bottles with argon gas immediately after use.
-
When mixing two-component chemicals, always use the double-cup mixing method. Pouring directly from the first container is a surefire way to create unmixed streaks and ruin the casting.
-
Use rubbing alcohol for loosening hot glue while disassembling the mold box for future use.
-
Install the fill port at a corner of the product that provides the shortest average distance to different sections of the part. This ensures that all areas are filled up.
-
To prevent air bubble formation, pour from a single point and around delicate areas with a lot of details, never directly on top of them.
-
Position the gate low and the vent high.
-
Add metallic powders for a spectacularly vibrant finish, or consider using polypyrrole or graphite powder for electrical conductivity.
-
When mixing urethane, allow plenty of room above the surface, as the liquid mixture will foam up and rise inside the vacuum chamber like a marshmallow in a microwave.
-
Use a professional vacuum casting machine to speed up the process and achieve more reliable results.
Vacuum Casting Machines
Due to the complexity of the process, most companies subcontract jobs to third-party urethane casting service providers.
For those planning to do vacuum casting in house, a professional vacuum casting machine provides an integral solution for taking prototyping efforts to the next level and speeding up the process towards production ramp-up. As much as fifty castings can be achieved within two days, each in a different material and color if needed.
A vacuum resin casting machine is a refrigerator-sized contraption that automates the process from mixing to casting to curing. It lets operators control parameters such as chamber pressurization, mixer speed, heated cup, and oven heat. The latest systems are programmable so that operators can create custom sequences to optimize casting cycles for specific materials and product types.
Vacuum casting machines come in different sizes to allow for different mold sizes. Most models can, next to working with resin, also be set up for casting injection-grade nylon, ceramics, wax, and even low-melt metal alloys.
Urethane casting machines are ideal for pre-production runs because they pull a vacuum much quicker and minimize manual labor. The downside is that they cost tens of thousands of dollars. Jewelry vacuum casting machines are much smaller and generally cost a few thousand dollars.
Here are some of the best vacuum casting machines:
-
Renishaw 5/01 PLC: Max. mold size 530 x 450 x 420 mm, price roughly $45k. The larger 5/04 model allows molds up to 750 x 750 x 900 mm and more materials, like glass-fiber reinforced nylon and wax, but it comes at nearly double the price.
-
SLM VCM 04: Max. mold size 750 x 750 x 900 mm, casting volume 2.2L, and includes casting with nylon and wax.
-
MCP 5/01: Max. part size 400 x 400 x 400 mm. MCP offers many larger models, including the MCP 003 with 560 x 600 x 600 mm part size, the 4/04 with 900 x 750 x 600 mm part size, and the 4/05 with 1300 x 750 x 800 mm part size. These machines are fully programmable and allow vario-pressure casting with wax, silicone, and nylon, next to PU resins. They can also be used with 3D printed injection molds.
-
Scott AM 1000: Max. mold size 500 x 450 x 425 mm, 1 kg casting weight. The 4000 model has a max. mold size of 750 x 750 x 900 mm and 5 kg casting weight. Besides resins, these apparatuses can be used for vacuum investment casting with ceramics and metals.
-
Multistation CSV 340: Max. mold size 340 x 340 x 435 mm, casting volume 600 mL. The CSV500 model fits molds up to 500 x 500 x 635 mm and casting volumes up to 1 liter.
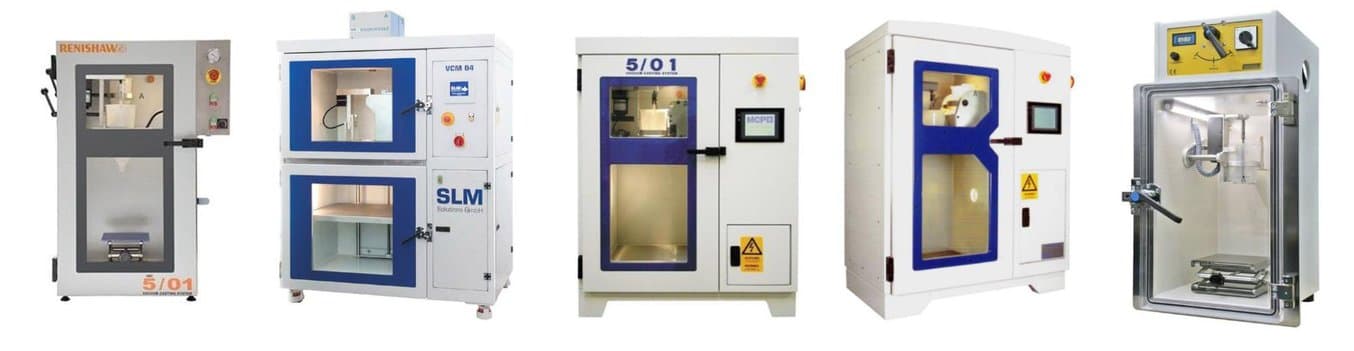
A line-up of vacuum casting machines by Renishaw, SLM, MCP, Scott AM, and Multistation.
Vacuum Casting Machines vs. Pressure Chambers
For a low-budget alternative, it is entirely possible to build a homemade vacuum gravity casting machine. Since a single air bubble left inside the mold can ruin the entire casting, degassing is a fundamental challenge of the resin casting process.
To get all bubbles out of the mixture, there are two anti-bubble weapons of choice when it comes to building a DIY vacuum casting machine: a vacuum chamber or a pressure pot.
A vacuum chamber is a vat that can be used to remove the air from silicone rubber before creating the mold. Because the vacuum-pulling approach is slower than the high-pressure approach, a vacuum chamber only works with slow-setting resins that have a curing time of twenty minutes or more.
A vacuum chamber has two levers: one for the air inlet, and the other for the vacuum pump. It has a gauge for checking if the vacuum has been reached, and a transparent acrylic lid for checking the degasification. A tempered glass lid is well-worth the higher price since it will never crack over time, as opposed to a plastic lid.
Pressure pots cost a bit more since they require an air compressor. But on the other hand, they are arguably the best means to create bubble-free resin mixtures and castings. Unlike vacuum chambers, these can be used with the mold, they work with quick-setting resins that have a short working window, and the resulting castings will be 100% clear of trapped air.
A vacuum chamber has the advantage of being useful for many applications, like deairing plaster, concrete, or wood infusions, while a pressure pot will typically only be utilized for degassing batches of silicone.

Vacuum chamber (left) and pressure pot (right).
Vacuum Casting Materials
Silicone Mold Materials
Casting silicones can be divided into tin-cure and platinum-cure silicones. Tin-cure silicones, a.k.a. condensation-cure silicones, show between 1-4% shrinkage. While model makers will do their best to compensate for shrink rate, for high-tolerance applications it’s better to go with higher quality platinum-cure silicone or high-temperature vulcanization (HTV) rubbers.
A 40-50 Shore A hardness will make for a durable mold that can be reused dozens of times, while facilitating easy demolding, even for parts that would get locked inside a rigid mold because of backdraft issues. A translucent silicone is recommended because it provides visibility of air traps, bubbles, contaminants, and everything else that’s going on inside the mold.
Some great two-component silicone brands are SmoothOn, Elastosil, V-Sure, and Silicones and More (S.A.M.). Ordering directly from chemical factories overseas can also reduce the price while providing a professional-quality product according to the buyer’s exact specifications, especially for large orders.
RTV and HTV jewelry molds are used in the jewelry industry for production and can capture intricate filigree details.
Urethane Resins for Casting
There are a legion of vacuum casting materials with different properties in terms of flexibility, elasticity, stiffness, and hardness:
-
ABS-like general purpose resin
-
Glass-filled nylon-like material for superior rigidity
-
Elastomeric TPE-like for applications like wearables, hand grips, buttons, gaskets and seals
-
PC-like (polycarbonate)
-
Translucent or water-clear casting urethane (PMMA-like)
-
POM-like or PU-like heat-resistant materials
There are also a few exotic urethane casting materials, such as smash glass, wax, epoxy, ceramic, composites, as well as food-grade, conductive, low-density, and fire-retardant options. Some well-known brands are FastCast urethane casting resin, Smooth-On, and SRC Specialty Resin.
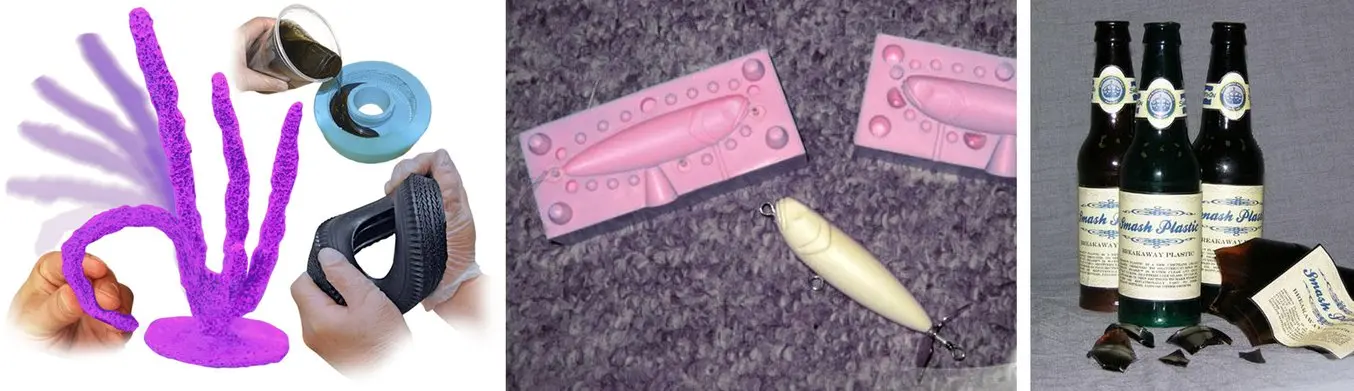
An assortment of urethane resins, from rubber-like to floating to glass-like.
Case Studies: Urethane Casting With 3D Printed Patterns
Calibur Fencing
Vacuum casting is ideal for pre-production runs to test and tweak the final product before investing in mass production tooling for injection molding. One successful case story is Calibur Fencing, a wireless wearable device for keeping score in fencing.
The designers started with simple prototypes to test the device’s functionality, and then stepped to FDM printing for rough mockups to find the right form factor. Finally, a Formlabs Form 3 SLA printer proved indispensable to create high-quality prototypes that represented the final product.
The team then used the SLA 3D printed parts as patterns and shipped them to a vacuum casting service provider to produce and beta test units for customer and make rapid strides toward a final product while staying on top of quality control.
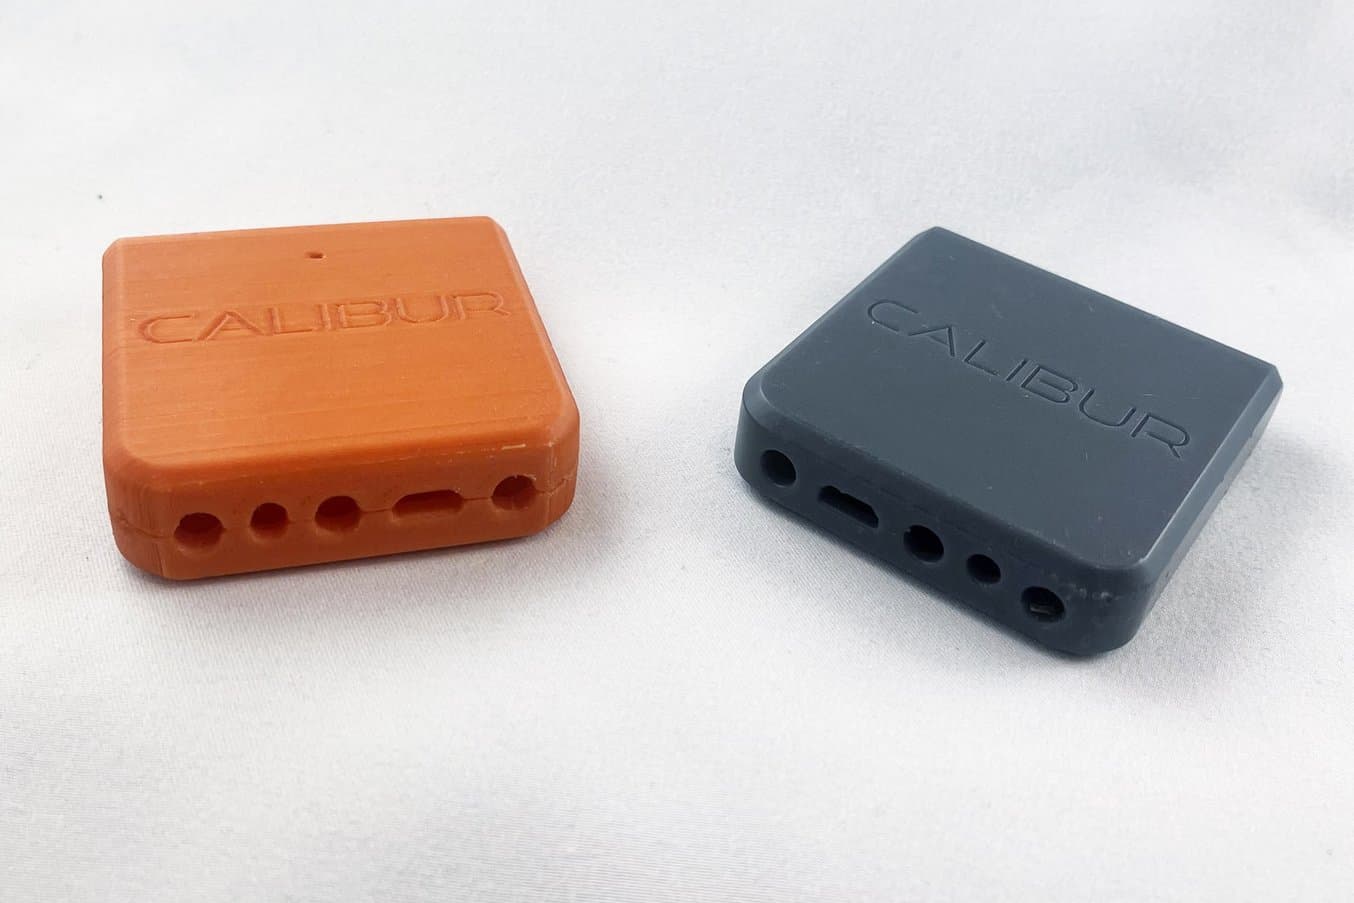
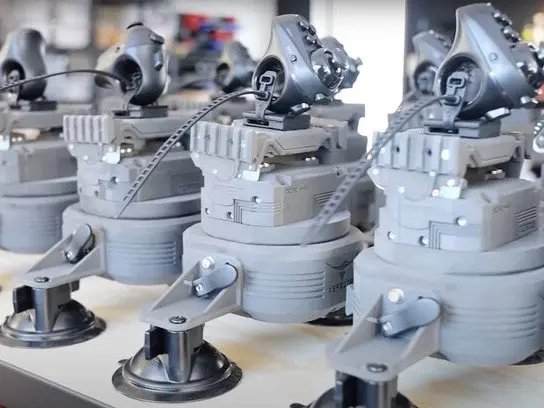
Calibur’s team used FDM 3D printing for the first mockups and then moved to SLA 3D printing for realistic, functional prototypes.
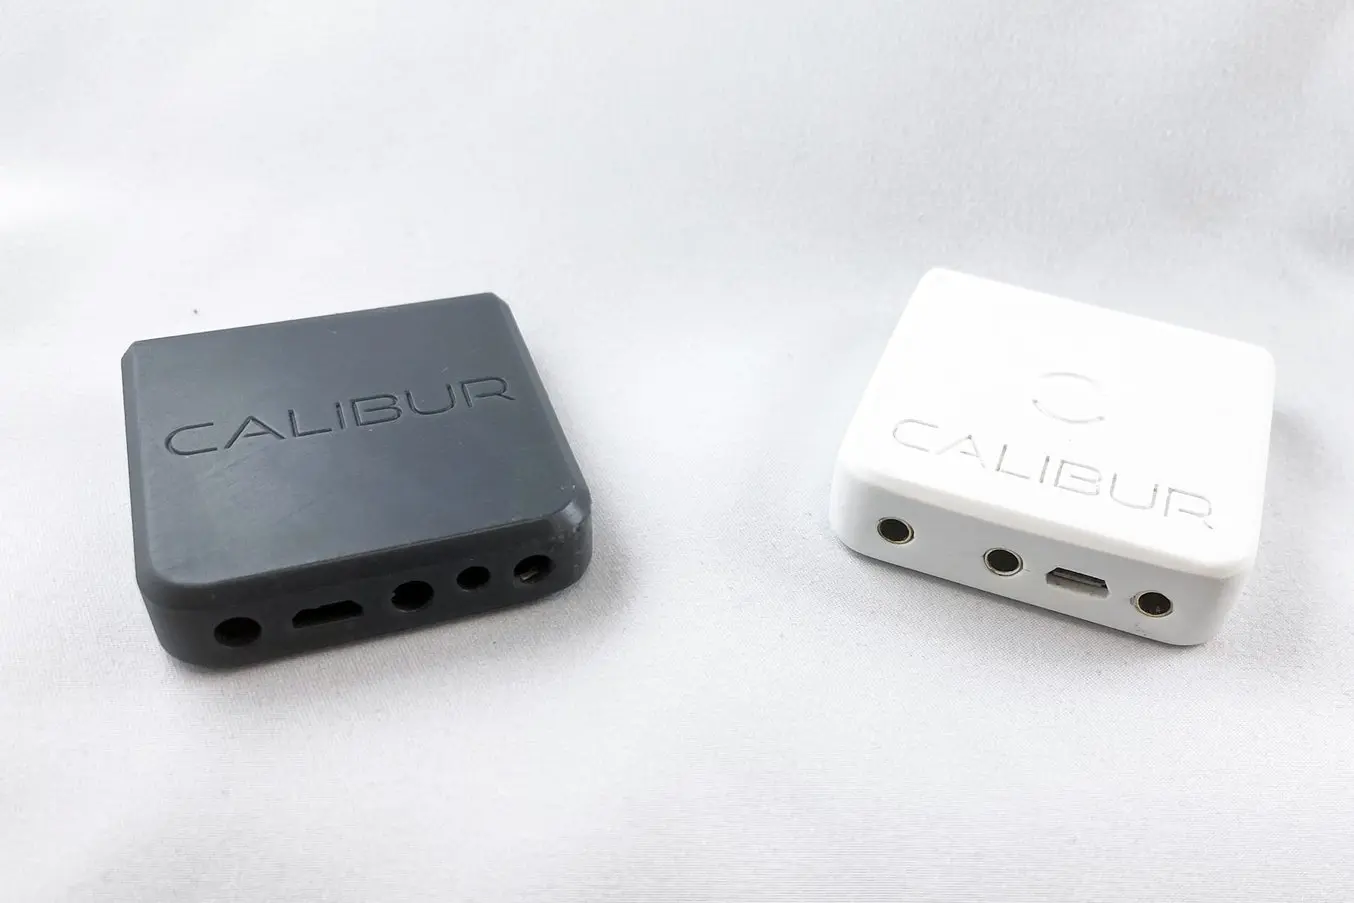
The team then used the SLA 3D printed parts as patterns for vacuum casting the first small series of end-use test units.
Louisville Slugger
The team at Louisville Slugger Innovation Center found that little things can make a big difference. They have been producing baseball bats since 1884 and know all about the factors that create an ever-faster, more powerful swing.
The staff at the Slugger Innovation Centers have maintained an analytic approach to design for sports, and created a grip add-on with help of Formlabs 3D printing solutions. The stepped geometry aids batters in acheiving a perfect grip for the firmest possible strike.
As in other cases, the Slugger design team found that having 3D printing and vacuum casting capacity on board under one roof speeds up the design iterations while driving faster knowledge generation. Detailed prototype models, printed on a Form 3 SLA printer at 50 μm layer height, served to create a mold positive. The power of urethane casting enabled them to create durable, testable models that near the quality of a silicone injection molded final product.
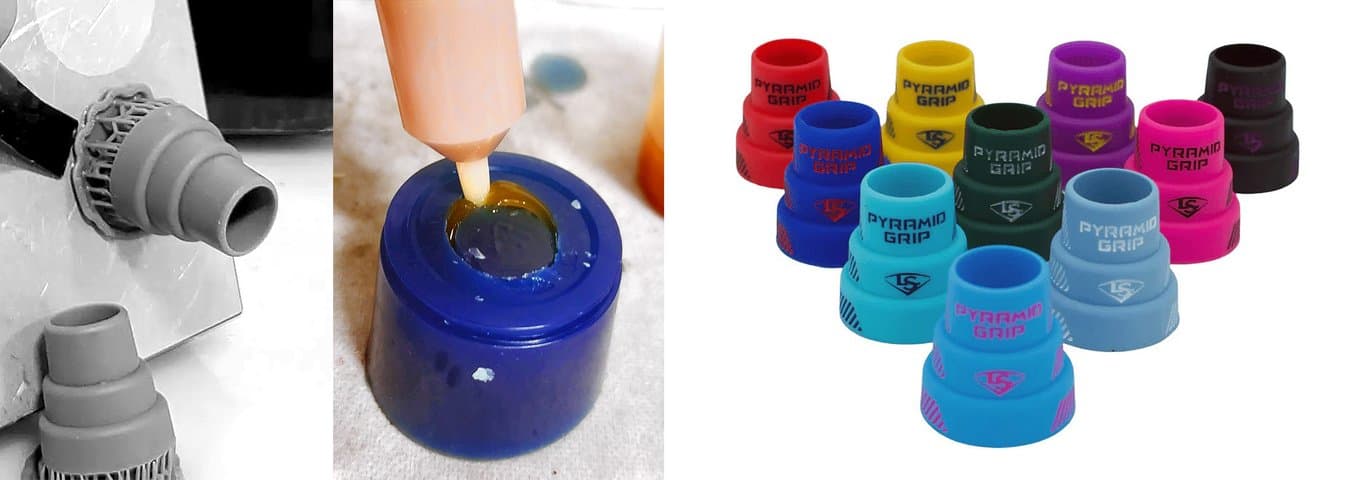
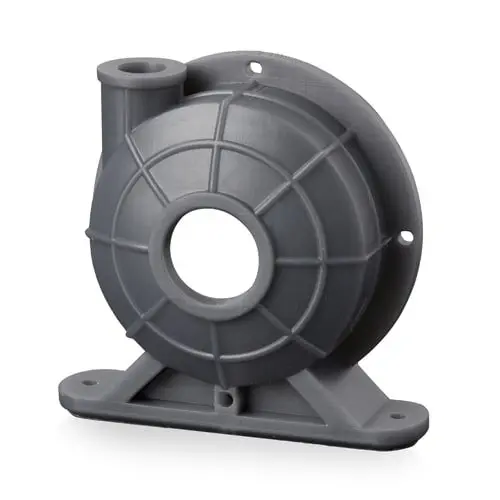
From 3D printed positive to in-house casting to finished product.
SiOCAST
SiOCAST has a unique story to tell when it comes to integrating 3D printing with resin casting. With the rise of MMORPG online games as well as RPG board games has come a rapidly growing demand for custom miniature figurines. Instead of going for the costly route of spin casting, or the limited series allowed with vacuum casting silicone molds, the company developed a patented resin injection system that works with a custom-developed machine and HTV rubber molds.
Their proprietary material, SiOres, even works with liquefied thermoplastic resins up to 240 ˚C. A SiOCAST machine is up to twenty times faster than traditional resin casting and could produce as many as 1,000 parts per hour with automation and rotating multi-cavity molds.
All master patterns are 3D printed using a Formlabs SLA printer and post-processed with Formlabs’ automated cleaning and curing systems, Form Wash and Form Cure. With reusable runners produced through SLS 3D printing, the process is further sped up to create up to 64 miniatures per casting.
Where injection molding produces the occasional error because it has to deal with more critical conditions and viscous materials, these vacuum cast models are without exception impeccable replicas of the original sculpture and ready to satisfy the digital soul of many a gamer.
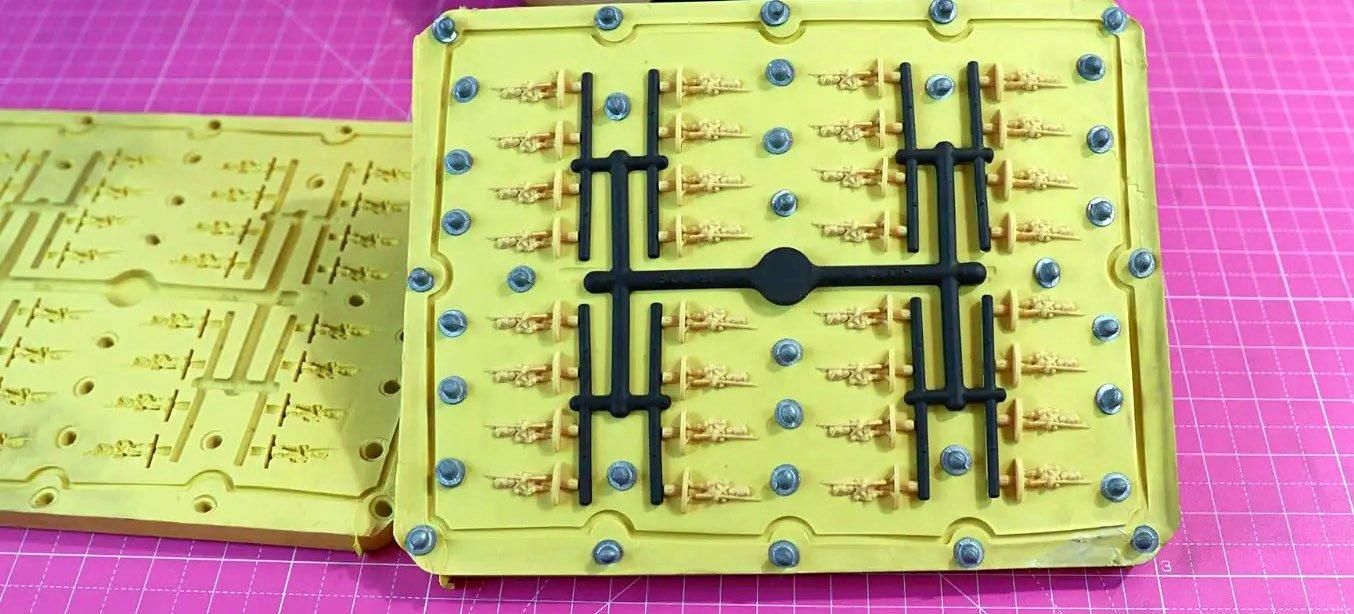
SiOCAST uses a proprietary HTV silicone, SLA master models, and reusable SLS nylon runners to duplicate miniatures in series up to 10,000 units.
Get Started With Vacuum Casting and 3D Printing
Vacuum casting is an ideal process for molding products without requiring the extensive upfront investments demanded by industrial-level production methods. It can be used to create prototypes, looks-like models, pre-production series, as well as final products for just about any application. The cast model is an exact replica of the master pattern, as long as the product geometry allows for demolding and conforms to specific design guidelines for vacuum casting.
Vacuum casting also benefits from new developments in 3D printing, as the ability of 3D printing to create highly detailed master models with supremely smooth perfect finish makes it a perfect match for the vacuum casting process.
But unlike 3D printing, DIY vacuum casting is not easy to do in house and requires following strict procedures. With high precision, simple workflow, and short lead times, 3D printing also offers a viable alternative to vacuum casting for prototyping and increasingly also for low volume production.