WHITE PAPER
Formlabs Logo

Replacing the Form Cure L V2 turntable motor and coupler

Replacing the Form Cure L V2 turntable motor and coupler

The Form Cure L V2 has a turntable motor that rotates the glass turntable, ensuring that all the surfaces of the part are exposed evenly for adequate curing. A faulty or malfunctioning turntable motor or coupler will not rotate the turntable or run inconsistently, resulting in unevenly-cured parts.

Use this guide to replace the turntable motor and coupler on a Form Cure L V2.

Form Cure L V2 turntable motor and coupler

Required Supplies:

Formlabs:

  • Replacement turntable motor and coupler
    • 120 V: RP-CU2L-MTR-120-01
    • 230 V: RP-CU2L-MTR-230-01
  • 2.5 mm hex driver (included in the Form 4 or Form 4L tool caddy)

Third-party:

  • 3 mm hex driver
  • Nitrile gloves
  • Anti-static grounding strap

Estimated time: 40 minutes

Danger:

Read and follow all safety instructions and warnings in the operator manual. Replacement with incorrect parts can lead to burns, shock, fire, or explosion. Dispose of all parts in accordance with local regulations.

Preparing the workspace

Overview: Prepare the Form Cure L V2 and workspace for replacing the turntable motor and coupler.

Step 1: Prepare the workspace

Clear a workspace around your machine. Ensure that the workspace is well-ventilated and free of dust.

Step 2: Unplug the machine

Turn off the machine using the power switch on the back of the unit. Disconnect the power cable before continuing with maintenance. Do not perform maintenance on the machine while it is connected to power. Wait five minutes after disconnecting the machine from power before proceeding. If the machine was recently in use, the post-cure chamber will be warm. Wait at least 10 minutes for the chamber to cool.


Danger:

Performing maintenance on the machine while it is plugged in increases the risk of electric shock. Never remove the machine's shells while it is plugged in. Never reconnect the machine to power while the shells are uninstalled.

Step 3: Remove the glass turntable

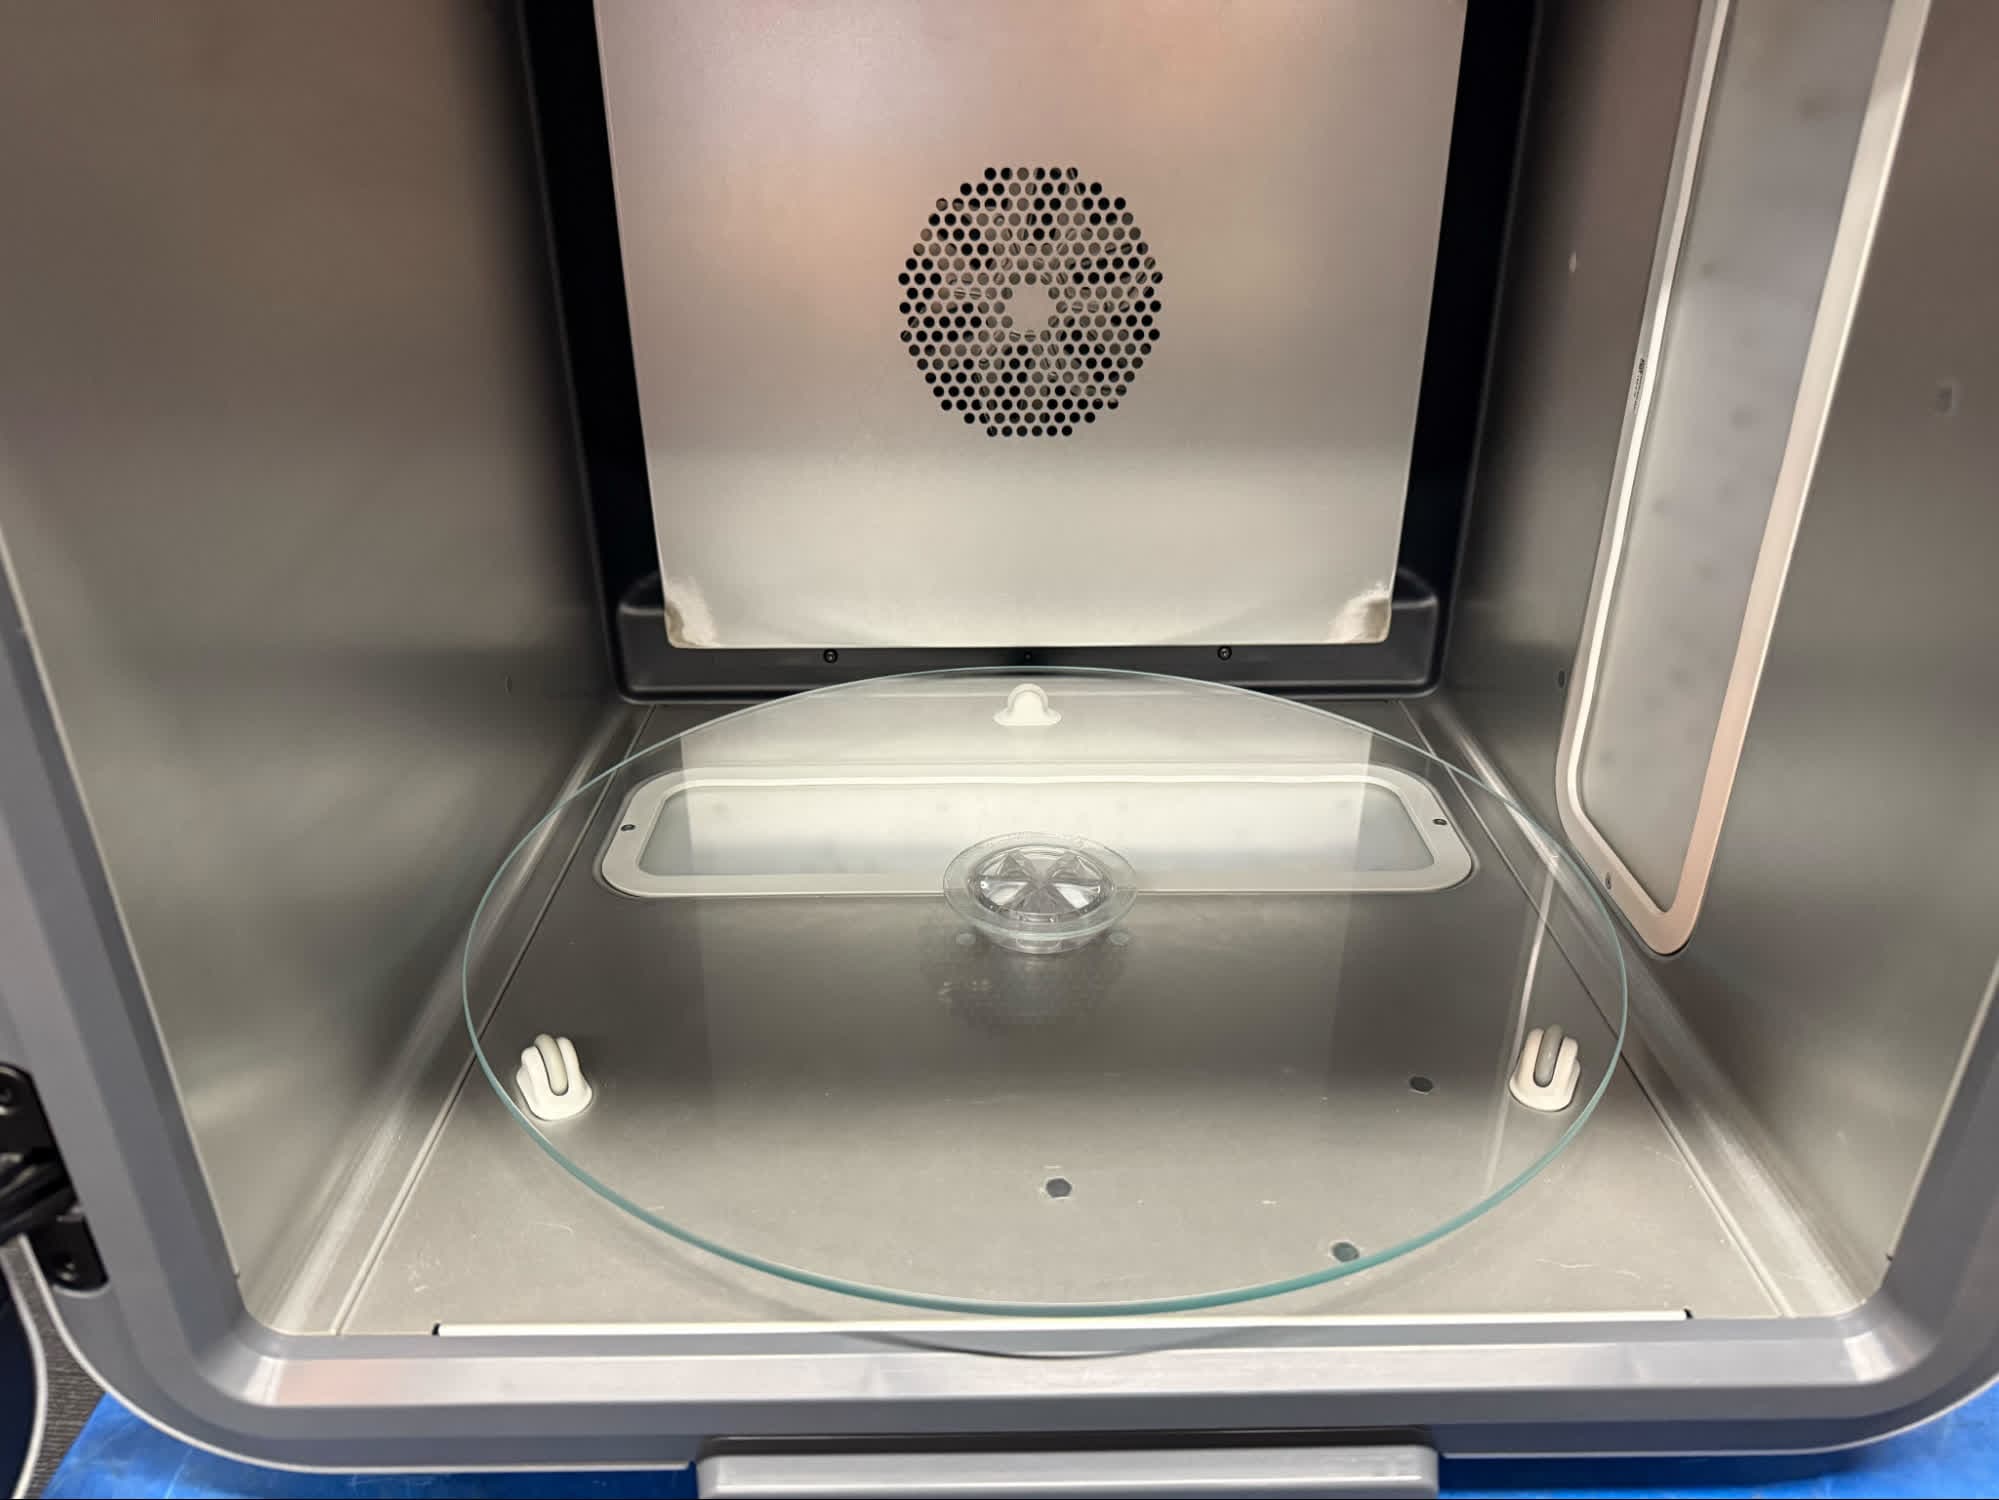
Open the curing chamber door. Gently lift the glass turntable off of the turntable coupler and set it aside.

Step 2: Remove the glass turntable

Step 4: Remove the turntable coupler

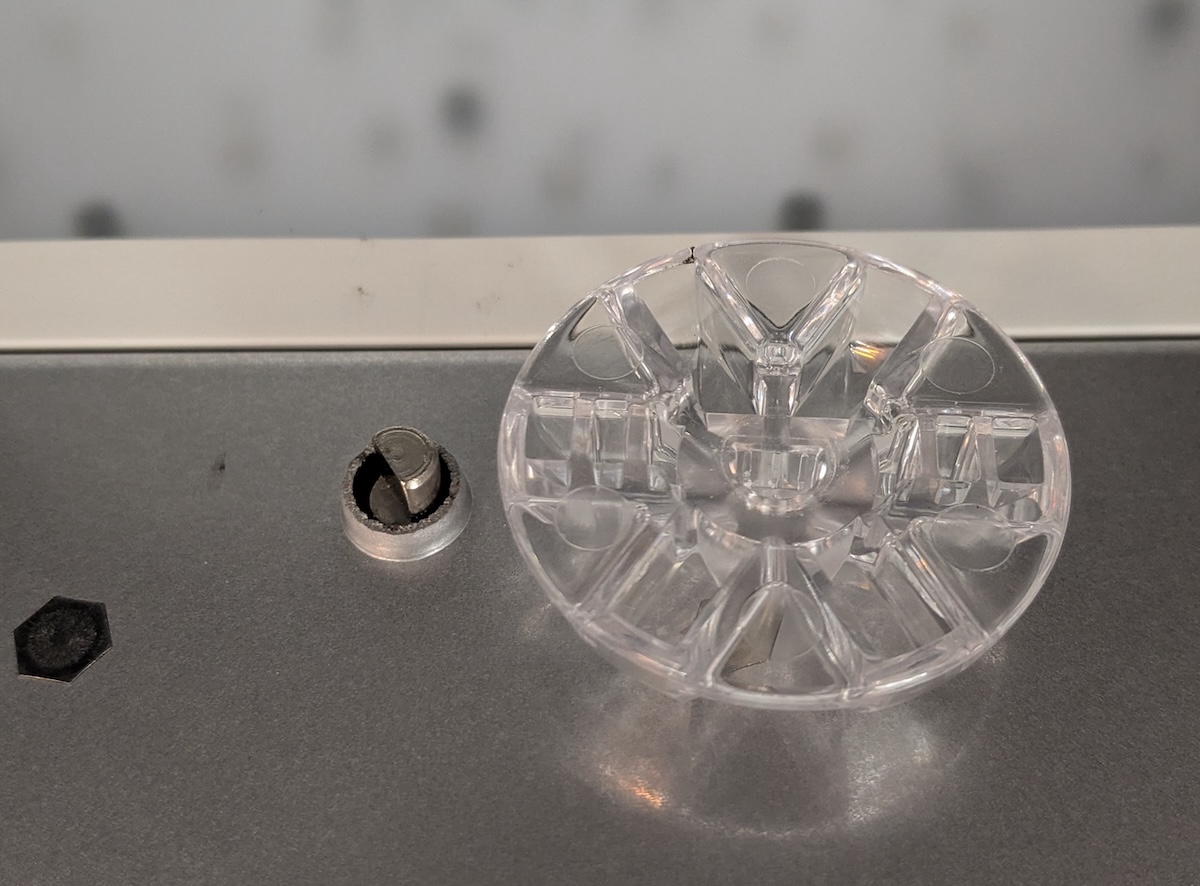
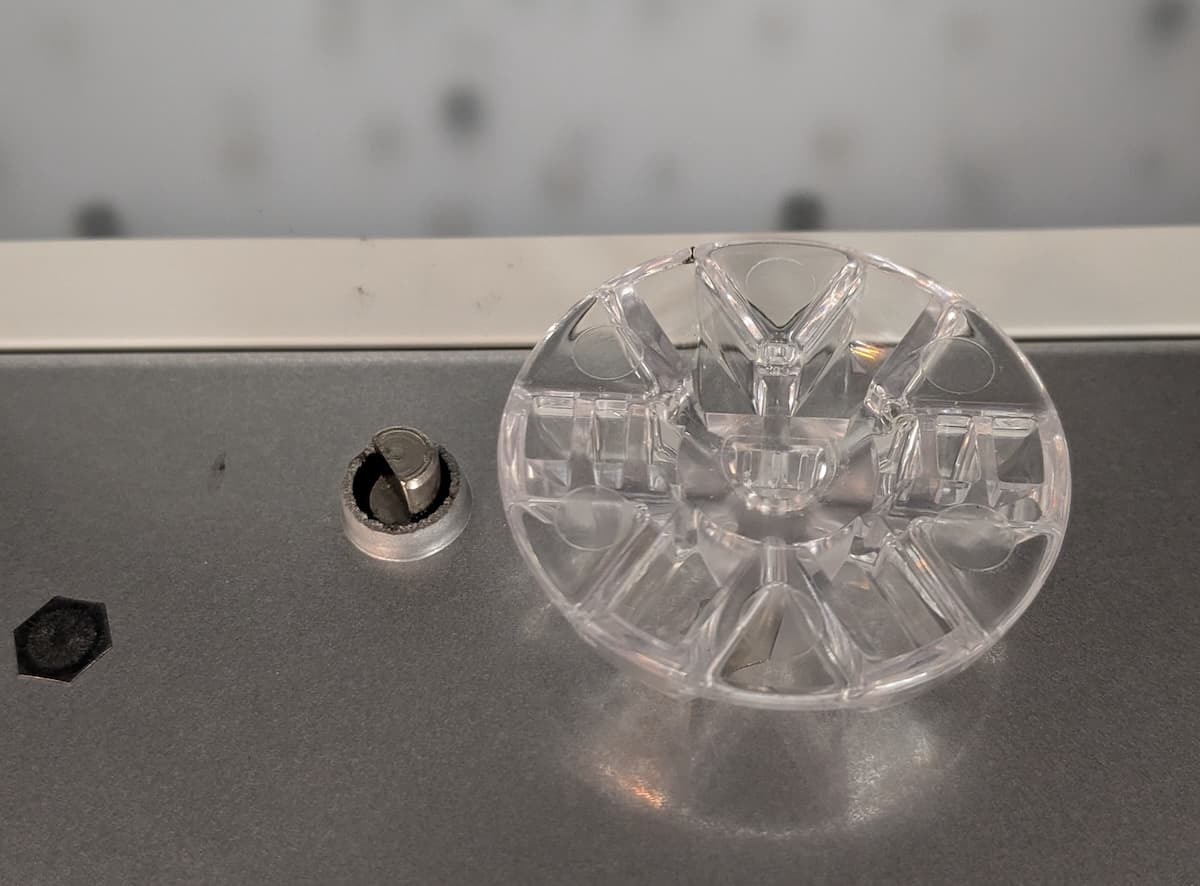
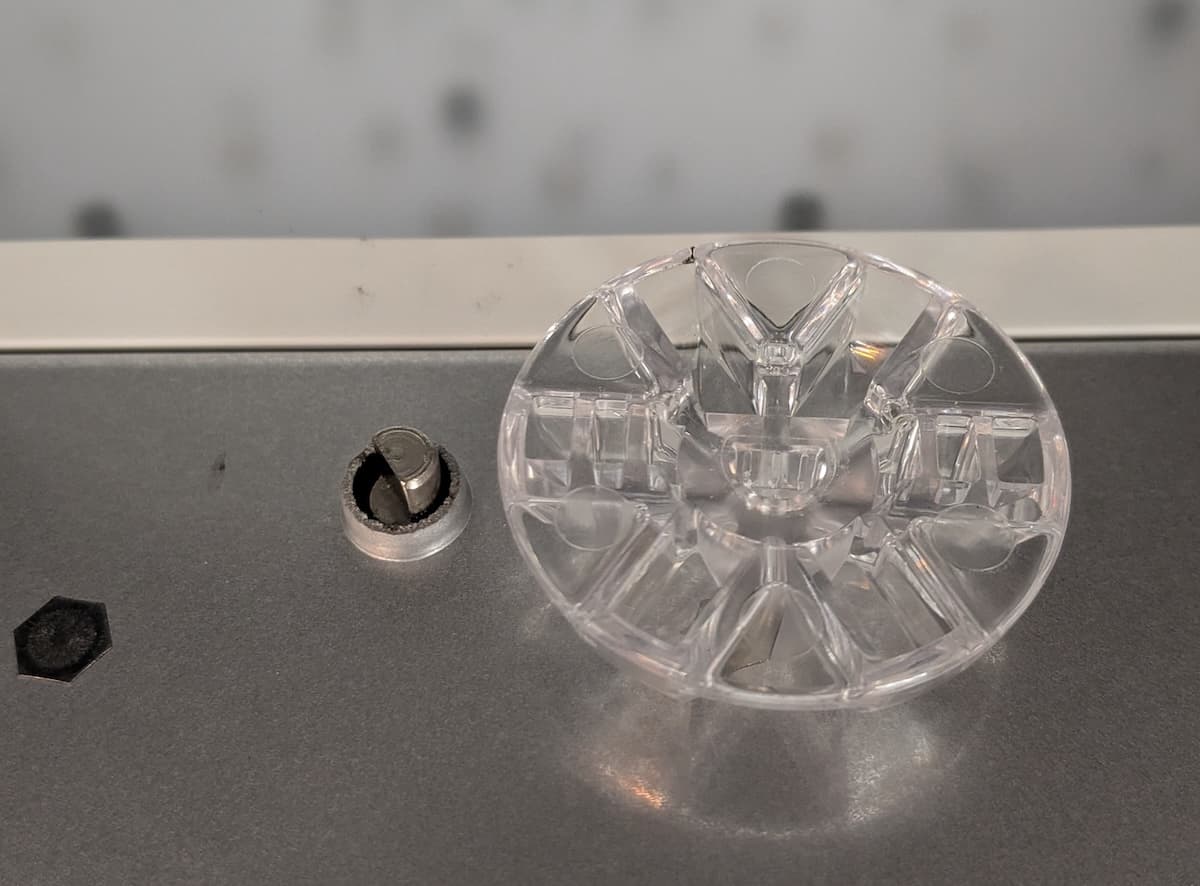
Pull the turntable coupler up off of the motor shaft. Set the coupler aside for disposal. Close the curing chamber door.

Step 3: Remove the turntable coupler

Removing the shells

Overview: Remove the rear, side, and bottom shells to access the turntable motor.

Step 1: Remove the rear shell

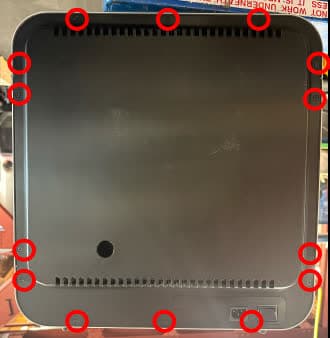
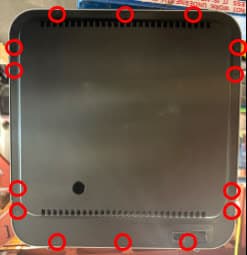
Rotate the machine so you can access its rear shell. Using a 2.5 mm hex driver, loosen and remove the 14 screws securing the rear shell to the frame of the machine. Set the screws and shell aside.

Step 1: Remove the rear shell

Step 2: Remove the side shells

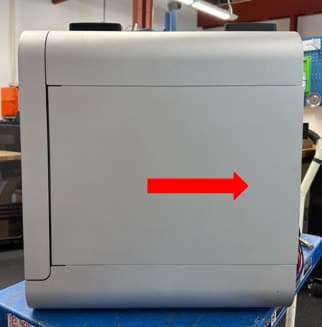
Slide the two side shells towards the back of the machine. If they are difficult to remove, use a vice grip with a towel between the jaws to avoid scratching the panel coating.

Step 2: Remove the side shells

Step 3: Remove the screws securing the bottom shell

Remove the screws securing the bottom shell

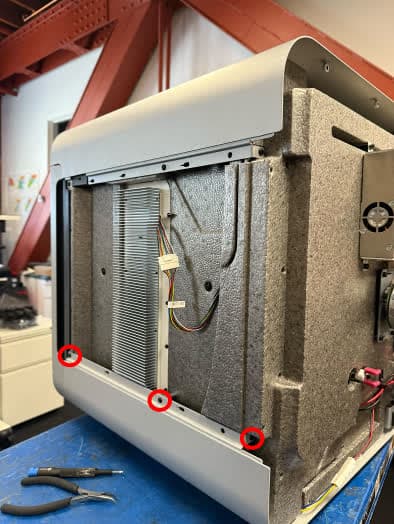
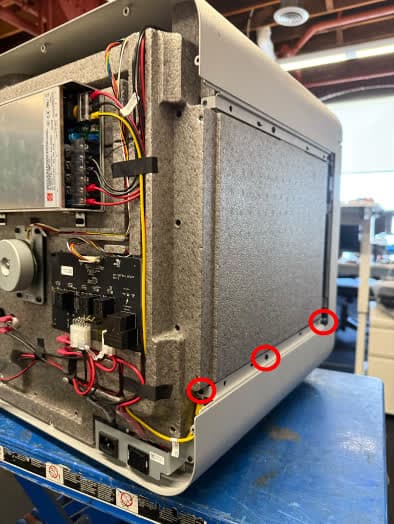
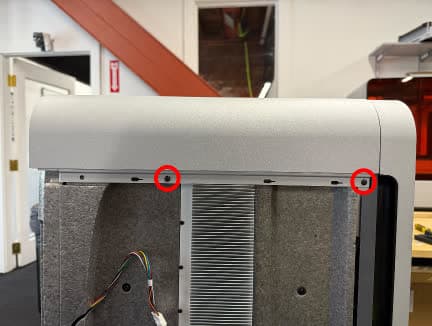
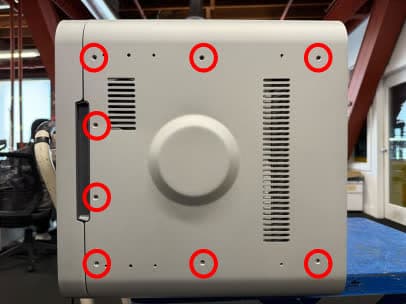
Using a 2.5 mm hex driver, loosen and remove the six screws along the upper edges of the bottom shell. Set the screws aside.

Step 4: Remove the bottom feet

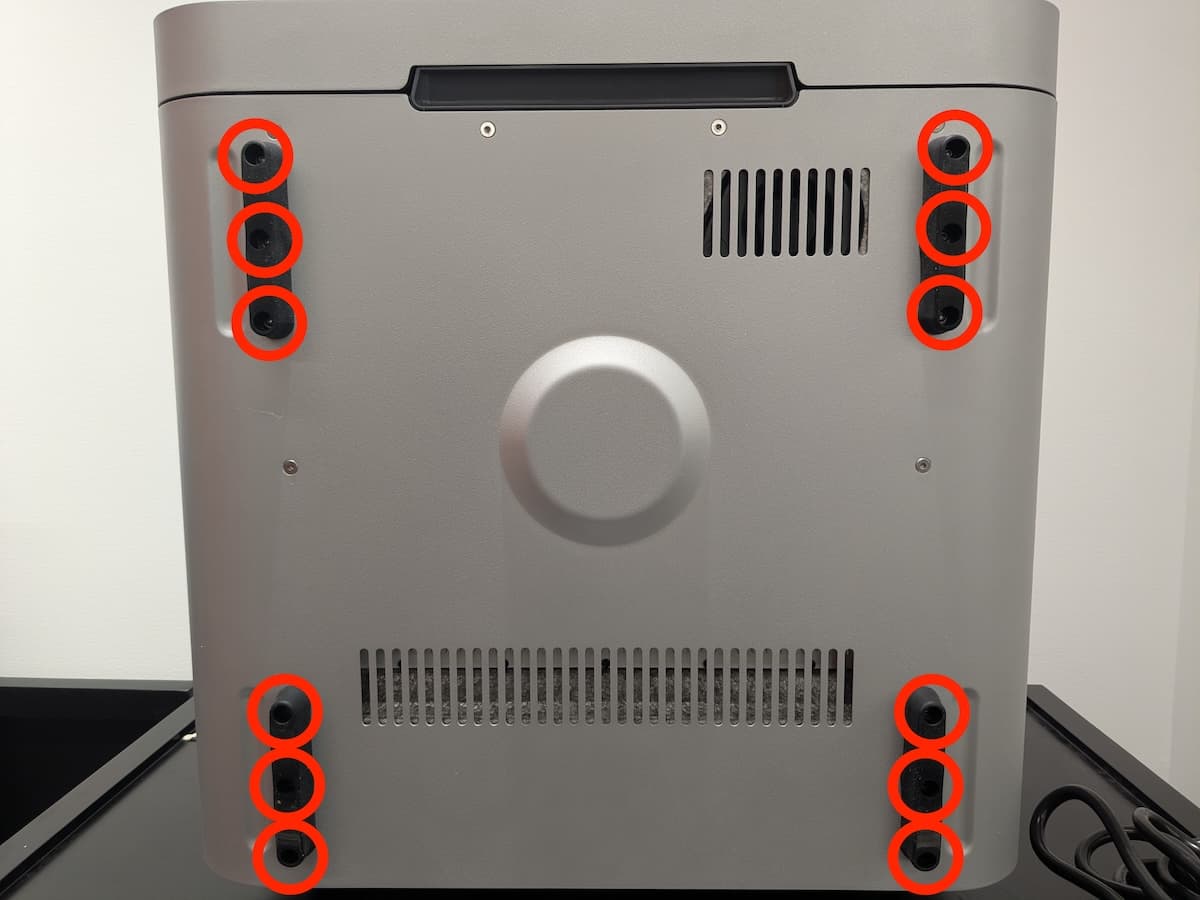
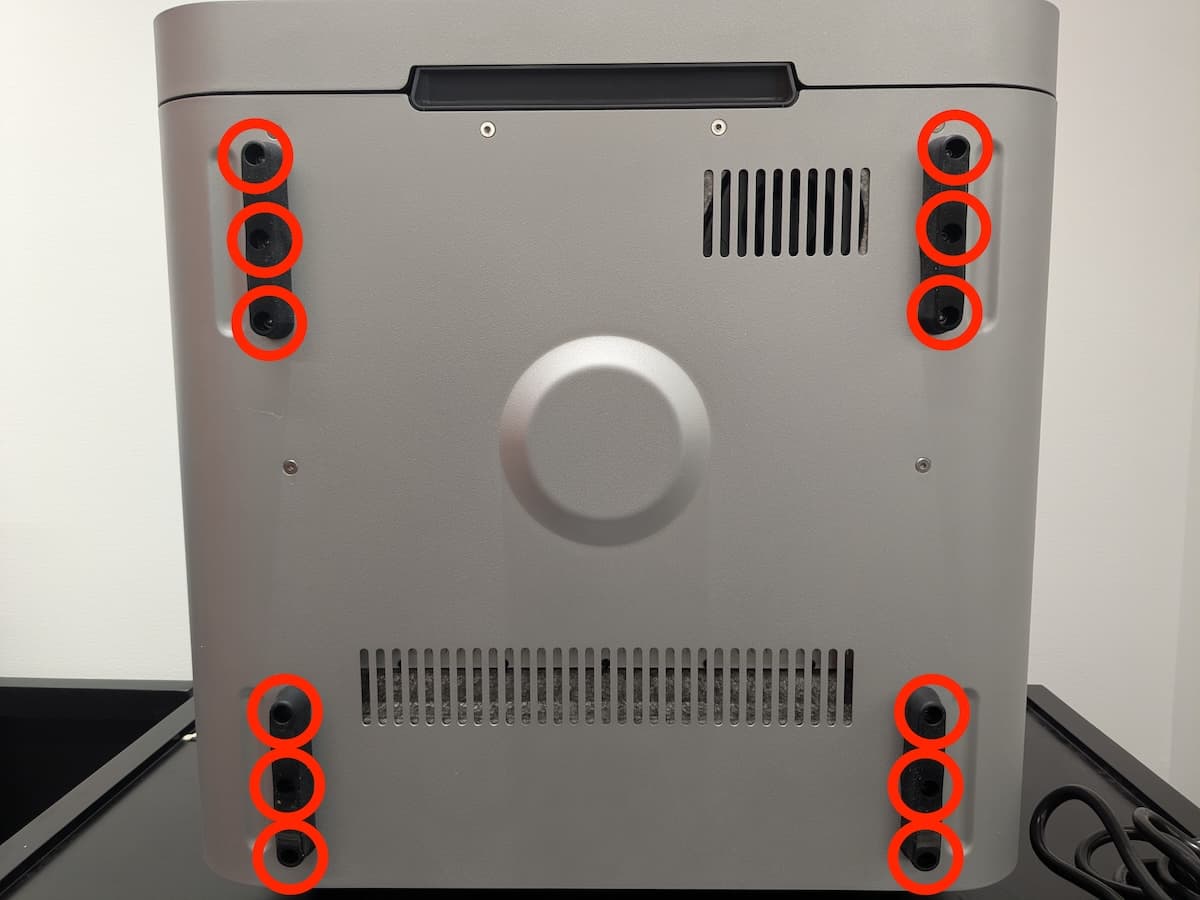
Carefully rotate the Form Cure L V2 so you can access the bottom of the machine. Using a 2.5 mm hex driver, loosen and remove the 12 screws securing the rubber feet to the bottom of the machine. Set the screws and the four feet aside.

Step 4: Remove the bottom feet

Step 5: Remove the screws securing the bottom shell

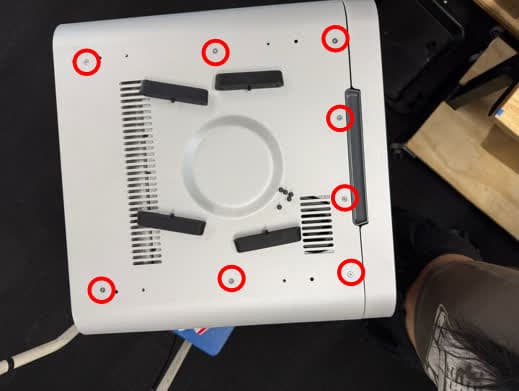
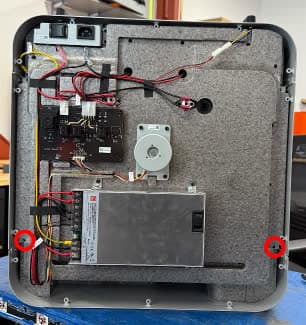
Using a 2.5 mm hex driver, remove the remaining eight screws securing the bottom shell to the machine. Set the screws aside.

Step 6: Remove the bottom shell

Lift the bottom shell off of the machine and set it aside.

Step 5: Remove the screws securing the bottom shell

Removing the turntable motor

Overview: Disconnect and remove the original turntable motor.

Step 1: Unscrew the motor mounting screws

Step 1: Unscrew the motor mounting screws

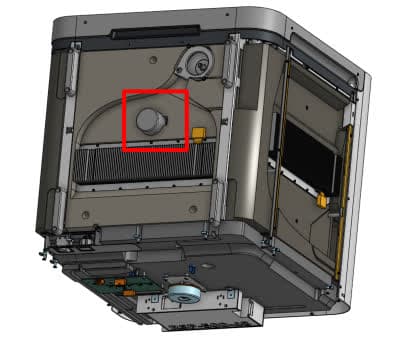
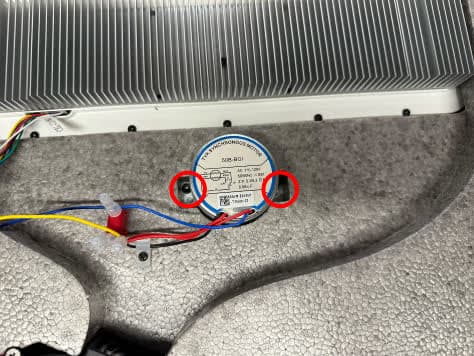
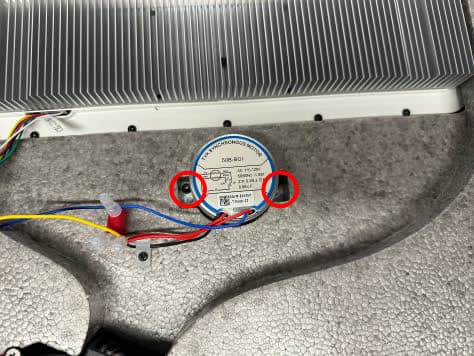
Locate the motor, positioned at the middle of the bottom face of the machine. Using a 3 mm hex driver, remove the two screws securing the motor to the machine. Set the screws aside for disposal.

Step 2: Disconnect the motor cable

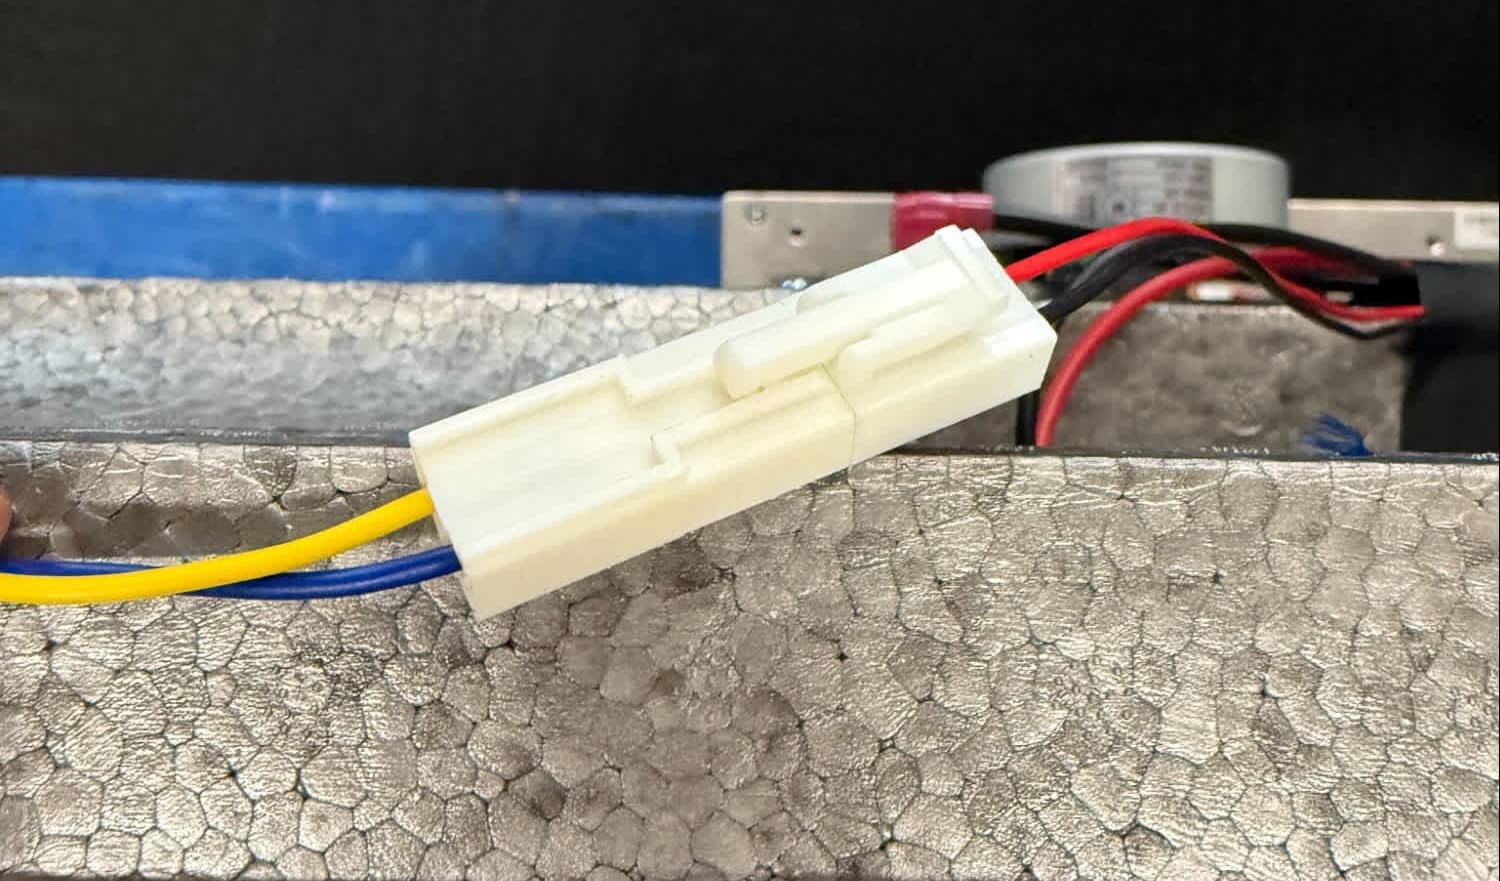
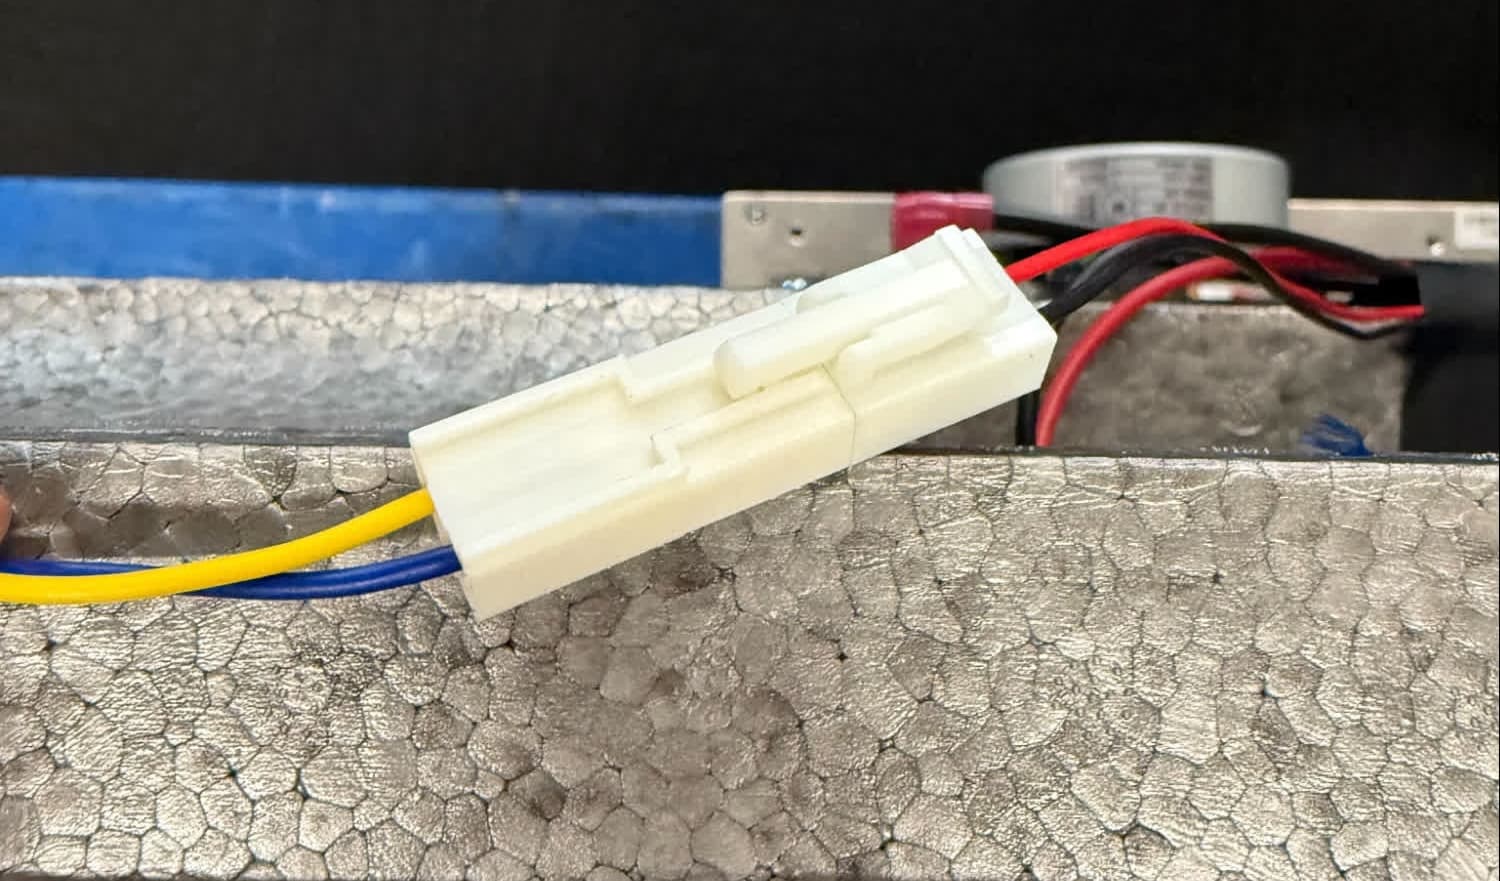
Follow the wires from the motor and locate the cable connector. Squeeze the locking tab and pull the connectors apart. Do not pull on the wires themselves. If the wire or connector is caught between layers of insulation, carefully move the insulating foam out of the way first.

Step 2: Disconnect the motor cable

Installing the replacement turntable motor

Overview: Mount, secure, and connect the new turntable motor.

Step 1: Mount and secure the turntable motor

Insert the motor shaft through the hole in the bottom of the Form Cure L V2. Align the two screw holes in the motor with the corresponding holes in the machine. Thread one motor mounting screw into both of the screw holes, then use a 3 mm hex driver to tighten until snug.

Step 1: Mount and secure the turntable motor

Step 2: Connect the motor cable

Reconnect the motor cable. The cable only fits into its connector in the correct orientation. The locking tab clicks into place when the cable is fully connected.

Step 2: Connect the motor cable

Reinstalling the shells

Overview: After replacing the turntable motor, reinstall the rear, side, and bottom shells.

Step 1: Mount and partially secure the bottom shell

Step 1: Mount and partially secure the bottom shell

Place the bottom shell onto the Form Cure L V2. Align the six screw holes along the edges of the shell with the corresponding holes in the insulation panel. Thread one mounting screw into each of the six screw holes, then use a 2.5 mm hex driver to tighten until snug.

Step 2: Reinstall the side shells

Slide the two side shells back into place between the top and bottom shells.

Step 3: Mount and secure the rear shell

Mount the rear shell back onto the machine. Thread one rear shell retention screw into each of the 14 screw holes in the rear shell. Using a 2.5 mm hex driver, tighten the screws until snug.

Step 3: Mount and secure the rear shell

Step 4: Fully secure the bottom shell

Check that the installed panels sit flush against one another. Thread one bottom shell mounting screw into each of the eight screw holes marked in the image here. Using a 2.5 mm hex driver, tighten the screws until snug.

Step 4: Fully secure the bottom shell

Step 5: Mount and secure the feet

Place the four feet on the bottom shell, aligning the three screw holes in each foot with the corresponding holes in the shell. Thread one mounting screw into each of the 12 screw holes, then use a 2.5 mm hex driver to tighten until snug.

Step 5: Mount and secure the feet

Finalizing the repair

Overview: After installing the new turntable motor, power on the machine and perform final checks.

Step 1: Install the turntable mount

Carefully rotate the machine to its upright position. Open the curing chamber door and press the new turntable mount onto the motor shaft. The shaft has a D-shaped profile, so the mount should fit snugly on it in one orientation. Close the curing chamber door.

Step 1: Install the turntable mount

Step 2: Power on the machine

Connect the power cable to the machine and its power supply. Turn on the switch at the back of the machine.

Step 3: Test the repair

Start a post-cure cycle and check that the turntable rotates normally once the machine reaches its target temperature.