
Who knew chocolate packaging could look this good? We were impressed by the sleek design of Ken-ichi Tanaka’s Valentine’s Day chocolate packaging project. At Super Crowds in Tokyo, Ken-ichi and his coworkers Yuma and Asato design logos, illustrations, websites, packaging, and products.
Working with the Form 1+ SLA 3D Printer
Ken-ichi received the Form 1+ 3D printer in September and have been actively experimenting with it ever since. Being a product designer, Ken-ichi has always been interested in 3D printers. When we asked him what influenced his decision to purchase the Form 1+, he cited the high-resolution prints from stereolithography, as well as the high quality hardware and software.

“I had never seen a product that combines high quality hardware and software to the extent that Form 1 does, so it grabbed my attention from the time it was announced. Above all it's simply cool! High quality tools motivate creators to create things, so in that sense Form 1 was the absolute best!“- Ken-ichi Tanaka
Inspiration for the “Eat Chocolate Be Happy” Brand
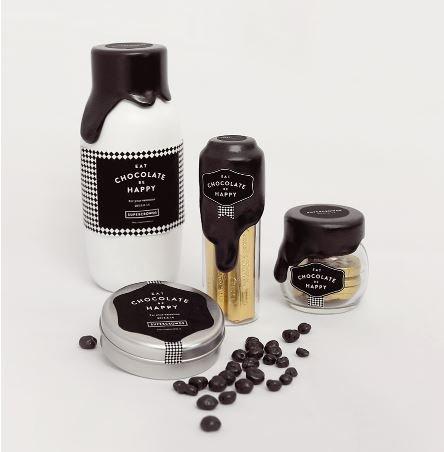
In Japan on February 14th, Valentine’s Day is celebrated differently than in other countries—women are the ones who give gifts, typically chocolate, to their significant others and friends. To celebrate the holiday, Ken-ichi and his team created a fictional chocolate brand, executed in the form of assorted chocolate packaging. They chose to create 3D printed caps for the bottles, which were inspired by melting chocolate.
Creating the 3D printed caps

“The biggest advantage of the Form 1 is being able to quickly turn ideas into reality. We made three types of caps for the Valentine's Day project, and from conception to completion it only took a single day.”- Ken-ichi Tanaka
The process involved:
1. Printing out three different caps with his Form 1+ 3D printer
2. Finishing and polishing the prints
3. Priming the surface
4. Adding texture with putty
5. Priming the surface again
6. Spray painting the caps brown
7. Attaching the caps to the bottles
8. Adding stickers and final touches


"I wanted to treasure not just the painting, but also the process of applying the putty. We were able to give the chocolate a more realistic feel by using our own hands to give form to the part of the chocolate that looks like it might melt.”-Ken-ichi

To see the process in detail and more pictures, check out Ken-ichi on his blog. If you’re interested in learning more about how designers use the Form 1+ 3D printer, visit our Design Applications page.