
WHITE PAPER
Formlabs Logo

Packaging and transporting the Fuse Sift

Packaging and transporting the Fuse Sift

Follow these instructions to prepare and package the Fuse Sift for protection during shipping or transit.

Tip:

If you are shipping the machine, review its shipping weight and dimensions.

Required resources

The original packaging is designed to be kept and reused for transporting or shipping the machine for service. Save the complete packaging including any inserts for your convenience.

Made by Formlabs:

  • one (1) pallet, plywood
  • one (1) inner C-fold, cardboard and foam
  • one (1) outer C-fold, cardboard and foam
  • one (1) topper, cardboard
  • four (4) tie down brackets, steel
  • twelve (12) M6 × 45 mm lag bolts, steel
  • one (1) protective bag, plastic
  • two (2) lifting straps

Made by third parties:

  • five (5) binding straps, nylon

Preparing for transportation

Before repackaging, vacuum the workspace and empty the hoppers. Remove the powder cartridge, parts bin, surface grate, tool shelf, build chamber, power catch, and all tools.

Caution:

The Fuse Sift is a heavy object. A two person lift is required to prevent injury and avoid damage to the machine.

Notice:

Do not ship the machine with the power cartridge inserted in the drawer or mixer. Powder left inside the machine can leak during transit, which may lead to additional fees or void the warranty.

To prepare the machine:

  1. Vacuum the machine’s workspace and hoppers.
  2. Open the hoppers. Scoop all powder out of the hoppers using a clean, dry scoop. The powder can be reintroduced into your powder stream by running it through the sifter on the Fuse Sift.

Notice:

Powder that comes into contact with fibers or other contaminants (e.g., in a vacuum cleaner) cannot be filtered and should be disposed of.

  1. Remove the powder cartridge from the cartridge drawer or mixer.
  2. Remove the parts bin and surface grate.
  3. Remove all tools from the tool shelf and uninstall the tool shelf.
  4. Unplug the vacuum hose from the port on the inside-left wall of the machine.
  5. Remove the build chamber cover and powder catch from the build chamber enclosure. Empty the powder catch.
  6. Flip the breaker switch on the back of the unit to the OFF position to turn off the machine.
  7. Unplug all cables (power, Ethernet, and USB) from the back of the machine.

Packaging

Thoroughly read and follow the instructions to properly package the machine. Skipping any of the following steps may result in shipping damage and void the warranty.

To package the machine:

  1. Loop both orange lifting straps under the machine from left-to-right, ensuring that the straps are not crossed. With one person on each side, insert your forearms into each loop so they do not go past your elbows.
  2. With your back straight and knees slightly bent, brace against the unit with your palms as you and a second person lift the machine up.
  3. Lift the machine onto the pallet using the lifting straps, aligning the unit's feet with the black markings. Each person should push at an upward angle when lifting to keep the machine steady and level.

Caution:

The Fuse Sift is a heavy object. Use appropriate precautions and correct lifting form when moving the machine.
  1. Remove the lifting straps.
  2. Wrap the hood with stretch wrap at least four times, sealing the hood closed.
  3. Wrap the cartridge drawer with stretch wrap at least four times, securing the drawer in place.
  4. Place the included protective bag over the machine.
  5. Extend the unit's feet by unscrewing them from the leg until there is a gap of approximately 13 mm (0.5 in) between the top of each foot and the bottom of its respective leg.
  6. Orient the tie down brackets facing diagonally inwards, hooking the brackets around the unit's feet bolts.
  7. Secure the machine to the pallet using the included M6 × 45 mm lag bolts.
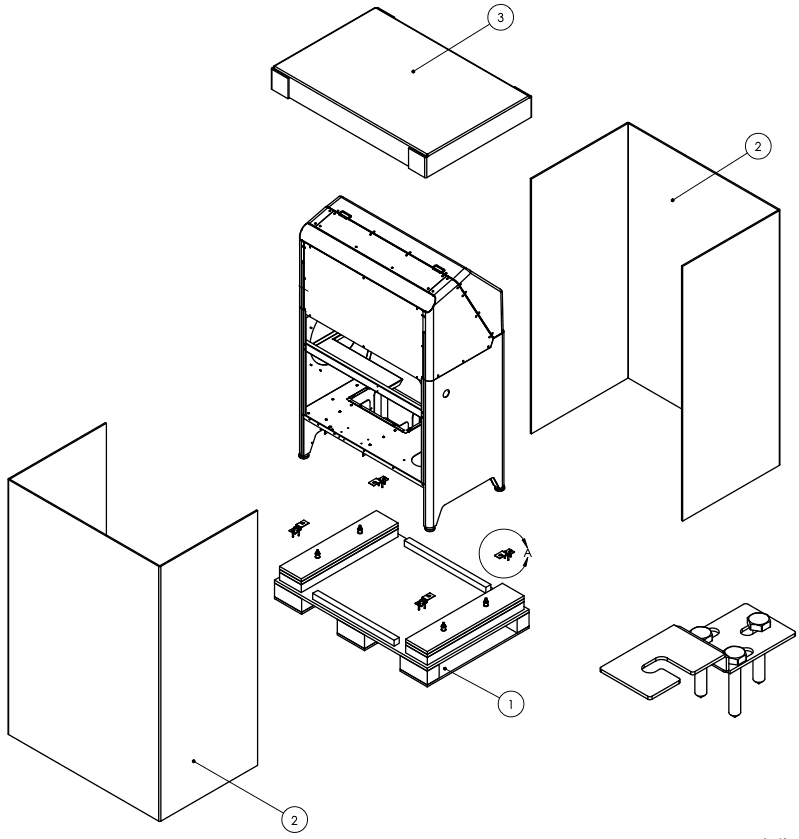
  1. Encase the front and the back of the machine with a C-fold segment (2), respectively.
  2. Place the topper (3) on top of the C-fold segments.
  3. Wrap a nylon binding strap (commercially available) horizontally around the C-folds. Position the strap approximately 50 cm (20 in) up from the bottom of the C-fold. Tighten and crimp the strap.
  4. Loop two nylon binding straps vertically around the machine, passing them underneath the pallet. Position the two straps approximately 25 cm (10 in) from the left and right sides of the machine, respectively. Tighten and crimp the straps.
The product is encased from four sides by two C-fold segments and a topper.