
Note:
Keep the packaging for transportation or shipping.

Plan an appropriate location for the Form Cure L V2. Purchase additional finishing supplies to ensure you can start using the Form Cure L when it arrives.
The Form Cure L V2 is ready for use once the turntable is installed and the Form Cure L is connected to power.
Additional supplies
Prior to receiving the Form Cure L, purchase the following additional supplies to help finish post-cured parts:
Arranging the workspace
The Form Cure L V2 has the following dimensions: 50.7 × 54.3 × 54.5 cm (20.0 × 21.4 × 21.5 in). The Form Cure L V2 unit weighs 40 kg (88.2 lb).
Reserve the following minimum dimensions for the most convenient access:
Operate the Form Cure L in a well-ventilated room with a temperature of 18–28 °C (64–82 °F). Follow safety considerations for the Form Cure L.
Unboxing the Form Cure L V2
The Form Cure L ships in a cardboard carton protected by foam inserts above and below the unit. During unboxing, inspect the Form Cure L for any damage or missing items. In the case of damage or missing items, contact Formlabs Support or your authorized reseller.
Note:
Keep the packaging for transportation or shipping.
To unbox the Form Cure L:
Caution:
If you need to readjust the Form Cure L, use the carrying slings to pick the machine back up. Do not pick up the Form Cure L without the carrying slings.
Notice:
Remove all packaging material before connecting power. Retain all packaging and inserts for warranty service. Refer to the manual for the repackaging instructions.
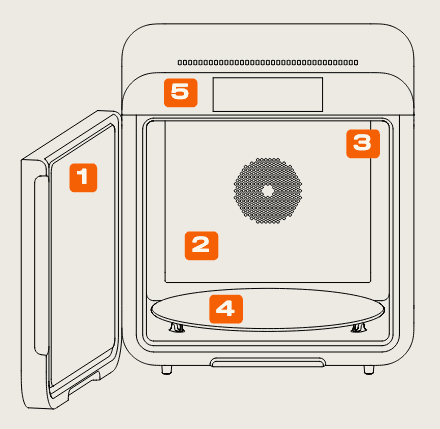
Form Cure L V2 components
Installing the Form Cure L
Place the Form Cure L on a clean, level surface with a nearby power source. Plug the included power cable into the power port on the back of the unit and connect the power cable to a circuit. Flip the breaker switch on the back of the unit to the ON position to power on the machine.
As the Form Cure L initializes, the Formlabs logo with a progress bar appears on the touchscreen, followed by the onboarding screen. Follow the on-screen prompts to finish setting up the machine.