WHITE PAPER
Formlabs Logo

Receiving and setting up the Form Wash V2

Receiving and setting up the Form Wash V2

Plan an appropriate location for the Form Wash V2. Purchase additional finishing supplies, including a suitable washing solvent, to ensure you can start using the Form Wash when it arrives.

The Form Wash is ready for use when its wash bucket is filled with solvent, the Form Wash is connected to power, and the hydrometer is calibrated for use with your solvent.

Additional supplies

Purchase the following additional supplies:

  • Paper towels. Keep paper towels in stock to ensure a clean work environment for printing and finishing.
  • Solvent. Multiple solvents are suitable for washing SLA printed parts. Prior to receiving the Form Wash, purchase fifteen liters of the solvent that best suits your needs. For more information about solvents and a complete list of compatible solvents, visit Formlabs Support.
  • Solvent Pump. Using the Solvent Pump reduces the risk of spilling solvent when filling or emptying the Form Wash.
  • Personal protective equipment. Powder-free, chemical-resistant, disposable gloves (nitrile or neoprene)
  • TPM only: TPM requires a hydrometer that can measure a specific gravity of 0.962–1.000.

Arranging the workspace

Review the technical specifications to determine the best location for the Form Wash.

The Form Wash has the following dimensions: 31.5 × 29.3 × 40.5 cm (12.4 × 11.5 × 15.9 in). The Form Wash unit weighs 8.6 kg (18.9 lb).

Reserve the following minimum dimensions for the most convenient access:

  • Width: 40 cm (16 in)
  • Depth: 40 cm (16 in)
  • Height: 80 cm (32 in)

Operate the Form Wash in a well-ventilated room with a temperature of 18—28 °C (64—82 °F). Follow safety considerations for the Form Wash.

Unboxing the Form Wash

The Form Wash ships in a cardboard carton, protected by foam inserts above and below the machine. The upper foam insert also contains the accessories. During unboxing, inspect the Form Wash for any damage or missing items. In the case of damage or missing items, contact Formlabs Support or your authorized reseller.

To unbox the Form Wash:

  1. Open the box from the top.
  2. Lift and remove the foam insert containing the accessories.
  3. Lift the Form Wash out of the box by its base.
  4. Raise the elevator to access and remove any twist ties that secure the bottom of the basket to the elevator.

Note:

The machine's power cord is included on top of the foam inside the box. If you cannot locate the power cable, be sure to check all boxes in your shipment, as it may have been packed separately.

Notice:

Remove all packaging material before connecting power. Retain all packaging and inserts for warranty service. Refer to the manual for the repackaging instructions.

Form Wash components
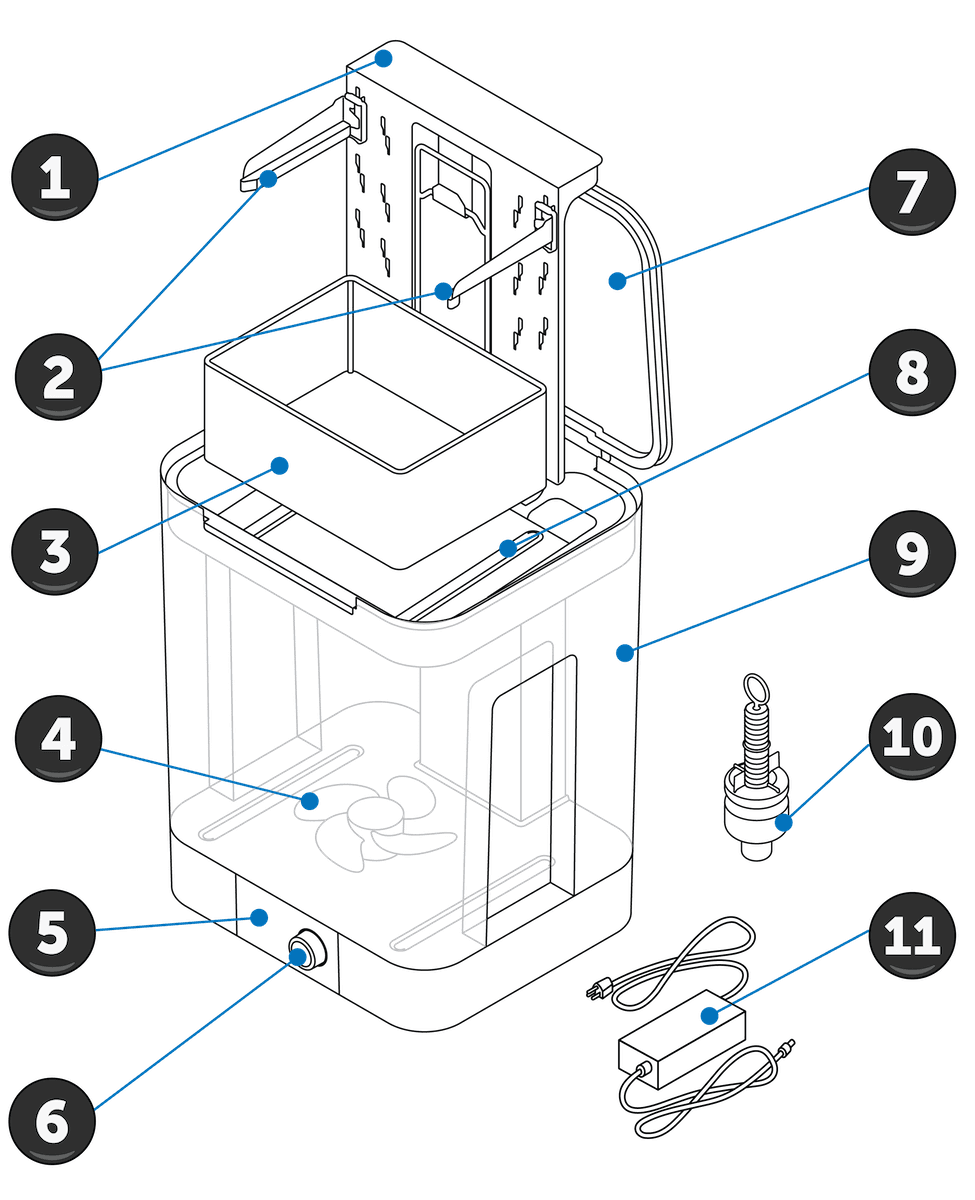
  1. Elevator. A flat plate with mounting points for the basket and build platform mount arms. Raises and lowers to wash and automatically dry printed parts.
  2. Build platform mount arms. Adjustable arms hold the build platform when washing parts on the platform.
  3. Basket. Removable container holds parts to wash without the build platform. A single hook secures the basket to the elevator to raise and lower.
  4. Impeller. Couples to the Form Wash using magnets and agitates the solvent during the wash cycle.
  5. Display. Shows status, time, and options for configuring the Form Wash.
  6. Knob. Turn or press to adjust time and to start, pause, or end a wash cycle.
  7. Outer lid. Limits solvent evaporation. Keep the lid closed when not in use.
  8. Inner lid. A hinged, secondary lid opens and closes to contain solvent while allowing parts to be lowered or raised from the bucket.
Form Wash V2 components
  1. Wash bucket. Removable container holds a maximum of 16.22 L of solvent. A rotating impeller at the bottom circulates the solvent.
  2. Hydrometer. If using isopropyl alcohol (IPA) as a solvent (or another solvent with an equivalent specific gravity), float in IPA to measure the IPA's resin concentration (based on previous calibration in fresh IPA). Other solvents may require a different hydrometer for a different specific gravity range.
  3. Power supply. Provides power to the Form Wash. Specifications: 24 V, 2 A.

Installing the Form Wash

Place the Form Wash on a clean, level surface with a nearby power source.

The Form Wash is ready for use once the wash bucket has been filled between the minimum and maximum fill lines and the hydrometer is calibrated. Choose whether to wash the part on the build platform or in the basket.

To prepare to use the Form Wash, follow the steps below to fill the wash bucket with solvent. If you are using isopropyl alcohol, calibrate the included hydrometer. The hydrometer can only be calibrated in fresh IPA (or another solvent with an equivalent specific gravity) with a concentration of 90% or higher.

Connect the power supply

Connect the power cable and external supply to the Form Wash and a power source.
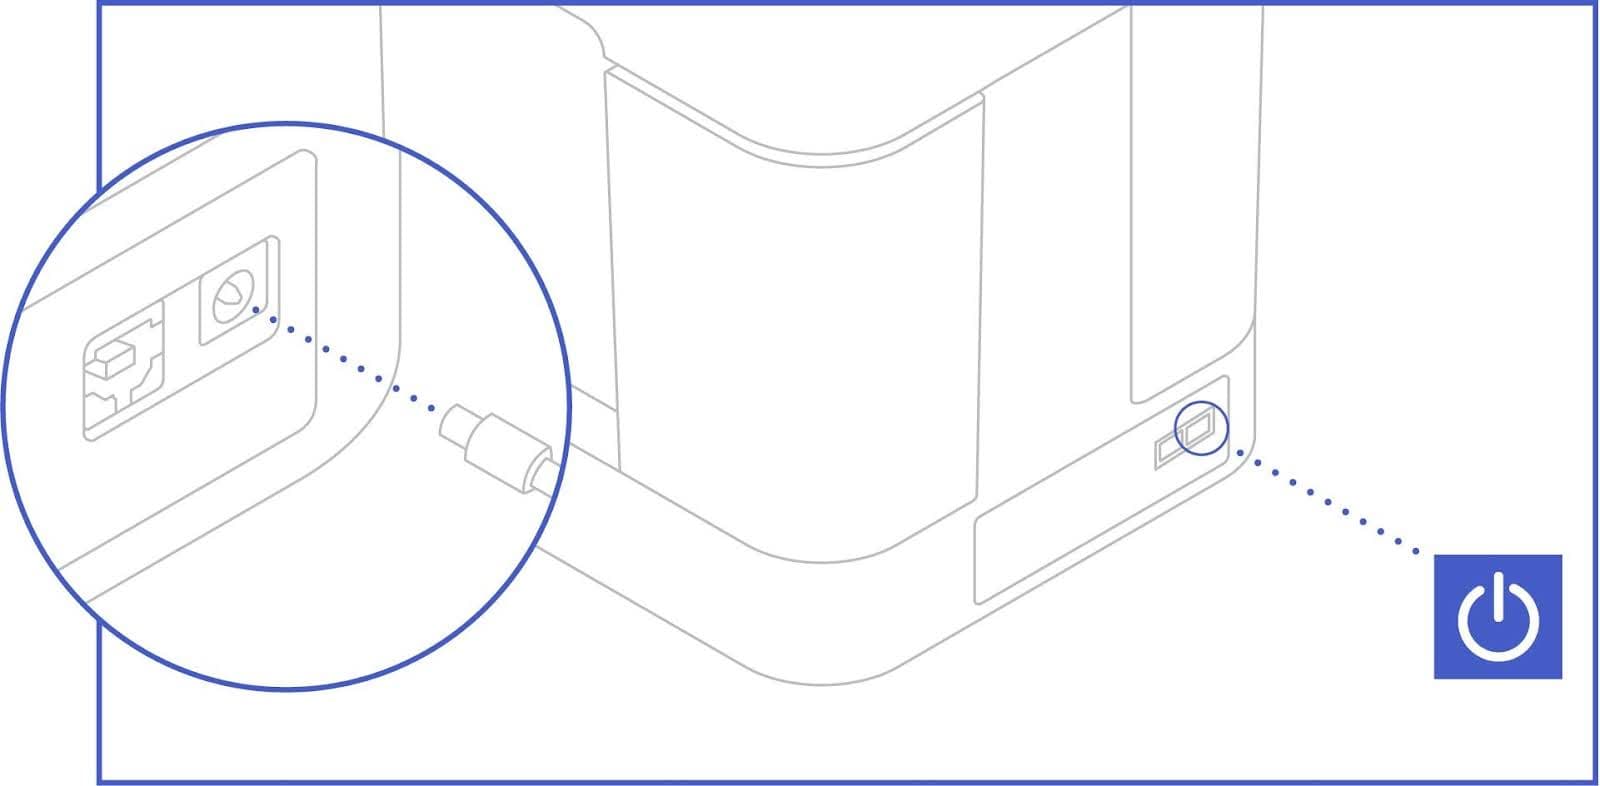
Connect the power supply to the Form Wash V2

Note:

The Form Wash includes a USB port to allow for firmware updates.

Install the build platform mount arms
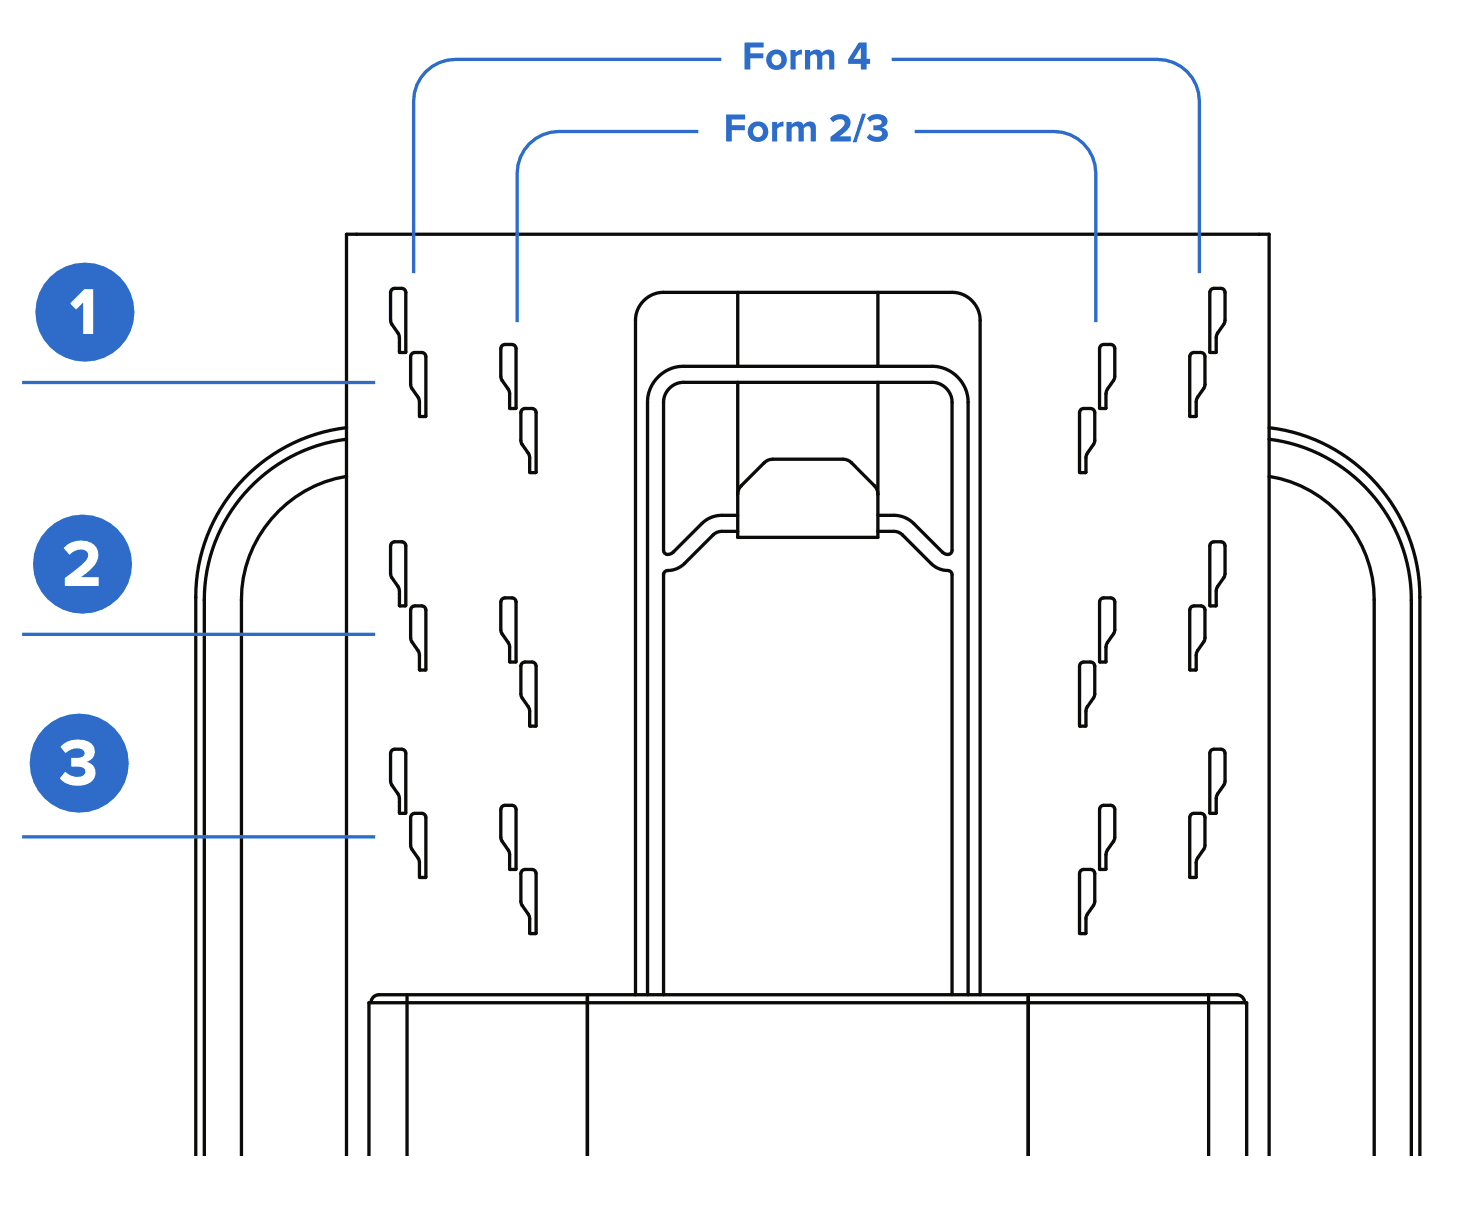
Install the build platform mount arms on the Form Wash V2

The Form Wash has three pairs of slots for the build platform mount arms. Top pair (1): large parts up to 185 mm tall. Middle pair (2): medium parts up to 120 mm tall. Lowest pair (3): small parts up to 70 mm tall.

To install the build platform mount arms:
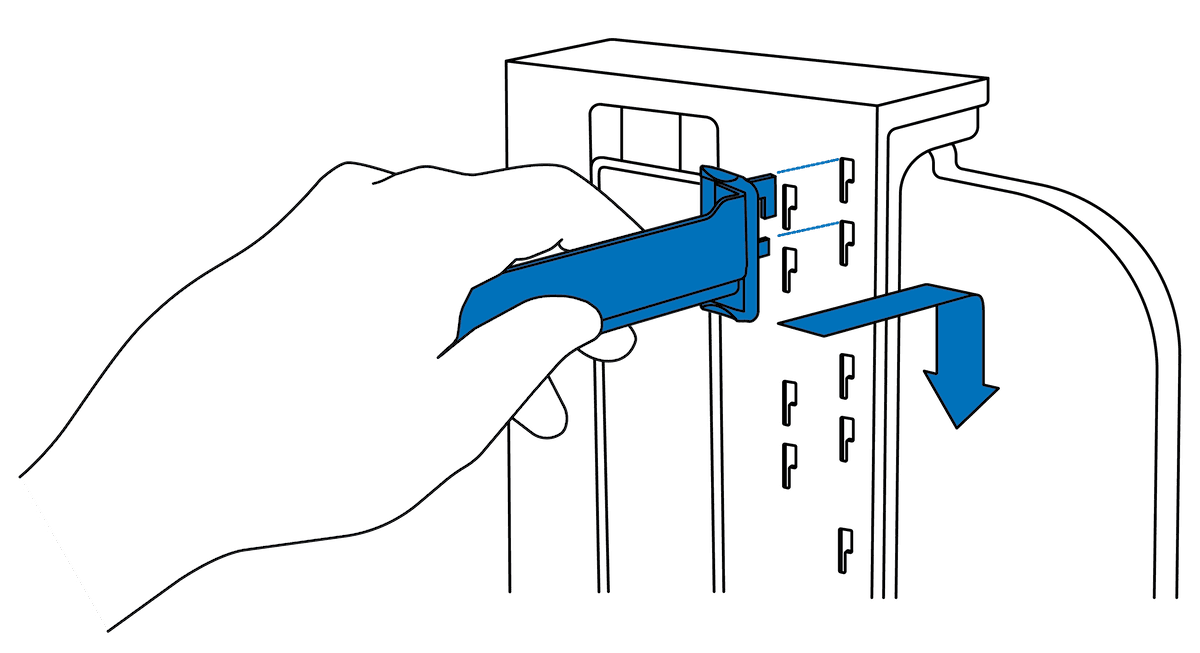
  1. Using the knob, select Raise. The elevator raises out of the bucket.
  2. The Form Wash has three pairs of slots for installing the build platform mount arms. The top pair (1) is suitable for large prints (up to 185 mm tall), the middle pair (2) is suitable for medium-height prints (up to 120 mm tall), and the lowest pair (3) is suitable for small printed parts (up to 70 mm tall). The inner set of each pair can support Form 2 or Form 3 build platforms, while the outer set can support Form 4 build platforms. Select the location to install the build platform mount arms that best suits your washing needs.
  1. Install the arms by inserting the tabs into the selected slots. Slide the arms down to lock them in place.
Inserting build platform mount arm tabs into slots on the Form Wash V2
  1. Using the knob, select Lower. The elevator lowers into the bucket.

Fill the wash bucket with solvent

To fill the Form Wash:
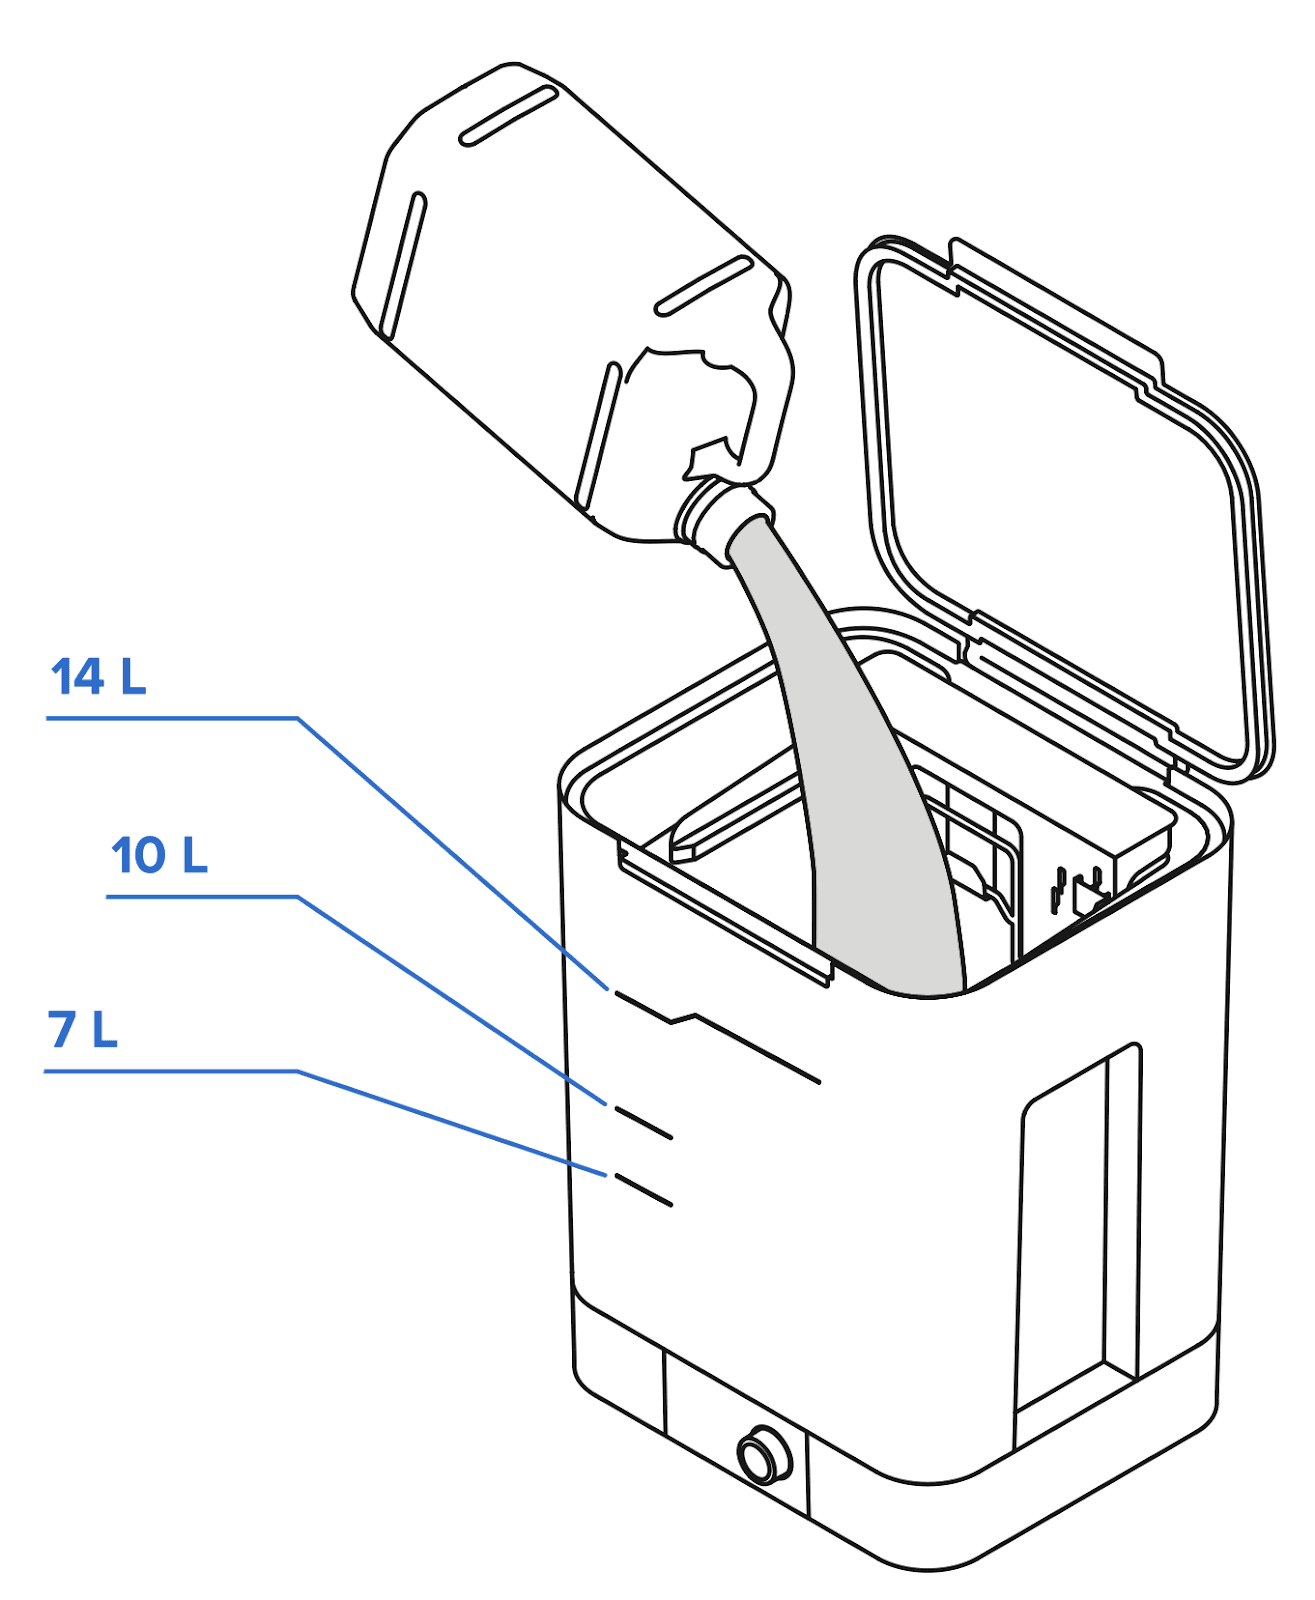
  1. Open the outer lid.
  2. Pour or siphon solvent into the wash bucket to fill to your desired level: 7 L for small parts using the lower position for the build platform mount arms, 10 L for the middle position, or 14 L for the top position. Do not fill with more than 15 L of solvent.
Adding solvent to the Form Wash V2 wash bucket

Calibrate the hydrometer (IPA only)

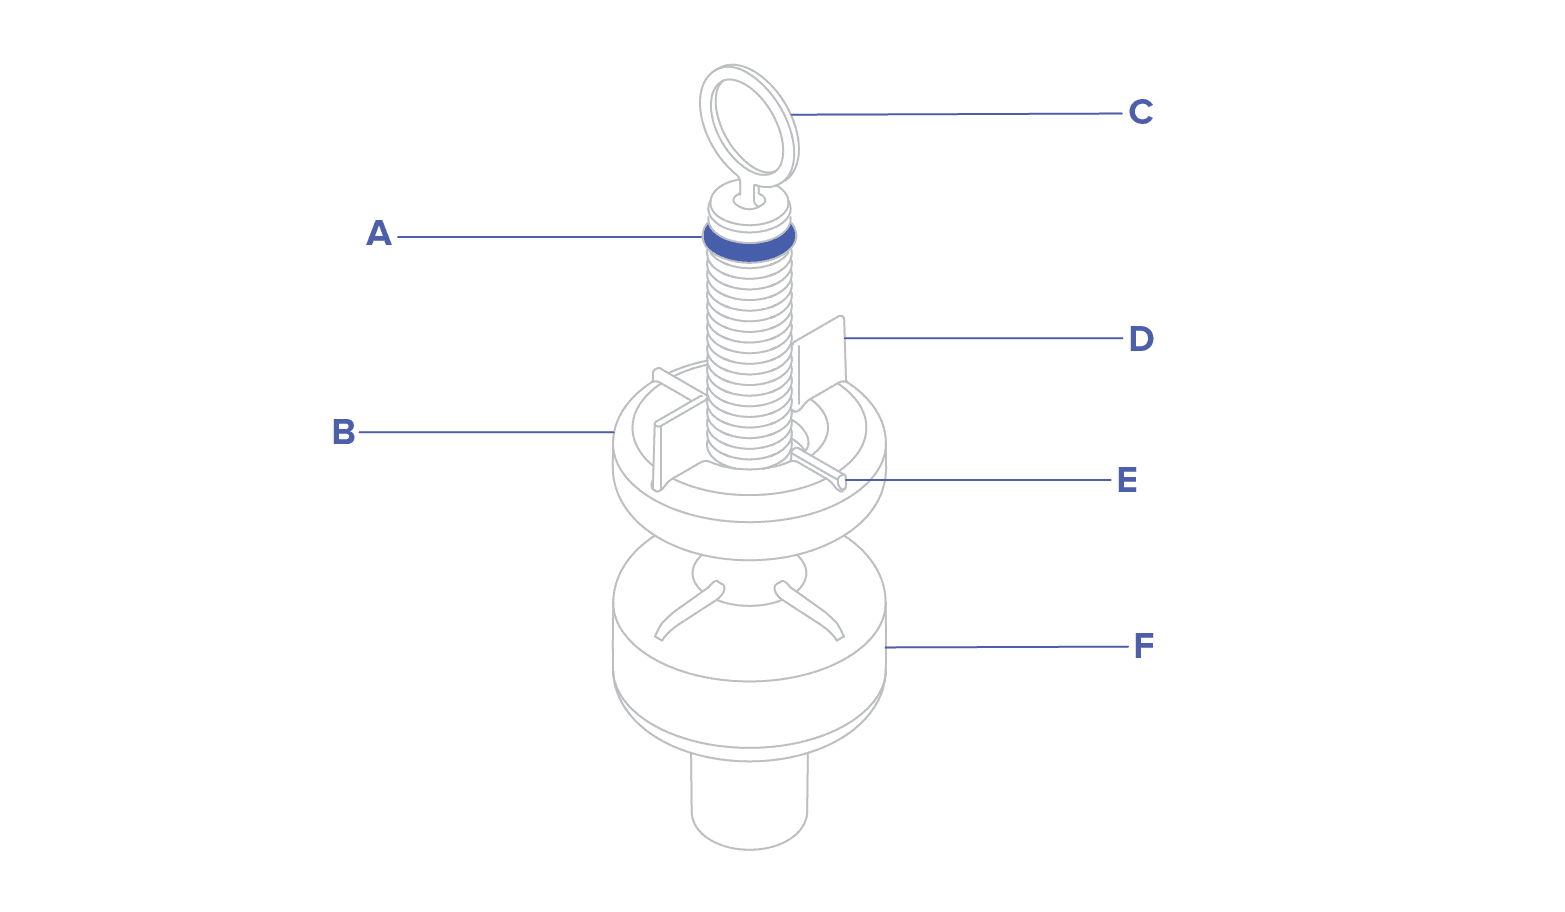
Form Wash V2 hydrometer components

Hydrometer components:

A. O-ring

B. Float

C. Handle

D. Tall wings

E. Short wings

F. Weight

If you have filled your Form Wash with fresh IPA (or another solvent with an equivalent specific gravity), calibrate the included hydrometer. Once calibrated, the hydrometer can be used to determine when the solvent should be changed.

Notice:

The hydrometer packaged with the Form Wash does not measure the correct range of specific gravity for use with TPM. A hydrometer that can measure a specific gravity of 0.962–1.000 can be used to measure the resin concentration in the TPM. When the specific gravity of the used TPM is above 1.000, it will not be fully effective as a final wash.

Read the support article Washing prints with TPM for more information.

To calibrate the hydrometer:
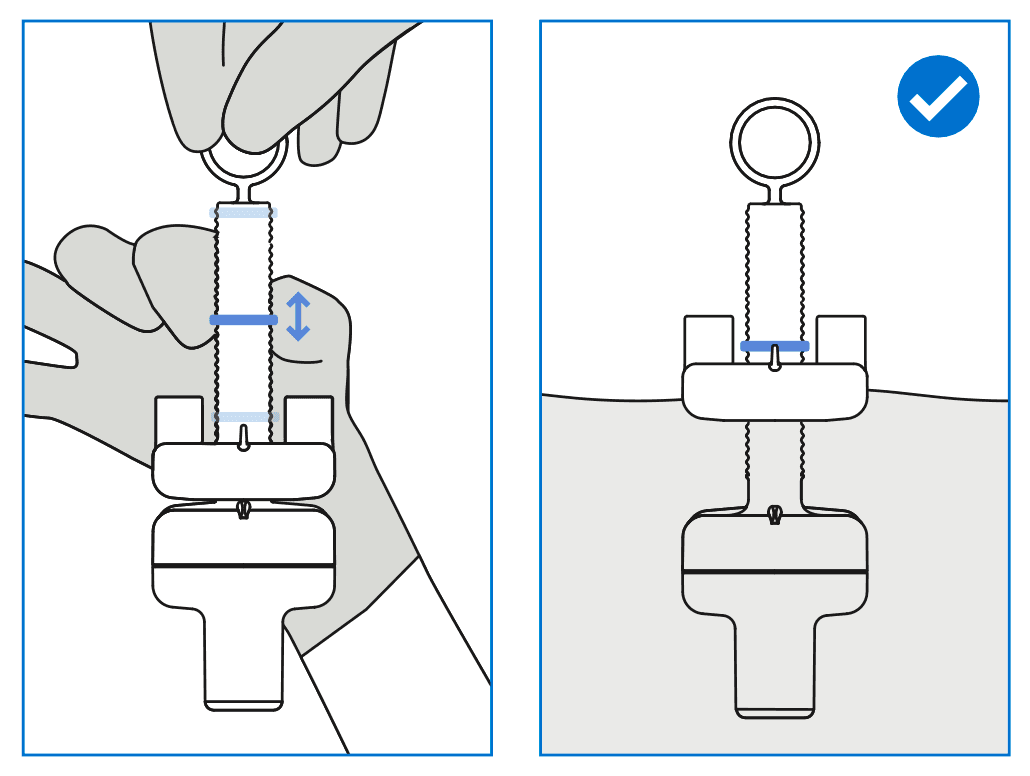
  1. Hold the handle and release the tool in the wash bucket's fresh IPA.
  2. Slide the O-ring along the ribbed stem until the O-ring aligns with the short wings at the top of the float.
  3. Leave the O-ring in this position. The alignment of the wings and O-ring is used to check the resin concentration of IPA between washes.
Calibrating the hydrometer in the Form Wash V2

The Form Wash is ready for use once the wash bucket has been filled and the hydrometer is calibrated. Choose whether to wash the part on the build platform or in the basket.