LIVRE BLANC
Formlabs Logo

Setting up an offline LAN connection on Formlabs printers (Windows only)

Setting up an offline LAN connection on Formlabs printers (Windows only)

Customers that require their work to be conducted in privacy may wish to configure a manual IP pointing to an offline network to maximize their security. This allows the printer to communicate with the computer via an offline Local Area Network (LAN) connection, without requiring the computer to communicate with the internet via a standard internet connection.

An offline LAN connection is most suited for the following environments:

  • Companies with heavy firewalls
  • Companies where printers are not allowed to be plugged into the internet (Ethernet or Wi-Fi)
  • No internet connection is available


Notice:

Ensure the internet or intranet connection you wish to connect the printer to is properly configured to be offline. A misconfigured internet connection may allow the printer to connect to the Formlabs network and share data.

Note:

The printer cannot contact the outside internet with this setup.

Opting out of data collection within PreForm

If a computer has an outside internet connection, PreForm automatically communicates with Formlabs to send telemetry data about prints and printers if you do not choose to opt out.

Note:

For full details on information collected by Formlabs please consult Formlabs Privacy Policy, or email questions to [email protected].

  1. Open the latest version of PreForm on your computer.
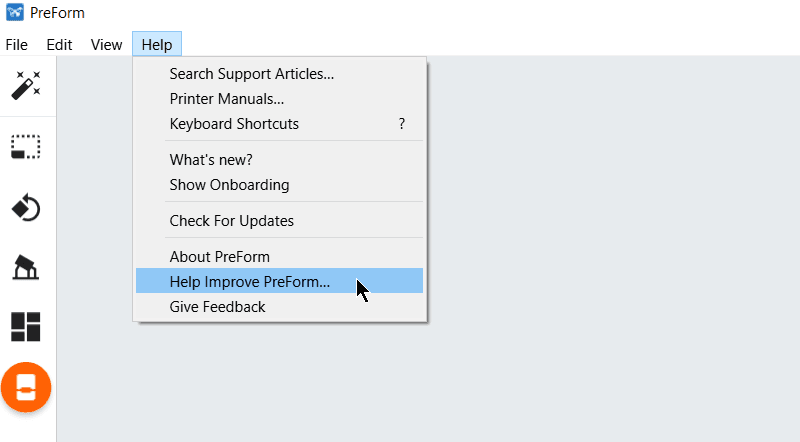
  2. In the menu bar, click Help > Help Improve PreForm…. The Quality Improvement Project window opens.
  3. Disable checkboxes to disallow collection of information about your use of PreForm, Formlabs printers, models, or personal information.
  4. Click Okay. The Quality Improvement Project window closes.
The Help dropdown is shown with the Help Improve PreForm... option selected.

Setting up an offline LAN for a single printer

A single printer is capable of communicating directly with a single computer via an Ethernet cable. All Formlabs printers support auto-MDIX.

Note:

The specifics given in this procedure have been provided as an example—your own TCP and other settings may be different.

To set up an offline LAN connection:

  1. Run an Ethernet cable (Cat5 or higher) from the printer to the computer.
  2. If the computer also needs to be connected to the internet or intranet via an Ethernet cable, you must use a second network interface (like an Ethernet to USB dongle) to set up a second Ethernet connection on the computer.
  3. On your printer, tap Settings > Connectivity > Ethernet. The Manual IP Settings screen appears.
  4. Toggle Use Manual IP to ON. The toggle turns blue./li>
  5. Enter and select the following configuration settings:
    • IP: 192.168.0.###

      Note:

      ### must be unique on this LAN network.

    • Gateway: 192.168.0.1
    • Mask: 255.255.255.0
     
  6. On your computer, navigate to Control Panel > Network and Sharing Center.
  7. Select your secondary network.
    The Network Sharing Center screen is shown with a secondary ethernet connection highlighted.
  8. Click on the Ethernet connection. The Status window for the selected connection opens.
  9. Click Properties (Admin). The Properties window for the selected connection opens.
    alttext
  10. Deselect Internet Protocol Version TCP/IPv6. The checkmark is removed from the checkbox.
    The properties screen of the secondary internet connection is shown with IPv6 deselected.
  11. Click on Internet Protocol Version (TCP/IPv4). The Status window opens.
    alttext
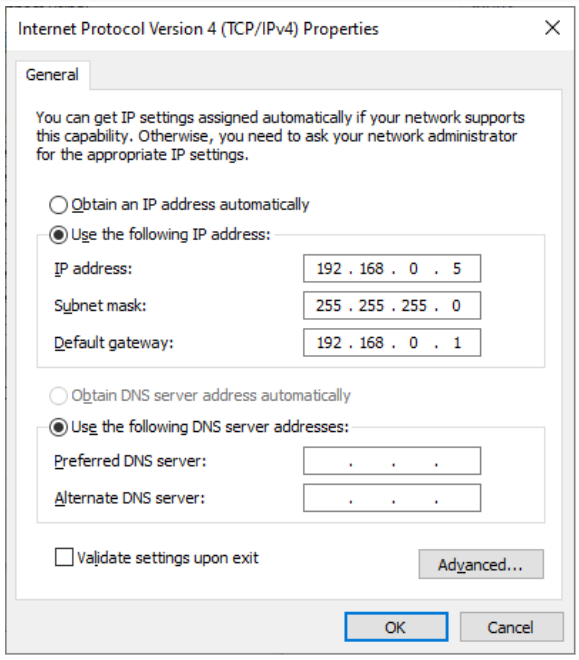
  12. Click Properties. The Internet Protocol Version (TCP/IPv4) Properties window opens.
  13. Use the following IP Address and enter the following information:
    • IP: 192.168.0.###

      Note:

      ### must be unique on this LAN network.

    • Gateway: 192.168.0.1
    • Mask: 255.255.255.0
     
    The properties window for IPv4 is shown.
  14. Open the latest versiob of PreForm on your computer.
  15. Click Job Settings. The Job Setup window opens.
  16. Click + Add Printer. The IP address field appears.
  17. In Preform, enter the same 192.168.0.### that was entered on the printer.
  18. Click Connect.

Setting up an offline LAN for multiple printers

Connect your computer to multiple printers by utilizing an Ethernet switch. This switch is needed if you want to have one computer send print jobs to multiple printers via an offline network.

Note:

The specifics given in this procedure have been provided as an example—your own TCP and other settings may be different.

To set up an offline LAN connection using an Ethernet switch:

  1. Run an Ethernet cable (Cat5 or higher) from the printer to the computer.
  2. If the computer also needs to be connected to the internet or intranet via an Ethernet cable, you must use a second network interface (like an Ethernet to USB dongle) to set up a second Ethernet connection on the computer.
  3. On your printer, tap Settings > Connectivity > Ethernet. The Manual IP Settings screen appears.
  4. Toggle Use Manual IP to ON. The toggle turns blue./li>
  5. Enter and select the following configuration settings:
    • IP: 192.168.0.###

      Note:

      ### must be unique on this LAN network.

    • Gateway: 192.168.0.1
    • Mask: 255.255.255.0
     
  6. On your computer, navigate to Control Panel > Network and Sharing Center.
  7. Select your secondary network.
    The Network Sharing Center screen is shown with a secondary ethernet connection highlighted.
  8. Click on the Ethernet connection. The Status window for the selected connection opens.
  9. Click Properties (Admin). The Properties window for the selected connection opens.
    alttext
  10. Deselect Internet Protocol Version TCP/IPv6. The checkmark is removed from the checkbox.
    The properties screen of the secondary internet connection is shown with IPv6 deselected.
  11. Click on Internet Protocol Version (TCP/IPv4). The Status window opens.
    alttext
  12. Click Properties. The Internet Protocol Version (TCP/IPv4) Properties window opens.
  13. Use the following IP Address and enter the following information:
    • IP: 192.168.0.###

      Note:

      ### must be unique on this LAN network.

    • Gateway: 192.168.0.1
    • Mask: 255.255.255.0
     
    The properties window for IPv4 is shown.
  14. Open the latest versiob of PreForm on your computer.
  15. Click Job Settings. The Job Setup window opens.
  16. Click + Add Printer. The IP address field appears.
  17. In Preform, enter the same 192.168.0.### that was entered on the printer.
  18. Click Connect.
  19. Repeat for each printer connected to the switch.