WHITE PAPER
Formlabs Logo

Fuse 1 generation motor movement errors (Error 90, 93, 94, and 95)

Fuse 1 generation motor movement errors (Error 90, 93, 94, and 95)

Fuse 1 generation printer motors overview

Each Fuse 1 generation printer has five motors that drive the following components:

  1. Hopper flipper (on the right side of the print plane, near the powder hopper)
  2. Buffer flipper (on the left side of the print plane, opposite the powder hopper)
  3. Recoater
  4. Z-drive (drives the build chamber print bed up and down; marked as Cylinder in error codes)
  5. Doser

While the actual hardware may be different from component to component, each motor has the same basic set of features:

  • An encoder board that measures the relative position of the motor (or the component) to some set “zero” position. This works by measuring the polarity of a magnet attached to the motor shaft.
  • A magnet attached to the motor or component, whose position is measured by the encoder board.
  • A stepper motor that drives the component.
  • A set of features that couples the motor to the component, translating the rotation of the motor to the movement of the component being driven.

Tip:

Fuse 1 generation motor assemblies are available for purchase on the Formlabs Store. If you need to replace a motor as part of troubleshooting, contact Formlabs Support or a certified service provider for assistance.

Large motor assemblies: flippers and recoater

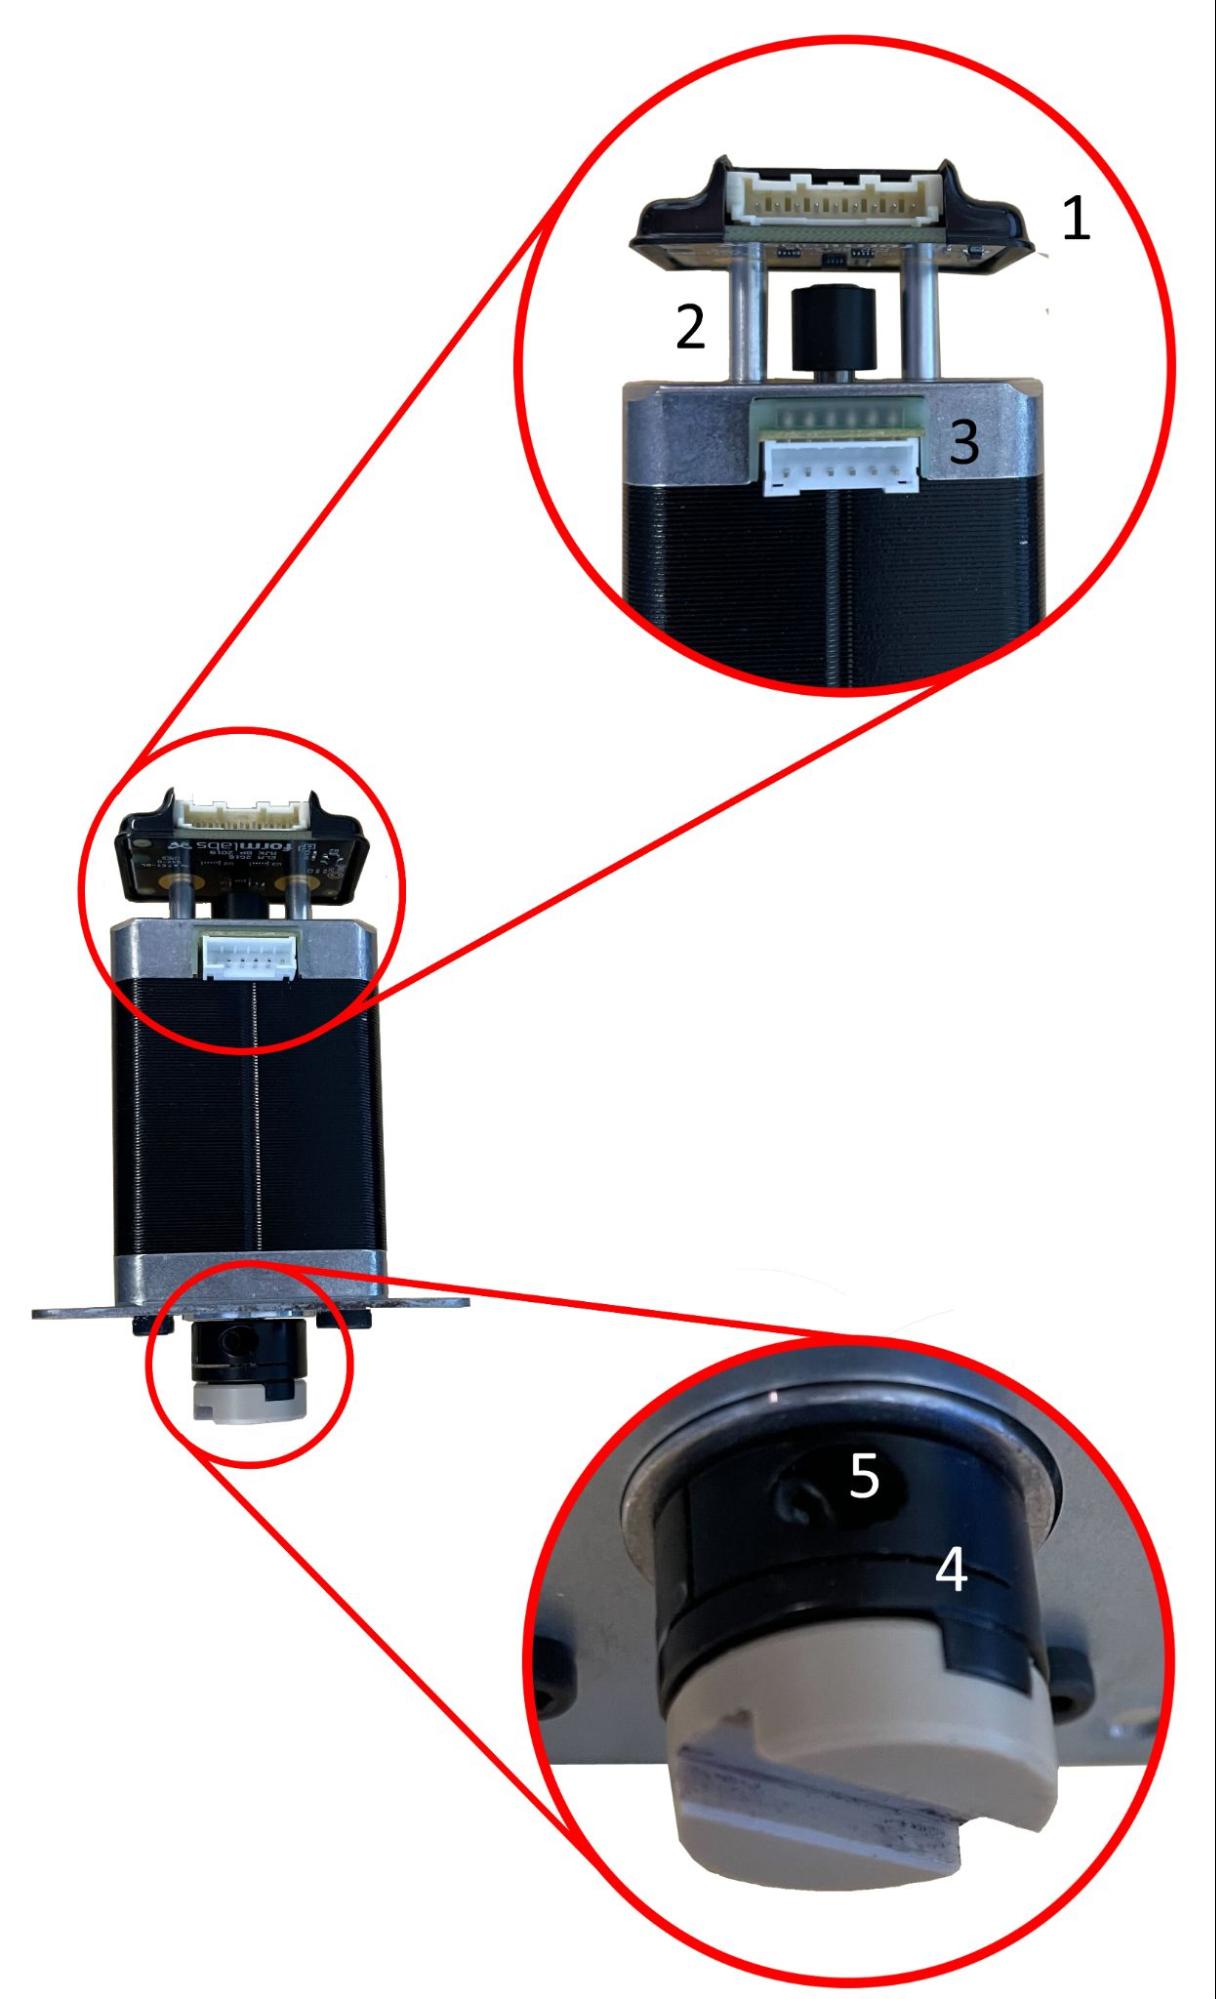
Both flippers and the recoater are driven by the same motor assembly, shown below.

These motors feature:
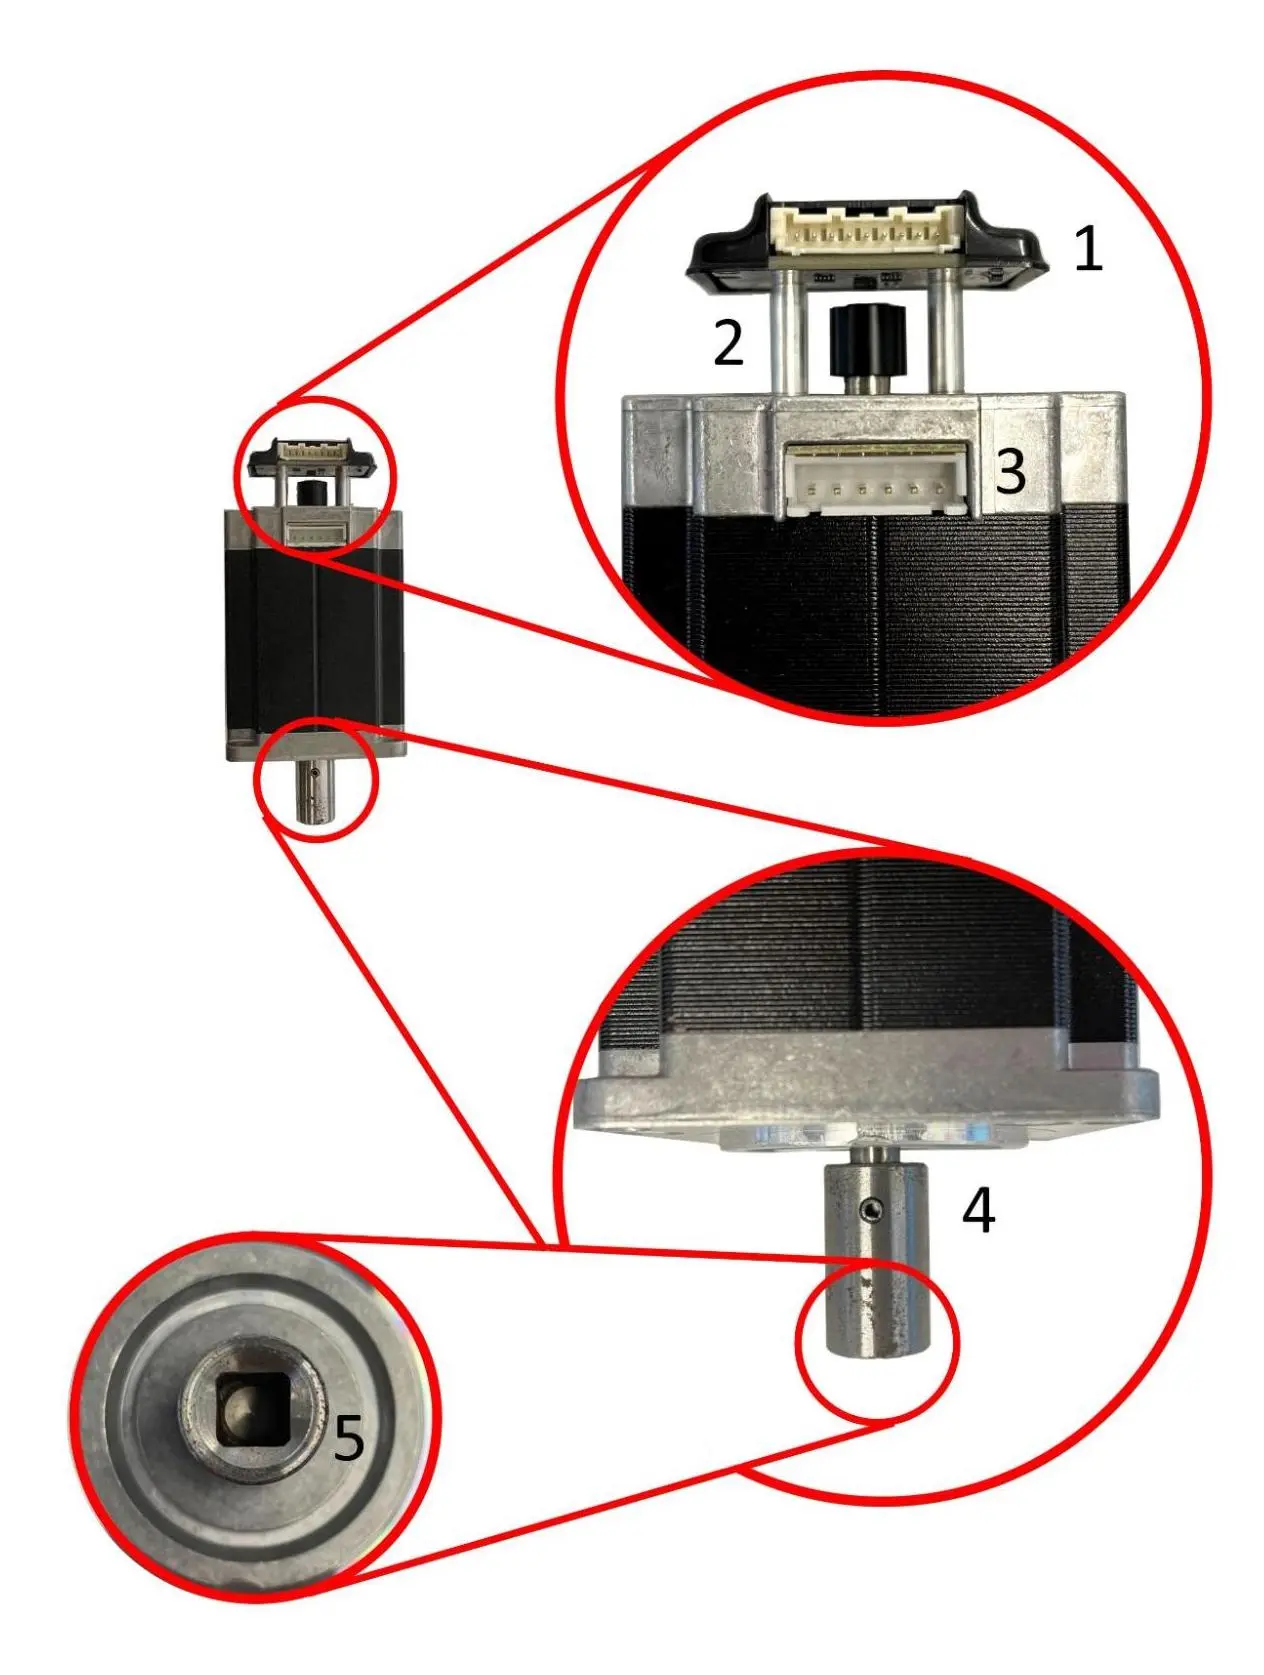
  1. An encoder board mounted behind the end of the motor shaft
  2. A magnet on the end of the motor shaft
  3. A stepper motor (larger than the other motors in the printer)
  4. A spring pin that secures the coupler to the motor shaft
  5. A coupler that secures the motor to the square shaft of the component it drives
Fuse 1 generation flipper and recoater motor assembly

Z-drive motor

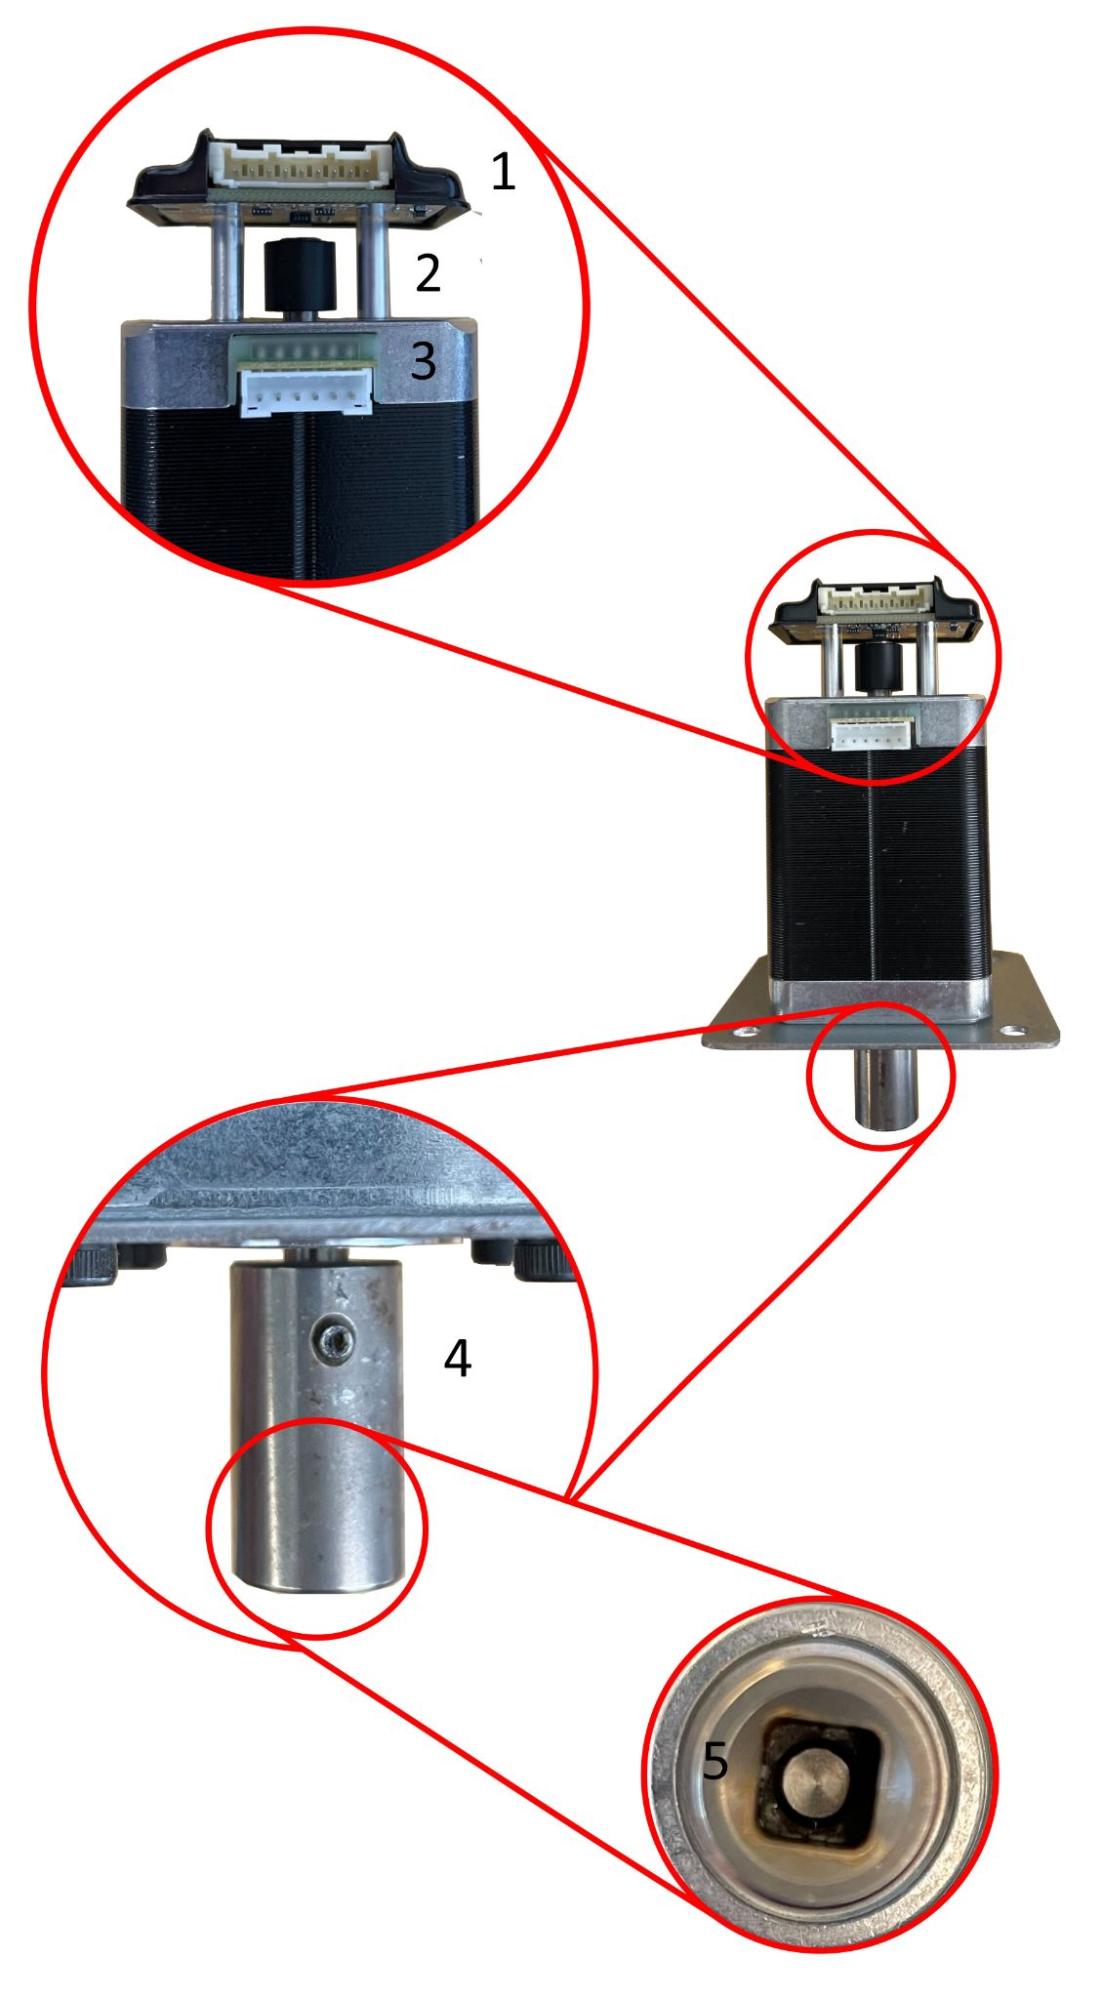
The Z-drive motor has two revisions: one that was installed into the majority of Fuse 1 units, and another that was installed in late model Fuse 1 units and all Fuse 1+ 30W units.

Early model Fuse 1 Z-drive motor assemblyLate model Fuse 1 and Fuse 1+ 30W Z-drive motor assembly

These motors feature:

  1. An encoder board mounted behind the end of the motor shaft
  2. A magnet on the end of the motor shaft
  3. A stepper motor (smaller than the recoater/flipper motors)
  4. An Oldham coupling secured to the motor shaft
  5. A set screw securing the Oldham coupling to the motor shaft

These motors feature:

  1. An encoder board mounted behind the end of the motor shaft
  2. A magnet on the end of the motor shaft
  3. A stepper motor (smaller than the recoater/flipper motors)
  4. A spring pin that secures the coupler to the motor shaft
  5. A coupler that secures the motor to the square shaft of the Z-drive

Doser motor

The doser is driven by a smaller motor with a sprocket attached to the motor shaft, which in turn drives a chain attached to the doser drum’s shaft. Unlike all other motors in Fuse 1 and Fuse 1+ 30W, the encoder board magnet is attached to the component’s shaft, not the motor shaft.
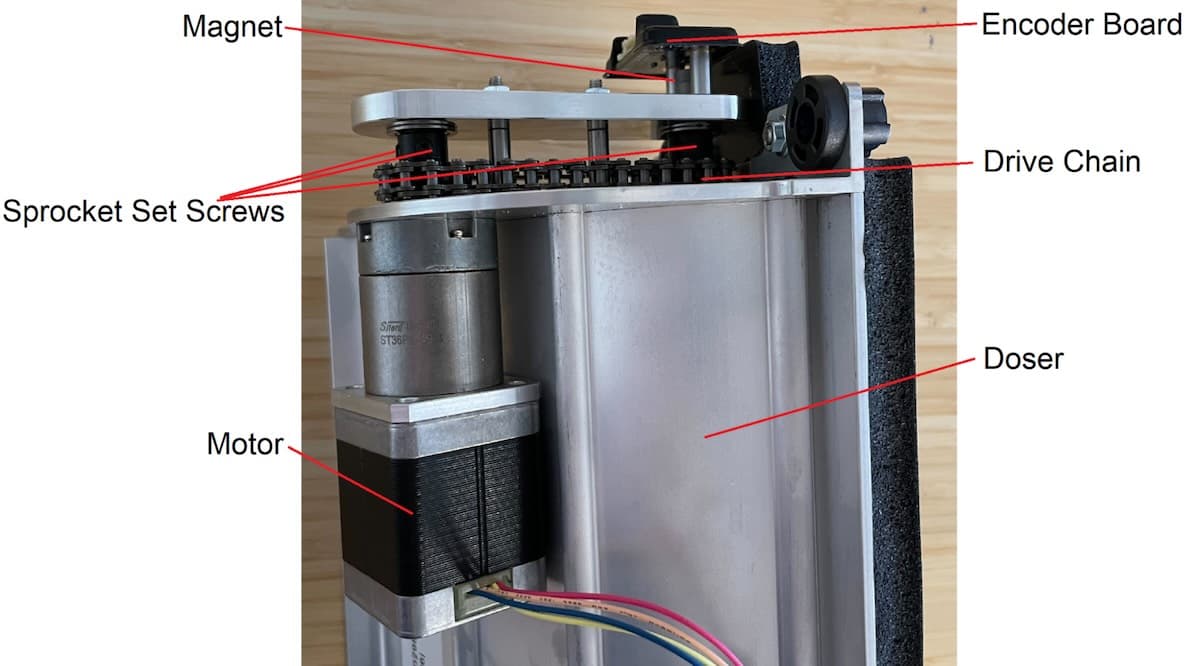
Fuse 1 generation doser motor assembly

Errors

The main error codes related to motor movement on Fuse 1 generation printers are as follows:

  • Error 90/1–5 PR_ERROR_MOTORS_UNEXPECTED__[Component]: The motor returned a response that was unexpected by the printer. This is typically a one-off error resulting from a transient firmware bug (e.g., churn or operation timeout). This error also occurs if the encoder board is not functioning or disconnected.
  • Error 93/1–5 PR_ERROR_MOTORS_MOVE_DEVIATION__[Component]: The motor was unable to move the expected amount, generally because the component collided with something.
  • Error 94/3, 94/4 PR_ERROR_MOTORS_MOVE_MISSED_HARDSTOP__[Component]: The motor was able to spin for a very long time without the component colliding with a hardstop as expected.
  • Error 95/1–5 PR_ERROR_MOTORS_MOVE_MISSED_INDEX__[Component]: The printer attempted to re-home the motor but the encoder board did not detect that the motor reached its home position.

The error code has a subcode following it to mark which motor it was reported from. For example, Error 93/4 corresponds to PR_ERROR_MOTORS_MOVE_DEVIATION__CYLINDER, meaning the Z-drive motor deviated from the expected movement. The number of these subcodes corresponds to the list above.

Error 90/1–5 PR_ERROR_MOTORS_UNEXPECTED

Error 90 indicates an issue with processing information from a particular motor’s encoder board. As such, the troubleshooting steps are the same for all motors, since they use the same encoder board.

Symptoms

  • Error code during preprint or during a print
  • Component not homing properly
  • Component not moving when commanded via the Motor Moves screen
  • Grinding/clicking sounds from moving components

Causes

The possible causes of this error message, in approximate order of likelihood, are:

  • Software bug
  • Defective/malfunctioning/disconnected encoder board
  • Defective/malfunctioning control board (Fuse 1 or Fuse 1+ 30W MoTempBo)
  • Defective/malfunctioning motor
  • Electrical noise

Troubleshooting steps

As noted above, the troubleshooting steps are the same for all motors, since they use the same encoder board.

  1. Confirm the printer’s firmware is up to date. If it is not, update the firmware.
  2. Power cycle the printer.
  3. If the issue is persistent, the encoder board may be disconnected or faulty.
    1. Reseat the encoder board on the motor in question.
    2. If the issue persists, replace the affected motor assembly, which includes the encoder board.

Fuse 1 generation motor assemblies are available for purchase on the Formlabs Store. Contact Formlabs Support or a certified service provider for assistance.

Error 93 overview

Error 93 indicates that the component in question was unable to move the expected amount, generally because the component collided with something. The primary causes for these errors are debris from a failed print jamming the component, or another component stopping in the wrong place, causing the original component to collide with it. It may also be caused by a malfunctioning encoder board or poorly processed encoder data.

Causes

The possible causes of this error message, in approximate order of likelihood, are:

  • Debris from a previous print failure jamming a component
  • Another component stopping in the wrong place, leading to a collision
  • Malfunctioning encoder board
  • Poorly-processed encoder data or other software bug
  • Software bugs related to the Empty Hopper routine (Error 93/1 only)
  • Incorrectly-inserted build chamber (Error 93/4 only)
  • Perimeter melting (upper cylinder wall RTD/heater failure) (Error 93/4 only)

Symptoms

  • Error code during preprint or during a print
  • Component not homing properly
  • Component not moving when commanded via the Motor Moves screen
  • Grinding/clicking sounds from moving components

Error 93/1 PR_ERROR_MOTORS_MOVE_​DEVIATION__HOPPER_FLIPPER

Error 93/1 indicates that the hopper flipper motor deviated from the expected movement and the flipper was not able to move the expected amount.

Tip:

Error 93/1 is commonly caused by debris. Thoroughly inspect and clean the hopper trough and the area around the hopper flipper before attempting any other troubleshooting steps.

Troubleshooting steps

  1. Error 93/1 can occur when running the Empty Hopper routine through the printer touchscreen. In these cases, retry the routine.
  2. Confirm the printer’s firmware is up to date. If it is not, update the firmware.
  3. Open the printer door and inspect the hopper flipper area, to the right of the print plane.
    1. If there is debris in the hopper side powder trough, proceed to step 4.
    2. If the recoater is directly above the flipper, proceed to step 5.
    3. If the hopper flipper appears to have nothing impeding it, proceed to step 6.
  4. In the Motor Moves menu, rotate the hopper flipper away from the debris and clean out any debris found.
  1. This failure mode generally happens after another print failure, usually a PrinterWatcher failure such as Error 112. Check the printer’s history to determine whether this may be the case.
    • Find the Event UUID alphanumeric code corresponding to the error.
    • Navigate to the PrinterWatcherFrames folder and locate the folder with the Event UUID you just found.
    • Review the last ten frames provided by the PrinterWatcher before the error occurred for any debris.
  2. If debris is blocking the hopper flipper, inspect the print area and all moving components for other debris.
  3. If the motor does not rotate when activated in the Motor Moves menu and the debris cannot be accessed without moving the flipper, try moving the flipper manually.
    • Power off the printer and allow it to cool to room temperature.
    • Try moving the flipper manually. When powered off, the motor holds no torque and should not resist movement.
  4. In some cases, the debris may be stuck to the hopper trough, preventing the flipper from rotating in both directions. In this case, it may be necessary to apply heat to the melted powder with a heat gun.
    • Vacuum any unsintered powder prior to applying heat to the debris in the powder trough.
    • Always wear a respirator when applying heat to SLS powders and only attempt in a well-ventilated area.
  1. If the recoater is directly above the hopper flipper after an error, the recoater motor coupling has likely been damaged. If so, you may need to replace the recoater motor assembly.
  1. When this error is caused by a collision with the recoater, it often occurs several minutes after the start of a print, the first point at which the hopper flipper moves after the recoater has moved to the hopper side of the printer.
  1. Check the recoater motor coupling for damage by removing the motor and feeling the coupler for play. Follow the repair guide Replacing the Fuse 1 generation recoater motor assembly [EN] until you have removed the recoater motor and can access the recoater motor coupler. The coupler should be secured tightly to the motor shaft and should have little to no play.
    1. If the recoater motor coupling is damaged, the motor may need to be replaced. Fuse 1 generation recoater motors are available for purchase on the Formlabs Store. The recoater motor does not have a calibrated home position, so this motor can be removed and replaced without requiring calibration.
  1. In the Motor Moves menu, home the doser, then rotate the hopper flipper to confirm that it can travel a full 360° and homes to the correct place every time. If you do not home the doser first, the hopper flipper may collide with it, making it more difficult to diagnose the issue.
    1. If the flipper doesn’t move and makes an audible clicking sound, or if it appears to hit an obstruction in the powder trough, there is likely debris in the powder trough that is not visible. Refer back to step 3.
    2. Take a video of the flipper’s rotation for at least 2–3 full turns to look for any unusual or unexpected behavior.
    3. If the hopper flipper does not turn smoothly, the encoder board may be malfunctioning.
      • Reseat the cable on the hopper flipper motor encoder board.
      • If reseating the cable does not resolve the issue, you may need to replace the hopper flipper motor assembly. Fuse 1 generation flipper motors are available for purchase on the Formlabs Store.
    4. If the hopper flipper turns smoothly but does not home to the right position, then it has lost its calibrated home position. Contact Formlabs Support or a certified service provider for assistance.
      • If the issue returns after recalibration, the hopper flipper motor assembly may need to be replaced. Fuse 1 generation flipper motors are available for purchase on the Formlabs Store.
  2. If the motor is colliding with something not previously mentioned, or if the issue cannot be reproduced by moving the motors manually, contact Formlabs Support or a certified service provider for assistance.

Error 93/2 PR_ERROR_MOTORS_MOVE_​DEVIATION__BUFFER_FLIPPER

Error 93/2 indicates that the buffer flipper motor deviated from the expected movement and the flipper was not able to move the expected amount.

Troubleshooting steps

  1. Confirm the printer’s firmware is up to date. If it is not, update the firmware.
  2. Open the printer door and inspect the buffer flipper area, to the right of the print plane.
    1. If there is debris in the buffer side powder trough, proceed to step 3.
    2. If the recoater is directly above the flipper, proceed to step 4.
    3. If the buffer flipper appears to have nothing impeding it, proceed to step 5.
  3. In the Motor Moves menu, rotate the hopper flipper away from the debris and clean out any debris found.
  1. This failure mode generally happens after another print failure, usually a PrinterWatcher failure such as Error 112. Check the printer’s history to determine whether this may be the case.
    1. Find the Event UUID alphanumeric code corresponding to the error.
    2. Navigate to the PrinterWatcherFrames folder and locate the folder with the Event UUID you just found.
    3. Review the last ten frames provided by the PrinterWatcher before the error occurred for any debris.
  2. If debris is blocking the buffer flipper, inspect the print area and all moving components for other debris.
  3. If the motor does not rotate when activated in the Motor Moves menu and the debris cannot be accessed without moving the flipper, try moving the flipper manually.
    1. Power off the printer and allow it to cool to room temperature.
    2. Try moving the flipper manually. When powered off, the motor holds no torque and should not resist movement.
  4. In some cases, the debris may be stuck to the buffer trough, preventing the flipper from rotating in both directions. In this case, it may be necessary to apply heat to the melted powder with a heat gun.
    1. Vacuum any unsintered powder prior to applying heat to the debris in the powder trough.
    2. Always wear a respirator when applying heat to SLS powders and only attempt in a well-ventilated area.
  1. If the recoater is directly above the buffer flipper after an error, the recoater motor coupling has likely been damaged. If so, you may need to replace the recoater motor assembly.
  1. When this error is caused by a collision with the recoater, it often occurs several minutes after the start of a print, the first point at which the hopper flipper moves after the recoater has moved to the hopper side of the printer.
  2. Check the recoater motor coupling for damage by removing the motor and feeling the coupler for play. Follow the repair guide Replacing the Fuse 1 generation recoater motor assembly [EN] until you have removed the recoater motor and can access the recoater motor coupler. The coupler should be secured tightly to the motor shaft and should have little to no play.
  3. If the recoater motor coupling is damaged, the motor may need to be replaced. Fuse 1 generation recoater motors are available for purchase on the Formlabs Store. The recoater motor does not have a calibrated home position, so this motor can be removed and replaced without requiring calibration.
  1. In the Motor Moves menu, rotate the hopper flipper to confirm that it can travel a full 360° and homes to the correct place every time.
    1. If the flipper doesn’t move and makes an audible clicking sound, or if it appears to hit an obstruction in the powder trough, there is likely debris in the powder trough that is not visible. Refer back to step 3.
    2. Take a video of the flipper’s rotation for at least 2–3 full turns to look for any unusual or unexpected behavior.
    3. If the buffer flipper does not turn smoothly, the encoder board may be malfunctioning.
      1. Reseat the cable on the hopper flipper motor encoder board.
      2. If reseating the cable does not resolve the issue, you may need to replace the hopper flipper motor assembly. Fuse 1 generation flipper motors are available for purchase on the Formlabs Store.
    4. If the buffer flipper turns smoothly but does not home to the right position, then it has lost its calibrated home position. Contact Formlabs Support or a certified service provider for assistance.
      1. If the issue returns after recalibration, the buffer flipper motor assembly may need to be replaced. Fuse 1 generation flipper motors are available for purchase on the Formlabs Store.
  2. If the motor is colliding with something not previously mentioned, or if the issue cannot be reproduced by moving the motors manually, contact Formlabs Support or a certified service provider for assistance.

Error 93/3 PR_ERROR_MOTORS_MOVE_​DEVIATION__RECOATER

Error 93/3 indicates that the recoater motor deviated from the expected movement and the recoater was not able to move the expected amount.

Note:

Damage to the recoater motor coupling usually does not result in Error 93/3, as the motor’s magnet is still free to turn normally in these cases. Damage to the recoater coupling generally results in Error 93/1, Error 93/2, or Error 94/3.

Troubleshooting steps
  1. Confirm the printer’s firmware is up to date. If it is not, update the firmware.
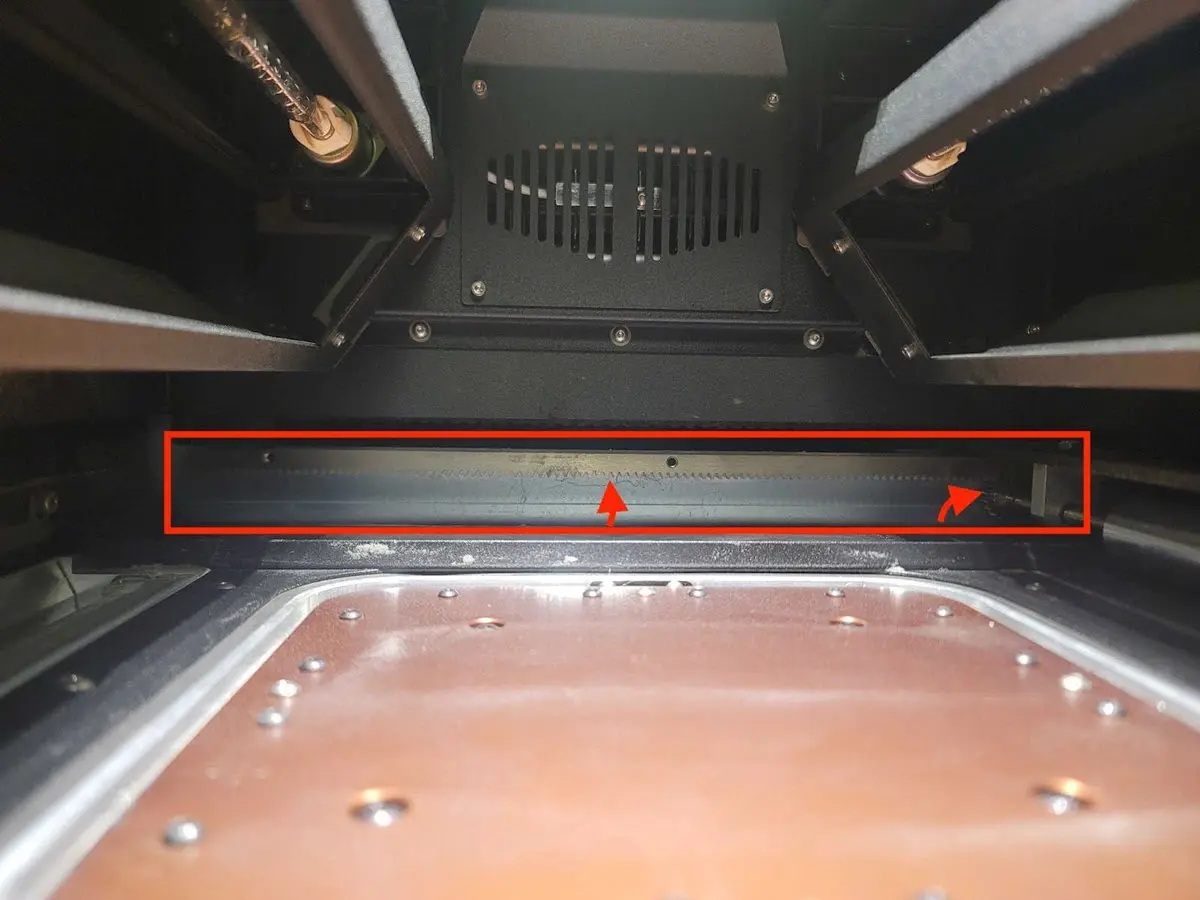
  2. Open the printer and inspect the recoater area, including:
    1. The roller
    2. The recoater rack and pinion gears (in the rear of the printer)
    3. The front linear rails
    4. The build chamber print bed
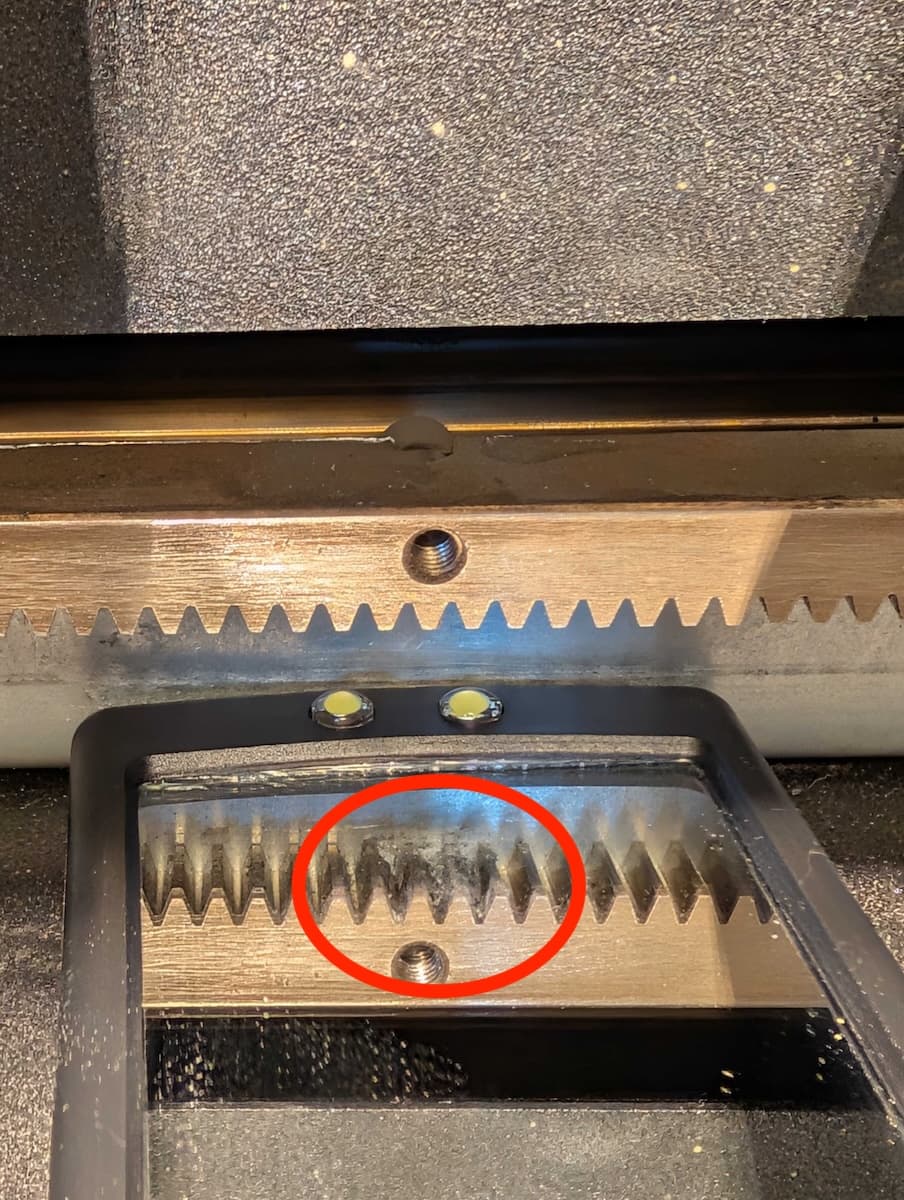
Fuse 1 generation recoater roller rack gear
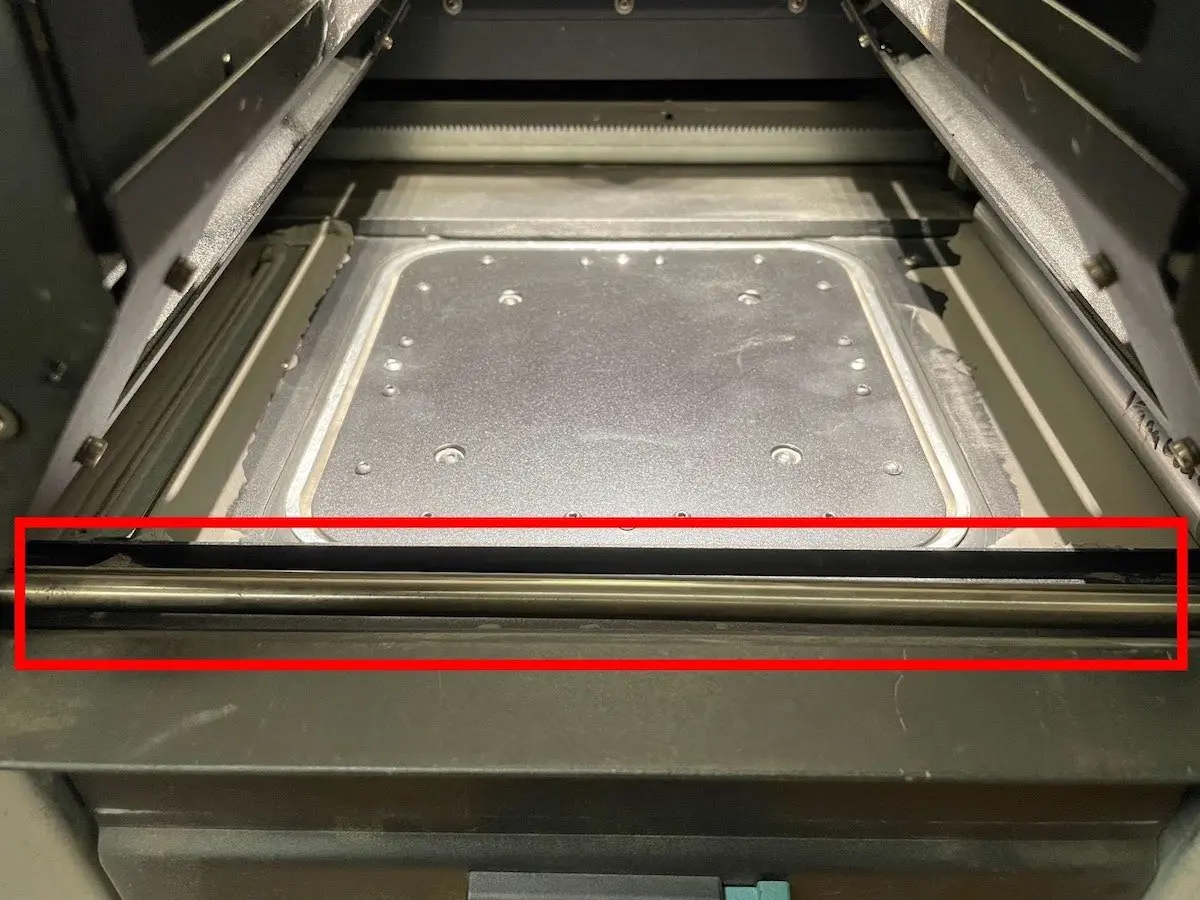
Fuse 1 generation linear rail
  1. If you find any melted or impacted powder, clean the affected area.
    1. In some cases, the debris may be stuck to a printer component, making the material difficult to remove. In this case, it may be necessary to apply heat to the melted powder with a heat gun.
      1. Vacuum any unsintered powder prior to applying heat to the debris in the powder trough.
      2. Always wear a respirator when applying heat to SLS powders and only attempt in a well ventilated area.
    2. Melted or impacted powder may indicate other issues. Check the printer’s history to see if this error is a symptom of another issue.
  2. If the recoater appears to have collided with a flipper, the flipper is not homing to the correct position. Refer to steps for resolving flipper homing issues for Error 93/1 and Error 93/2.
  3. If you find no obvious debris or obstruction, try moving the recoater using the Motor Moves menu.
    1. Take a video of the recoater’s movement to look for any unusual or unexpected behavior.
    2. If the recoater stops unexpectedly when driving it using the Motor Moves menu:
      • Closely inspect the rack gear in the rear of the printer for impacted powder. Use the picks provided with the Fuse Sift to remove any buildup, thoroughly cleaning each tooth.
      • Remove the recoater roller and inspect the pinion gear on the roller assembly for impacted powder. Use the picks to clear any buildup, then reinstall the roller.
Fuse 1 generation recoater removed for cleaning
  • Wipe the front linear rail with ethanol and a non-scratching microfiber cloth.
Fuse 1 generation front linear rail
  1. If you do not find any powder in the roller assembly or if the issue persists after cleaning, try moving the recoater using the Motor Moves menu with the roller removed:
    1. If the issue does not recur, you may need to replace the roller. Fuse 1 generation recoater rollers are available for purchase on the Formlabs Store.
    2. If the issue still persists with the roller removed, contact Formlabs Support or a certified service provider.
  2. If the recoater is moving erratically but you do not find an obstruction, the encoder board may be defective:
    1. Reseat the recoater motor encoder board.
    2. Replace the recoater motor assembly. Fuse 1 generation recoater motors are available for purchase on the Formlabs Store.

Error 93/4 PR_ERROR_MOTORS_MOVE_​DEVIATION__CYLINDER

Error 93/4 indicates that the Z-drive motor deviated from the expected movement and the print bed was not able to move the expected amount.

Troubleshooting steps

  1. Confirm the printer’s firmware is up to date. If it is not, update the firmware.
  2. Confirm whether the issue is a printer issue or if the issue is specific to one build chamber.
    1. Test the affected build chamber in the Fuse Sift. If the issue occurs on both the printer and Fuse Sift, the problem is likely with the build chamber. Proceed to step 3.
    2. Try another build chamber in the printer, if one is available. If the issue occurs persistently with both build chambers, it is likely specific to that printer. Proceed to step 4.
    3. If the issue is inconsistent, or the affected hardware cannot be isolated, contact Formlabs Support or a certified service provider for assistance.
  3. If the issue is specific to one build chamber:
    1. Remove the print bed and vacuum the felt seal.
      1. If debris cannot be removed or the felt seal is visibly damaged, replace the print bed assembly. Follow the steps in Replacing the Fuse 1 generation build chamber print bed [EN] [DE] [ES] [FR] [IT] [JA] [ZH].
    2. Inspect the edge of the print bed and the build chamber walls for melted plastic powder. Remove any melted debris.
      1. It may be necessary to remove or replace the build chamber print bed to clean melted powder around the perimeter of the build chamber.
      2. If you cannot remove the melted powder, replace the build chamber. Melted powder around the print bed is often a symptom of another issue. Refer to the steps for troubleshooting perimeter melting for next steps.
    3. Optional: To reduce friction within the build chamber and prolong the life of its Z-axis components, clean, and lubricate the build chamber lead screw. Follow the steps in Cleaning and lubricating the build chamber lead screw [EN] [DE] [ES] [FR] [IT] [JA] [ZH].
  4. If the issue is specific to the printer, there may be an issue with the printer’s Z-drive assembly or motor.
    1. Remove the build chamber from the printer and use the Motor Moves menu to move the Z-drive bevel gear.
      1. If the printer’s Z-drive does not move at all, the encoder board may have failed.
        1. Reseat the Z-drive encoder board cable.
        2. If reseating does not help, you may need to replace the Z-drive motor assembly. The assembly is available for purchase on the Formlabs Store.
      2. If the Z-drive motor moves intermittently or erratically, replace the Z-drive motor assembly. The assembly is available for purchase on the Formlabs Store.

Error 93/5 PR_ERROR_MOTORS_MOVE_​DEVIATION__DOSER

Error 93/5 indicates that the doser motor deviated from the expected movement and the doser was not able to move the expected amount.

Troubleshooting steps

Confirm the printer’s firmware is up to date. If it is not, update the firmware.

It can be challenging to observe the doser’s movement while the printer is full of powder. For cases that need detailed inspection of the doser assembly and doser motion, it may be necessary to empty the hopper and hopper trough area, if possible.
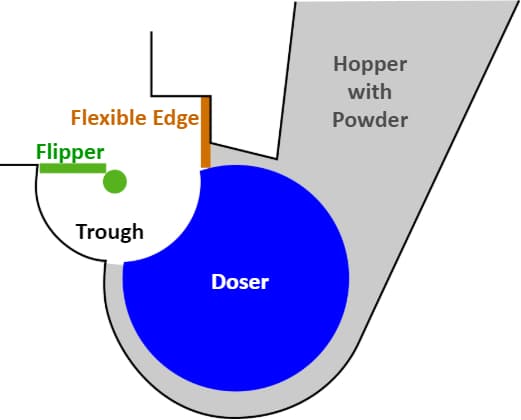
A diagram of the hopper, doser, and flipper assembly in a Fuse 1 generation printer

Use the Motor Moves menu to drive the doser and hopper side flipper and evaluate their motion. Record a video.

  1. Move the hopper side flipper out of the doser drum’s range of motion. Moving it to or near its home position works well.
  2. Rotate the doser drum several full rotations.
  3. If the doser drum is stopping before it comes to its home position, closely inspect at this point.
  4. If the doser stops unexpectedly when driving it using the Motor Moves menu:
    1. Look around this area specifically for something interfering with the doser drum. Specifically, look out for any melted powder or debris that may be stuck to the drum or the powder trough.
  5. If the doser drum rotates fully but does not return to the correct home position (as shown in the image above):
    1. Confirm whether the drum returns to the same home position every time.
      1. If it does, recalibrate the doser assembly. To recalibrate the doser, tap Settings > Calibration > Doser Calibration on the printer’s touchscreen. Follow the on-screen instructions.
      2. If it does not, the encoder board may be malfunctioning. Reseat the doser encoder board.
      3. If reseating the doser encoder board does not resolve the issue, you may need to replace the doser assembly. Fuse 1 and Fuse 1+ 30W doser assemblies are available for purchase on the Formlabs Store. Recalibrate the doser assembly installing the replacement.
  6. If the doser drum rotates normally and homes to the correct position, evaluate the motion of the hopper flipper.
    1. Make sure that the doser drum is in the home position before moving the hopper flipper.
    2. Rotate the hopper flipper several rotations.
      1. If the flipper consistently stops at the same incorrect home position, contact Formlabs Support or a certified service provider for assistance recalibrating the flipper.
      2. If the flipper stops at the wrong position, but not the same position every time, or moves erratically, the encoder board may be broken.
        1. Reseat the flipper motor encoder board cable.
        2. If reseating the cable does not resolve the issue, you may need to replace the buffer flipper motor assembly. Fuse 1 generation flipper motors are available for purchase on the Formlabs Store.
  7. If the doser moves erratically but you do not see an obstruction, the encoder board may be defective or a component on the drive train may be slipping.
    1. Reseat the doser motor encoder board cable.
    2. If reseating the doser encoder board does not resolve the issue, you may need to replace the doser assembly. Fuse 1 and Fuse 1+ 30W doser assemblies are available for purchase on the Formlabs Store.
  8. If no fault can be found after performing the steps above, contact Formlabs Support or a certified service provider. Include the video of the flipper and doser moving.

Error 94/3–4 PR_ERROR_MOTORS_MOVE_​MISSED_HARDSTOP

At the start of every print, the printer calibrates the home positions of the recoater and print bed by moving each component to the end of its travel range, known as the hardstop. The printer detects the hardstop by monitoring the motor’s current; when the current reaches a specific threshold, it indicates the component has collided with the hardstop, establishing this as the home position for the entire print.

Error 94 indicates the motor was able to spin for a very long time without the component reaching a hardstop. This occurs when there is a failure somewhere in the component’s drive train, causing the rotation of the motor not to translate into motion of the component.

Symptoms

  • Error code during preprint or during a print
  • Grinding/clicking sounds from moving components

Causes

Error 94/3Error 94/4
  • Damaged recoater motor
  • Damage to build chamber Z-drive assembly
  • Damaged Z-drive motor

Troubleshooting steps

  1. Confirm the printer’s firmware is up to date. If it is not, update the firmware.
  2. Replace the affected motor assembly. Fuse 1 generation motor assemblies are available for purchase on the Formlabs Store.
  3. If the issue persists after the motor has been replaced, contact Formlabs Support or a certified service provider.

Error 95/1–5 PR_ERROR_MOTOR_MOTOR_​MOVE_MISSED_INDEX

During normal motor operation, small deviations occur, causing minor differences between a component's actual position and its intended position. . For components with a fixed home position, like the doser and flippers, the printer periodically corrects these deviations by re-homing the component. These re-homing actions are called index moves. An index move intentionally commands the motor to travel slightly beyond the home position and then stops once the encoder board confirms the motor has reached the home position.

Error 95 indicates that a motor has moved the full commanded distance during an index move but the encoder board does not detect that the home position was reached.

Symptoms

  • Error code during preprint or during a print

Causes

  • Poor connection to the component’s encoder board
  • Drift in the component’s calibrated home position
  • Small deviations (below the threshold for Error 93) causing the component to miss its indexed position at a later point

Troubleshooting steps

Error 95/1–5 can be resolved following the same troubleshooting steps as their Error 93 counterparts. Note that encoder board issues are more likely to result in Error 95 than Error 93.

Unexpected motor movements or sounds without an error message

Most unexpected motor movements or behaviors that cause unusual sounds eventually result in one of the error messages described above. If you notice new or unusual motor movements but your printer has not reported any errors, identify the affected motor and follow the relevant troubleshooting steps for the corresponding error message above.