
Caution:
Due to its size and weight, do not move or reposition the Fuse Sift alone. If the unit needs to be moved, at least two or more individuals should use the lifting straps provided with the machine.

This guide illustrates the various components of the Fuse Sift, the initial setup, and how to begin recovering powder. Review the unboxing and setup support article for more detailed instructions on how to unbox, install, and connect your Fuse Sift.
Read and understand the instruction manual and its safety instructions before using the Fuse Sift.
Product components
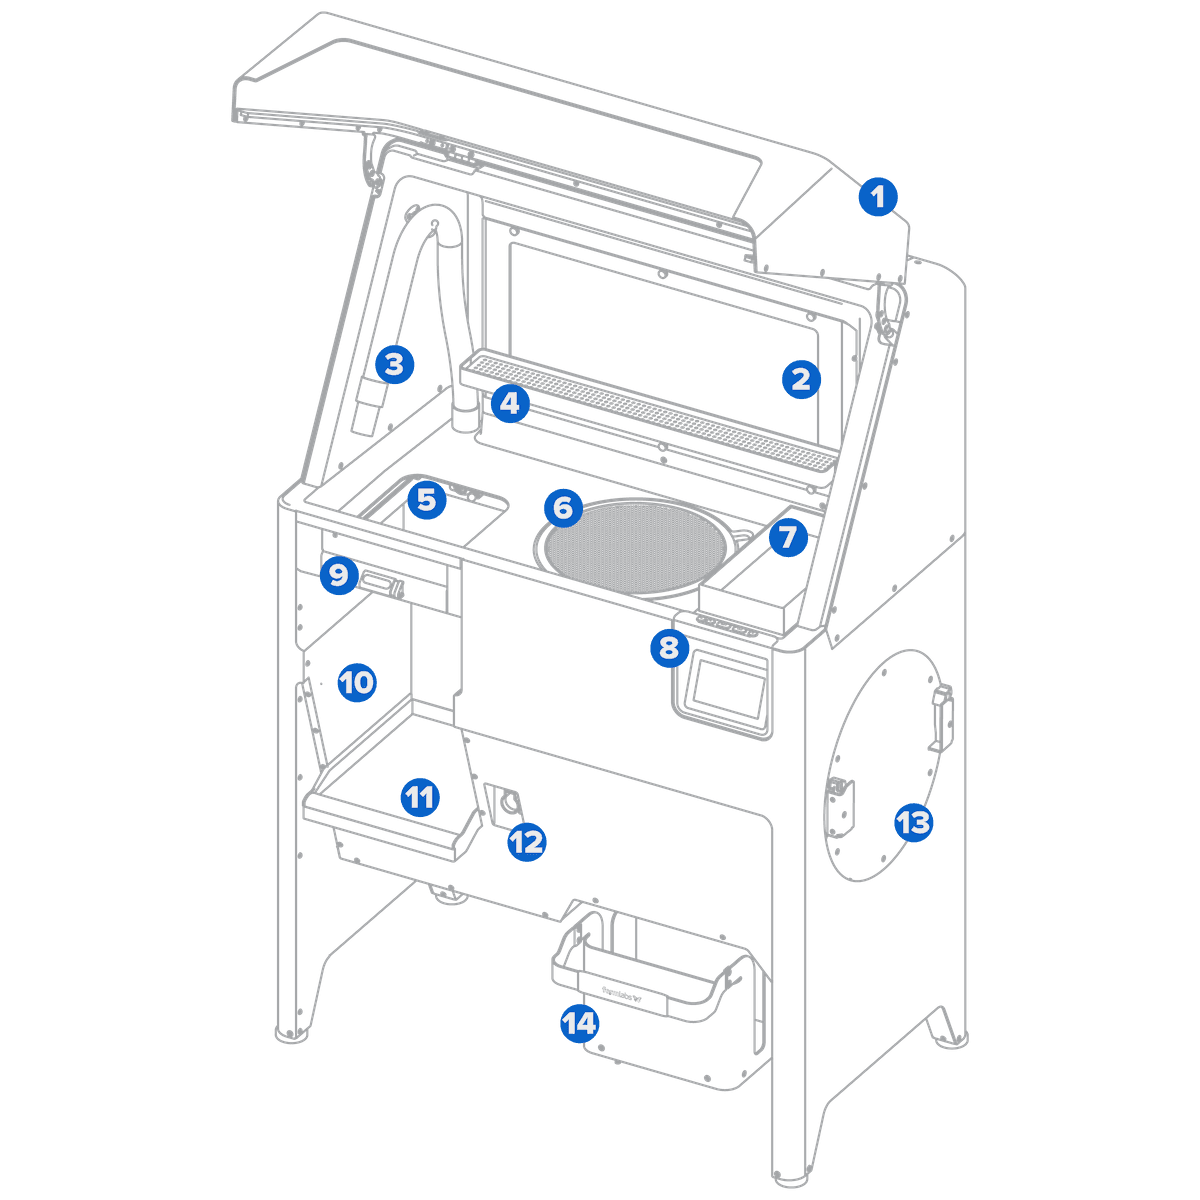
① Hood: Prevents powder and debris from leaving the Fuse Sift’s workspace.
② Vent: Collects pluming powder.
③ Vacuum: For cleaning the Fuse 1 and Fuse Sift after use.
④ Tool shelf: Storage for break-out tools and brushes.
⑤ Build chamber via: Access port for cooled cake to enter workspace.
⑥ Surface grate: Protective grate covering the sifter.
⑦ Fuse Sift Funnel: Access point for filling the fresh powder hopper.
⑧ Control panel: A touchscreen and physical controls for interfacing with the Fuse Sift.
⑨ Build chamber latch: Secures the build chamber.
⑩ Build chamber enclosure: Area for housing the build chamber with prints ready to be ejected. The powder catch at the bottom of the build chamber enclosure is a removable tray for catching loose powder.
⑪ Powder catch: Removable tray for catching loose powder.
⑫ Build chamber socket: For the build chamber’s plug.
⑬ Mixer: For mixing powder cartridges after filling.
⑭ Cartridge drawer: For storing and filling a powder cartridge.
Unboxing
Unboxing and setting up the Fuse Sift
Step 1: Position the packaging near the designated location and stand it upright
Step 2: Open the box from the top
Step 3: Disengage the 4 steel brackets with a 8-mm socket driver to remove the 12 bolts
Step 4: Loop the lifting straps under the machine from left-to-right
Step 5: Insert your forearms into each loop
Step 6: Brace against the machine with your palms to lift the it out the box
Step 7: Position the machine
Step 8: Remove additional packaging material
Caution:
Due to its size and weight, do not move or reposition the Fuse Sift alone. If the unit needs to be moved, at least two or more individuals should use the lifting straps provided with the machine.
Installing
Unboxing and setting up the Fuse Sift
Step 1: Insert the sifter mesh and surface grate
Step 2: Install the tool shelf
Step 3: Install the powder catch tray
Step 4: Set up the build chamber port cover
Step 5: Assemble the vacuum
Step 6: Connect the vacuum hose and power cable to the port
Step 7: Loop the hose around the hook
Step 8: Flip the breaker switch on the vacuum to the ON position
Step 9: Plug the power cable into the power port on the back
Step 10: Connect the power cable to a dedicated circuit
Step 11: Flip the breaker switch on the back to the ON position
Step 12: Turn on the machine

Notice:
The Fuse Sift requires a dedicated AC circuit, providing at least 7.5 A at 230 VAC (EU) or 15 A at 120 VAC (US), as well as reliable grounding. This circuit must be separate from other devices—including the corresponding Fuse 1, fans, vacuums, power tools, space heaters, or any large appliances or power tools. Power surges may disrupt mixing or filling operations and/or permanently damage sensitive components, jeopardizing the reliability of the product. Formlabs suggests the use of line conditioners or UPS in regions with voltage fluctuations.
Connecting
Unboxing and setting up the Fuse Sift
Connect the machine to a secured network via Ethernet or Wi-Fi.
Next steps
After setting up your Fuse Sift, use it to recover and depowder printed parts and prepare for your next print.