

Sheet metal forming
Sheet metal forming
Sheet metal forming is the most cost-effective forming procedure today for manufacturing parts at large quantities. It can be highly automated in factories or manually operated in metal workshops for small series parts. It is a versatile, consistent, and high-quality procedure to create accurate metal parts with limited material waste.
Sheet metal forming is an equipment-intensive operation and requires part-dependent machinery and specialized tools. The tool, also known as the form or die, is the part of the forming machine acting to bend the sheet. Typically, manufacturers produce their forming tools out of metal by CNC machining in-house or outsourcing to service providers.
Although large size parts are associated with heavy tooling, most metal workshops also produce all kinds of small elements requiring lower bending forces. Replacing those metal tools with 3D printed plastic parts printed in-house for prototyping and low volume production can shorten development times and drive down production costs. In-house printing allows engineers to quickly prototype metal parts and iterate tool designs with complex geometries, while reducing reliance on outsourced providers.
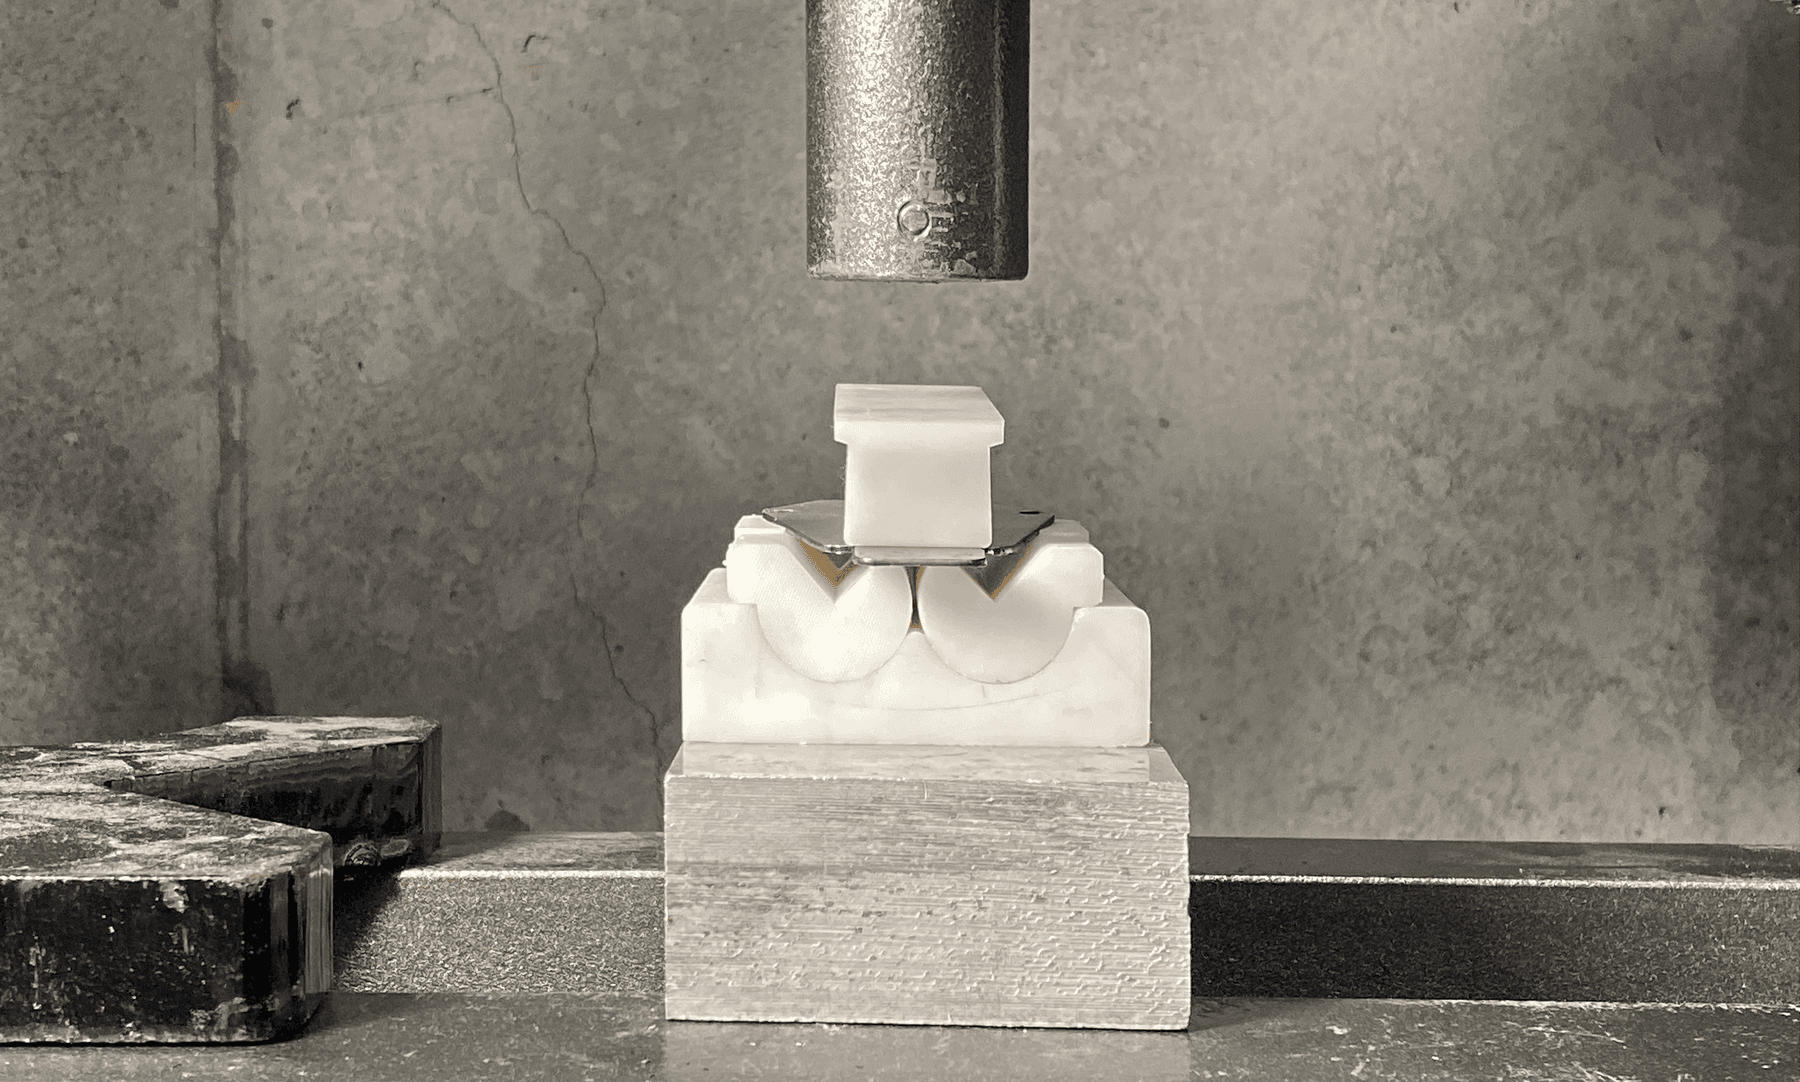
Forming metals involves applying forces to plastically deform the material into the desired shape. It permits the creation of complex structures with great strength and a minimum amount of material. Forming includes treatments such as bending, spinning, drawing or stretching implemented by dies or punching tools.
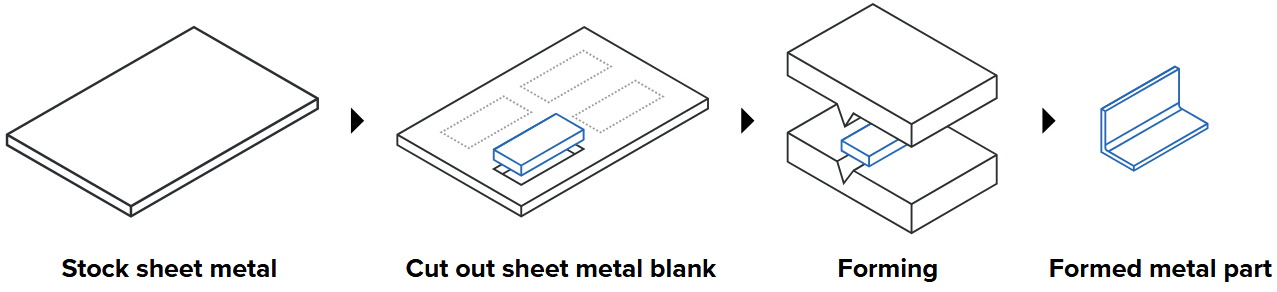
The sheet metal forming process is straightforward:
- A sheet of metal is cut out from a stock metal to create individual blanks.
- The blank is placed in the forming machine in between two tools.
- Subjected to the high forces of the machine, the upper tool pushes the sheet metal around the matching lower tool and bends it in the desired shape.
Formlabs recommended materials
Formlabs offers a broad library of technical resins and powders with various material properties that can be used to optimize the process for different applications.
- Rigid 10K Resin has a high tensile strength (88 MPa) and tensile modulus (11 GPa), which provides good stiffness that helps the tools withstand high loads without deformation.
- Tough 2000 Resin and Tough 1500 Resin are suitable choices when lower forces and dynamic loading are involved. These resins absorb the impact energy without breaking and should withstand wear, hammering, and embossing treatments.
- Nylon 12 Powder has a high tensile strength (50 MPa) and is best suited for complex assemblies and durable parts.
- Draft Resin is suitable for quickly validating the die geometry. Formlabs does not recommend this resin for sheet metal forming part production.
Design considerations
The geometry of the tool is key to the success of the forming operation. The first thing to do when looking at the CAD of the final part is to determine how to bend it and form it. Formlabs recommends breaking each feature into its own forming step of the procedure.
General guidelines:
- Bending flanges near a hole can provoke distortion. Ensure the upper tool is pressing the whole surface of the top part.
- Take metal springiness to bend vertical walls into account. Bend sheets beyond 90° to create vertical walls.
- Use ramps to bend flanges beyond 90°.
- Leave clearance in between the two dies or the part may break. Some CAD software tools have a feature called adaptivity that integrates tolerancing automatically.
For more information about design considerations, refer to the white paper How to do Rapid Tooling for Sheet Metal Forming with 3D Printed Dies.
Printing considerations
Follow Formlabs best practices for model orientation and avoid printing supports on forming surfaces. If the geometry allows it, print the tool flat on the edge directly on the build platform, in order to reduce warpage.
General guidelines:
- Ensure sufficient support to prevent warpage.
- Print at 50–100 μm layer height.
Post-processing considerations
Follow Formlabs best practices for washing and post-curing prints. Refer to the individual material articles for specific wash and cure instructions.
Tips for sheet metal forming success:
- Validate the tool with a thinner gauge material to reduce chances of breakage.
- Cut the sheet metal blank before forming. Traditional forming processes cut the material with the metal die. However, 3D printed parts are not strong enough to punch out the metal. Formlabs recommends bench shear, hand shear, drilling, water jetting, plasma cutting, or laser cutting to cut the sheet metal blank.
- Use lubrication to help prevent wear on the tools and reduce the forces required to press.
- Plastic tools do not mark the sheet in the forming process, so polishing is unnecessary.
End-use recommendations and limitations
3D printing sheet metal tool in-house gives flexibility to designers and engineers by reducing the lead time from weeks to a day. For large volume production, prototyping the tool in plastic allows users to verify the design before committing to an expensive metal tool For short-run production, printed dies would save hundreds of dollars compared to outsourcing the part. It is particularly recommended for:
- Prototyping sheet metal parts such as brackets, guards, and flanges.
- Short-run production of simple or medium-complexity geometries.
- Test-fitting and validation before investing in metal dies.
Some limitations include:
- Not suitable for large sheet panels or deep-draw parts requiring extremely high press forces.
- Printed dies can crack under excessive pressure. Formlabs recommends validating the die first with thinner gauge sheet metal.
- Printed parts have a limited shear resistance and cannot cut or punch dies.
Additional resources