LIBRO BLANCO
Formlabs Logo

Form 2 error messages

Form 2 error messages

La pantalla táctil de la impresora muestra mensajes de error si la impresora encuentra alguna anomalía y muestra además más detalles sobre el error.

Mensaje de error Cartridge Low (Cartucho con resina insuficiente)

Configura los ajustes de Dashboard para recibir notificaciones por SMS o correo electrónico de los errores enumerados en este artículo y de otros eventos de impresión.

Registros de diagnóstico

Formlabs printers maintain diagnostic logs to provide detailed information about the printer. Include these diagnostic logs with other relevant observations and details when contacting Formlabs Support or your authorized reseller to speed up resolution.

For printers connected to the internet over an active Wi-Fi or Ethernet connection:

  1. Tap the printer icon on the printer's home screen. The My Printer screen appears.
  2. Tap Settings. The Settings screen appears.
  3. Tap Printer Info. The Printer Info screen appears.
  4. Scroll down and tap Upload Diagnostic Info. A confirmation message to upload diagnostic information appears.
  5. Tap Continue to start the upload. A confirmation message appears when the upload is complete.
  6. If the printer displays an error message indicating that it cannot upload the logs, there may not be enough storage space on the printer for the upload. Delete print jobs from the queue to clear enough storage space to upload the logs.
  7. Restart the printer and try again.

For printers not connected to the Internet:

  1. Open PreForm.
  2. Click Edit Job Setup. The Job Setup window opens.
  3. Select the printer’s serial name.
  4. Click Download Logs. A confirmation window appears.
  5. Click Browse to download the diagnostic logs to a preferred location on your computer.
  6. Click OK. The diagnostic logs save and appear in the encrypted FORMLOGS format.
  7. Attach the file when contacting Formlabs Support or your authorized reseller.
  8. If PreForm displays the message ERROR_BAD_STATE, there may not be enough storage space on the printer for the upload. Delete print jobs from the queue to clear enough storage space to upload the logs.
  9. Restart the printer and try again.

Learn more about options for network and non-network connections.

Cartidge Dispense Error (Error del cartucho al dispensar resina)

The printer displays a Cartridge Dispense Error if it tries to dispense resin but nothing comes out of the cartridge. Usually, this means the cartridge is empty. Each cartridge contains and can reliably dispense one liter of resin. After the full liter dispenses, dispose of the cartridge and continue printing with a new cartridge.

If a cartridge is not empty but the printer is unable to dispense resin, an issue with the cartridge may be preventing resin from dispensing.

  1. Check that the cartridge vent cap is open.
  2. Check the inside of the cap to ensure the vent is not blocked.
  3. Consider loosening the cap.
  4. Check the bite valve on the underside of the cartridge to make sure it opens when squeezed.

Cartridge Low (Cartucho con resina insuficiente)

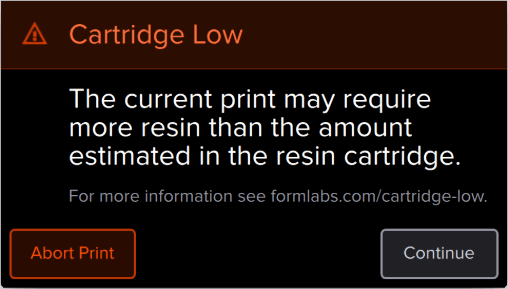
The printer checks the estimated amount of resin in the cartridge before starting each print. If the estimated resin supply isn’t enough to complete the part, the printer displays Cartridge Low.

Tap Ignore on the touchscreen to continue. However, if the printer runs out of resin in the middle of a print, it pauses until a new cartridge is inserted. Long print pauses can cause a horizontal line across printed parts. Consider swapping the low cartridge for a full cartridge before starting the print, or monitor the print closely and insert a new cartridge as soon as the current cartridge runs out of resin.

Resin Tank Overfilled (Sobrecarga del tanque de resina)

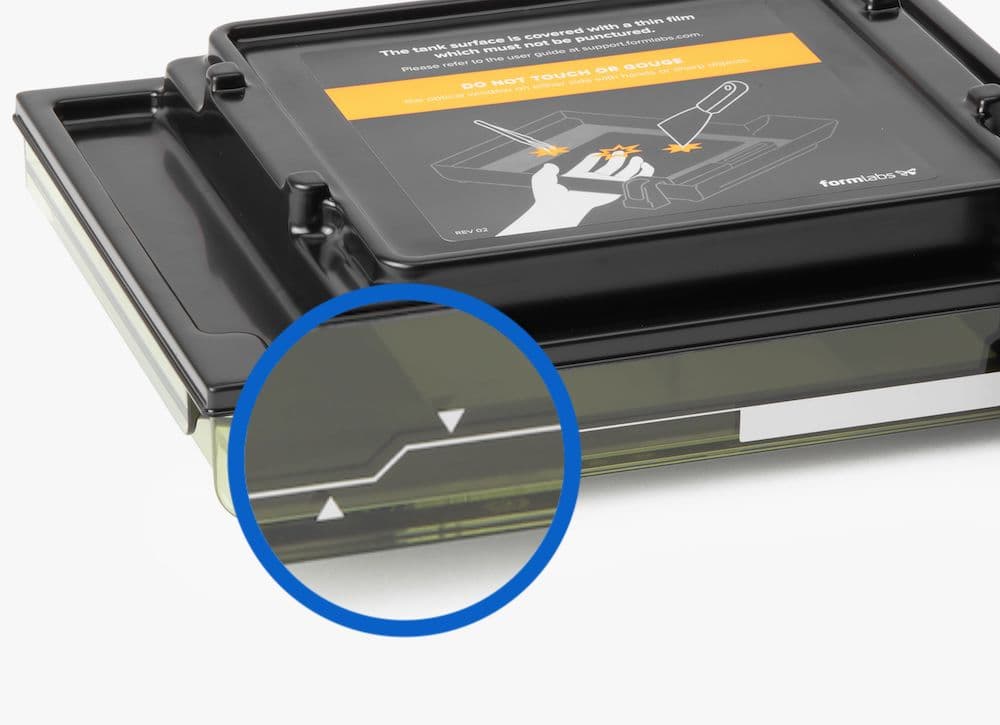
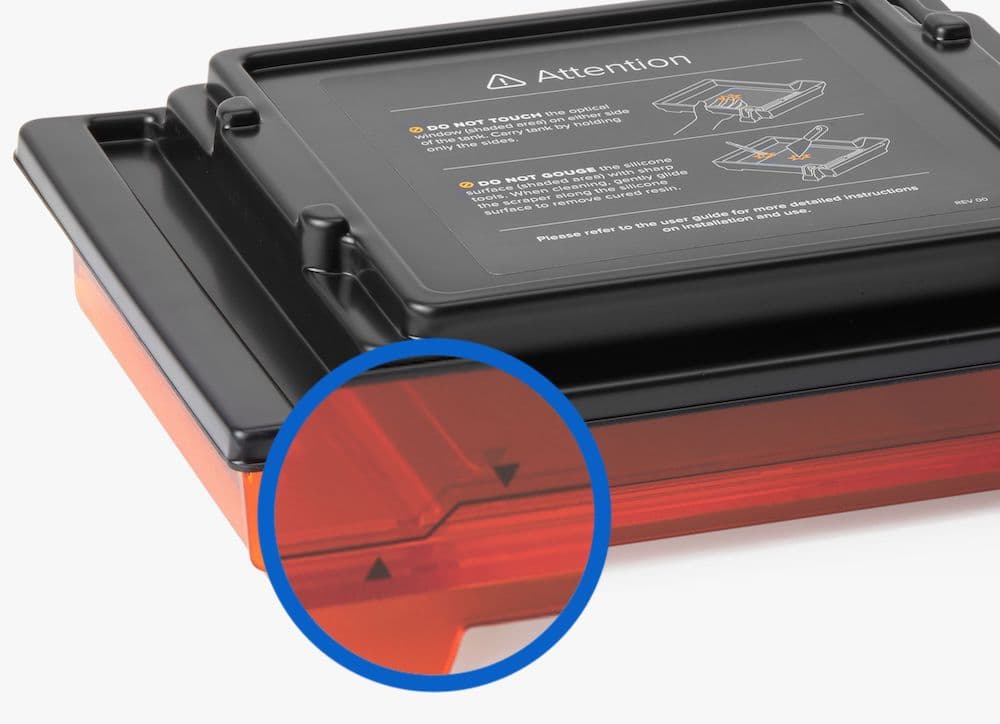
If the resin tank is overfilled, the printer will show this error. Form 2 resin tanks are marked with minimum and maximum fill lines. The level of resin in the tank should always be between these two lines.

Minimum and maximum fill lines on a Resin Tank LT (Form 2)
Minimum and maximum fill lines on a standard resin tank (Form 2)

Use a syringe or small disposable cup to remove small amounts of resin, and pour it into a separate container. If the printer incorrectly warns of a resin tank overfill, check the LevelSense board for damage.

Errores Missing Resin Tank (Falta el tanque de resina) y Missing cartridge (Falta el cartucho)

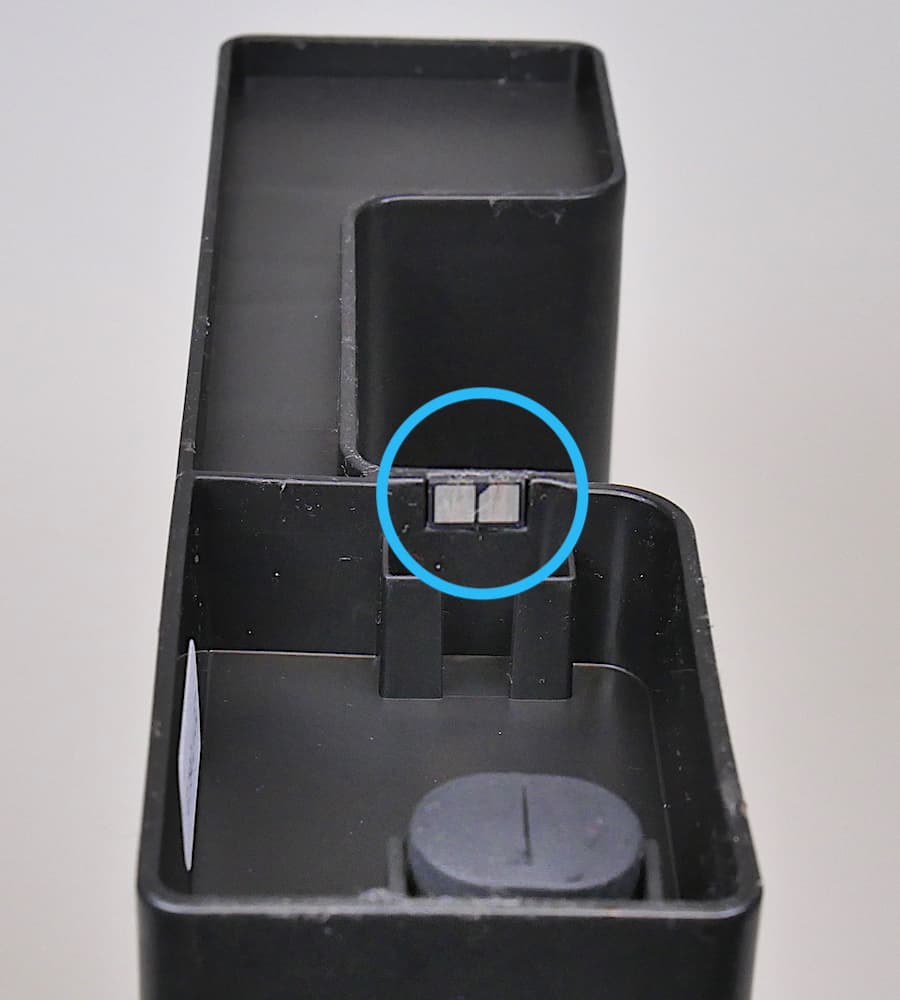
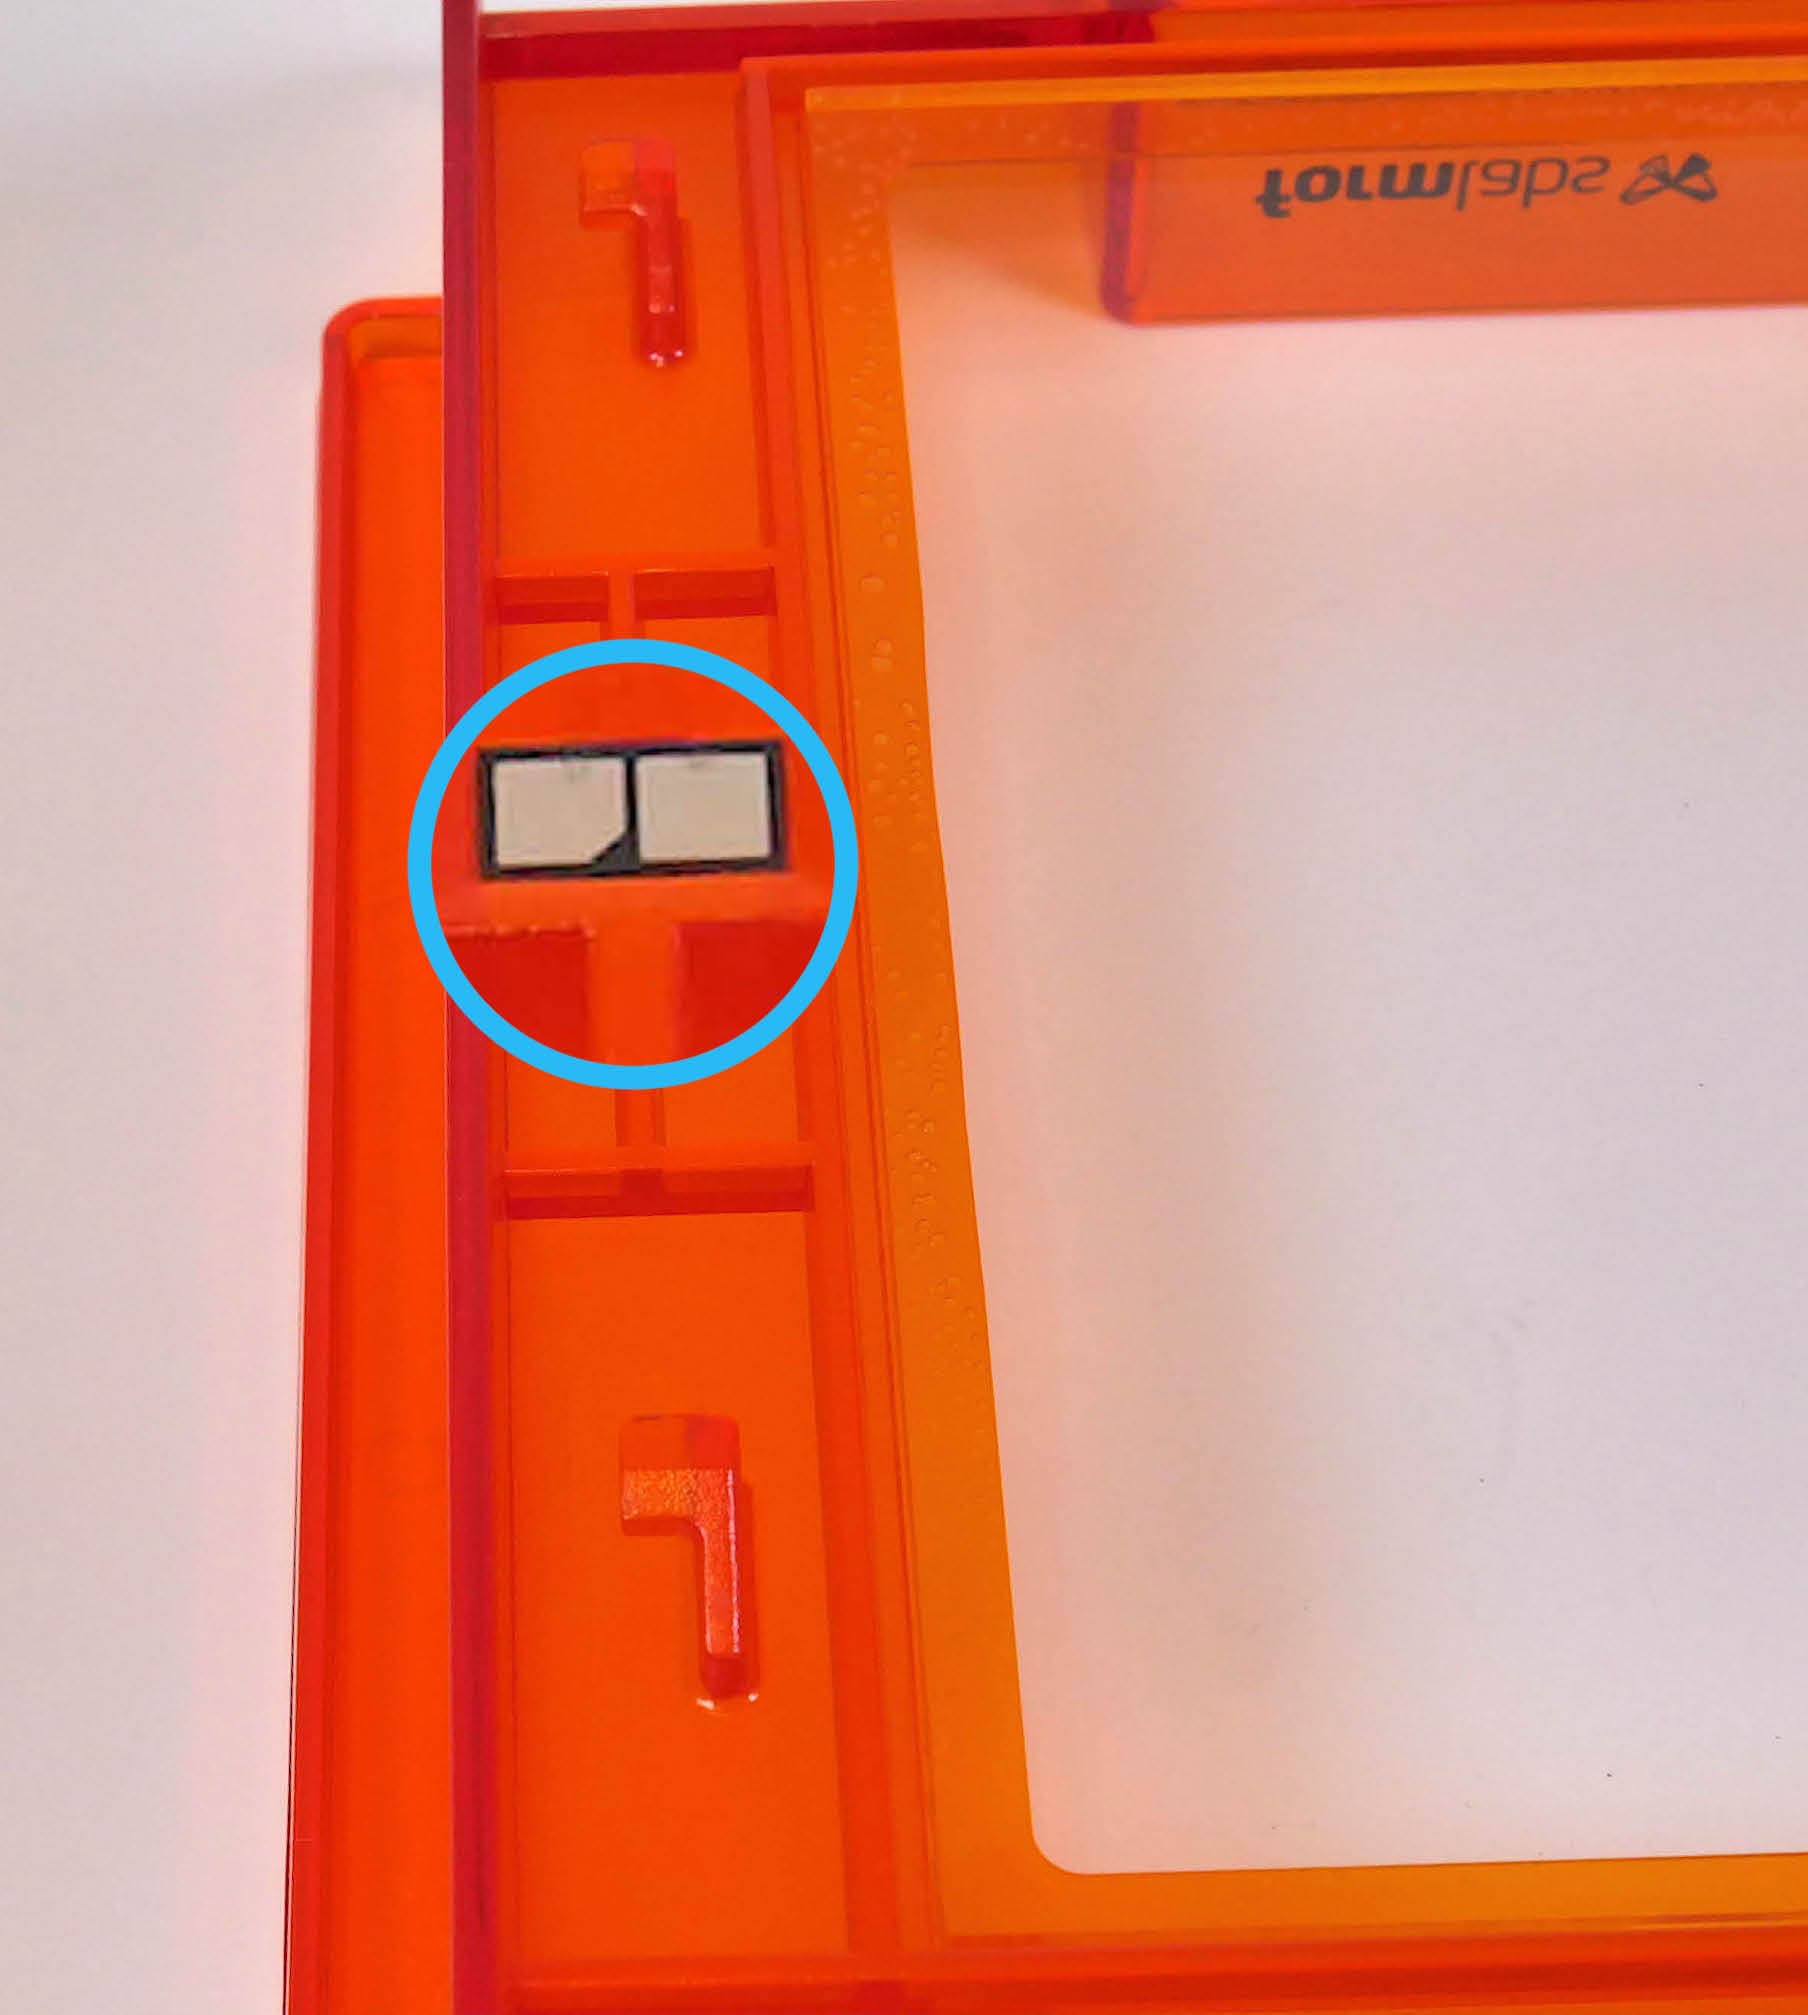
Si la impresora no detecta un tanque o cartucho insertado, comprueba el chip de identificación del tanque o cartucho de resina para asegurarte de que el chip está presente y limpio. Un chip sucio o la ausencia del mismo pueden impedir que la impresora detecte el tanque o el cartucho.

Chip EEPROM del cartucho de resina
Form 2 resin tank EEPROM chip

Fully remove and reinsert the resin tank or cartridge. The top of an inserted cartridge should be flush with the orange cover, and the front edge of an inserted resin tank should rest against the front edge of the tank carrier.

Resin Tank and Cartridge Warning (Tanque y cartucho de resina erróneos)

La impresora verifica el tipo de resina en el tanque y el cartucho para asegurarse de que coinciden con el trabajo de impresión actual. Si no coinciden con el tipo de resina identificado en el trabajo de impresión, la impresora muestra Resin Tank and Cartridge Warning (Tanque y cartucho de resina erróneos) y te pide que insertes un tanque y un cartucho que coincidan con los ajustes de la impresión.

Resin Tank Warning (Tanque de resina erróneo)

If the resin cartridge is inserted first, the printer displays Resin Tank Warning when the type of resin in the tank does not match the cartridge. Remove the resin tank and replace it with one that matches the resin cartridge.

To use a new type of resin with a resin tank, empty and clean the tank, then tap Ignore to reprogram the tank's resin type.

Cartridge warning (Cartucho de resina erróneo)

Si el tanque de resina se inserta primero, la impresora muestra Cartridge Warning (Cartucho de resina erróneo) cuando el tipo de resina en el cartucho no coincide con el del tanque. Retira el cartucho y reemplázalo por uno que del mismo tipo de resina que el del tanque.

Motors Jammed (Motores atascados)

Sensors track the printer's motor movements. If a motor does not return to its original position in the right amount of time, the printer displays Motors Jammed.

Anything in the path of wiper or tank motion may prevent the motor from moving properly. Open the cover to inspect the build platform, resin tank, and wiper. Remove obstructions, then remove and reinsert the build platform, wiper, and resin tank.

Heater Error (Error del calentador)

La impresora deja de calentarse si no puede alcanzar la temperatura objetivo de 30 °C después de 60 minutos. En un entorno de funcionamiento frío, la impresora puede necesitar más de un ciclo de calentamiento para alcanzar la temperatura deseada. Vuelve a iniciar la impresión para comenzar a calentar de nuevo. Para más información, consulta el artículo de asistencia Mantenimiento de la temperatura de la resina.

Cartridge Worn Out (Cartucho agotado)

Each cartridge contains and can reliably dispense one liter of resin. After the full liter dispenses, dispose of the cartridge and continue printing with a new cartridge. Restart the print once the depleted cartridge has been replaced.

To manually print with non-Formlabs resins, explore the open mode on the Form 2.

Resin sensor error

The LevelSense board is located directly behind the resin tank. The printer may display Resin Sensor Error if the resin tank is too close, too far, or if the sensor or tank are contaminated.

If the printer displays a Resin Sensor Error, follow each step to see if that step resolves the error:

  1. Ensure that the printer is level.
  2. Grasp the front corners of the tank and nudge the tank in a counter-clockwise direction.
  3. Inspect the resin tank:
    • Remove the resin tank.
    • Reinsert and push the tank all the way back. The touchscreen displays a confirmation message when the resin tank is properly seated.
  4. Inspect the LevelSense board:
  5. If the printer still shows the error, try a different resin tank. If the error does not occur with a different tank, the problem may lie with the resin tank.
  6. If the error happens with all resin tanks, contact Formlabs Support or your authorized reseller.

Printer Tilted (Impresora inclinada)

Las impresoras SLA de Formlabs funcionan mejor cuando están perfectamente niveladas. La pantalla táctil te pedirá que niveles la impresora cuando sea necesario. Pulsa Settings > Printer Leveling (Ajustes > Nivelación de la impresora) en la pantalla táctil para visualizar el estado actual del nivel.

Sigue las instrucciones de la pantalla táctil y utiliza la herramienta de nivelación para nivelar la impresora.

Reset While Printing (Reinicio durante la impresión)

If power to the printer is interrupted during a print job, the printer will not resume the print job when it restarts. The touchscreen displays Reset While Printing. If the reset was unexpected, contact Formlabs Support or your authorized reseller.

Failed to start print (No se ha podido iniciar la impresión)

The Failed to start print error message appears if the printer is unable to determine why the print failed to start properly. In some cases, it can indicate damage to the motherboard that prevents proper connection to the laser controller or motors. To resolve this issue:

  1. Power cycle the printer.
  2. Update PreForm and your printer’s firmware.
  3. Perform a factory reset on your printer.
  4. Delete the FORM file from your computer and delete the print job from the printer.
  5. Remake the print job, reupload it to the printer, and retry the print.
  6. Check your printer’s connection to the computer. Reupload the print job via another connection method, if possible.
  7. Try another resin tank, particularly if the previous resin tank has been heavily used.

If you see this error message repeatedly, contact Formlabs Support or your authorized reseller.

Print error code: 41

The printer displays Print error code: 41 on the print job screen when it detects an unusual power draw from the galvanometers. This is a safety measure which prevents damage to the printer if the galvanometers behave unexpectedly. This behavior may be caused by a loose connection with the galvanometer cables. If you encounter this error, contact Formlabs Support or your authorized reseller.

Errores de wifi

La impresora muestra mensajes de error específicos en función de la respuesta del punto de acceso wifi al intento de conexión. Consulta el artículo de asistencia Conexión a la impresora para configurar una conexión a través de wifi, USB o Ethernet. Consulta siempre a un administrador de la red para asegurarte de que la red inalámbrica esté configurada para permitir la conexión de la impresora. Si utilizas un sistema operativo Windows, sigue las instrucciones de Apple para asegurarte de que Bonjour esté instalado correctamente. Este paso es necesario para la conexión. PreForm debe estar conectado a la misma red que la impresora para la carga inalámbrica.

Invalid Network Key (Clave de red no válida)

La contraseña no se ha introducido correctamente. Comprueba la contraseña de la red. Consulta a un administrador de la red para asegurarte de que la red inalámbrica esté configurada para permitir la conexión de la impresora.


Connection Failed (Conexión fallida)

La impresora no ha podido configurar la conexión inalámbrica y no ha podido conectarse a la red. Consulta a un administrador de la red para asegurarte de que la red inalámbrica esté configurada para permitir la conexión de la impresora.
Error 8

Error 8 indicates that an unexpected error occurred while the printer was reading a FORM file. To resolve this issue, delete old print jobs from the printer and attempt another print. Update PreForm and the firmware to the latest version. If the issue persists, perform a factory reset. Performing a factory reset may resolve a corrupted file system or file system bugs.

Error 23

Error 23 indicates that the printer encountered an error while trying to move its motors. To resolve this issue, delete old jobs from the printer and attempt another print. Update PreForm and the firmware to the latest version. If the issue persists, perform a factory reset. Performing a factory reset may resolve a corrupted file system or file system bugs.

Instrucciones para el restablecimiento de los ajustes de fábrica

On some occasions, a factory reset may correct unusual printer behavior. Unusual behavior may include Unknown Error messages, incomplete firmware updates, an unresponsive touchscreen, or trouble connecting to PreForm. A factory reset erases custom settings, including Fine Tuning, including prints saved in the queue and network connections.

Aviso:

Un restablecimiento de los ajustes de fábrica borra toda la información de las impresiones, la configuración personalizada y los registros de diagnóstico. Carga los registros de diagnóstico antes de realizar un restablecimiento de los ajustes de fábrica.

To perform a factory reset:

  1. Unplug the printer.
  2. Reconnect the printer power cable.
  3. When the Formlabs logo appears, press and hold the button until Resetting to factory defaults appears on the touchscreen.
  4. Release the button.
  5. The touchscreen displays Factory reset complete before initializing the printer.

To confirm a successful factory reset, tap queue on the touchscreen. After a successful reset, the print queue is empty. If the reset does not resolve the behavior, contact Formlabs Support or your authorized reseller.