Tip:
Read the support article Printing crown and bridge models with Model Resin for more information and dental CAD settings.


Formlabs 3D printers are designed with accuracy in mind. Every printer goes through rigorous factory calibration, so no onsite calibration is typically required. For applications that require extremely high accuracy on the Form 3 and Form 3B, Formlabs has added a setting to optimize dimensional fit.
Fit Tuning allows users to further adjust the fit of printed parts demanded by their application. To refine the accuracy of printed parts on the Form 3 and Form 3B, Formlabs has added a configurable setting to adjust dimensional fit on the X- and Y-axis. Increasing or decreasing this value compensates for horizontal expansion during the printing process to improve the fit of dental restorative dies and other end-use parts.
Tip:
Read the support article Printing crown and bridge models with Model Resin for more information and dental CAD settings.
Complete the following steps to tune your printer for fitment:
Notice:
To ensure consistency in performance and safety, Fit Tuning is not available for biocompatible materials.
Note:
Fit Tuning is currently in Beta for Model Resin V3 at the 100 micron layer thickness setting. If using other resins or layer thicknesses, the customer is responsible for verifying printed part performance after adjustment.
Impression du fichier de test
Prepare your printer, download the test file, then send it as a print job using PreForm.
Note:
This feature is only available with the latest firmware and PreForm versions. Ensure your Form 3/Form 3B is using firmware version 1.16.0 or later, and that your computer is running PreForm version 3.21.0 or later.
Prepare your printer
Before printing the test file, ensure the printer is using the latest firmware and has a well-maintained tank inserted.
Prepare the model in PreForm
Open the test file in the latest version of PreForm.
The exact material and layer thickness settings selected here will be the only material and layer thickness affected by the final Fit Tuning adjustment. For example, if you print the test file in Model Resin V3 with a layer thickness of 100 microns, only that combination of material and layer thickness is affected by the subsequent adjustment. All other combinations of materials and layer thicknesses are unaffected.
The supplied test file opens as a FORM file that should not be modified, including actions such as moving, rescaling, reorienting, or adding supports.
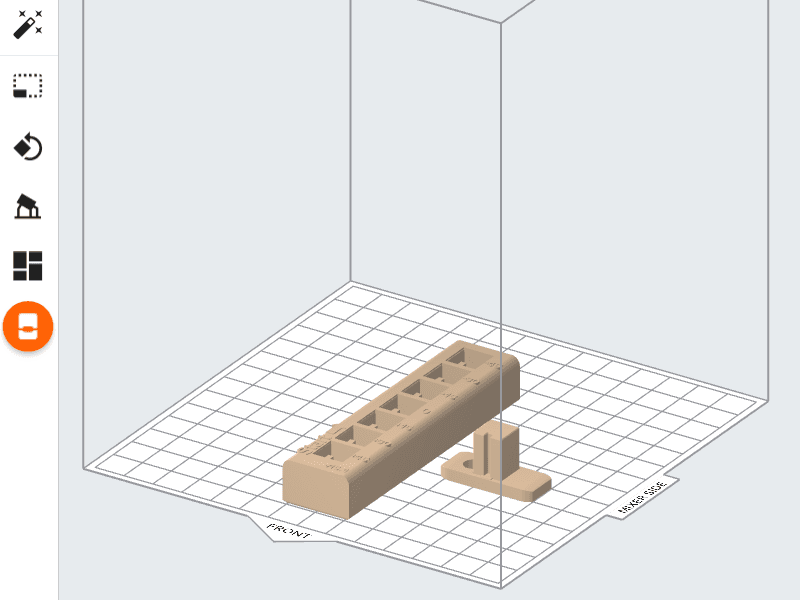
Post-processing the printed parts
Thoroughly wash, dry, and post-cure the part after it has finished printing.
Remarque :
Pour obtenir des résultats uniformes, utilisez les mêmes méthodes de lavage et de polymérisation que celles utilisées habituellement dans vos flux de travail. Les résidus de résine non lavés sur le fichier de test imprimé affecteront le résultat du réglage de l’ajustement.
Running the Fit Tuning Test
Test the fitment of the test print after the FORM file has been printed, washed, post-cured, and cooled. The Fit Tuning Test consists of two printed parts, the “block” and “peg.” Insert the peg into increasingly tighter holes in the block until the desired fit is found.
To perform the Fit Tuning Test:
The Fit Tuning Test is an object that is 3D printed by a user to tune the fitment of models. The test print consists of two printed parts, the “block” and the “peg.”
Depending on the printer, the test can result in a value of +45, +30, +15, 0, -15, -30, or -45. The starting position is the loosest fitment, +45, and becomes tighter as you move up the block.
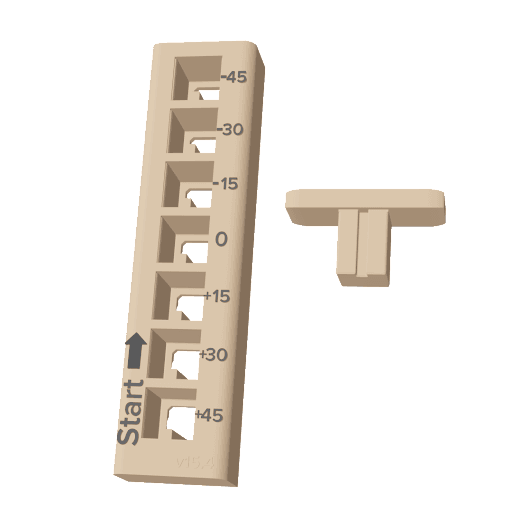
Testing begins by following the path identified on the block as the Start position. Insert the peg into the slot labeled as +45.
Attempt to remove the peg from the block. If the fitment is loose and the peg can be easily removed, insert the peg into the next slot.
If the +45 slot is too tight to insert the peg, stop. Enter 45 μm as the test value, reprint the test file, and retry.
To check proper fitment:
Tip:
Insert the peg into the block by squeezing the peg and block with your thumb and index finger.
Step 4: Review the results
Once the peg is inserted into a slot position that meets fitment criteria, check the number displayed in the peg’s viewing hole. This number is the printer's Fit Tuning value for the given material and layer thickness.
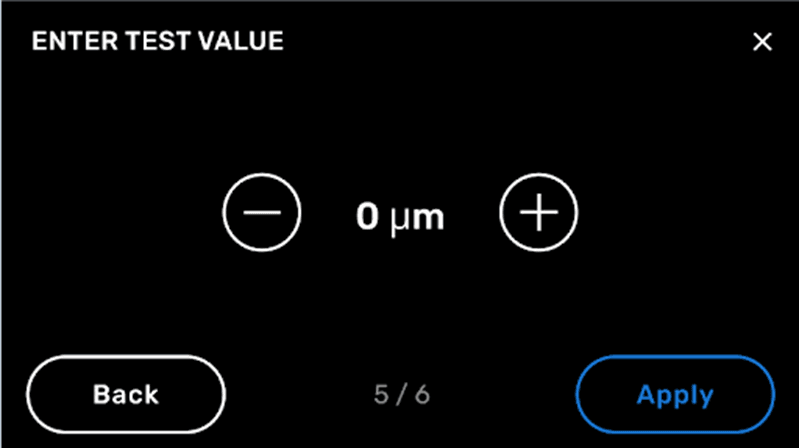
Enter this value using the printer touchscreen.
If the -45 slot is still too loose, enter -45 μm as the test value, reprint the test file, and retry.
Appliquer les nouveaux paramètres
Apply the result from the peg on the test print to the Enter Test Value on the printer’s touchscreen. Adjustments are cumulative—for example, if you enter a test value of -45 μm, redo the test, and enter a new value of -15 μm, the total adjustment will be -60 μm.
Note:
There may be variation between different units, therefore it may be necessary to print a Fit Tuning Test for each printer in use. Only apply the changed settings to the printer that was used to print the offset tool.
Tune the printer
Apply the number shown through the peg’s slot when it is inserted into the acceptable slot on the test block to tune your printer.
Note:
Previously uploaded jobs in the same material and layer thickness as the test print are not affected by the new Fit Tuning values. Reupload the print jobs after adjusting the Fit Tuning value in order to apply the changes to those files.
Tip:
Read the support article Printing crown and bridge models with Model Resin for more information and dental CAD settings.
If you experience trouble with the procedure or unexpected test results, please reach out to Formlabs Support.
Dépannage
Fit Tuning Out of Date
When uploading a FORM file from PreForm to the printer, the FORM file includes the Fit Tuning values from the printer. If the Fit Tuning values on the printer are adjusted after uploading the FORM file, the printer’s touchscreen displays the error message Fit Tuning Out of Date when you start the previously-uploaded print.
The Fit Tuning values in the print job cannot be updated once the file is uploaded to the printer. Reupload the FORM file from PreForm to apply the new Fit Tuning values to your print job.
If the problem persists after reuploading the FORM file from PreForm, contact Formlabs Support or your authorized reseller.
Ressources supplémentaires
Dental model settings for removable dies: