Formlabs Logo

Troubleshooting connectivity on a Formlabs SLS printer

Troubleshooting connectivity on a Formlabs SLS printer

Networking issues can be challenging to troubleshoot. Each network is different, with its own configuration, firewall settings, VPNs, password and security options, anti-virus software settings, and restrictions.

If you are experiencing connectivity issues when trying to send print jobs to your printer, follow these steps first:

  1. Check that the printer and the computer running PreForm are on the same network.
  2. Select Show All in the Choose Printer menu in PreForm, in case your filter selections prevent your printer from being visible.
  3. Non-dental/medical printers, including all Formlabs SLS printers, are only visible in the Standard Workspace. If you are using one of these printers, click View > Choose Workspace and select Standard Workspace.
  4. Ensure that PreForm is up to date.
  5. Check for firmware updates via your printer’s touchscreen and update if needed.
  6. Power cycle the printer.
  7. On the printer touchscreen, tap Settings > Connectivity to check the printer's IP address, and add it to PreForm manually.
  8. Try connecting to PreForm with a different computer.
  9. Check with your IT department, if applicable, to confirm the configuration of your network and any settings that may be interfering with connecting and detecting the printer:
    • Firewalls
    • VPNs
    • Filtering and whitelists
    • Password and security configurations

Troubleshooting Wi-Fi connectivity

  1. Make sure the Wi-Fi router is on and connected.
  2. Power cycle the Wi-Fi router.
  3. Confirm that other devices can connect to the Wi-Fi network.
  4. If your printer has an external Wi-Fi antenna, make sure it is installed.
  5. PreForm 3.57.2 or earlier: Ensure Bonjour is properly installed and up to date. It comes with MacOS but may need to be installed separately on Windows machines. For instructions on installing and updating Bonjour, see the Apple support article Download Bonjour Print Services for Windows.
  6. Assign the printer a static IP address.
  7. Try uploading a file to the printer over the Wi-Fi network using another computer. This step helps figure out if the issue is with the network or the individual computer.
  8. Ping the printer using the computer that is running PreForm.

Windows

  1. Go to Start > Command Prompt to open a Command Prompt window.
  2. In the command-line, type ping followed by the printer's IP address and hit enter.

MacOS

  1. Go to Applications > Utilities > Terminal to open a Terminal window.
  2. In the command-line, type ping followed by the printer's IP address and hit enter.
  1. If the computer is not able to ping, use a different computer to ping the printer. If no computer can ping the printer, there are security restrictions on your network preventing a connection.
  2. Inspect the internal Wi-Fi antenna on your printer following the steps in the guide:
  3. If the Wi-Fi antenna is disconnected, plug the Wi-Fi antenna cable into its connector on the System on Module (SOM). The Wi-Fi antenna cable should not be bundled with any other cables.
  4. If you still cannot connect via Wi-Fi and cannot connect to the printer via any other method, the SOM may need to be replaced. Contact Formlabs Support or your certified service provider.

Tip:

To disconnect from a wireless network, tap Settings > Connectivity > Wi-Fi. Tap the connected network, then tap Disconnect. The printer disconnects from the network.

Troubleshooting Ethernet connections

  1. Make sure the switch or router is on and connected.
  2. Check that your network speed matches the printer’s requirements.
  3. Power cycle the switch or router.
  4. Confirm that other devices can connect to the network.
  5. PreForm 3.57.2 or earlier: Ensure Bonjour is properly installed and up to date. It comes with MacOS but may need to be installed separately on Windows machines. For instructions on installing and updating Bonjour, see the Apple support article Download Bonjour Print Services for Windows.
  6. Check the Ethernet cable connected to the router. A blinking LED status light on the router port corresponding to the cable plugged into the printer indicates a successful network connection.
  7. Test the Ethernet cable. 
    1. Disconnect it from the printer and connect it to a computer. 
    2. Try using the computer to access the network via Ethernet. 
    3. If the computer is not able to access the network, an issue with the cable or port is likely. Try using a different Ethernet cable or port on the router.
    4. If the connection is successful, remove the cable end from the computer and reconnect it to the printer, then relaunch PreForm.
  8. Check the Ethernet port on the printer for resin contamination. If necessary, clean the port using cotton swabs and IPA. Allow the IPA to dry thoroughly before reconnecting the printer to the router.
  9. Ping the printer using the computer that is running PreForm.

Windows

  1. Go to Start > Command Prompt to open a Command Prompt window.
  2. In the command-line, type ping followed by the printer's IP address and hit enter.

MacOS

  1. Go to Applications > Utilities > Terminal to open a Terminal window.
  2. In the command-line, type ping followed by the printer's IP address and hit enter.
  1. If the computer is not able to ping, use a different computer to ping the printer. If no computer can ping the printer, there are security restrictions on your network preventing a connection.
  2. Fuse 1 generation printers have an Ethernet extension cable that runs from the motherboard behind the touchscreen to the rear of the printer. If this extension cable is damaged or faulty, you may be unable to connect to the printer.
    1. Follow the instructions in our guide to replace the display assembly until you can access the motherboard.
    2. Unplug the Ethernet cable from the motherboard.
    3. Plug one end of an Ethernet cable into the port on the motherboard and the other end into your computer.
    4. Power the printer back on and check if you can connect to it via PreForm. Do not touch any internal components of the printer while it is powered on and any panels are removed.
  3. If you still cannot connect to the printer, there may be an issue with the motherboard. Contact Formlabs Support or your certified service provider.
  4. If you can connect to the printer when plugged directly into the motherboard, the Ethernet extension cable needs to be replaced. The cable is a 4 ft Cat-5e panel-mount extension cable, such as this one sold by DataPro.
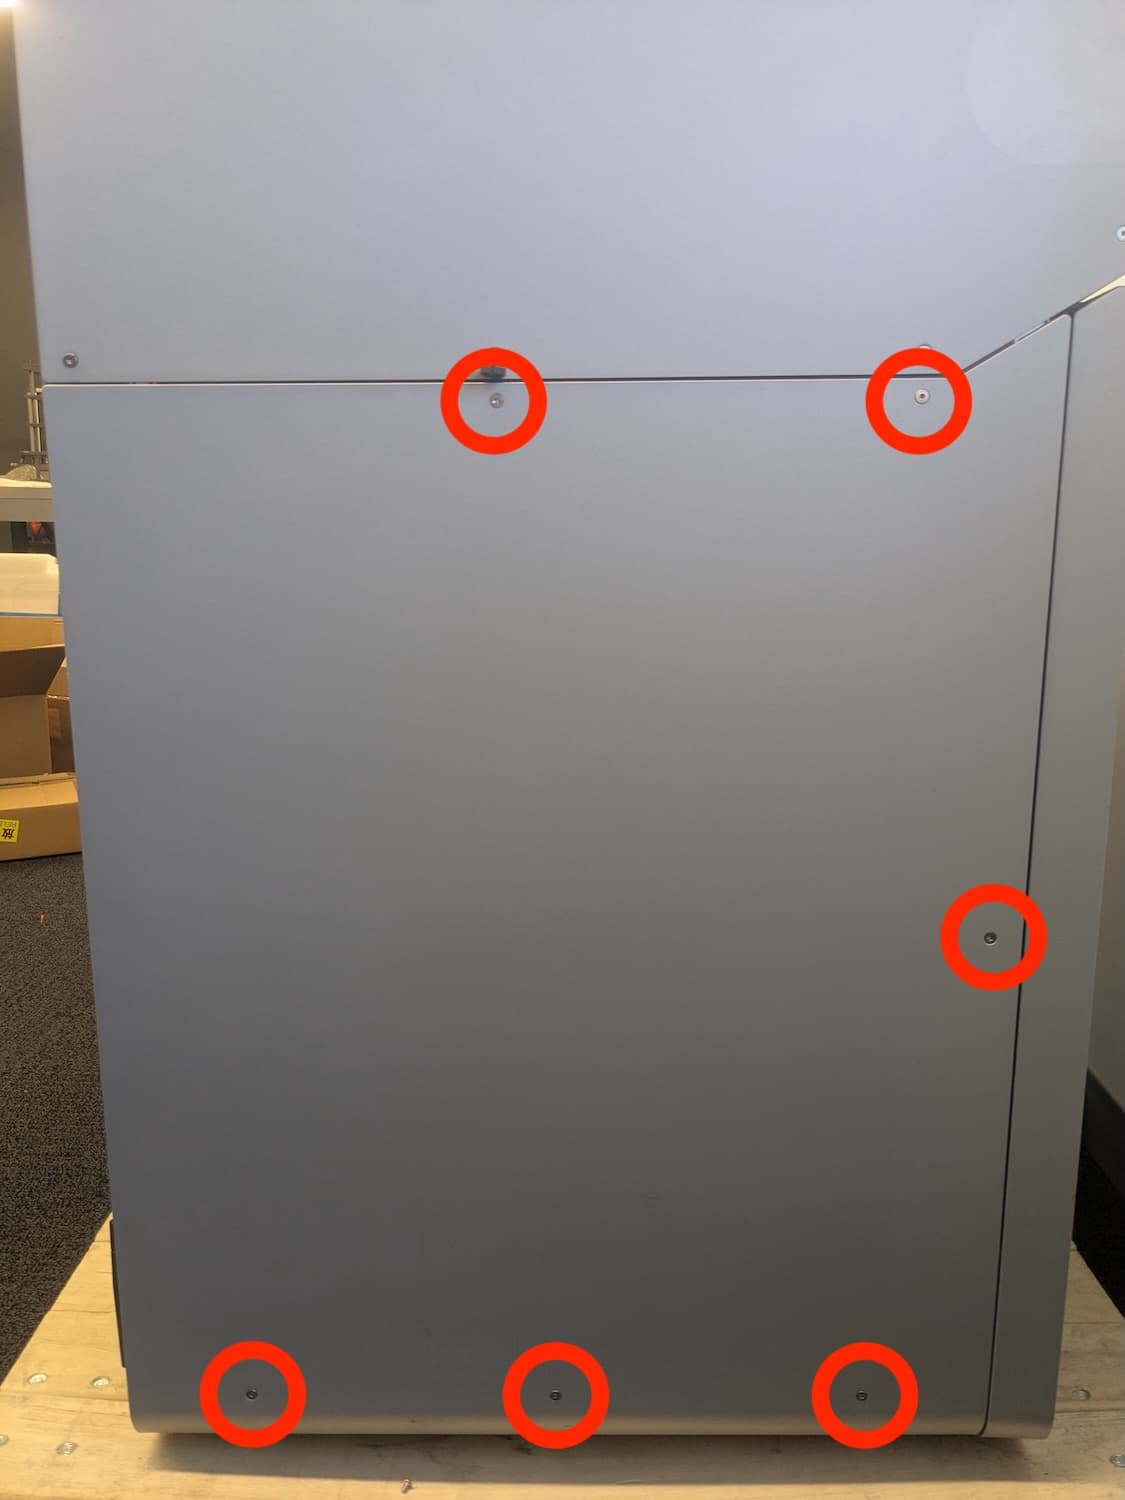
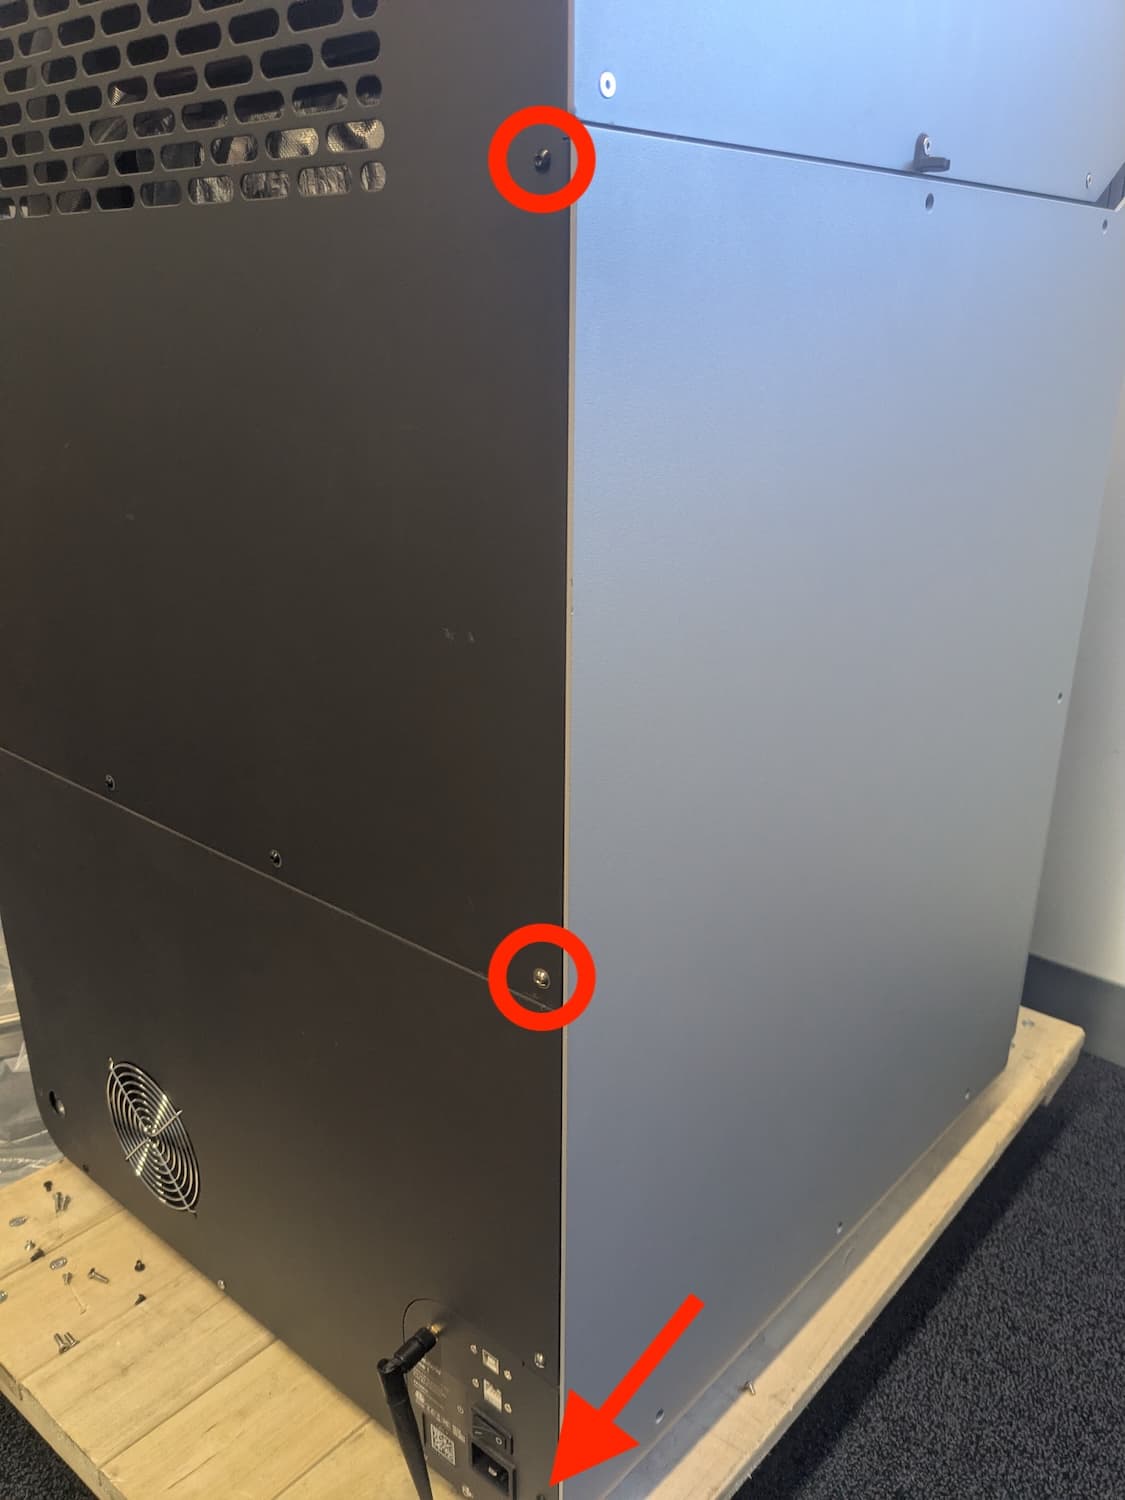
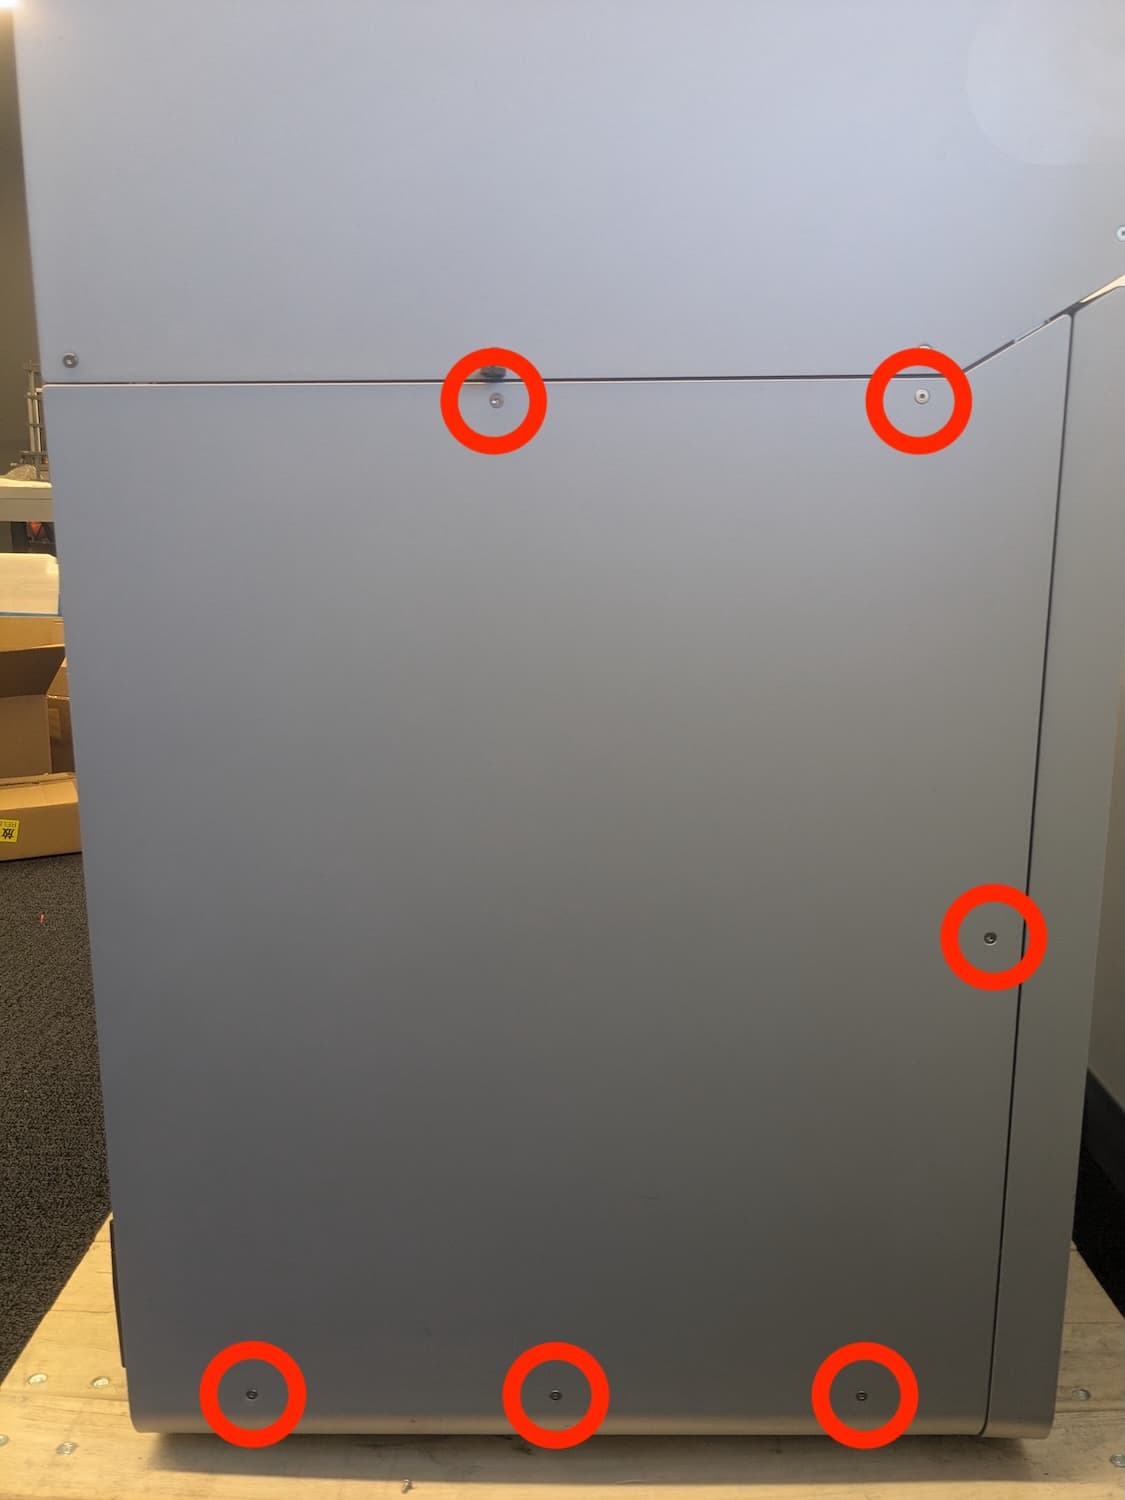
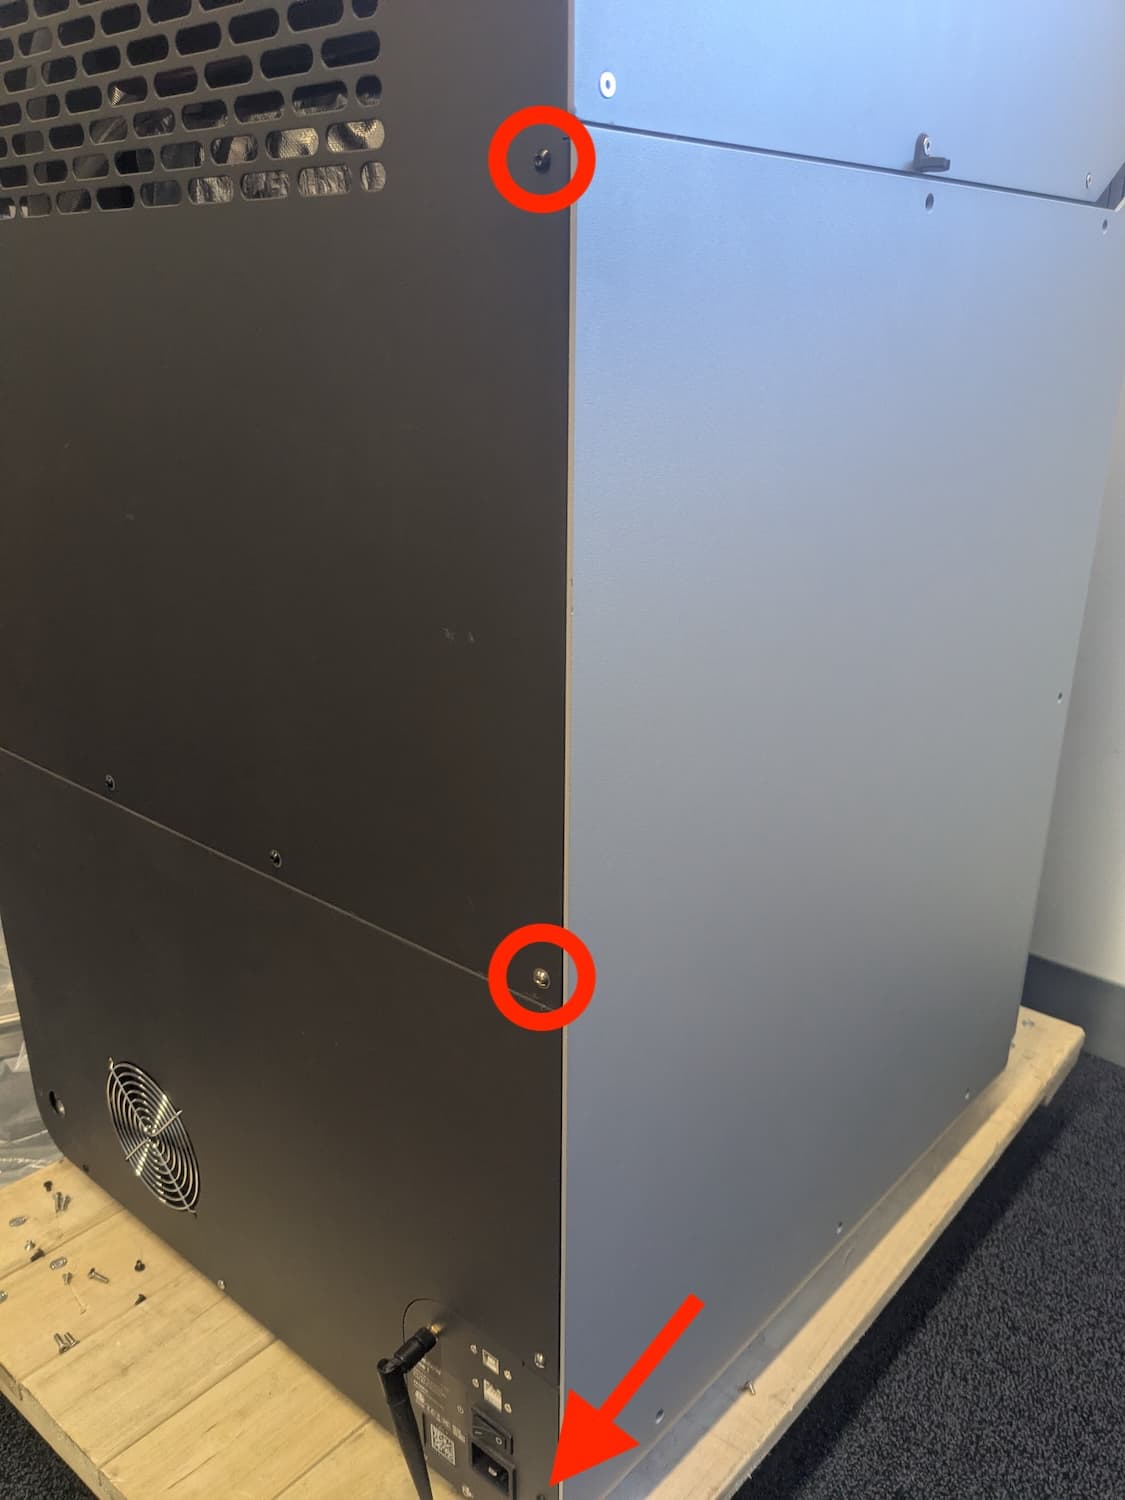
    1. Using a 2.5 mm hex driver, remove the eight screws that secure the buffer-side panel to the printer. Five countersunk screws are located on the buffer (left) side of the printer. Three button head screws are located on the rear of the printer. Take note of the locations of any chrome button head screws, as the placement of these screws is critical to the printer's electrical grounding. Set the screws and panel aside.
Fuse 1 generation buffer side panel screws
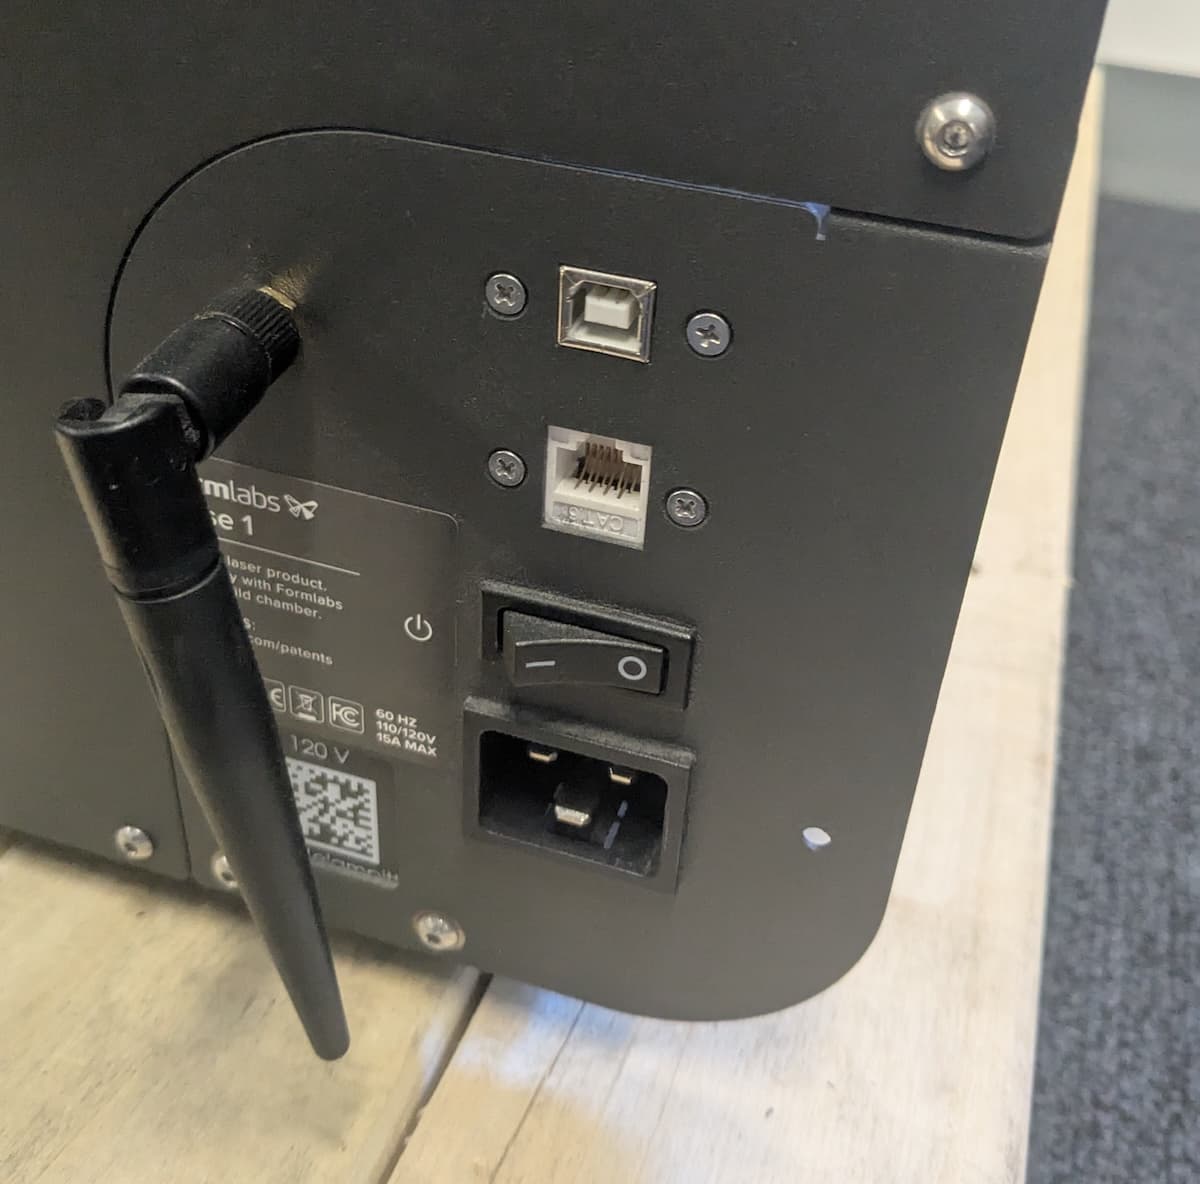
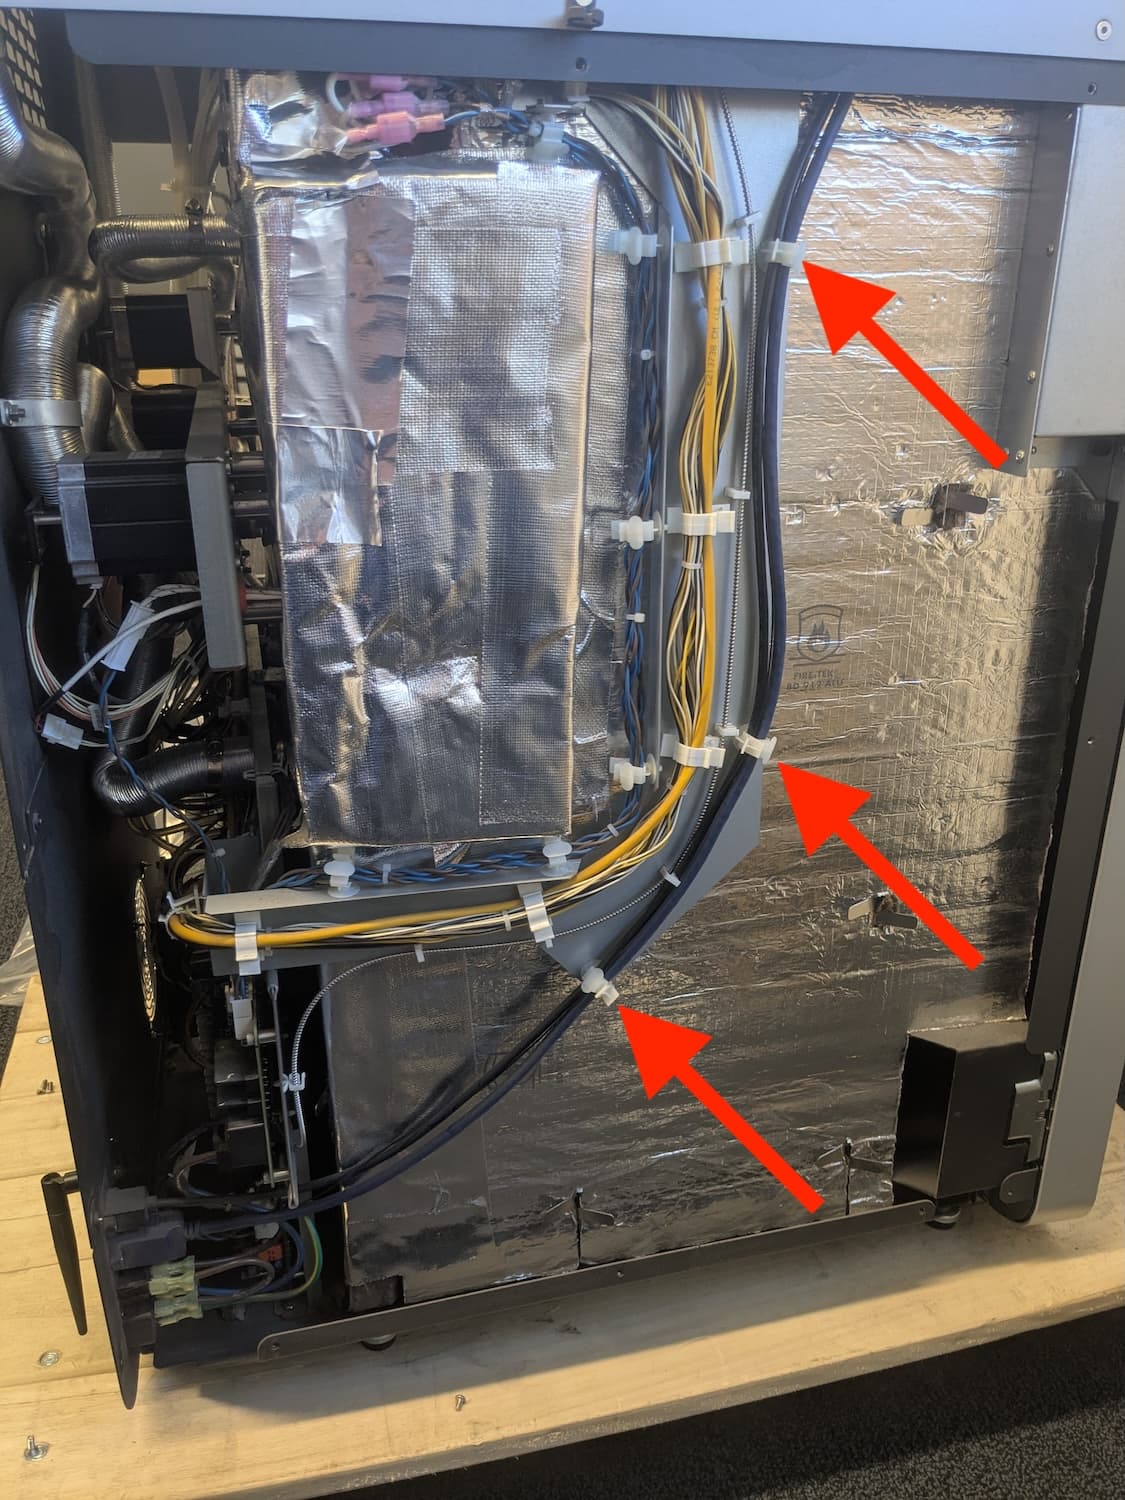
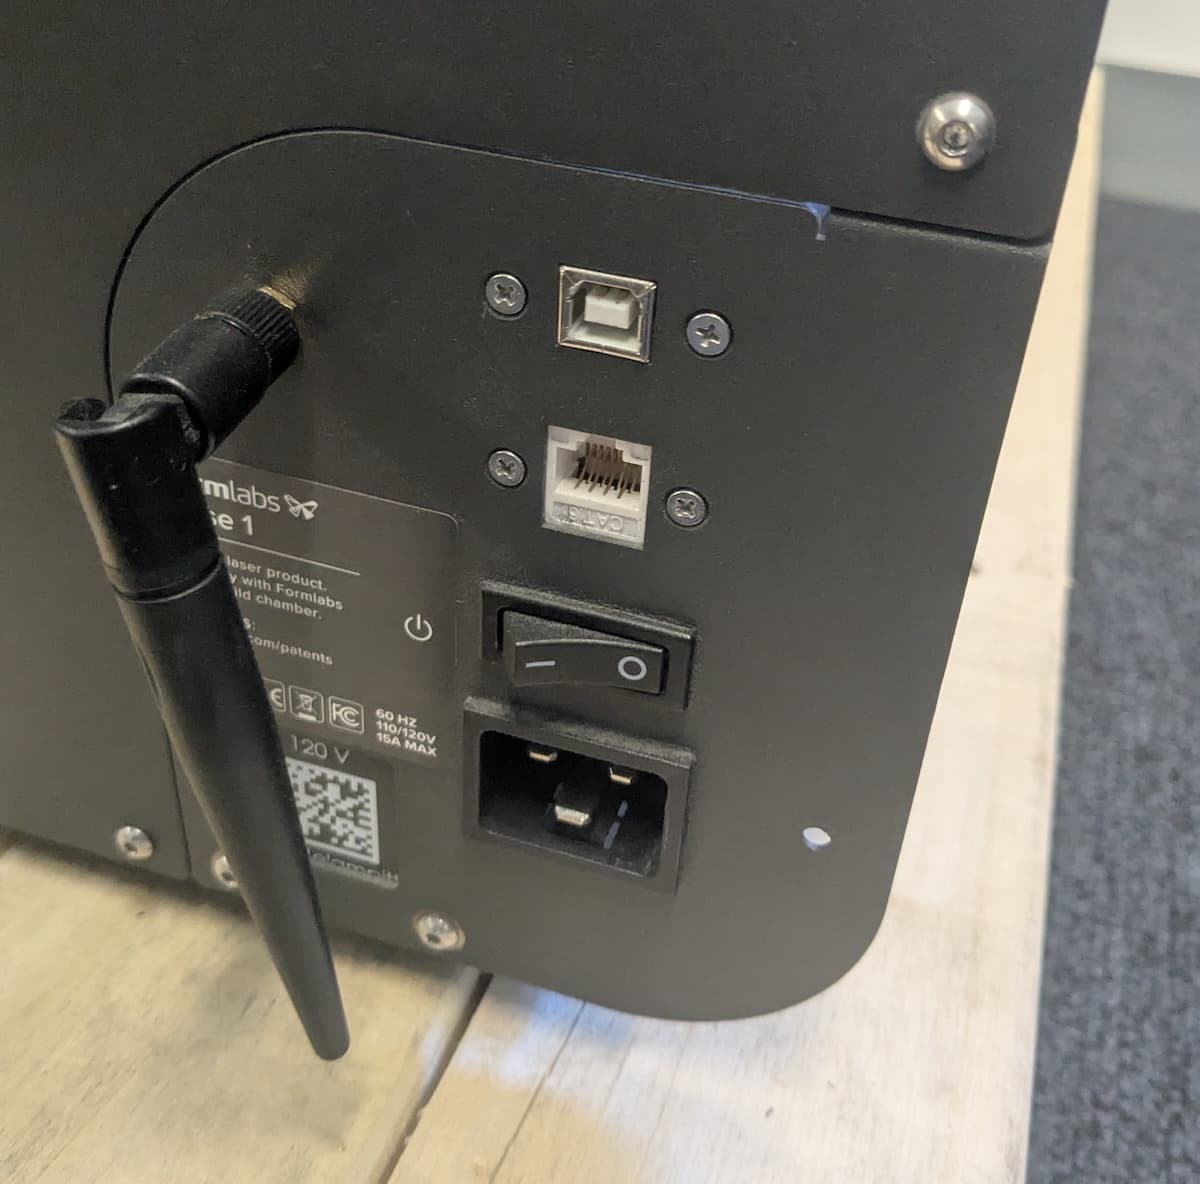
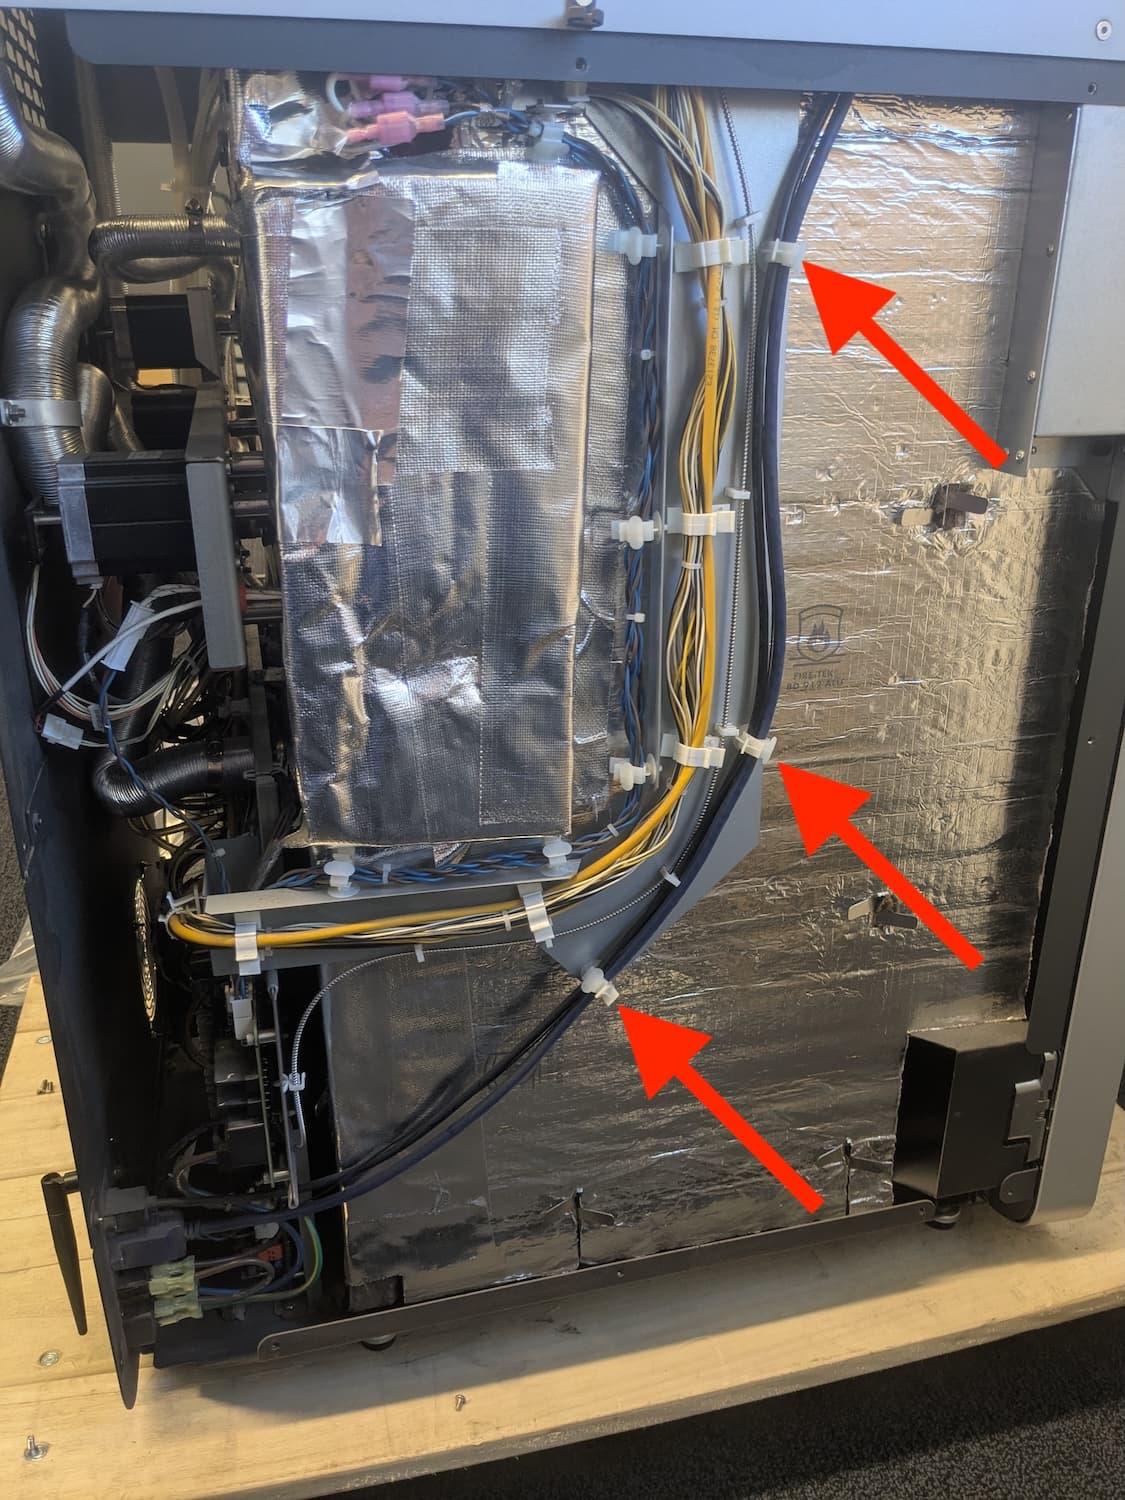
    1. Using a small Phillips driver, remove the two screws securing the Ethernet port to the rear of the printer. Follow the extension cable along the buffer side of the printer back towards the motherboard, separating it from the cable clips. Set the extension cable aside for disposal.
Fuse 1 generation rear ports
Fuse 1 generation rear port cable routing
    1. Secure the panel-mount port on the replacement cable to the rear of the printer using the two Phillips screws. Route the cable along the buffer side of the printer, securing it with the cable clips, and plug it into the Ethernet port on the motherboard.
    2. Mount and secure the buffer-side panel. As noted above, the placement of any chrome button head screws on the rear of the printer is critical to the printer's electrical grounding. Incorrect placement may lead to printer damage.
    3. Follow the instructions in the display assembly replacement guide to finish reassembling the printer.

Troubleshooting USB connections

  1. Try a different USB cable. If this does not resolve the issue, proceed.
  2. Check the USB port for resin contamination, and if necessary, clean the port using cotton swabs and IPA. Allow the IPA to dry thoroughly before reconnecting the printer.
  3. Check the list of USB drivers to see if the printer appears.

Windows

Go to Control Panel > System and Security > System > Device Manager. The printer should appear under Universal Serial Bus devices.

MacOS

Go to Applications > Utilities > System Information. The printer should appear under USB.

Note:

If the computer is running Windows 7 and cannot connect to a printer via USB, download the USB drivers for PreForm.
  1. If the printer does not appear in the USB drivers list, you may need to download the latest USB drivers from the manufacturer's website.
  2. Fuse 1 generation printers have a USB extension cable that runs from the motherboard behind the touchscreen to the rear of the printer. If this extension cable is damaged or faulty, you may be unable to connect to the printer.
    1. Follow the instructions in our guide to replace the display assembly until you can access the motherboard.
    2. Unplug the USB cable from the motherboard.
    3. Plug one end of a USB A-to-B cable into the USB port on the motherboard and the other end into your computer.
    4. Power the printer back on and check if you can connect to it via PreForm. Do not touch any internal components of the printer while it is powered on and any panels are removed.
  3. If you still cannot connect to the printer, there may be an issue with the motherboard. Contact Formlabs Support or your certified service provider.
  4. If you can connect to the printer when plugged directly into the motherboard, the USB extension cable needs to be replaced. The cable is a 4 ft USB 2.0 panel-mount B (F) to B extension cable, such as this one sold by DataPro.
    1. Using a 2.5 mm hex driver, remove the eight screws that secure the buffer-side panel to the printer. Five countersunk screws are located on the buffer (left) side of the printer. Three button head screws are located on the rear of the printer. Take note of the locations of any chrome button head screws, as the placement of these screws is critical to the printer's electrical grounding. Set the screws and panel aside.
Fuse 1 generation buffer side panel screws
    1. Using a small Phillips driver, remove the two screws securing the USB port to the rear of the printer. Follow the extension cable along the buffer side of the printer back towards the motherboard, separating it from the cable clips. Set the extension cable aside for disposal.
Fuse 1 generation rear ports
Fuse 1 generation rear port cable routing
    1. Secure the panel-mount port on the replacement cable to the rear of the printer using the two Phillips screws. Route the cable along the buffer side of the printer, securing it with the cable clips, and plug it into the USB port on the motherboard.
    2. Mount and secure the buffer-side panel. As noted above, the placement of any chrome button head screws on the rear of the printer is critical to the printer's electrical grounding. Incorrect placement may lead to printer damage.
    3. Follow the instructions in the display assembly replacement guide to finish reassembling the printer.

Submitting a support request

Before submitting a support request to Formlabs Support or your certified service provider, please provide the following information to help us process your request as quickly as possible:

  • Operating system and version

Windows

  1. Open the Control Panel.
  2. Click System and Security.
  3. Click System. Your Windows version is listed under the Windows edition section.

MacOS

Go to the Apple menu in the corner of your screen and click About This Mac. The macOS name is displayed, followed by its version number.

  • Printer serial name
  • PreForm version - In the PreForm menu bar, click Help > About PreForm. The About PreForm window appears.
  • Printer diagnostic log file