
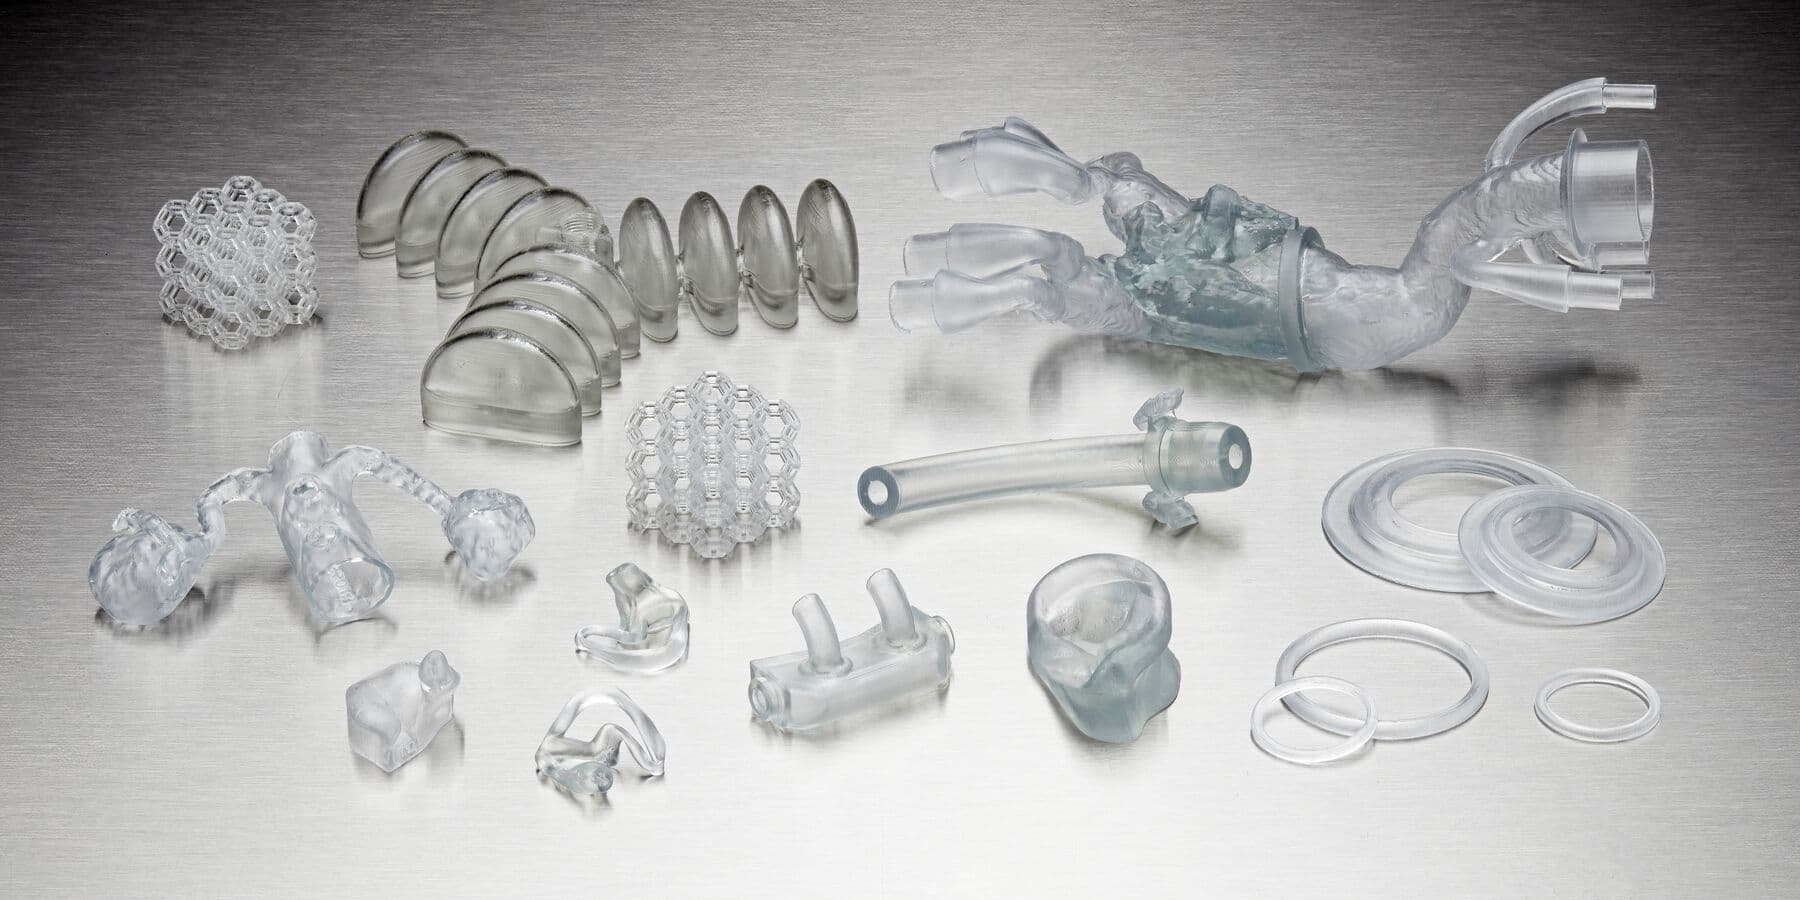
Printing Soft Anatomical Models Using BioMed Flex 80A Resin and BioMed Flex 50A Resin
BioMed Flex 80A Resin and BioMed Flex 50A Resin are two novel, elastomeric materials perfectly suited for the direct 3D printing of soft anatomical models. In-house manufacturing of soft anatomical models has proven invaluable for aiding surgical planning, bolstering medical training, and enhancing patient consent. This comprehensive application guide walks through elastomeric material options for stereolithography (SLA) 3D printing and the entire in-house manufacturing process for soft anatomical models. The use of such models not only enhances patient outcomes but also improves consent through informed discussions about proposed solutions.
Introduction
Traditionally, professionals looking to create soft anatomical models have grappled with the challenges of multi-step silicone molding processes, labor-intensive procedures resulting in limited geometries, messy outcomes, and excessive time and money spent. Alternatively, they have settled for costly contract manufacturing or rigid models.
Enter BioMed Flex 80A Resin and BioMed Flex 50A Resin, which offer healthcare professionals the unprecedented ability to merge the advantages of traditional elastomeric and biocompatible materials with the user-friendly experience and streamlined workflows inherent to Formlabs SLA 3D printers.
Soft anatomical models offer a great value to healthcare providers and patients alike. As cases become more complex, and interventions more unique, anatomical models can be used by healthcare providers to map pathology, plan interventions, gain a three-dimensional understanding of anatomical spatial relationships, pre-fit medical equipment, and practice approaches, all before the patient enters the operating room (OR). Soft models in particular pose a great advantage to surgical training by providing medical residents, fellows, and students with the ability to cut directly into tissue-simulating material. Because BioMed Flex 80A Resin and BioMed Flex 50A Resin are biocompatible and sterilizable, models can also be taken directly into the OR while surgery is underway to be used as an anatomical reference or sizing tool.
The use of soft anatomical models offers advantages to patients as well. Not only are patient outcomes better when the physician has the opportunity to plan using a patient-specific model, patient consent is enhanced when an anatomical model is used to inform them about the solution being offered.
This application guide will walk through the SLA elastomeric material options for directly printing soft anatomical models, and all of the steps associated with manufacturing in-house.
Book a Consultation
Get in touch with our 3D printing experts for a 1:1 consultation to find the right solution for your business, receive ROI analyses, test prints, and more.
User Experiences
DR. PRASHANTH RAVI, UNIVERSITY OF CINCINNATI
Dr. Prashanth Ravi, an Assistant Professor in the Department of Radiology at the University of Cincinnati, has utilized Formlabs' array of biocompatible resins extensively over the years. With regard to the new applications made possible by BioMed Flex 80A Resin, Dr. Ravi states, "The BioMed Flex 80A Resin is a great tool to have in that it is flexible and has all the ingredients to be biocompatible for different clinical indications, and it really gives us more options in our arsenal to help surgeons out in the field.”
Dr. Ravi identified the perfect application for the new material: an anatomical model used for device sizing, right in the OR. He states, “one clear application is in device sizing for left atrial appendage closure planning to treat atrial fibrillation. If the cardiologist wants to take the sterilized 3D printed anatomic model into the operating room to actually size the device and communicate with the surgical team prior to the intervention, the BioMed Flex 50A Resin is the material we would be using.”
ALLISON NEUWIRTH, NORTHWELL HEALTH
At Northwell Health, a leading provider of cutting-edge medical services, 3D printing has become a standard part of their workflow. Before the release of these two new materials, Allison Neuwirth, a project manager at Northwell Health, had to undergo a labor-intensive, multi-step silicone molding process to create biocompatible, personalized medical devices. She states, “in our hospital serving environment, this material excels in producing custom malleable parts which interface with the body. It also eliminates the need for prototyping via silicone molding which is labor-intensive and wasteful.”
GREG GAGNON, BAYSTATE HEALTH
At Baystate Health, Greg Gagnon is a specialist in 3D printing and is responsible for preparing 3D printed bolus devices and other medical tools for physicians. It wasn't until the launch of BioMed Flex 50A Resin that he was able to utilize direct 3D printing of elastomeric material in his workflow. He says that he “really enjoyed the material. Relative electron density was almost identical to water which is 1.0 g/cm3 and is great for 3D printing patient boluses. [We] already have some designs completed to start testing and expand our use cases into our surgical field."
BRIAN POWELL, MEDICAL DEVICE CONSULTANT
Brian Powell is a Medical Device Consultant based in Pennsylvania. When asked about his experience with the new materials, he told us, “Formlabs BioMed Flex 80A Resin is a robust, durable addition to the company’s suite of material offerings. It offers high precision accuracy, and small-feature generation capability, in conjunction with a high durometer while being biocompatible. Even in view of the additional water immersion UV cure step, I found this material to be compliant with my needs for high-resolution net shape generation and general ease of post-processing. I view this offering as a welcome addition to Formlabs BioMed material line-up which opens up an array of options resultant of flexible biocompatible component generation. Its introduction along with BioMed Flex 50A Resin is definitely worth the wait.”
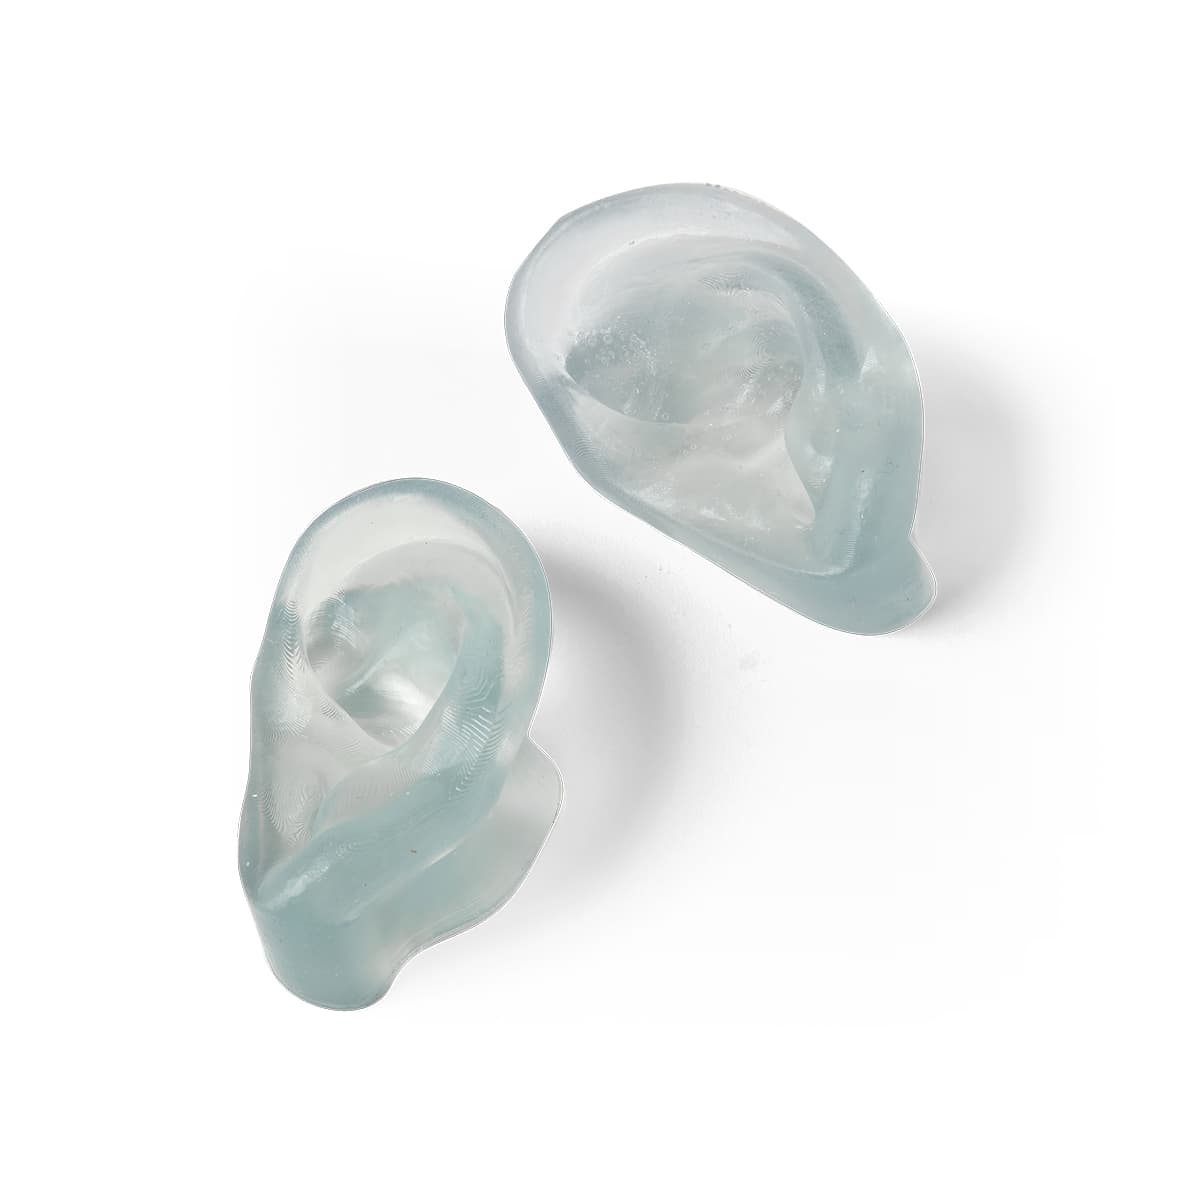
Anatomical models of ears printed in BioMed Flex 80A Resin.
BioMed Flex 80A Resin vs. BioMed Flex 50A Resin
BioMed Flex 80A Resin and BioMed Flex 50A Resin are similar in that they are both clear, biocompatible elastomers. However, differences in mechanical properties result in one often being preferred over the other for certain applications. When it comes to anatomical modeling, both materials are suitable and the optimal material depends on the mechanical properties of the anatomy that you’re aiming to simulate, and the forces that the model needs to withstand.
BioMed Flex 50A Resin is softer, similar to a pencil eraser or rubber stamp, whereas BioMed Flex 80A Resin is stiffer, similar to a leather belt or shoe heel. When using these materials for anatomical modeling, the effective resistance provided by the material can be varied by modifying the dimensions of the model (i.e. a part can be made easier to cut through by making the walls of that part thinner, even if the durometer is fixed).
BioMed Flex 80A Resin is more rugged and is preferable for anatomical models with delicate geometries, or that are expected to resist larger amounts of force. BioMed Flex 50A Resin, on the other hand, is less rugged but can experience more stretch before breaking.
|
BioMed Flex 80A Resin |
BioMed Flex 50A Resin |
|
|---|---|---|
|
Color |
Clear with a blue tint |
Clear with a yellow tint |
|
Hardness Shore A |
80A |
50A |
|
Ultimate Tensile Strength |
7.2 MPa |
2.3 MPa |
|
Stress at 50% Elongation |
2.6 MPa |
1 MPa |
|
Stress at 100% Elongation |
4.5 MPa |
1.3 MPa |
|
Elongation |
135% |
150% |
|
Tear Strength |
22 kN/m |
11 kN/m |
Technical data sheets with more extensive mechanical property data can be found here.
Biocompatibility
Both BioMed Flex 80A Resin and BioMed Flex 50A Resin are ISO 10993 and USP Class VI certified materials. They are made in an FDA-registered, ISO 13485 facility and can be used in applications for long-term skin contact (>30 days), and short-term mucosal membrane contact (≤24 hours).
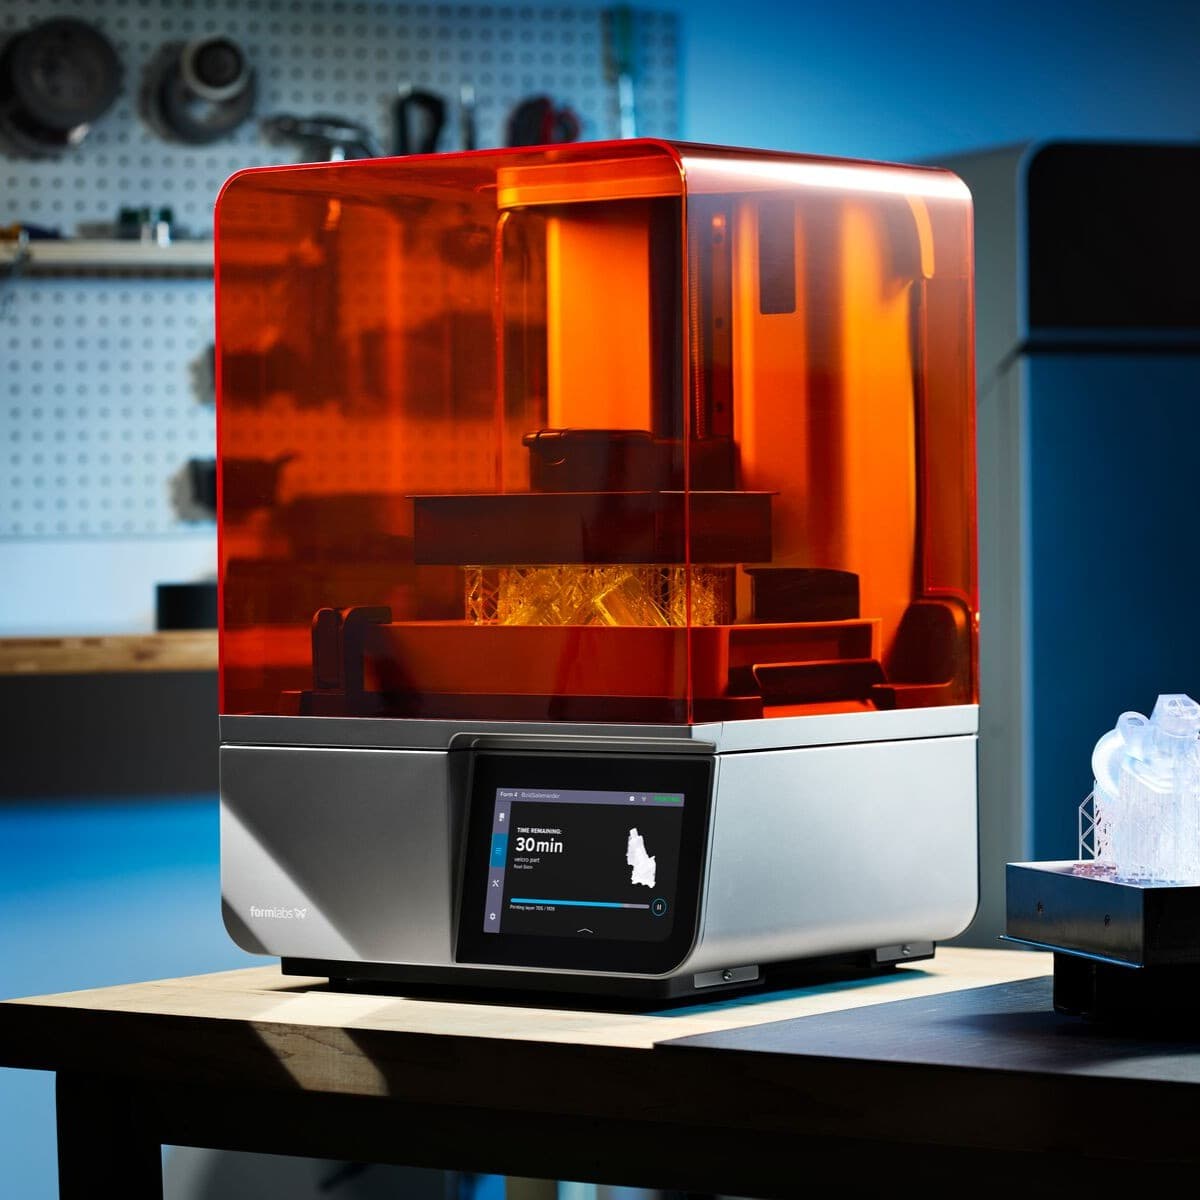
Step-By-Step Printing With Elastomers
What's Required?
From Formlabs:
- Formlabs BioMed Flex 80A Resin or BioMed Flex 50A Resin
- Form 4B, Form 4BL, Form 3B/+, or Form 3BL with up-to-date firmware
- PreForm software (most recent version)
- Compatible Build Platform
- Compatible Resin Tank (and Mixer, if applicable)
- Form Wash, Form Wash L, or Finish Kit
- Form Cure or Form Cure L
WARNING:
For biocompatible applications, separate accessories (dedicated resin tank, build platform, and finishing equipment) must be maintained to comply with biocompatibility standards.
From Third Parties:
| Item | Supplier | Notes |
|---|---|---|
|
IPA (99% or higher) |
To wash parts |
|
|
Glass Beaker (at least 500 mL in size) |
To submerge BioMed Flex 80A Resin or BioMed Flex 50A Resin parts in water during the post-cure step |
Request a Free Sample Part
See and feel Formlabs quality firsthand. We’ll ship a free 3D printed sample part to your office.
1. Design
1.1 Scan
Start with a CT, MRI, 3D Ultrasound, or surface scanner image of the anatomy of interest. The quality of this image is most often the limiting factor in printed part resolution.
WITH CT, MRI, OR 3D ULTRASOUND
When imaging using CT, MRI, or 3D Ultrasound, you may want to consider these scanning modalities and slice thickness recommendations from Boston Children’s Hospital, as well as these considerations from the Radiology Society of North America (RSNA) Special Interest Group for 3D Printing. Users are encouraged to check with their segmentation software provider for more specific recommendations. Prior to imaging, it should be confirmed that the scanner and imaging personnel both have up-to-date accreditations, and that images have been acquired within a reasonable amount of time as to still accurately represent the patient’s anatomy and pathology.
WITH SURFACE SCANNER
Some specific considerations need to be taken into account when choosing a surface scanner for healthcare applications, such as whether the subject is able to keep perfectly still, or if the scanner will need to be pointed towards the eyes. Surface scanners are most commonly limited by mesh density, so when aiming to create the highest quality prints from a surface scan, it is important to aim for the highest resolution possible. Additionally, a scanner with an accuracy range of 0.1 mm or better is recommended for use in conjunction with Formlabs printers because our printers produce parts of similar accuracy. This article may be helpful when determining the best surface scanner for your general application, and this article may be helpful when determining the best scanner for podiatry applications.
1.2 Segment
Accuracy errors are most likely to be introduced during the medical image segmentation phase. If segmentation is part of your workflow, extra precautions should be taken to ensure that you are reconstructing anatomy with the highest accuracy possible and meeting the clinical requirements defined by the physician.
The healthcare professional handling segmentation must be cautious of any possible image distortions and address them in post-processing. Automated segmentation and any 3D surface mesh reconstruction should be carefully reviewed, ideally by a radiologist. The accuracy of the segmented model can be verified before printing by overlaying surface contours onto the original medical images.
Segmentation software packages should adhere to internal Quality Management Systems (QMS) and regulatory standards. Validation, such as IQ/OQ/PQ evaluations, should be conducted regularly on the segmentation software. Information on some of Formlabs’ preferred segmentation partners can be found here.
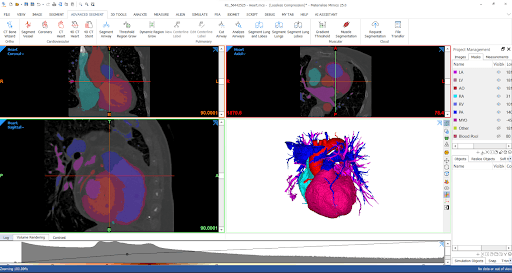
Example segmentation done using Formlabs’ partner Materialise.
1.3 Optimize for Printing
Some anatomical models may require additional modification in order to print successfully. In some cases, you may need to add holes for drainage, or thicken walls so that the material provides mechanical resistance similar to that of the anatomy being simulated. Make sure that the finished model adheres to Formlabs’ design guidelines. Edits to your scanned model should be made either in your segmentation software, or your CAD software of choice.
In point-of-care settings, a virtual surgical planning (VSP) session may be advisable at this stage. This is a meeting where the physician and segmentation team analyze the model and make necessary adjustments. VSP sessions are particularly useful in cases where the model’s accuracy is of the utmost importance.
1.4 Add Patient Identifiers
Patient identifiers should be determined using an internal case number or naming scheme. They can be added to the part’s raft by double clicking the name of the part in the bottom right corner of the PreForm window and typing in the patient identifier as the part name. Make sure that the Raft Label box is checked off under Supports. This patient identifier will then be printed on the part’s removable raft, and be saved as the part's name in the online Dashboard. In some scenarios, it may be desirable to have the patient identifier embossed or etched into the printed part itself. In this case, the text must be added to the part in the CAD stage of the workflow.
2. Print
2.1 Import File
Check that your version of PreForm is up to date by going to Help, then Check For Updates in the upper left-hand corner. Import or open your part file by dragging it into PreForm, or by going to File and then Open in the upper right hand corner.
2.2 Select Material
Select BioMed Flex 80A Resin or BioMed Flex 50A Resin by clicking the Printer Type box in the Job Info menu on the right-hand side. Select your choice from the materials grid.
2.3 Orient
PreForm can auto-orient based on Formlabs best practices. To auto-orient, select your part and click Orientation on the left side of the screen. Then, click Auto-Orient Selected.
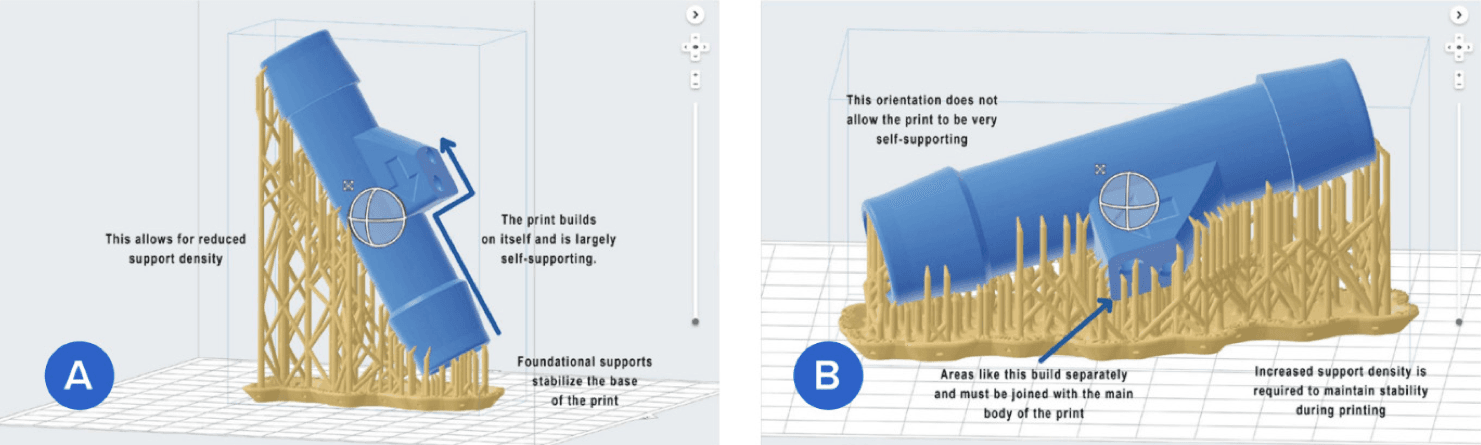
Preferable (A) and less preferable (B) orientation.
For best results, you should orient manually using the red, green, and blue actuators surrounding your part. Below are some orientation considerations for manually orienting; deviating from these practices increases the risk of print failure:
- Print directly on the build platform whenever possible. When doing this, keep the X and Y dimensions greater than the Z dimension.
- When printing with supports, orient the part so that it is smaller at the base and then builds on itself. This decreases the likelihood that the print will break away from the supports during printing and increases stability.
- Minimize the number of unsupported minima whenever possible.
- Aim cups away from the build platform to avoid filling with liquid resin while printing and adding more weight to the part.
- Orient the thinnest part of the object away from the build platform to decrease peel forces and lower the failure rate.
- Flat surfaces should be oriented on an angle. This study conducted at the Mercer University School of Engineering suggests that a 60° angle is ideal for maintaining dimensional accuracy.
- Parts should be angled on more than one axis.
- If there is one side where supports are more acceptable than another, or where surface texture or fine details are less important, this side should be oriented towards the build platform. Areas where supports are undesirable, such as a specific region of interest or surfaces with fine details, should be oriented facing away from the build platform to avoid having supports here.
- Aim to point junctions between two surfaces down towards the build platform to preserve dimensional integrity at intersections.
- Thoughtful orientation can sometimes be used to fit a large part, or multiple parts, into one print. Choosing an orientation that reduces the size of the print in the X and Y axis may allow you to fit more parts onto one build platform. Space-saving orientations are not based on maximizing print success, and thus increase risk of failure. Ensure proper support placement to compensate.
- Keep the bulk of the part’s weight as close to the build platform as possible to reduce the failure rate.
- Orient long parts parallel to the front edge of the build platform for easier removal.
2.4 Add Supports
Elastomeric parts should be printed without supports whenever possible. When supports are required, you may auto-generate supports based on material properties by selecting your part, going to Supports on the left side of the screen, and selecting Auto-Generate All.
For optimal results, we recommend manually editing auto-generated supports, or manually placing supports until the part is sufficiently supported (indicated by a green thumbs-up beside Supports in the Job Setup menu). PreForm will indicate in red what areas might require additional support.
If surface texture, print failure, or post-processing time is a major concern, you may want to consider designing custom supports using your CAD software. Guidelines for adding tearaway supports can be found here. This document focuses on Silicone 40A Resin, but the concepts presented still apply to BioMed Flex 80A Resin and BioMed Flex 50A Resin.
2.5 Layout
Set your part’s location on the build platform by clicking and dragging, using the red, green and blue actuators surrounding your part, or by clicking Layout, then Layout All, on the right side of the screen. It’s best to place parts in the center of the build platform. When printing multiple parts, space on the build platform can be optimized and material can be saved by overlapping rafts.
2.6 Send to the Printer
Send your job to the printer by clicking the orange Upload Print button on the bottom right. When the Print dialogue box opens, select the printer that you would like to use.
2.7 Set Up the Printer
Check that your resin cartridge is within its expiration date. Shake the resin cartridge and then insert it. When using a new cartridge, double check that the silicone bite valve is opening successfully by squeezing it with a gloved finger. Wearing gloves, insert a build platform and a compatible resin tank into the printer.
Begin printing by selecting your print job from the printer’s touch screen. Follow any prompts or dialogues shown.
ATTENTION:
For full compliance and biocompatibility, BioMed Flex 80A Resin and BioMed Flex 50A Resin require dedicated resin tanks and build platforms.
3. Post-Process
3.1 Remove the Part
Remove the part from the build platform by flexing the stainless steel handles towards one another on the Flex Build Platform or Build Platform 2, or wedging the part removal tool under the part raft and rotating the tool. Leave supports on until after the first wash.
3.2 Wash and Remove Supports
Place the part (with supports still attached) in the Form Wash filled with 99% isopropyl alcohol (IPA). IPA that has been used to wash many parts will decrease in concentration over time and cause parts to remain sticky. Check that your IPA has an acceptable concentration using this procedure.
Wash using the recommended settings for BioMed Flex 80A Resin and BioMed Flex 50A Resin found here. If the model is hollow or has internal channels, ensure liquid resin is thoroughly flushed out from these features. This can be done using a syringe filled with IPA.
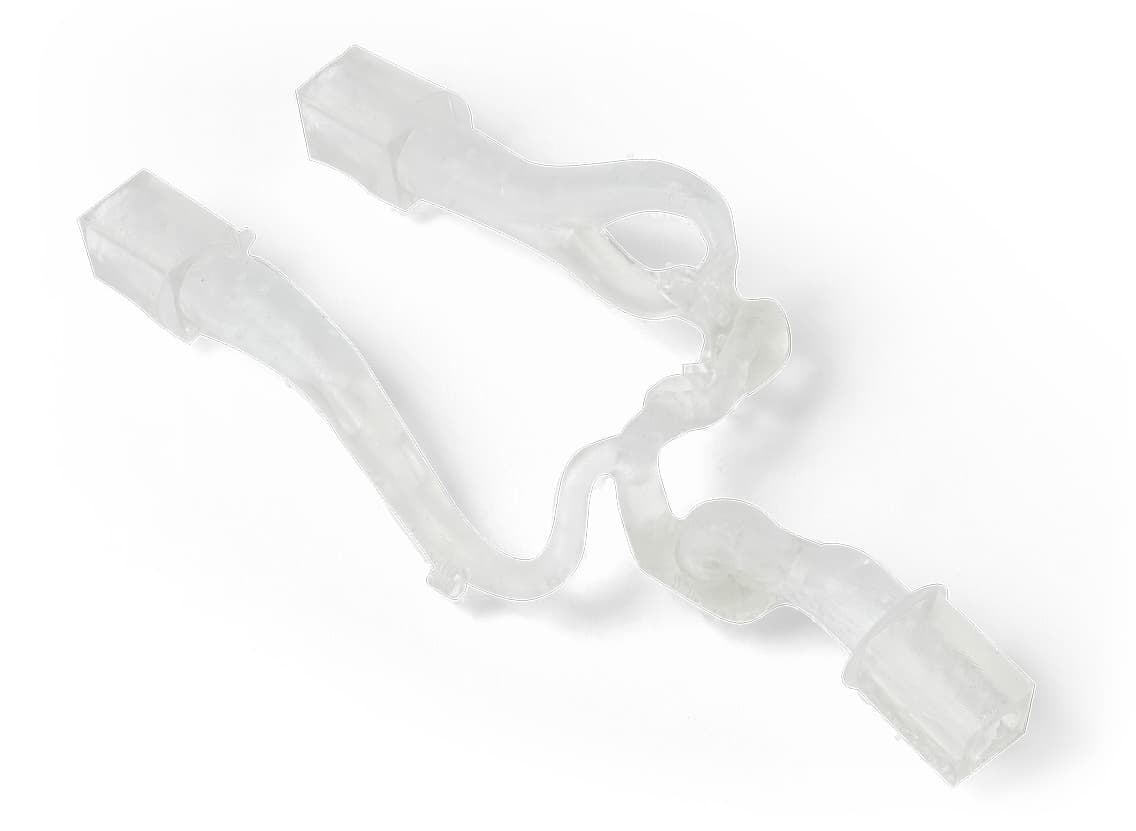
An example part with hollow channels that would require rinsing with an IPA-filled syringe.
Remove supports by gently pulling at the support structure; they should detach easily. If they are not releasing easily, or you are worried about causing damage to your parts by pulling, you may use flush cutters, a hobby knife, or an ultrasonic cutter to cut the supports at their attachment point.
After the supports have been removed, wash again for ten minutes. Allow parts to dry fully by leaving them to sit for one hour. Not allowing parts to dry fully may result in tacky parts.
ATTENTION:
For full compliance and biocompatibility, BioMed resins require a dedicated Form Wash. Only use the Form Wash with other Formlabs biocompatible resins.
3.3 Post-Cure
Fully submerge the part in a beaker (or other UV-transparent container) of water, and place the beaker of water containing the part into the Form Cure. Cure the parts according to the time and temperature settings found here.
Leave the parts in the water until the water reaches room temperature. Once the water is room temperature, remove the parts and let them dry on a paper tower. Compressed air can be used to expedite the drying process, but will result in a foggy surface. This foggy surface can be removed by wiping parts with mineral oil, but this should not be done to parts that require biocompatibility.

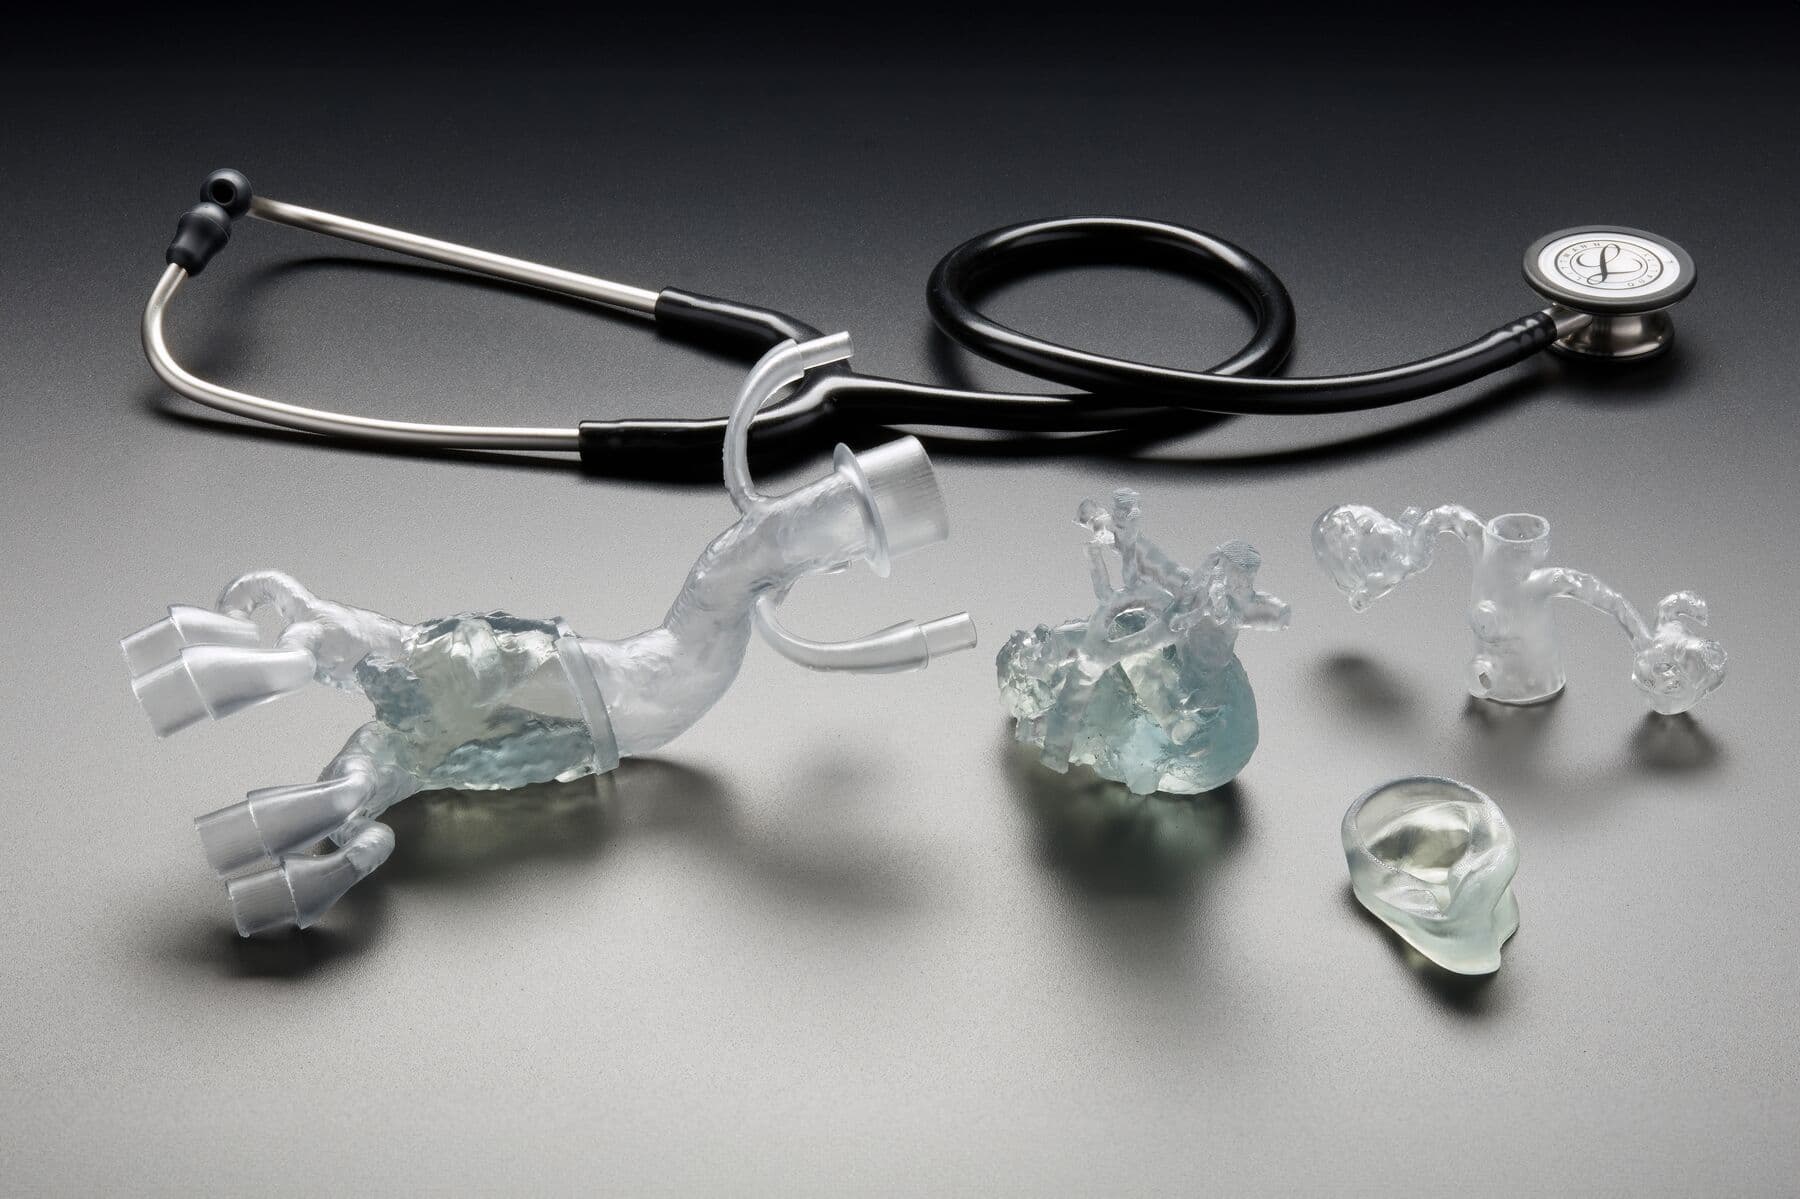
Cardiac model printed using BioMed Flex 80A Resin.
Start Printing Soft Anatomical Models
Formlabs' complete, easy-to-use ecosystem makes it simple to create soft anatomical models by directly 3D printing with BioMed Flex 80A Resin and BioMed Flex 50A Resin. In-house manufacturing of soft anatomical models has proven invaluable for aiding surgical planning, bolstering medical training, and enhancing patient consent. With Formlabs BioMed Flex 80A Resin and BioMed Flex 50A Resin, you can take a patient scan to a realistic, 3D printed model for use in or out of the OR.
Do you have questions about using SLA printing for soft anatomical models, or finding the right 3D printing solution for your business? Set up a meeting with a Formlabs expert who can answer your questions. Request a free sample part to see Formlabs 3D printed materials firsthand.
Get Started with 3D Printing
Formlabs' complete, easy-to-use ecosystem makes it simple to get started with 3D printing. Explore our 3D printers and materials to find the right fit for your needs.