WHITE PAPER
Formlabs Logo

Printing crown and bridge models with Model Resin

Printing crown and bridge models with Model Resin

Note:

The following instructions and settings have been validated for the Form 3 and Form 3B using Model Resin V3. To ensure consistent fitment on these printers, perform a Fit Tuning Test.

Model Resin V2 application guides:

Model Resin prints at 50 microns and 100 microns.

Note:

To learn more about the performance or specific material properties of Model Resin, please refer to the Safety Data Sheet (SDS) and Technical Data Sheet (TDS). Always consult the SDS as the primary source of information to understand safety and handling of Formlabs materials.

Required resources

Made by third parties

  • Dental CAD software
  • Digital impression from a 3D intraoral or desktop scanner

Workflow overview

Scan

In order to plan the treatment and design the model, use an intraoral scanner to scan the patient’s dentition directly or a desktop optical scanner on a PVS impression.

Design

Use a dental CAD software package to process and design the model before printing. Choose a software that has open STL/OBJ/3MF file export and that aids in designing the types of models that you prefer. The exact design steps vary for each software package, so contact the software provider for details on generating a model from patient scans.

Follow these basic steps within your CAD software to design and prepare models for printing:

  1. Import the scan
  2. Trim the scan data
  3. Margin marking
  4. Finalize the model design
  5. Export the digital model in STL/OBJ/3MF file format

Design settings for restorative dental models

Using the correct dental CAD settings and parameters to generate restorative dental models is critical. Perform a Fit Tuning Test to ensure accuracy for each material and layer thickness.

Validated dental CAD software materials settings and libraries

  • Solid models
  • 0.10 to 0.03 model-to-die offset

Designing in 3shape

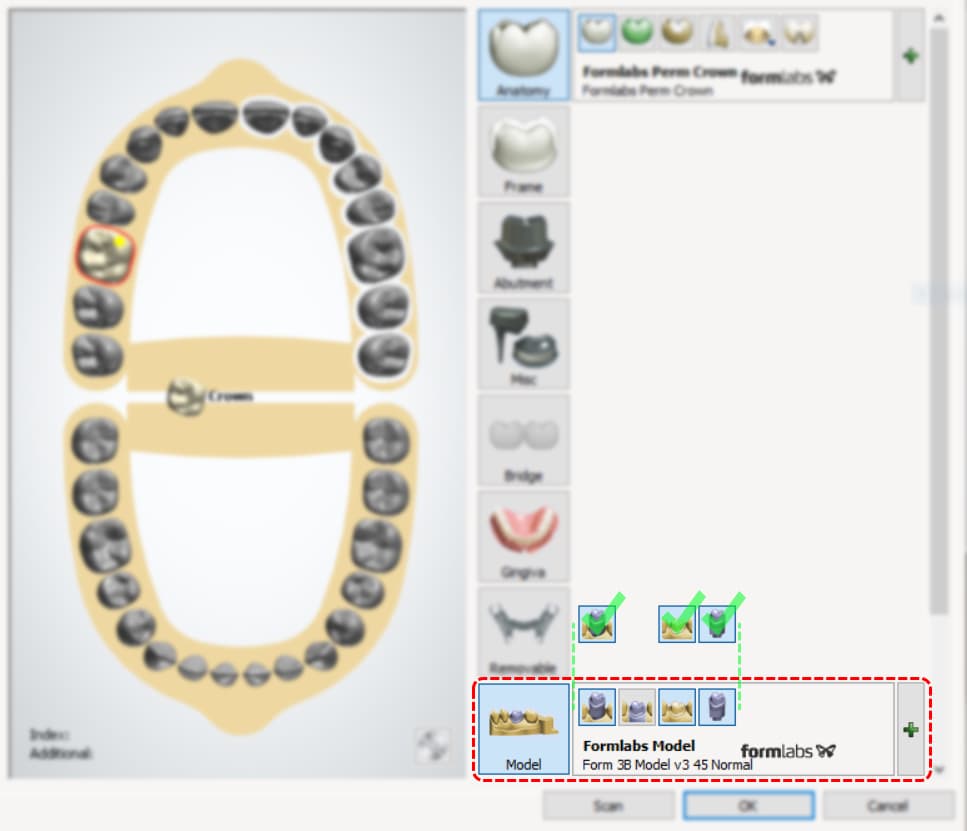
In the Model menu, select Formlabs Model as the material.

Additional offsets are available in the CAD settings dropdown:

  • Form 3B Model V3 55 Tighter
  • Form 3B Model V3 45 Normal
  • Form 3B Model V3 35 Looser

In the Model menu, select the first, third, and fourth thumbnails to enable removable die models, solid models, and individual working dies.

3shape model settings dropdown

Note:

Solid die models with working dies are recommended for their fixed abutment position in contact and occlusion checks.

Designing in exocad

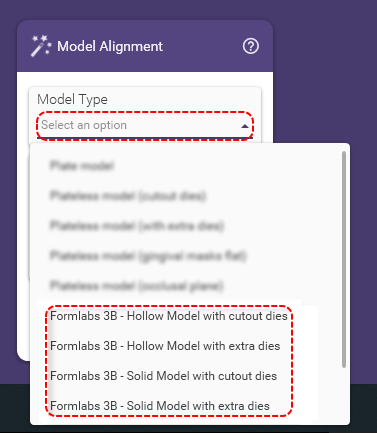
When designing the model, use the Model Type preset to select the appropriate model type.

exocad model type dropdown

Note:

Solid Model with extra dies is recommended for its fixed abutment position in contact and occlusion checks.

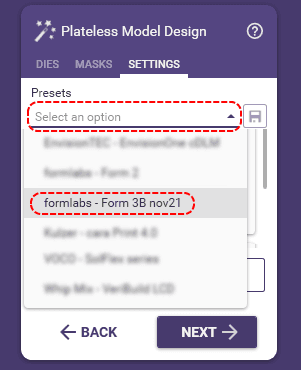
Go to Plateless Model Design > Settings and select Formlabs - Form 3B nov21 as the preset printer.

exocad preset dropdown

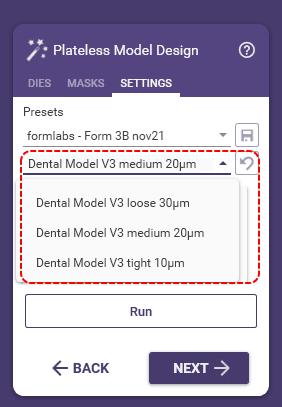
In the Presets dropdown menu, select the preferred fitment:

  • Dental Model V3 Loose 30 μm
  • Dental Model V3 Medium 20 μm
  • Dental Model V3 Tight 10 μm
exocad material preset dropdown


For further information on these manually configurable parameters, please contact your software provider/reseller, 3Shape, or exocad for support.

Preparing the model in PreForm

Step 1: Open a scan in PreForm

After saving your scans as an STL/OBJ/3MF file, open the files by clicking File > Open in the menu bar.

Step 2: Material and print settings

In the printer menu, select Model as the resin type, and select Model V3 as the subtype.

The 100 micron layer thickness is highly accurate and prints twice as fast as 50 microns print settings. Both settings meet the application accuracy requirements.

Step 3: Orientation and supports

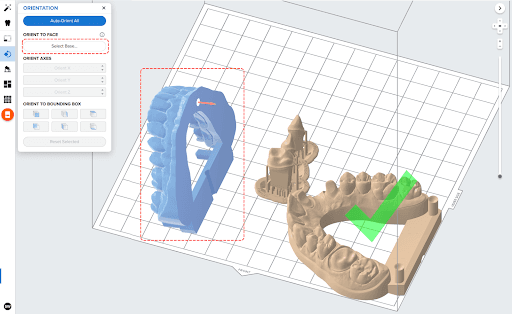
Orient arches or models directly on the build platform.

Click Select Base... and select the flat surface of the model. The model rotates so that the selected face is parallel with the build platform, ensuring maximum contact.

PreForm screenshot depicting the Select Base feature

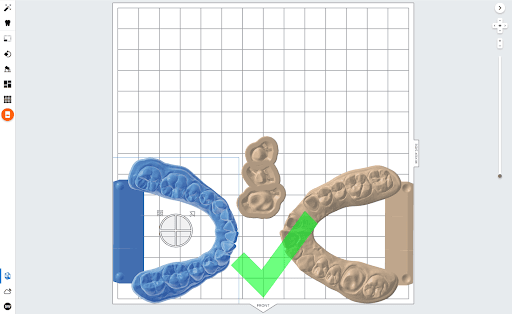
Position the arches so the anterior teeth are facing the center of the build volume, perpendicular to the mixer.

PreForm screenshot depicting the proper position for arches

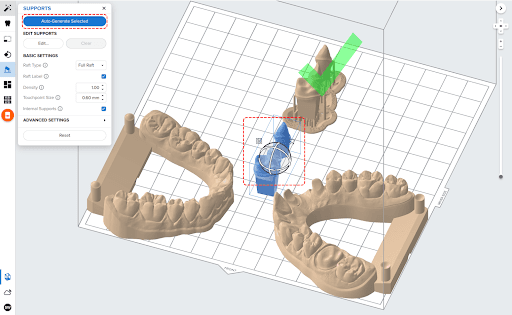
Select the dies and click Auto-Generate Selected in the support menu. Confirm or edit the generated support touch point locations.

Overlap the support rafts for the dies and position them centrally on the build platform.

PreForm screenshot depicting rafts for dies


Printing

Step 1: Shake the cartridge and check the tank

For best results, maintain a dedicated resin tank for Model Resin. Before beginning a print with Model Resin, shake the resin cartridge and stir the resin in the tank. This ensures the pigment is properly mixed.

Step 2: Check the resin tank

Form 2

For the best printing results, use Resin Tank LT and replace the tank when it reaches the end of its lifetime.

Note:

Fit tuning has not been validated for use with the Form 2.

Form 3/3B

For moderate wear or scratches on the film, use the Layout tool in PreForm to move models away from the worn or scratched area.

Replace the tank if there are scratches, punctures, cuts, or gouges on the film, or if it has exceeded its lifetime.

Step 3: Send to the printer

Once all models are properly configured in PreForm, save the FORM file, choose a print job name, and send the print job to the printer.

Step 4: Confirm print

Confirm the uploaded print job on your printer’s touchscreen to start the print.

Finishing

When removing flat parts from the build platform, consider using the flush cutters included in the Finish Kit to release the model at its corner edge. Use the part removal tool to release parts with a chamfered edge and the scraper to detach dies from the build platform.

The Form Wash agitates the solvent bath and removes parts from the bath after a set time. Wash parts according to the support article Form Wash time settings.

If applicable, remove support structures, then use a file or a handpiece to sand support touchpoints. Remove any small skirt-like features that print on the base of the part with a file or a rotating handpiece. A large skirt may block the insertion of the die.

Adjustments in post-processing

If the die is fitting just slightly too tight, spray a fine powder, such as indicating spray or titanium oxide spray, below the margin to lubricate the surface slightly and improve the fit. Quickcheck and Occlude are common brands. Fine powder spray is recommended to lubricate dies with a tight fit, but it is not necessary if the models fit as expected.


Post-curing requirements

Refer to the support article Form Cure time and temperature settings for post-curing recommendations.

Additional resources