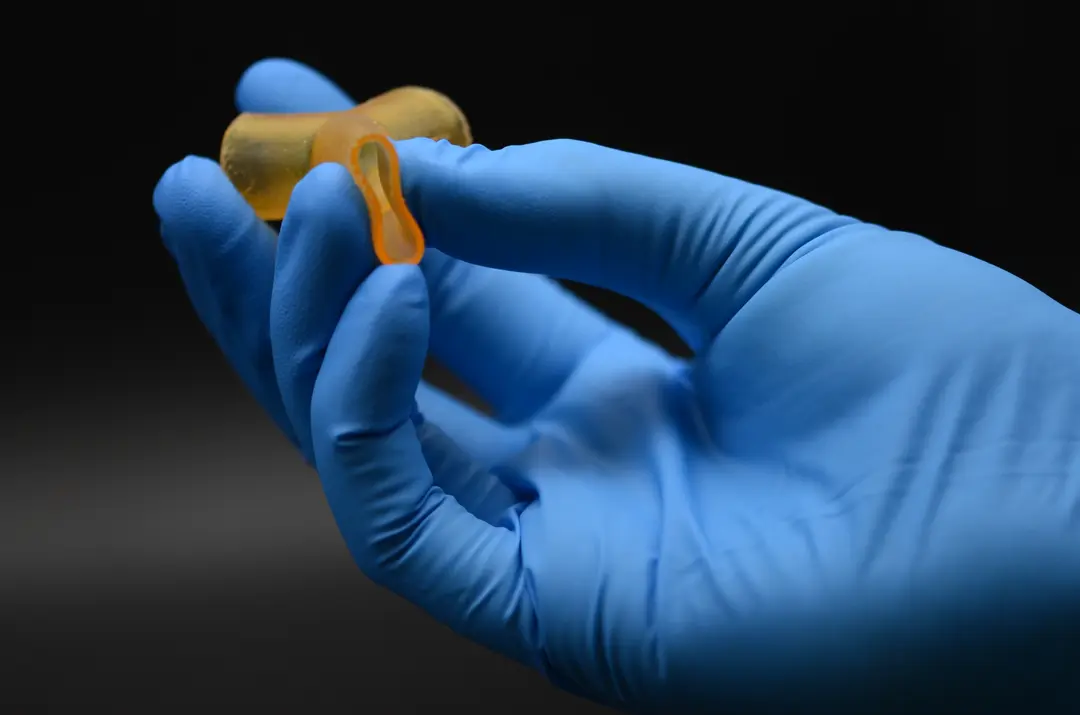
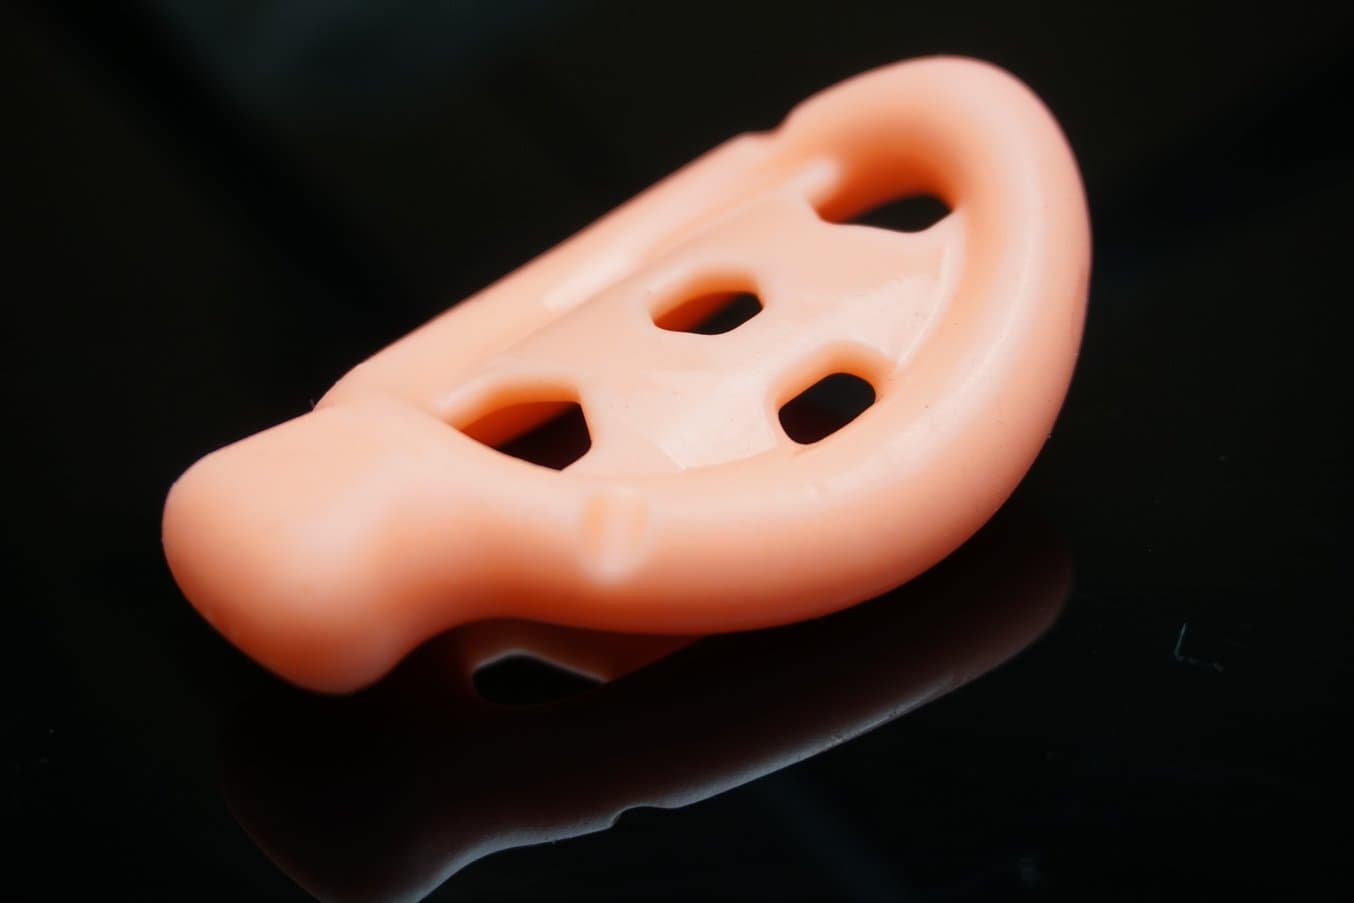
Le caoutchouc de silicone est un matériau polyvalent dont les propriétés mécaniques, notamment la résistance à la chaleur et la biocompatibilité, en font un matériau très adapté aux applications dans le domaine de la médecine. Qu'il s'agisse d'appareils auditifs personnalisés, de poignées spécialisées sur des dispositifs médicaux, de modèles anatomiques souples ou de prothèses, le silicone est un matériau essentiel pour le secteur de la santé.
Dans ce guide, nous allons illustrer comment l'écosystème de Formlabs peut être utilisé pour créer de véritables pièces en silicone pour des applications médicales. Pour découvrir les flux de travail complets pour l'impression 3D avec Silicone 40A Resin et pour le moulage de silicone avec les imprimantes 3D stéréolithographiques (SLA) de Formlabs, téléchargez notre livre blanc.

Contacter nos experts
Que vous deviez fabriquer des outils chirurgicaux adaptés aux patients ou un prototype de dispositif médical cardiaque, nous sommes là pour vous aider. L'équipe de Formlabs Medical est composée de spécialistes dévoués qui savent exactement comment vous soutenir et répondre aux besoins de votre entreprise.
Production de pièces en silicone
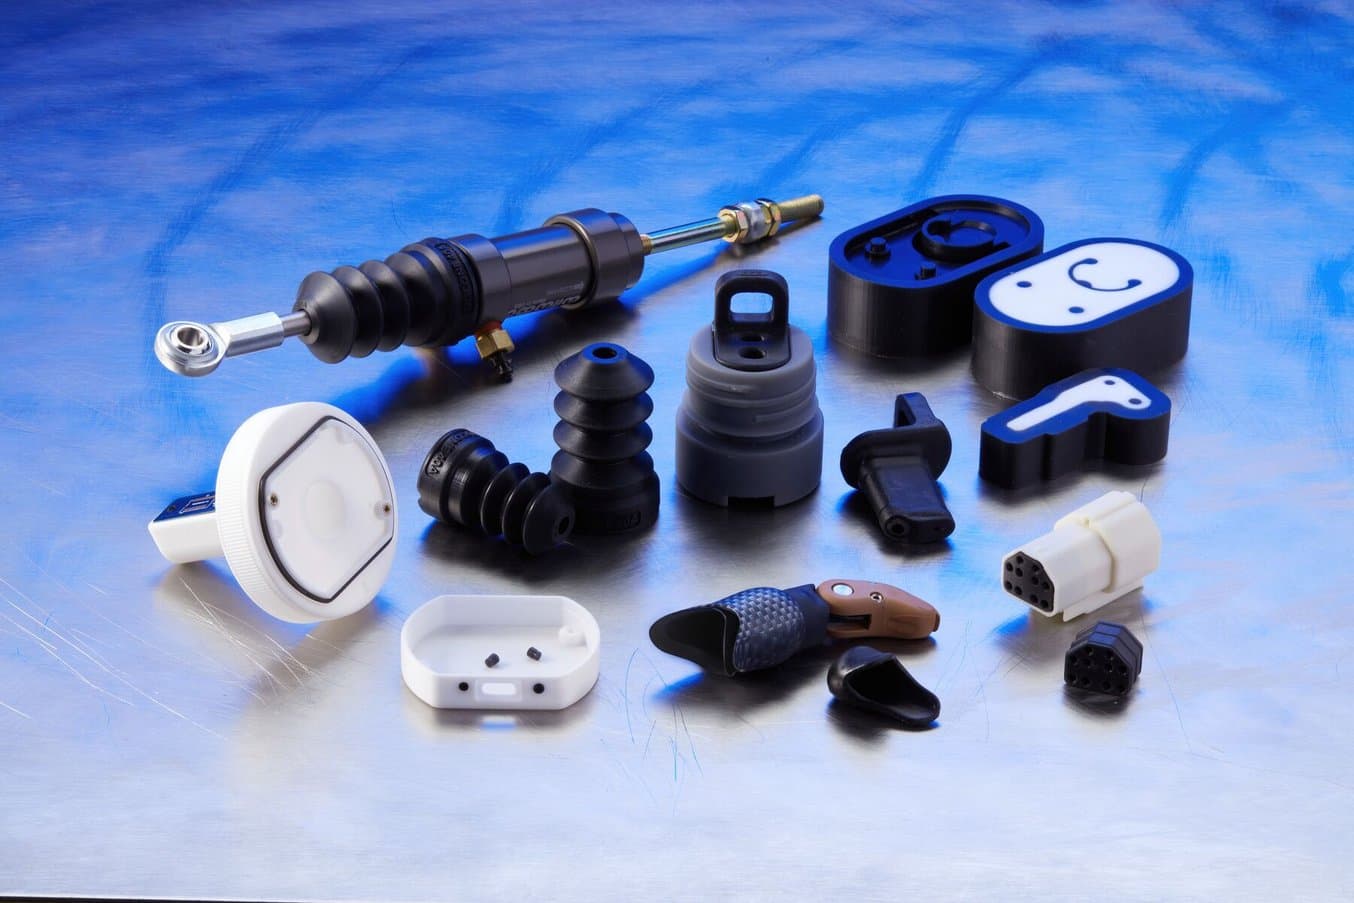
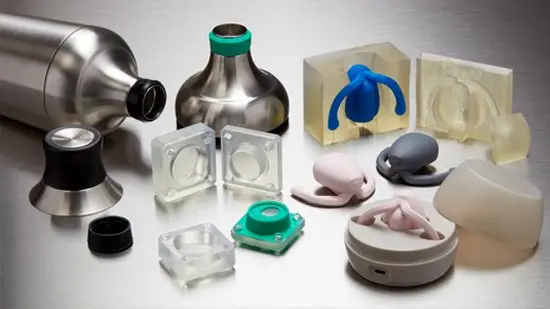
Les pièces souples et caoutchouteuses ont de nombreuses applications dans le domaine de la santé, qu'il s'agisse de modèles anatomiques souples, de prothèses ou d'autres objets de technologie portable. Pour ajouter à leur portefeuille des pièces robustes, flexibles et extensibles en silicone véritable, les équipes de conception peuvent utiliser deux méthodes : l'impression directe avec Silicone 40A Resin et le moulage de silicone à l'aide de l'outillage 3D SLA.
Le silicone est un matériau très utilisé pour la fabrication de dispositifs médicaux souples à usage final. Il peut également être utilisé pour produire des moules souples destinés à mouler des matériaux rigides, un processus connu sous le nom de « fabrication de moules en silicone ». Ce guide couvre seulement la production de pièces en silicone, qui permet d'obtenir des pièces souples et caoutchouteuses en imprimant directement avec Silicone 40A Resin, ou en moulant du silicone dans des moules imprimés en 3D. Vous trouverez plus d'informations sur la production de pièces rigides à l'aide de moules en silicone dans notre guide.
Notre livre blanc présente des exemples de production de pièces en silicone à l'aide de différentes méthodes. Cela inclut :
-
Impression directe de silicone : les pièces en silicone sont produites directement sur la Form 3/3B+ à l'aide de Silicone 40A Resin. Cette méthode est la meilleure pour produire des géométries complexes qui ne peuvent pas être obtenues par moulage.
-
Moulage par compression de mastic silicone : un mastic silicone à durcissement rapide est tassé sur les deux côtés d'un moule imprimé en 3D, qui est ensuite serré à l'aide d'un étau d'atelier. Cette méthode est souvent utilisée pour les prototypes de joints, et l'outillage ressemble beaucoup à celui utilisé pour la production de masse.
-
Moule rempli par injection pour le silicone liquide : il s'agit de la méthode la plus courante utilisée pour former un seul prototype en silicone à l'aide d'un moule en deux ou plusieurs parties. Dans de nombreux cas, le moule est configuré de telle sorte que la gravité facilite le processus de remplissage du silicone. Le silicone est injecté dans un canal situé en haut du moule, et la cavité du moule se remplit progressivement à partir du bas. Le silicone liquide est finalement libéré par les orifices et les canaux d'air situés au sommet du moule.
-
Surmoulage pour l'encapsulation complète ou partielle du matériel : le matériel est suspendu dans un moule en deux ou plusieurs parties. Du silicone liquide est ensuite injecté dans la cavité du moule et épouse complètement ou partiellement la forme du matériel.
-
Moule en coque pour les produits en silicone personnalisés : le moule est une coque fine (<1 mm) qui enveloppe de manière précise la cavité d'injection du silicone. Après le durcissement du silicone, le moule en forme de coque imprimé en 3D se détache pour libérer une pièce en silicone. Comme il s'agit d'un moule sacrificiel qui ne peut être réutilisé, cette technique est utilisée pour créer une seule pièce personnalisée. Un guide détaillé, étape par étape, sur la fabrication de moules en coque pour embouts auriculaires en silicone est disponible ici.
Les méthodes de conception, d'impression et de moulage partagent des étapes fondamentales, même dans des secteurs et des applications différentes. Pour un exemple détaillé de conception d'un surmoule rempli par injection, tenant compte des conseils et des meilleures pratiques fournis par les clients présentés, lisez le livre blanc complet.
Types de silicones
Les silicones sont une catégorie de polymères dont la chaîne moléculaire contient du silicium et de l'oxygène, et qui passent d’un état de gel ou de liquide à un état solide extrêmement flexible et élastique après être durci. Ce sont des matériaux polyvalents dotés de propriétés très performantes telles qu'une excellente isolation électrique, une résistance à la chaleur, une stabilité chimique, une grande résistance au déchirement et une biocompatibilité, ce qui les rend attrayants pour des secteurs très exigeants comme celui de la santé.
Les élastomères de silicone dominent le marché et peuvent être divisés en trois catégories :
-
Les caoutchoucs de silicone liquide (LSR) sont des silicones de haute performance généralement utilisés pour produire des pièces techniques solides avec des tolérances serrées, comme des joints ou des connecteurs électroniques. Ils sont traités à haute température, souvent par moulage par injection de liquide, et sont utilisés pour produire de grands volumes de pièces.
-
Les silicones vulcanisés à haute température (HTV) , également appelés silicones thermodurcis (HCR), offrent une grande résistance à la température et au vieillissement, ce qui est idéal pour les câbles ou les isolateurs des dispositifs médicaux. Ils utilisent généralement une formule à base de platine, et sont façonnés par extrusion ou moulage par compression avec vulcanisation sous pression et chaleur. Découvrez comment l'expert en silicone SIOCAST forme des moules en silicone HTV autour de modèles maîtres imprimés en 3D.
-
Les silicones vulcanisés à température ambiante (RTV) sont relativement plus faciles à mettre en œuvre et présentent d'excellentes propriétés mécaniques et thermiques pour les joints et les dispositifs médicaux, ainsi que pour l'encapsulation de composants électriques et la fabrication de moules. Ils sont généralement mis en forme à température ambiante en utilisant le moulage par injection, le moulage par compression ou le moulage par gravité.
Ce rapport couvre l'utilisation des silicones vulcanisés à température ambiante (RTV). Il décrit des techniques qui peuvent être utilisées en interne dans tout laboratoire de prototypage ou de développement de produits. Parmi les formes spécifiques de vulcanisation à température ambiante, on peut citer
-
Silicone 40A Resin : Silicone 40A Resin est une résine silicone RTV à un composant produisant des pièces 100 % en silicone qui présentent une excellente élasticité et résistent à la chaleur et aux produits chimiques. Les pièces sont imprimées directement sur la Form 3/3B et post-traitées à l'aide d'un mélange d'alcool isopropylique (IPA) et d'acétate de butyle, puis d'eau, de chaleur et de lumière UV.
-
Silicone liquide RTV : les silicones de type liquide se présentent généralement en deux composants ou un composant unique avec une petite quantité de catalyseur à ajouter. Deux grandes catégories sont facilement disponibles. Les silicones catalysés au platine sont généralement plus coûteux mais fournissent une meilleure stabilité dimensionnelle sur le long terme et se contractent très peu après un durcissement complet. Les silicones catalysés à l’étain sont moins coûteux mais moins stables sur la durée, et ont généralement un taux de contraction plus élevé. Les durées de durcissement peuvent varier de 10 minutes à plusieurs heures.
-
Polydiméthylsiloxane (PDMS) : le PDMS est un type chimiquement distinct de silicone liquide RTV qui contient des groupes méthyles sur la chaîne polymère silicium-oxygène. Le polymère liquide est très couramment utilisé comme lubrifiant ou additif visqueux dans les biens de consommation et les produits industriels. En tant que caoutchouc vulcanisé, le PDMS est utilisé dans un certain nombre d'applications de recherche. Sa grande transparence optique et sa capacité à capturer les textures de surface et les canaux à l'échelle microscopique le rendent idéal pour la microfluidique et la lithographie douce. De nombreuses formules de PDMS durcissent à température ambiante sur une période de 48 heures, ou durcissent en moins d'une heure à température élevée.
-
Mastic silicone : il s'agit d'un mastic en deux parties dont les composants sont mélangés à la main en volumes égaux. Le type présenté dans ce rapport possède une dureté Shore 40A (voir l’échelle ci-dessous), équivalente à celle d’une gomme de crayon. Ce type de silicone peut être acheté auprès des fournisseurs de bijoux, car il est couramment utilisé pour produire des modèles en cire pour le moulage des métaux. Cependant, le silicone peut aussi être utilisé pour les joints moulés par compression et les joints d'étanchéité.
Peau, muqueuse et sécurité alimentaire
Certaines applications exigent une sensibilité supérieure à d’autres quand elles entrent en contact avec le corps humain ou avec la nourriture. Vérifiez toujours la fiche de données de sécurité des matériaux fournie par le fabricant du matériau pour vous assurer de l’innocuité du caoutchouc pour votre application. Notez que les silicones liquides à deux composants qui sont classés pour la sécurité de la peau ont tendance à utiliser un catalyseur en platine.
Silicone 40A Resin est en train d'être testée en tant que dispositif entrant en contact avec la peau, conformément à la norme ISO 10993-1 pour les critères de biocompatibilité suivants : ISO 10993-5:2009, 10993-23-2021:2021, ISO 10993-10:2021.
Échelle et indices de dureté
On attribue aux matériaux caoutchouteux, comme les silicones, un indice de dureté allant du plus souple au plus ferme, mesuré avec un duromètre selon l’échelle de dureté Shore. Les matériaux les plus mous sont mesurés sur l’échelle de dureté Shore A, et les plus durs sur l’échelle Shore D. Le tableau ci-dessous fournit une comparaison utile avec des produits ménagers courants.

Vaut-il mieux imprimer ou mouler ?
Les exigences spécifiques de votre application et de votre flux de travail détermineront si l'impression directe ou le moulage de silicone est la méthode optimale. Voici quelques spécificités de chaque processus à prendre en compte :
-
Géométries complexes : Le moulage ne permet pas de réaliser toutes les géométries. L'impression directe est préférable pour les applications nécessitant des géométries complexes.
-
Couleur : Silicone 40A Resin est de couleur noire. Pour les applications nécessitant des pièces claires ou colorées, le moulage en silicone peut être une option préférable.
-
Temps : le temps nécessaire à la conception des pièces pour l'impression directe est inférieur à celui nécessaire à la conception des moules. En outre, le temps nécessaire à l'impression d'une seule pièce en silicone est nettement inférieur à la durée nécessaire à l'impression d'un moule et à son remplissage avec du silicone. Lorsque le temps est un facteur important, l'impression directe est généralement privilégiée.
-
Odeur : Silicone 40A Resin termine l'impression avec une odeur qui peut mettre du temps à se dissiper. Ce processus peut être accéléré en post-polymérisant la pièce imprimée dans un mélange d'eau et de Febreze HD, mais le moulage en silicone est préférable pour les applications où l'odeur du matériau est un vrai problème.
-
Biocompatibilité : Les différents types de silicone ont des niveaux de biocompatibilité différents. Silicone 40A Resin fait actuellement l'objet d'une évaluation du contact avec la peau conformément à la norme ISO 10993-1. Le moulage en silicone peut être préféré pour des applications ayant des exigences plus larges en matière de biocompatibilité.
-
Exposition aux UV : Les propriétés mécaniques de Silicone 40A Resin se dégradent après une exposition répétée aux UV. Pour les applications où les pièces vont passer beaucoup de temps à la lumière directe du soleil, le moulage en silicone est probablement préférable.
Pour les applications médicales nécessitant des pièces caoutchouteuses pour lesquelles le silicone ne convient pas, vous pouvez envisager d'autres élastomères Formlabs, tels que BioMed Elastic 50A Resin pour le SLA ou TPU 90A Resin pour l'impression 3D SLS.
| Matériau | Imprimante | Résistance à la rupture par traction | Contrainte à 100 % d'allongement | Allongement à la rupture |
|---|---|---|---|---|
| Silicone 40A Resin de Formlabs | Form 4/B Form 3/B/+ | 7,2 MPa | 4,5 MPa | 135 % |
| BioMed Elastic 50A Resin | Form 4/B Form 3/B/+ | 2,3 MPa | 1,3 MPa | 150 % |
| BioMed Flex 80A Resin | Form 4/B Form 3/B/+ | 7,2 MPa | 4,5 MPa | 135 % |
| TPU 90A Powder | Fuse 1+ 30W | 8,7 MPa (X/Y) 7,2 MPa (Z) | 7,2 MPa (X/Y) 7,0 MPa (Z) | 310 % (X/Y) 110 % (Z) |
Aperçu de l'impression avec Silicone 40A Resin
Silicone 40A Resin utilise la Pure Silicone Technology™ en instance de brevet et l'écosystème de stéréolithographie (SLA) Formlabs, ce qui permet la production en interne de pièces 100 % en silicone en quelques heures. Elle est idéale pour les applications nécessitant flexibilité, solidité et résistance à des cycles répétés d'allongement, de flexion ou de compression.
| Propriété d'un matériau | Silicone 40A Resin |
|---|---|
| Dureté Shore | 40A |
| Allongement à la rupture | 230 % |
| Résistance au déchirement | 12 kN/m |
| Résilience au rebond | 34 % |
| Gamme de température | -25 °C à 125 °C |
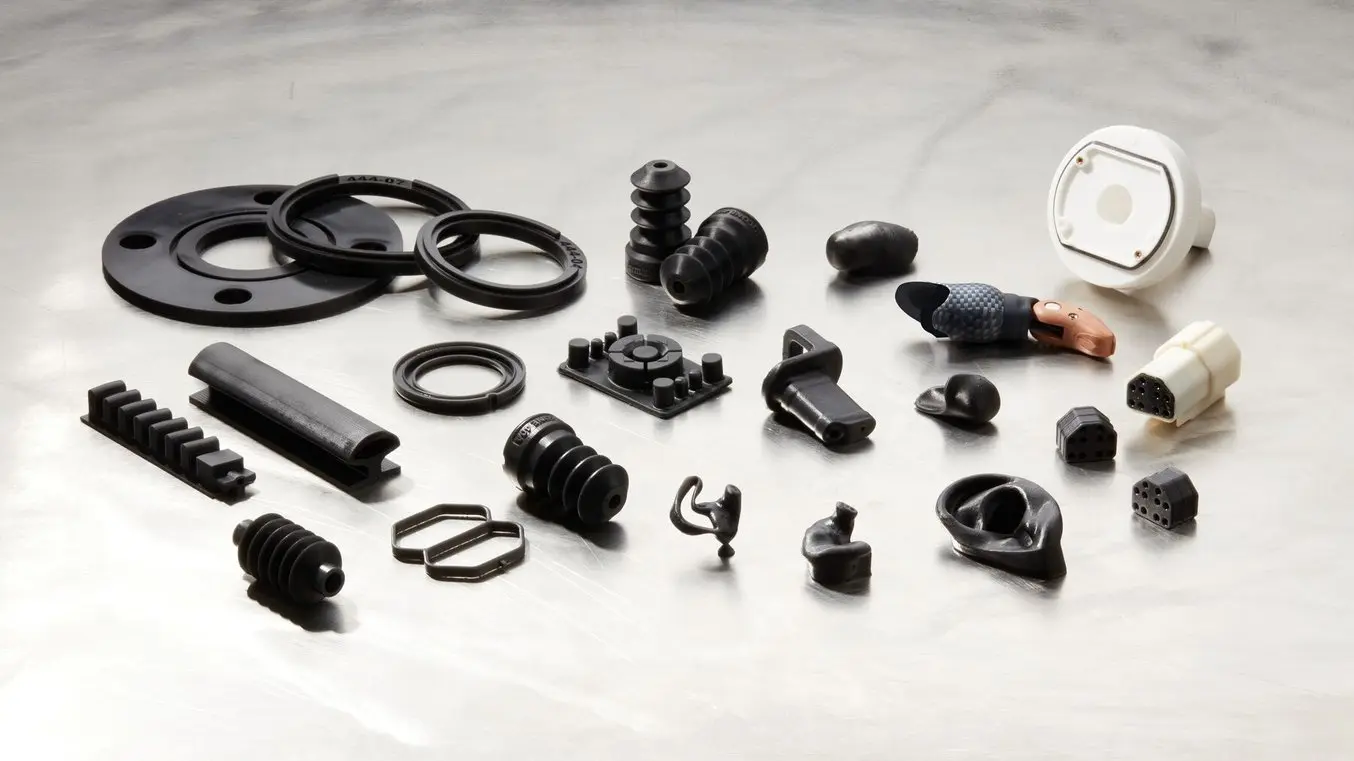
Les applications de Silicone 40A Resin sont diverses, allant du prototypage rapide, des tests bêta et des étapes de validation dans le développement de produits à la fabrication rentable de petites séries personnalisées de pièces finales. Le matériau convient également à la fabrication de dispositifs médicaux, de prothèses adaptées au patient, de composants d'audiologie, ainsi qu'à la production de pièces à géométrie complexe difficiles à fabriquer par des méthodes traditionnelles.
L'impression 3D directe de silicone avec Silicone 40A Resin est idéale pour un large éventail d'applications, du prototypage rapide aux aides à la fabrication, jusqu'à l'outillage et à la fabrication de petites séries personnalisées.
L'introduction de Silicone 40A Resin répond aux défis de longue date associés aux méthodes traditionnelles d'impression 3D en silicone, tels que les coûts élevés et les limitations techniques. L'impression instantanée avec Silicone 40A Resin permet de gagner du temps et élimine la nécessité de concevoir et de fabriquer des moules, puis de couler et de verser le silicone. Elle ouvre également des possibilités de conception en permettant aux utilisateurs de créer des géométries complexes difficiles à réaliser avec les méthodes de fabrication traditionnelles. Cette solution accessible permet aux entreprises de créer des pièces finales de haute qualité sans faire de compromis sur le prix, la qualité ou la vitesse.
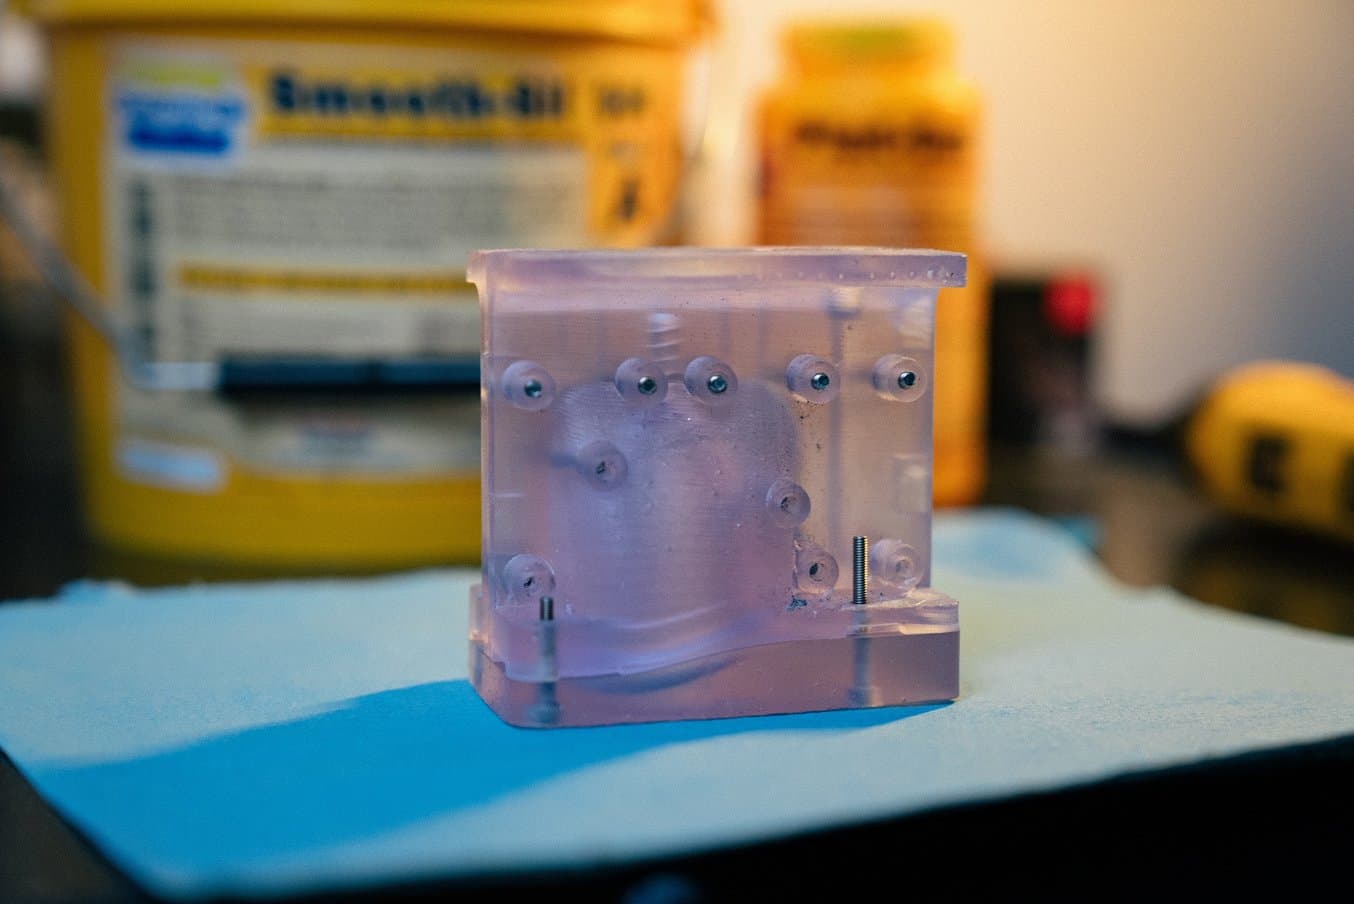
Vue d'ensemble de l'outillage imprimé en 3D pour le moulage en silicone
Les moules traditionnels pour la production de pièces en silicone sont usinés par CNC à partir de blocs d'aluminium ou d'acier. Il s'agit notamment de moules d'injection en deux ou plusieurs parties pour les caoutchoucs de silicone liquides (LSR), ou de moules de compression à cavité unique utilisés avec une feuille de silicone thermodurcie (HCR) qui est durcie sous pression et à haute température. Normalement, ce type de moule métallique est utilisé pour la production de masse. Mais lorsqu'il est utilisé pour le prototypage, les délais d'exécution de plusieurs semaines et les coûts initiaux d'outillage, qui vont de plusieurs centaines à plusieurs milliers d'euros, limitent la capacité des équipes de conception à mettre en œuvre et à tester de petites modifications de la conception du moule.
L’impression 3D de bureau est une solution puissante pour fabriquer des outils rapidement et à moindres coûts. Elle ne nécessite qu'un équipement très limité, ce qui permet aux opérateurs qualifiés de se concentrer sur d'autres tâches à haute valeur ajoutée. Grâce à l'impression 3D en interne, les fabricants et les concepteurs de produits peuvent introduire l'outillage rapide dans le processus de développement de produits afin de valider les choix de conception et de matériaux avant de passer à la production en série. Ils peuvent itérer rapidement, accélérer le développement des produits et mettre sur le marché de meilleurs produits. L'outillage imprimé en 3D à l'aide des résines SLA de Formlabs offre de nombreux avantages aux concepteurs de produits, qu'il s'agisse de prototypage, de production à petite échelle ou de fabrication de pièces sur mesure. Avec un outillage imprimé en 3D, des silicones RTV peuvent être injectés dans un moule en deux ou plusieurs parties, ou un mastic silicone RTV peut être pressé entre les sections d'un moule de compression imprimé en 3D. L'outillage imprimé en 3D permet aux concepteurs d'utiliser une large gamme de silicones à base étain et platine, qui comprennent un large éventail de duromètres, de couleurs et de degrés de transparence, ainsi que des fonctions spéciales telles que la sécurité de la peau.
Production de pièces en silicone avec des outils imprimés en 3D
Ce rapport fournit un guide étape par étape sur l'impression 3D d'outillage pour la production de pièces en silicone, avec des meilleures pratiques et des études de cas.
L'impression 3D stéréolithographique (SLA) est parfaite pour fabriquer des outils destinés au moulage de silicone. Les pièces SLA se caractérisent par une finition de surface lisse et une grande précision. Les caoutchoucs de silicone RTV capturent les détails fins de la surface, y compris les défauts, de sorte que la qualité de la surface de l'outil se reflète sur la surface de la pièce finale. Un moule imprimé avec une imprimante à dépôt de fil fondu (FDM), par exemple, laisserait des lignes de couches visibles dans la pièce en silicone.
En revanche, l'impression 3D SLA avec Formlabs BioMed Clear Resin ou Clear Resin permet de visualiser le processus d'injection de silicone, ce qui permet aux concepteurs d'évaluer la formation de bulles et de cavités, et d'identifier les zones où il convient d'ajouter des filets d'angle ou des évents supplémentaires. L'impression 3D SLA offre également un avantage pour la complexité de la conception ; un moule imprimé en 3D permet aux concepteurs de tirer parti des contre-dépouilles ou d'autres géométries complexes qui ne sont pas toujours possibles ou dont le coût serait prohibitif avec l'usinage CNC.
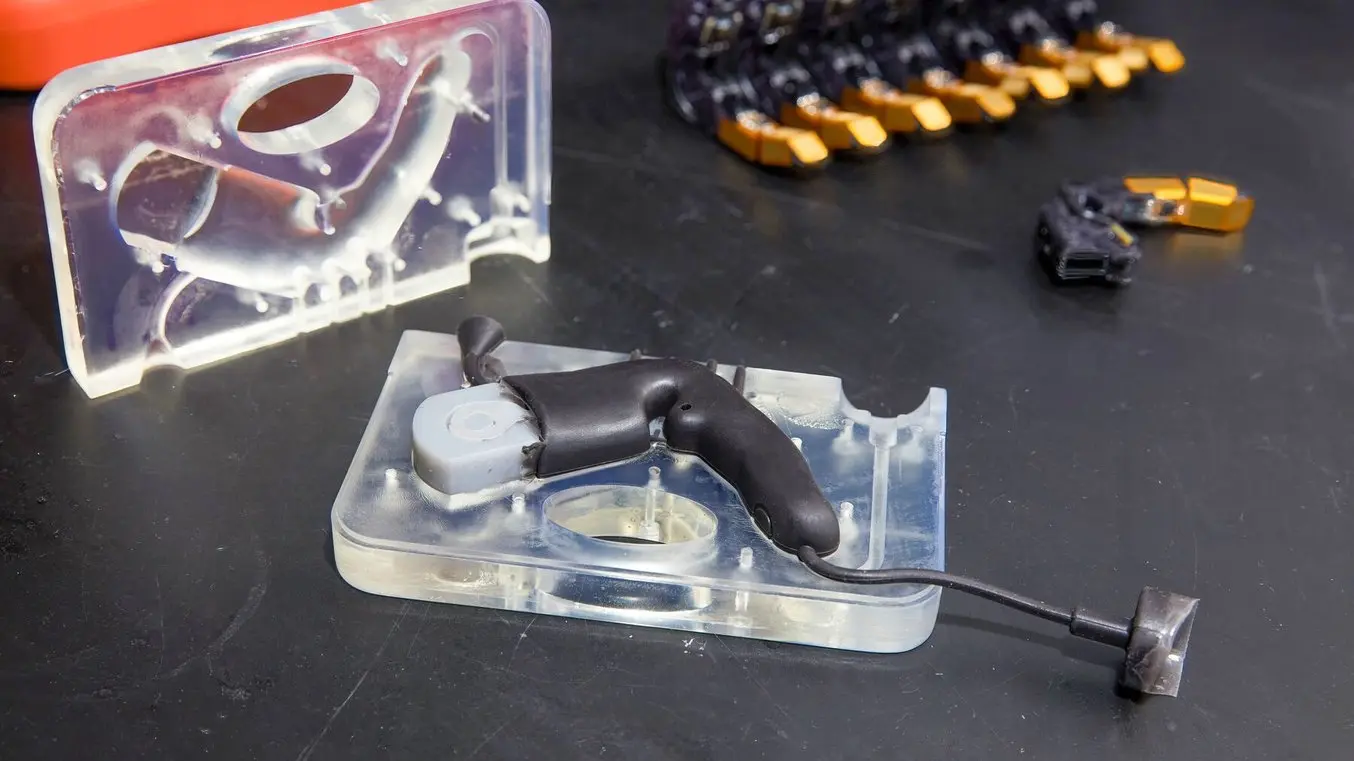
PSYONIC encapsule les doigts de l'Ability Hand en utilisant une configuration de surmoulage en silicone. Certains moules comprennent un insert de moule en Tough 2000 Resin pour ancrer l'« os » encapsulé dans le moule.
BioMed Clear Resin et Clear Resin de Formlabs sont également assez polyvalentes dans leurs performances mécaniques. Le même matériau peut être utilisé pour un moule en coque extrêmement fin qui se détache facilement d'une pièce en silicone personnalisée, ou pour un moule de compression robuste qui est utilisé plusieurs fois pour produire des joints d'étanchéité. Enfin, cette technique de fabrication abordable réduit les délais de production : un concepteur peut imprimer une forme de moule et commencer à injecter du silicone dès le lendemain.
Quand il est utilisé avec des moules imprimés en 3D, le caoutchouc silicone RTV restitue les moindre détails, comme un texte en relief. De plus, la plupart des silicones coulables ne sont pas chimiquement adhésifs et peuvent être retirés des moules imprimés en 3D après la post-polymérisation des pièces. La fixation mécanique peut être obtenue en les coulant sur des surfaces très poreuses telles que des tissus. Dans certains cas, la liaison chimique peut être favorisée par des liants spécialisés.
Comme le traitement du silicone RTV ne nécessite pas de chaleur ou de pression élevées, il peut être facilement formé avec un équipement limité dans un laboratoire de prototypage, ce qui réduit le coût de fabrication de pièces souples dans n'importe quelle entreprise. Les instructions pour fabriquer en interne rapidement et à un prix abordable de petites séries de pièces en silicone sont incluses dans le livre blanc complet.
Compatibility of 3D Printing Resins and Silicones
Anytime a castable material such as silicone comes into contact with a printed mold, we must consider the chemical interaction between the two materials. When casting platinum-catalyzed silicones in SLA molds, one particular challenge arises: the resin monomer can inhibit the silicone curing process, leaving an uncured gummy surface. However, high-quality platinum-catalyzed silicone parts can be produced by making sure SLA molds are fully cleaned and cured, and by applying protective coatings and mold releases.
There are many possible combinations of silicone, resin, protective coating, and mold release that you can try. We asked customers from a variety of industries to report on their successful workflows, and their responses are summarized below. We considered many of these insights when developing our own step-by-step process.
| Secteur | Application | Type de moule | Silicone | Résine | Best Practices |
|---|---|---|---|---|---|
| Product Design | Beta prototypes Skin contact | Surmoule | Unspecified (Pt cure) | Clear Resin | Paint on Vaseline as mold release |
| Product Design | End-use | Eggshell mold | Smooth-On Mold Max (Tin cure) | Clear Resin | No mold release used; mold is sacrificial / one-time use |
| Product Design | Prototypes | Compression mold | Castaldo Quick-sil (putty) | Clear Resin | General purpose mold release from Smooth-On |
| Product Design | Prototypes skin contact | Injection filled mold | Unspecified (Pt cure) | LT Clear Resin Clear Resin Grey Resin | Any general purpose mold release |
| Product Design | Prototypes Skin contact | Injection filled mold Overmold | Smooth-On Dragon Skin 20 (Pt cure) | Clear Resin | Krylon Crystal Clear Acrylic spray + Ease Release 200 |
| Manufacturing / Healthcare | End-use | Injection filled mold Overmold | Smooth-On Dragon Skin 20 (Pt cure) | Clear Resin | No mold release needed |
| Manufacturing / Healthcare | End-use Mucous membrane contact | Eggshell mold | Unspecified (Pt cure) | Biomed Amber Resin | No mold release used; mold is sacrificial / one time use |
| Audiology / Healthcare | End-use Skin contact | Eggshell mold | BioPor AB 40 by Dreve | Clear Resin Biomed Clear Resin | No mold release used; mold is sacrificial / one time use |
| Divertissement | Models and props Skin contact | Injection filled mold Open mold | Smooth-On FX Pro (Pt cure) | Black Resin >br>Grey Resin | Mold release not always needed |
| Divertissement | Models and props Part reproduction | Open mold Silicone mold | Variety of Pt and Tin cure by Smooth-On | Crear Resin Grey Resin | XTC-3D High Performance 3D Print Coating |
| Divertissement | Models and props Part reproduction | Silicone mold | Unspecified (Pt cure) | Cler Resin | SEM Flexible Primer Surfacer spray coating |
| Divertissement | Models and props Skin contact | Injection filled mold | Platsil Gel-25 by Polytek (Pt cure) | Rigid 10K Resin | Smooth-On Super Seal coating and Ease Release 200 |
| Hobby | art reproduction | Open mold Silicone mold | Smooth-on OOMOO 30 (Tin cure) | Grey Resin | General purpose mold release from Smooth-On |
While the combination of materials clearly varies, our customers aligned on the following:
- Make sure your parts are fully washed and cured. The 3D printed mold must be washed thoroughly in clean IPA, such that surfaces are not tacky after the mold dries. The mold should also be cured completely to reduce the amount of unreacted monomer on the SLA parts. For this process, the Form Cure is a great option. Clear Resin parts will develop a yellow tint, which is a good indicator that your mold is fully cured.
- Try a protective coating. There are many acrylic or epoxy coatings available that are applied as an aerosol spray in a single step (e.g. Krylon Crystal Clear acrylic coating), or as a two-part brush- on material (e.g. XTC-3D from Smooth-On). Using very little material, both types of coatings will leave a glossy, glass-like finish on the internal surfaces of the mold. Multiple applications may be needed. Check the manufacturer’s instructions for drying or curing times.
- Use a mold release anytime silicone contacts another material. This will ease the de-moldingstep, and eliminate silicone residue inside the mold, making it easier to reuse it for multiple castings. In many cases a generic or “general purpose” mold release from your silicone brand is sufficient (e.g. Stoner Dry film e408). A light mist of mold release is enough. Once again, check the manufacturer's instructions for recommended drying times.

Introduction à la Form 4B : production plus rapide, précision accrue et conformité réglementaire
Découvrez comment la Form 4L et la Form 4BL permettent de nouveaux niveaux de productivité et d'innovation grâce à leur vitesse, leur précision et leur fiabilité inégalées.
Additional Best Practices
Some silicone formulas, such as PDMS, are more susceptible to cure inhibition than others when they come into contact with SLA 3D printed tooling. We have listed further troubleshooting steps provided by Formlabs users, which build off of our general guidelines for RTV liquid silicones.
- Rinse with acetone. Spraying the 3D printed mold with an acetone squeeze bottle can help to remove residual solvent and any debris after the standard IPA washing step.
- Over-cure the mold. For tooling printed in Clear Resin, increase the curing time from 15-20 minutes to 60-120 minutes at 60 °C.
- Wait 24-48 hours after post-processing. Allow the mold to sit in ambient temperature and light before applying coatings and casting the silicone. It is helpful to expose the mold surfaces to open airflow during this step.
- Use an epoxy coating. A two-part epoxy sealant can act as an effective barrier between the silicone and the 3D printed mold.
- Use a higher concentration of catalyst. When using two-part silicones, we suggest adding a bit of extra catalyst component. If a small proportion of the catalyst is inhibited by the mold surface, the extra catalyst can help compensate for this and prevent formation of a tacky silicone surface.
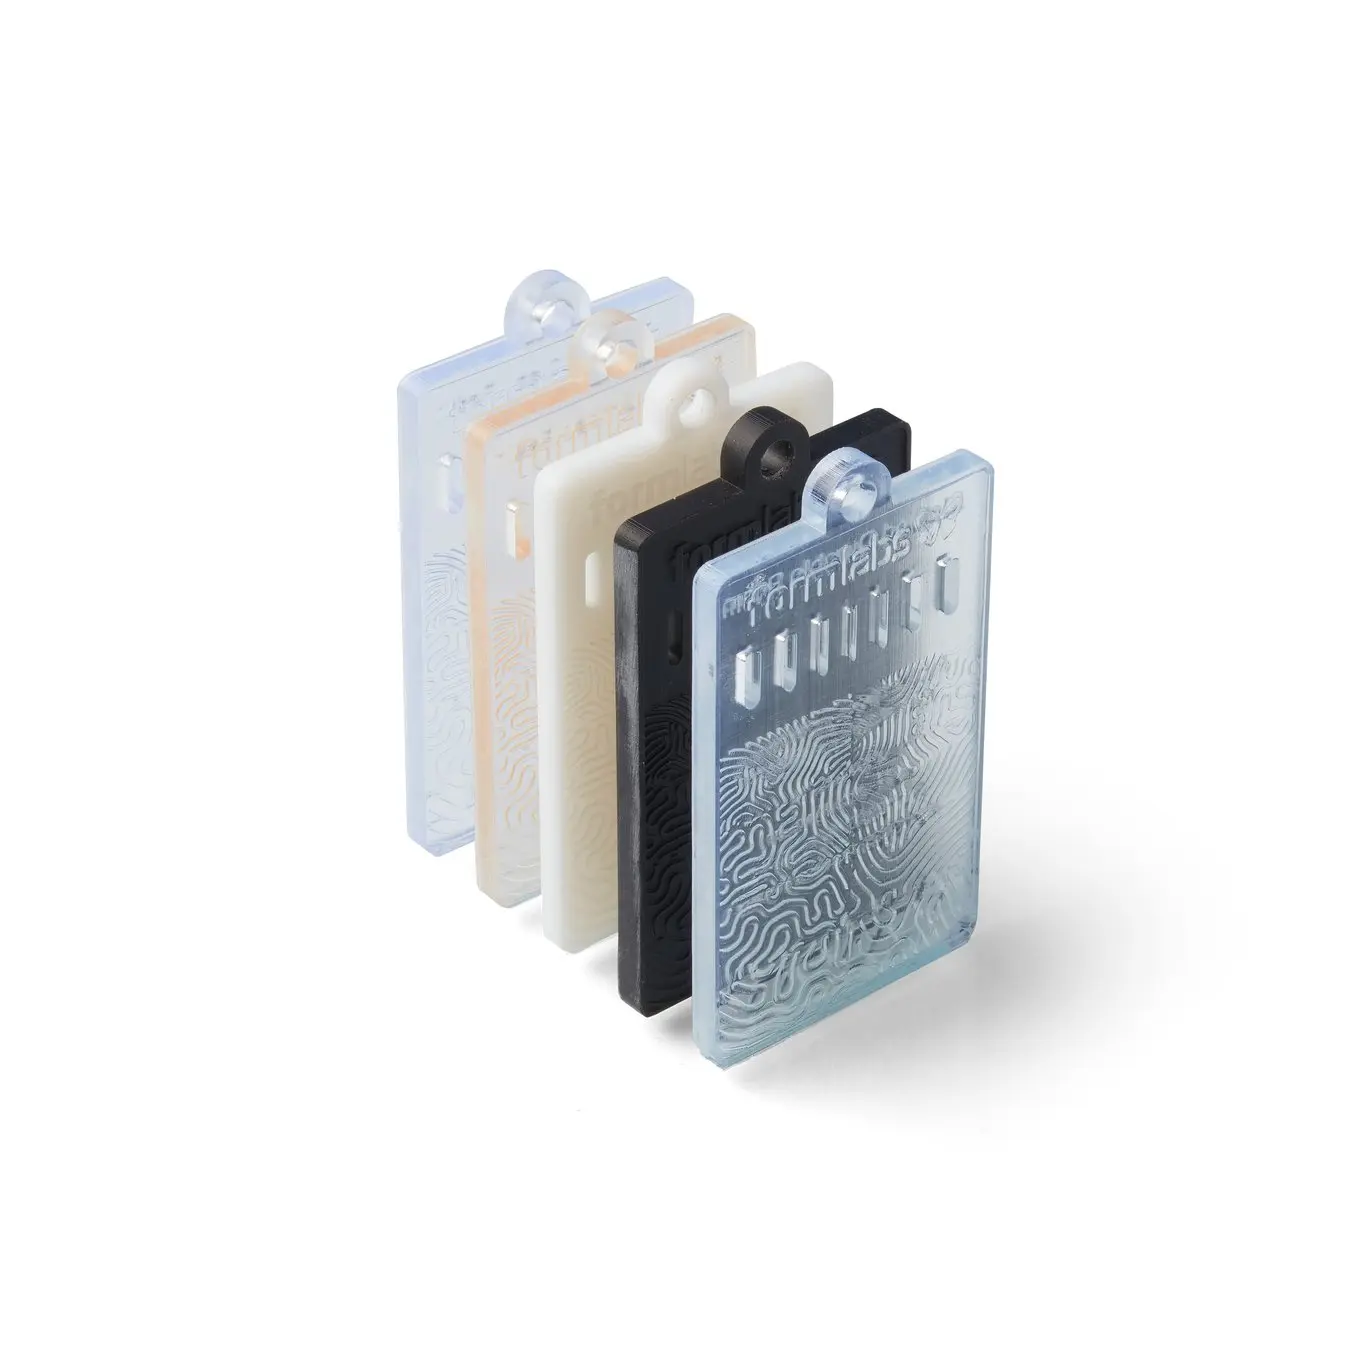
Échantillons en BioMed Resin
Chaque échantillon de résine BioMed présente des motifs en relief et en creux, des épaisseurs de découpe de 0,5 à 2,0 mm, ainsi que des informations réglementaires propres à cette résine.
Selecting a Mold Type
Bien que le résultat de chaque processus de moulage puisse sembler similaire, il existe quelques critères que nous recommandons pour sélectionner un type de moule. Il s'agit notamment de la géométrie de la pièce cible et de la possibilité de prendre en compte les contre-dépouilles et les trous dans la conception, de votre échelle de production et des matériaux que vous avez l'intention de couler. Nous citons quelques lignes directrices dans le tableau ci-dessous.
| Type de moule | Géométrie de la pièce | Matériaux | Échelle de production |
|---|---|---|---|
| Moule de compression | Pas de contre-dépouille | Mastic silicone à haute dureté | Des dizaines de moulages |
| Moule rempli par injection | Petites contre-dépouilles | Two-part liquid silicones | Des dizaines de moulages |
| Surmoule | Encapsulate internal hardware, minor undercuts | Two-part liquid silicones | Des dizaines de moulages |
| Moule en coque | Can accommodate large | Two-part liquid silicones | À usage unique |
Silicone Molding Step-By-Step
The Formlabs team has developed a step-by-step process for creating a silicone product prototype by combining different aspects of our customers’ successful workflows. One project presented below is a molded silicone keychain with an embedded Apple AirTag device. The other is a gasket designed by OXO. The design guidelines cover all critical steps from importing a reference geometry to adding alignment features for encapsulated hardware. We also used the novel silicone filling method employing an epoxy gun with a 1:1 volume mixing nozzle recommended by Dame Products.
Many of the steps and best practices shared are common across mold types. Each step of the tutorial indicates its relevance to injection filled molds, overmolds, or compression molds.
For information about eggshell molds, the Formlabs audiology white paper 3D Printing Custom Silicone Ear Molds provides a step-by-step guide.
WHAT IS REQUIRED?
From Formlabs:
- Formlabs BioMed Clear Resin or Clear Resin
- Compatible Formlabs SLA printer with up-to-date firmware
- PreForm software (most recent version)
- Compatible Build Platform
- Compatible Resin Tank
- Form Wash, Form Wash L, or Finish Kit
- Form Cure or Form Cure L
| Item | Supplier | Remarques |
|---|---|---|
| High-gloss acrylic spray | Krylon | Protective coating |
| Ease Release 200 | Mann Release Technologies | Mold Release |
| Apple AirTag | Encapsulated hardware | |
| Dragon Skin 20 | Smooth-On | Two-part RTV Silicone, Platinum Cure |
| Silc Pig | Smooth-On | Colored pigment |
| Stirring sticks | ||
| Epoxy cartridge | McMaster-Carr | 1:1 ratio |
| Epoxy dispensing gun | McMaster-Carr | |
| Mixing nozzle | McMaster-Carr | |
| C-clamp or spring clamps | ||
| Duct tape | ||
| Vacuum chamber and pump (optional) | Amazon | |
| Pressure pot (optional) | Amazon |
Molding Process: Compression Mold
| Item | Supplier | Remarques |
|---|---|---|
| Ease Release 200 | Mann Release Technologies | Mold release |
| Castaldo QuickSil | Castaldo | |
| Tabletop vice |
WHAT IS REQUIRED?
Overmold
- Import the Reference If you are planning to overmold or encapsulate another object with silicone, import your reference object or substrate in the CAD software of your choice. In this example, we imported a digital replica of an Apple AirTag.
Injection Filled Mold, Overmold, or Compression Mold
- Design the Silicone Part Together, the silicone and any encapsulated items form the base volume. For overmolded parts, aim for a minimum silicone shell thickness of 2 mm. In our compression mold example, the object has a complete through-hole. We recommend defining a core as a separate object. The silicone part plus core can be thought of as your base volume.
- Design the Mold Stock Create a block around your base volume that extends at least 1 cm beyond the outer shell of your part.
- Split the Mold For a basic two-part mold, you will be splitting your base volume into two parts along a defined surface based on a parting line. Start by using draft analysis to define the parting line. Consider how the two halves of your mold will come apart, to ensure that the silicone part can be easily released from the mold. To avoid undercuts, the parting line might be a contour instead of a straight line. Next, extrude the parting line into a surface and use this surface to split your mold. For complex molds that require more than two parts, this process can be repeated multiple times to generate the number of mold parts required.
- Remove Base Volume From the Mold Stock Use boolean subtract in your CAD software to carve out the mold cavity from the solid block. In the case of our compression mold, the individual core component is added back with a boolean addition to one side of the mold, in effect creating two parting lines.
- Check Draft Angles It is a good idea to pause here and consider how your mold bodies will come apart after you inject the silicone. Our customers recommend using at least a 2° draft angle for silicone product prototypes. However, this aspect of silicone mold design is quite forgiving. Because the silicone rubber can generously deform during de-molding, many angles can be handled including 90° angles or slight undercuts. We recommend using the Draft Analysis tool in your CAD program at this step to analyze and edit any areas shown in red beyond the threshold draft angle.
Injection Filled Mold, Overmold
- Design the Gate If you are relying on gravity to fill the recesses of the mold cavity, place the entrance of your gate high on the mold block and then, using a U-shape with a generous bend radius, connect the gate to the mold cavity at the lowest possible point. Filling at this location prevents air bubbles from forming. Boolean subtract the gate from the mold stock. Typically, the central axis of the fill gate is located on the parting line. Another configuration would be a short fill gate that directly connects to a point on your mold cavity; the main air vent will be located on the opposite side.
- Define Air Vents Air is displaced when filling silicone into an enclosed space, so it is natural to place an air vent at the point of the mold that is last to fill. In our example, this is placed at the top of the mold stock. To place additional air vents, it is helpful to think about areas where air is likely to be trapped, and connect vents specifically to points such as sharp turns, corners, or areas where two liquid flow fronts connect. Typically air vents will be cylinders (~0.5-2 mm in diameter) that connect areas of your cavity to the top of the mold. Like the fill gate, it is helpful to align the axis of any air vent on the parting line. Once placed, boolean subtract these features from the mold stock.
Injection Filled Mold, Overmold, or Compression Mold
- Add Mating Features These features align and constrain separate parts of the mold stock to each other. Leave a ~ 0.1 mm offset gap between complementary mating features.
Overmold
- Add Alignment Pins for Encapsulated Devices If you are overmolding or encapsulating a part in silicone, the part must be fully constrained in the mold so it does not shift during silicone casting. Use as few alignment pins as necessary to constrain the part and aim for a pin diameter of ~1.25 mm. Pins should be pointing in the direction of draw, or perpendicular to the parting line of the mold. Note that alignment pins do leave small holes in the surface of the silicone part. If needed, these can be patched after de-molding using a small dab of liquid silicone which is then allowed to cure.
Injection Filled Mold, Overmold
- Add More Mold Features One additional mold feature is a fill trough. A trough is used for overflow of the silicone at both the fill gate and vent locations, and can be designed as a single continuous well that covers all gate and vent features. The trough also contains a reservoir of liquid silicone that can enter the mold during the curing process by freely seeping into the mold cavity to displace bubbles and voids, or to compensate for silicone that enters the interface between mold parts during cure. In this particular example, our trough is 10 mm deep.
-
Add a Syringe Inlet We also recommend adding a syringe inlet feature that matches the geometry of your syringe. We made ours slightly oversized, with a 6° angle to fit a variety of syringe and mixing nozzle types.
-
Add Pry Points Pry points can be added to assist with disassembly of the mold after curing. These are small rectangular cutouts along the parting line that allow a flathead screwdriver or another tool to be used to separate the mold parts. Our example cutouts extend 5 mm into the mold edge.
-
Add Fillets or Chamfers Add fillets or chamfers to angled mold features This is usually the final step after the mold geometry is locked. Adding fillets to soften the edges of the mold can also aid the 3D printing process. When printing a mold stock directly on the build platform, beveling any external corners eases part removal after printing and reduces the amount of resin flash that can accumulate around sharp corners.
Printing the Mold
Injection Filled Mold, Overmold, or Compression Mold
- Select the Resin Many resins work, however Clear Resin or Biomed Clear Resin are great options for visualizing the flow of silicone while casting your part.
- Print the Mold We recommend printing with a 50 microns layer height for a good balance between smooth surface texture and fast printing time. Since silicone picks up fine details on the surface, including layer lines, 25 microns layer height might be needed for some aesthetic applications. Orient your parts on the build plate so that critical interior surfaces are free of support marks. Placing the mold stock flat on the build platform can work in some cases.
- Wash and Post-Cure the Mold It is critical to thoroughly wash excess resin off of the mold stock with clean IPA because uncured resin can inhibit curing of silicone. The mold should also be cured completely to reduce the amount of unreacted monomer on the SLA parts. For Clear Resin, the recommended settings are 15 minutes at 60 °C. For BioMed Clear Resin, the recommended settings are 60 minutes at 60 °C. The preset time and temperature settings on Form Cure work well. The outer surface can be polished to a highly transparent finish. Adding mineral oil to the exterior surfaces is one option to help fill in surface scratches and provide an extremely clear window into the silicone filling process.
Printing the Mold
Injection Filled Mold, Overmold
- Apply Coatings and Mold Release Apply coatings and mold release. Consider using mold release anytime two different materials come into contact with each other. This includes embedded hardware that you plan to insert and remove from an overmolded silicone sheath. Consult our customer workflow table for recommendations. Follow the guidelines on your material packaging, and wait for the coatings to fully cure or dry before moving on to the next step.
- Insert Internal Parts/Hardware Alignment pins help to orient the part that will be encapsulated.
- Close and Clamp the Mold Carefully clamp the mold starting in the direction of the draw, making sure that the mold stock and any encapsulated objects remain in alignment. In our example, we used a 3D printed replica of an Apple AirTag, fabricated in Rigid 10K Resin.
Printing the Mold
Injection Filled Mold, Overmold
If you are incorporating a pigment, mix the pigment into Part B before moving on to the steps below.
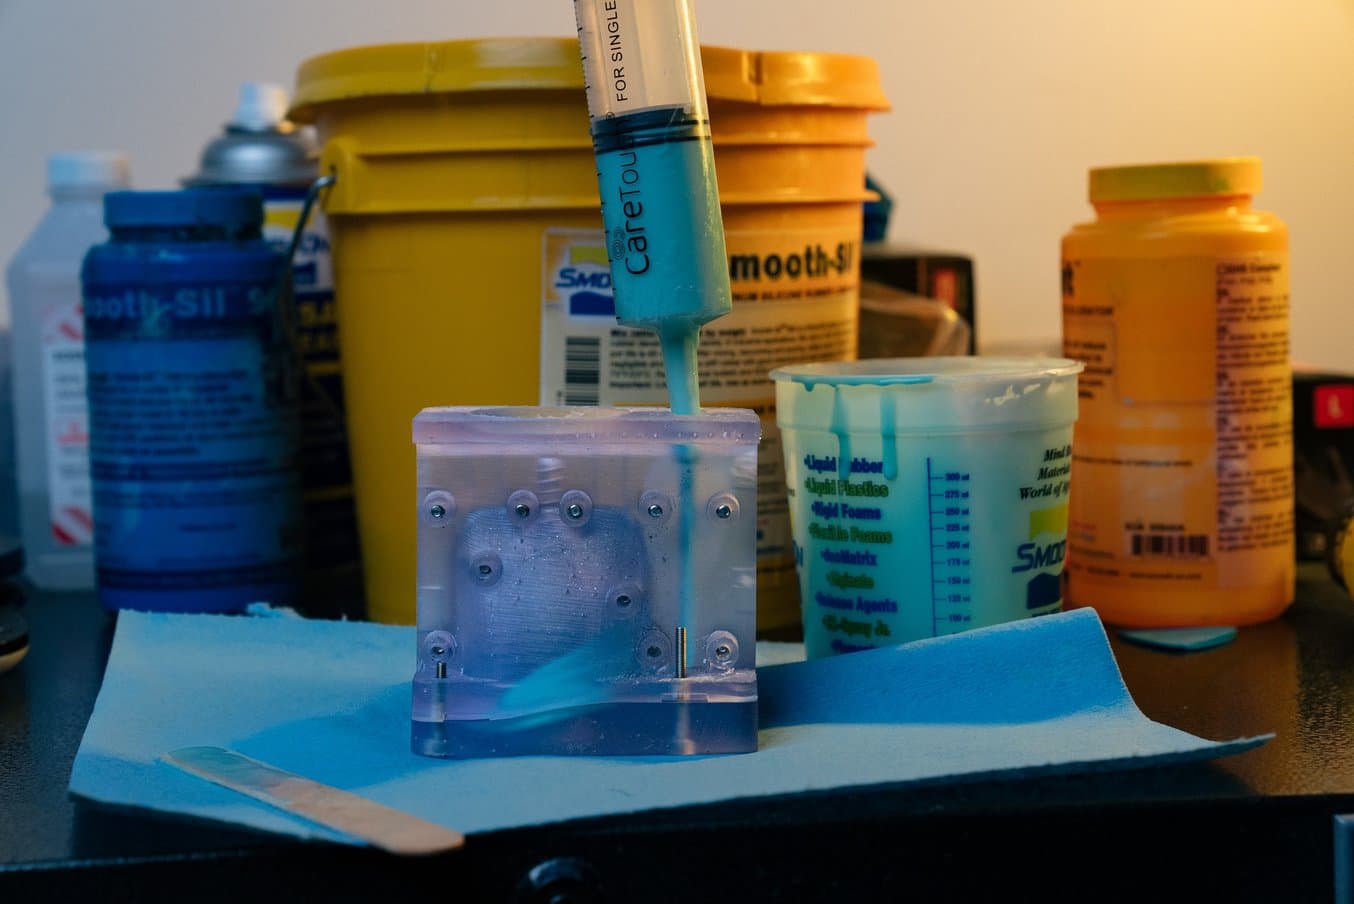
A frequent concern when casting silicone is trapping small air bubbles in the mold. This results in voids in the final casted part. A couple of supplemental methods are recommended to manage air bubbles, including degassing liquid silicone in a vacuum chamber prior to mold filling. As a general guideline, check the viscosity of your liquid RTV silicone formula. If it is over 18,000 cps (centipoise) degassing is recommended. If it is below this threshold, a degassing step may not be necessary. Another recommended technique is placing the filled mold in a pressure chamber during silicone curing in order to collapse and shrink any entrained bubbles. A great prototype can be produced without degassing the silicone or curing under pressure, but you can achieve a nearly perfect part using these supplemental methods.
Vat Method
- Degas parts A and B separately under vacuum, if needed.
- Mix parts A and B together vigorously. Typically the two silicone components are mixed in equal volumes. Allow the mixture to degas under vacuum again, or to gently degas in air.
Mixing Nozzle Method
- Degas parts A and B separately under vacuum, if needed.
- Fill each side of an epoxy cartridge system with one part (A or B), using separate syringes to transfer the liquids. Pouring the silicone high above the cartridge in a thin stream will help to avoid remixing air into the silicone.
- Degas parts A and B. Stand upright and allow the silicone to gently degas in air. Because silicone parts A and B remain separate, the filled cartridge can remain for days before you use it.
Moule de compression
- Mix Parts A and B Thoroughly Mix together equal volumes of parts A and B of the silicone putty and knead by hand. The silicone rubber begins to cure after 90 seconds, so the parts should be kneaded for the minimum time necessary to generate a uniform color.
Moule de compression
Injection FIlled Mold, Overmold
Vat Method
- Draw the degassed silicone mixture into a syringe. Next, invert the syringe so the nozzle faces up. Allow any air pockets to rise to the top. Depress the plunger to expel the air and extrude a small amount of your silicone to ensure no air bubbles remain in the syringe. Insert into the fill gate and slowly fill the mold until silicone exits from the air vents. If your model has an overflow trough feature, continue filling this area of the mold.
Mixing Nozzle Method
- Assemble the epoxy gun. Insert the cartridges into the gun and screw on the mixing nozzle. It’s helpful to squeeze a little bit of liquid out of the nozzle tip at this stage to make sure the epoxy is properly mixed.
- Fill the mold. Insert the epoxy gun nozzle into the fill gate and slowly fill the mold until silicone exits from the air vents. Again, fill up the trough feature if your mold includes one.
Use a Pressure Pot (optional)
- As an optional step, place the mold in the pressure pot and add your silicone manufacturer’s recommended air pressure to the pot (e.g. ~ 30 psi). This shrinks any bubbles trapped in the mold and forces the material in the trough down into the mold. Let the silicone cure under pressure according to the manufacturer's instructions.
Compression Mold
- Stuff Silicone Into the Mold The silicone should be compacted into both sides of the mold, being sure to catch all details and crevices. Any excess material will simply spill outside the edges of the mold.
- Squeeze Mold Together The mold should be squeezed perpendicular to the parting line. In compression molds, the mating surfaces don’t completely touch until pressure is applied. Close the clamp gently until it does not close further. The recommended Castaldo Quick-Sil silicone rubber cures completely in 20 minutes.
Moule de compression
Injection Filled Mold, Overmold, Compression Mold
The cure time can range from 10 minutes to several hours depending on the silicone chemistry.
- Define Mold Orientation With a gravity-filled configuration, like our example, the mold can remain oriented upright without an extra sealing step as the silicone cures. With an end-to-end filling configuration, we would experience a backflow of silicone if the filled mold was set on our workbench. After filling, we recommend sealing the gate with duct tape. The compression mold should remain clamped in a tabletop vise while curing.
- De-Mold and Trim the Silicone Part It is normal to develop some flash within and around the parting line. Remove excess silicone from the exterior of the mold first. Pry open the mold by inserting a flat head screwdriver or another flat tool into the pry point and gently twisting to break the seal. Remove the silicone part, being mindful that some silicone may need to be gently trimmed away from any air vents. After removing the silicone part from the mold, use a sharp razor or flush cutters to trim the vent and gate features from the part. Residual bumps can be removed gently with wet fine grit sandpaper. Finally, you can wash the part with soap and water to remove sandpaper and mold release residues.
- Prepare for the Next Casting Molds can be reused multiple times. You may need to clean out vents with a sharp tool and/or reapply mold release before filling with silicone again. It is common to accumulate incompletely cured silicone in the narrow surface between mold blocks. This can be wiped away with a clean cloth.
- Iterate Design It is normal to go through a couple of mold design iterations after trying the full end-to-end workflow. A few design changes you might need to consider include increasing the offset distance between mating features, moving alignment pins to ensure that encapsulated objects are fully constrained, or adding air vents in areas that tend to trap air bubbles during filling.

Dame Products use 3D printed molds for overmolding.
Moule de compression
Mold material: Production molds are typically made from machined aluminum or steel.
Alignment pins for overmolding: The alignment pins for overmolding are oriented within the plane of the mold’s main parting line, rather than perpendicular to it. These are also designed to retract in and out of the mold, resulting in a silicone layer that does not have dimples and holes created by alignment pins.
Draft angle: Our customers recommend using at least two degrees draft angle for silicone products. While the prototype or short-run production molds presented in this report can handle deep undercuts, these types of silicone geometries must be carefully pried from the mold, and would be difficult to replicate by an automated injection system.
Injection molding configuration: Gravity-fill molds are highly reliable mold configurations for benchtop prototyping. For rapid mass production methods, inlet and outlet geometries are on opposite sides of the mold.
Silicone materials: While silicone chemistry used in production is quite similar to the RTV materials presented in this white paper, both liquid silicone rubbers (LSR) for injection moldingnand heat cured rubbers (HCR) for compression molding typically enter the mold at low temperature, and are then cured at elevated temperature.
Silicone Printing Step-By-Step
WHAT IS REQUIRED?
From Formlabs
- Formlabs Silicone 40A Resin
- Compatible Formlabs SLA printer with up-to-date firmware
- PreForm software (most recent version)
- Compatible Build Platform
- Compatible Resin Tank
- Form Wash, Form Wash L, or Finish Kit
- Form Cure or Form Cure L
From Third-Parties
- IPA (99% or higher): To make wash solvent blend for washing Silicone 40A parts
- N-Butyl Acetate (purchase in the US; purchase in EU): To make wash solvent blend for washing Silicone 40A parts
- Glass Beaker (at least 500 mL in size): To submerge Silicone 40A parts inbwater during the post-cure steps
- Febreze HD (optional): For masking of odor of printed Silicone 40A parts
- 1.5 Gallon Glass Jar (optional): For storing wash solvent and washing printed Silicone 40A parts if not using a Form Wash
- Ultrasonic Cutting Knife (optional): For removing support nubs on Silicone 40A parts
1. Conception
1.1. Design your parts with the Silicone 40A Design Guidelines in mind.
2. Impression
2.1. Import File
Check that your version of PreForm is up to date by going to Help, then Check For Updates in the upper left-hand corner. Import or open your part file by dragging them into PreForm, or by going to File and then Open in the upper right hand corner.
2.2. Select Material
Select Silicone 40A by clicking the Printer Type box in the Job Info menu on the right-hand side. Select “Silicone” from the materials grid.
2.3. Orient
PreForm can auto-orient based on Formlabs best practices. To auto-orient, select your part and click Orientation on the left side of the screen. Then, click Auto-Orient Selected.
For best results, you may orient manually using the red, green, and blue actuators surrounding your part. Consider orientating so that areas where a smooth surface texture is most important are facing away from the build platform.
Print directly on the build platform whenever possible. Try to keep the bulk of the part’s weight as close to the build platform as possible and orient long parts parallel to the front edge of the build platform.
2.4. Add Supports
To auto-generate supports based on material properties, select your part and go to Supports on the left side of the screen and select Auto-Generate All.
For optimal results, we recommend manually editing auto-generated supports, or manually placing supports until the part is sufficiently supported (indicated by a green thumbs-up beside Supports in the Job Setup menu). PreForm will indicate in red what areas might require additional support.
If surface texture or post-processing time is a major concern, you may want to consider designing custom supports using CAD software. Guidelines for adding tearaway supports can be found here.
2.5. Layout
Set your part’s location on the build platform by clicking and dragging, using the red green and blue actuators surrounding your part, or by clicking Layout, then Layout All on the right side of the screen. It’s best to place parts in the center of the build platform. When printing multiple parts, space on the build platform can be optimized and material can be saved by overlapping rafts.
2.6. Send to the Printer
Send your job to the printer by clicking the orange Upload Print button on the bottom right. When the Print dialogue box opens, select the printer that you would like to use.
2.7. Set Up the Printer
Shake the Silicone 40A cartridge and then insert it. When using a new cartridge, double check that the silicone bite valve is opening successfully by squeezing it with a gloved finger. Insert a build platform and a compatible resin tank into the printer.
Begin printing by selecting your print job from the printer’s touch screen. Follow any prompts or dialogues shown.
Attention: For full compliance and biocompatibility, Silicone 40A requires a dedicated resin tank and build platform. Only use the Form Wash with other Formlabs biocompatible resins.
3. Post-traitement
3.1. Remove the Part
Remove the part from the build platform by wedging the part removal tool or a scraping tool under the part raft and rotating the tool. Parts can also be washed directly on the build platform in the Form Wash.
3.2. Wash
Place the part in the Form Wash filled with an 80/20 mixture of 99% isopropyl alcohol (IPA) and n-butyl acetate. Do not wash with IPA or n-butyl acetate alone. Wash using the recommended setting for Silicone 40A (20 minutes).
If the model is hollow or has internal channels, ensure liquid resin is thoroughly flushed out from these features. This can be done using a syringe filled with the mixture from the Silicone 40A wash. Allow parts to fully dry before post-curing.
3.3. Remove Supports
For rest results, remove supports after washing but before post-curing.
To remove supports, pull gently at the support structure. On thicker parts, just pulling may be sufficient. On thinner parts, consider using flush cutters, or sliding a sharp hobby knife along the part’s surface, being careful not to damage the part itself. An ultrasonic cutter can also be used here for greater precision.
3.4. Post-Cure
Post-cure your part to achieve optimal mechanical properties. Fully submerge the part in a beaker (or other UV-transparent container) of water, and place the beaker of water containing your part into the Form Cure. Use the recommended settings for Silicone 40A (45 min at 60 °C).
Mask the odor of Silicone 40A by adding Febreze HD to the water in the glass beaker before post-curing. For every 500 mL of water, use 12.5 g of Febreze HD. If not treated, this odor will dissipate over time.
3.5. Additional Post-Processing
A miniature, mounted Scotch Brite wheel can be used with a rotary tool to grind down support marks on parts either before or after curing.
Before applying any adhesives, ensure that the part has been thoroughly washed, is dry, and the surface is not tacky or dusty. Formlabs recommends using a primer such as DOWSIL 1200 series or a medical primer. After a primer has been applied, use a silicone adhesive such as DOWSIL 734. Do not use cyanoacrylate glues as they are brittle and leave a crust on the silicone.
Medical Customer Case Studies
Direct Printing with Silicone 40A Resin
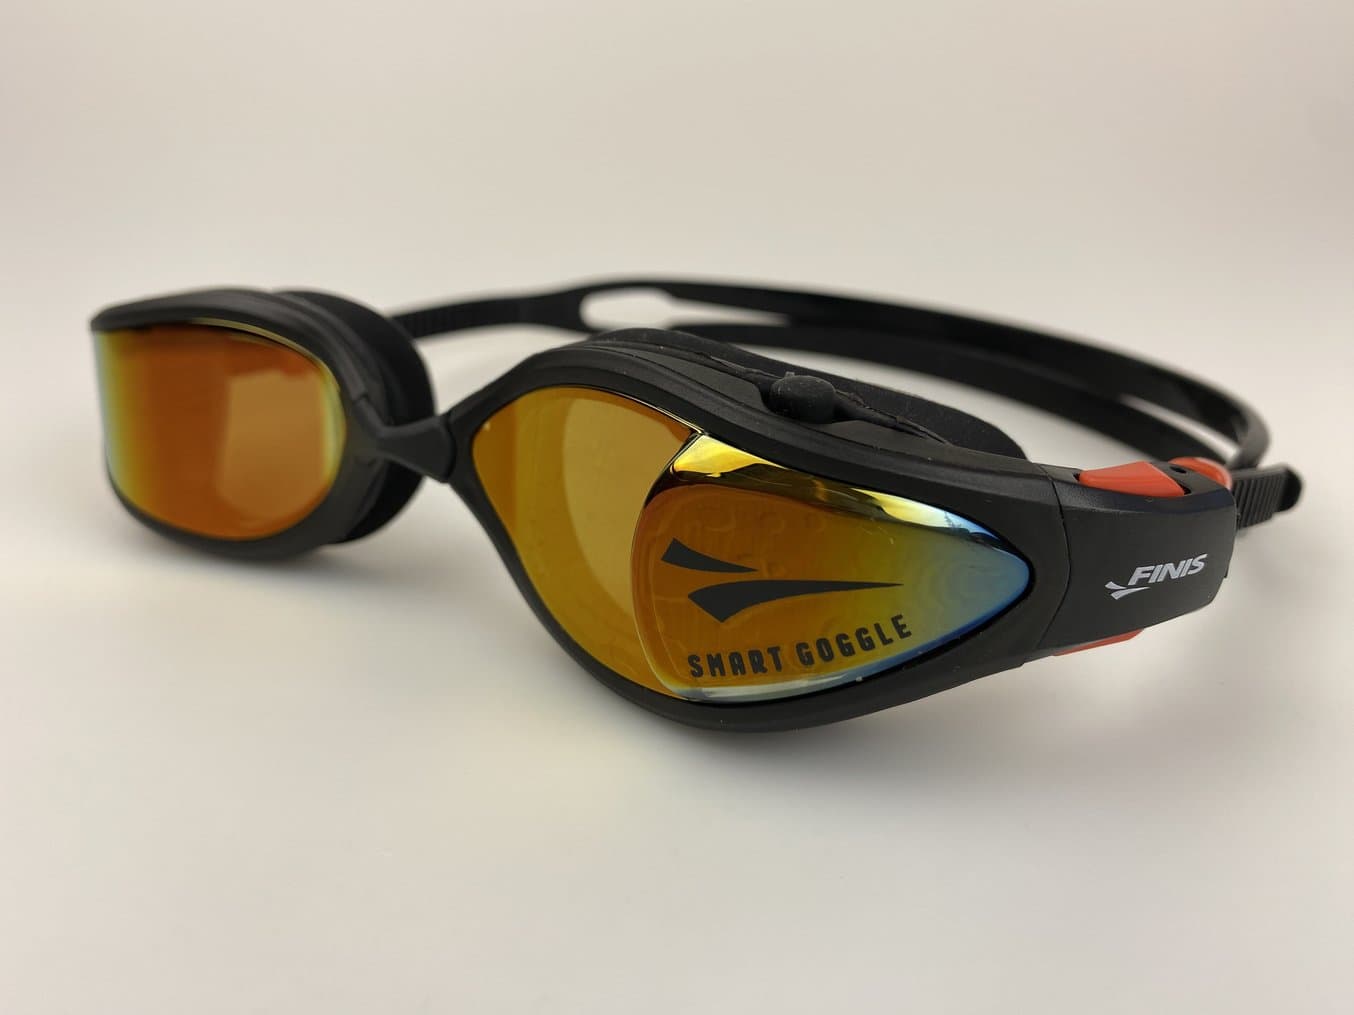
FINIS, Inc. est spécialisée dans le développement d'équipements de natation et de sports aquatiques, y compris des appareils de pointe comme les lunettes de natation intelligentes Smart Goggle Max.
FINIS, Inc., a California-based company renowned for its innovative swim-related products, prioritizes quality and performance to meet the evolving needs of swimmers of all skill levels. Led by senior designer David Beittel, the product development team initially used filament 3D printing for rapid prototyping but sought more detailed and isotropic parts. That’s when they transitioned to Formlabs Form 3+ Stereolithography (SLA) 3D printers and Silicone 40A Resin. This resin proved invaluable for swift adjustments, overnight functional prototype printing, and achieving characteristics close to final production materials.
Historically, FINIS relied on labor-intensive silicone casting in traditional molds, leading to long production lead times. With the introduction of the Form 3+ 3D printers and Silicone 40A Resin, the team overcame challenges associated with mass-producing silicone parts. They were able to produce production-quality parts in a mere eight hours for just $10 a piece. This is a significant undercut to outsourced urethane casting, which has the usual expenditure of over $1,000 and a three-week timeline. The 3D printed silicone gaskets successfully underwent rigorous water tightness assessments within a swimming pool environment and demonstrated elasticity closely mirroring final production characteristics. Silicone 40A has become an essential tool for refining designs and ensuring optimal performance throughout FINIS, Inc.’s development process.
Injection Filled Molds for Product Prototyping With Glassboard
BioMed Clear Resin is used to create transparent molds which can be inspected for air bubbles or other imperfections.
Glassboard is a product design consulting firm in Indianapolis, IN. Their design team uses silicone in molds for a very wide variety of prototyping applications from silicone menstrual cups, to custom fittings and overmolds, to seals, gaskets, and o-rings. Glassboard typically uses molds that are made of multiple parts that can be disassembled to remove the casted silicone and then reused for multiple castings.
A typical mold design at Glassboard, such as the one used for the Sunny Menstrual Cup, is an injection filled mold aided by a gravity-fill configuration. Liquid silicone is injected through a port at the top of the mold, runs down a channel to enter the bottom of the mold cavity, gradually fills to the top of the cavity, and exits via narrow air vents at the top of the mold.
An innovative feature of Glassboard mold design is a trough reservoir at the top of the mold. Troughs are used to contain the overflow of the silicone at both the gate and vent locations. Another purpose of the trough is to allow excess silicone to enter into the mold after filling to displace voids created by collapsing air bubbles or by silicone seeping into the narrow surface between mold blocks.
Silicone Overmolding of Customer Beta Prototypes With Dame Products

Dame Products employs an overmolding method to produce customer beta prototypes with embedded hardware. Their mold is printed in Clear Resin.
Dame Products is a Brooklyn-based startup that designs products for the health and wellness industry. Their product line incorporates complex ergonomically shaped hardware that is fully encapsulated in a layer of skin-safe silicone in vibrant colors. The team employs silicone overmolding with 3D printed molds to produce customer beta prototypes.
Each 3D printed mold stock is a two or three part injection filled mold that has anchoring features for small internal hardware. Parts A and B of a platinum-catalyzed liquid silicone are loaded into two sides of a 50:50 ratio epoxy cartridge, and attached to an epoxy gun with a mixing nozzle. This innovative method simultaneously mixes the silicone components while gradually forcing the liquid silicone into the mold.
Dame engineers can prototype dozens of overmolded devices in one day by rotating through three or four SLA printed molds. While the silicone rubber from one prototype is curing, the next can be de-molded and prepared for the next fill. Trimming and cleaning of prototypes happens in parallel. When prototype hardware is returned to the company, the beta device is bleached, the thin silicone layer removed, and the internal hardware is reused in a new prototype.
End-Use Overmolded Grippers With PSYONIC
PSYONIC encapsulates the Ability Hand fingers using a silicone overmold configuration. Some molds include a Tough 2000 Resin mold insert to anchor the encapsulated “bone” feature in the mold.
California-based PSYONIC is reinventing limb prosthetics with the world’s first touch-sensing bionic hand. The team uses 3D printing as a critical step in manufacturing almost every component of their device. This includes mechanical fingers that are encapsulated with silicone using an SLA 3D printed mold.
The molds are produced by taking the inverse of the finger or thumb shape, subtracting it from the mold stock, and adding inlets and air vents for injection of two-part platinum cure silicone. The mold also accommodates the structural “bone” component of the finger, which is fabricated using an FDM 3D printer.
Designers at PSYONIC are able to use each mold dozens of times before it wears out, and when this happens they can simply print a new mold and start injecting silicone again the next day. The team also directly contrasts Formlabs Clear Resin to their previously used fused deposition modeling (FDM) thermoplastic molds, namely referring to the upgrade in surface quality. Silicone picks up any texture or defect in the mold cavity, including 3D printing layer lines, so the smooth surface quality of Formlabs resins has been beneficial.
Silicone Injection Molding of Custom Makeup Effects With Dreamsmith
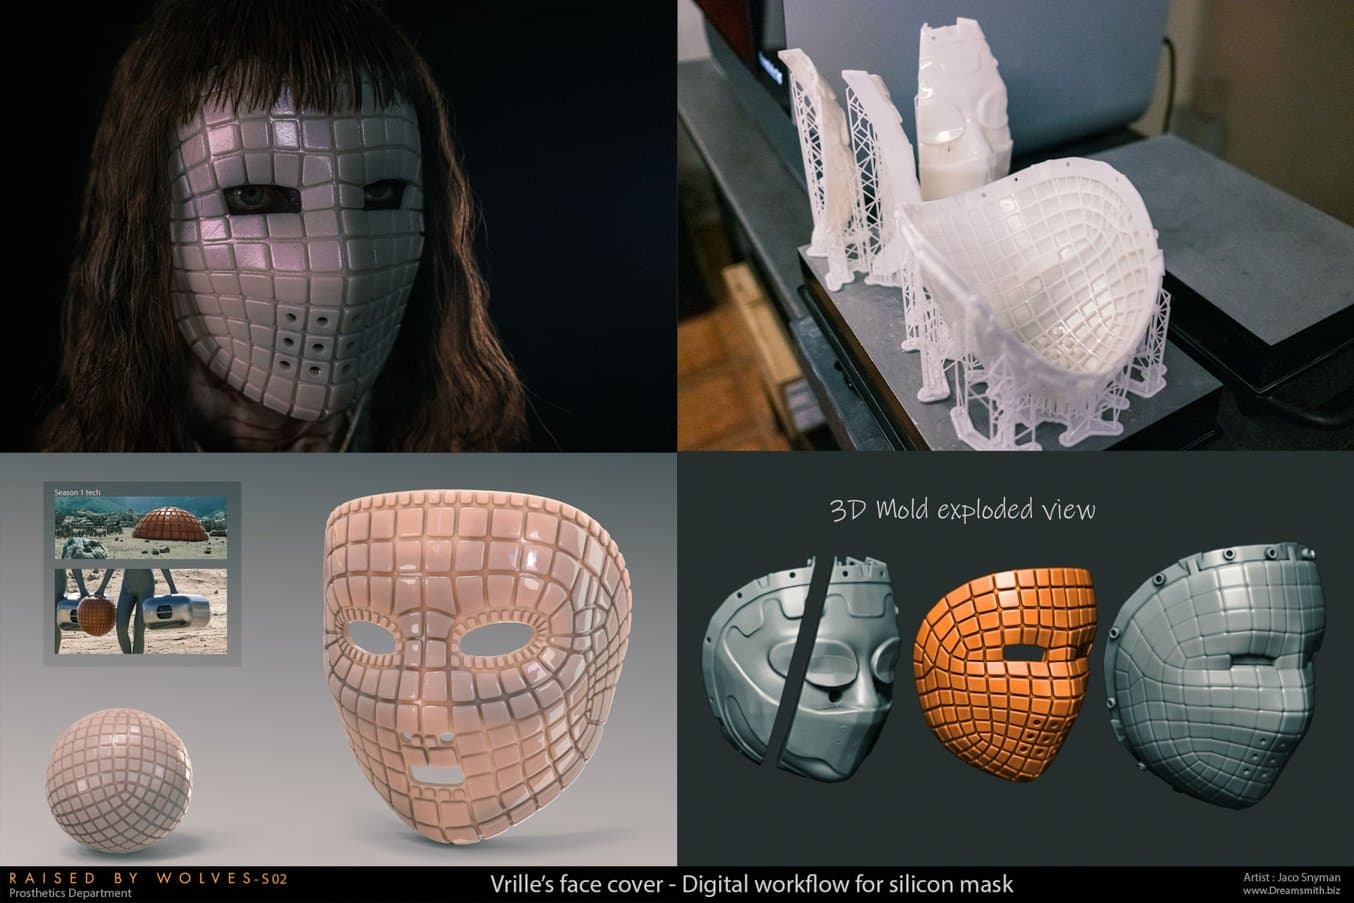
Designing and printing a complex shape and highly-detailed silicone mask with 3D printing.
Dreamsmith is an entertainment props and makeup effects firm based in South Africa. Their team has worked on designs for popular shows like Raised By Wolves, in which one particular effect needed was a silicone face mask incorporating a highly geometric exterior and an interior that conformed to the face of their actor.
Using the Form 3L, their team printed a mold that utilized optical scan data from the actor’s face for one interior surface, and a sharp geometric tile pattern for the other. While their design looks quite different from some of the product design examples in this report, the Dreamsmith team had many of the same material concerns, including ensuring compatibility of their mold material with skin-safe platinum cure silicone. They ultimately selected Formlabs Rigid 10K Resin for its high precision.
Eggshell Mold for Custom Medical Devices With Cosm
Cosm employs eggshell molds to produce custom silicone medical devices. Their thin-walled mold is printed with Biomed Amber Resin.
Cosm is a medical device company revolutionizing treatment for uterine prolapse, a common but often overlooked medical condition, with patient-specific silicone pessaries. The pessary is a non-surgical treatment approach in which a small support device is inserted below the uterus by a doctor. However standardized designs require fit by trial and error, and patients often give up on treatment before finding the proper fit.
The Cosm team’s approach utilizes data from a novel ultrasound technique to design a custom device tailored to a patient’s own anatomy. The Cosm team turned to Formlabs SLA printers for their silicone tooling, developing an eggshell-style conformal mold that is filled with medical-grade silicone and then cracked away to reveal the patient-specific silicone implant. The moldsare made from Biomed Amber Resin printed on the Form 3B.
Se lancer dans la création de dispositifs médicaux en silicone
Les applications du silicone sont diverses, allant du prototypage rapide, des tests bêta et des étapes de validation dans le développement de produits à la fabrication rentable de petites séries personnalisées de pièces finales. L'écosystème de Formlabs permet d'imprimer en 3D avec Silicone 40A Resin et d'imprimer des moules en silicone pour la fabrication de dispositifs médicaux, de prothèses adaptées aux patients, de composants d'audiologie, et pour la production de pièces à géométrie complexe qui sont difficiles à fabriquer avec des méthodes traditionnelles.
Pour consulter les guides complets concernant à la fois l'impression 3D de moules en silicone et l'impression silicone, téléchargez le livre blanc.