WHITEPAPER
Formlabs Logo

Messaggi di errore di Form Auto

Messaggi di errore di Form Auto

Se la stampante o Form Auto riscontra delle anomalie, sull'interfaccia touchscreen della stampante vengono visualizzati messaggi di errore e dettagli al riguardo. Per ulteriori informazioni sui messaggi di errore della stampante, consulta Messaggi di errore della Form 3/Form 3B.

Consiglio:

Per determinare se un errore è stato causato da Form Auto o dalla stampante, scollega Form Auto e verifica se l'errore si ripete.

Configura le impostazioni di Dashboard per ricevere avvisi via SMS o e-mail in merito agli errori elencati in questo articolo e ad altri eventi legati alla stampa.

Raccolta dei dati di diagnostica

Le stampanti Formlabs conservano i dati di diagnostica per fornire informazioni dettagliate sulla stampante. Quando vorrai contattare l'Assistenza Formlabs o un rivenditore autorizzato, allega i dati di diagnostica e altri dettagli e osservazioni rilevanti per velocizzare la risoluzione del problema.

Per accedere ai dati di diagnostica della stampante installata su Form Auto, ruota la stampante nella posizione dell'interfaccia touchscreen.

Per le stampanti connesse a Internet tramite una connessione Wi-Fi o Ethernet attiva:Tocca l'icona della chiave inglese in basso a sinistra nella schermata

  1. Home della stampante. Verrà visualizzata la schermata Settings (Impostazioni).
  2. Tocca System (Sistema). Comparirà la schermata System (Sistema).
  3. Tocca
  4. Upload Diagnostic Info (Carica informazioni di diagnostica). Comparirà un messaggio di conferma per avviare il caricamento delle informazioni di diagnostica.
  5. Tocca
  6. Next (Avanti) per avviare il caricamento. Quando il caricamento sarà stato completato, comparirà un messaggio di conferma.
  7. Se il display della stampante visualizza un messaggio di errore per indicare che non è in grado di caricare i dati, potrebbe non esserci spazio sufficiente per il caricamento. Elimina i lavori di stampa dalla coda, in modo da liberare memoria sufficiente per caricare i dati di diagnostica.
  8. Riavvia la stampante e riprova.

Per le stampanti non connesse a Internet:

  1. Apri PreForm.
  2. Clicca su Edit Job Setup (Modifica impostazione progetto). Si aprirà la finestra Job Setup (Impostazione progetto).
  3. Seleziona il nome di serie della stampante.
  4. Clicca su Download Logs (Scarica dati). Comparirà una finestra di conferma.Clicca su
  5. Browse
  6. (Sfoglia) per scaricare i dati di diagnostica in una cartella del tuo computer.
  7. Clicca su OK. I dati di diagnostica vengono salvati e visualizzati nel formato cifrato FORMLOGS.
  8. Allega il file quando contattati l'Assistenza Formlabs o un rivenditore autorizzato.
  9. Se PreForm visualizza il messaggio ERROR_BAD_STATE, potrebbe non esserci memoria sufficiente sulla stampante per il caricamento. Elimina i lavori di stampa dalla coda, in modo da liberare memoria sufficiente per caricare i dati.
  10. Riavvia la stampante e riprova.

Scopri di più sulle opzioni per le connessioni di rete e altre connessioni.

Stampante non allineata
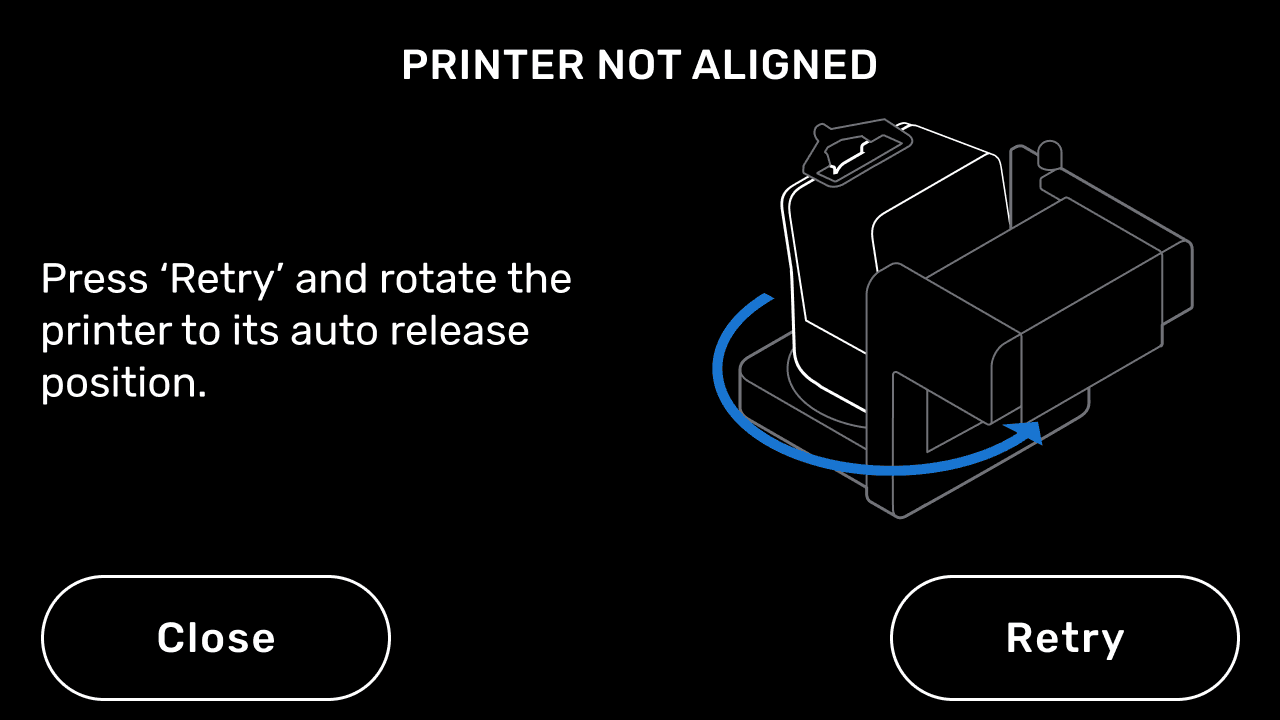
Messaggio di errore di Form Auto: Printer not aligned (Stampante non allineata)

Per il recupero automatico delle parti stampate, la stampante deve essere rivolta verso l'alloggiamento di rimozione delle parti. La stampante visualizza il messaggio di errore Printer not aligned (Stampante non allineata) se non è rivolta verso l'alloggiamento di rimozione delle parti al termine di una stampa. Ruota la stampante in posizione di stampa (rivolta verso l'alloggiamento di rimozione delle parti) e tocca Retry (Riprova).

Errore nella rimozione della parte

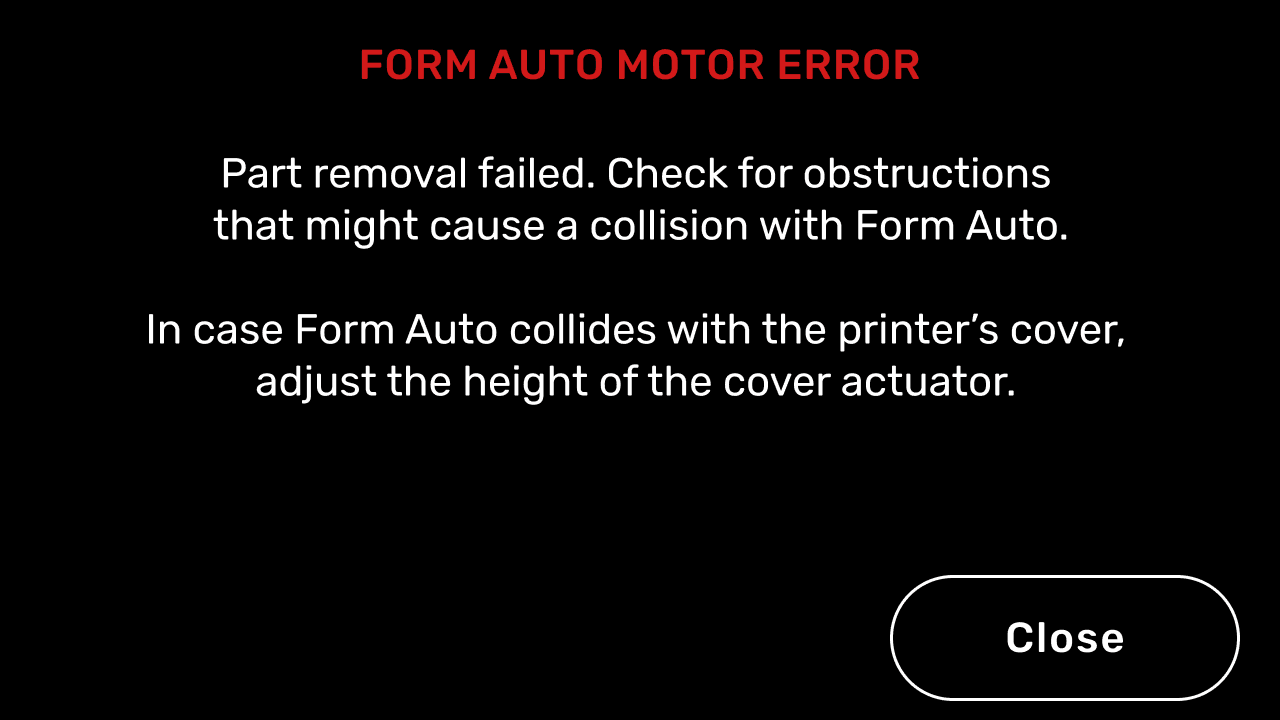
Messaggio di errore di Form Auto: Motor error (Errore del motore)
Messaggio di errore di Form Auto: Part removal failure (Errore nella rimozione della parte)

If the Form Auto cannot automatically release a printed part after multiple attempts, the printer displays the Part removal failure error message or the Motor error message.

Recupera manualmente le parti stampate, quindi reinserisci la piattaforma di stampa e continua a stampare. Per recuperare le parti stampate:

Errore di comunicazione

Messaggio di errore di Form Auto: Communication error (Errore di comunicazione)

Se la stampante non riesce a comunicare con Form Auto, viene visualizzato il messaggio di errore Communication error (Errore di comunicazione). Verifica che il cavo USB di Form Auto sia collegato correttamente alla porta USB sul retro della stampante. Per risolvere questo problema:

  1. ispeziona la porta USB della stampante e la spina USB di Form Auto per verificare la presenza di contaminazioni, come resina liquida. Con Form Auto e la stampante spente, pulisci la porta o il cavo USB con una piccola quantità di alcool isopropilico. Lascia asciugare completamente la porta o la spina prima di testarla.
  2. Prova a collegare un'altra stampante a Form Auto, se disponibile.
    • Se solo una stampante non riesce a comunicare con Form Auto, potrebbe essere necessario sostituire la porta USB. Contatta l'Assistenza Formlabs o il tuo rivenditore autorizzato.
    • Se nessuna stampante può comunicare con Form Auto, continua.
  3. Rimuovi la copertura posteriore del sistema di binari di Form Auto per accedere alla scheda madre. Segui le istruzioni della guida Sostituzione della scheda madre della Form Auto [EN] [DE] [ES] [FR] [IT] [JA] [ZH].
  4. Scollega il cavo USB dal lato sinistro della scheda madre.
  5. Collega un altro cavo USB-A/USB-B, come quello in dotazione con le stampanti della generazione Form 3, direttamente alla stampante e alla scheda madre di Form Auto.
    • Se la stampante è ora in grado di comunicare con Form Auto, fai passare il cavo attraverso la base di Form Auto per sostituire il cavo USB originale.
    • Se la stampante non riesce ancora a comunicare con Form Auto, è possibile che la scheda madre di Form Auto sia danneggiata o difettosa. Contatta l'Assistenza Formlabs o il tuo rivenditore autorizzato.

Errore del motore

Messaggio di errore di Form Auto: Motor error (Errore del motore)

The printer displays a generic Motor error message if the Form Auto motors cannot move as expected. Check for obstructions around the printer and Form Auto that interfere with the movement of the cover or part removal mechanism. If the part removal mechanism interferes with the printer cover, adjust the cover actuator.

The printer may also display a more specific motor-related error, such as Error 357 (which indicates a general motor movement failure) or Error 358 (which indicates that a specific motor failed to reach its home position). These errors also have subcodes: Error 357/1 and 358/1 are related to the part removal mechanism, while Error 357/2 and 358/2 are related to the part release gantry. To resolve these errors:

Error 357

A generic Error 357 is not usually indicative of a more pervasive issue and can often be fixed by resetting and recalibrating the machine. This error and its subcodes occur when the printer sends a command to a motor and the encoder on the motor doesn't detect the expected movement after a few seconds.

  1. Power cycle the Form Auto using the power switch on the unit.
  2. Recalibrate the Form Auto. On the printer’s touchscreen, tap Settings > Form Auto > Calibrate Form Auto and follow the on-screen instructions.
  3. When the calibration is complete, run a test harvest. On the printer’s touchscreen, tap Settings > Form Auto > Run Print Removal Cycle.
  4. If the issue recurs, record a video of the print removal cycle showing the error and contact Formlabs Support or your authorized reseller. Include the video you recorded.

Error 357/1

Error 357/1 indicates an issue with the motor that closes and opens the part removal mechanism or its encoder.
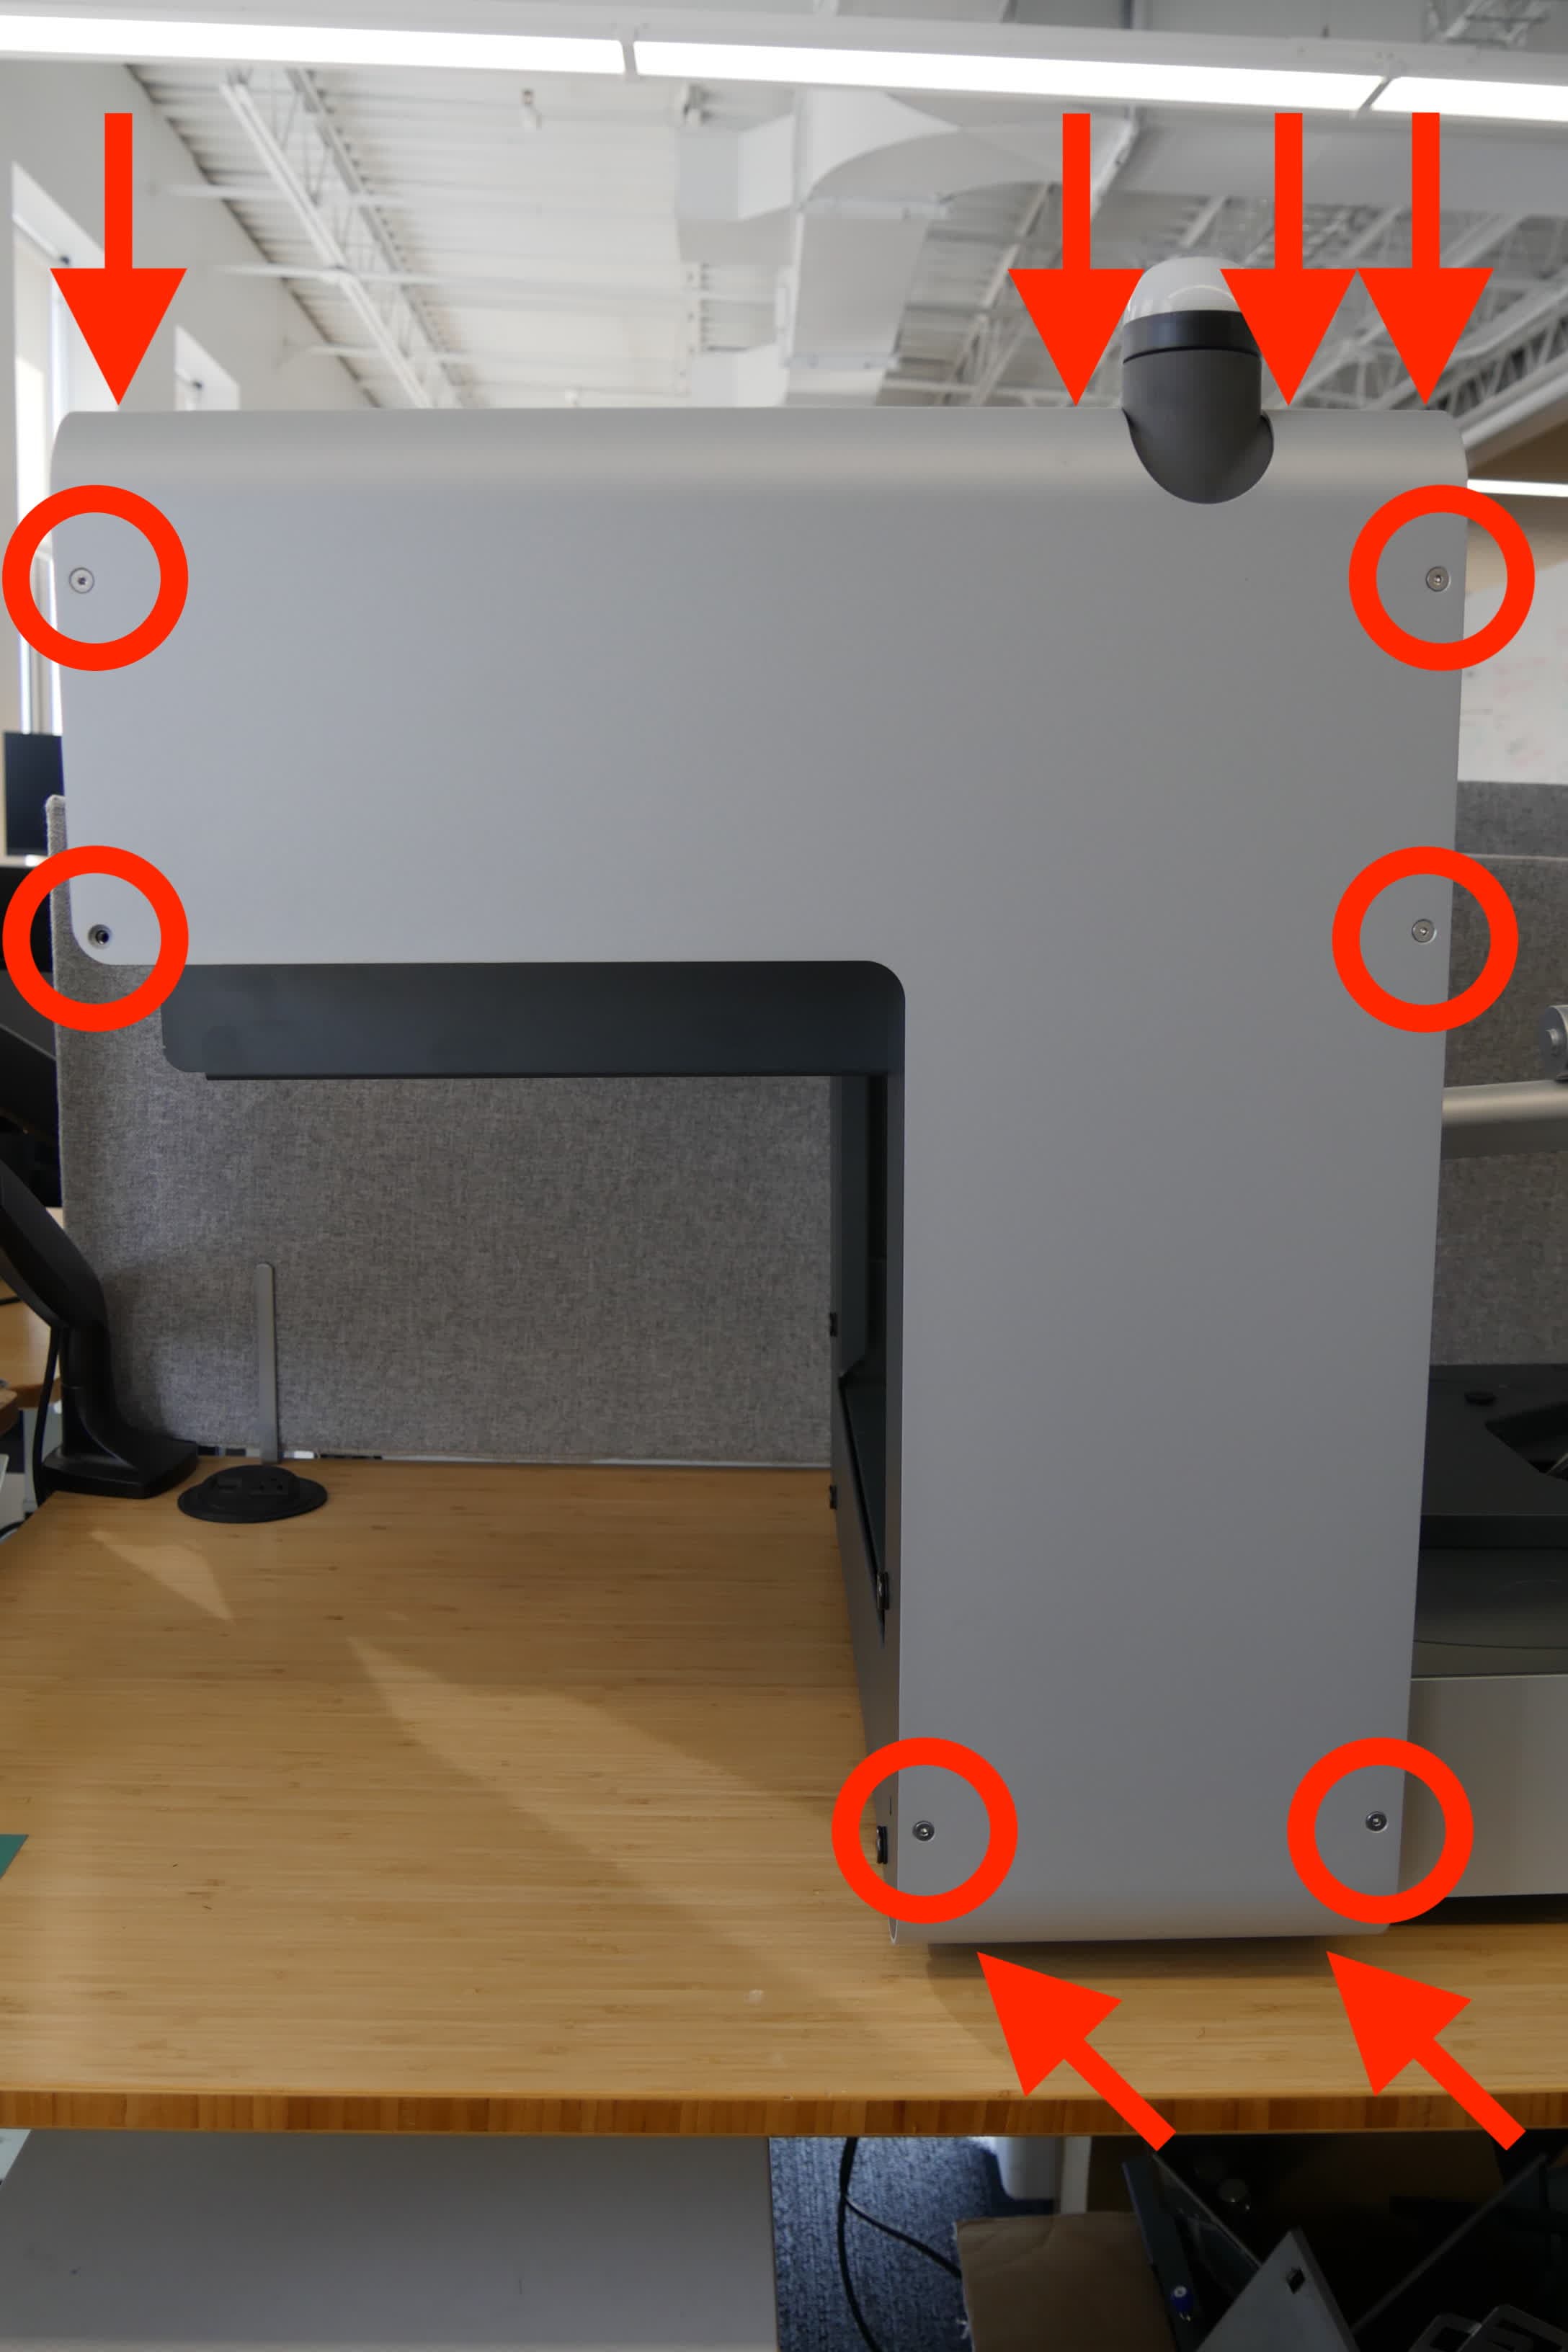
  1. Run a test harvest. On the printer’s touchscreen, tap Settings > Form Auto > Run Print Removal Cycle. Check if the part removal mechanism attempts to close or open at all.
    1. If the part removal mechanism does move and the error appears while or after it squeezes the build platform part release paddles, there may be an issue with the motor encoder or limit switch. Power off and unplug the machine, remove the rear shell (on the same side as the power switch), and reseat both ends of the encoder and limit switch cables.
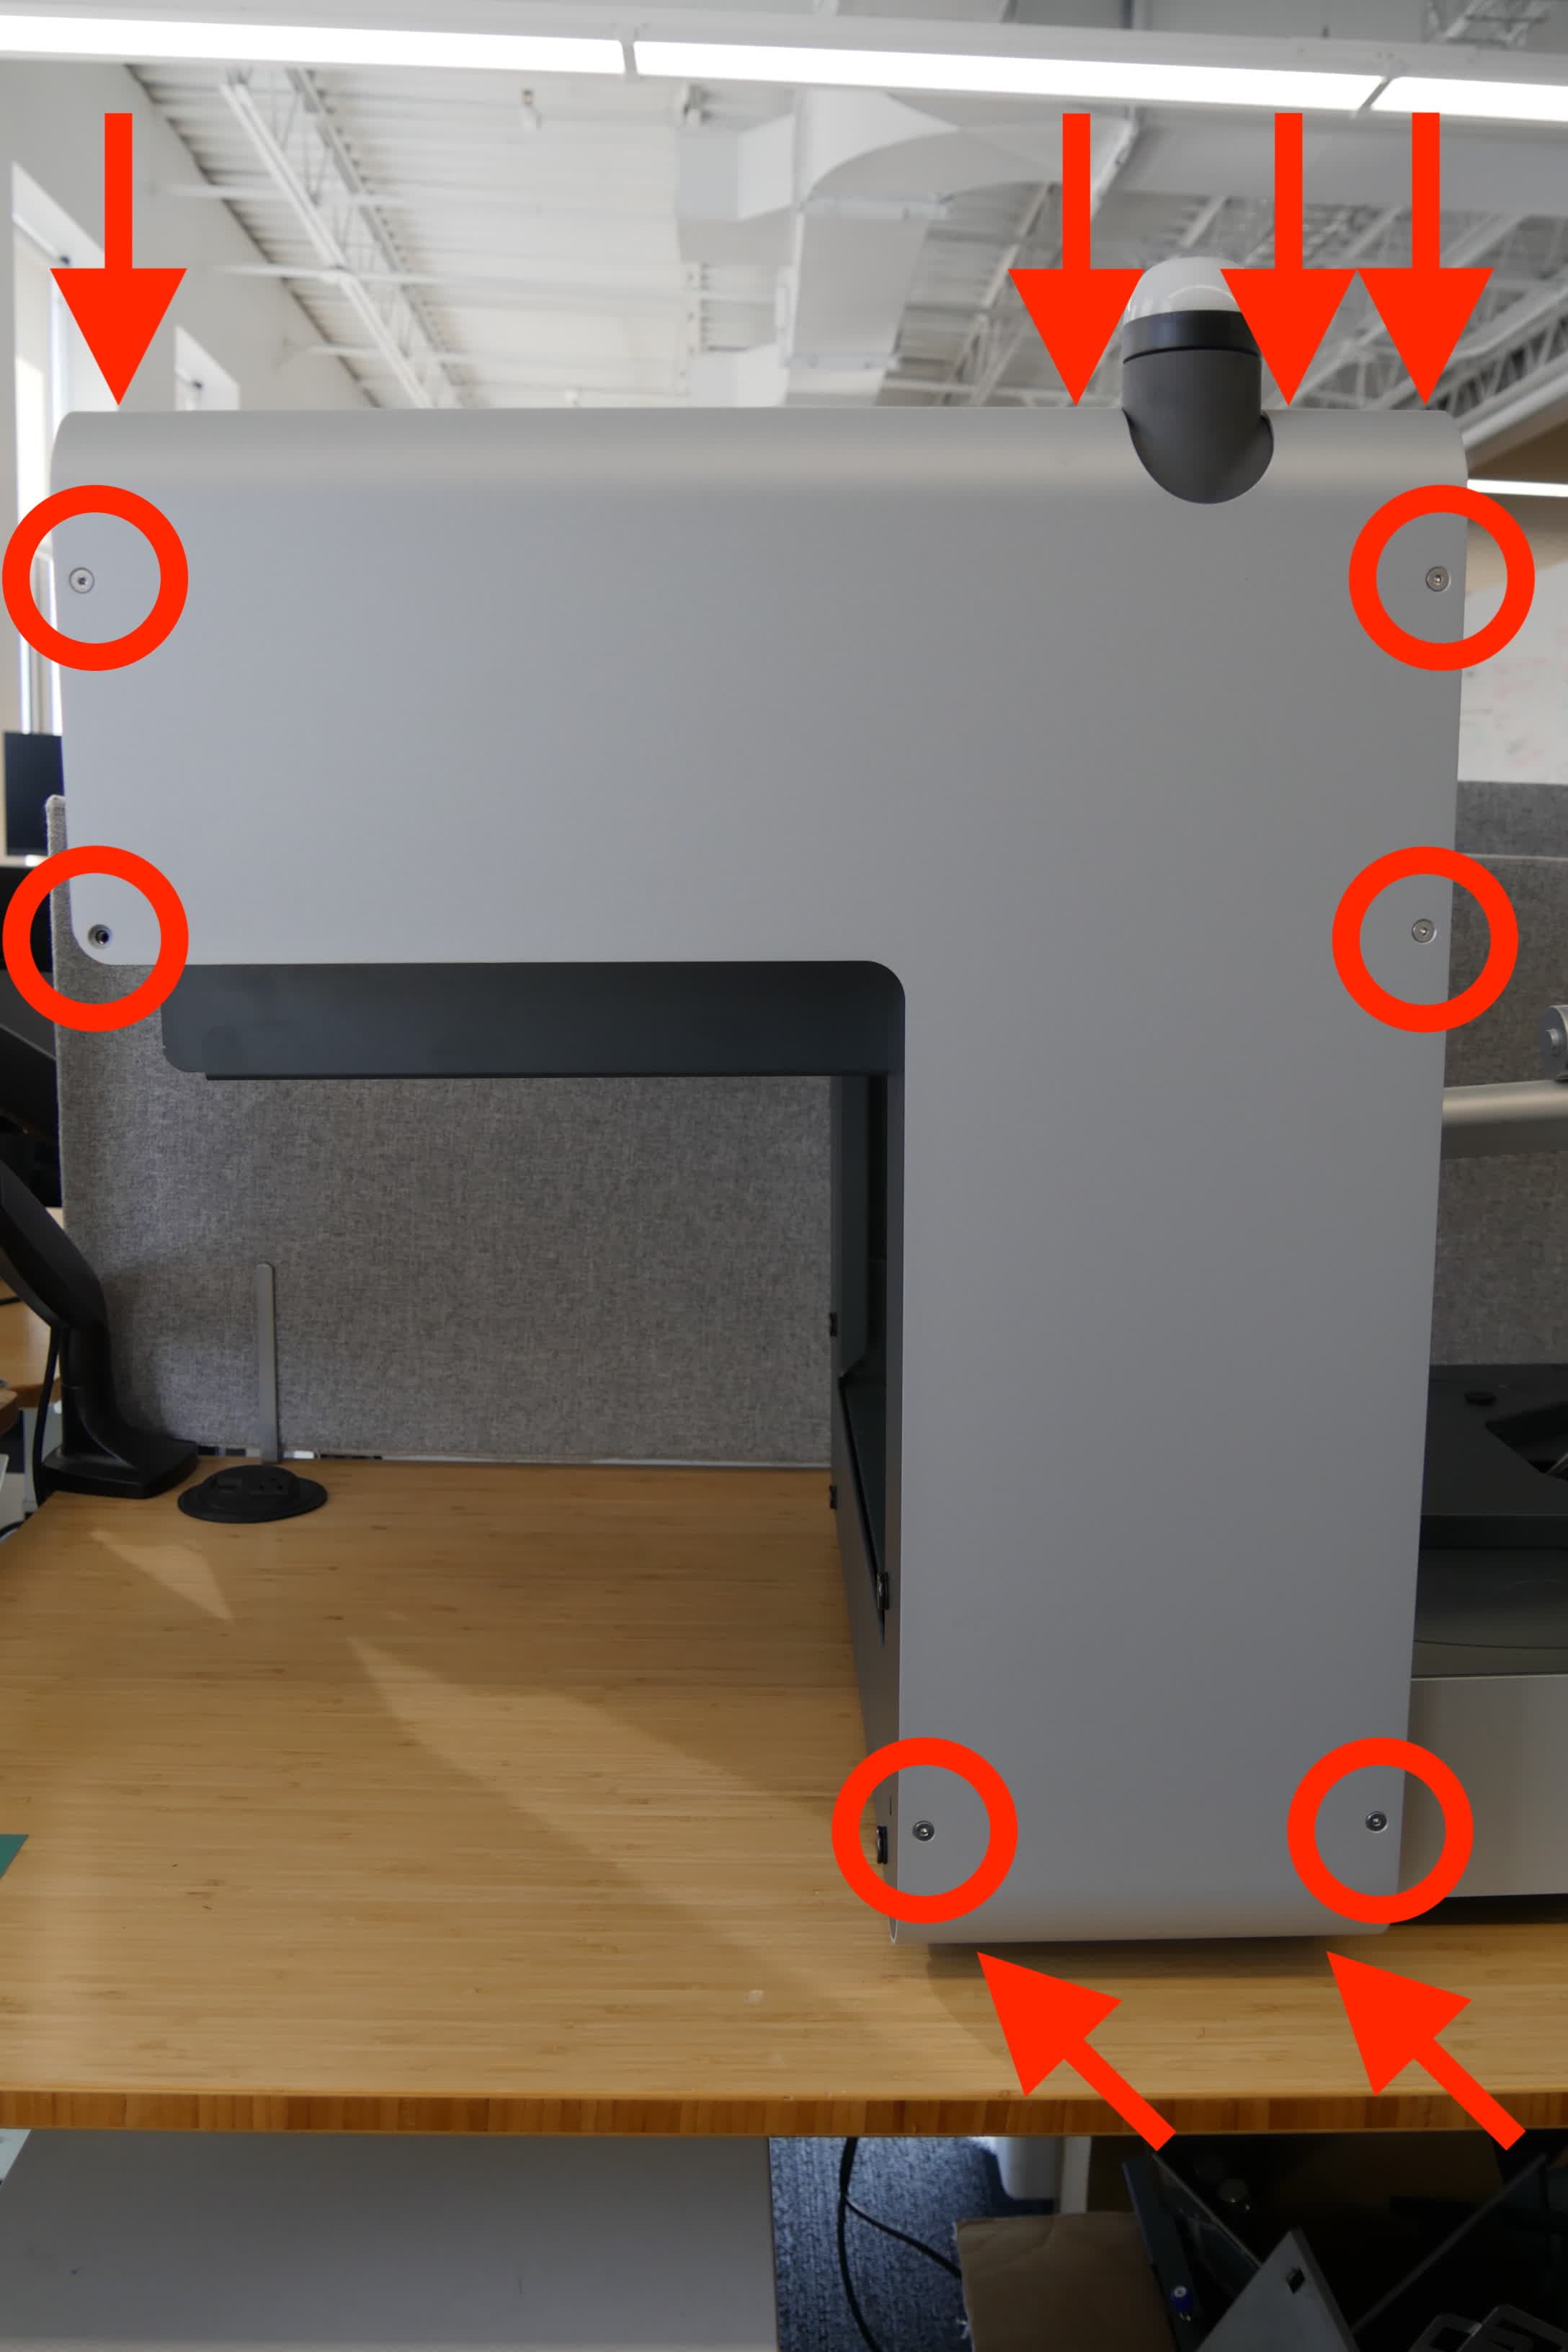
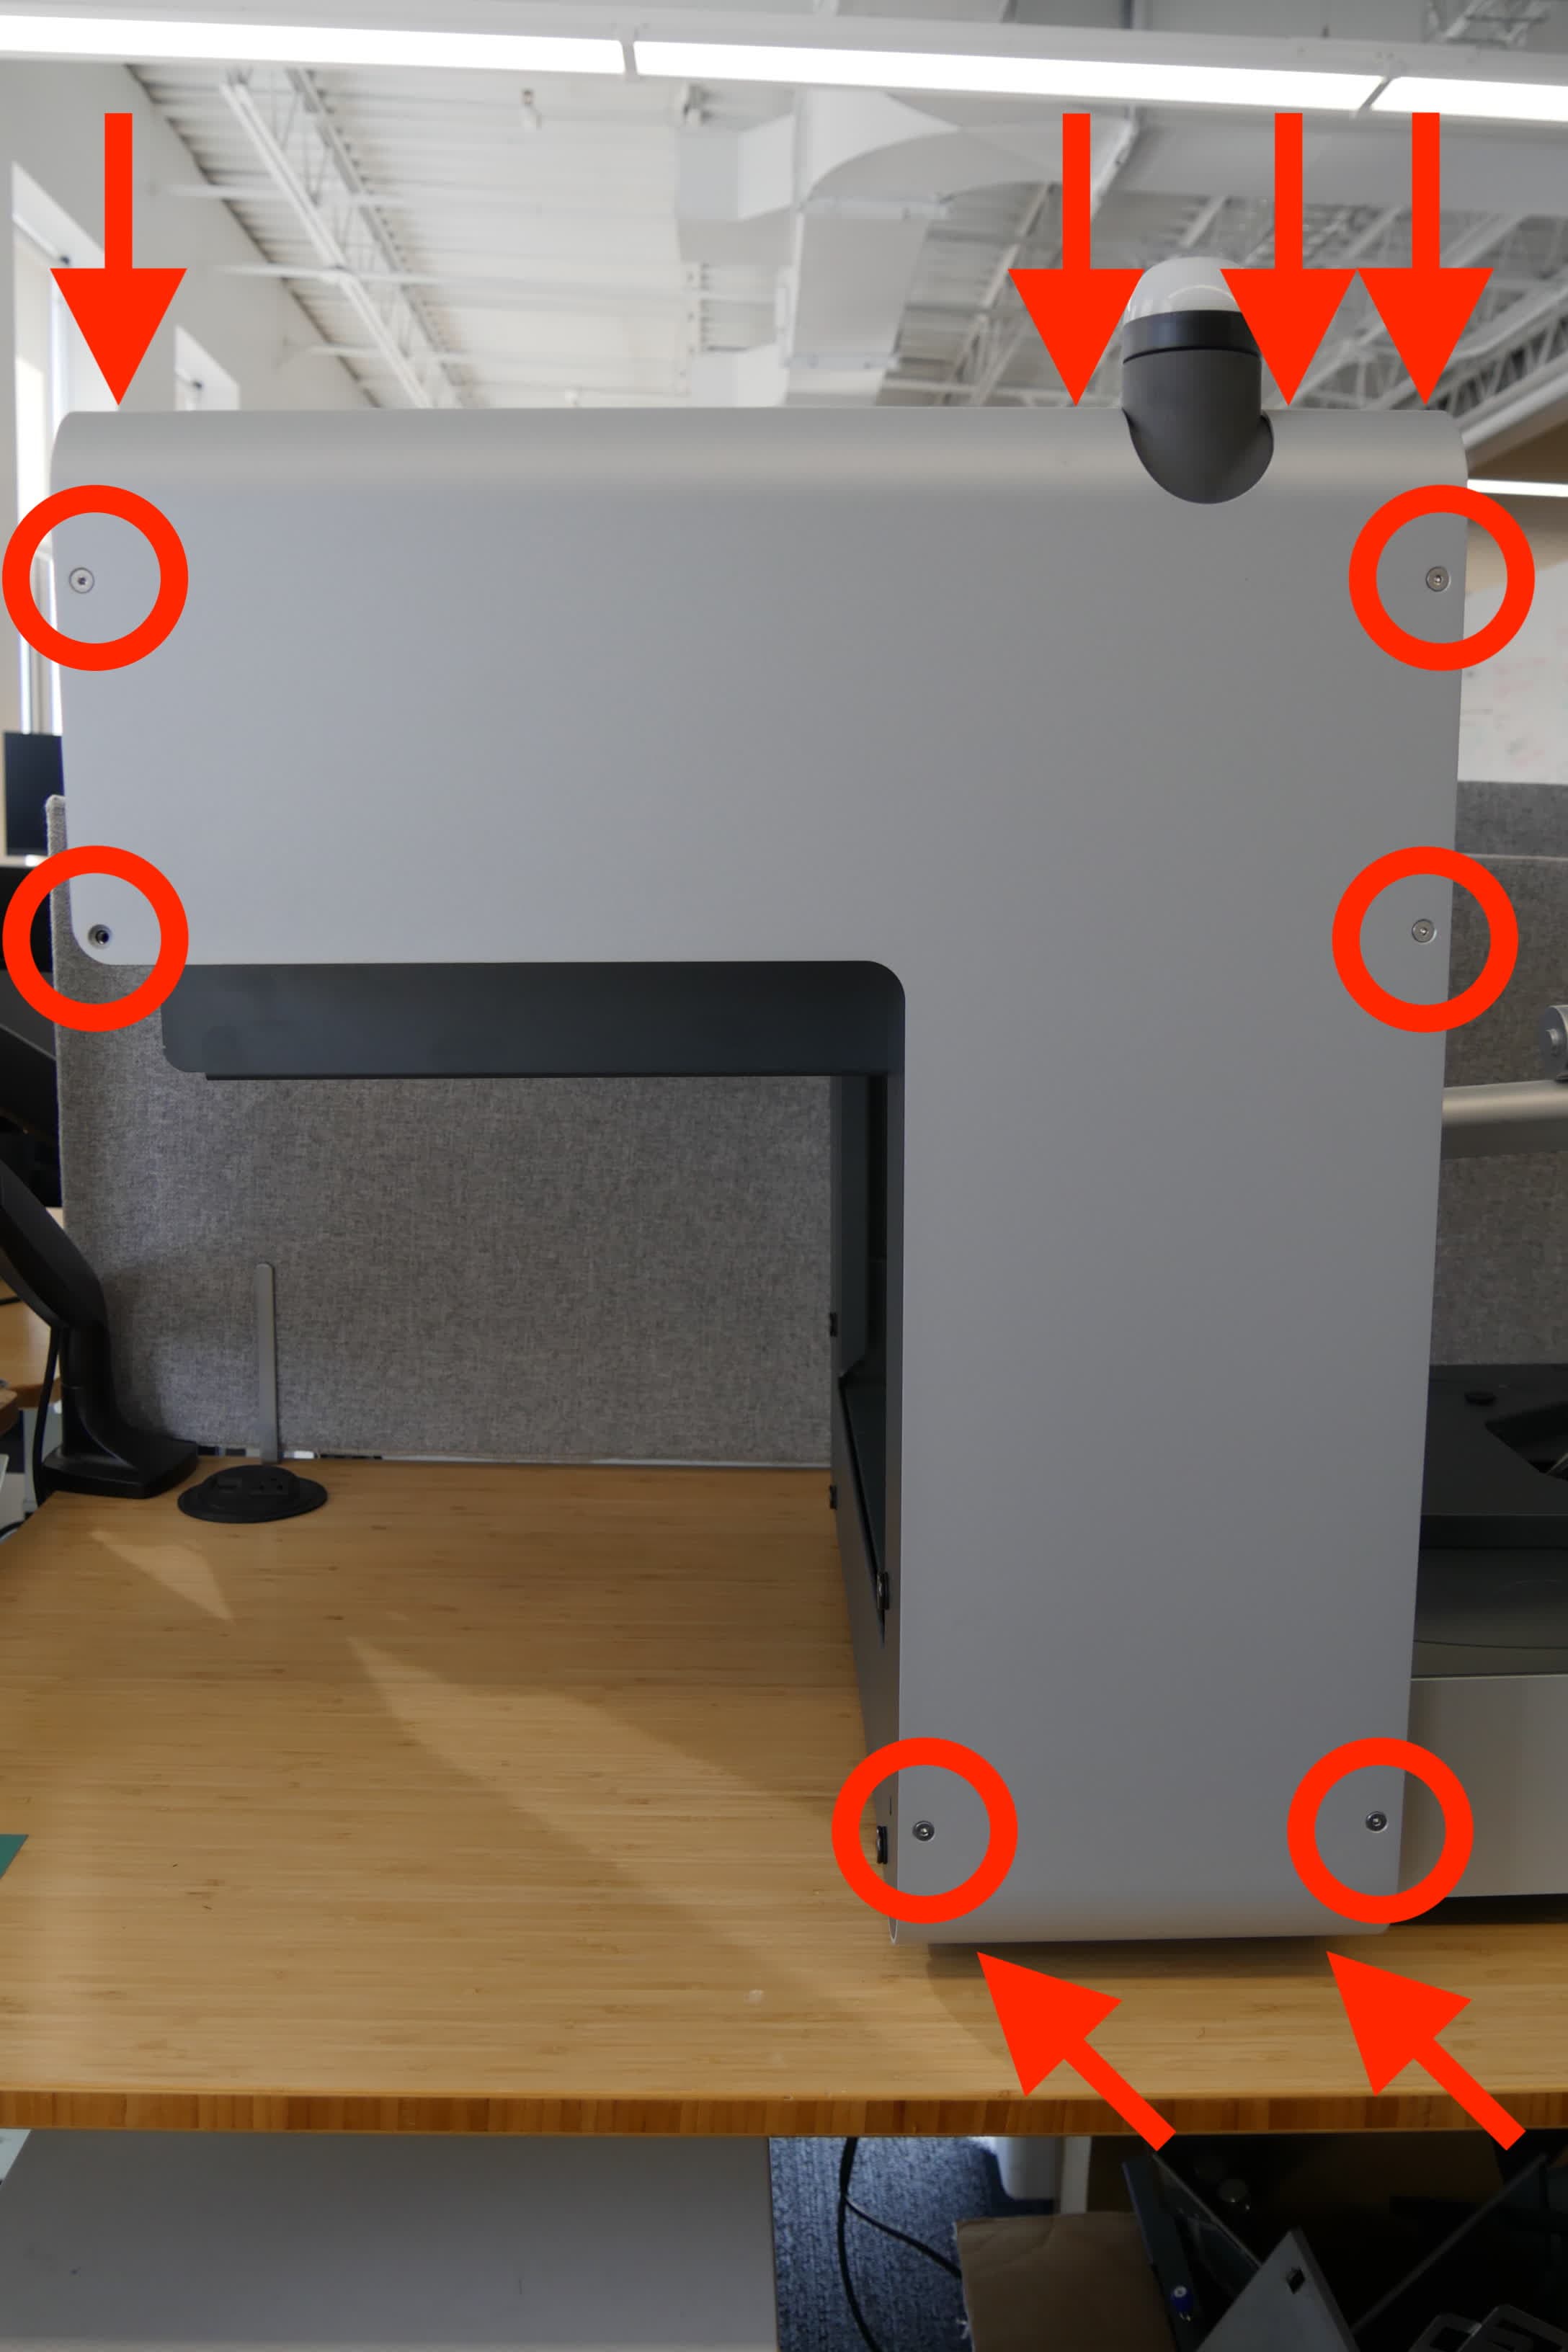
Form Auto rear shell screws
Form Auto print removal mechanism motor
    1. If the part removal mechanism stalls in an unusual place, power off and unplug the Form Auto and move the mechanism by hand to search for a physical obstruction. Replace the part removal mechanism if necessary.
    2. If the mechanism does not move, then the motor is likely the cause of the error. Power off and unplug the machine, remove the rear shell (on the same side as the power switch), and reseat both ends of the motor cable.
Form Auto rear shell screws
Form Auto print removal mechanism motor
  1. If the issue recurs, record a video of the print removal cycle showing the error and contact Formlabs Support or your authorized reseller. Include the video you recorded.

Error 357/2

Error 357/2 indicates an issue with the motor that moves the part removal mechanism towards and away from the printer (also known as the gantry motor) or its encoder.
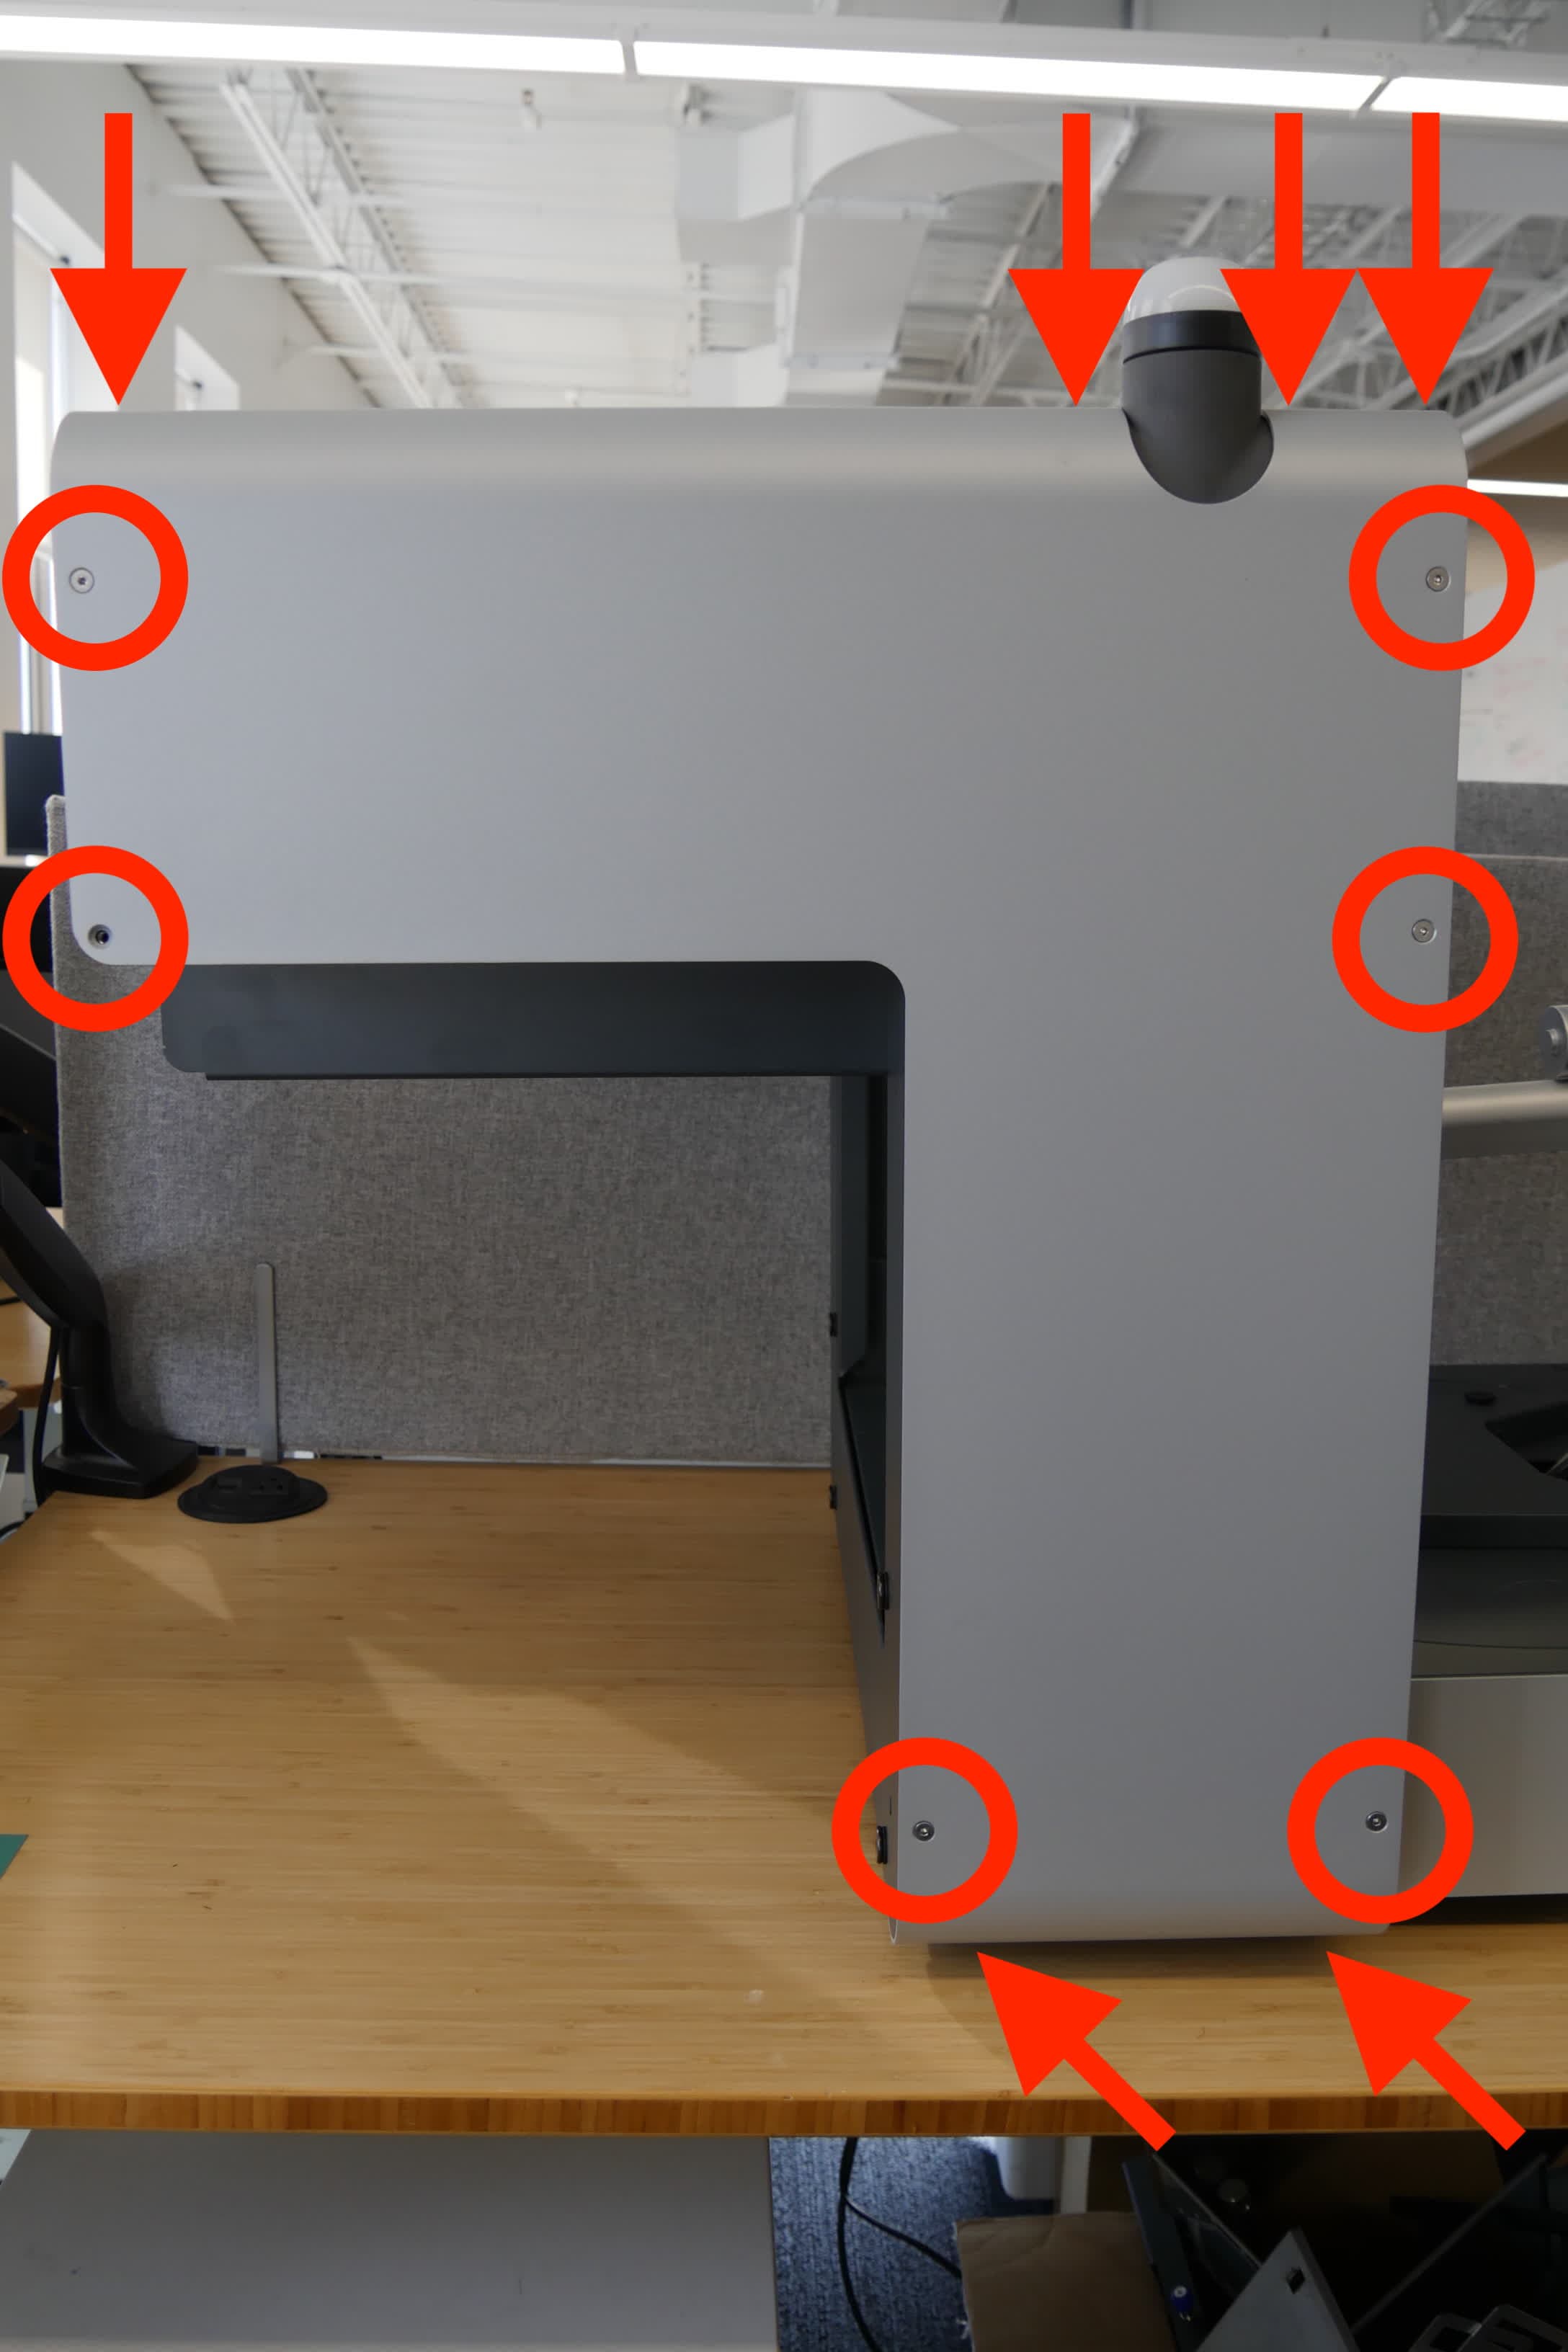
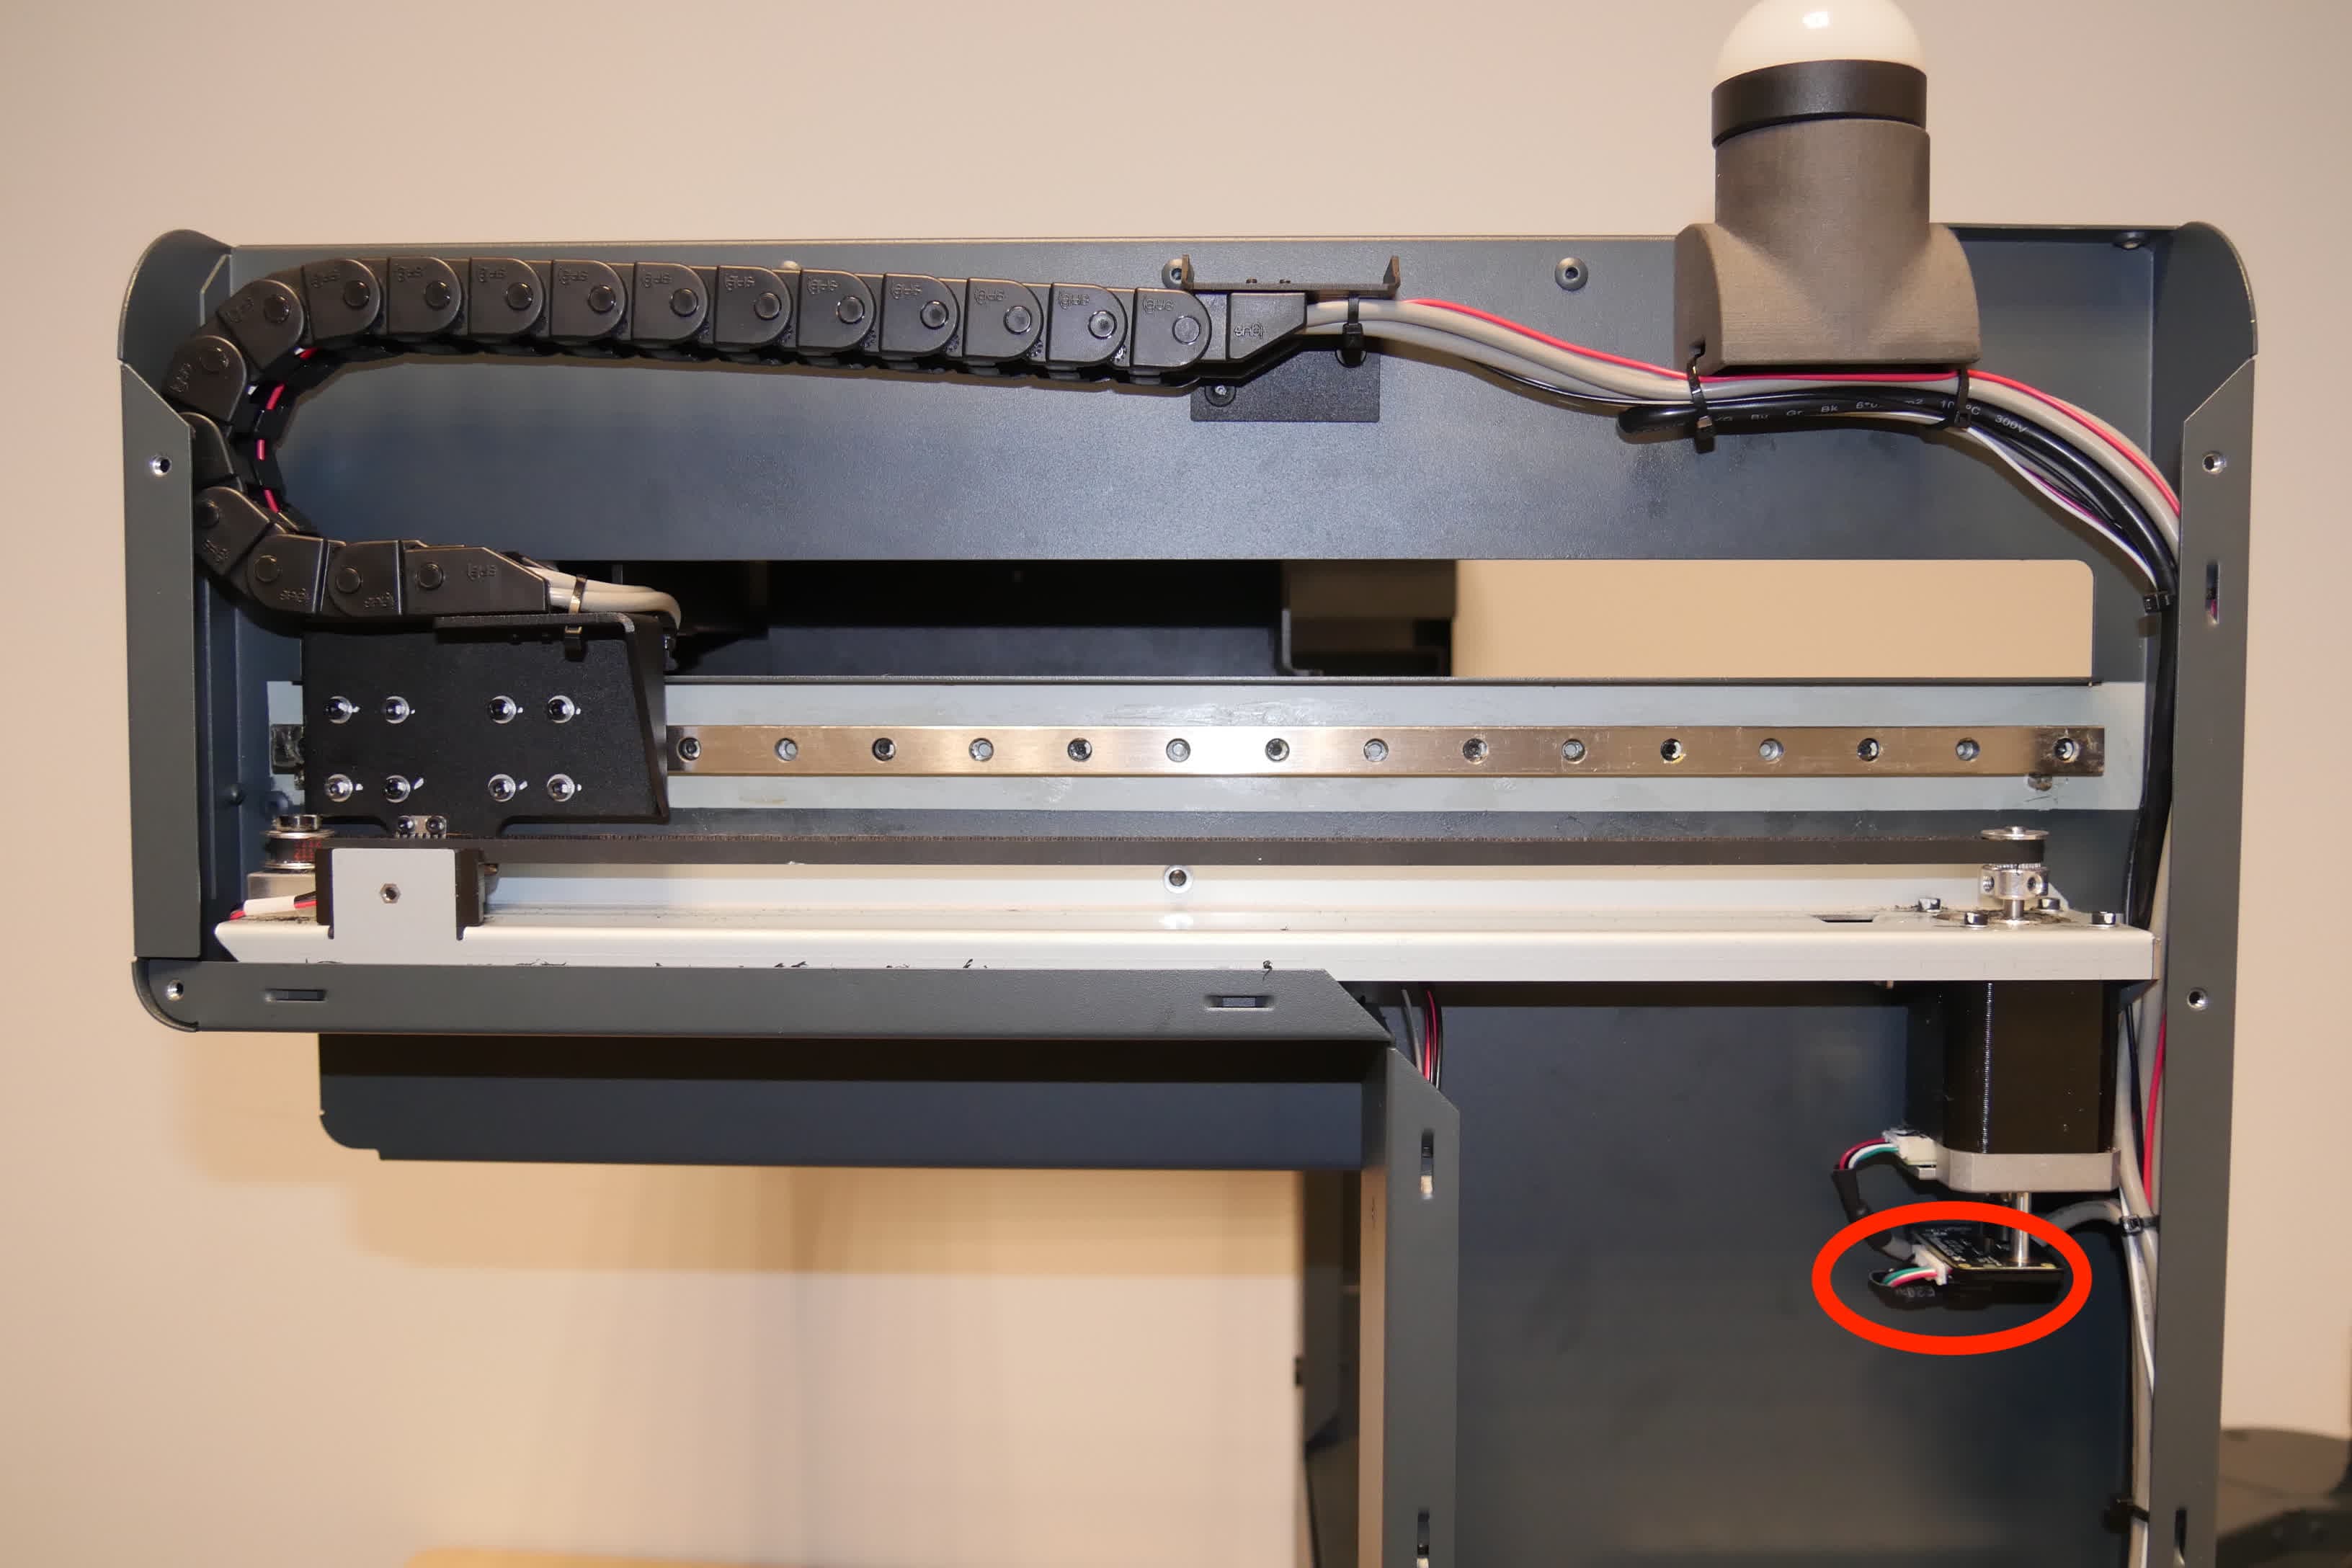
  1. Run a test harvest. On the printer’s touchscreen, tap Settings > Form Auto > Run Print Removal Cycle. Check if the gantry moves towards the printer at all during the cycle.
  2. If the gantry moves, the gantry motor encoder may be malfunctioning. Power off and unplug the machine, remove the rear shell (on the same side as the power switch), and reseat both ends of the encoder cable.
Form Auto rear shell screws
Form Auto gantry motor encoder
    1. If the gantry does not move, the motor may be malfunctioning. Power off and unplug the machine, remove the rear shell (on the same side as the power switch), and reseat both ends of the motor cable.
Form Auto rear shell screws
Form Auto gantry motor
  1. If there's any obvious physical issue with the gantry moving (e.g., a grinding noise, motor stalling noise, excessive resistance when moving the gantry by hand while the machine is powered off, etc.), the mechanism may be misaligned or the belt that drives the gantry may be damaged. Replace the gantry drive assembly if necessary.
  2. If the test harvest completes normally but the printer shows this error, contact Formlabs Support or your authorized reseller.

Error 358/1

Error 358/1 indicates that the motor that closes and opens the part removal mechanism failed to reach its home position.

  1. Check for obstructions around the printer and Form Auto.
  2. Re-rack the part removal mechanism by pulling the arms to the closed position, then reopening them.
  3. Inspect the part removal mechanism pulley and service it if it is slipping. Follow the instructions in the guide Proactively servicing the Form Auto part removal mechanism pulley [EN] [DE] [ES] [FR] [IT] [JA] [ZH].
  4. If the pulley axle is damaged, replace the part removal mechanism. Follow the instructions in the guide Replacing the Form Auto part removal mechanism [EN] [DE] [ES] [FR] [IT] [JA] [ZH]. Replacement part removal mechanisms are available on the Formlabs Store.

Error 358/2

Error 358/2 indicates that the motor that moves the part removal mechanism towards and away from the printer failed to reach its home position.

  1. Check for obstructions around the printer and Form Auto.
  2. Re-rack the part release gantry by pulling it fully towards the printer, then pushing it back to its home position.
  3. Inspect the gantry pulley and service it if it is slipping. Follow the instructions in the guide Repairing a slipping gantry pulley [EN] [DE] [ES] [FR] [IT] [JA] [ZH].
  4. If the pulley axle is damaged, replace the part release gantry. Follow the instructions in the guide Replacing the Form Auto gantry drive assembly [EN] [DE] [ES] [FR] [IT] [JA] [ZH]. Replacement part removal mechanisms are available on the Formlabs Store.

If you see any of these error messages repeatedly, contact Formlabs Support or your authorized reseller.

Form Auto non calibrata
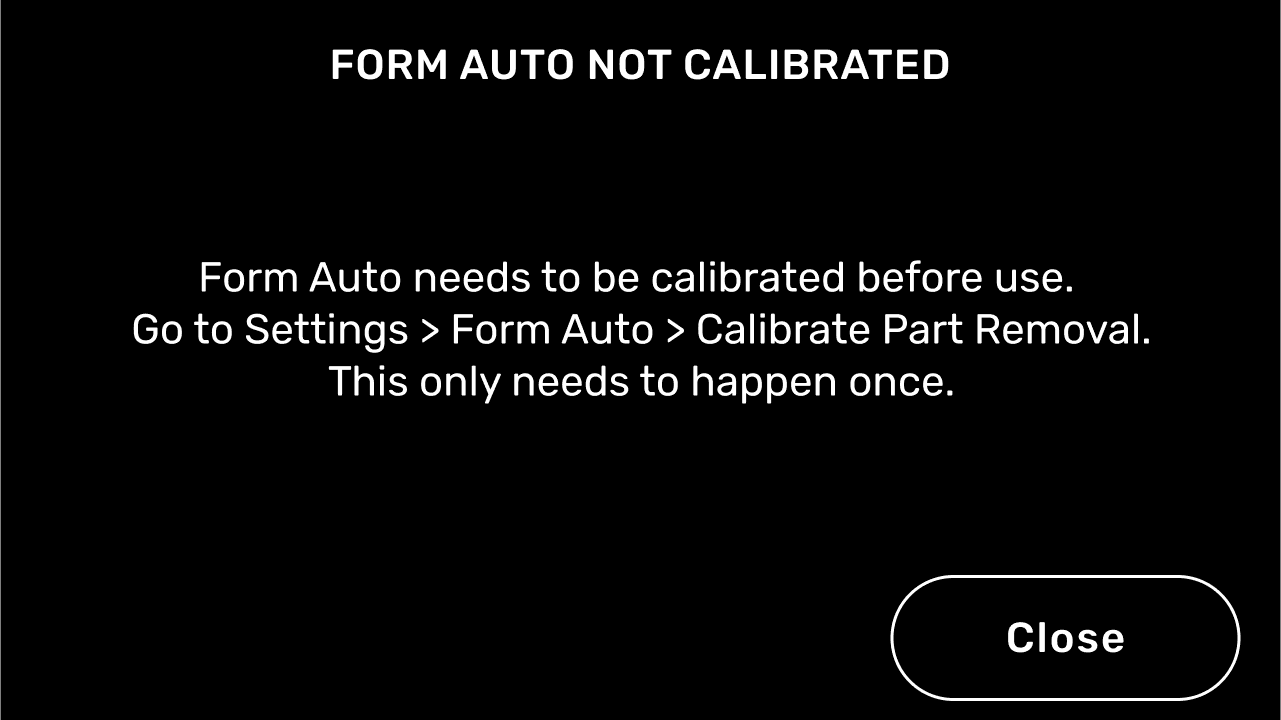
Messaggio di errore di Form Auto: Form Auto not calibrated (Form Auto non calibrata)

Form Auto deve essere livellata e calibrata prima di avviare una stampa. La routine di calibrazione rileva l'esatta posizione della Build Platform 2 rispetto all'alloggiamento di rimozione delle parti.

Tocca l'icona della chiave inglese nella schermata Home.
  1. Verrà visualizzata la schermata Settings (Impostazioni).
  2. Tocca Form Auto. Comparirà la schermata Form Auto.
  3. Tocca
  4. Calibra rimozione parti. Comparirà la schermata Calibration (Calibrazione). Non avviare il processo di calibrazione senza prima aver inserito una Build Platform 2 nella stampante.
  5. Ruota la stampante in posizione di stampa.
  6. Tocca
  7. Calibrate (Calibra) per avviare il processo di calibrazione. Può essere sufficiente calibrare Form Auto solo durante la configurazione iniziale.