WHITEPAPER
Formlabs Logo

Unboxing and setting up the Fuse 1+ 30W

Unboxing and setting up the Fuse 1+ 30W

Prior to unboxing and installing the printer, prepare a suitable workspace for the Fuse 1+ and Fuse Sift, ensure you have sufficient space to store consumables, and purchase additional supplies so you are ready to process powder when your Fuse 1+ arrives.

Follow Formlabs instructions to unbox, connect cables, level the printer and turn on your Fuse 1+. Connect the machine to a network to print remotely, manage your printer, and receive notifications about print events.

Ricezione

The standard Fuse 1+ package ships on a pallet and contains the Fuse 1+ printer, stand, build chamber, and powder cartridge. Additional powder cartridges and accessory boxes ship separately from the printer's packaging.

Note:

  • Depending on the package you purchase, the accessories may ship together on a pallet. If you are in a building with palletized deliveries, ensure you have access to the loading dock.
  • As of June 2025, Fuse 1 generation printers are packaged with the build chamber installed but unplugged within the print enclosure.
 PrinterStandBuild chamber (if shipped separately)Powder cartridge
Shipping dimensions77 × 83 × 150 cm
30 × 33 × 59 in
63.5 × 66 × 22.9 cm
25 × 26 × 9 in
41 × 48 × 64 cm
16 × 19 × 25 in
41 × 21 × 27 cm
16 × 8 × 11 in
Shipping weightPrinter without build chamber:
120 kg
264.6 lb

Printer with build chamber:
131 kg
288.8 lb
24 kg
53 lb
13.5 kg
29.7 lb
2.3 kg
5 lb
Product weightPrinter without build chamber:
114 kg
251.3 lb

Printer with build chamber:
125 kg
275.6 kg
23.9 kg
52.6 lb
11 kg
24.3 lb
1.8 kg
4 lb

Disimballaggio

The custom packaging the printer arrives in is specially designed to protect the machine during shipping. During unboxing, inspect the product for any damage or missing items. In the case of damage or missing items, contact Formlabs Support or a certified service provider.

Attenzione:

Per rimuovere l’apparecchio dal suo imballaggio sono necessarie almeno due persone abituate a sollevare oggetti pesanti e di grandi dimensioni.

1° passaggio: posizionamento dell'imballaggio

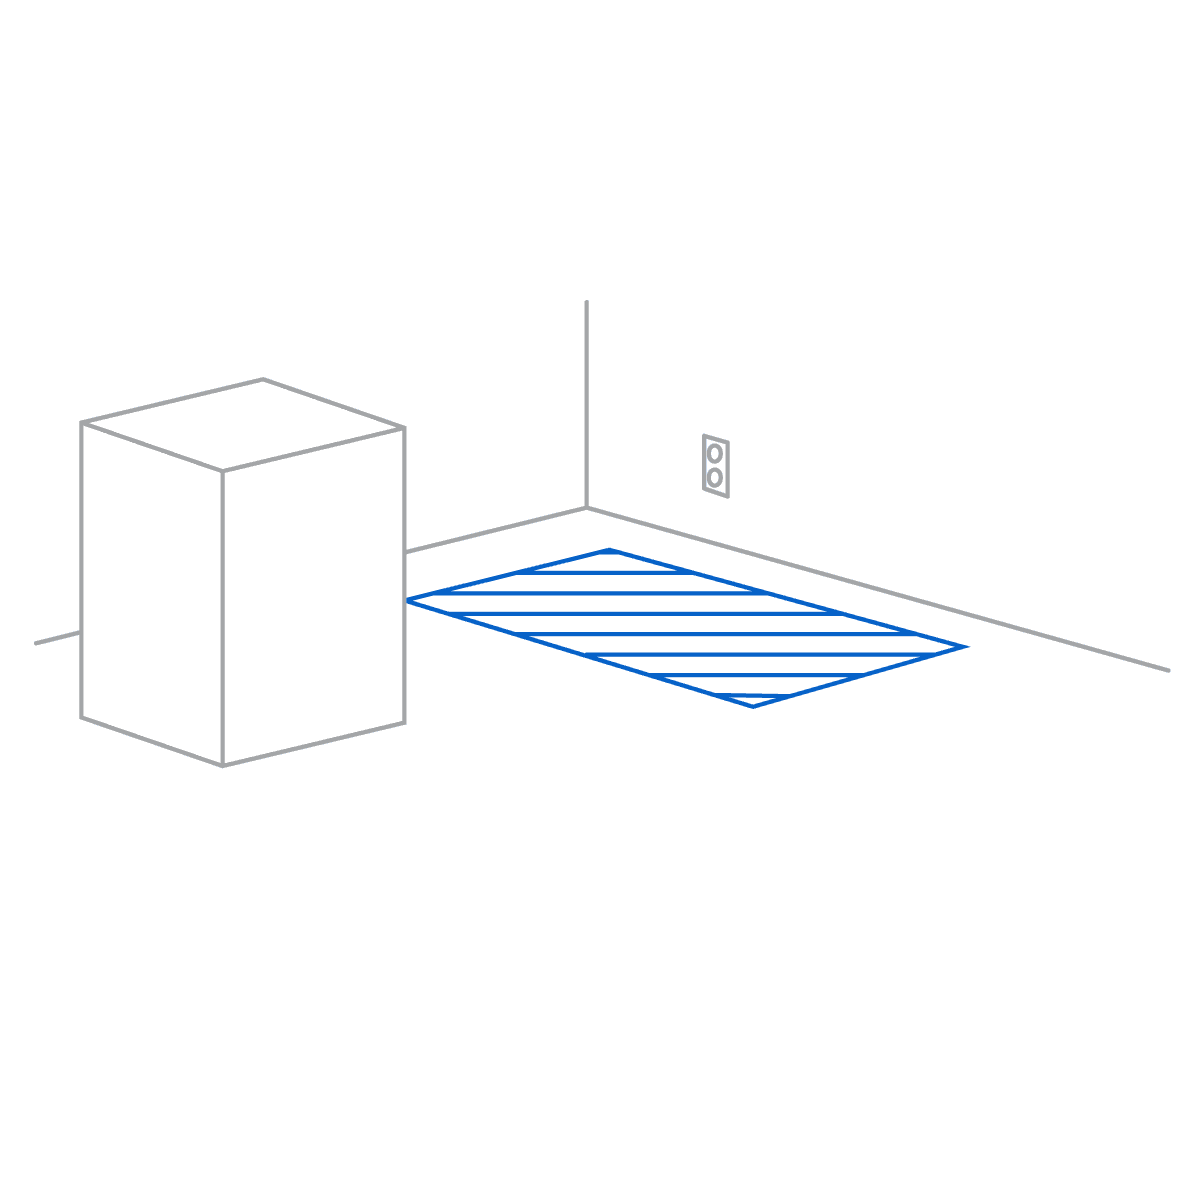
Posiziona l'imballaggio vicino alla postazione scelta, considerando che lo spazio deve essere sufficiente al movimento di due persone che spostino l’apparecchio. Sistema l'imballaggio in posizione verticale e assicurati che sia in piano.

L'imballaggio della stampante è posizionato vicino alla postazione designata.

2° passaggio: assemblaggio e posizionamento del supporto

Individua la scatola che contiene il supporto e assemblalo secondo le istruzioni incluse. Controlla che il supporto sia in piano prima di estrarre la stampante dal suo imballaggio.

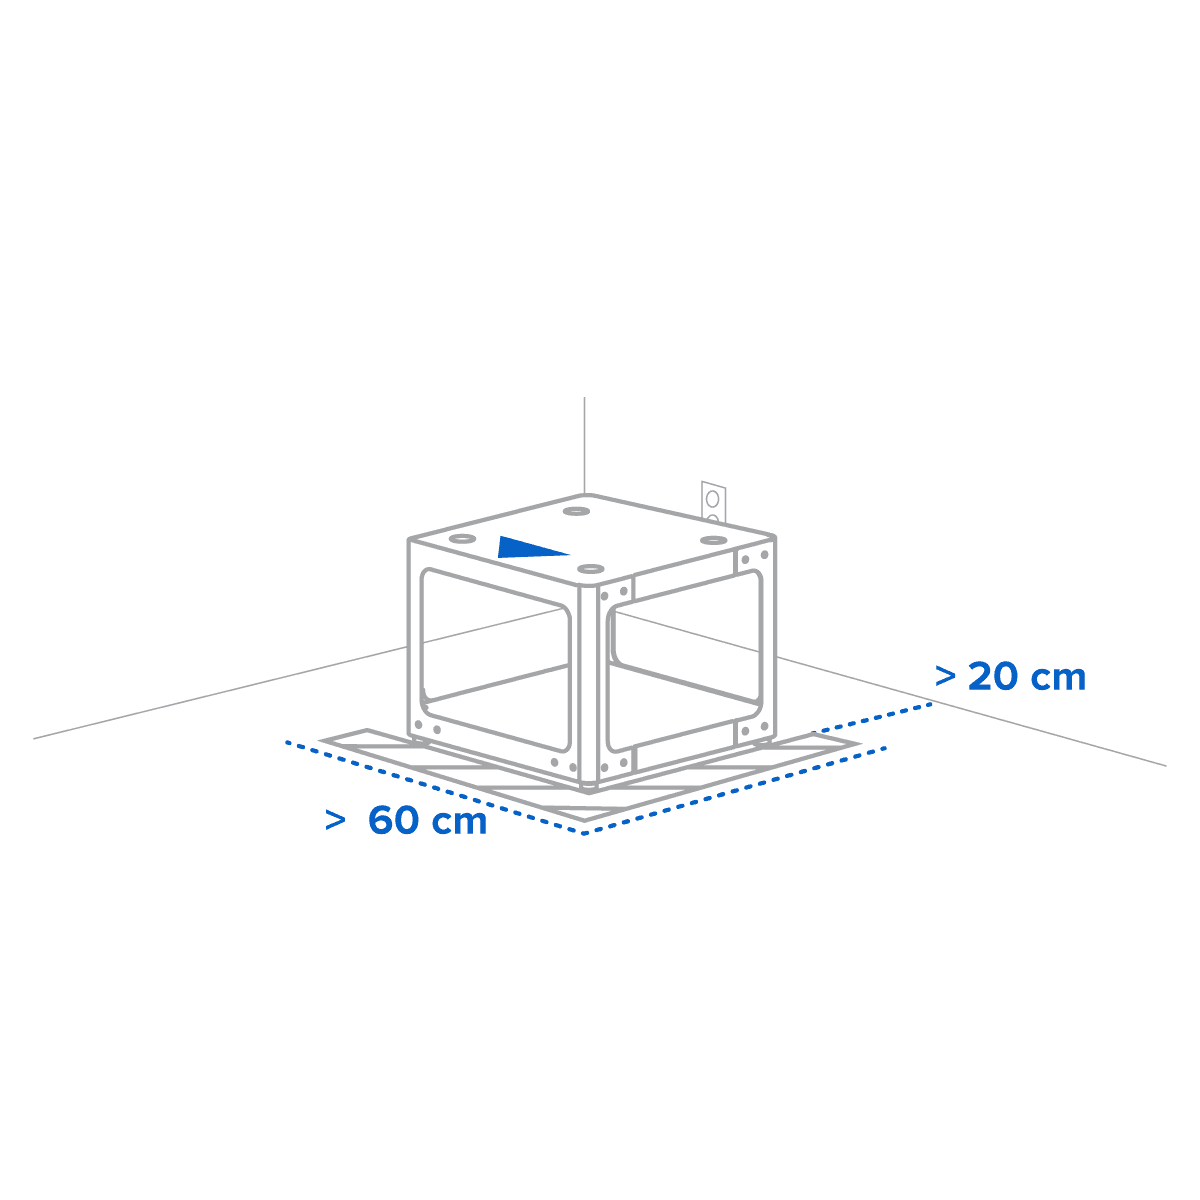
Posiziona il supporto assemblato nella postazione scelta per la stampante, con la parte anteriore rivolta verso di te. Una freccia sulle istruzioni del supporto indica qual è la parte anteriore.

Il supporto è posizionato nella postazione scelta con la parte anteriore rivolta verso l'operatore.

Step 3: Open the box

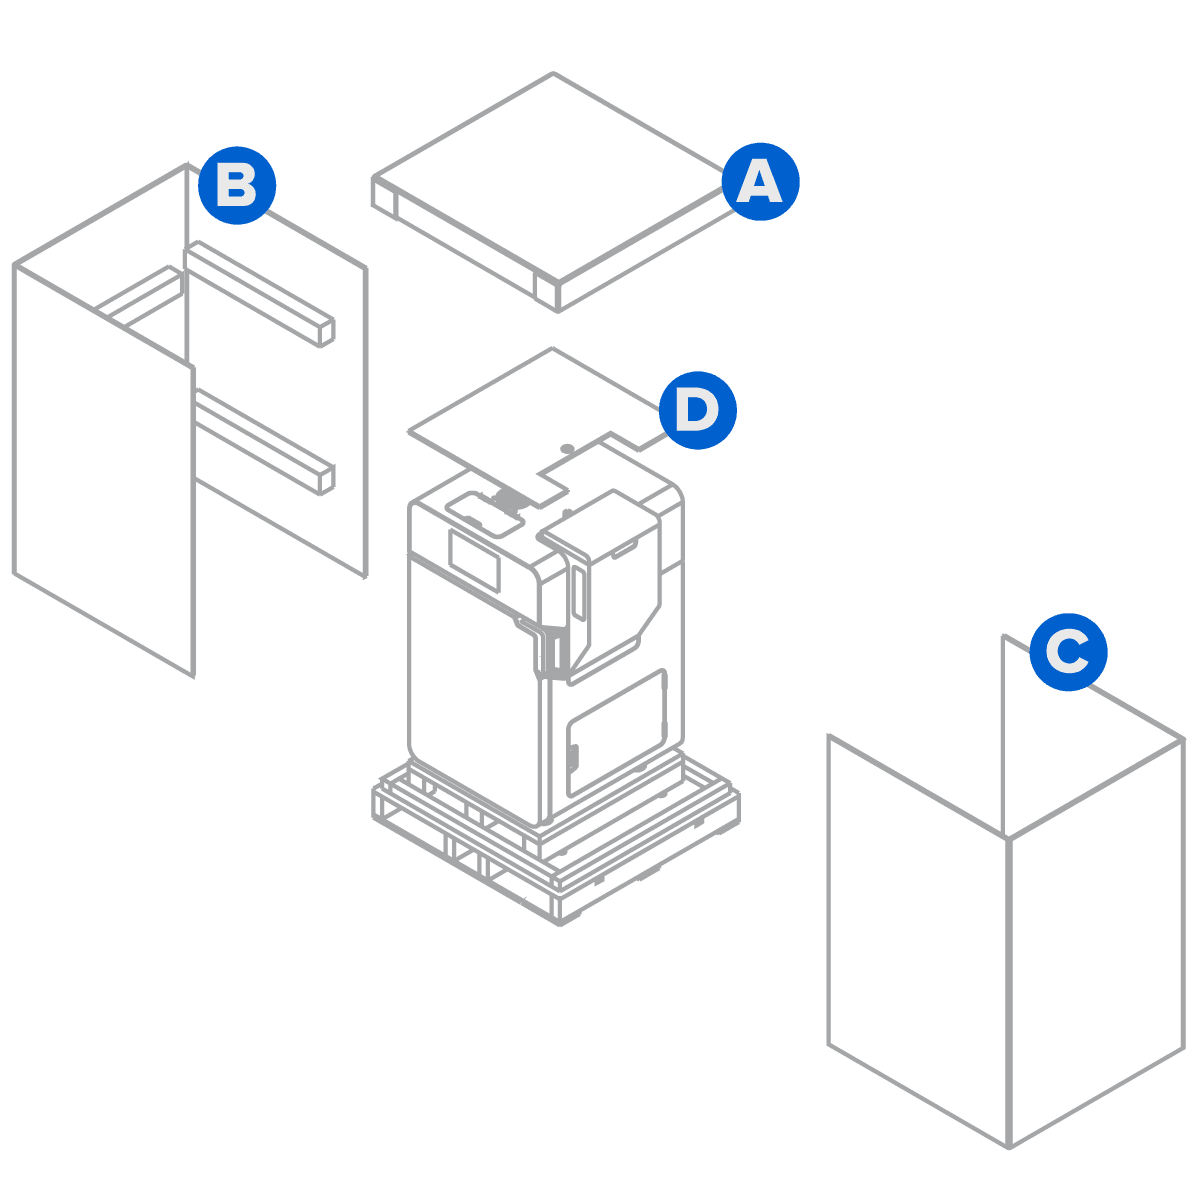
Open the printer’s box from the top by removing the lid (A), then consecutively remove the two C-shaped shells from the left (B) and right (C) sides, and then remove the protective pad (D) from the top of the printer.


Step 4: Remove accessories

Remove the accessory tray with the included accessories from the top of the printer.

L'imballaggio della stampante deve essere rimosso in quest'ordine: prima il coperchio superiore, poi le due protezioni a C da sinistra a destra, infine il cuscinetto protettivo.

5° passaggio: inserimento delle cinghie di sollevamento sotto l'apparecchio

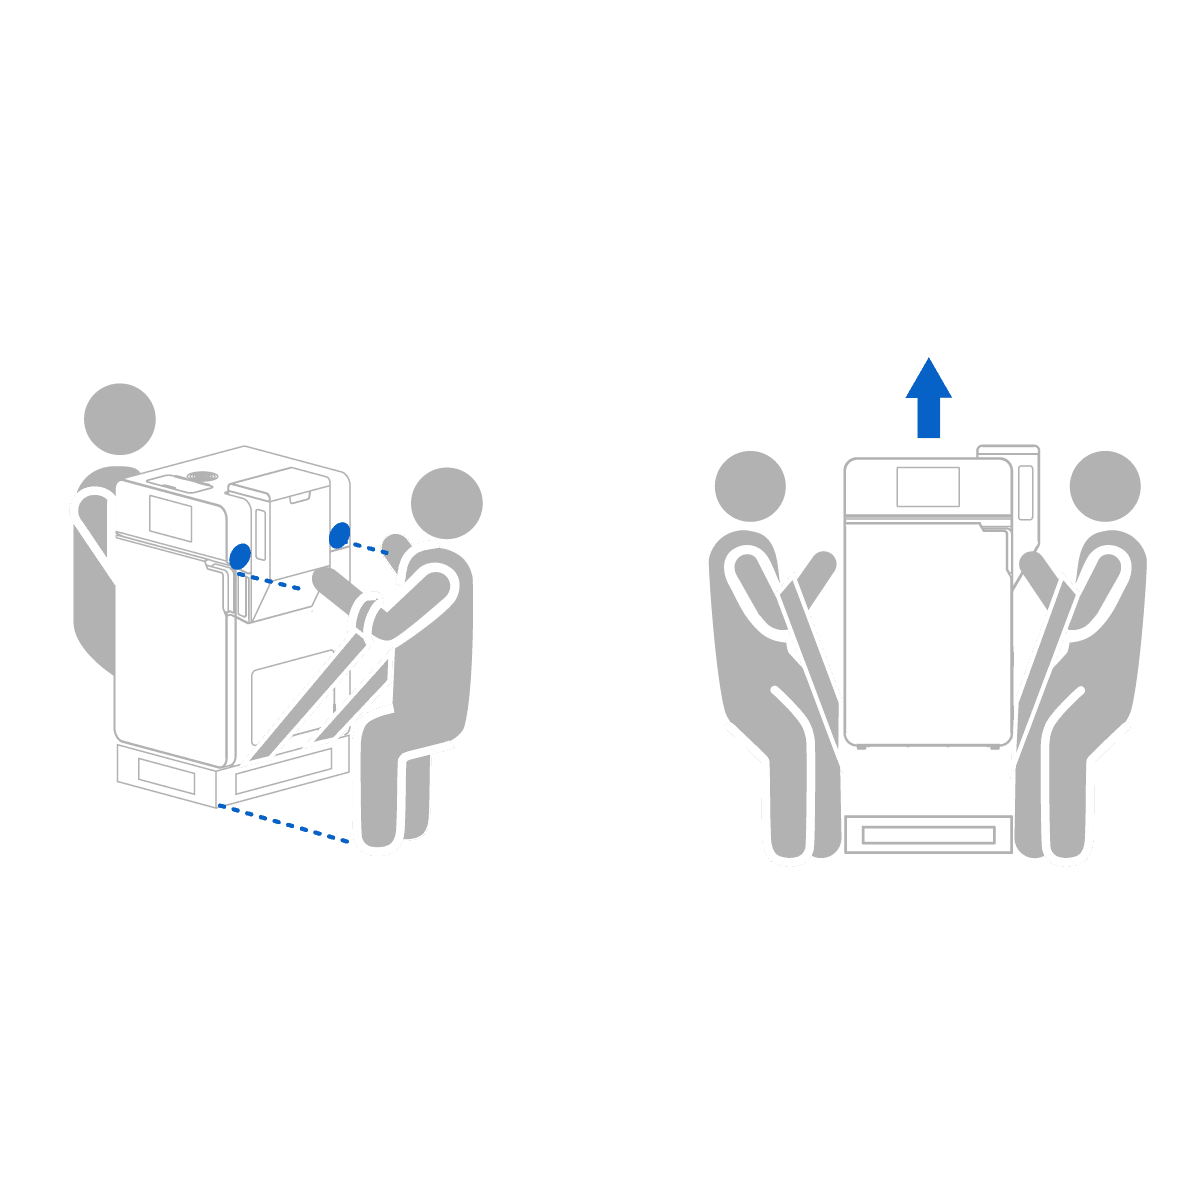
Fai passare entrambe le cinghie di sollevamento al di sotto dell'apparecchio, da sinistra a destra, assicurandoti che non si incrocino. Chiedi a un’altra persona di posizionarsi sul lato opposto dell'apparecchio. Infilate gli avambracci negli anelli delle cinghie di sollevamento, facendo attenzione a non oltrepassare il gomito.

Ciascuna persona inserisce gli avambracci negli anelli, senza oltrepassare i gomiti.

6° passaggio: estrazione dell'apparecchio dalla scatola

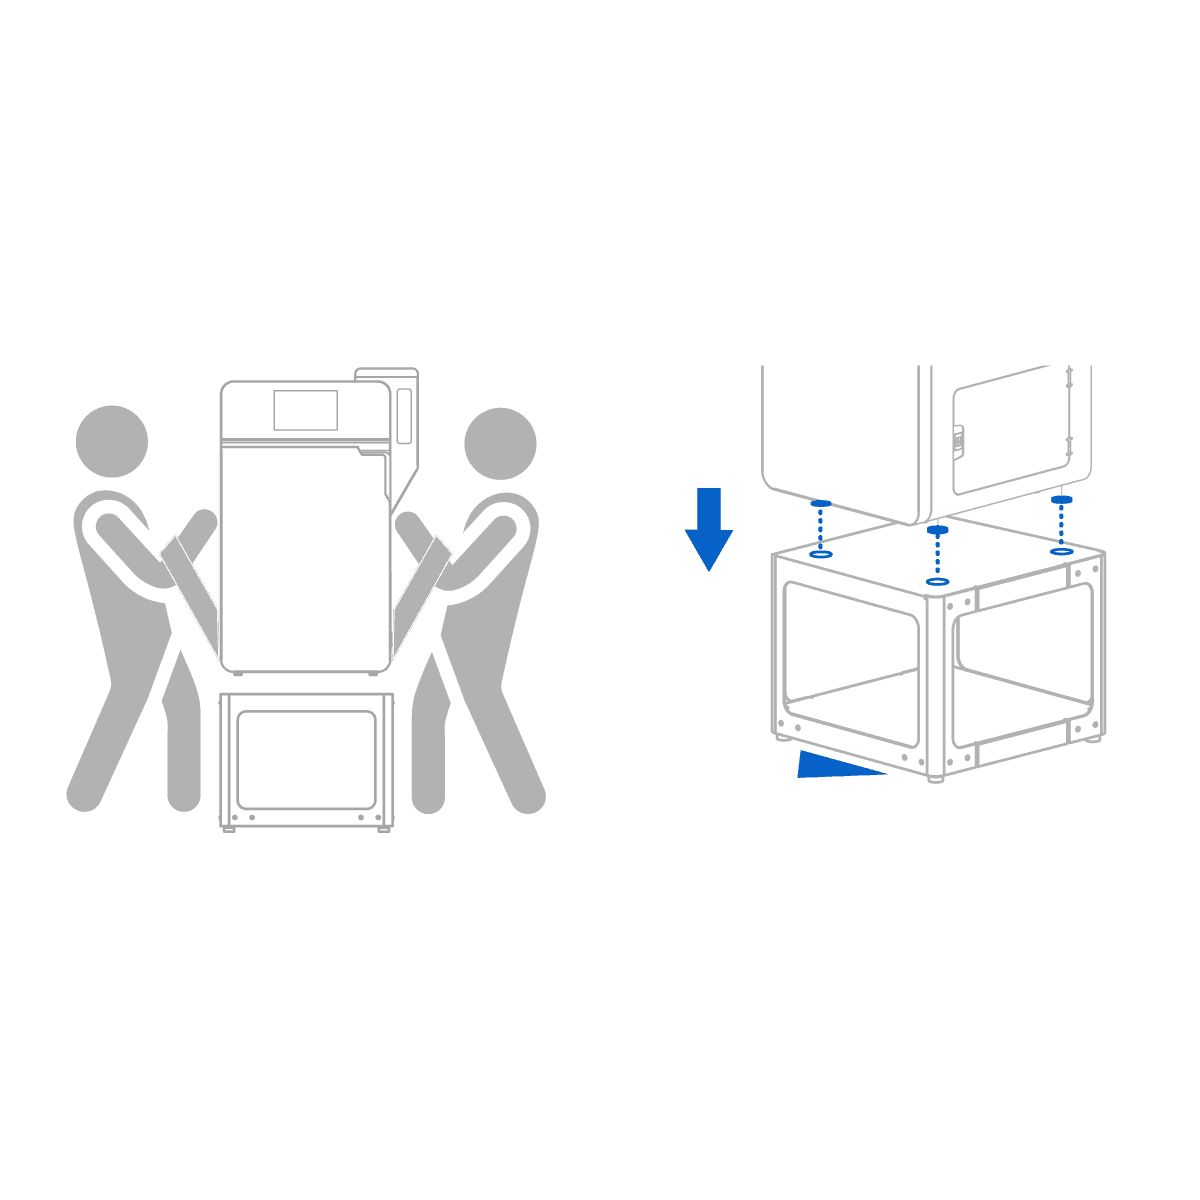
Con la schiena dritta e le ginocchia leggermente piegate, afferrate l'apparecchio con le mani e insieme sollevate l'unità.

Due persone che usano la tecnica corretta per sollevare la stampante.

7° passaggio: posizionamento dell'apparecchio

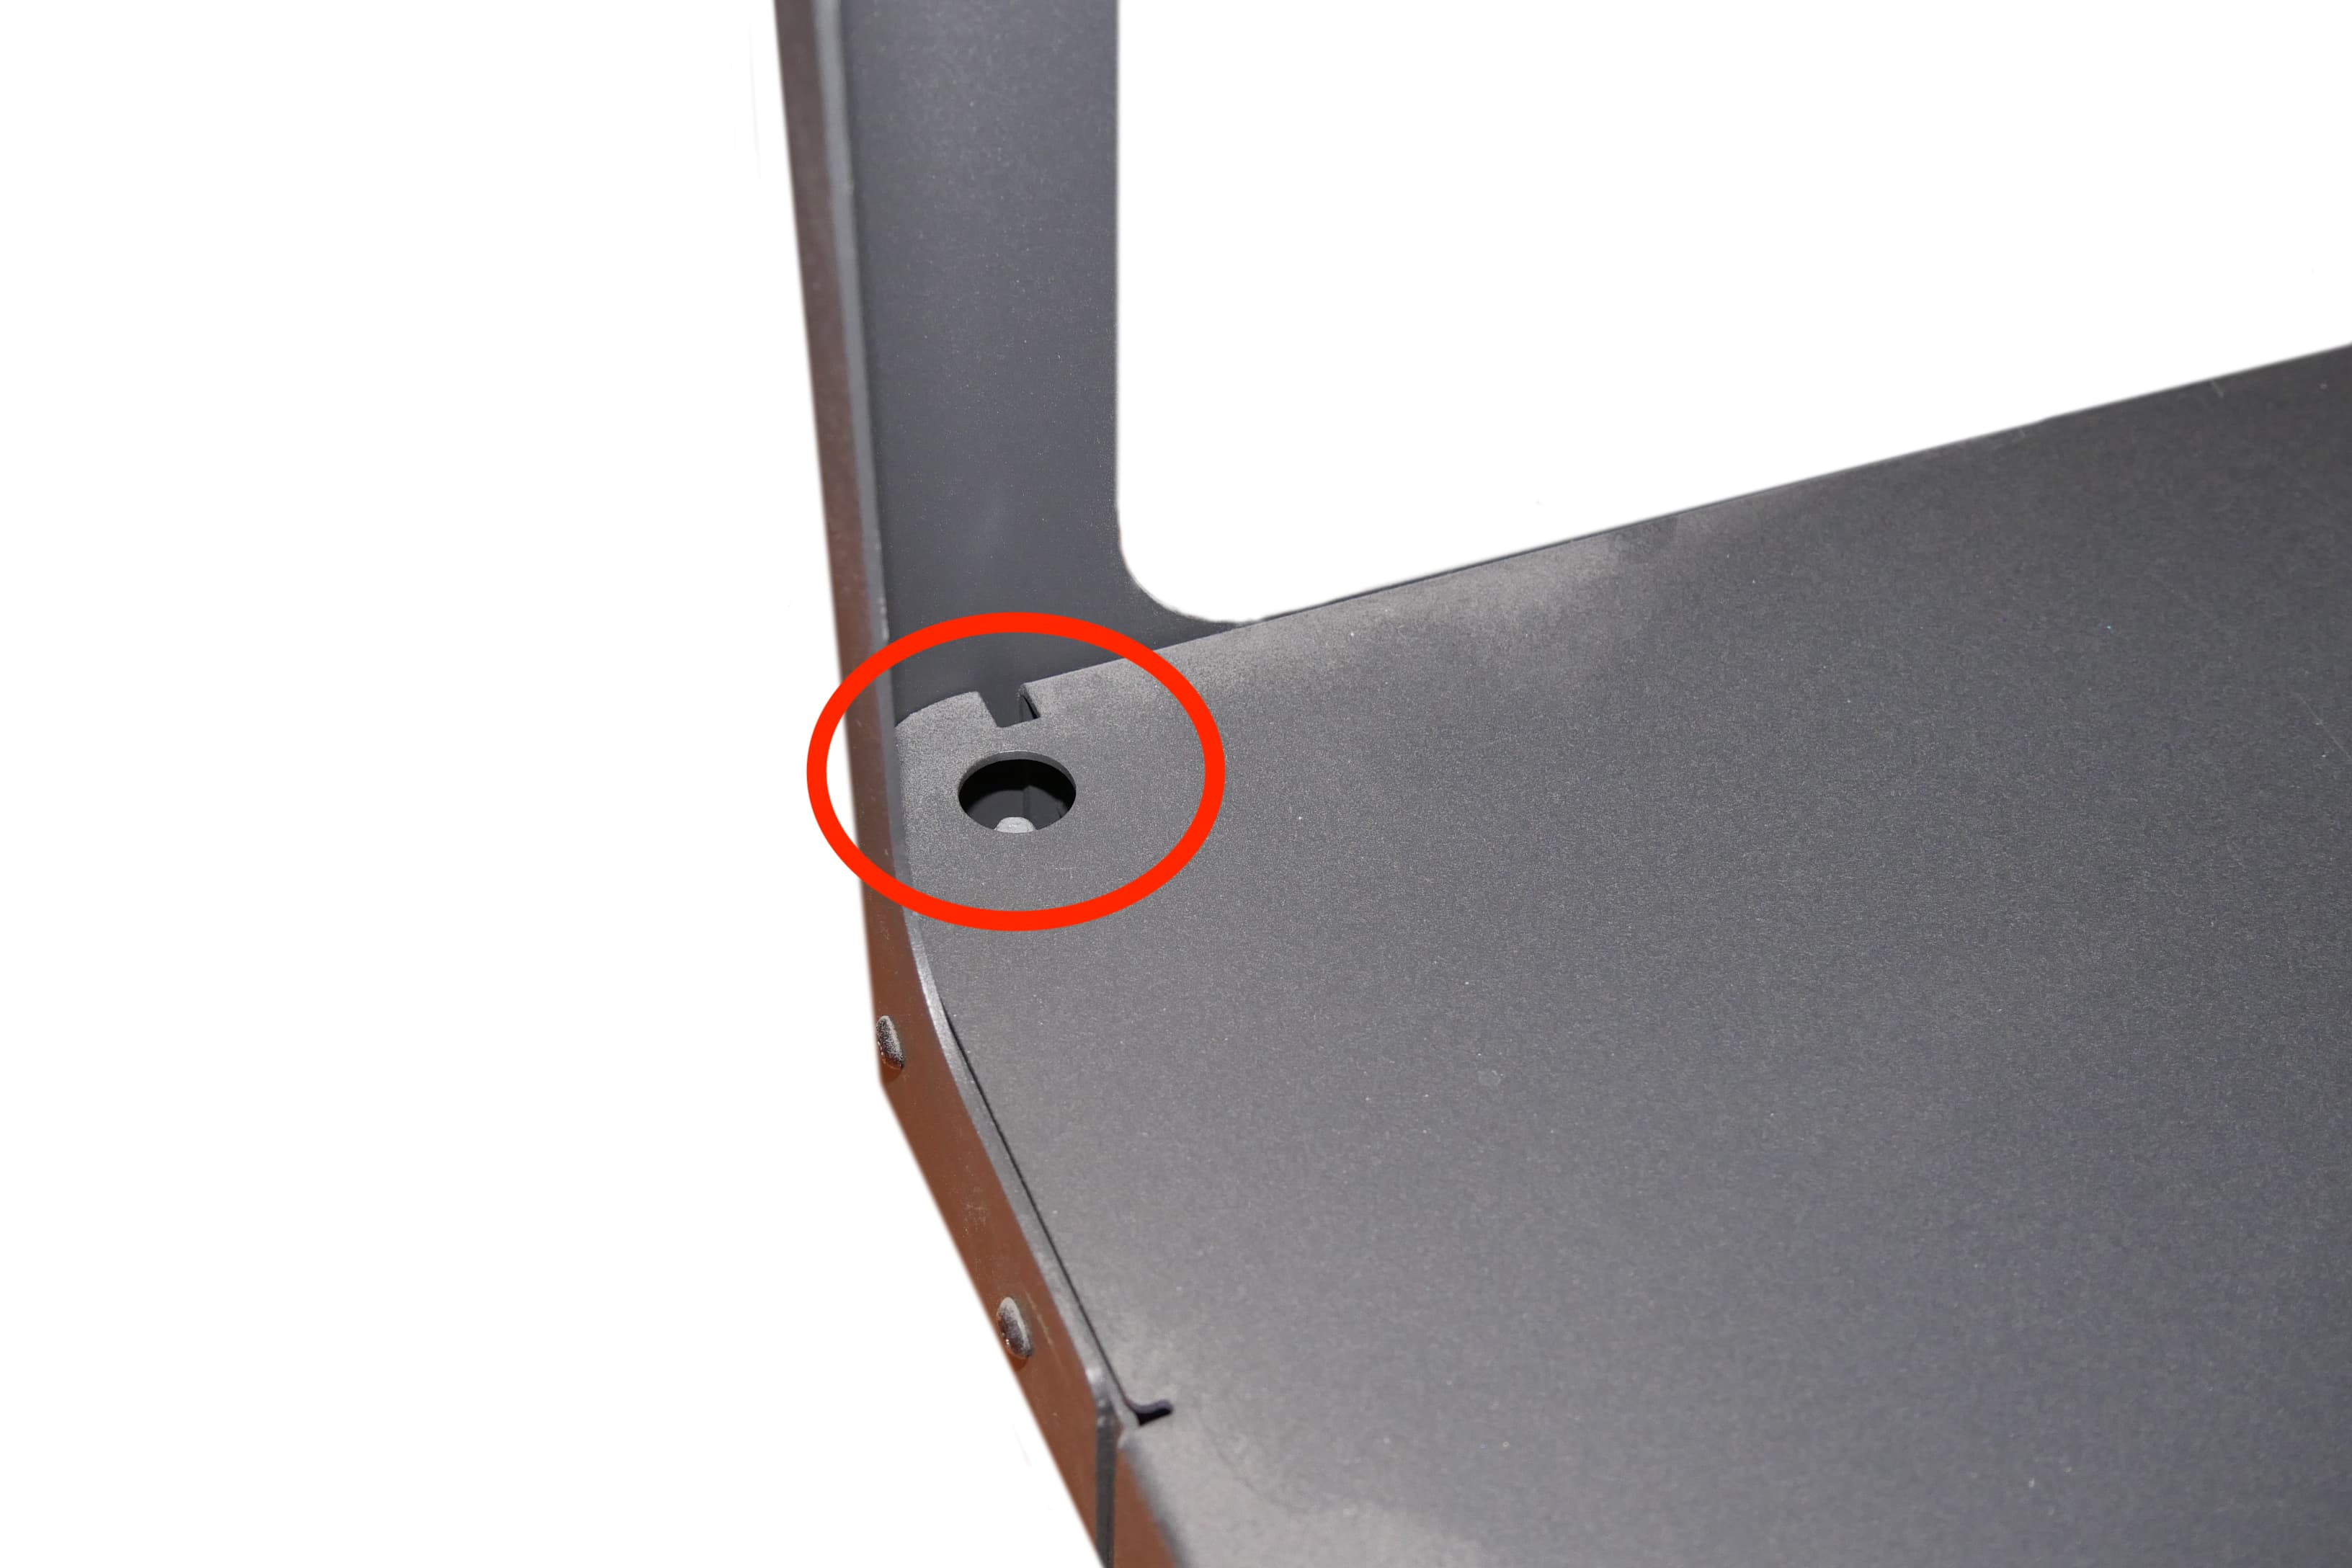
Spostate con attenzione la stampante sul supporto, mantenendo i quattro piedini allineati con le rientranze corrispondenti sul supporto.


8° passaggio: rimozione del materiale di imballaggio aggiuntivo

Rimuovi ogni ulteriore involucro e imballaggio della stampante prima di collegarla alla corrente.

Due persone allineano i quattro piedini della stampante con le rientranze sul supporto.

Caution:

If you need to readjust the machine, use the lifting straps to pick it back up. Do not pick up the machine without lifting straps.

Nota:

L’imballaggio originale è pensato per essere conservato e riutilizzato per il trasporto e la spedizione dell’apparecchio in caso di interventi di assistenza. Conserva l'imballaggio completo, inclusi gli inserti per maggiore comodità.

Installazione

Connect the cables and install the Wi-Fi antenna, then turn on the machine. Last, connect the Fuse 1+ to a network via Wi-Fi or Ethernet.

Step 1: Connect the cables

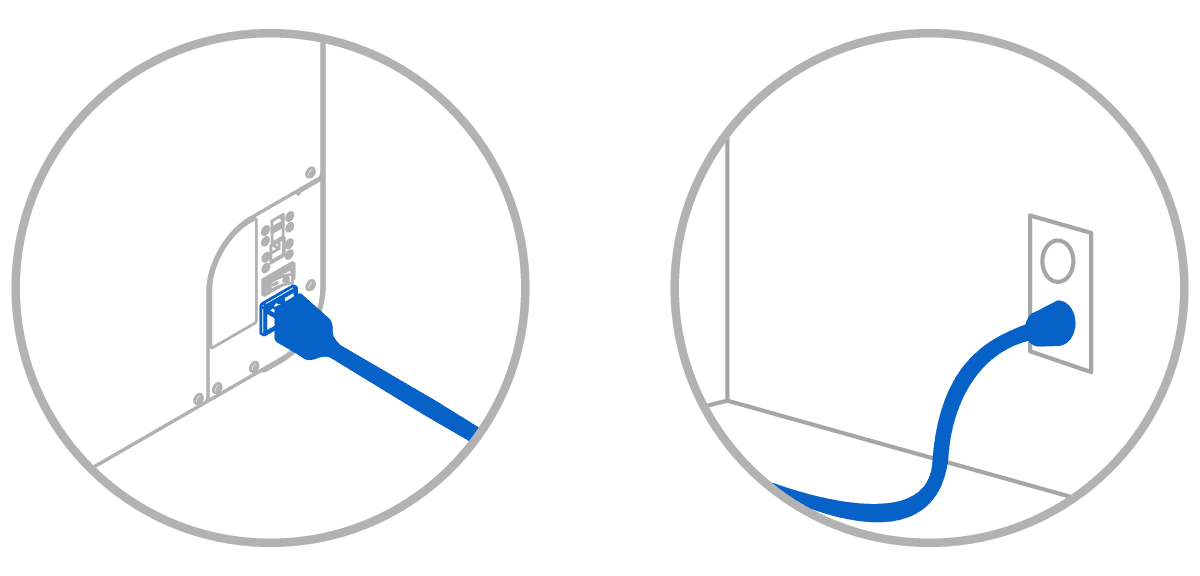
Plug the included power cable into the power port on the back of the unit and connect the power cable to a dedicated circuit.

Cavo dell'alimentazione inserito nell'ingresso sul retro dell'unità e in una presa di corrente.

Notice:

The Fuse 1+ requires a dedicated AC circuit, providing at least 7.5 A at 230 VAC (EU) or 15 A at 120 VAC (US), as well as reliable grounding. This circuit must be separate from other devices, including the corresponding Fuse Sift, fans, vacuums, power tools, space heaters, or any large appliances or power tools. Power surges may disrupt prints and/or permanently damage sensitive components, jeopardizing the reliability of the product. Formlabs suggests the use of line conditioners or UPS in regions with voltage fluctuations.

Step 2: Install the Wi-Fi antenna

Screw the Wi-Fi antenna onto the jack on the back of the unit, next to the power, USB, and Ethernet ports.

Step 3: Prepare the printer for use with an inert gas atmosphere (optional)

The Fuse 1+ 30W can print with an inert gas atmosphere. The printer’s nitrogen inlet accepts a gas source with an ⅛” NPT connector or can be adapted to a ¼” quick disconnect connector. If you plan to print with an inert gas atmosphere:

  1. Locate the nitrogen inlet at the bottom-left corner of the back of the printer.
  2. Remove the plug from the inlet.

If your nitrogen source uses ¼” quick disconnect connector:

  1. Remove the hose coupling from the accessory tray.
  2. Screw the hose coupling into place.
  3. Tighten until snug.

Step 4: Connect the nitrogen source (optional)

If you previously installed the included ¼” quick disconnect adapter, use a ¼” quick disconnect connector to connect the nitrogen supply to the nitrogen interface at the rear of the Fuse 1+. Otherwise, connect the nitrogen supply to the nitrogen interface using an ⅛” NPT connector.

Step 5: Install the IR sensor O-ring

The Fuse 1+ uses an O-ring around the IR sensor shaft to improve print enclosure sealing. This prevents IR sensor contamination, helping reduce the likelihood of a print failure. Depending on the date of manufacture of your printer, this O-ring may come preinstalled or may be included with the printer packaging. If your printer came with a separately-packaged O-ring, install the O-ring:

  1. Remove the O-ring from its packaging.
  2. Open the IR sensor door at the top of the printer.
  3. Grip the IR sensor cap and pull. The IR sensor is held in place with magnets and comes out with little force.
  4. Slide the O-ring onto the IR sensor shaft until it reaches the cap.
  5. Push the IR sensor cap into the mount. The LED turns green when it is fully connected.
  6. If the LED turns orange:
    1. Push the cap into the mount until you feel the magnets click together.
    2. Rotate the cap in a clockwise direction until it comes to a halt and cannot rotate further.
  7. Close the access door.

Step 6: Turn on

To turn on the machine:

  1. Plug the included power cable into the power port on the back of the unit and connect the power cable to a dedicated circuit.
  2. Flip the breaker switch on the back of the unit to the ON position to turn on the machine.
  3. As the machine initiates, the Formlabs logo with a progress bar appears on the touchscreen, followed by the onboarding process. Follow the on-screen prompts to finish setting up the machine.
L'interfaccia touchscreen indica la schermata di benvenuto.

Livellamento

Prima di poter avviare la stampa, la stampante deve trovarsi perfettamente in piano. Se richiesto, serviti di una chiave a bussola esagonale da 7 mm per alzare o abbassare ciascuno dei piedini del supporto.

1° passaggio: seguire le indicazioni sullo schermo

Quando la stampante si avvia, sull'interfaccia touchscreen compare il logo Formlabs con una barra di avanzamento, seguito dal processo di formazione iniziale. Se necessario, l'interfaccia touchscreen richiederà di livellare la stampante.

2° passaggio: regolazione dei piedini del supporto (se necessario)

La parte superiore di ciascun piede del supporto termina con una testa esagonale da 7 mm. Serviti di una chiave a bussola esagonale da 7 mm per ruotare il piedino come indicato sull'interfaccia touchscreen e regolarne l'altezza. Regola i piedini finché l'interfaccia touchscreen indica che la stampante è in piano.
alttext

Connessione

1° passaggio: connessione a una rete

Per caricare i lavori di stampa sulla Fuse 1 e monitorare la stampante da remoto, assicura che l'apparecchio mantenga una connessione costante a una rete sicura. L'apparecchio si collega anche direttamente a un computer via USB.

2° passaggio: registrazione della Fuse 1 su Dashboard

Registrazione dell'apparecchio su Dashboard tramite l'interfaccia touchscreen. Una connessione alla rete locale non è sufficiente per l'invio di dati a Dashboard.