
Throughout history, artisans have used molds to make everything from Bronze Age weaponry to modern-day consumer products. While early molds were commonly shaped in stone, modern science has given rise to materials that are far easier to work with, such as silicone.
Soft components are a ubiquitous part of most commercial goods, from rubbery feet on a laptop to the ergonomic grip on a pair of scissors. Rubbery materials like polyurethanes, silicones, neoprene, and latex enable product applications from roofing materials to medical devices. Casting of silicones specifically allows us to expand the properties of 3D printed parts to include bendable and stretchable components using materials readily accessible from hardware stores, art and jewelry supply resellers, and other common retailers.
In this practical guide to silicone mold making, we’ll break down everything you need to know before getting started, including selecting silicone for your application and best practices for designing critical features of 3D printed molds.

Talk to Our Sales Team
Whether you need to prototype at speed, or are producing end-use parts, we’re here to help. The Formlabs Sales team is composed of dedicated specialists who know exactly how to support you and your company's needs.
About Silicone
Silicones are a class of polymers that contain the element silicon in their molecular chain, and transform from a liquid (silicone) to a highly flexible and stretchable solid (silicone rubber) when reacted with a chemical catalyst.
In casting and mold-making, RTV silicone rubber captures fine surface details including embossed text. In addition, most castable silicones are not chemically adhesive, and will peel away from 3D printed molds after curing. Mechanical bonding can be achieved by casting onto highly porous surfaces like woven fabric, and in some cases chemical bonding can be promoted with specialized binders.
Liquid silicone: Liquid type silicones are typically two-part or a single part with a small amount of catalyst added. There are two general categories that are readily available. Platinum catalyzed silicones are higher cost but offer superior long-term dimensional stability and very low shrinkage after full cure. Tin catalyzed silicones are lower cost but less stable over time, and tend to have higher shrinkage rates. Curing time ranges from 10 minutes to several hours.
Silicone putty: This is a two-part putty in which components are blended together in equal amounts by hand. Key applications include mold making for the jewelry industry, however, the silicone itself is a good mimic for compression molded gaskets or seals. It has a durometer rating of Shore 40A (see scale below), or a similar hardness to a pencil eraser. This silicone cures quickly in less than 20 minutes, and has zero percent shrinkage.
Skin, mucous membrane, and food safety: Some applications require more sensitivity than others when it comes to contact with the body or contact with food. Always check the materials safety data sheet (MSDS) from the silicone manufacturer to make sure the rubber is safe for your application.
Durometer rating scale: Rubbery materials, including silicone rubbers, can be formulated to a range of hardnesses from extremely soft to extremely firm, as indicated by a specific Shore durometer number. Softer materials are measured on the Shore A scale, and harder materials on the Shore D scale.

Adapted from Meridian Laboratory
Why Make Silicone Molds?
Silicone is a strong choice for mold-making because it offers such a diverse array of benefits. You can easily create custom designs using silicone molding. The molds themselves are also quite durable, so you can use them repeatedly without fear of breakage. Silicone’s inorganic makeup — compared to rubber, its organic counterpart — makes it highly resilient to heat and cold, chemical exposure, and even fungus. Some of the benefits of silicone molds include the following.
Flexibility
Silicone’s flexibility makes it easy to work with. Silicone molds are pliable and lightweight compared to stiffer substances like plastic and they’re also easier to remove once a part is fully formed. Thanks to silicone’s high level of flexibility, both the mold and the fabricated part are less likely to break or chip. You can use custom silicone molds to shape everything from complex engineering components to holiday-themed ice cubes or confections.
Stability
Silicone withstands temperatures from -65-400 °C. Additionally, it can have an elongation of 700%, depending on the formulation. Highly stable under a broad range of conditions, you can put silicone molds in the oven, freeze them, and stretch them during removal.
Durability
In most cases, you’ll get many runs out of a silicone mold. However, it’s important to note that the life span of molds can vary greatly. The more frequently you cast, and the more complex or detailed your design, the faster your mold might degrade. To maximize the life of your silicone molds, clean them with mild soap and water, dry them thoroughly, and store them flat without stacking.
Limitations
While there are a lot of benefits to working with silicone, there are also a few limitations to be aware of:
-
Silicone costs more than latex and organic rubbers. A quick comparison on Amazon shows a gallon of silicone regularly topping $100 — almost twice as much as latex.
-
Though it’s flexible, silicone can tear if stretched too far.
-
Not all silicone is formulated equally. Always purchase silicone and any manufacturing materials from a reputable supplier.
Common Applications for Silicone Molds
Hobbyists and professionals alike rely on silicone molds because of their versatility and ease of use. Here are a few examples of industries and applications that make silicone molds to produce their products.
Prototyping
Silicone molding is used in prototyping and product development production across a wide range of industries. Because the cost for silicone molds is substantially lower than hard tooling for traditional manufacturing processes like injection molding, casting in silicone molds is ideal for prototyping product designs as well as creating beta units for testing the market and consumer response to a new product. While 3D printing is better suited for creating one-off parts quickly, silicone molding and urethane casting can be ideal for smaller runs of parts.
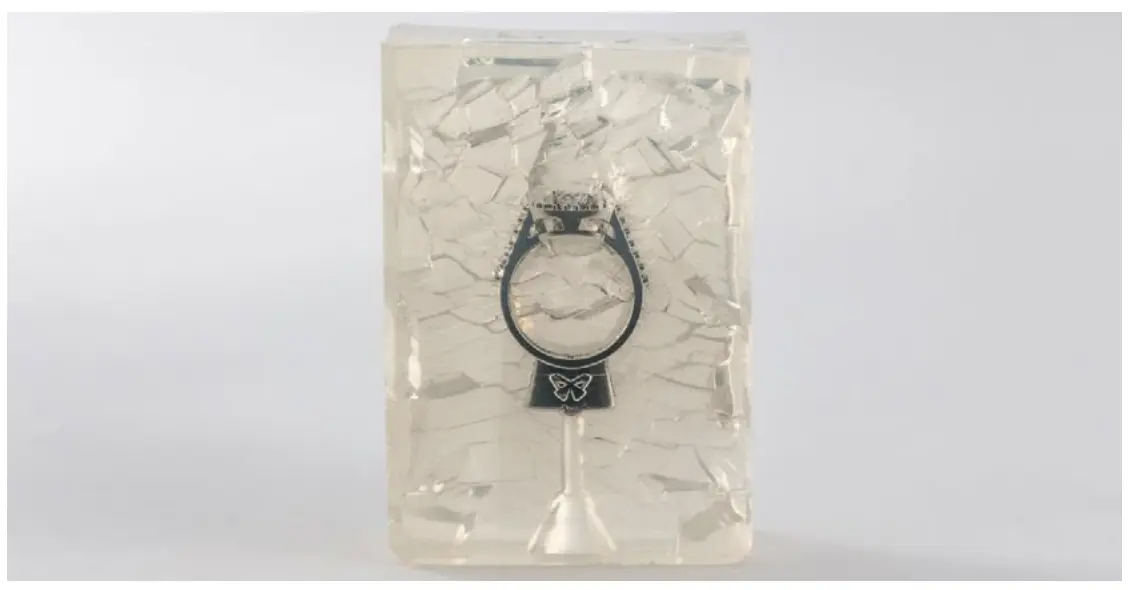
Jewelry
Jewelers use custom silicone molds to duplicate hand-carved or 3D printed patterns in wax, allowing them to phase out the time-consuming labor of creating wax-carved patterns for each new piece, but still continue to cast from wax. This offers a major leap in serial production, making it possible for investment casting to work at scale. Because silicone molds capture a fine level of detail, jewelers can produce pieces with ornate details and intricate geometries.
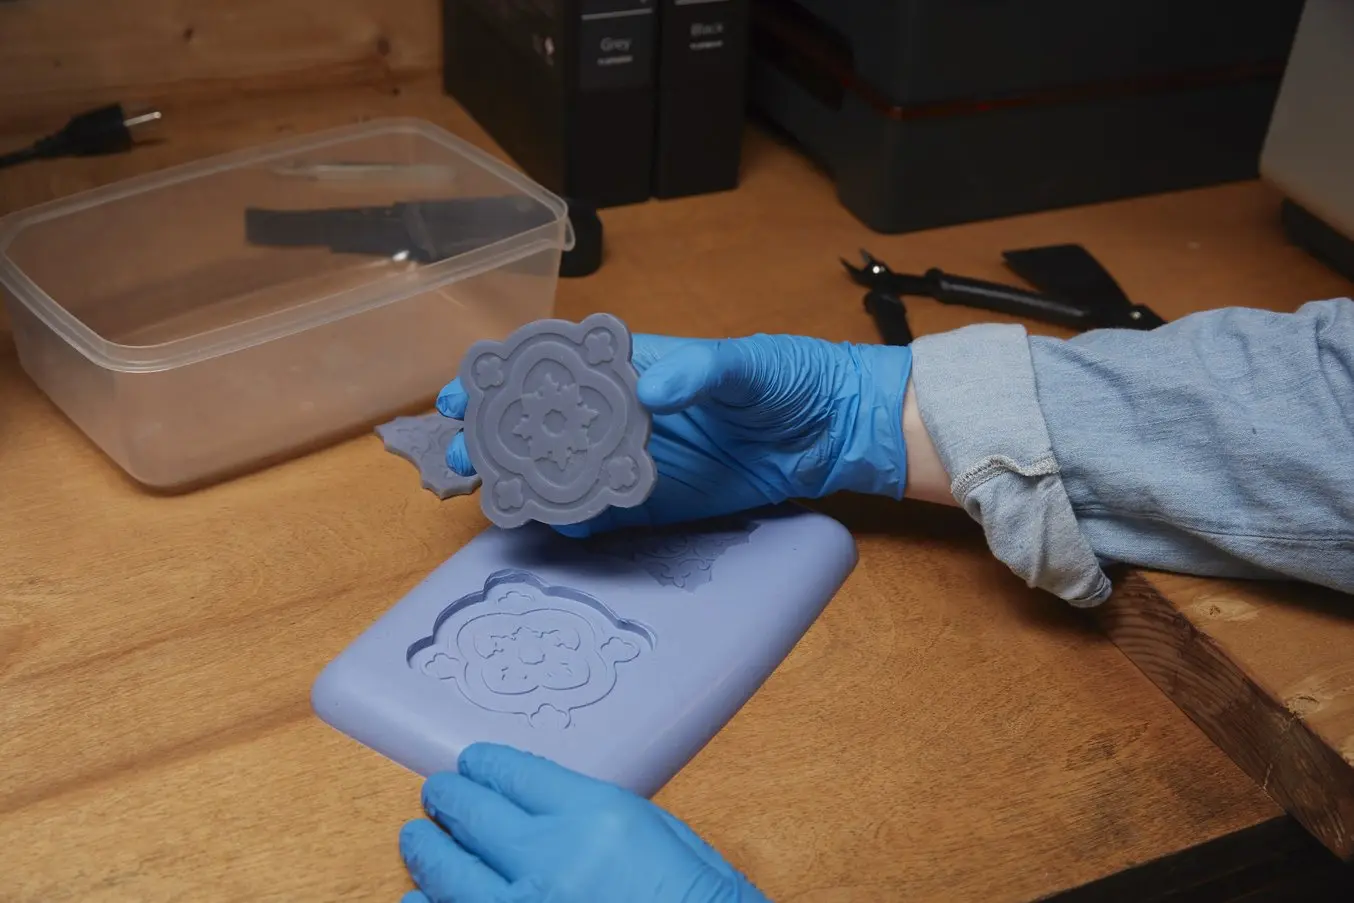
An RTV (room-temperature-vulcanized) silicone mold formed around the 3D printed master.
Vulcanized Rubber Molding with 3D Printed Masters
3D printing with high-performance materials allows designers and casters to leverage digital technology in their production processes. Read now to learn how 3D printing can be used in the production of small metal parts.
Consumer Goods
Creators use silicone molds to make many custom crafts such as soaps and candles. School suppliers often use silicone molds to form items such as chalk and erasers. Toy and collectible manufacturers also use the technique to produce high-quality and accurate miniatures and custom figurines.
For example, SiOCAST uses 3D printed masters to make silicone molds for a unique process that combines the benefits of 3D printing, silicone molding, and injection molding. SiOCAST’s technology has already been adopted widely, from small studios to the biggest miniatures manufacturers in the industry, such as Monster Fight Club (The Witcher, Cyberpunk RED), Reaper Miniatures (Bones), and Warlord Games (Blood Red Skies, Bolt Action).
Food and Beverage
Food-grade silicone molds are used to form all sorts of whimsical confections, including chocolates, ice pops, and lollipops. Since silicone can handle heat up to 400 °C, molds can be used in cooking, too. Small baked goods such as muffins and cupcakes rise nicely in silicone molds.
DIY Projects
Independent artists and DIYers often use silicone molding to craft unique creations. You can use silicone molds to form or replicate everything from bath bombs to dog treats — the possibilities are nearly endless. A fun silicone molding project for kids is to create a lifecast of their hand. Just make sure you choose a skin-safe silicone.
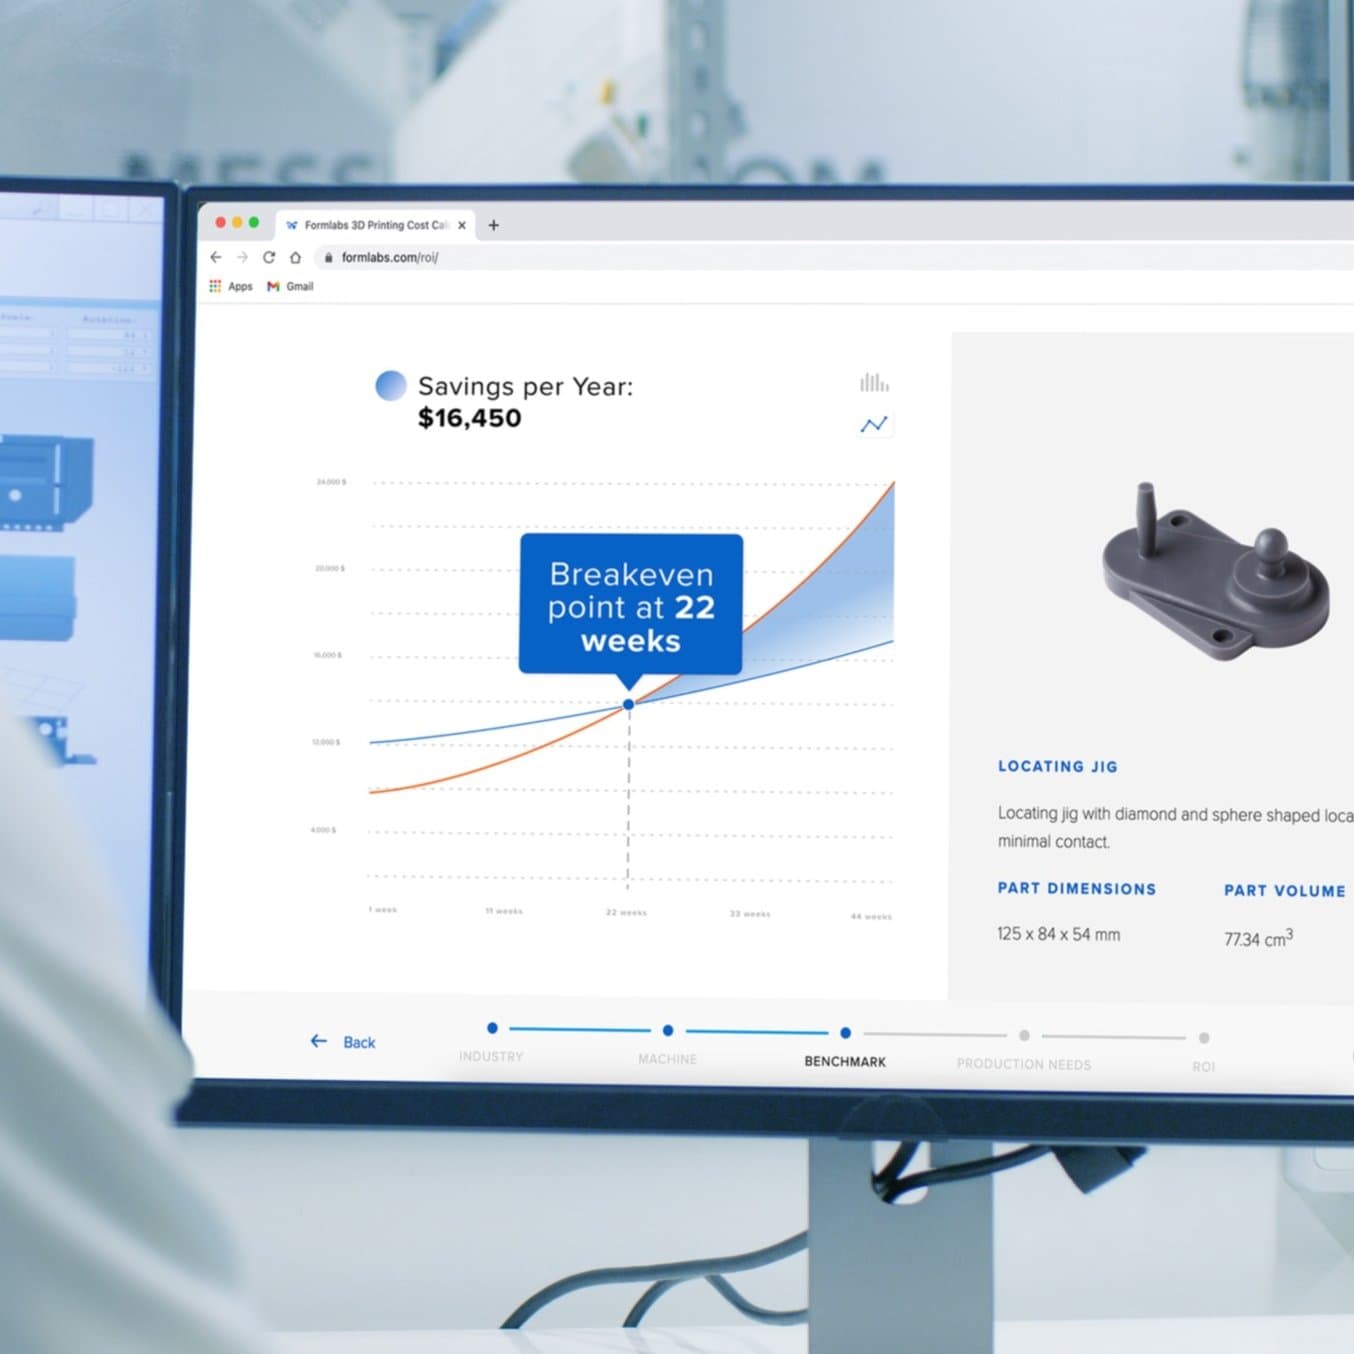
Calculate Your Time and Cost Savings
Try our interactive ROI tool to see how much time and cost you can save when 3D printing on Formlabs 3D printers.
How To Make the Masters for Silicone Molding
A pattern — sometimes referred to as a master — is the part you use to create a precise negative in your silicone mold. If you are simply trying to replicate an existing object, it might make sense to use that object as your pattern. You’ll just need to be sure that the object can withstand the mold-making process.
To create a new design or prototype, you must first fabricate your pattern; you have several options for this. Here are a few ways to make patterns for silicone molding:
-
Sculpting: If you’re a talented sculptor or if you’re creating a relatively simple design, you can use clay to create a pattern. Sculpting a pattern is also a fun project for kids and a cost-effective option for DIYers.
-
Carving: You can make your pattern out of wood. Carved wood masters are an excellent choice for making tiles and flat designs.
-
3D printing: Many professionals and commercial designers choose to 3D print patterns. Desktop 3D printers offer many benefits, including design flexibility within CAD software, high accuracy, ease of prototype modification, and quick turnaround times.
Once you have a pattern, you can get started with making your silicone mold.
Guide to Rapid Tooling
In this white paper, learn how to combine rapid tooling with traditional manufacturing processes like injection molding, thermoforming, or casting.
Request a Free Sample Part
See and feel Formlabs quality firsthand. We’ll ship a free 3D printed sample part to your office.
Getting Started With Silicone Mold-Making
Here’s everything you’ll need to build a basic silicone molding kit:
-
A master pattern
-
Liquid silicone, such as Smooth-On OOMOO 30
-
A box or nonporous container for the mold housing
-
Mold release, such as Smooth-On universal mold release
-
Wax, resin, or other end-use material
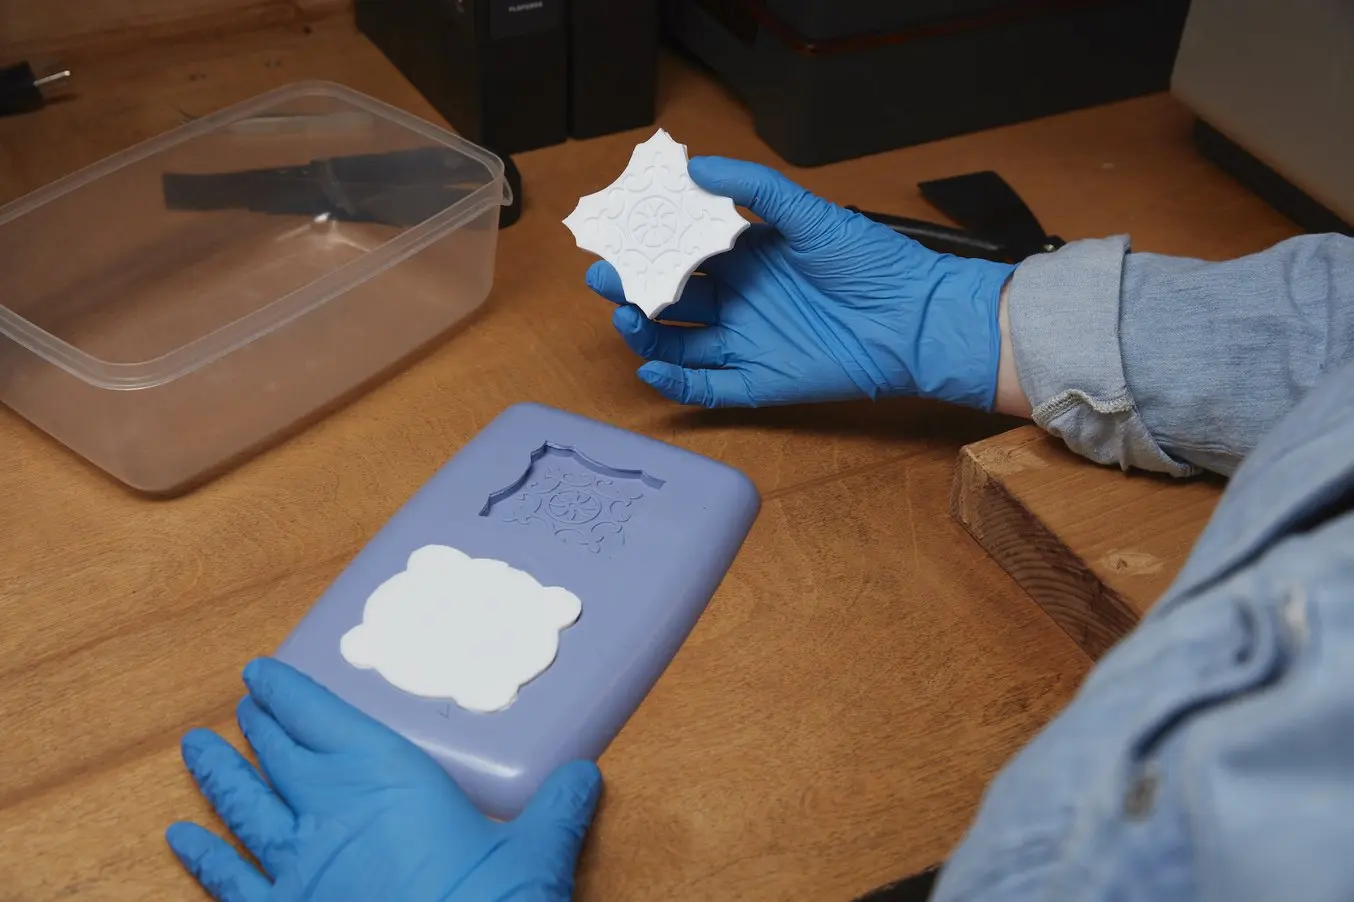
One-Piece vs. Two-Piece Silicone Molds
Before you start making your molds, you’ll need to determine which type of mold(s) you want to create.
One-piece silicone molds are like ice cube trays. You fill the mold and then let the material set. However, just as an ice cube tray creates cubes with a flat top, one-piece molds will only work with designs that have a flat side. If your master has deep undercuts, that also makes it harder to remove it and the finished parts from the mold once the silicone sets without damage.
When these are not a concern for your design, a one-piece silicone mold is an ideal way to create a seamless 3D reproduction of your master on all of its other surfaces.
One-piece silicone molds are ideal for designs that have a flat side and no deep undercuts.
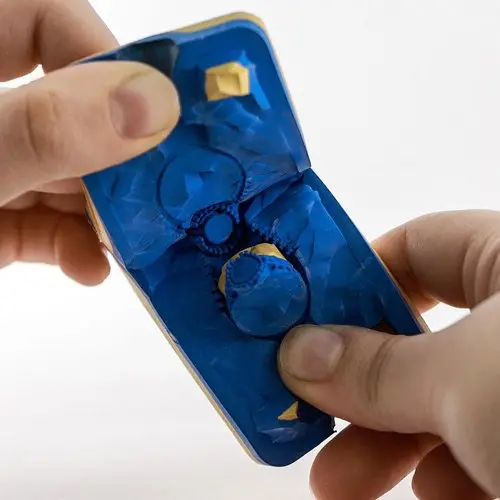
A two-piece silicone mold is better for reproducing your 3D master without a flat side or if it has deep undercuts. The mold splits into two pieces that join back together, forming a fillable 3D cavity (similar to how injection molding works).
Two-piece molds leave no flat surfaces and are easier to work with than single block molds. On the downside, they are a bit more complex to create and seams may form if the two pieces aren’t perfectly flush.
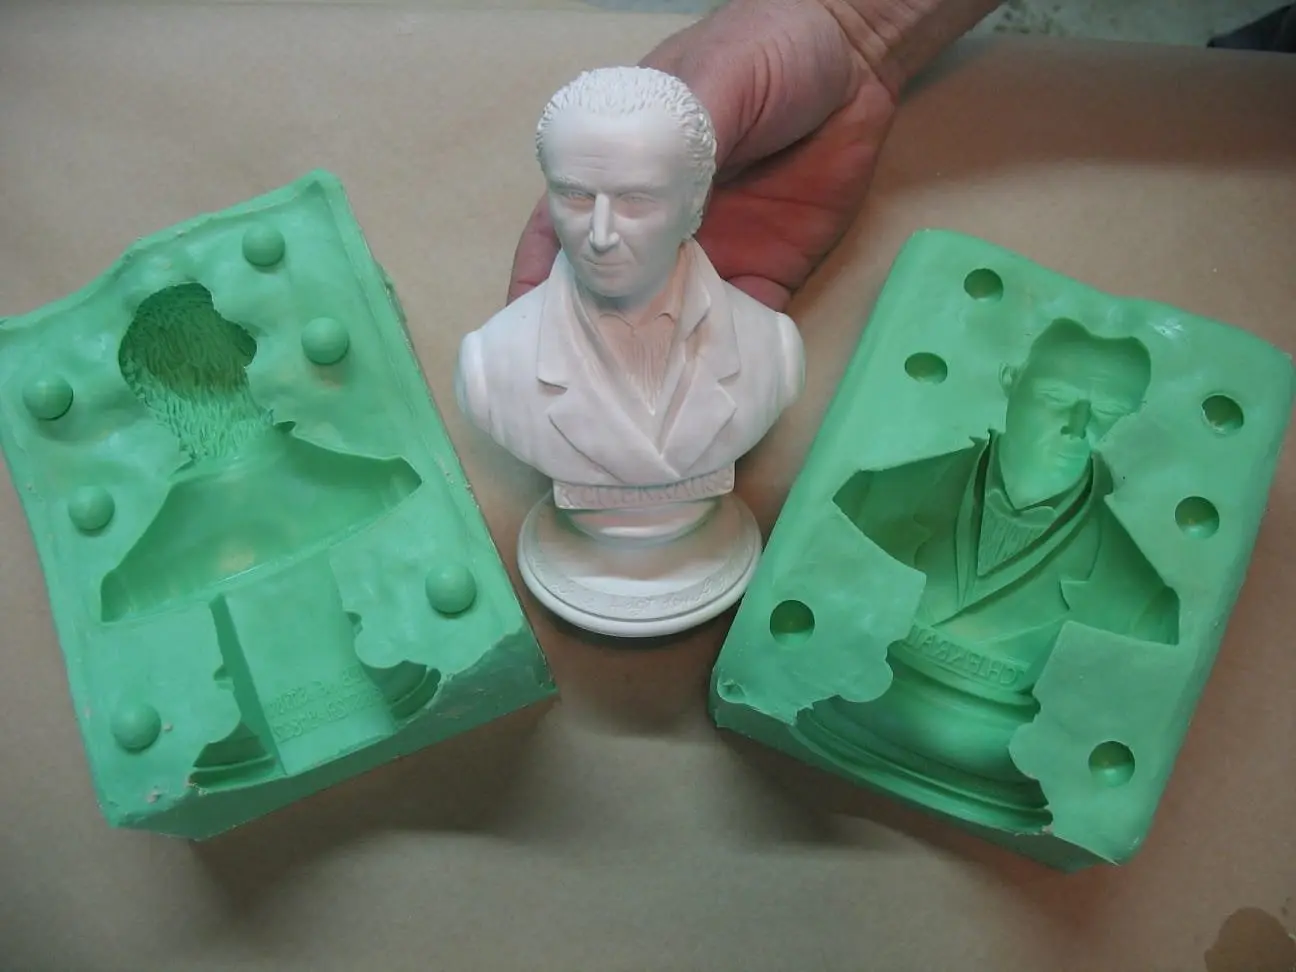
Two-piece silicone molds can reproduce any master design. (image source)
How to Make Silicone Molds
First, you’ll need to decide if you want to use a one-piece or two-piece mold. The processes for making these molds are similar, but it will take a bit longer to create a two-part mold. You can use the following step-by-step instructions to create your own silicone molds.
One-Piece Silicone Mold
-
Create your product master: This is your final part design, which will be replicated in another material. When 3D printing on a stereolithography (SLA) 3D printer, use any General Purpose Resin with a layer height of 50 microns. Keep the detailed surface free of support marks. Wash the parts thoroughly with IPA — any residual tackiness on the surface can affect the silicone molding process.
-
Construct the mold housing: Coated MDF is a popular choice for constructing a containment box for the silicone mold, but even a simple premade plastic container will do. Look for nonporous materials and a flat bottom.
-
Lay out the master and apply mold release: Start by lightly misting the inside of the mold housing with mold release. Tile the masters inside the box with the detailed side up. Lightly spray these with mold release as well. This will need about 10 minutes to dry thoroughly.
-
Prepare the silicone: Mix the silicone rubber according to the package instructions. You can use a vibrating device like a handheld electric sander to remove air bubbles.
-
Pour the silicone into the mold housing: Gently pour the mixed silicone rubber into the containment box in a narrow stream. Aim for the lowest part of the box first (the base) and gradually come up the contours of your 3D printed master. Cover it with at least one centimeter of silicone. The curing process will take from one hour to one day to complete, depending on the silicone type and brand.
-
De-mold the silicone: When curing is complete, peel the silicone out of the containment box and remove the masters. This will serve as your ice cube tray-style mold for casting your end-use product.
-
Cast your part: Again, it’s a good idea to lightly spray the silicone mold with mold release and let it dry for 10 minutes. Pour your end-use material (wax or concrete, for example) into the cavities, and allow to cure.
-
Prepare the mold for the next casting: You can use this silicone mold multiple times. Return to step seven to repeat the process.
Best Practices
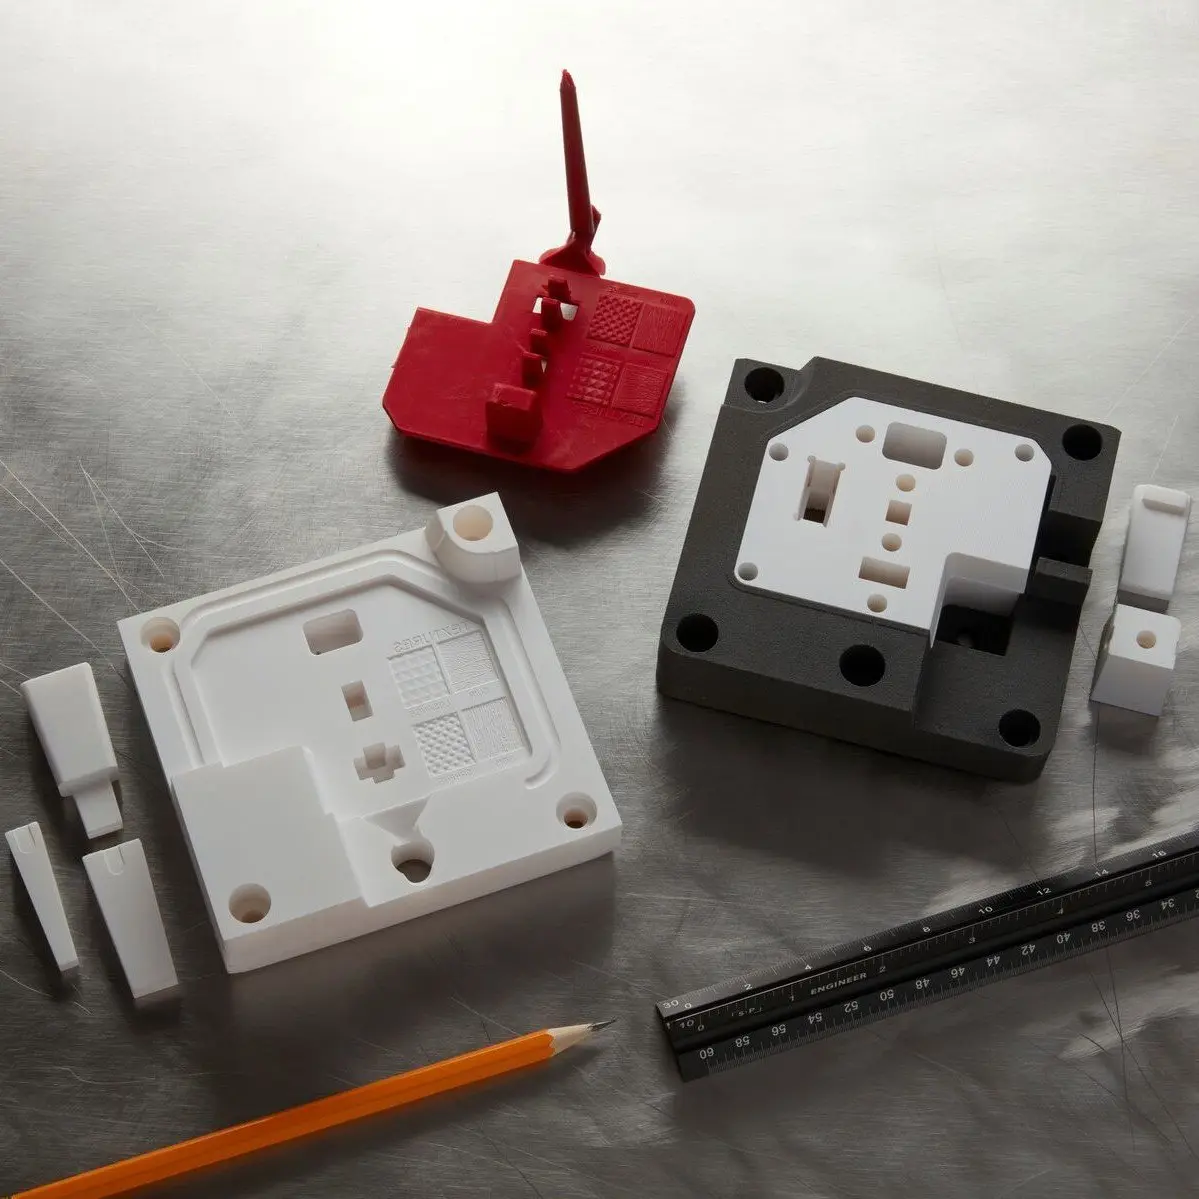
Resin selection: We recommend using Clear Resin to provide a visual queue for mold filling. We recommend printing with a 50 μm layer height for a good balance between smooth surface texture and fast printing time. Orient your parts on the build plate so that critical interior surfaces are free of support marks.
Alignment features: The four cylindrical bumps and divots at the corners of the mold are used as alignment features to ensure proper registration between the two sides of the mold. Our partner recommends adding 0.1 mm of clearance for alignment features.
In a rotationally symmetric object like this gasket, the alignment features can have identical shape and placement. In other words, the top of the mold can be rotated 90 or 180 degrees, and the gasket shape is not affected. For irregular geometries, a lock and key strategy can be used, in which the shape and placement of the alignment features can only come together in one unique way.
Beveled pry points: Adding chamfers to the mold edges can make it easier to pry apart the two sides of the mold To pry apart the mold, you can use the spatula that comes with the Formlabs Finish Kit, or a flat head screwdriver
Mold design: One of the first design features that you need to consider is the parting line of the mold, or how the two parts of the compression mold come together, and how they come apart.
Two-Piece Silicone Mold
To create a two-part mold, start by following the first two steps above, which include creating a master and constructing the mold housing. After that, follow this process to create a two-part mold:
-
Lay out the masters in clay: Use the clay to form what will eventually be one half of your mold. The clay should be placed inside your mold housing with half of your master sticking out of the clay.
-
Prepare and pour your silicone: Follow the package instructions included with your silicone to prepare and gently pour the silicone into your mold housing on top of the clay and your masters. This layer of silicone will be one half of your two-piece mold.
-
Remove everything from the mold housing: Once your first mold has cured, you’ll need to remove the silicone mold, masters, and clay from the mold housing. It’s okay if the layers separate upon extraction.
-
Clean away the clay: Clean all of the clay away to reveal your first silicone mold and masters. Make sure your masters and your existing mold are completely clean.
-
Place the mold and masters back in the mold housing: Insert both your existing silicone mold and the masters (laid in the mold) back into the mold housing facing up instead of down.
-
Apply release agent: Apply a thin layer of release agent to the top of your master and existing silicone mold to make de-molding easier.
-
Prepare and pour the silicone for your second mold: Following the same instructions as before, prepare and pour the silicone into the mold housing to create your second mold.
-
Wait for your second mold to cure: Allow plenty of time for your second mold to cure before attempting to remove it from the mold housing.
-
De-mold your parts: Remove both silicone molds from the mold housing and gently pull them apart.

OXO used a two-part mold to prototype this cocktail shaker gasket. Learn more about the compression molding process they used here.
Best Practices
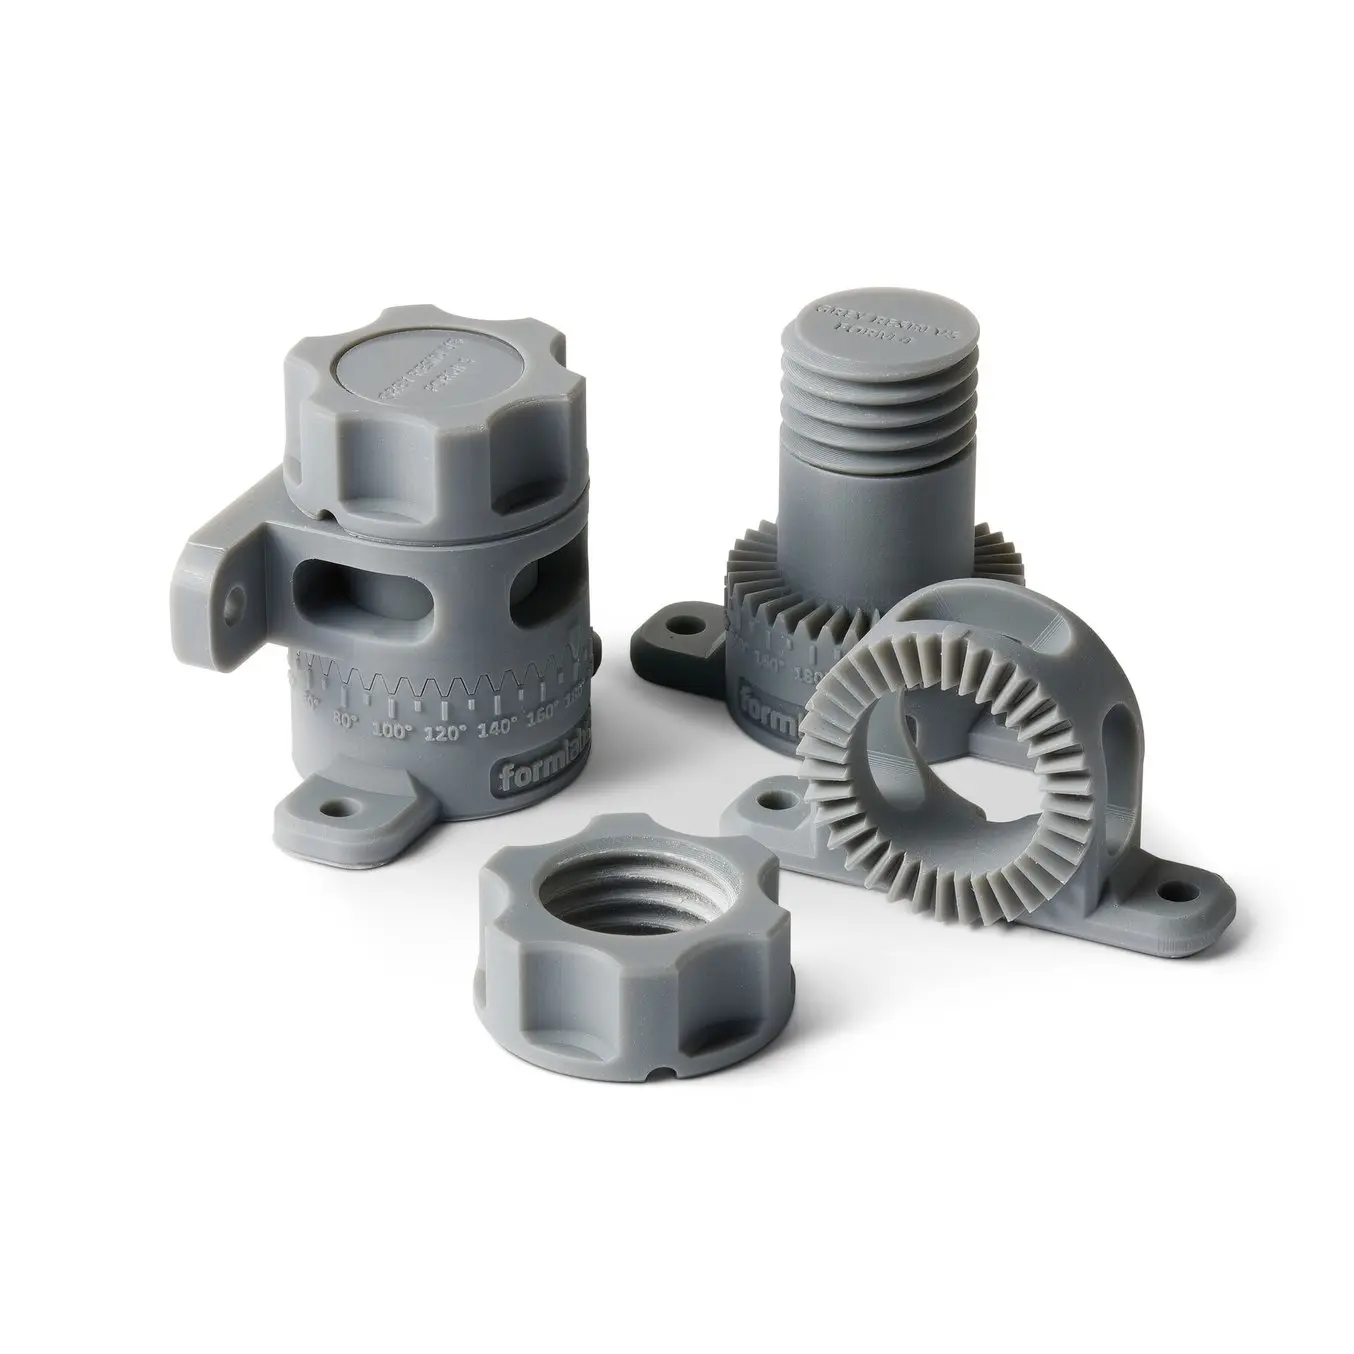
Resin Selection: General Purpose Resins such as Grey Resin capture high surface detail. Silicone picks up fine details in the surface, including layer lines. While 50 micron layer height provides a good balance between smooth surface and print speed, printing at 25 micron layer height might be appropriate for some aesthetic applications.
Mold Release: It is important to use this in both stages of your molding process, such as in the creation of the silicone mold, as well as the casting of the end-use part. The Smooth-On brand makes a multipurpose mold release which works well for most applications.
Draft Angles: The silicone molding process is fairly forgiving and can handle 90 degree angles or light undercuts. If you plan to use the mold multiple times, try to minimize the amount that you need to flex and stretch the mold to release your parts, or seek out a silicone rubber formula with a high tear strength.
Silicone Overmolding

Dame Products employs silicone overmolding in production and to encapsulate internal hardware for customer beta prototypes.
Overmolding is a multi-step molding process where two or more components are molded over top of one another. Overmolding is sometimes referred to as two-shot molding because it is a two-step process. First a base component is created. Then, a different material is molded over parts of it. Overmolding is commonly used to manufacture plastic parts that feature a rubber handle. The two-shot process of overmolding a toothbrush, for example, consists of forming a base layer for the plastic handle and a top layer of rubber (to make the toothbrush less slippery to hold).
To learn about silicone overmolding, read the complete guide.
A World of Possibilities With Silicone Molding Techniques
At the end of the day, there’s no one right way to make products. Various production methods are frequently used together to achieve the best results; understanding all of their unique advantages and disadvantages will help you make the best decisions for your project.
Explore Formlabs SLA 3D printers to start printing or contact sales.