
Computer-Guided In-House Cranioplasty: Establishing a Novel Standard for Cranial Reconstruction
Background: “Restoring the ideal geometry of the skull vault can be a challenging task. This is especially true for complex cases when cranial reconstruction is associated with concomitant cranial resection in a one-stage procedure. Oftentimes, cranioplasty designing and production are delegated to external companies, with a significant increase in time and cost to fabricate an alloplastic implant. This case series collects and critically examines previous experiences in the field of in-house cranial reconstruction providing an updated protocol to establish a novel standard for cranial reconstruction with a substantial reduction of costs.”
Materials and Methods: “A virtual craniotomy was digitally designed by the surgeon and transferred in the operating room using navigation and a surgical guide. Cranial reconstruction was planned using interpolation functions, recreating the ideal shape of the skull vault. Molds were designed, and 3D printed to intra-operatively shape polymethyl methacrylate (PMMA) according to the pre-operative plan. For validating the accuracy of reconstruction, as well as the restoration of the appropriate skull thickness, software-encoded color maps and root-mean-square error (RMSE), were calculated.”
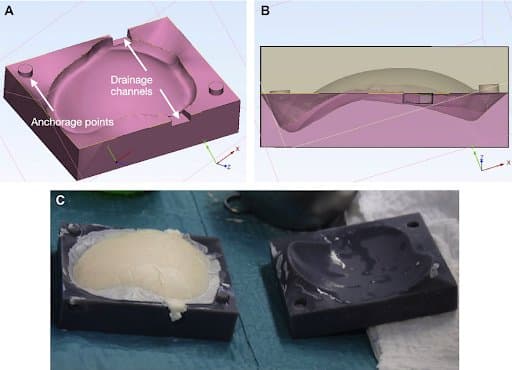
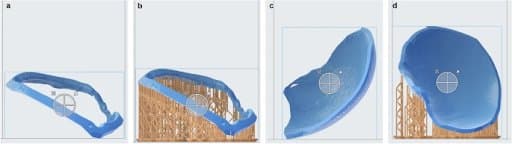
CAD design of molds. A) Overview of improvements, including drainage channels and anchorage points for the mutuality of the two components of the mold; B) Transparent vision showing the perfect negative impression of the desired shape; C) Intra-operative use of the molds.
During the CAD modeling, “channels for extrusion of exceeding PMMA were inserted in the molds along the thickness of the plate, allowing for improved filling of the molding chamber. Molds were individually exported as stereolithographic (STL) files and then imported in the Preform software (Formlabs, Somerville, CA), for 3D-printing optimization and creation of supports. The resulting project was uploaded in the Form 2 3D-printer (Formlabs, Somerville, CA) and a Grey Pro resin cartridge was used to create a stereolithographic model of the molds… Finished objects were sent for hydrogen peroxide gas plasma sterilization, a low-temperature process, which does not cause any deformation on the molds, ensuring the shape quality as planned.”
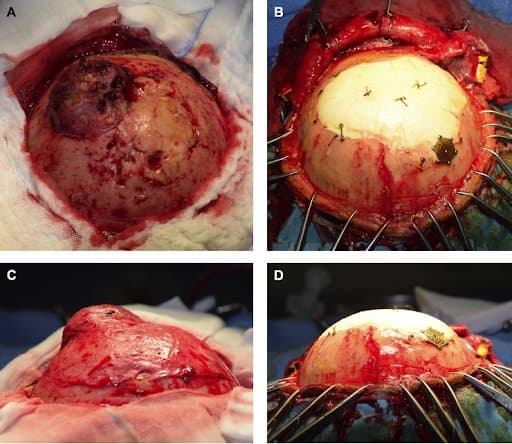
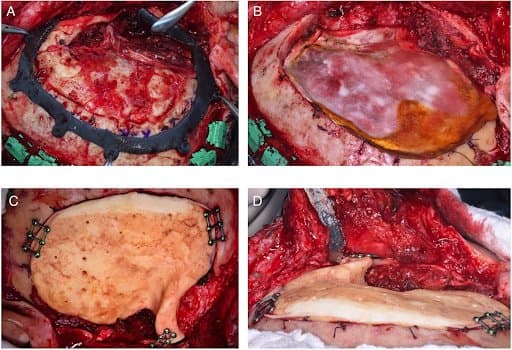
Intra-operative views.
A) and C): pre-operative appearance;
B) and D) after reconstruction
Results: “All surgeries were uneventful. No adverse reactions to PMMA were observed. Accuracy of the procedure was validated, showing a submillimetric deviation from the original planning and a plate thickness value similar to the adjoining bone. All steps of design and production were performed by the surgical team, and costs were seven to ten times less than in the past.”
Discussion: “We performed a mixed-cost analysis to describe the economic impact our protocol can have on the hospital budget, considering that, in addition to the low cost of materials, including resins and PMMA, the cost for the software is invariable; therefore, if 20 cranioplasties are performed in one year, the cost using our protocol is approximately $30,000, while third-party companies may account for an economic burden ranging from $100,000 to $160,000. Moreover, the same software can be used for many other surgeries, thereby lowering the overall cost of surgical procedures for oral and maxillofacial surgery. It should be acknowledged that delegating such processes to an external company requires additional advance planning (from 10 to 30 days according to our previous experience). Conversely, the planning process using a completely in-house protocol is much more direct, and the time necessary to design and print the molds is limited to 48 hours, increasing the flexibility of the clinical workflow.”
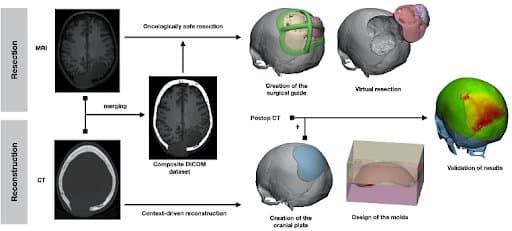
Graphical flowchart summarizing the steps of the protocol.
Conclusion: “We discussed and improved previous reports in the field of computer-guided in-house cranioplasty, particularly when complex one-stage resective and reconstructive procedures are planned. The use of three-dimensional analyses provides a validation of the accuracy of the resulting cranial reconstruction. The authors hope that the results might inspire other colleagues to consider computer-guided in-house cranioplasty, giving surgeons the mastery of each planning phase with a substantial decrease in costs.”
Citation: Alessandro Tel, Francesco Tuniz, Sara Fabbro, Salvatore Sembronio, Fabio Costa, Massimo Robiony, Computer-Guided In-House Cranioplasty: Establishing a Novel Standard for Cranial Reconstruction and Proposal of an Updated Protocol, Journal of Oral and Maxillofacial Surgery, Volume 78, Issue 12, 2020, Pages 2297.e1-2297.e16, ISSN 0278-2391, https://doi.org/10.1016/j.joms.2020.08.007
Cranioplasty With a Low-Cost Customized PMMA Implant Using a Desktop 3D Printer
Introduction: “Cranioplasty implants should be widely available, low in cost, and customized or easy to mold during surgery. Although autologous bone remains the first choice for repair, it cannot always be used due to infection, fragmentation, bone resorption, or other causes, which led to use of synthetic alternatives. The most frequently used allogenic material for cranial reconstructions with long-term results is polymethylmethacrylate (PMMA). Three-dimensional printing technology has allowed the production of increasingly popular customized, prefabricated implants. The authors describe their method and experience with a customized PMMA prosthesis using a precise and reliable low-cost implant that can be customized at any institution with open-source or low-cost software and desktop 3D printers.”
Materials and Methods: “A review of 22 consecutive patients undergoing CT-based, low-cost, customized PMMA cranioplasty over a 1-year period at a university teaching hospital was performed…
Postoperative data included morbiditiy and complications, such as implant exposure, infection, hematoma, seroma, implant failure, and seizures; the cost of the implant; and cosmetic outcome.”
During the design phase… “The implant is verified to match perfectly with the skull’s perimeter. The next step is to model the mold for the implant using the same open-source image-editing software. When finished, the mold must be exported to a stereolithography format for printing. Then the mold is sterilized, and the implant is customized during or before surgery, pressing the PMMA into the mold when it is in its plastic phase until its complete polymerization. ”

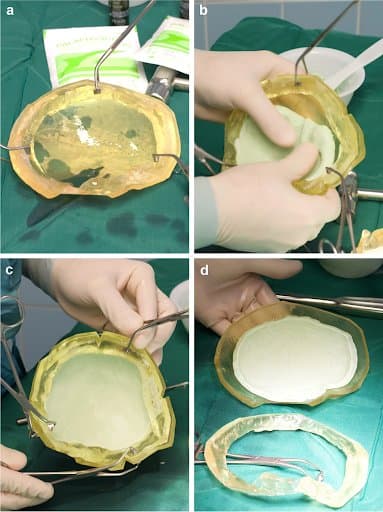
Design phase

Creating the mold

Preforming the implant
Results: “Indications for the primary craniectomy were traumatic brain injury, tumor resection, infection, and vascular. The median interval between previous surgery and PMMA cranioplasty was 12 months. The operation time ranged from 90 to 150 minutes (mean 126 minutes). The average cranial defect measured 65.16 cm2 (range 29.31–131.06 cm2).
During the recovery period, there was no sign of infection, implant rejection, or wound dehiscence, and none of the implants had to be removed over a follow-up ranging from 1 to 6 months. The aesthetic appearance of all patients was significantly improved, and the implant fit was excellent.”
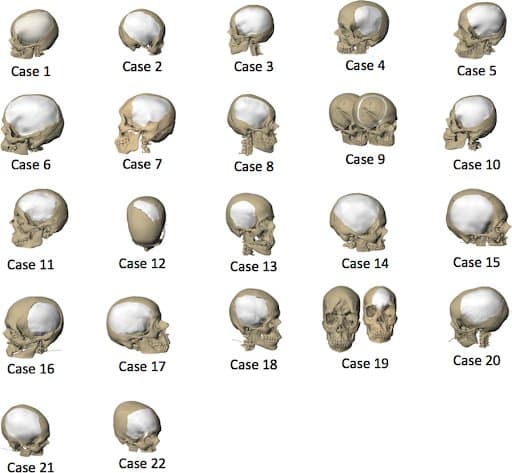
Illustrations showing the customized polymethylmethacrylate implants for each patient.
Discussion: “To our knowledge, there is no report of computer-designed customized cranioplasty usage in low- and middle-income countries where the incidence of cranioplasty should be expected to be higher. In a high-income country, it is expected that the implant would be offered without cost to the patient but not in most middle- and low-income countries… by sharing our experience using a reliable and low-cost method that can be performed in any institution with open-source or low-cost software and a desktop 3D printer, we hope to facilitate the advancement of customized cranioplasty. In the end, the democratization of technology will help every novel and creative spirit to develop and embark on future directions in world neurosurgery.”

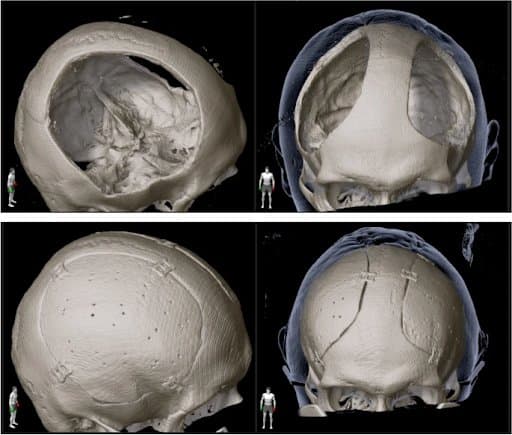
This 23-year-old patient, who was involved in a motorcycle accident, was diagnosed with an acute subdural hematoma for which a craniectomy was performed. A customized cranioplasty was applied seven months later.
Conclusion: “The use of a customized PMMA was associated with excellent patient, family, and surgeon satisfaction at follow-up at a fraction of the cost associated with commercially available implants. This technique could be an attractive option to all patients undergoing cranioplasty.”
The “Springform” Technique in Cranioplasty: 3DP Templates for Intraoperative Modelling of PMMA Cranial Implants
Introduction: “Manual moulding of cranioplasty implants after craniectomy is feasible, but does not always yield satisfying cosmetic results. In contrast, 3D printing can provide precise templates for intraoperative moulding of polymethylmethacrylate (PMMA) implants in cranioplasty. Here, we present a novel and easily implementable 3D printing workflow to produce patient-specific, sterilisable templates for PMMA implant moulding in cranioplastic neurosurgery.”
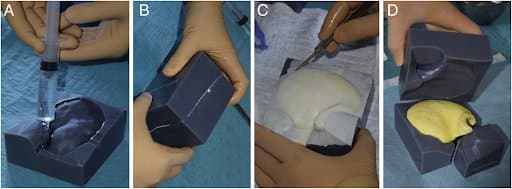
Materials and Methods: “3D printable templates of patients with large skull defects before and after craniectomy were designed virtually from cranial CT scans. Both templates - a mould to reconstruct the outer skull shape and a ring representing the craniectomy defect margins - were printed on … a Formlabs Form 3B or Form 2 stereolithography printer using biocompatible photopolymer resins (Formlabs Dental SG Resin, Formlabs Surgical Guide Resin)... and sterilised after curing [autoclave at 134 °C for at least 20 min]. Implant moulding and implantation were then performed intraoperatively using the templates. Clinical and radiological data were retrospectively analysed.”
Ring (a, b) and cover (c, d) template are loaded into PreForm 3.12.2 software and support structures for printing are automatically added (b, d). No support structures are added at the inner side of the cover and the outer side of the ring template, thus ensuring an even surface for implant moulding
“Prior to the first surgical application of the method, a trial implant was produced in the described manner. The heating of PMMA during polymerisation process did not affect the shape or structure of the cured resin templates.”
Results: ”Sixteen PMMA implants were performed on 14 consecutive patients within a time span of 10 months. The median defect size was 83.4 cm2 (range 57.8–120.1 cm2). Median age was 51 (range 21–80) years, and median operating time was 82.5 (range 52–152) min. No intraoperative complications occurred; PMMA moulding was uneventful and all implants fitted well into craniectomy defects. Excellent skull reconstruction could be confirmed in all postoperative computed tomography (CT) scans. In three (21.4%) patients with distinct risk factors for postoperative haematoma, revision surgery for epidural haematoma had to be performed. No surgery-related mortality or new and permanent neurologic deficits were recorded.”
Preoperative implant production: ring and cover template are clamped firmly together, a thin layer of neutral oil is applied (a). PMMA dough is modelled into the templates until heating occurs (b). After largely completed polymerisation, the ring is removed (c, d) and the implant can be inserted into the patient
Comparison of prebilateral cranioplasty (upper row) and postbilateral cranioplasty (lower row) shows very good fit of the implants and symmetrical reshaping of the skull.
Discussion: “The novel “springform” technique for cranioplasty is feasible and combines the advantages of in-house production with the quality of CAD implants at much lower costs. All implants showed excellent fit and appealing cosmetic results. Operation time was short and intraoperative handling of the moulding process straightforward. Thus, we were able to implement the described workflow in our institution. In our series, excellent cosmetic results could be achieved which are in line with other 3D printing studies for implant moulding in cranioplasty”
“To perform all steps of implant creation in one institution - from image fusion and segmentation to printing and sterilisation - gives the surgeon the possibility to guarantee quality throughout the whole process and apply changes in design as needed."
Conclusion: “Our novel 3D printing-aided moulding workflow for elective cranioplasty with patient-specific PMMA implants proved to be an easily implementable alternative to solely manual implant moulding. The “springform” principle, focusing on reconstruction of the precraniectomy skull shape and perfect closure of the craniectomy defect, was feasible and showed excellent cosmetic results. The proposed method combines the precision and cosmetic advantages of computer-aided design (CAD) implants with the cost-effectiveness of manually moulded PMMA implants.”
Maximizing Possibilities of Guided Surgery for Complex Craniofacial Reconstruction
Introduction: “Craniofacial reconstruction represents a major challenge due to the complex anatomical morphology. Although implant production has often been outsourced to external companies, in-house planning and manufacturing has developed in many centres. This note introduces a conceptualized modular mould system to perform any desired craniofacial reconstruction, named ‘Cubik’, inspired by the famous Rubik’s cube. A sophisticated virtual process is described that simulates realistic cranio-orbital resections, and the workflow to create multi-component moulds in order to achieve intraoperatively moulded implants is presented”
Methods and Materials: “This was an institutional review board-approved retrospective case-series study conducted during the period between March 2019 and October 2020. Seven patients undergoing extended cranio-orbital resection and requiring a concomitant customized reconstruction were included… All patients underwent thin-slice volumetric computed tomography (CT)... Using polygon-marking techniques on high-resolution polygonal meshes, a freehand osteotomy was simulated… “
“After the digital design of the Cubik had been validated in a multidisciplinary meeting between maxillofacial surgeons and neurosurgeons, STL files were sent to a Form 2 printer (Formlabs, Somerville, CA, USA). Moulds were sterilized using hydrogen peroxide in order not to induce any thermal modification to the 3D printed polymer resins and then sent to the operating room”
Multi-piece mould printed with Grey Pro resin. A thin layer of sterile paraffin was applied to the mould chambers to prevent the final implant sticking to the wall of the moulds during the exothermic reaction of the PMMA.
Results: “All surgeries were uneventful, and no intraoperative complications occurred. No adverse effects or allergies to the implant were reported. There were no infections related to the implant… In all cases, the intraoperative creation of the prosthesis was successful and it did not prolong the surgical time since it was conducted by two dedicated surgeons working on a separate bench while the resection was being performed.”
Intraoperative phases: (A) to further improve the navigation-assisted design of the craniotomy and the orbital marginotomy, a surgical guide is modelled and positioned; (B) the bone flap containing the relapsing meningioma is removed and a dural substitute is placed over the dura; (C) overview of the final implant in the correct place; (D) reconstruction of the lateral orbital rim and zygomatic arch projection.
Discussion: “In summary, this paper is novel in presenting a rethinking of the moulding technique, showing how the use of multi-component (three or more components) moulds allows a much wider variety of anatomical structures to be represented, without being restricted to simple cranial vault plates.”
Conclusion: ”The use of Cubik does not prolong the overall duration of surgery, and it appears to be a very versatile tool, allowing personalized implants with different morphology to be created, which are suitable to cover every potential defect of the skull and the orbital region.”
3D Printing Molds: Evaluating Surface Coatings To Reduce Bone Cement Adhesion
Background: “Polymethyl methacrylate [PMMA], or “bone cement,” can be used intraoperatively to replace damaged or diseased bone and to deliver local antibiotics. 3D printed molds allow surgeons to form personalized and custom shapes with bone cement. One factor hindering the clinical utility of anatomically accurate 3D printed molds is that cured bone cement can be difficult to remove due to the strong adhesion between the mold and the bone cement. One way to reduce the adhesion between the 3D printed mold and the cured bone cement is with the use of a surface coating, such as a lubricant. This study sought to determine the optimal surface coating to prevent bone cement adhesion to 3D printed molds that could be utilized within a sterile operating room environment.”
Materials and Methods: “The molds were printed using a Form 3BL (Formlabs, Somerville, MA) stereolithography printer using the biocompatible Biomed Amber resin with 0.100 mm z-axis resolution. The molds were coated with four sterile surface coatings available in most operating theatres (light mineral oil, bacitracin ointment, lubricating jelly, and ultrasound transmission gel). Polymethyl methacrylate with tobramycin antibiotic was mixed and poured into the molds. The amount of force needed to “push out” the cured bone cement from the molds was measured to determine the efficacy of each surface coating.
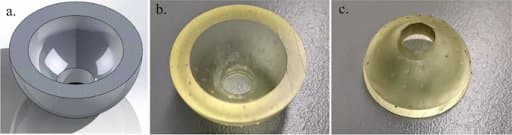
The SolidWorks model of the hemispherical mold (a). Concave surface of mold (b). Back of mold (c). The inner diameter of the mold is 2.5 cm with a height of 1.25 cm, and the outer diameter is 3.5 cm with a height of 1.75 cm
“... this type of printer is capable of printing with high enough resolution for medical applications and can print using biocompatible materials. In addition to being biocompatible, the high melting point of this material allowed it to avoid issues that have faced other materials used as bone cement molds, as the methyl -methacrylate hardens in an exothermic reaction. After printing, the molds were washed with isopropyl alcohol (IPA) for 20 minutes, “post-cured” with UV light at 70C for 30 minutes, and autoclaved at 134C for 20 minutes ”
Results: “The average pushout force for the surface coatings, in increasing order, were as follows (mean ± standard deviation) --- bacitracin ointment: 9.10 ± 6.68 N, mineral oil: 104.93 ± 69.92 N, lubricating jelly: 147.76 ± 63.77 N, control group: 339.31 ± 305.20 N, ultrasound transmission gel 474.11 ± 94.77 N. Only the bacitracin ointment required significantly less pushout force than the control (p = 0.0123)”
Conclusion: “The bacitracin ointment was the most effective surface coating, allowing the bone cement to be pushed out of the mold using the least amount of force. In addition, the low standard deviation speaks to the reliability of the bacitracin ointment to reduce mold adhesion compared to the other surface coatings. Given its efficacy as well as its ubiquitous presence in the hospital operating room setting, bacitracin ointment is an excellent choice to prevent adhesion between bone cement and 3D printed molds intraoperatively.”