
How to 3D Print Anatomical Models for Preoperative Planning and Enhanced Patient Consent
How to 3D Print Anatomical Models for Preoperative Planning and Enhanced Patient Consent
Introduction
3D printed models are becoming increasingly useful tools in today’s practice of personalized, precision medicine. As cases become more complex and treatments truly unique, visual and tactile anatomical models can enhance understanding and communication in the process of reaching a patient-specific solution.
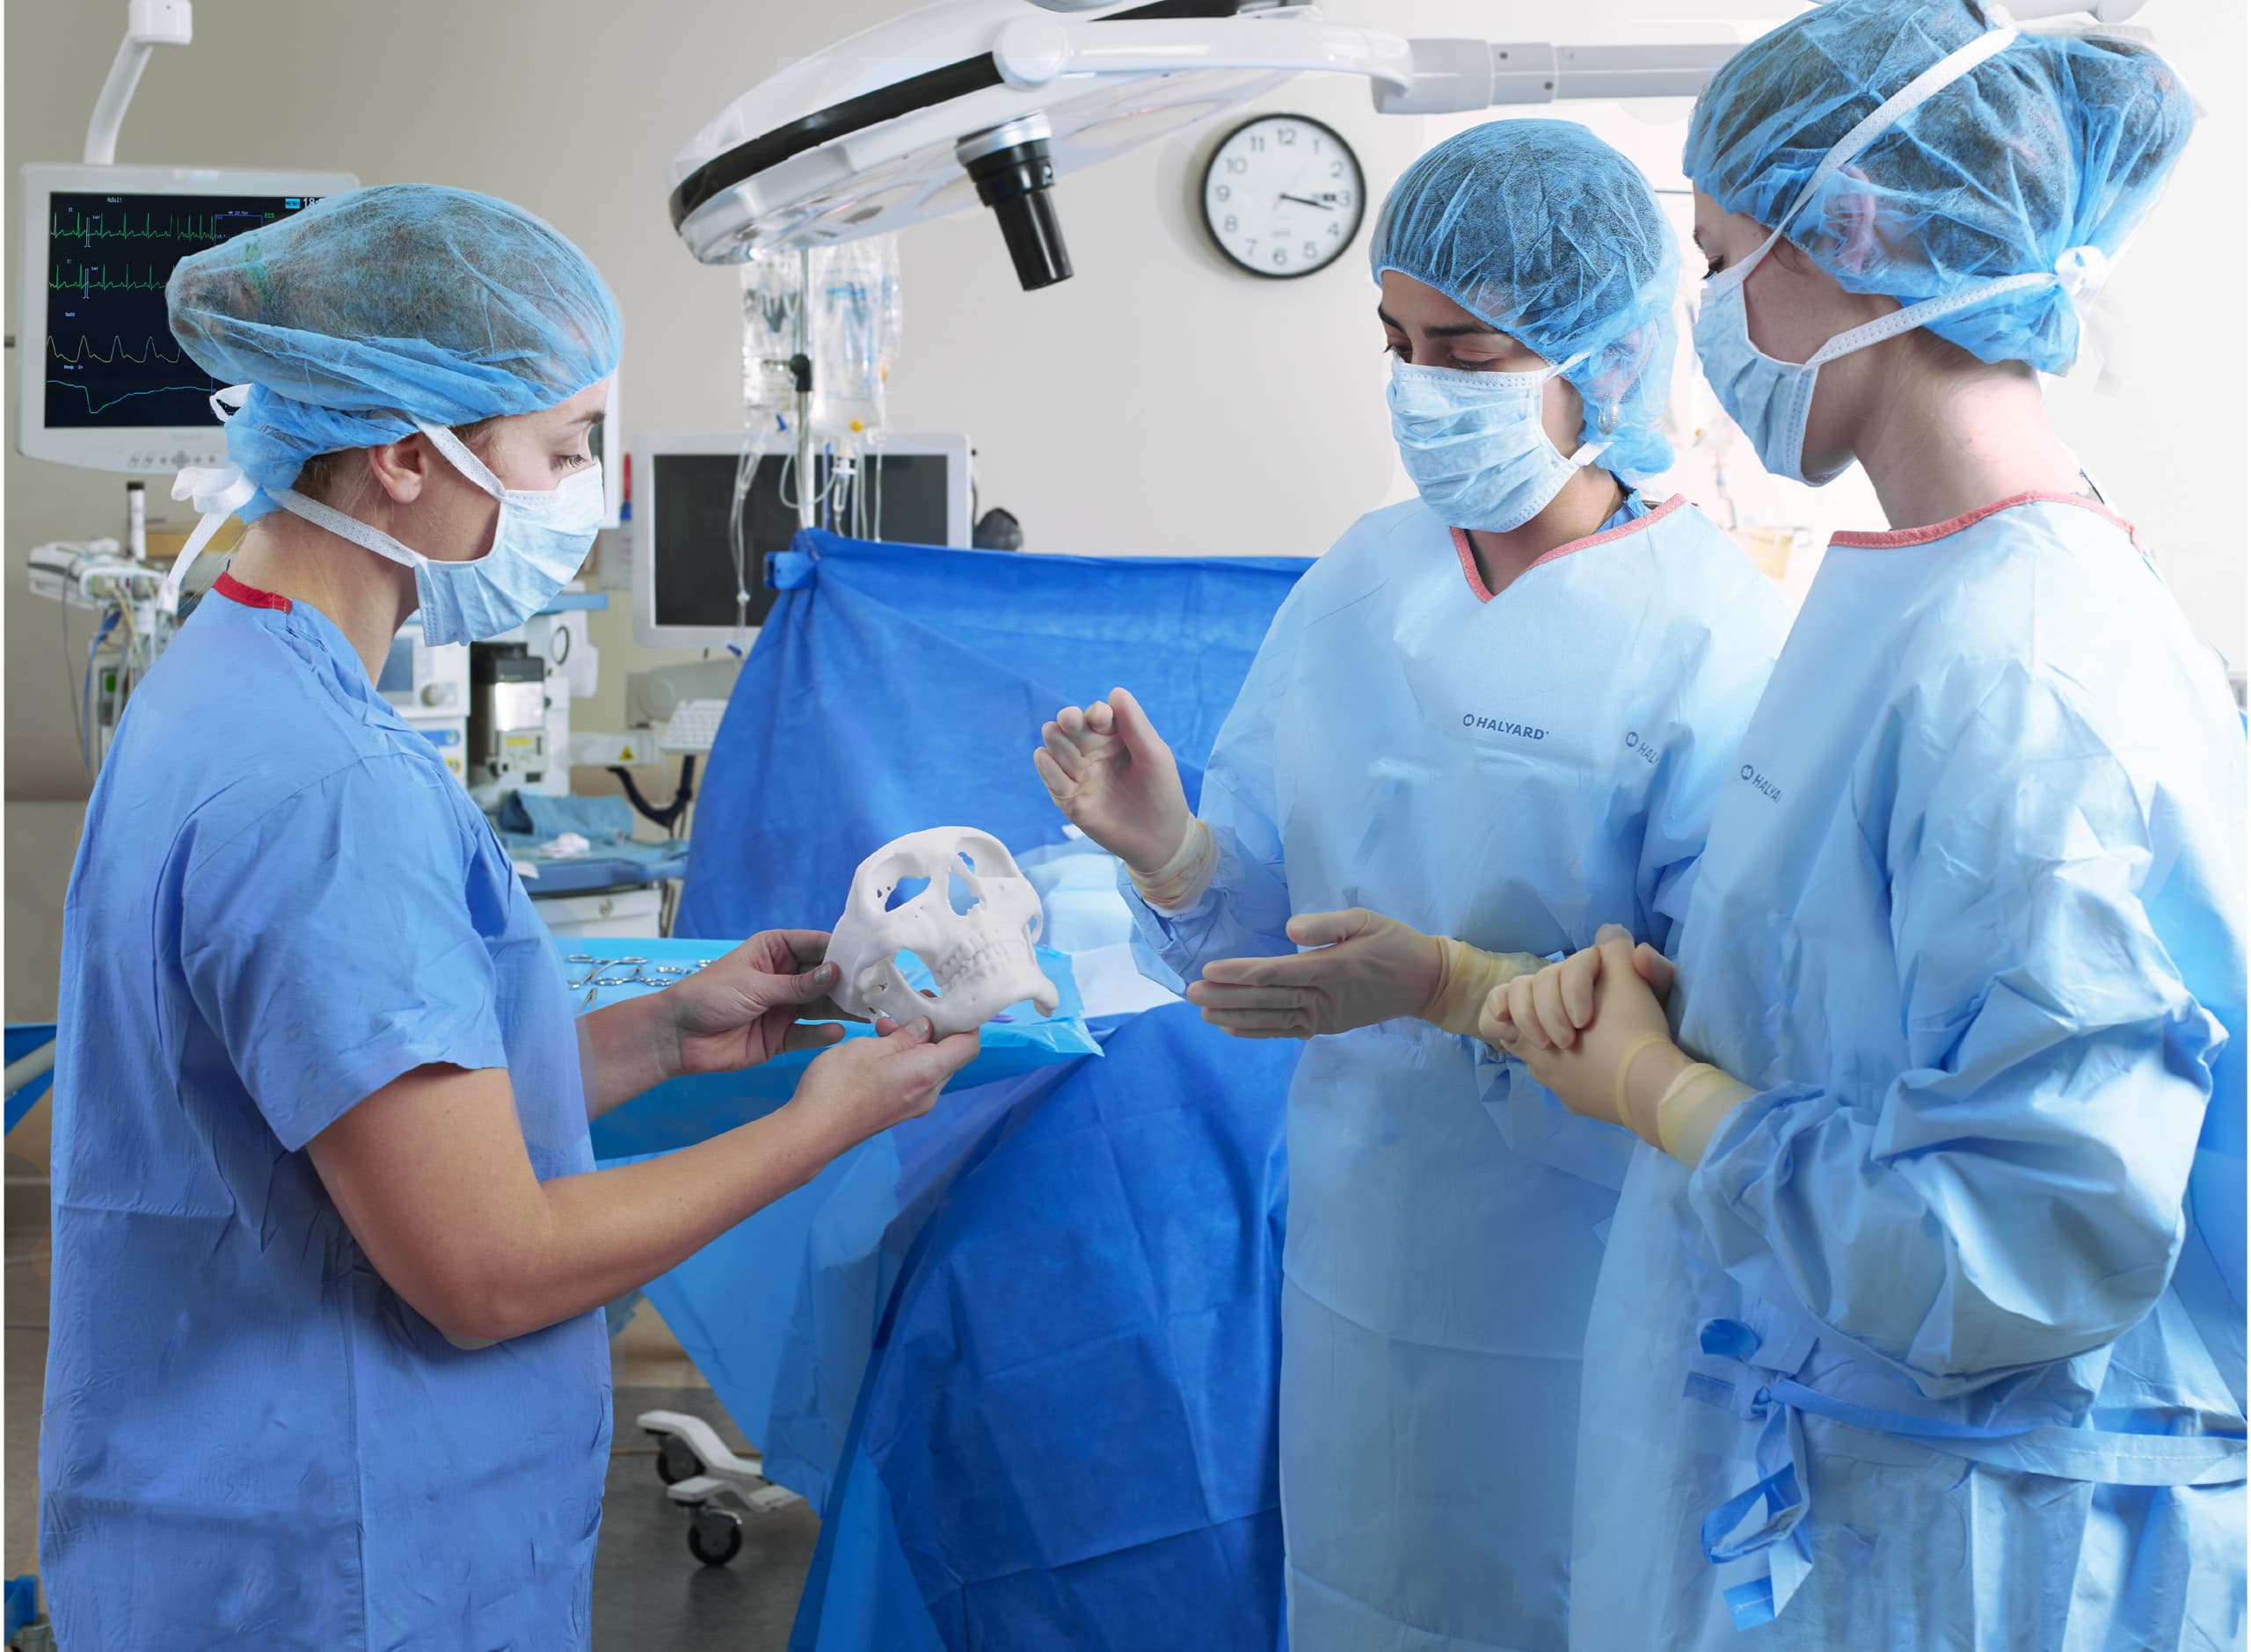
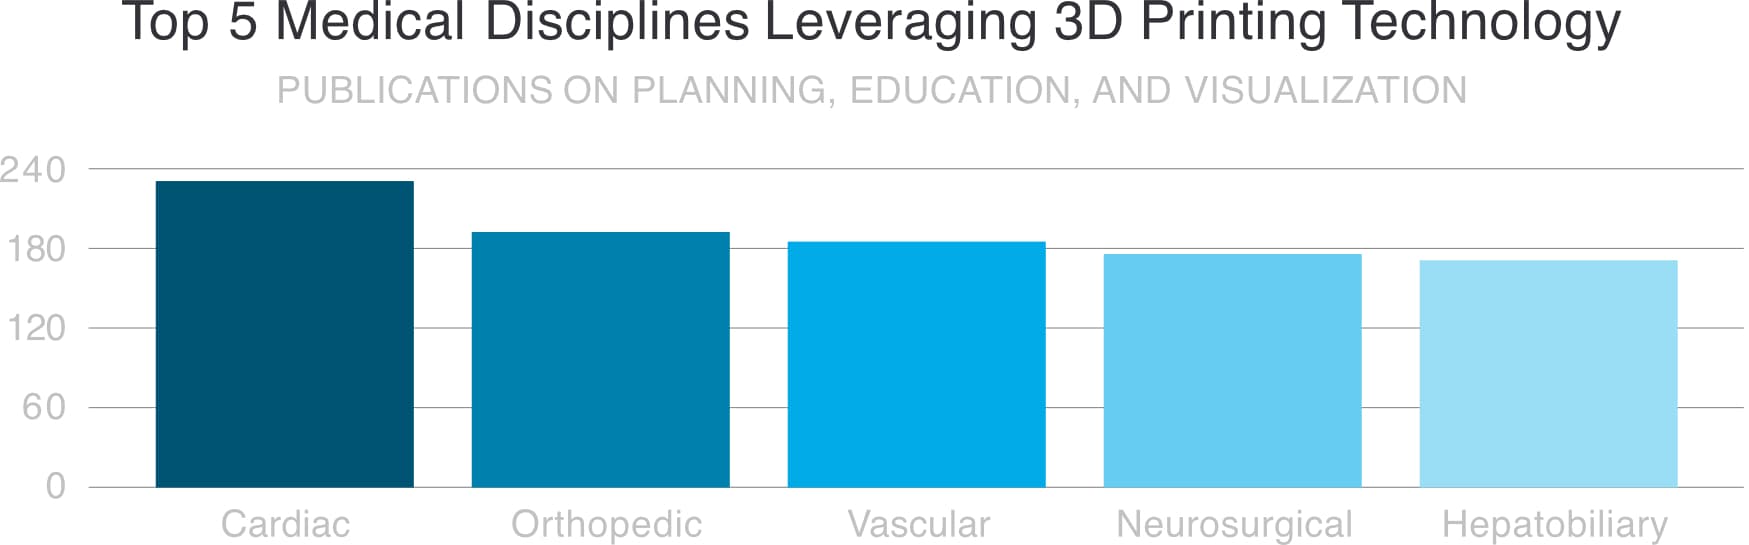
Healthcare professionals, institutions, and organizations across the globe are using 3D printed anatomical models as reference tools for preoperative planning, intraoperative visualization, and sizing or pre-fitting medical equipment for both routine and highly complex procedures that have been documented in hundreds of publications. 1 Physicians often save time preparing for and conducting surgeries, leading to drastically reduced operating room costs while lowering patient risk, anxiety, and recovery time.
This guide offers a practical, step-by-step walkthrough for physicians and technologists to go from patient scan to 3D printed model, reviewing best practices for setting up a CT/MRI scan, segmenting datasets, and converting files to a 3D-printable format.
"A unique advantage of image-based 3D printing is the ability to demonstrate
anatomic spatial relationships with submillimeter accuracy."
Anatomical models printed on Formlabs machines are already being used across several sub-specialties of surgery, including but not limited to orthopedic, cardiothoracic, vascular, oral and maxillofacial (OMFS), oncology, plastics, reconstructive, urology, and pediatric. This tutorial provides an overview of steps that can be applied to any Digital Imaging and Communications in Medicine (DICOM) dataset, which is the standard format for image storage in any modern picture archiving and communication system (PACS).
WHAT YOU’LL NEED FOR ON-SITE 3D PRINTING
CT or MRI scan and associated DICOM file
- Recommended slice thickness: 0.25 mm-1.25 mm2
Computer with medical imaging software for segmentation, or use of an outsourced
segmentation service
Form 2 3D printer and resin, for example:
- White Resin for orthopedics or OMFS
- Clear Resin for cardiovascular or urology
- Dental SG Resin for surgical guides (approved uses only)
Form Wash and Form Cure for post-processing 3D prints (recommended for medical models)
Applications and Benefits of 3D Printed Anatomical Models
Formlabs is an industry-leading provider of 3D printers and materials that are used by healthcare providers to support the practice of medicine. Please consider local regulations, material data sheets, patient information, and institutional requirements before 3D printing or using anatomical models. For more information, visit our regulatory information page.
Depending on your institution, anatomical models may be used for patientor pathology-specific purposes:
- Preoperative planning and intraoperative reference models for surgeons
- Device sizing (e.g., mandibular plates) and surgical tool design*
- Molds for implantable material or prostheses*
- Trainee education and simulation labs
- Patient education and enhanced informed consent
*May be subject to regulation and/or require institutional approval
Numerous published case studies and ongoing efforts have demonstrated the potential of 3D printing in a clinical setting. Published use cases include preoperative planning3, intraoperative use4, patient-specific instrument guides5, custom-tailored implants6, molds for bone cement⁷ or polymethyl methacrylate (PMMA) implants8, prostheses9, and trays.
These use cases have seen success in a variety of fields and surgical specialties, including orthopedic, cardiac, oral and maxillofacial (OMFS), vascular, neurological, cardiothoracic, musculoskeletal, plastics and non-facial reconstructive surgery, oncology, pediatrics, interventional radiology, and others.
"As much as I’d like to think that my brain can reconstruct a 3D interpretation from a 2-D CT scan, I was surprised by the relative inaccuracy of the approach that I’ve been using for 20 years. The 3D printed models have been invaluable in planning, particularly when using the daVinci robot."
3D printed models can also have substantial benefit for educating medical residents, fellows, and students10. Patient-specific models are especially appealing when considered against the cost of cadaveric specimens and animal testing and their associated requirements for laboratory space, surgical instruments, and disposal.
Chepelev et al, 3D printing in Medicine, 2017. Image retrieved from http://www.materialise.com/en/blog/3d-printing-us-hospitals
Explore our collection of research publications to learn more about how Formlabs printers and materials have been used in healthcare.
Widespread use of advanced visualization in radiology has been key for diagnosis and communication among physicians. While these visualizations have traditionally lived in 2D planes from CT or MRI scans as DICOM files, software developers have recently created tools to reconstruct diagnostic images as 3D anatomic renderings.
3D printed models are a natural progression from these various 3D visualization options, and offer many additional benefits, such as tactile feedback and other tangible information, that visualizations cannot.
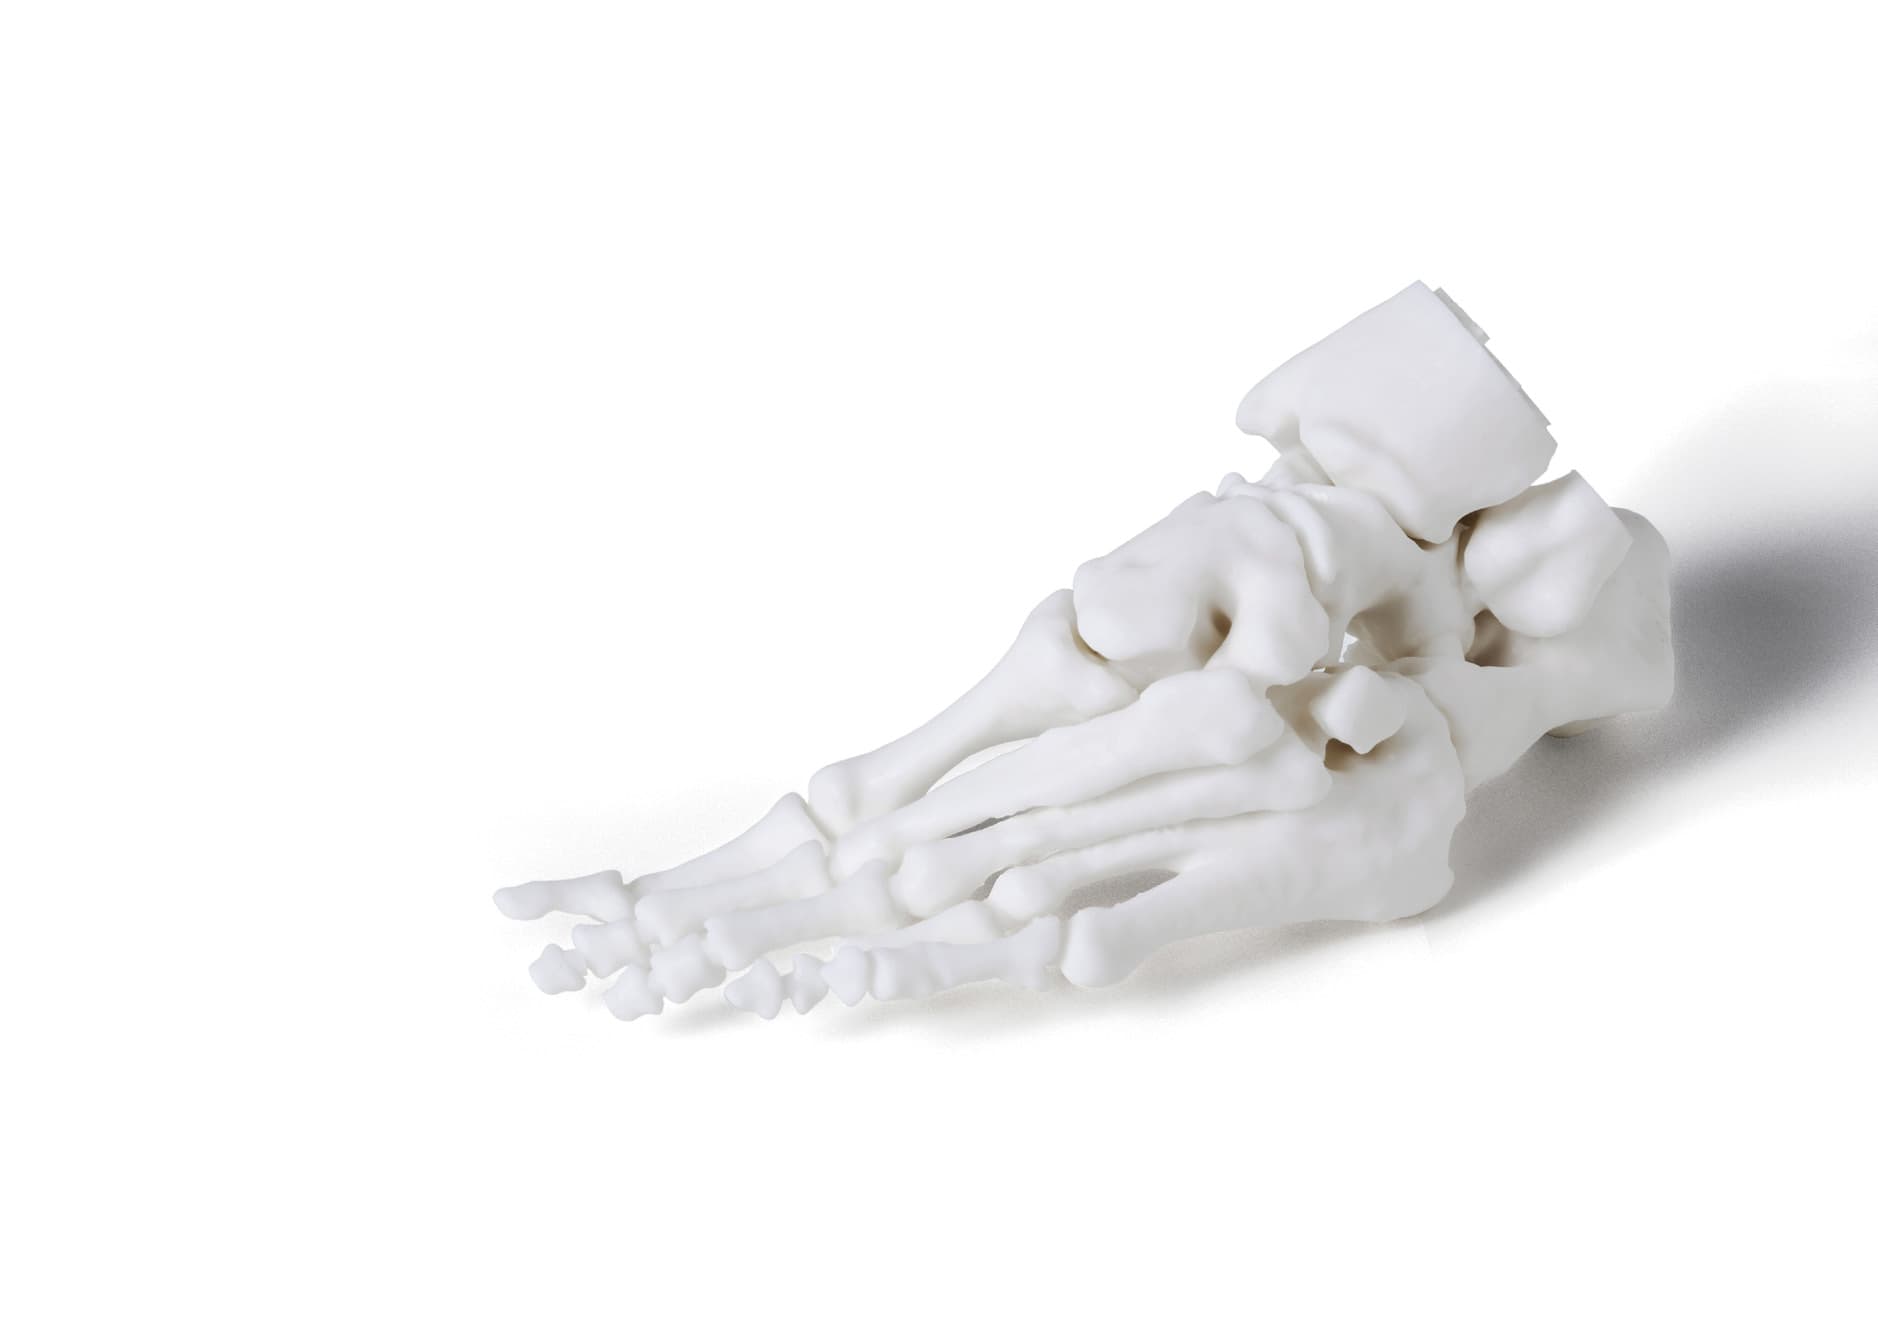
When a patient’s severe foot deformity could not be fully conceptualized with 2D images, surgeons used a 3D printed model to plan how to correct gait with equipment prior to surgery and communicate with clinical staff and registrars.
For example, examining a custom 3D printed model led an orthopedic surgeon in the UK to find a lower risk solution to a young boy’s abnormal forearm injury.
“Access to the model changed the standard treatment indicated by the CT scans from a four-hour complex osteotomy to a simple, much less invasive 30-minute soft tissue procedure,” said Dr. Michael Eames.
The successful surgery was completed in just under 30 minutes—a decrease of over three hours from the originally planned time in the operating room, saving the hospital an estimated $5,500. Subsequently, the patient spent less time in postoperative care and recovered faster11.
Workflows from Scan to 3D Printed Model
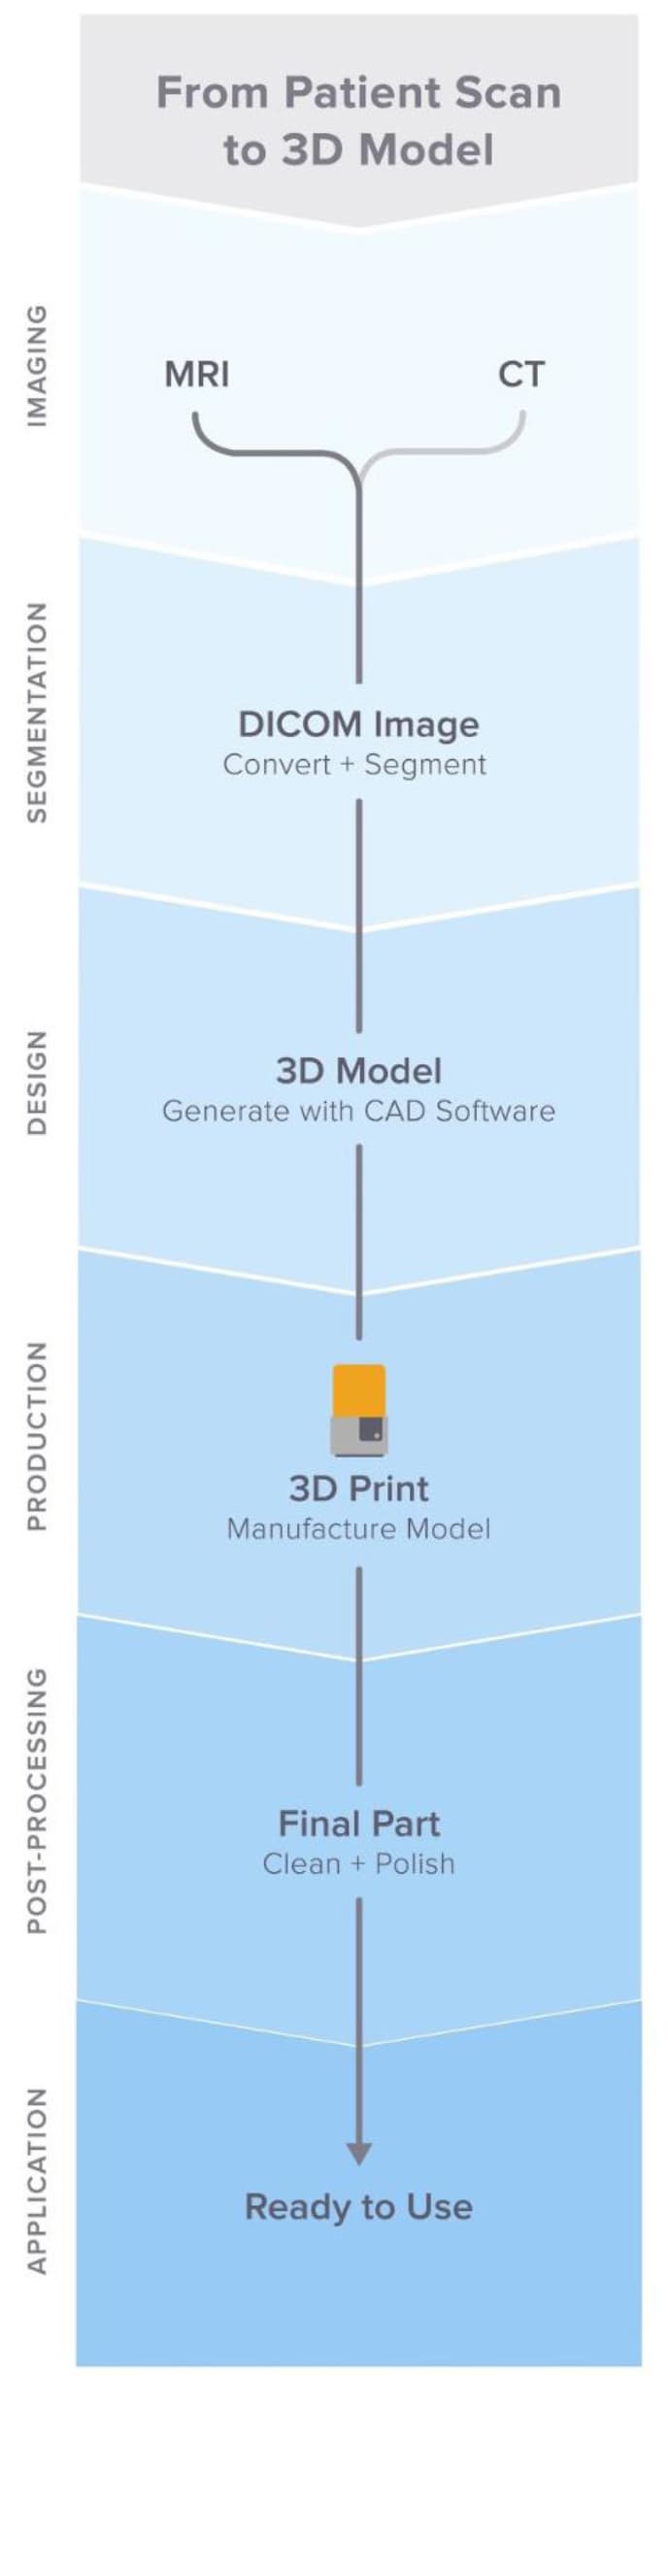
Generating 3D printable files and 3D printed models requires specific considerations and minor modifications in the medical imaging workflow.
The adapted workflow can be summarized in three stages: image acquisition, image segmentation, and 3D printing.
IMAGE ACQUISITION
Image acquisition is the first step that is already integrated into the workflow. The most common imaging methods useful for 3D printing are CT and MRI. In general, 3D models can be printed from any volumetric image dataset (slices) with sufficient contrast to differentiate tissues. Cone Beam CT is also commonly used for dental and ENT imaging, but the contrast resolution may be poorer than with traditional CT, making segmentation more difficult12. Find guidelines for setting up patient scans for 3D models in the second portion of this white paper.
IMAGE SEGMENTATION
The main objective of this step is to reduce the complexity of the original image, leaving the characteristics of interest intact and isolated. After a radiologist acquires the DICOM, they must obtain the regions of interest (ROI) to be rendered as a 3D printable object. The process of identifying and separating tissues and other regions of interest is called segmentation. Depending on the complexity of the model, this is either performed by a radiology technologist under the direction of the radiologist or by the radiologist directly. When the segmentation is done, it is reviewed with the surgeon for final approval13.
A range of commercial and open-source software is available (see the list at the end of this section) for the segmentation process. Consider the intended use, regulatory requirements in your geographic location, and guidelines within your institution before selecting a software solution.
Steps in ROI segmentation can involve automatic methods (e.g., thresholding, edge detection, and region growing) or manual selection and adjustments. Thresholding uses parameters that are identifiable and attributable to the specific ROI, such as bones with higher Hounsfield units relative to their surroundings.
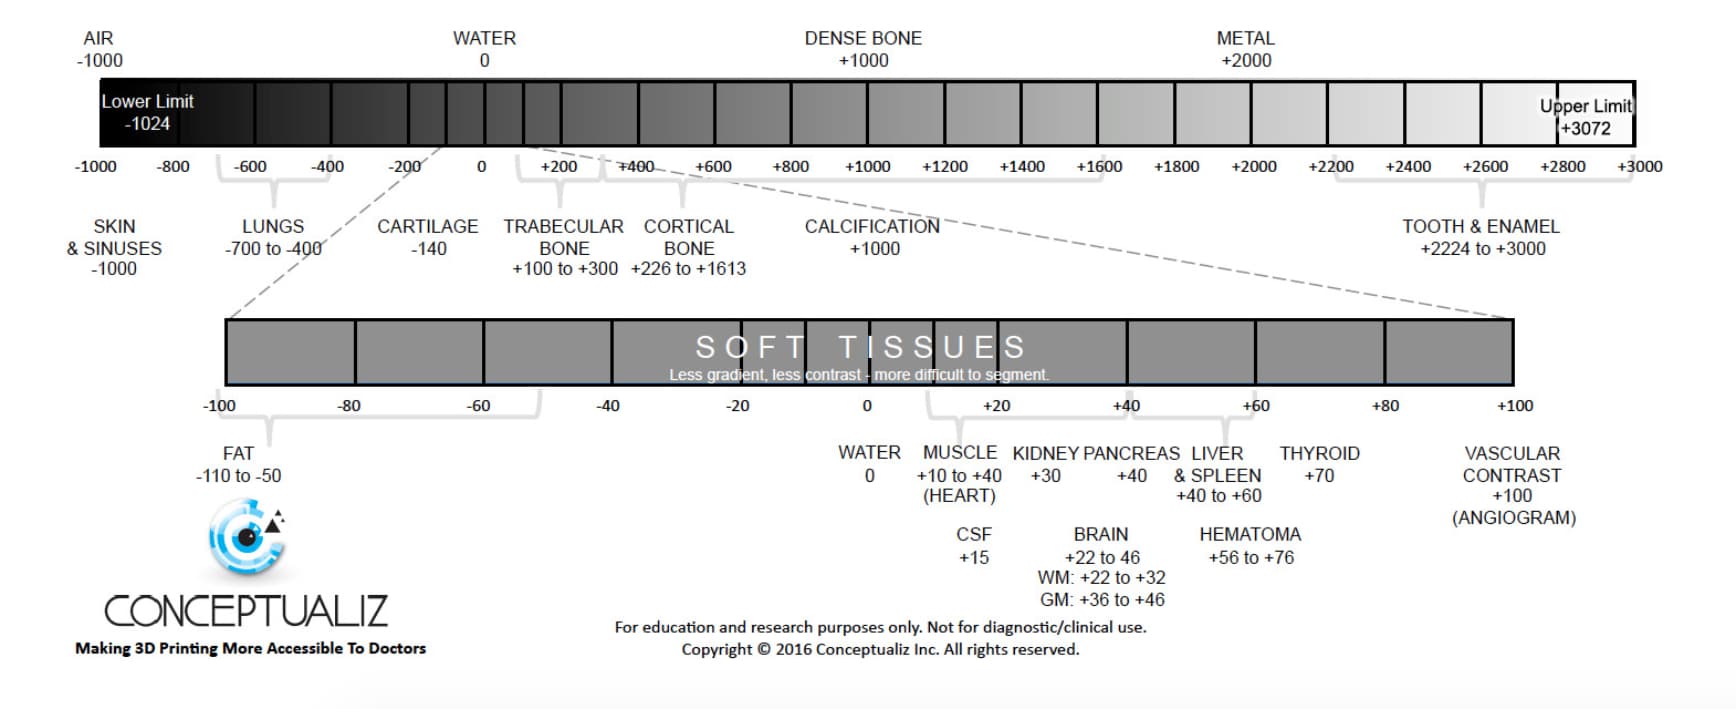
Thresholds may need to be dynamic and involve more complex algorithms to account for factors
such as CT noise and beam hardening that may produce artifacts and other undesired results.
Another option is to use region growing to automate segmentation, where an algorithm assigns
voxels as belonging to one part or another based on similarity or deviation from its surrounding
voxels. Additional adjustments and refinements may be necessary.
After segmentation is finished, convert segmented objects into a file type that a 3D printer can
use. This file type is typically an STL or OBJ file format.
After the conversion, perform any necessary physical adjustments that are more common in 3D
modeling, such as smoothing out surfaces, filling holes, and fixing other minor features. These
adjustments can be performed by a technician on a variety of CAD or CAM software and should
always include physician review to ensure that the output is clinically useful.
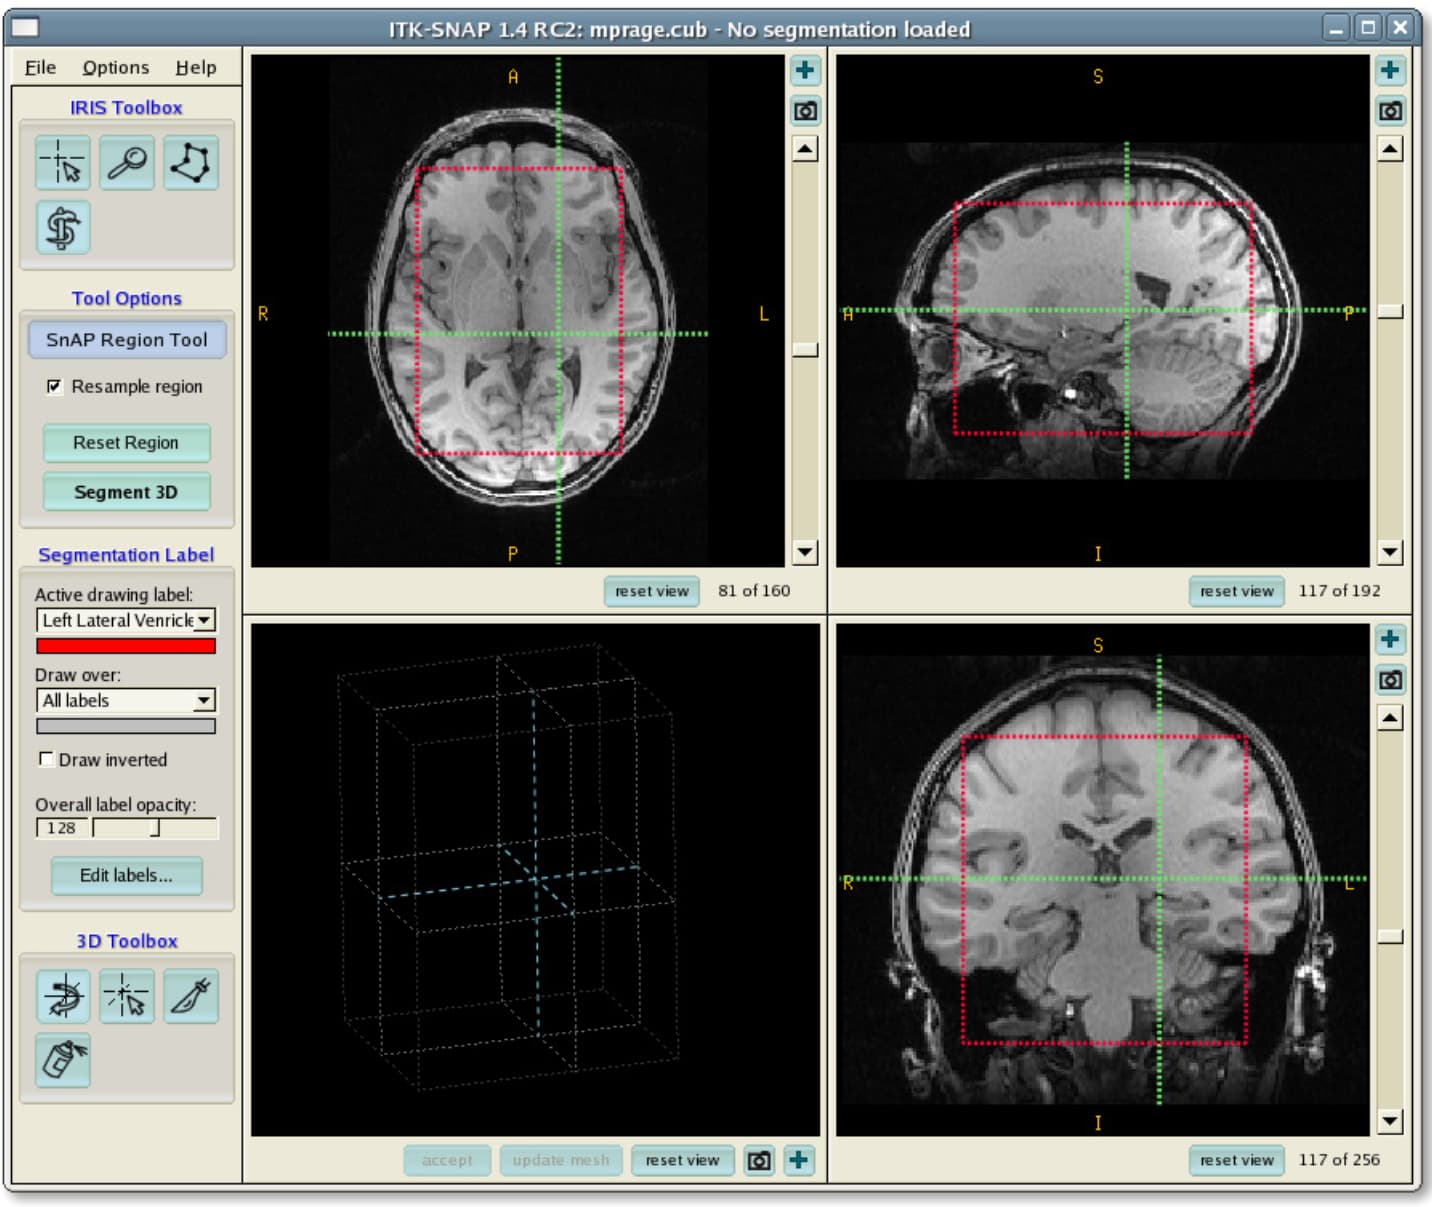
After a radiologist acquires the DICOM, they must obtain the regions of interest (ROI) to be rendered as a 3D printable object. Source: ITK-Snap
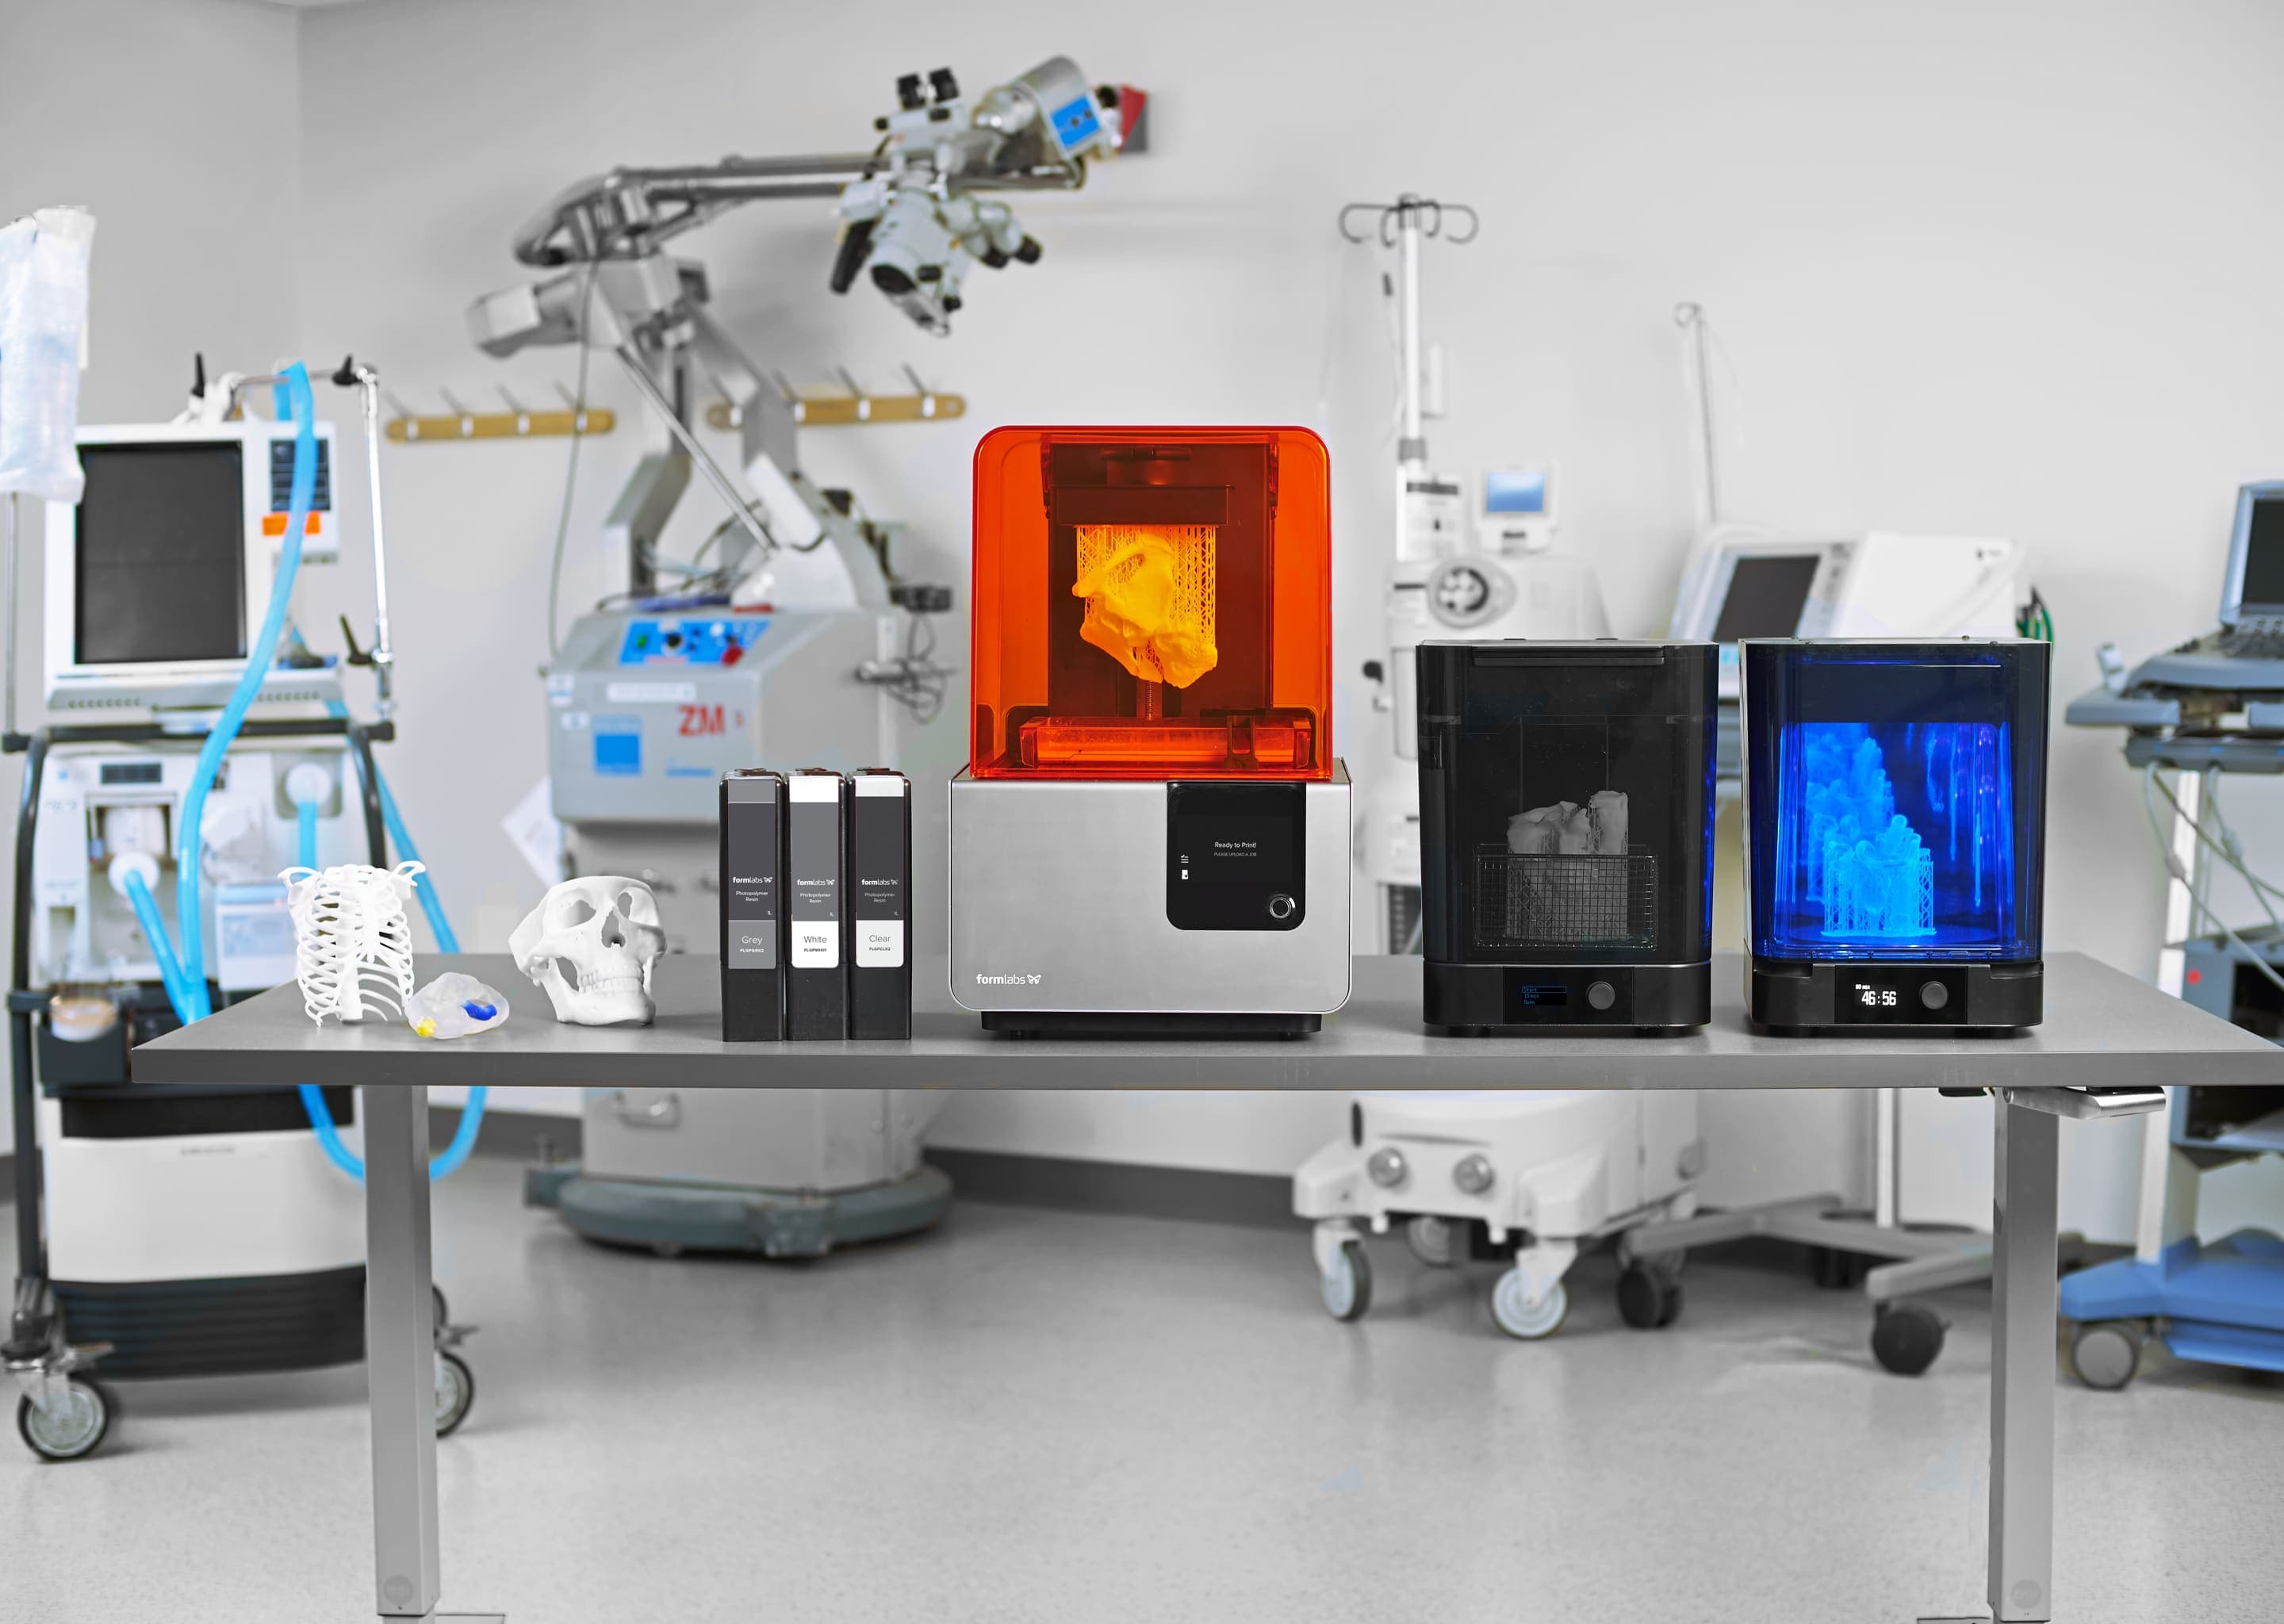
In-house 3D printing enables healthcare providers to quickly create high-resolution medical models.
3D PRINTING
Once the final file is ready, it can be exported and sent to a 3D printer for fabrication. There are
several key factors to consider when choosing the right 3D printing technology, including: the
cost of the printer, software, and materials; print speed, accuracy, and resolution; ease of use
and access to customer service; and the type of printing materials, including biocompatibility
and the ability to be sterilized for certain use cases.
After printing, parts must be washed in isopropyl alcohol (IPA) to remove excess resin and,
depending on the material and applications, post-cured in a cure chamber. All biocompatible
resins require post-curing before use, and Formlabs Standard Resins, such as White and Clear
Resin, increase in strength and stability after post-curing.
Additional information on printability
Visit our software support and resources pages for additional information on how to set
up files for printability and to learn more about design specifications, such as internal supports
and minimal wall thickness.
POTENTIAL SOFTWARE AND HARDWARE OPTIONS FOR ON-SITE 3D PRINTING
Note: only one software is required per section, which represent steps in the workflow. This list
is meant to facilitate reference and research only and is not an endorsement of any particular
software or vendor. For those who want anatomical models without segmentation or printing
on-site, specialized service providers offer conversion, segmentation, and/or printing services
for a fee (e.g., Anatomage, Armor Bionics, Axial3D, and Materialise).
Please consider your local regulatory guidelines and intended uses before selecting a
software solution.
| Conversion + Segmentation | |
|---|---|
| Materialise Mimics* | ITK-SNAP |
| 3D Slicer14 | 4DICOM |
| Axial3D | Seg3D |
| Osirix | Embodi3D (DICOM to STL conversion, no segmentation) |
| Ossa 3D | Vitrea Vital Images |
| Anatomage Medical Design Studio | |
| Editing Preparation + File Manipulation, Smoothing, and Identification | ||
|---|---|---|
| Blender | Materialise 3matic | Autodesk Meshmixer |
| Support Generation + Print Orientation | ||
|---|---|---|
| Formlabs PreForm | Materialise e-Stage Note: In cardiac cases, advanced support removal from within valves may be necessary (PreForm video tutorial - missing link) |
|
| Print Post-Processing | ||
|---|---|---|
| Formlabs Finishing Kit | Form Wash and Form Cure | |
| Ultrasonic Cleaner (e.g., GT Sonic) | CUREBox CB-4051 | |
* Formlabs and Materialise have partnered to offer an end-to-end bundle in the US, Europe, and Japan. Mimics inPrint is a dedicated software solution to create accurate virtual anatomical models based on medical images and to prepare files for 3D printing. Integrated into clinical environments (PACS), Mimics inPrint includes pre-defined workflows with a direct link to Formlabs 3D printers
Book a Consultation
Get in touch with our 3D printing experts for a 1:1 consultation to find the right solution for your business, receive ROI analyses, test prints, and more.
Setting Up Patient Scans for 3D Models
Some conventional medical imaging scans cannot be converted into high-quality 3D models to produce clear, accurate anatomic structures of interest. Plain radiographs (X-rays) and ultrasounds are not commonly used for 3D printing, and these imaging modalities are not recommended.
The most commonly obtained imaging modalities for evaluation of internal structures are CT scans and MRI imaging. These scans generate a DICOM file. DICOM is the standard for storing and transmitting medical images and can be considered a series of slices.
DICOM images cannot be edited in 3D design software or sent directly to a printer. In order to convert a DICOM file into a format suitable for 3D printing, such as an STL or OBJ file, a separate software is required to calculate the surface area of the structure of interest. This surface will then become the 3D model.
Almost any DICOM file with sufficiently fine detail (e.g., thin slices) can be converted into a format that allows for 3D printing of the structure(s) of interest.
The articles below may be helpful when preparing, printing, and post-processing
anatomical models:
Design Models for Printability
Design Specs and Best Practices for Geometric Features
Criteria for Generating a Printable Scan
The first consideration when turning a CT or MRI scan into a 3D model is what needs to be shown; bones, vessels, and solid organs all need to be modeled in different ways. A model with obsolete structures not only distracts from the focus of the model, but will also be more difficult to manufacture. A scan with proper characteristics makes it easier to create a 3D printable model. Basic features to consider are intravenous contrast and slice thickness.
For 3D models of bone structures, noncontrast images will likely be sufficient for accurate, detailed printing. Contrast-enhanced scans are almost always required for models that include solid organs, tumors, or vascular structures.
Introductory Information about Contrast
The variation in brightness on a CT scan allows segmentation software to separate out different structures, which allows you to print the area or organ of interest. Some structures, such as bones, are inherently bright on CT scans. This makes them easy to 3D print when starting from a noncontrast CT. However, intravenous (IV) contrast is necessary when you want to 3D print a blood vessel, tumor, or most organs. The contrast is given to the patient just prior to obtaining the scan, and will enhance these structures. With IV contrast, blood vessels (arteries and veins) and solid organs (e.g., the liver, kidneys, spleen, heart, and brain) are brighter on the scan, which allows segmentation software to accurately separate them from the surrounding tissues. See the images below for comparison of noncontrast and contrast-enhanced CTs of the abdomen.
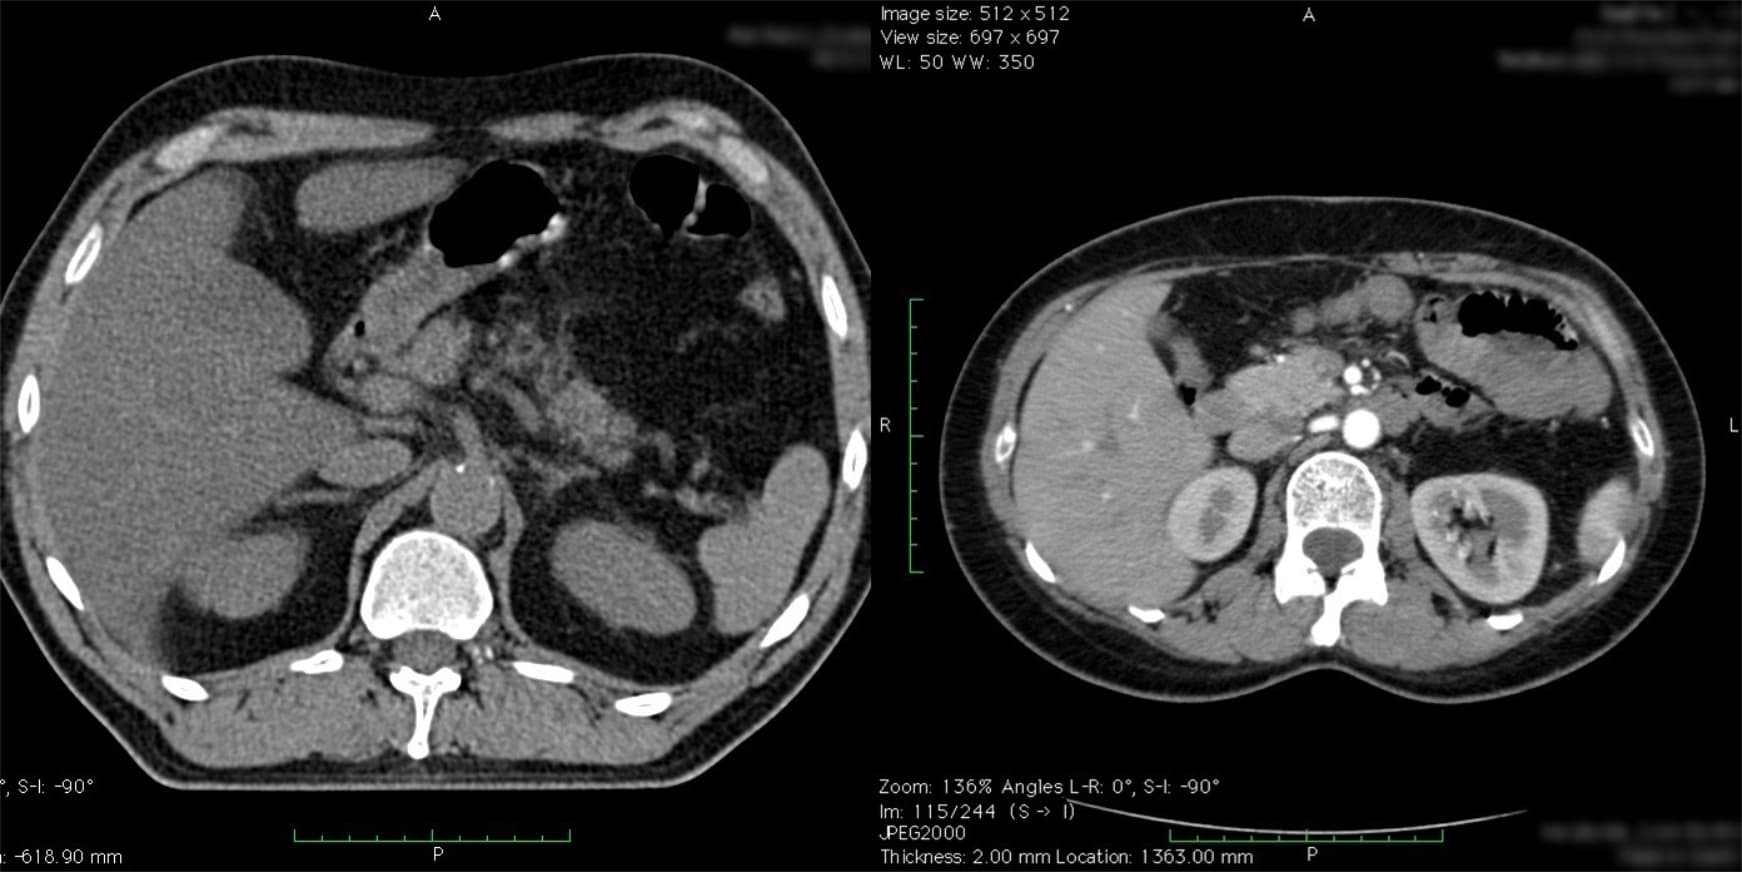
The effect of intravenous contrast is shown with these two axial (transverse) images of CT scans of the upper abdomen. In the righthand scan the aorta is enhanced, whereas on the lefthand scan the aorta appears quite similar to the adjacent soft tissues. Contrast allows for isolation of desired structures in post-processing. Source: Embodi 3D
In addition to contrast enhancement, slice thickness and resolution are equally important to consider when planning for 3D model creation. Most clinically useful scans are obtained with adequate resolution for 3D printing. However, if you try to 3D print an anatomical model from a scan with thick slices, your model will have a rough finish. According to numerous sources, it is very important to use scans with slices less than thinner than 1.25 mm when creating a model for 3D printing.
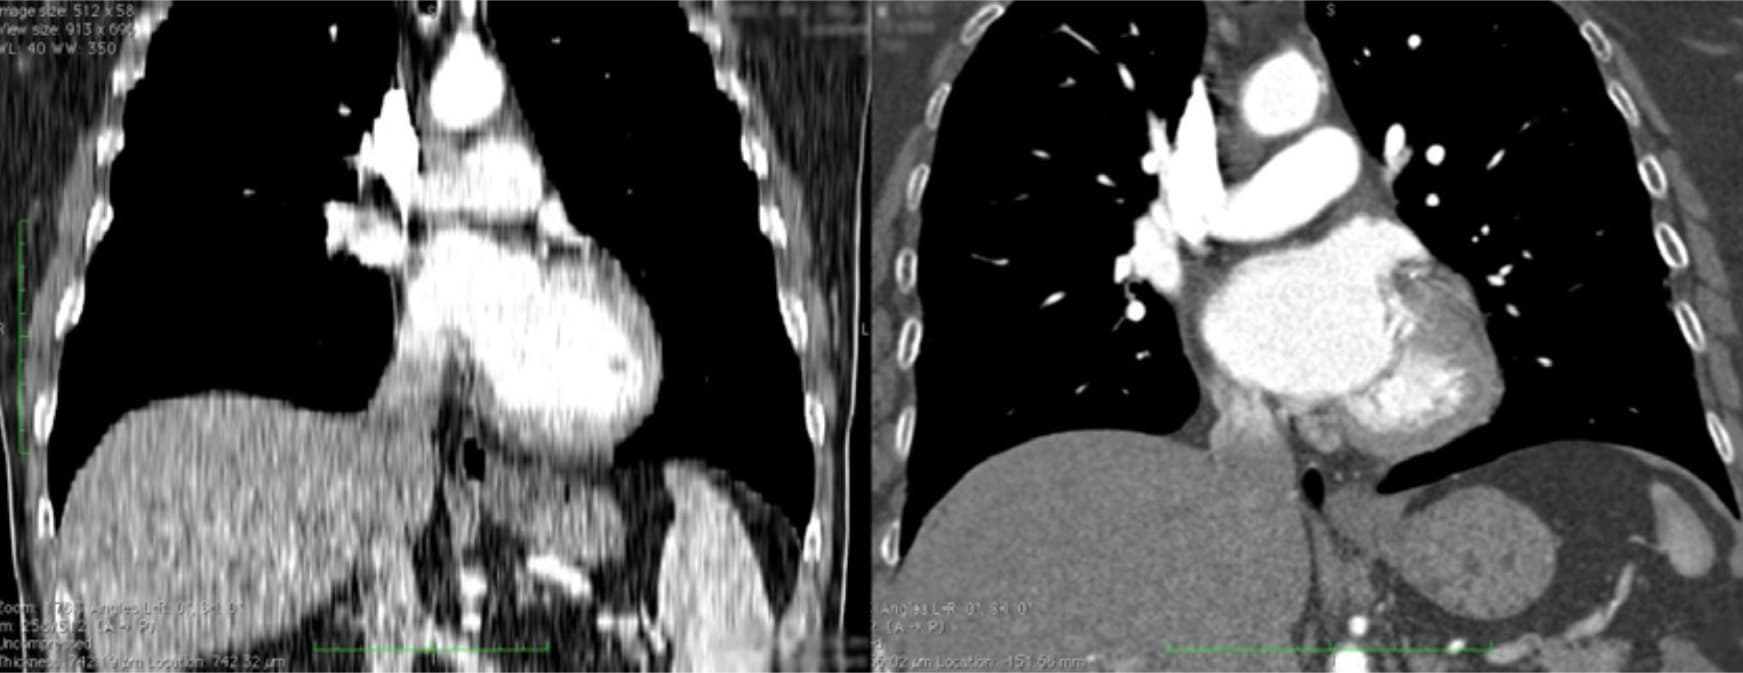
Two CT scans of the chest. The image on the left shows a coronal view built from slices that are 5 mm thick, whereas the righthand scan demonstrates a similar view of the chest using slices that are only 1 mm thick. The thick slices in the lefthand image generate coarse structures that will lead to a lower quality printed model. Source: Embodi 3D
The thickness of slices captured by a CT or MRI scan translates directly into the detail generated in a 3D scan. Depending on the item of focus, image sections should be reconstructed with isotropic voxels of 1.25 mm or less15. According to a presentation by the Mayo Clinic in March 2016, slices as thick as 1.5–3 mm may be used for larger structures, whereas 0.75 mm may be used for fine bone16. Thicker sections may compromise model accuracy, while very thin sections (e.g., <0.25 mm) could require extensive segmentation and STL refinement, particularly in the presence of image artifact. Cardiac models demonstrate sufficient accuracy with 0.5 mm sections, but thin objects such as the orbital floor may require thinner sections17. Generally, thicker sections may produce unclear or less accurate printed models. Nevertheless, unnecessarily thin sections may create significantly more work in the post-processing phase.
Regulatory Considerations
Please consider local regulations, material data sheets, patient information, and institutional requirements before 3D printing or using anatomical models. For physicians in the US, refer to the latest FDA presentation summarizing its guidance document18. Please note that these documents and guidelines are subject and likely to change. Always confirm you comply with the latest recommendations.
Formlabs is an industry-leading provider of 3D printers and materials that are used by
healthcare providers to support the practice of medicine.
Conclusion
Barriers to entry for personalized, precision medicine are rapidly lowering. The advent of affordable professional-grade desktop 3D printers has enabled healthcare providers to produce patient-specific anatomical models for a variety of specialities with inspiring results. In some cases, the initial cost of high-quality a printer was covered by the costs associated with time saved in the OR room after a surgeon used a 3D printed model to prepare for a single complex procedure19.
"Medicine is not one size fits all, and when a tool like desktop 3D printing comes along that allows you to create personalized medical solutions, it is a no brainer to utilize it to its fullest capacity."
Understanding the workflows required to integrate 3D printing is key to a successful operation. This tutorial addressed what you need to get started, popular workflows and tools, and techniques to facilitate the progression from patient scan to 3D printable model.
Contact us to learn more about introducing 3D printing into your institution and join the community of innovators in precision medicine.
Contact Formlabs to learn how desktop SLA can work for your project.
References
1. Chepelev, Leonid, Andreas Giannopoulos, Anji Tang, Dimitrios Mitsouras, and Frank J. Rybicki. “Medical 3D printing: methods to standardize terminology and report trends.” 3D Printing in Medicine 3, no. 1 (2017). doi:10.1186/s41205-017- 0012-5.
2. Mitsouras, Dimitris, Peter Liacouras, Amir Imanzadeh, Andreas A. Giannopoulos, Tianrun Cai, Kanako K. Kumamaru, Elizabeth George, et al. “Medical 3D Printing for the Radiologist.” RadioGraphics 35, no. 7 (November 2015): 1965–88. https://doi.org/10.1148/rg.2015140320
3. Kerr, William, Philip Rowe, and Stephen Gareth Pierce. “Accurate 3D Reconstruction of Bony Surfaces Using Ultrasonic Synthetic Aperture Techniques for Robotic Knee Arthroplasty.” Computerized Medical Imaging and Graphics 58 (June 2017): 23–32. https://doi.org/10.1016/j. compmedimag.2017.03.002
4. Parthasarathy, Jayanthi. “3D Modeling, Custom Implants and Its Future Perspectives in Craniofacial Surgery.” Annals of Maxillofacial Surgery 4, no. 1 (2014): 9. https://doi.org/10.4103/2231-0746.133065
5. Chen, Xing, Jessy K. Possel, Catherine Wacongne, Anne F. van Ham, P. Christiaan Klink, and Pieter R. Roelfsema. “3D Printing and Modelling of Customized Implants and Surgical Guides for Non-Human Primates.” Journal of Neuroscience Methods 286 (July 2017): 38–55. https://doi.org/10.1016/j. jneumeth.2017.05.013
6. Wong, K. C., S. M. Kumta, N. V. Geel, and J. Demol. “One-Step Reconstruction with a 3D-Printed, Biomechanically Evaluated Custom Implant after Complex Pelvic Tumor Resection.” Computer Aided Surgery 20, no. 1 (January 2, 2015): 14–23. https://doi.org/10.3109/10929088.2015.1076039
7. Tan, Eddie T. W., Ji Min Ling, and Shree Kumar Dinesh. “The Feasibility of Producing Patient-Specific Acrylic Cranioplasty Implants with a Low-Cost 3D Printer.” Journal of Neurosurgery 124, no. 5 (May 2016): 1531–37. https://doi. org/10.3171/2015.5.jns15119
8. Abdel Hay, Joe, Tarek Smayra, and Ronald Moussa. “Customized Polymethylmethacrylate Cranioplasty Implants Using 3-Dimensional Printed Polylactic Acid Molds: Technical Note with 2 Illustrative Cases.” World Neurosurgery 105 (September 2017): 971–979.e1. https://doi.org/10.1016/j. wneu.2017.05.007
9. Kate, Jelle ten, Gerwin Smit, and Paul Breedveld. “3D-Printed Upper Limb Prostheses: A Review.” Disability and Rehabilitation: Assistive Technology 12, no. 3 (February 2, 2017): 300–314. https://doi.org/10.1080/17483107.2016.1253117
10. Azer, Samy A., and Sarah Azer. “3D Anatomy Models and Impact on Learning: A Review of the Quality of the Literature.” Health Professions Education 2, no. 2 (December 2016): 80–98. https://doi.org/10.1016/j.hpe.2016.05.002
11. Planning with a Custom Surgical Model Reduces Theater Time by 88 Percent.” Formlabs. Accessed November 22, 2017.
https://formlabs.com/preoperative-planning-with-custom-3d-printed-surgicalmodel-reduces-theater-time/
12. Christensen, Andy. “Medical image processing software.” 3D Printing | Wohlers Associates. Accessed November 22, 2017. http://www. wohlersassociates.com/.
13. Matsumoto, Jane S., Jonathan M. Morris, Thomas A. Foley, Eric E. Williamson, Shuai Leng, Kiaran P. Mcgee, Joel L. Kuhlmann, Linda E. Nesberg, and Terri J. Vrtiska. “Three-dimensional Physical Modeling: Applications and Experience at Mayo Clinic.” RadioGraphics 35, no. 7 (2015): 1989-2006. doi:10.1148/ rg.2015140260.
14. Kikinis R, Pieper SD, Vosburgh K (2014) 3D Slicer: a platform for subjectspecific image analysis, visualization, and clinical support. Intraoperative Imaging Image-Guided Therapy, Ferenc A. Jolesz, Editor 3(19):277–289 ISBN: 978-1-4614-7656-6 (Print) 978-1-4614-7657-3 (Online) https://www.slicer.org/wiki/CitingSlicer
15. Mitsouras, Dimitris, Peter Liacouras, Amir Imanzadeh, Andreas A. Giannopoulos, Tianrun Cai, Kanako K. Kumamaru, Elizabeth George, et al. “Medical 3D Printing for the Radiologist.” RadioGraphics 35, no. 7 (November 2015): 1965–88. https://doi.org/10.1148/rg.2015140320
16. T. J. Vrtiska, MD, Jane Matsumoto, MD, Jay Morris, MD, “Imaging Acquisition: Role of the Radiologist. The crucial first step” Mayo Clinic (March 4, 2016)
17. Mitsouras, Dimitris, Peter Liacouras, Amir Imanzadeh, Andreas A. Giannopoulos, Tianrun Cai, Kanako K. Kumamaru, Elizabeth George, et al. “Medical 3D Printing for the Radiologist.” RadioGraphics 35, no. 7 (November 2015): 1965–88. https://doi.org/10.1148/rg.2015140320
18. Nooshin Kiarashi, PhD, FDA/CDRH/Division of Radiological Health, “FDA Current Practices and Regulations,” FDA/CDRH – RSNA SIG Joint Meeting on 3D Printed Patient-Specific Anatomic Models”, retrieved from www. fda.gov/downloads/ MedicalDevices/NewsEvents/ WorkshopsConferences/UCM575723.pdf
19. “Planning with a Custom Surgical Model Reduces Theater Time by 88 Percent.” Formlabs. Accessed November 22, 2017. https://formlabs.com/preoperative-planning-with-custom-3d-printed-surgical-model-reduces-theatertime/.
Additional Resources and References
Kikinis R, Pieper SD, Vosburgh K (2014) 3D Slicer: a platform for subject-specific image analysis, visualization, and clinical support. Intraoperative Imaging ImageGuided Therapy, Ferenc A. Jolesz, Editor 3(19):277–289 ISBN: 978-1-4614-7656- 6 (Print) 978-1-4614-7657-3 (Online)
Rybicki, F., & Christensen, A. (2017, May 12). Guidelines for Medical 3D Printing: Patient Safety. Retrieved November 03, 2017, from https://www.3printr.com/ guidelines-medical-3d-printing-patient-safety-3345869/ (n.d.). http://www. conceptualiz.com/resources.html
Biomedical Modeling, Inc. Follow. (2013, October 16). The Biomodeling Process: From 2D to 3D. https://www.slideshare.net/ Biomedical_Modeling_Inc/thebiomodeling-process-from-2d-to-3d-27259255
Choosing the Best Medical Imaging Scan to Create a 3D Printed Medical Model. (2016, December 27). https://www.embodi3d.com/ blogs/entry/183-choosing-thebest-medical-imaging-scan-to-create-a-3d-printed-medical-model/
Documentation/4.6/Training. (n.d.). https://www.slicer.org/wiki/ Documentation/4.6/Training
Essential Guidelines for Medical 3D Printing: Patient Safety Comes First. (n.d.). http://www.materialise.com/ en/blog/patient-safety-3D-printing
G., & I. (2017, October 20). How to Convert Medical Scan Data Into a 3D Printable Model (also, Dinosaurs!). http://www.instructables.com/ id/How-toconvert-medical-scan-data-into-a-3D-printab/
How-to add supports to 3D Medical Models. (2016, April 20). https://www. youtube.com/watch?v=84EXccjijtM
Tutorial: Preparing Data for 3D Printing Using 3D Slicer. (2014, January 08). https://www.youtube.com/watch?v=MKLWzD0PiIc