

Introduction to Casting for 3D Printed Jewelry Patterns
The way jewelers work is changing, and castable photopolymer resins are leading the way. From independent designers concepting and prototyping in their studios, to casting houses increasing capacity and diversifying their offerings, digital fabrication techniques are increasingly key to growing a successful jewelry business. In this guide, learn how to cast fine jewelry pieces 3D printed on Formlabs printers.
What Is Direct Investment Casting?
Direct investment casting, or lost wax casting, is a popular moldmaking technique that can be used to fabricate small and large parts in a wide variety of metals. Originating over 5,000 years ago, casting enables creators to work with a wide variety of materials and is one of the easiest ways to make metal parts.
In investment casting, a hollow mold is created from a hand-sculpted or 3D printed master pattern. The master is immersed in a refractory casting material (or “investment”), which dries and hardens. The wax or 3D printed pattern is burned out, leaving a negative mold of the design. Metal is poured into this hollow cavity to create the final part.
Wax patterns for intricate jewelry are complicated to produce by hand, and in a world driven by high demand and fast fashion, it can be difficult for hand-crafted pieces to keep pace. Advanced materials and affordable in-house 3D printers such as those from Formlabs are changing the way jewelry manufacturers and designers work, bringing industrial quality to the desktop and making it easier to produce and fit complicated geometries that once required hours of meticulous labor.
Essentials
Made by Formlabs
Made by Third Parties
- Certus Prestige Optima investment
- Furnace (732 °C or 1400 °F), vacuum investment machine, and casting system such as Neutec J2R
- For indoor burnout, active ventilation such as Vent-A-Kiln
For more information on using True Cast Resin, read our support article here.
Book a Consultation
Get in touch with our 3D printing experts for a 1:1 consultation to find the right solution for your business, receive ROI analyses, test prints, and more.
1. Design for Casting
Use CAD software such as RhinoGold, JewelCAD, or 3Design to take your parts from concept to 3D printed pattern using these best practices.
Products referenced:
True Cast Resin: A wax-filled material designed for precision casting of intricate jewelry to complex engineering components up to 5 mm thick. It delivers highly accurate parts with exceptional detail and smooth surfaces.
Castable Wax 40 Resin: A high wax-content direct casting resin with superior castability, accommodates a wide range of design features such as stone holes and engraves.
Castable Wax Resin: A lower wax-content, high green strength resin appropriate for ultra-fine structures such as wire filigree.
|
CASTABLE WAX 40 RESIN | TRUE CAST RESIN | CLEAR CAST RESIN | ||
|---|---|---|---|---|---|
| Applications | Fine filigree, lightweight jewelry, and dental applications | Medium to heavy jewelry and small engineering components | Medium to heavy jewelry, medallions, figurines, and small engineering components up to 5 mm thick | Demanding engineering applications over 3 mm thick | |
| Compatibility | Form 2 Form 3/+ Form 4 |
Form 2 Form 3/+ |
Form 4 | Form 2 Form 3/+ Form 4 |
AVOIDING INVESTMENT BREAKAGE
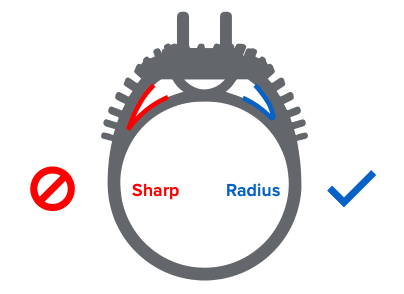
Design of traditional wax patterns and 3D printed resin patterns share many principles, such as the importance of smooth surface flow. Where possible, avoid creating sharp corners and edges. Sharp edges not only increase metal turbulence, but they also concentrate expansion stresses in the mold.
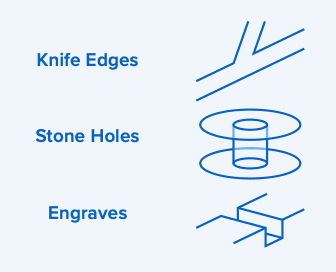
Concentrated expansion stress causes investment breakage, which is one of the most common quality issues in direct-resin casting. Signs of investment breakage are filled-in negative features such as engraves and stone holes in the cast part. Investment breakage is usually accompanied by rough cast surfaces or pitting, resulting from investment debris.
In addition to sharp edges, be mindful of the depth of negative features. A good rule of thumb is to keep engraved channels and holes wider than they are deep. This guideline is more important if the negative feature is small, and the investment that fills around the feature is fragile.
In the Formlabs ecosystem, True Cast Resin and Castable Wax 40 Resin are designed to minimize expansion and investment breakage, allowing for more reliability where negative features are required. Compare jewelry casting resins here.
SPRUES
Delicate sprue channels can be 3D printed to save labor and improve mold fill to areas of fine detail. Design feed sprues that are either straight, or taper down towards the piece.
Supports added in PreForm should not be used as sprues. If you intend to 3D print sprues, we recommend incorporating them into your CAD design.
3D printed feed sprues should only be used where placing wax sprues would be difficult, eg. where a sprue connects one inaccessible area of the resin pattern to another. Real wax sprues promote better cast part quality, by giving the pattern early access to oxygen when they melt out.
SPRUE ATTACHMENT POINTS
Resin patterns do not melt, which means that heavy parts can sometimes be tricky to attach (and keep attached) to wax sprues. By adding a sprue attachment point to your CAD model, you can avoid the frustration of finding a 3D printed pattern floating in the flask you just poured. This can be as simple as a hole in the bottom of a ring band, or a small hollow post that you can fill or surround with wax when attaching it to a sprue rod.
THICK AND LARGE PARTS
True Cast Resin is suitable for printing and casting thick jewelry parts up to 5 mm thick, such as heavy class rings, while Castable Wax 40 Resin can accommodate cross sections up to 4 mm in most places in the model. Thick regions of a model will tend to perform better in casting the closer they are to the feed sprue. Note that for investment casting large parts with geometries thicher than 3 mm, Clear Cast Resin is also an option.
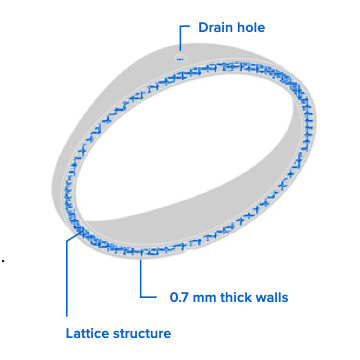
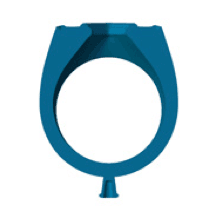
Castable Wax Resin is an alternative material for designs that are both large and monolithic, such as statues. Due to Castable Wax Resin’s higher green strength, this material supports hollowing designs to a thin-walled shell. This strategy minimizes expansion forces on the investment during burnout. Parts thicker than 3 mm should be shelled, and drain holes must be added to allow resin to flush out of the hollow interior.
Formlabs recommends 0.7 mm thick walls for hollow shells printed in Castable Wax Resin. A lattice structure can also be added to the interior to improve the handling strength of large shelled parts. When creating a hollow thin-shelled pattern in Castable Wax Resin, check for areas of the model that are close to (or less than) double the minimum 0.7 mm wall thickness for the shell. These areas may be untouched by a shell CAD operation, resulting in regions of the pattern that are too thick for casting. Excessively thick parts are likely to cause expansion cracks during burnout.
FILIGREE
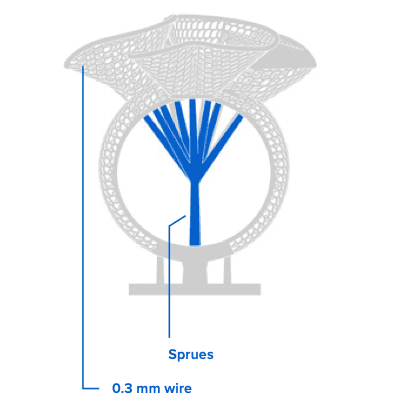
The exceptional detail of Castable Wax Resin allows you to create pieces with intricate filigree. These fine meshes of wires are challenging but possible to cast with careful sprue design.
Fine meshes can be printed with a wire diameter as thin as 0.3 mm. Printed filigree is fragile and easily damaged by support removal. Design filigree parts to be as self- supporting as possible.
In filigree designs, 3D printed sprues may serve a dual purpose as “supports” that are removed after casting. To avoid metal freezing in these thin channels, add sprues that feed metal to many points on the rim of a filigree mesh.
Note:
Castable Wax 40 Resin and True Cast Resin are not recommended for printing wire filigree, due to the lower green strength of these resins.
Request a Free Sample Part
See and feel Formlabs quality firsthand. We’ll ship a free 3D printed sample part to your office.
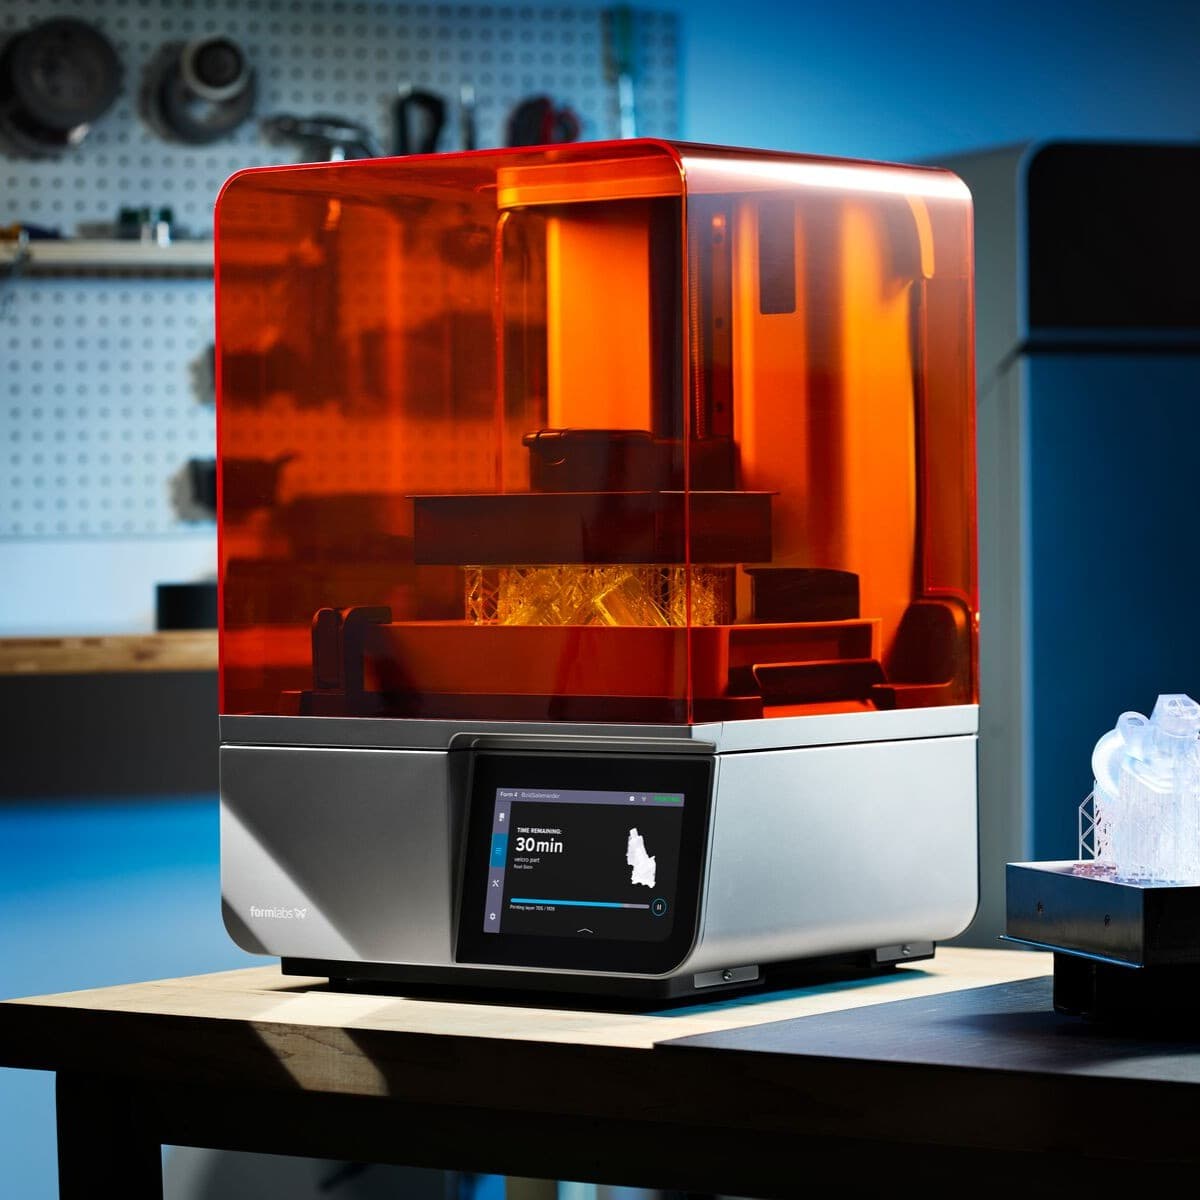
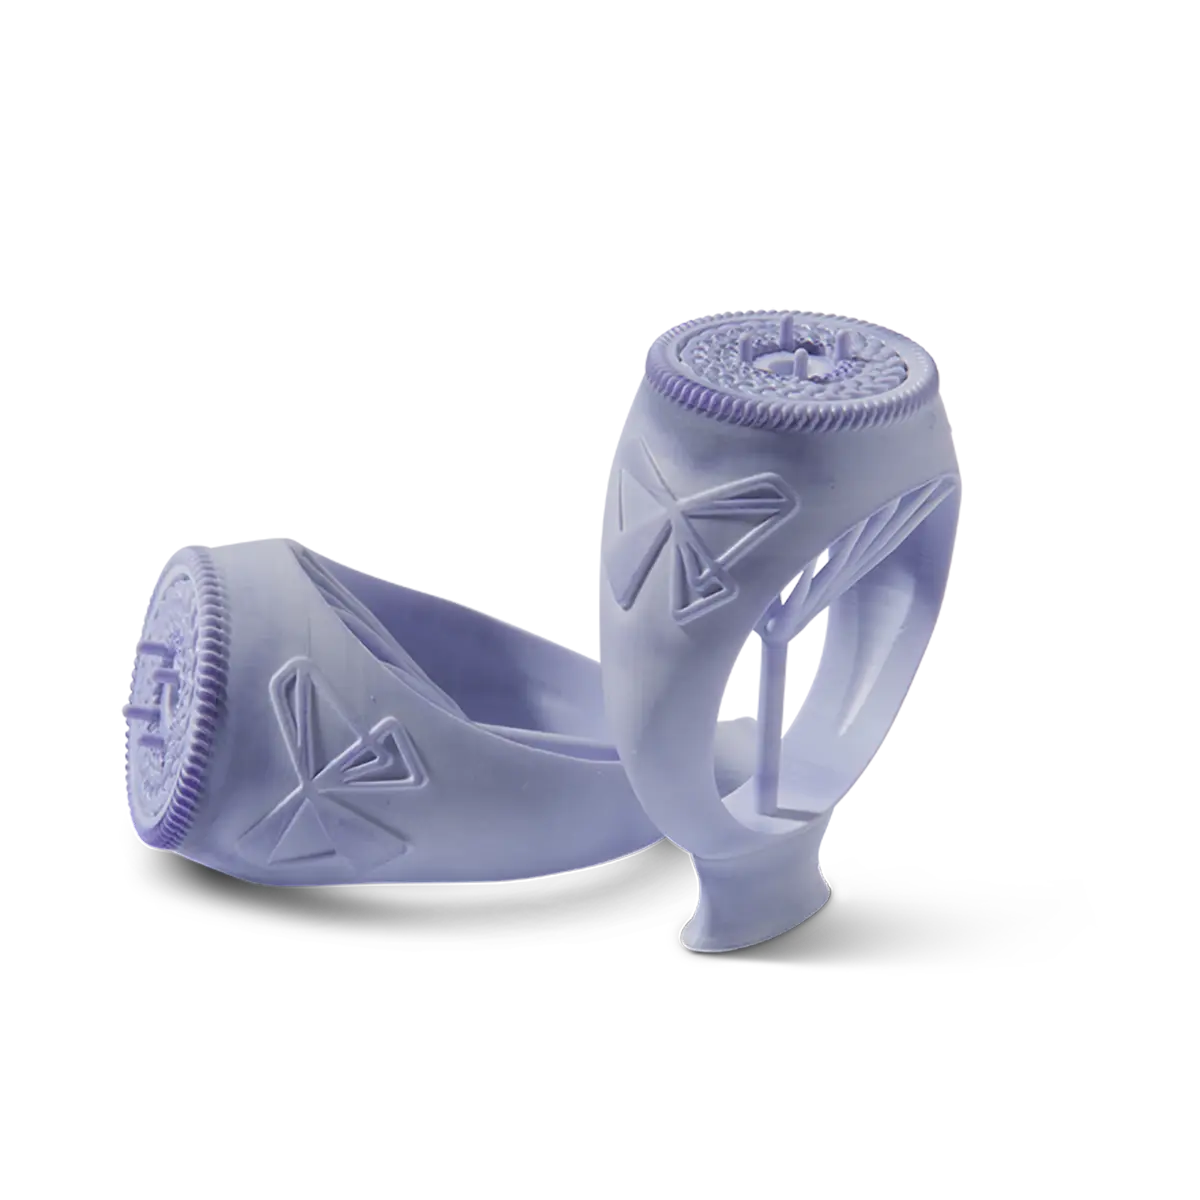
2. Print and Prepare Parts for Casting
PRINTING
Jewelry patterns can be printed individually or in batches on Formlabs stereolithography (SLA) desktop 3D printers.
Orientation
- For the best quality prints in Castable Wax 40 Resin, we recommend printing top-heavy parts such as signet rings oriented and supported at an angle, rather than vertically.
- Lighter weight jewelry designs, and parts printed in Castable Wax Resin, may be printed vertically.
- For rings and other small parts printed in True Cast Resin, orient vertically to minimize support touchpoints. For all other models, orient 30-45 degrees relative to the build platform.
Orient top-heavy parts at an angle for best results.
WASHING
Thoroughly washing parts in 90%+ isopropyl alcohol (IPA) is critical to a clean casting. Excess uncured resin can interfere with investment curing and will cause casting defects.
Allow the parts to fully dry after removing them from the IPA bath. Use compressed air to ensure all IPA is fully evaporated prior to post-curing and casting. If parts are still sticky after washing and drying, you may need to replace your IPA.
For wash times, check out our support page.
CURING
Post-cure will not improve casting results, unless parts are insufficiently washed. Parts may be optionally post-cured for extra handling strength if you experience parts breaking while spruing. If your parts are fragile, we recommend post-curing after support removal. Green parts are more flexible and less likely to shatter as you snip supports. Remaining touch tips can be sanded with 1,000 grit sandpaper after post-curing.
For post-cure times and settings, check here for Form Cure V2, and here for Form Cure V1.
Note:
Post-curing parts may cause a small (<1%) degree of shrinkage.
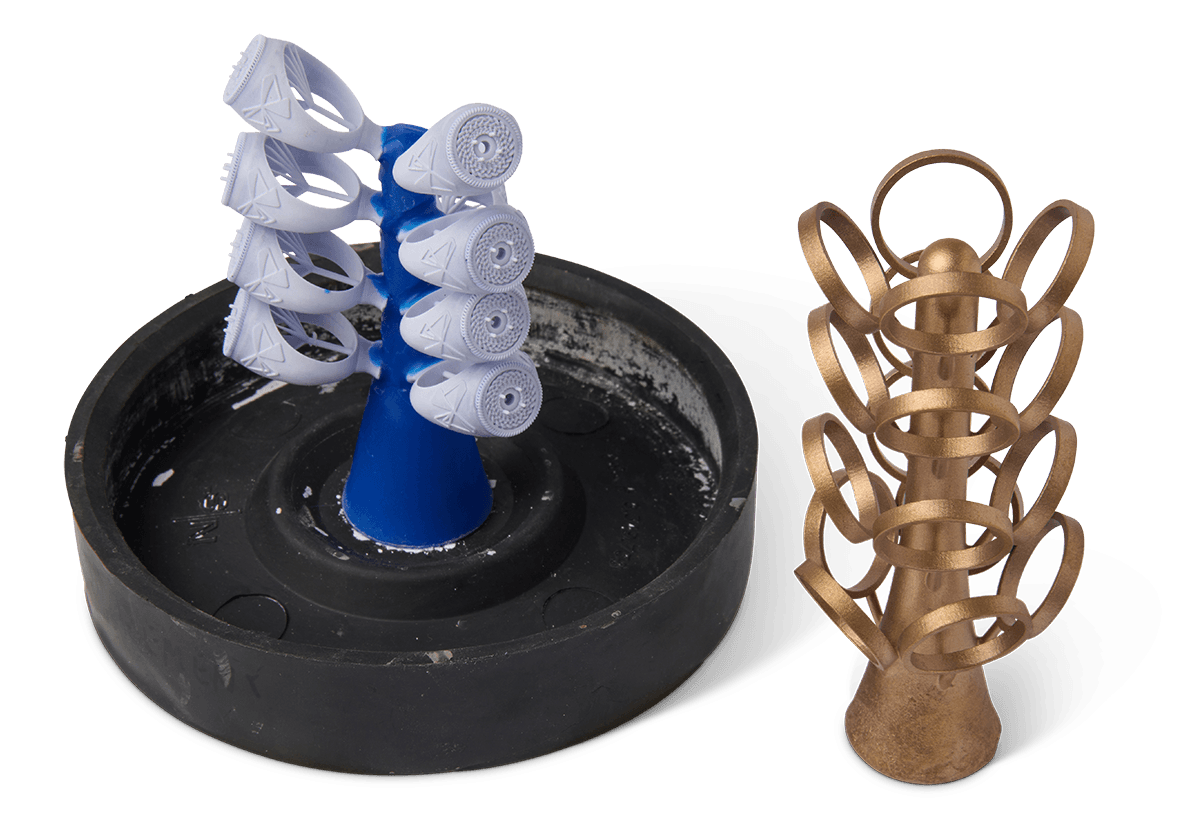
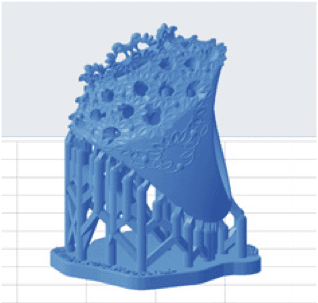
3. Build the Sprue Tree
Attach the post-processed prints to a main wax sprue with sticky sprue wax. Melt the wax to create smooth junctions between each printed pattern and its feed sprue.
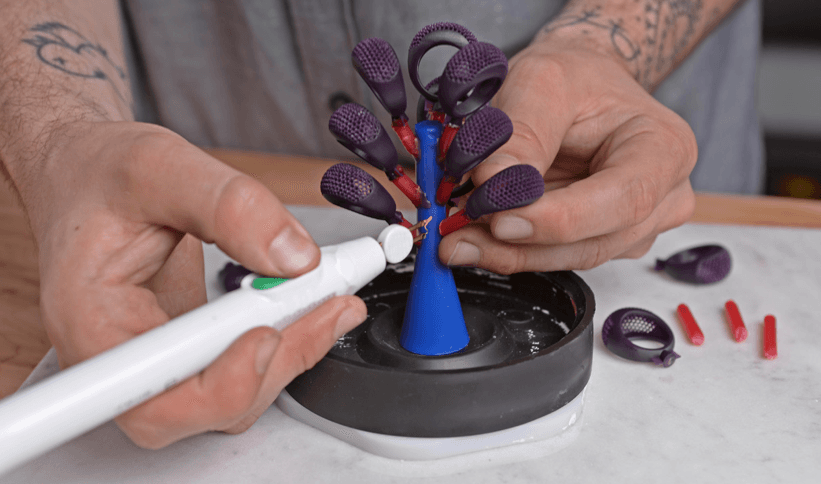
A wax heat pen makes it easier to join resin patterns to the wax sprue tree.
Arrange thicker parts at the bottom and thinner parts at the top of the tree. 3D printed parts may require slightly more space between parts than a traditional wax tree. If you are casting large “thin-shelled” parts, make sure to fill any drain holes with wax to prevent any investment material from entering the print.
CASTING BARRIERS
Formlabs does not recommend dipping 3D printed patterns into a “casting barrier” film. Casting barrier films may interfere with the ability of the resin to lose liquid wax during heating.
Note:
Printed resin patterns do not melt. If you have difficulty joining a print to a wax sprue, try using a small amount of super glue or fast setting epoxy. Adding a sprue attachment point to the model can also be helpful.
4. Prepare the Mold
The following steps are a standard procedure for preparing any investment flask mold. A vacuum investing machine helps to evenly mix, degas, and pour the investment easily and cleanly. However, it is also possible to use a separate mixer and vacuum chamber.

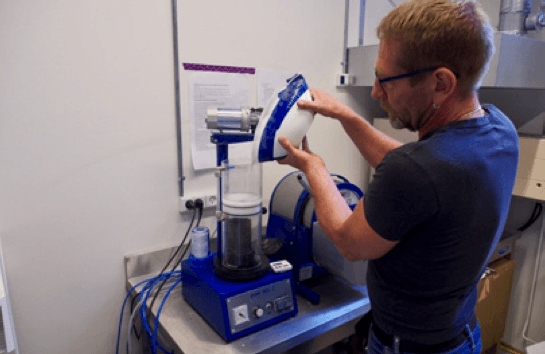
1. Attach a casting flask to the sprue base. If the flask is perforated, wrap it with clear packing tape to contain the investment.
2. Mix investment powder and cold distilled water according to manufacturer’s instructions.
Tip:
Dissolve boric acid (1% of water weight) into investment water before mixing to increase mold strength.
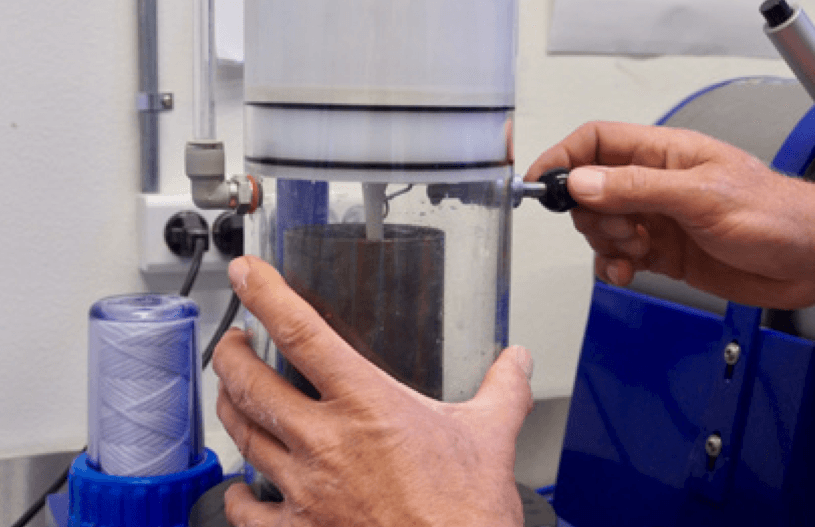
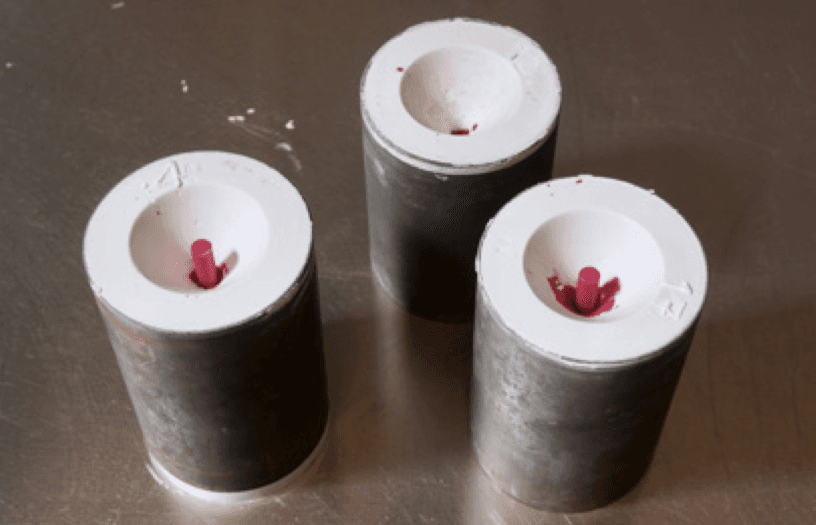
3. Slowly pour the investment down the side of the flask, avoiding the pattern tree. A smooth pour is less likely to trap bubbles. Use a vacuum chamber to extract any bubbles from the flask. Allow the investment to harden and dry.
4. Carefully remove rubber sprue base from the flask and allow it to set in a vibration-free environment for 2-6 hours. Follow the investment manufacturer’s safety recommendations. We recommend wearing a dust mask or respirator.
INVESTMENT MATERIAL OPTIONS
Formlabs recommends Certus Prestige Optima jewelry investment for True Cast Resin, Castable Wax 40 Resin, and Castable Wax Resin. Castable Wax 40 Resin will give you more freedom in investment materials. If you are casting especially difficult designs, consider upgrading to a stronger phosphate bonded investment material, such as Nobilium Microfire. When using alternative investments, incorporate the manufacturer’s burnout recommendations.
5. Burnout and Casting
Place the casting flask in the burnout oven and heat using the recommended Burnout Schedule. Make adjustments depending on the investment instructions, flask size, and amount of printed material.
Formlabs recommends using a well-ventilated furnace (with an inlet and an outlet), to provide sufficient air flow throughout the chamber and to safely exhaust all vaporized resin material.
SHORT BURNOUT
Significantly shorter burnouts (four to eight hours) are limited to lightweight geometries and strong phosphate-bonded investment materials. Phosphate bonded investment will allow for a faster burnout with all Formlabs casting resins.
Tips:
- Venting is essential, but it can cause the temperature in the oven to drop. Monitor the oven and flask temperature and adjust your process as you develop a burnout schedule suited to your own equipment.
- If using active ventilation, increase suction as much as possible to improve airflow throughout the oven.
- If the oven is full, burnout will be less effective per flask. Attach an oxygen generator or low flow air line to the oven to increase the airflow.
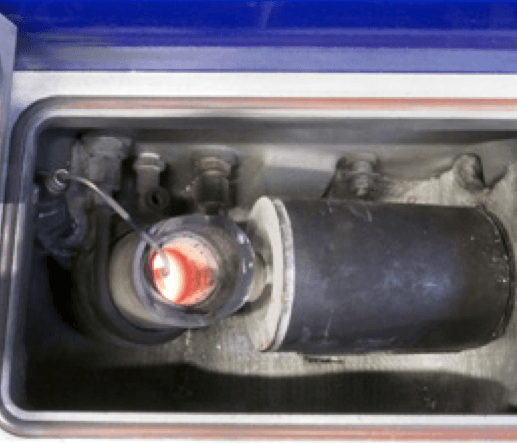
CASTING
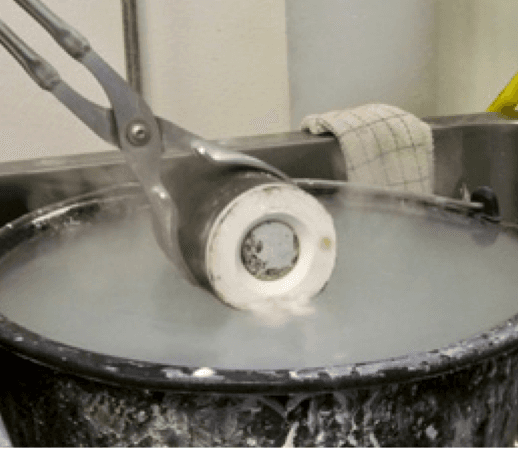
Remove the mold from the furnace and cast metal. Centrifugal or vacuum casting machines such as the Neutec J2R (USA) and the Indutherm MC-series (EU) are simple to use and highly controllable. After casting, carefully quench the mold in water and wash away the investment.
PRECIOUS METAL COMPATIBILITY
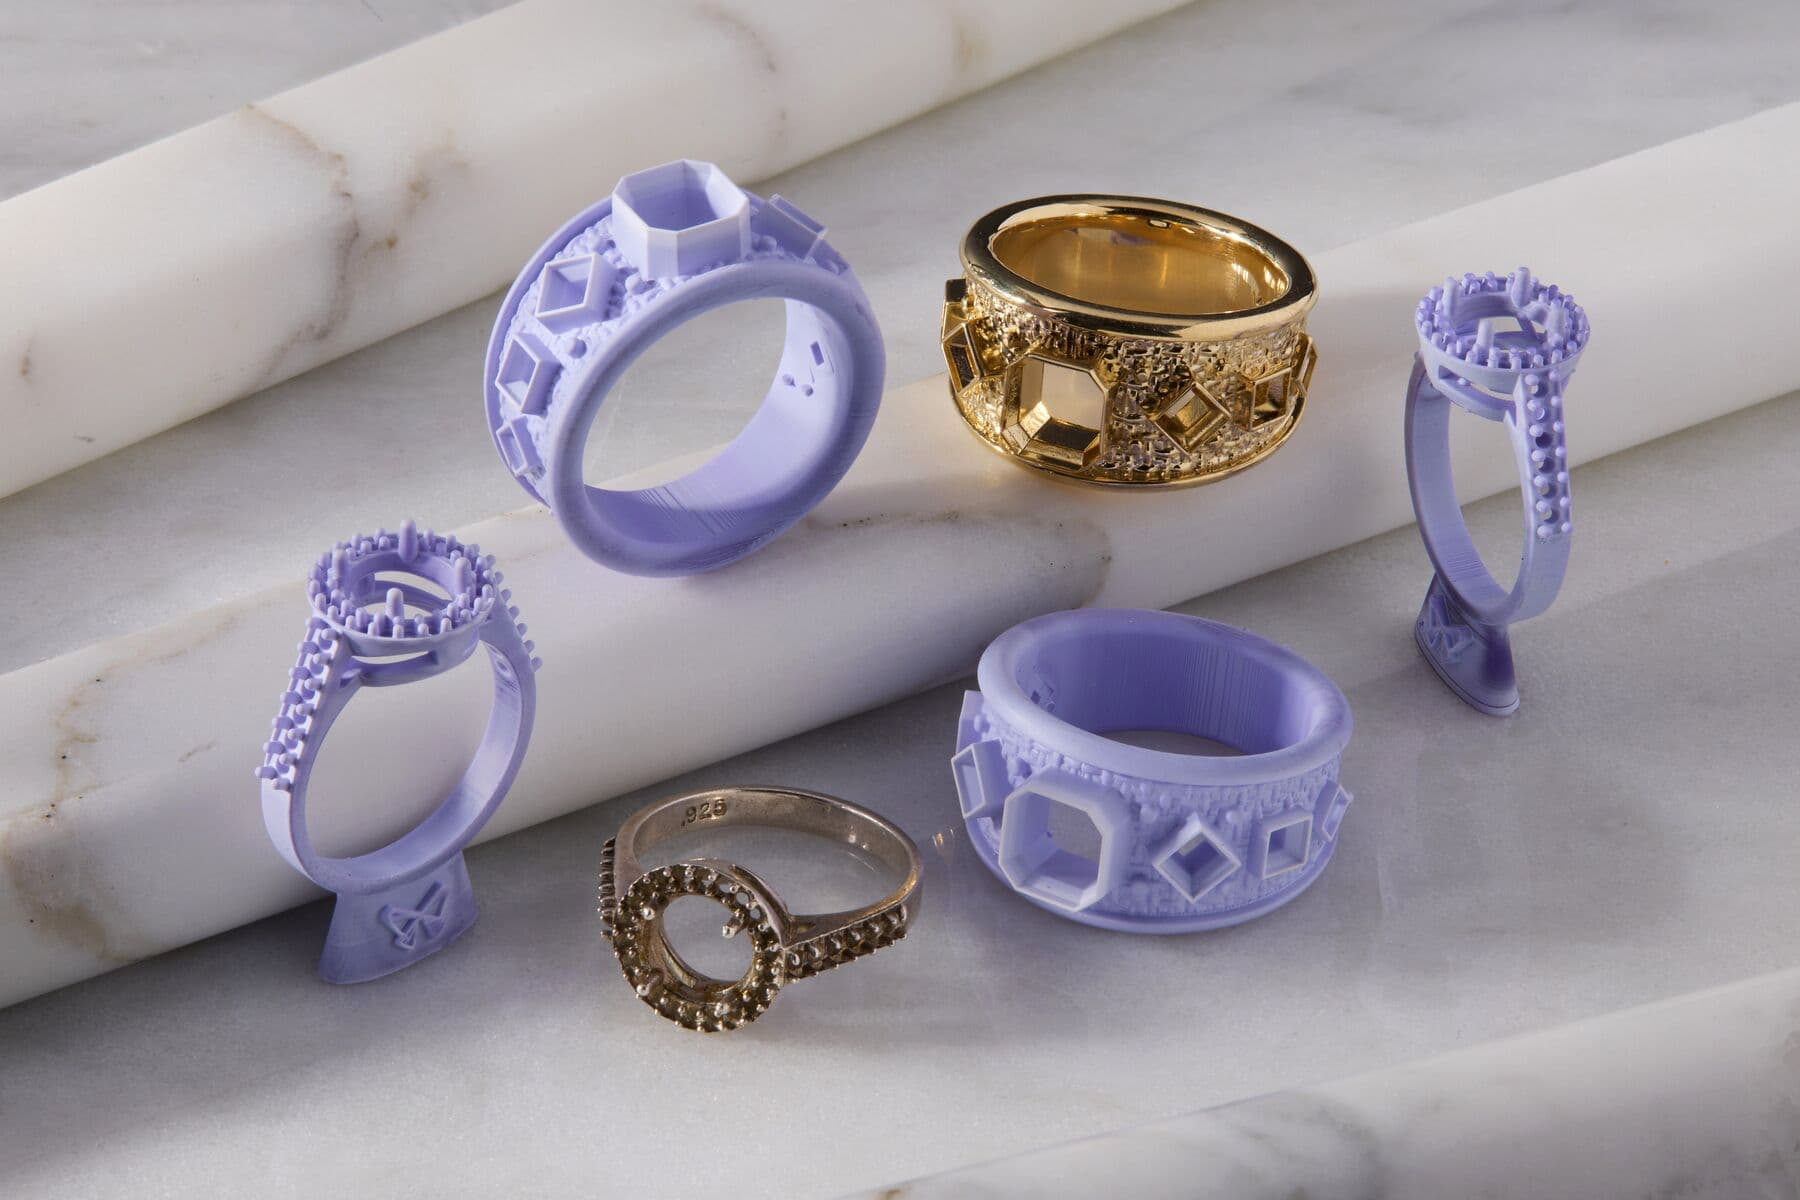
Formlabs has tested gold, silver, and bronze castings from True Cast Resin, Castable Wax 40 Resin, and Castable Wax Resin patterns. Metal compatibility is foremost a property of the investment. Different metals require varying degrees of temperature resistance from the investment.
Formlabs direct-casting resins require temperatures of at least 732 °C to complete burnout. Ask the manufacturer if you are unsure about resin compatibility with a specific investment.
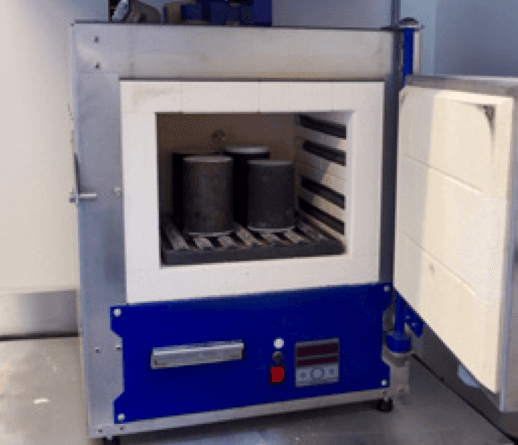
Place flasks in a well-ventilated burnout oven.
Vacuum or centrifugal casting improves fill to thin details.
Quench and de-vest the flask by submerging it in water.
6. Burnout Schedule
Formlabs offers True Cast Resin, Castable Wax 40 Resin, and Castable Wax Resin for jewelry investment casting. Castable Wax 40 Resin is designed to offer improved flexibility in its burnout schedule, and is more forgiving if you are new to casting resin. Castable Wax Resin requires stricter adherence to burnout guidelines and geometry limitations to achieve high quality casting results.
Recommended schedules for each material are shown below, for use with Certus Prestige Optima or equivalent investment.
True Cast Resin
View a full breakdown of times and temperatures based on investment and metal in our guide to using True Cast Resin here.
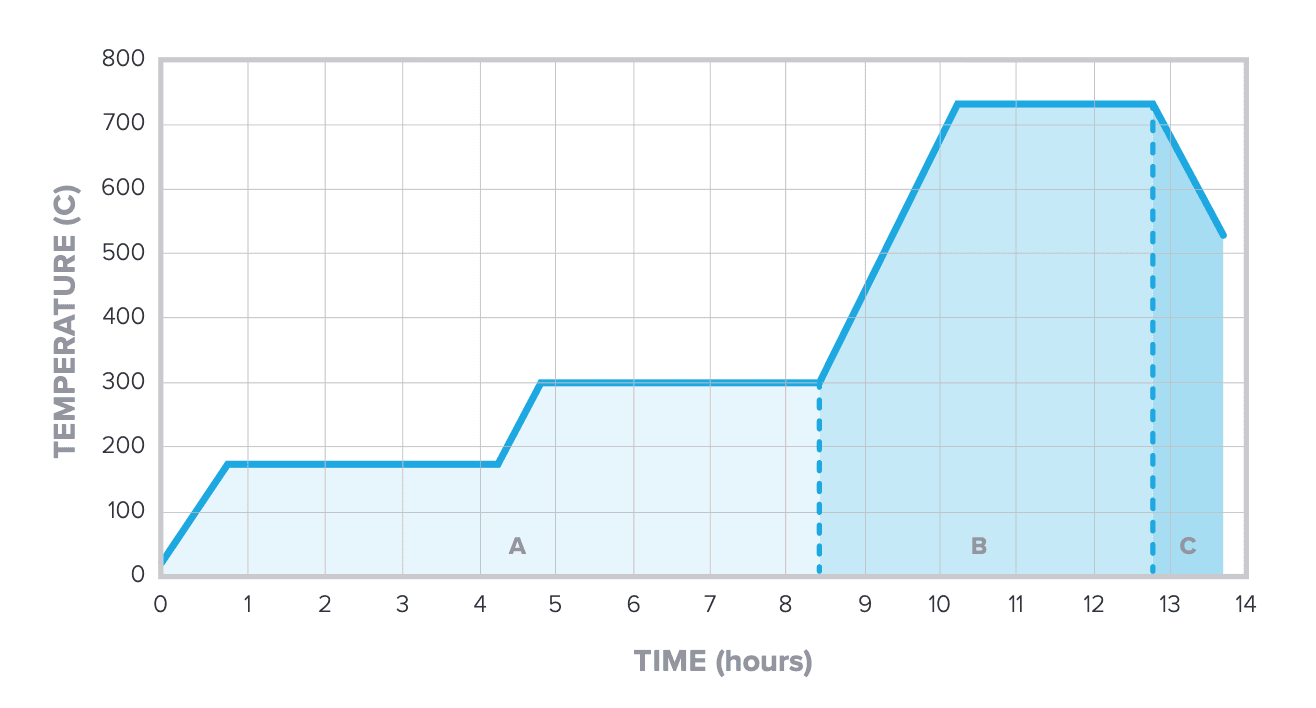
Castable Wax 40 Resin
|
Phase |
Time |
Schedule °C |
Schedule °F |
|
|
Heated Flask Drying |
180 min |
55 °C |
131 °F |
|
|
A |
Ramp |
48 min |
2 °C/min |
3.6 °F/min |
|
Hold |
180 min |
150 °C |
302 °F |
|
|
Ramp |
75 min |
2.0 °C/min |
3.6 °F/min |
|
|
Hold |
108 min |
300 °C |
572 °F |
|
|
B |
Ramp |
108 min |
4.0 °C/min |
7.2 °F/min |
|
Hold |
180 min |
732 °C |
1,350 °F |
|
|
C |
Ramp |
44 min |
-5 °C/min |
-9 °F/min |
|
Casting Window |
Up to 2 h |
Desired casting temp |
Desired casting temp |
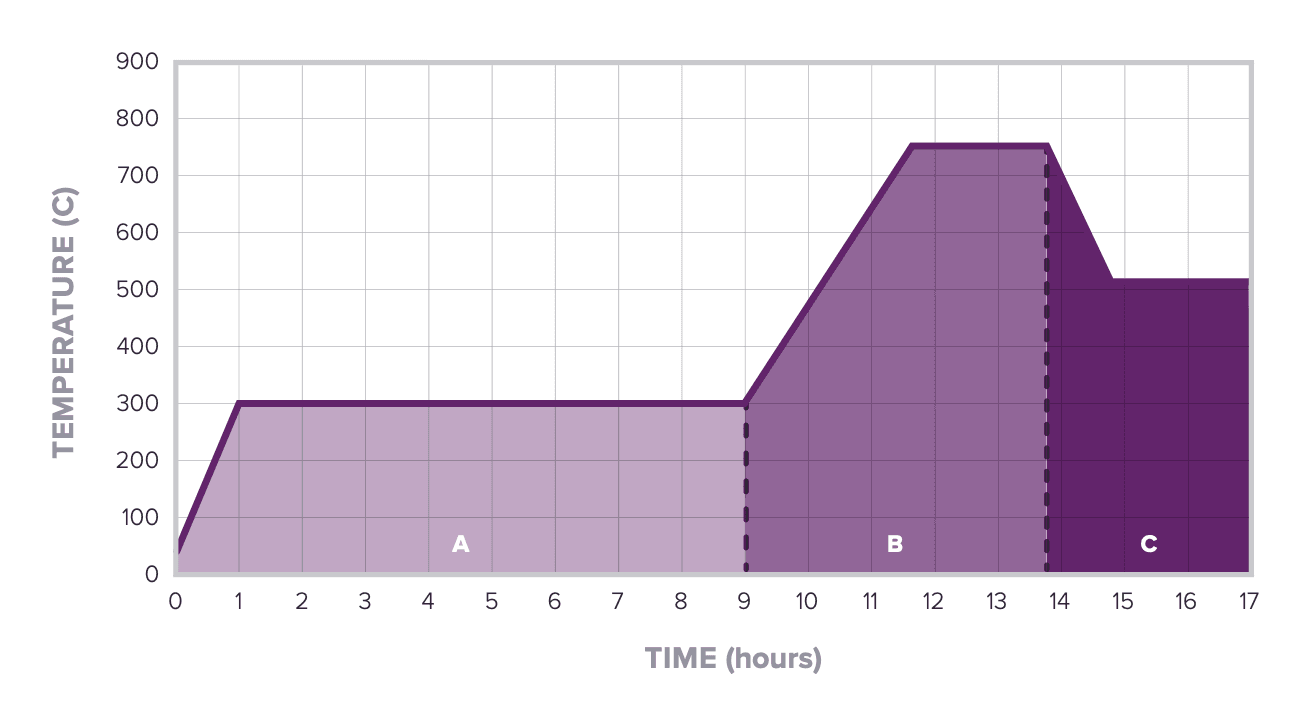
Castable Wax Resin
|
Phase |
Time |
Schedule °C |
Schedule °F |
|
|
A |
Insert Flasks |
0 min |
21 °C |
70 °F |
|
Ramp |
60 min |
4.7 °C/min |
8.4 °F/min |
|
|
Hold |
480 min |
300 °C |
572 °F |
|
|
B |
Ramp |
100 min |
4.5 °C/min |
8.1 °F/min |
|
Hold |
180 min |
750 °C |
1,382 °F |
|
|
C |
Ramp |
60 min |
-4.0 °C/min |
-7.1 °F/min |
|
Casting Window |
Up to 2 h |
Desired casting temp |
Desired casting temp |
Troubleshooting Casting
|
Problem |
Cause |
Solution |
|
Holes or engraves filled and pitted surfaces nearby |
Localized investment breakage due to stress from resin thermal expansion. |
Slow burnout ramp rate. |
|
Add fillets to sharp corners of model in CAD. |
||
|
Reduce depth of engraved feature in CAD. |
||
|
Upgrade to Castable Wax 40 Resin (if using Castable Wax Resin). |
||
|
Add boric acid to strengthen investment. |
||
|
Metal flashing |
Investment too weak, cracked due to bulk thermal expansion of resin. |
Slow burnout ramp rate. |
|
Increase spacing between resin patterns. |
||
|
Decrease ratio of water added to investment. |
||
|
Increase bench set time after investing. |
||
|
Consider switching investment material. |
||
|
Rough surfaces (without visible investment breakage) |
Resin boiling from excessive heating prior to liquid wax elimination. |
Slow burnout ramp rate, increase low temperature hold time. |
|
Insufficient oxygen for combustion. |
Increase airflow in burnout oven. |
|
|
Add wax sprue from problem area to main feed sprue. |
||
|
Evacuate flask with light vacuum pressure prior to casting. |
||
|
Resin cross section too thick for resin system, part constrained against mold wall during combustion. |
Castable Wax 40 Resin:
Castable Wax Resin:
|
|
|
Small bubbles on casting |
Investment is too viscous. |
Increase ratio of water added to investment. |
|
Investment working time too short to fully degas flask. |
Use cold water in the investment mixture. |
Learn More About Digital Jewelry Fabrication
Formlabs SLA 3D printers' seamless print process, high accuracy, and smooth surface finish allow you to move directly from design to production. Whether you are 3D printing try-on pieces for customers, ready to cast custom jewelry, or masters for reusable jewelry molds, Formlabs offers a material up to the task. Explore Formlabs SLA 3D printers to learn more, or contact sales to find the right solution for your application.
Resources for Jewelers and Casting Houses
Learn how to integrate 3D printing into your workflow. Download free white papers, watch webinars, and read our guides about 3D printing workflows for jewelry.
Special thanks to Lars Sögaard Nielsen and the KEA (Copenhagen School of Design and Technology) for letting Formlabs document their casting process.