Nota:
Pulsa Ignore (Ignorar) para reprogramar el tanque de resina para que coincida con el tipo de resina del trabajo de impresión.


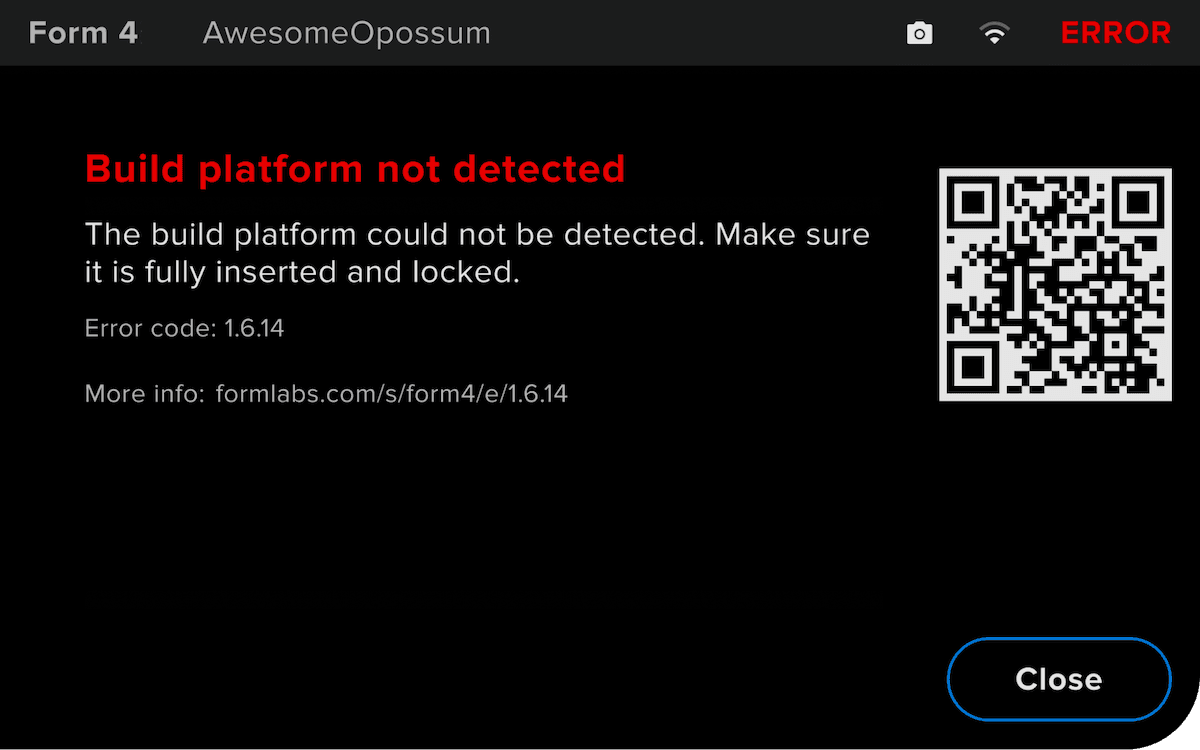
La pantalla táctil de la Form 4 o la Form 4L muestra mensajes de error si la impresora encuentra alguna anomalía y muestra también más detalles sobre el error. En este artículo se describen los pasos iniciales para resolver los códigos de error comunes que se han observado en las impresoras de la generación Form 4 o que se esperan durante el funcionamiento normal. Si te encuentras con un código de error que no se encuentra en este artículo, consulta los pasos generales de resolución de problemas que se indican a continuación.
Los códigos de error de la generación Form 4 y Form 4L tienen el formato X.YY.ZZ, donde X es el código de la máquina, YY es el subsistema y ZZ es el código de error único que indica la advertencia correspondiente. El código de máquina de las impresoras de la generación Form 4 es 1, por lo que el código de error completo de todos los errores de estas impresoras empiezan por 1. El número de grupo de error describe el tipo de error, mientras que el subcódigo designa un subsistema o modo de fallo específico. Por ejemplo, todos los subcódigos del Grupo de errores 3 de la generación Form 4 están relacionados con el calentador y la temperatura de la resina, mientras que el Error 1.3.1 en particular se refiere a que la resina no alcanza la temperatura deseada.
Pasos generales para la resolución de problemas
Los siguientes pasos se recomiendan para la mayoría de los problemas que se observan en las impresoras de la generación Form 4 y Form 4L:
Reg. de diagnóstico
Las impresoras de la generación Form 4 y Form 4L mantienen registros de diagnóstico para proporcionar información detallada sobre el funcionamiento de la máquina. Incluye estos registros de diagnóstico con otras observaciones y detalles relevantes al ponerte en contacto con el equipo de asistencia de Formlabs o tu revendedor autorizado para acelerar la resolución.
Para máquinas conectadas a Internet a través de una conexión wifi o Ethernet activa:
Para impresoras no conectadas a Internet:
Obtén más información acerca de las opciones para trabajar con o sin conexión a Internet.
Errores de control (Grupo de errores 1)
Todos los subcódigos del Grupo de errores 1 (1-61) de la Form 4 y la Form 4L están relacionados con la comunicación de los subsistemas y el control del motor en la máquina.
Error 1.1.1: El motor no ha podido llegar a su posición inicial
ElError 1.1.1 indica que un motor no ha alcanzado su posición inicial. Es posible que el motor se haya calado debido a residuos o que el interruptor de final de carrera que utiliza la impresora para determinar la posición del motor esté dañado. Comprueba si hay restos en el tanque de resina o sobre la base de impresión y retíralos; a continuación, comprueba si la base de impresión y el mezclador se desplazan con normalidad durante la impresión. Este mensaje de error se eliminó en la versión 1.4 del firmware. Si ves este mensaje de error repetidamente, actualiza el firmware de la impresora.
Error 1.1.3: Error interno
El Error 1.1.3 indica un error de comunicación interna entre los subsistemas de la impresora. Para resolver este problema:
Error 1.1.4: El sensor de nivel de resina no está programado
ElError 1.1.4 indica un problema con el sistema del sensor de nivel de la impresora. Para resolver este problema:
Error 1.1.5: No se ha podido medir la resina en el tanque
ElError 1.1.5 indica un problema con el sistema del sensor de nivel de la impresora. Si hay una impresión en curso, supervísala para asegurarte de que el tanque de resina no se quede sin resina. Para resolver este problema, sigue los mismos pasos de resolución de problemas que para el Error 1.1.4: El sensor de nivel de resina no está programado.
Error 1.1.6: El mezclador ha detectado restos
ElError 1.1.6 indica que el mezclador ha chocado con restos mientras se desplazaba por el tanque de resina. Para resolver este problema:
Si el mezclador chocaba con la base de impresión porque la base de impresión se ha quedado pegada al tanque de resina durante la impresión:
Si este error se produce inmediatamente al encender la impresora o el mezclador se mueve de forma inesperada al utilizar la herramienta Move motors (Mover motores) (sin un tanque de resina o un mezclador insertados), sustituye el conjunto de accionamiento del mezclador. Sigue las instrucciones de las guías de reparación Sustitución del conjunto de accionamiento del mezclador (generación Form 4) o Sustitución del conjunto de accionamiento del mezclador (generación Form 4L). Puedes adquirir conjuntos de accionamiento de recambio del mezclador en la tienda web de Formlabs.
Error 1.1.7: La base de impresión ha detectado restos
ElError 1.1.7 indica que la base de impresión se ha topado con restos al bajar al tanque de resina. Para resolver este problema:
Error 1.1.17: La cubierta está abierta
El Error 1.1.17 indica que la cubierta (generación Form 4) o la puerta (generación Form 4L) se ha abierto durante la impresión. Por motivos de seguridad, la impresión se detiene cuando la cubierta o la puerta está abierta. Cierra la cubierta o la puerta para continuar.
Si la cubierta o la puerta no estaba abierta o cerrarla no resuelve el problema:
Error 1.1.23: Fallo en la comunicación con la placa base
ElError 1.1.23 indica que la impresora no ha podido enviar un mensaje a la placa base. Para resolver este problema:
Error 1.1.31: Incompatibilidad del firmware
ElError 1.1.31 indica un problema con el firmware instalado en la impresora. Asegúrate de que el firmware de la impresora esté actualizado. Si el problema persiste y el firmware de la impresora ya está actualizado, reinstala manualmente el último paquete de firmware. Reinicia la impresora y vuelve a intentarlo.
Error 1.1.32: Fallo del ventilador de la LPU
ElError 1.1.32 indica que el ventilador de refrigeración de la Light Processing Unit (LPU) ha fallado. Seguir utilizando la impresora puede provocar daños en la LPU. Para resolver este problema:
Error 1.1.33: Fallo del ventilador de la retroiluminación
ElError 1.1.33 indica que el ventilador de refrigeración de la unidad de retroiluminación ha fallado. Seguir utilizando la impresora puede provocar daños en la unidad de retroiluminación. Para resolver este problema:
Error 1.1.34: Fallo del ventilador de la fuente de alimentación
ElError 1.1.34 indica que el ventilador de refrigeración de la fuente de alimentación ha fallado. Seguir utilizando la impresora puede provocar daños en la fuente de alimentación. Reinicia la impresora, vuelve a instalar la última actualización del firmware y vuelve a intentarlo. Si ves este mensaje de error de forma repetida, contacta con el servicio de asistencia de Formlabs o con tu revendedor autorizado.
Error 1.1.40: La tensión de la impresora es inferior a la esperada
ElError 1.1.40 indica que la fuente de alimentación está suministrando una tensión inferior a la esperada. Si tus impresiones son satisfactorias, puedes ignorar este mensaje de error. Sin embargo, una tensión baja puede afectar a la impresión e incluso impedir que se encienda la unidad de retroiluminación. Para resolver este problema:
Error 1.1.47: La base de impresión no pudo volver a su posición inicial
ElError 1.1.47 indica que la base de impresión no ha podido volver correctamente a su posición inicial.
Error 1.1.48: El motor no pudo volver a su posición inicial
ElError 1.1.48 indica que el mezclador no ha podido volver correctamente a su posición inicial.
Errores del calentador (Grupo de errores 3)
Todos los subcódigos del Grupo de errores 3 (1-12) de la Form 4 y la Form 4L están relacionados con el calentador.
Error 1.3.1: No se ha podido calentar la resina
El error 1.3.1 indica que la resina no alcanzó su objetivo de temperatura tras un período de tiempo. Para resolver este problema:
Para más información, lee el artículo de asistencia Mantenimiento de la temperatura de la resina.
Error 1.3.3: La resina se ha sobrecalentado
ElError 1.3.3 indica que la resina del tanque de resina ha superado su temperatura objetivo. Para resolver este problema:
Para más información, lee el artículo de asistencia Mantenimiento de la temperatura de la resina.
Error 1.3.4: El calentador se ha sobrecalentado
ElError 1.3.4 indica que la temperatura del calentador ha superado su intervalo de funcionamiento seguro. Hay que detener todos los trabajos de impresión en curso, ya que continuar puede dañar la impresora y provocar un fallo de impresión. Para resolver este problema, sigue los mismos pasos de resolución de problemas que para el Error 1.3.3: La resina se ha sobrecalentado.
Para más información, lee el artículo de asistencia Mantenimiento de la temperatura de la resina.
Error 1.3.5: El calentador no está conectado
ElError 1.3.5 indica que el calentador puede no estar conectado. El calentador está situado en el bastidor del conjunto de la LPU.
Error 1.3.6 y Error 1.3.7: No se ha podido medir la temperatura de la resina
ElError 1.3.6 y el Error 1.3.7 indican que la impresora no ha podido medir la temperatura actual de la resina en el tanque de resina y puede ser necesario desactivar el calentador. Para resolver este problema:
Error 1.3.8 y Error 1.3.9: No se ha podido medir la temperatura del calentador
ElError 1.3.8 y el Error 1.3.9 indican que la impresora no ha podido medir la temperatura actual del calentador. El calentador está situado debajo del bastidor del conjunto de la LPU.
Error 1.3.10 y Error 1.3.11: La corriente del calentador es demasiado alta
ElError 1.3.10 y el Error 1.3.11 indican que el calentador ha encontrado un problema durante el proceso de preimpresión o durante la propia impresión. El calentador está situado en el bastidor del conjunto de la LPU. Para resolver este problema, sigue los mismos pasos de resolución de problemas que para el Error 1.3.8 y Error 1.3.9: No se ha podido medir la temperatura del calentador.
Error 1.3.12: Calentando la resina hasta la temperatura de impresión
La impresora puede mostrar el mensaje Error 1.3.12 para informar de que está calentando la resina del tanque. No indica necesariamente que haya un problema. Si la impresora no consigue calentar la resina después de un tiempo prolongado, revisa el cartucho de resina como si se tratara de un error relacionado con el calentador.
Errores del acelerómetro (Grupo de errores 4)
Todos los subcódigos del Grupo de errores 4 (1-7) de la Form 4 y la Form 4L están relacionados con el acelerómetro.
Error 1.4.1: La impresora está desnivelada
Las impresoras SLA de Formlabs funcionan mejor cuando están perfectamente niveladas. La pantalla táctil te pide que niveles la impresora cuando sea necesario, mostrando el mensaje Error 1.4.1. Pulsa Settings > Tools > Level printer (Ajustes > Herramientas > Nivelar impresora) en la pantalla táctil de la impresora para visualizar el estado actual del nivel. Sigue las instrucciones de la pantalla táctil y utiliza la herramienta de nivelación para nivelar la impresora. Si el error no desaparece, vuelve a instalar la última versión del firmware de tu impresora.
Error 1.4.2 y Error 1.4.3: El acelerómetro no está conectado
Error 1.4.2 y Error 1.4.3 indican un problema con el acelerómetro de la impresora. Reinicia la impresora, vuelve a instalar la última actualización del firmware y vuelve a intentarlo. Si ves este mensaje de error de forma repetida, contacta con el servicio de asistencia de Formlabs o con tu revendedor autorizado.
Error 1.4.7: La recalibración del acelerómetro ha fallado
ElError 1.4.7 indica que la rutina de calibración del acelerómetro ha fallado. Para resolver este problema:
Error de la retroiluminación (Grupo de errores 5)
Todos los subcódigos del Grupo de errores 5 (1-11) de la Form 4 y la Form 4L están relacionados con la unidad de retroiluminación UV.
Error 1.5.1: Sobrecalentamiento de la retroiluminación
ElError 1.5.1 indica que la unidad de retroiluminación se está sobrecalentando. La impresión se reanudará cuando la unidad de retroiluminación se haya enfriado. Para resolver este problema:
Error 1.5.2: No se detecta la retroiluminación
ElError 1.5.2 indica que no se ha podido detectar la unidad de retroiluminación. Para resolver este problema:
En algunos casos excepcionales, una unidad de retroiluminación de recambio para la generación Form 4L puede hacer que la impresora muestre este error inmediatamente después de la instalación. Si esto ocurre, activa la opción de Remote Assistance (Asistencia remota) y ponte en contacto con el servicio de asistencia de Formlabs.
Error: 1.5.5: No se reconoce la retroiluminación
ElError 1.5.5 indica que no se ha podido reconocer la unidad de retroiluminación. Para resolver este problema, sigue los mismos pasos de resolución de problemas que para el Error 1.5.2: No se detecta la retroiluminación.
En algunos casos excepcionales, una unidad de retroiluminación de recambio para la generación Form 4L puede hacer que la impresora muestre este error inmediatamente después de la instalación. Si esto ocurre, activa la opción de Remote Assistance (Asistencia remota) y ponte en contacto con el servicio de asistencia de Formlabs.
Error 1.5.6: La retroiluminación lleva encendida demasiado tiempo
ElError 1.5.6 indica que la unidad de retroiluminación ha estado encendida más de cinco minutos, por lo que la impresora la apagó como mecanismo de autoprotección. Para resolver este problema:
Error 1.5.7: La retroiluminación no responde
ElError 1.5.7 indica que la unidad de retroiluminación no ha respondido a una orden de la impresora. Para resolver este problema, sigue los mismos pasos de resolución de problemas que para el Error 1.5.2: No se detecta la retroiluminación.
Error 1.5.9 y Error 1.5.10: No se ha podido medir la temperatura de la retroiluminación
ElError 1.5.9 y el Error 1.5.10 indican que la impresora no ha podido medir la temperatura de la unidad de retroiluminación. Para resolver este problema, sigue los mismos pasos de resolución de problemas que para el Error 1.5.2: No se detecta la retroiluminación.
Error 1.5.11: No se ha podido encender la retroiluminación
ElError 1.5.11 indica que la impresora no ha podido encender la unidad de retroiluminación. Para resolver este problema, sigue los mismos pasos de resolución de problemas que para el Error 1.5.2: No se detecta la retroiluminación.
Errores de los consumibles (Grupo de errores 6)
Todos los subcódigos del Error 6 (1-32) de la Form 4 y la Form 4L están relacionados con problemas con los consumibles (el cartucho de resina, el tanque de resina y la base de impresión).
Error 1.6.2: Falta un cartucho
Si se extrae el cartucho de resina durante la impresión, la impresión puede continuar durante un tiempo utilizando la resina almacenada en el tanque de resina. La impresora mostrará el mensaje Error 1.6.2 para indicarlo. Vuelve a insertar el cartucho de resina para continuar. Si eso no resuelve el problema:
Error 1.6.3: La impresión se ha interrumpido por la falta de un cartucho
Si se extrae el cartucho de resina durante la impresión, la impresión puede continuar durante un tiempo utilizando la resina almacenada en el tanque de resina. Después, la impresión se detiene. La impresora muestra el mensaje Error 1.6.3 para indicar que la impresión se ha detenido debido a que se ha retirado el cartucho de resina. Vuelve a insertar el cartucho de resina para continuar. Si esto no resuelve el problema, sigue los mismos pasos de resolución de problemas que para el Error 1.6.2: Falta un cartucho.
Error 1.6.4: El cartucho izquierdo es incorrecto (solo en la generación Form 4L)
La impresora verifica el tipo de resina en el tanque y el cartucho para asegurarse de que coinciden con el trabajo de impresión actual. Si el tipo de resina del cartucho de resina izquierdo no coincide con el tipo de resina identificado en el trabajo de impresión, la impresora mostrará el mensaje Error 1.6.4 y te pedirá que insertes un cartucho de resina que coincida con los ajustes de la impresión. Asegúrate de que la resina del cartucho sea el tipo de resina para el que se ha configurado la impresión, con el mismo número de versión del material. Si eso no resuelve el problema:
Error 1.6.5: El cartucho izquierdo ha excedido el límite (solo en la generación Form 4L)
Cada cartucho contiene y puede dispensar de forma fiable un litro de resina. Si el cartucho ha superado su vida útil, la impresora muestra el mensaje Error 1.6.5. Después de que todo el litro de resina se dispense, desecha el cartucho y continúa la impresión con un cartucho nuevo. Reinicia la impresión cuando hayas sustituido el cartucho gastado. Si este error aparece incorrectamente, sigue los mismos pasos de resolución de problemas que para el Error 1.6.4: El cartucho izquierdo es incorrecto.
Error 1.6.6: El cartucho derecho es incorrecto (solo en la generación Form 4L)
La impresora verifica el tipo de resina en el tanque y el cartucho para asegurarse de que coinciden con el trabajo de impresión actual. Si el tipo de resina del cartucho de resina derecho no coincide con el tipo de resina identificado en el trabajo de impresión, la impresora mostrará el mensaje Error 1.6.6 y te pedirá que insertes un cartucho de resina que coincida con los ajustes de la impresión. Asegúrate de que la resina del cartucho sea el tipo de resina para el que se ha configurado la impresión, con el mismo número de versión del material. Si eso no resuelve el problema:
Error 1.6.7: El cartucho derecho ha excedido el límite (solo en la generación Form 4L)
Cada cartucho contiene y puede dispensar de forma fiable un litro de resina. Si el cartucho ha superado su vida útil, la impresora muestra el mensaje Error 1.6.7. Después de que todo el litro de resina se dispense, desecha el cartucho y continúa la impresión con un cartucho nuevo. Reinicia la impresión cuando hayas sustituido el cartucho gastado. Si este error aparece incorrectamente, sigue los mismos pasos de resolución de problemas que para el Error 1.6.6: El cartucho derecho es incorrecto.
Error 1.6.9: Falta un tanque
ElError 1.6.9 indica que falta el tanque de resina o que se ha retirado durante la impresión. Vuelve a insertar y fijar el tanque de resina para continuar. Si eso no resuelve el problema:
Error 1.6.10: Se ha insertado un tanque incorrecto
La impresora muestra el Error 1.6.10 cuando el tipo de resina del tanque no coincide con el necesario para llevar a cabo el trabajo de impresión. Retira el tanque de resina y reemplázalo por uno que se ajuste a la configuración de la impresión.
Nota:
Pulsa Ignore (Ignorar) para reprogramar el tanque de resina para que coincida con el tipo de resina del trabajo de impresión.
Error 1.6.11: Se ha superado la vida útil del tanque
El Error 1.6.11 indica que el tanque de resina ha superado su vida útil recomendada. Considera la posibilidad de sustituir el tanque de resina para que la impresión tenga éxito.
Error 1.6.12: El tanque no está bloqueado
ElError 1.6.12 indica que el tanque de resina no está bloqueado en su sitio mediante los pasadores del tanque. Presiona hacia abajo los laterales del tanque de resina con los pulgares y cierra los pasadores para asegurar el tanque. Si eso no resuelve el problema:
Error 1.6.14: No se ha podido detectar la base de impresión
ElError 1.6.14 indica que la impresora no ha podido detectar una base de impresión. Inserta y asegura una base de impresión para continuar. Si estás seguro de que hay una base de impresión limpia insertada en la impresora, también puedes pulsar Ignore (Ignorar) para continuar.
Si eso no resuelve el problema, abre la cubierta de la impresora, retira la base de impresión e inspecciona la barra de sujeción en la esquina superior derecha del soporte de la base de impresión.
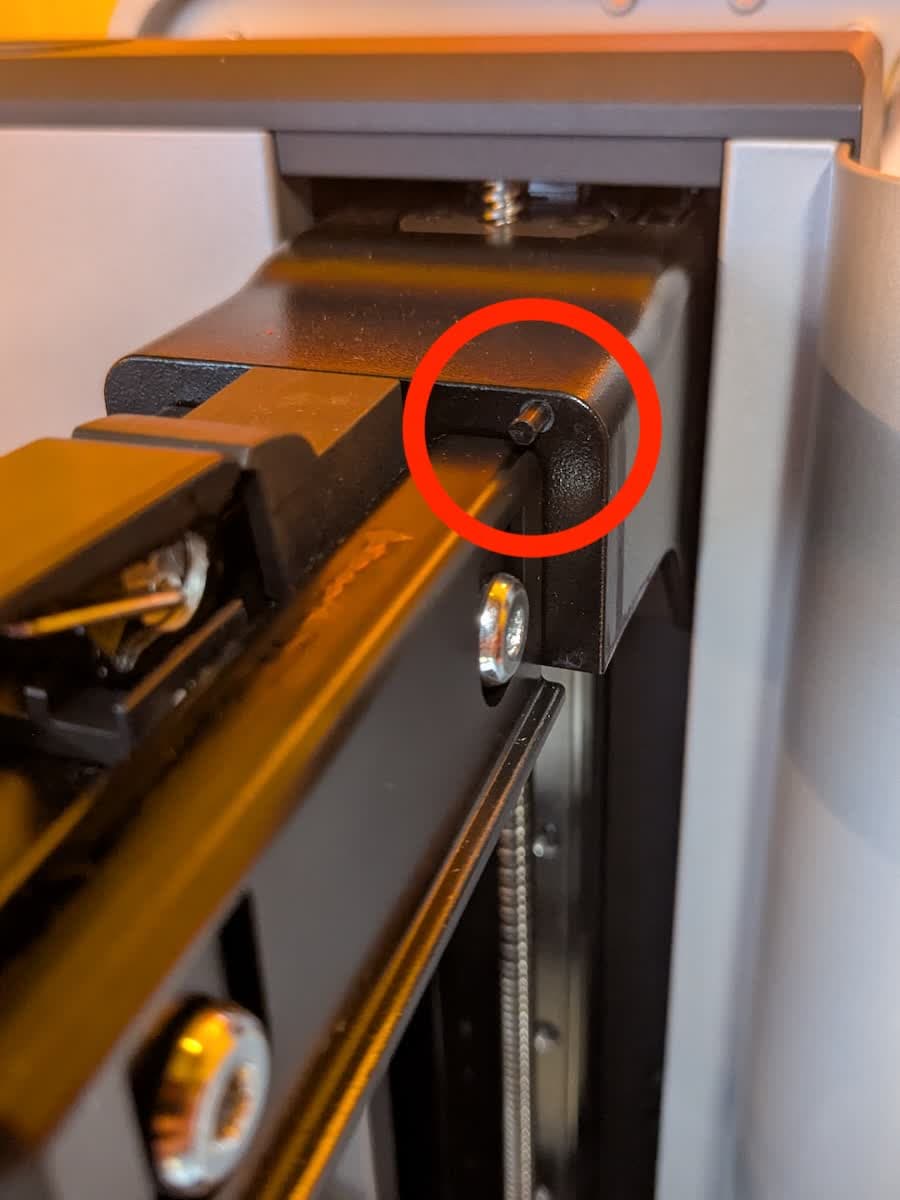
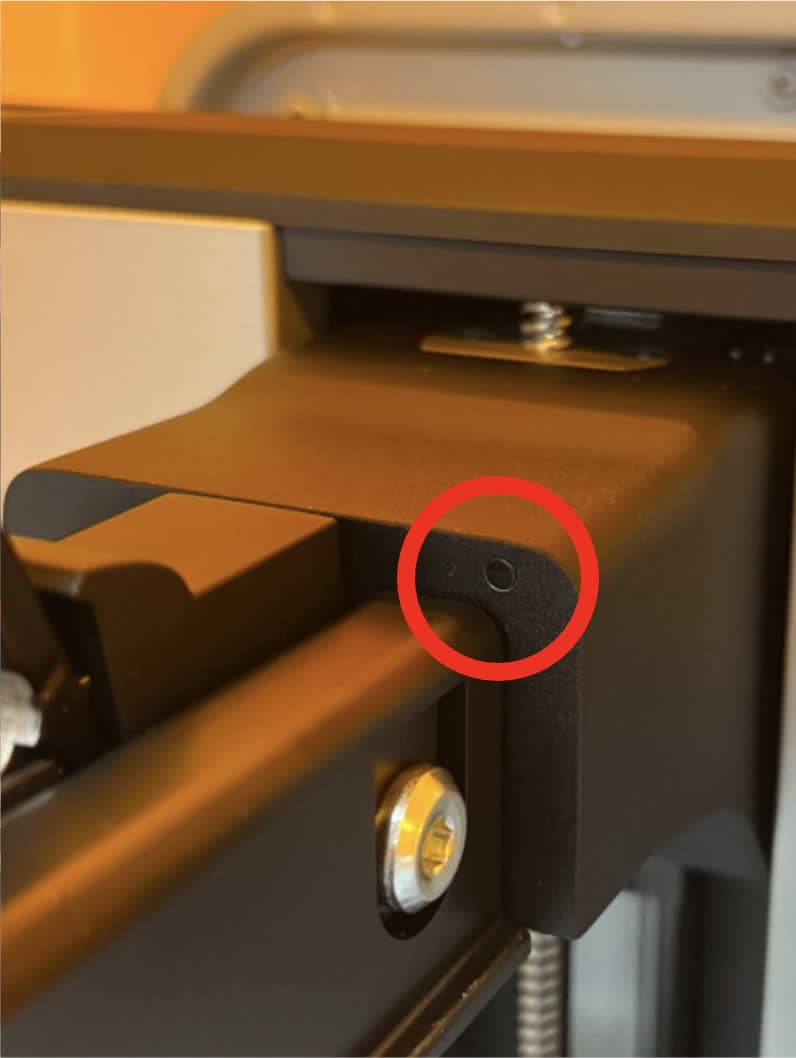
Si el émbolo es visible:
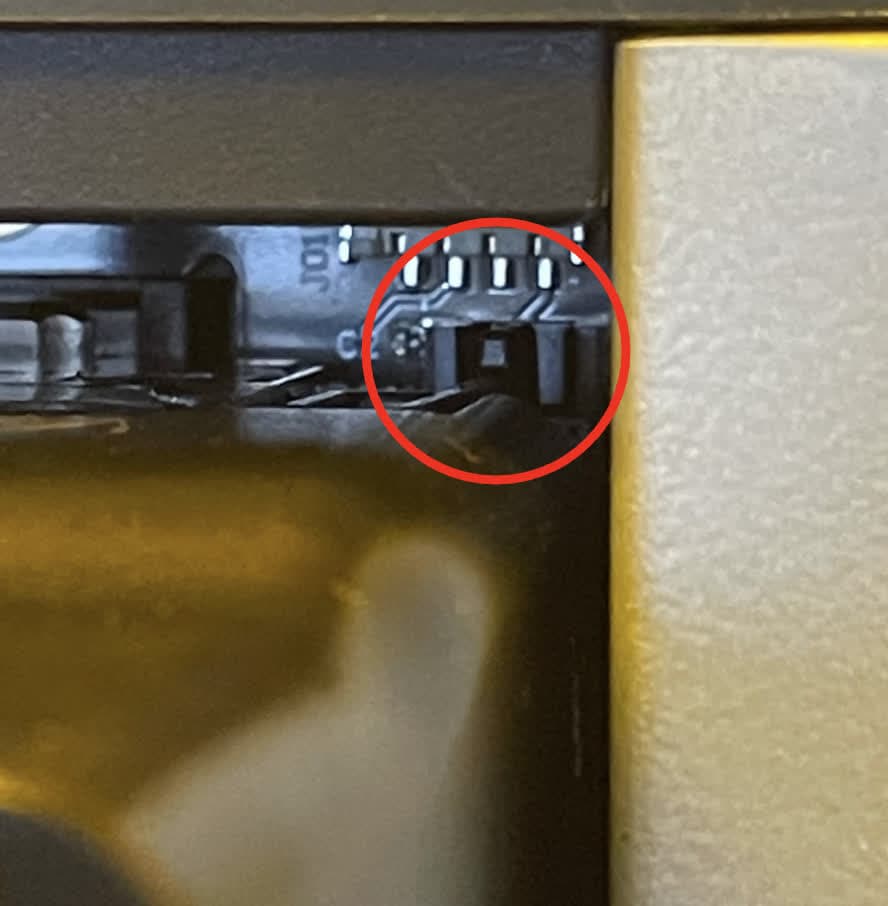
Si el émbolo está atascado dentro del soporte de la base de impresión:
Aviso:
No cortes el émbolo sin la herramienta de recorte. La herramienta de recorte garantiza que se corte la longitud correcta. Cortar demasiado impedirá que el émbolo interactúe con el sensor de la base de impresión, lo que romperá permanentemente la detección de la base de impresión.
Si el error no desaparece, contacta con el servicio de asistencia de Formlabs o con tu revendedor autorizado para recibir ayuda.
Error 1.6.27: El cartucho es incorrecto (solo en la generación Form 4)
La impresora verifica el tipo de resina en el tanque y el cartucho para asegurarse de que coinciden con el trabajo de impresión actual. Si no coinciden con el tipo de resina identificado en el trabajo de impresión, la impresora mostrará el mensaje Error 1.6.27 y te pedirá que insertes un cartucho de resina que coincida con los ajustes de la impresión. Asegúrate de que la resina del cartucho sea el tipo de resina para el que se ha configurado la impresión, con el mismo número de versión del material. Si eso no resuelve el problema:
Error 1.6.28: El cartucho ha excedido el límite (solo en la generación Form 4)
Cada cartucho contiene y puede dispensar de forma fiable un litro de resina. Si el cartucho ha superado su vida útil, la impresora muestra el mensaje Error 1.6.28. Después de que todo el litro de resina se dispense, desecha el cartucho y continúa la impresión con un cartucho nuevo. Reinicia la impresión cuando hayas sustituido el cartucho gastado. Si este error aparece incorrectamente, sigue los mismos pasos de resolución de problemas que para el Error 1.6.27: El cartucho es incorrecto (solo en la generación Form 4).
Error 1.6.33: Se ha insertado un tanque no reconocido
Formlabs tiene varios tipos de tanques de resina para sus impresoras SLA. El Error 1.6.33 indica que la impresora no ha podido reconocer el tanque de resina insertado. Para resolver este problema:
Errores de detección de restos (Grupo de errores 7)
Todos los subcódigos del Grupo de errores 7 (1-7) de la Form 4 y la Form 4L están relacionados con la detección por parte de la impresora de restos en el tanque de resina o en la base de impresión durante la preparación de la impresión.
Error 1.7.2: El mezclador ha detectado restos
Error 1.7.2 indica que el mezclador ha encontrado restos durante el raspado de la base de impresión previo a la impresión. Utiliza un rascador para retirar la resina curada de la base de impresión y vuelve a intentarlo. Si el problema no desaparece, sigue los mismos pasos de resolución de problemas que para el Error 1.1.6: El mezclador ha detectado restos.
Error 1.7.3: La base de impresión ha detectado restos
Error 1.7.3 indica que la base de impresión ha encontrado restos mientras descendía hasta el tanque de resina durante la fase previa a la impresión. Utiliza un rascador para retirar la resina curada de la base de impresión y vuelve a intentarlo. Si el problema no desaparece, sigue los mismos pasos de resolución de problemas que para el Error 1.1.7: La base de impresión ha detectado restos.
Errores del mezclador (Grupo de errores 8)
Todos los subcódigos del Grupo de errores 8 (1) de la Form 4 y la Form 4L están relacionados con el mezclador.
Error 1.8.1: No se ha detectado el mezclador
ElError 1.8.1 indica que la impresora no ha detectado el mezclador. Para resolver este problema:
Errores del dispensador (Grupo de errores 9)
Todos los subcódigos del Grupo de errores 9 (1-25) de la Form 4 y la Form 4L están relacionados con el sistema de dispensación de resina.
Error 1.9.4: No se ha podido medir el nivel de la resina
ElError 1.9.4 indica que la impresora no ha podido medir la cantidad de resina en el depósito de resina. Para resolver este problema:
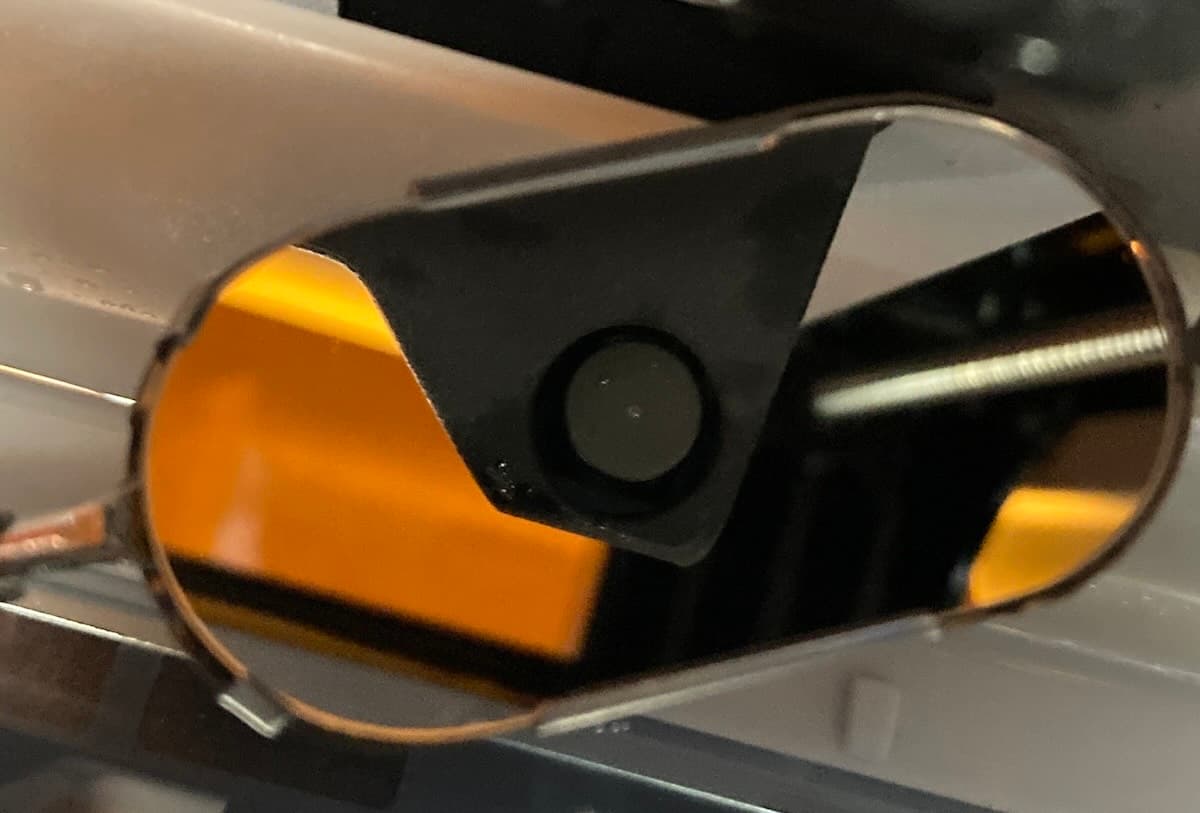
Error 1.9.5: El tanque está sobrecargado de resina
Si el tanque de resina está excesivamente lleno, la impresora mostrará el mensaje Error 1.9.5. Utiliza una jeringa o un pequeño vaso desechable para retirar pequeñas cantidades de resina y viértela en otro recipiente. Si la impresora avisa incorrectamente de una sobrecarga del tanque de resina:
Error 1.9.6: No hay suficiente resina para terminar la impresión
ElError 1.9.6 indica que el trabajo de impresión actual requiere más resina de la que hay disponible en el tanque de resina y en el cartucho de resina. Es posible que tengas que reemplazar el cartucho de resina durante la impresión. La impresora se detendrá y mostrará el Error 1.9.6 cuando el cartucho esté vacío. Para resolver este problema:
Error 1.9.7: La impresión se ha interrumpido por falta de resina
Las impresoras SLA de Formlabs tienen un componente llamado sensor de nivel, que mide la cantidad de resina que hay en el tanque de resina durante una impresión. Al monitorizar el nivel de resina, la impresora puede dispensar automáticamente la resina desde el cartucho hasta el tanque siempre que la resina en el tanque comience a escasear. El Error 1.9.7 indica que la impresora se ha detenido para reponer la resina del tanque. Si ves este mensaje repetidamente:
Error 1.9.9: El cartucho izquierdo está vacío (solo en la generación Form 4L)
La impresora muestra el Error 1.9.9 si no queda resina en el cartucho izquierdo. Cada cartucho contiene y puede dispensar de forma fiable un litro de resina. Después de que el litro completo se dispense, desecha el cartucho y continúa la impresión con un cartucho nuevo.
Si un cartucho no está vacío, pero la impresora muestra este error:
Error 1.9.10: El cartucho derecho está vacío (solo en la generación Form 4L)
La impresora muestra el Error 1.9.10 si no queda resina en el cartucho derecho. Cada cartucho contiene y puede dispensar de forma fiable un litro de resina. Después de que el litro completo se dispense, desecha el cartucho y continúa la impresión con un cartucho nuevo.
Si un cartucho no está vacío, pero la impresora muestra este error:
Error 1.9.11: El cartucho izquierdo dispensa con lentitud (solo en la generación Form 4L)
ElError 1.9.11 indica que la resina se está dispensando desde el cartucho de resina izquierdo a un ritmo más lento de lo esperado. Si un cartucho no está vacío, pero la impresora no puede dispensar resina, es posible que un problema con el cartucho esté impidiendo que la resina se dispense. Para comprobarlo, haz lo siguiente:
Nota:
Es posible que la impresora dispense la resina con más lentitud de lo debido sin mostrar un mensaje de error. Sigue los pasos de resolución de problemas anteriores para solucionar la lentitud de la dispensación, tanto si aparece un mensaje de error como si no.
Error 1.9.12: El cartucho derecho dispensa con lentitud (solo en la generación Form 4L)
Error 1.9.12 indica que la resina se está dispensando desde el cartucho de resina derecho a un ritmo más lento de lo esperado. Si un cartucho no está vacío, pero la impresora no puede dispensar resina, es posible que un problema con el cartucho esté impidiendo que la resina se dispense. Para comprobarlo, haz lo siguiente:
Nota:
Es posible que la impresora dispense la resina con más lentitud de lo debido sin mostrar un mensaje de error. Sigue los pasos de resolución de problemas anteriores para solucionar la lentitud de la dispensación, tanto si aparece un mensaje de error como si no.
Error 1.9.13, Error 1.9.14, Error 1.9.15 y Error 1.9.19: Errores de distancia de recalibración del sensor de nivel
Las impresoras SLA de Formlabs tienen un componente llamado sensor de nivel, que mide la cantidad de resina que hay en el tanque de resina durante una impresión. En las impresoras de la generación Form 4 y Form 4L, la impresora lo hace midiendo la distancia entre el sensor de nivel y la resina líquida. Si la impresora mide incorrectamente el nivel de resina, vuelve a calibrar el sensor de nivel. Si la impresora no puede medir esta distancia o está fuera del intervalo esperado, la impresora mostrará los mensajes Error 1.9.13, Error 1.9.14, Error 1.9.15, or Error 1.9.19. Para resolver estos problemas:
Error 1.9.16, Error 1.9.17, and Error 1.9.18: LevelSense temperature errors
Formlabs SLA printers have a component known as LevelSense that measures the amount of resin in the resin tank during a print. On Form 4 and Form 4L generation printers, the LevelSense system also measures the ambient temperature to accurately measure the resin level. If the printer is incorrectly measuring resin level, recalibrate the LevelSense. During recalibration, if the printer cannot measure the ambient temperature or it is out of the expected range, the printer displays Error 1.9.16, Error 1.9.17, or Error 1.9.18. To resolve these issues:
Error 1.9.20: Filling tank
The printer may show Error 1.9.20 to inform you that it is filling the resin tank. It does not necessarily indicate that there is an issue. If the printer fails to fill the resin tank after a prolonged length of time, check the resin cartridge as you would for a dispense-related error.
Error 1.9.21: Could not determine offset
Error 1.9.21 indicates that the cartridge sensor readings were not stable during cartridge floor load cell calibration. Make sure that nothing is sitting on the cartridge floor(s) and retry the cartridge floor calibration process. If the issue persists:
Error 1.9.22: Cartridge is empty (Form 4 generation only)
The printer displays Error 1.9.22 if there is no more resin in the cartridge. Each cartridge contains and can reliably dispense one liter of resin. After the full liter dispenses, dispose of the cartridge and continue printing with a new cartridge.
If a cartridge is not empty but the printer displays this error:
Nota:
Es posible que la impresora tenga problemas para dispensar la resina sin mostrar un mensaje de error. Sigue los pasos de resolución de problemas anteriores para solucionar los problemas de dispensación de resina, tanto si aparece un mensaje de error como si no.
Error 1.9.23: El cartucho está dispensando lentamente (solo en la generación Form 4)
El Error 1.9.23 indica que la resina se está dispensando desde el cartucho de resina a un ritmo más lento de lo esperado. Si un cartucho no está vacío, pero la impresora no puede dispensar resina, es posible que un problema con el cartucho esté impidiendo que la resina se dispense. Para comprobarlo, haz lo siguiente:
Nota:
Es posible que la impresora dispense la resina con más lentitud de lo debido sin mostrar un mensaje de error. Sigue los pasos de resolución de problemas anteriores para solucionar la lentitud de la dispensación, tanto si aparece un mensaje de error como si no.
Error 1.9.24: La impresión se ha interrumpido por falta de resina
Las impresoras SLA de Formlabs tienen un componente llamado sensor de nivel, que mide la cantidad de resina que hay en el tanque de resina durante una impresión. Al monitorizar el nivel de resina, la impresora puede dispensar automáticamente la resina desde el cartucho hasta el tanque siempre que la resina en el tanque comience a escasear.
Sin embargo, las impresoras con el Open Material Mode no pueden dispensar automáticamente desde el cartucho de resina. El Error 1.9.24 indica que la impresora se ha detenido para que el usuario pueda reponer manualmente la resina del tanque. Si ves este mensaje repetidamente:
Errores de la Light Processing Unit (Grupo de errores 10)
Todos los subcódigos del Grupo de errores 10 (1-9) de la Form 4 y la Form 4L están relacionados con la Light Processing Unit (LPU).
Error 1.10.1 y Error 1.10.4: La LPU no está conectada
ElError 1.10.1 y el Error 1.10.4 indican que la Light Processing Unit (LPU) no está conectada. Para resolver estos problemas:
Error 1.10.3: No se ha detectado la LPU
ElError 1.10.3 indica que no se ha podido detectar la Light Processing Unit (LPU). Para resolver este problema, sigue los mismos pasos de resolución de problemas que para el Error 1.10.1 y el Error 1.10.4: La LPU no está conectada.
Error 1.10.5: No se ha cargado el archivo de impresión
ElError 1.10.5 indica que hay un problema con un archivo del trabajo de impresión que has cargado. Actualiza PreForm y el firmware de la impresora, y vuelve a cargar el trabajo de impresión.
Error 1.10.8: La LPU ha agotado su vida útil
ElError 1.10.8 indica que la Light Processing Unit se ha usado más allá de su vida útil recomendada. Continuar puede provocar fallos de impresión. Reemplaza la LPU. Sigue las instrucciones de las guías de reparación Sustitución de la Light Processing Unit (LPU) de la Form 4 o Sustitución de la Light Processing Unit (LPU) de la Form 4L. Puedes adquirir LPU de recambio en la tienda web de Formlabs.
Errores de la cámara fotográfica (Grupo de errores 12)
Todos los subcódigos del Grupo de errores 12 (1-5) de la Form 4 y la Form 4L están relacionados con el sistema de la cámara fotográfica.
Error 1.12.2: La cámara no está conectada
ElError 1.12.2 indica que la cámara, que se utiliza para capturar fotos posteriores a la impresión, no está conectada. Si has desconectado o retirado la cámara intencionadamente, ignora este mensaje. Para resolver este problema:
Error 1.12.3: La foto ha fallado
ElError 1.12.3 indica que la cámara no ha podido realizar una foto. Para resolver este problema, sigue los mismos pasos de resolución de problemas que para el Error 1.12.2: La cámara no está conectada.
Errores de la fase de aplastamiento (Grupo de errores 13)
La fase de aplastamiento de cada capa se refiere al descenso de la base de impresión al tanque de resina. Todos los subcódigos del Grupo de errores 13 de la Form 4 y la Form 4L están relacionados con las fases de aplastamiento.
Error 1.13.1: La base de impresión ha detectado restos
El Error 1.13.1 indica que la impresora ha detectado restos en el tanque de resina o en la base de impresión durante la fase de aplastamiento. Para resolver este problema, sigue los mismos pasos de resolución de problemas que para el Error 1.1.7: La base de impresión ha detectado restos.
Errores del estado de la impresión (Grupo de errores 15)
Todos los subcódigos del Grupo de errores 15 (1-6) de la Form 4 y la Form 4L están relacionados con un problema con el estado de la impresión.
Error 1.15.1: No se ha cargado el trabajo de impresión
ElError 1.15.1 indica un problema con el trabajo de impresión cargado. Actualiza PreForm y el firmware de la impresora y, a continuación, vuelve a cargar el trabajo de impresión.
Error 1.15.2: Ya se está imprimiendo un trabajo
El Error 1.15.2 indica que no se ha iniciado un nuevo trabajo de impresión porque ya hay uno en curso. Espera a que termine la impresión actual antes de iniciar una nueva. Si no hay ningún trabajo en curso, reinicia la impresora, vuelve a instalar su firmware y vuelve a intentarlo.
Error 1.15.3: El trabajo de impresión no es válido
ElError 1.15.3 indica un problema con el trabajo de impresión cargado. Es posible que se haya generado utilizando una versión de PreForm incompatible con el firmware de la impresora. Actualiza PreForm y el firmware de la impresora y, a continuación, vuelve a cargar el trabajo de impresión.
Error 1.15.5: Ajuste preciso incompatible
ElError 1.15.5 indica que los valores de ajuste preciso de la impresora se han actualizado después de cargar este trabajo. Para resolver este problema, vuelve a cargar el trabajo a través de PreForm.
Error 1.15.6: No hay suficiente espacio de almacenamiento para imprimir
ElError 1.15.6 indica que no hay suficiente espacio de almacenamiento en la impresora para almacenar los datos de impresión, incluso después de borrar automáticamente los trabajos del historial. Eliminar trabajos de la cola de impresión y vuelve a subir el trabajo sin la función de secuencia a cámara rápida a través de PreForm.
Errores del Resin Pumping System (Grupo de errores 20)
Todos los subcódigos del Grupo de errores 20 (1-15) de la Form 4 y la Form 4L están relacionados con un problema del Resin Pumping System.
Error 1.20.1: Comprueba el contenedor de resina
El Resin Pumping System bombea resina desde un envase de 5 litros a la impresora. Si el envase está vacío, reemplázalo para continuar con la impresión. Si el contenedor no está vacío, puede haber un problema con la tarjeta de resina insertada en la bomba. Contacta con el servicio de asistencia de Formlabs o con tu revendedor autorizado si necesitas ayuda.
Error 1.20.4: La Resin Pump no está conectada
El Resin Pumping System (Form 4) se comunica con las impresoras de la generación Form 4 y Form 4L mediante una conexión USB. El Error 1.20.4 indica que la impresora ha reconocido una bomba de resina a través del sensor RFID del cartucho de resina, pero no ha podido comunicarse con la bomba a través del cable USB. Para resolver este problema:
Error 1.20.6: No ha sido posible actualizar el firmware de la Resin Pump
ElError 1.20.6 indica que la impresora ha intentado actualizar el firmware de la bomba de resina, pero no lo ha conseguido. Esto puede ocurrir si la bomba está desconectada mientras se está actualizando. Para resolver este problema, sigue los mismos pasos de resolución de problemas que para el Error 1.20.4: La Resin Pump no está conectada.
Error 1.20.14: Problema de conexión de la Resin Pump
ElError 1.20.14 indica que hay un problema con la conexión a la bomba de resina. Asegúrate de que la bomba está conectada directamente a la impresora mediante el cable USB integrado. No conectes la bomba de resina a la impresora mediante un concentrador, un adaptador u otro accesorio USB. Si el error no desaparece, sigue los mismos pasos de resolución de problemas que para el Error 1.20.4: La Resin Pump no está conectada.
Error 1.20.15: Problema de alimentación de la Resin Pump
ElError 1.20.15 indica un problema con la alimentación de la bomba de resina. Para resolver este problema, sigue los mismos pasos de resolución de problemas que para el Error 1.20.4: La Resin Pump no está conectada. Si el error no desaparece, reemplaza la bomba de resina.
Errores de la Color Resin (Grupo de error 22)
Todos los subcódigos del Grupo de errores 22 (1-4) de la Form 4 y la Form 4L están relacionados con un problema con la Color Resin.
Error 1.22.1: El color del depósito no coincide
La impresora muestra el mensaje Error 1.22.1 cuando el color de la resina en el depósito no coincide con el necesario para el trabajo. Retira el tanque de resina y reemplázalo por uno que se ajuste a la configuración de la impresión.
Nota:
Pulsa Ignore (Ignorar) para reprogramar el tanque de resina para que coincida con el color de resina del trabajo de impresión.
Error 1.22.2: El color del cartucho no coincide (solo en la generación Form 4)
La impresora muestra el mensaje Error 1.22.2 cuando el color de la resina en el cartucho no coincide con el necesario para el trabajo. Retira el cartucho de resina y reemplázalo por uno que se ajuste a la configuración de la impresión. Si esto no resuelve el problema, sigue los mismos pasos de resolución de problemas que para el Error 1.6.27: El cartucho es incorrecto (solo en la generación Form 4).
Error 1.22.3: El color del cartucho izquierdo no coincide (solo en la generación Form 4L)
La impresora muestra el mensaje Error 1.22.3 cuando el color de la resina en el cartucho izquierdo no coincide con el necesario para el trabajo. Retira el cartucho de resina izquierdo y reemplázalo por uno que se ajuste a la configuración de la impresión. Si esto no resuelve el problema, sigue los mismos pasos de resolución de problemas que para el Error 1.6.4: El cartucho izquierdo es incorrecto (solo en la generación Form 4L).
Error 1.22.4: El color del cartucho derecho no coincide (solo con la generación Form 4L)
La impresora muestra el mensaje Error 1.22.4 cuando el color de la resina en el cartucho derecho no coincide con el necesario para el trabajo. Retira el cartucho de resina derecho y reemplázalo por uno que se ajuste a la configuración de la impresión. Si esto no resuelve el problema, sigue los mismos pasos de resolución de problemas que para el Error 1.6.6: El cartucho derecho es incorrecto (solo en la generación Form 4L).
Errores de los consumibles (Grupo de errores 227)
Todos los subcódigos del Grupo de errores 227 (1-4) de la Form 4 y la Form 4L están relacionados con un problema con un cartucho de resina insertado.
Error 1.227.1: El cartucho de resina es incompatible (solo con la generación Form 4)
La impresora muestra el mensajeError 1.227.1 cuando la resina del cartucho es incompatible con la impresora. Concretamente, esto ocurre cuando se introduce una resina para aplicaciones biocompatibles en una impresora Form 4 en lugar de en una impresora Form 4B. Si has introducido el cartucho en el tipo de impresora incorrecto, muévelo a la impresora correcta. De lo contrario, sigue las instrucciones para preparar la Form 4B para registrar en la impresora una licencia vitalicia para materiales biocompatibles de Formlabs.
Error 1.227.2: El cartucho de resina derecho es incompatible (solo en la generación Form 4L)
La impresora muestra el mensaje Error 1.227.2 cuando la resina del cartucho derecho es incompatible con la impresora. Concretamente, esto ocurre cuando se introduce una resina para aplicaciones biocompatibles en una impresora Form 4L en lugar de en una impresora Form 4BL. Si has introducido el cartucho en el tipo de impresora incorrecto, muévelo a la impresora correcta. De lo contrario, sigue las instrucciones para preparar la Form 4BL para registrar en la impresora una licencia vitalicia para materiales biocompatibles de Formlabs.
Error 1.227.3: El cartucho de resina izquierdo es incompatible (solo con la generación Form 4L)
La impresora muestra el mensaje Error 1.227.3 cuando la resina del cartucho izquierdo es incompatible con la impresora. Concretamente, esto ocurre cuando se introduce una resina para aplicaciones biocompatibles en una impresora Form 4L en lugar de en una impresora Form 4BL. Si has introducido el cartucho en el tipo de impresora incorrecto, muévelo a la impresora correcta. De lo contrario, sigue las instrucciones para preparar la Form 4BL para registrar en la impresora una licencia vitalicia para materiales biocompatibles de Formlabs.
Error 1.227.4: Los cartuchos de resina son incompatibles (solo con la generación Form 4L)
La impresora muestra el mensaje Error 1.227.4 cuando la resina de ambos cartuchos es incompatible con la impresora. Concretamente, esto ocurre cuando se introduce una resina para aplicaciones biocompatibles en una impresora Form 4L en lugar de en una impresora Form 4BL. Si has introducido los cartuchos en el tipo de impresora incorrecto, muévelos a la impresora correcta. De lo contrario, sigue las instrucciones para preparar la Form 4BL para registrar en la impresora una licencia vitalicia para materiales biocompatibles de Formlabs.
Error 1.227.5: Se recomienda comprobar el cartucho
Las resinas más recientes de la familia Tough hacen que la válvula de mordida del cartucho de resina se hinche con el tiempo. Una válvula de mordida hinchada dispensa resina más lentamente, sobre todo hacia el final de la vida útil de un cartucho. En un número limitado y contenido de casos, la válvula de mordida puede acabar desprendiéndose por completo del cartucho de resina, provocando un derrame importante de resina. La impresora muestra el Error 1.227.5 después de que el cartucho de resina haya pasado por 50 ciclos de dispensación y sea posible que el rendimiento de dicha dispensación se haya reducido. Para evitar problemas de dispensación y derrames de resina:
Error 1.227.6: Recomendado comprobar el cartucho (solo en la generación Form 4L)
Las resinas más nuevas de la familia Tough hacen que la válvula de mordida del cartucho de resina se hinche con el tiempo. Una válvula de mordida hinchada dispensa resina más lentamente, sobre todo hacia el final de la vida útil de un cartucho. En un número limitado y contenido de casos, la válvula de mordida puede acabar desprendiéndose por completo del cartucho de resina, provocando un derrame importante de resina. En las impresoras de la generación Form 4L, la impresora muestra el Error 1.227.6 después de que el cartucho de resina de la ranura para cartuchos de la derecha haya pasado por 50 ciclos de dispensación y sea posible que el rendimiento de dicha dispensación se haya reducido. Para evitar problemas de dispensación y derrames de resina:/p>
La impresora no se inicia
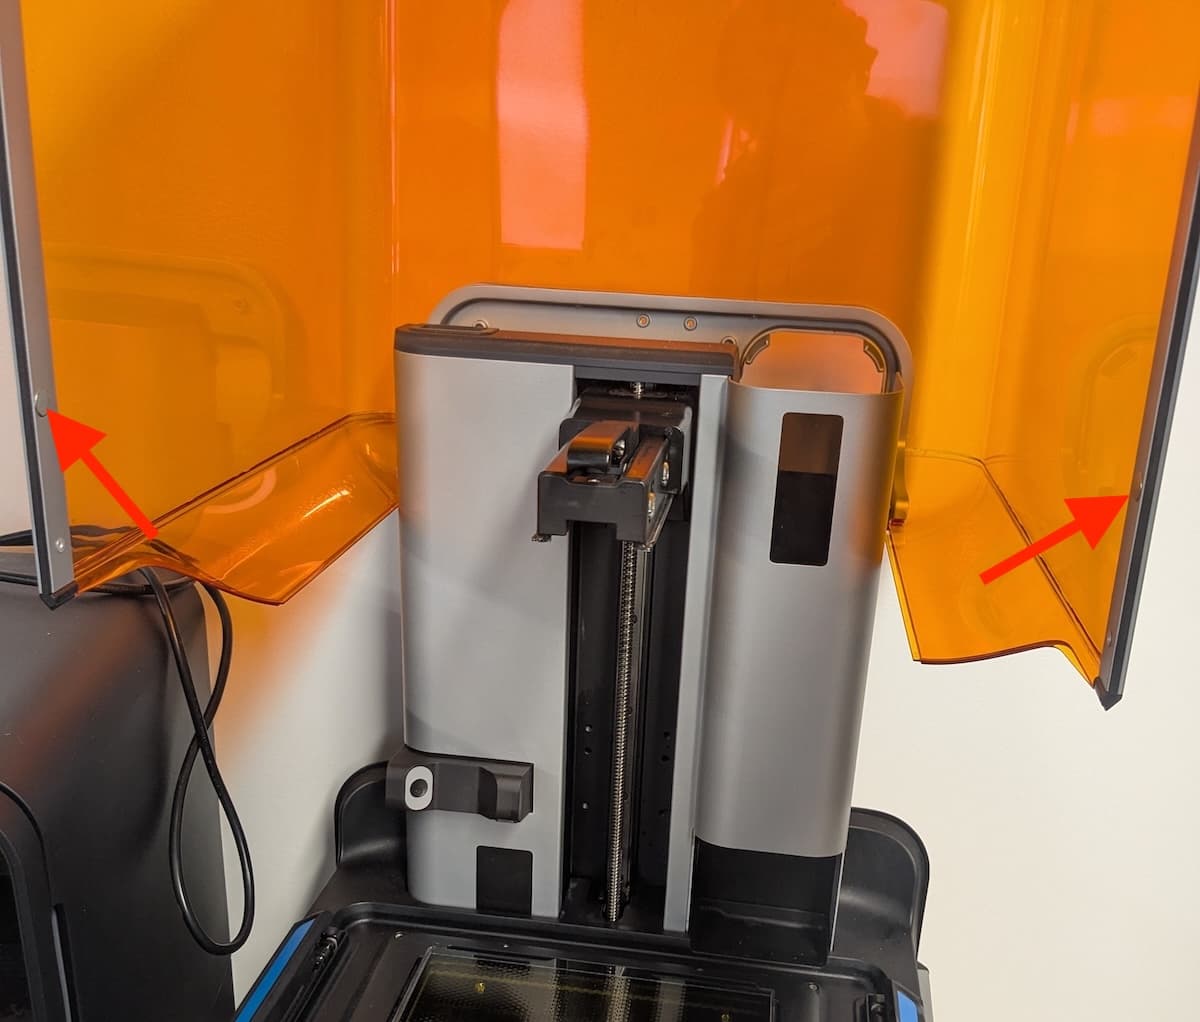
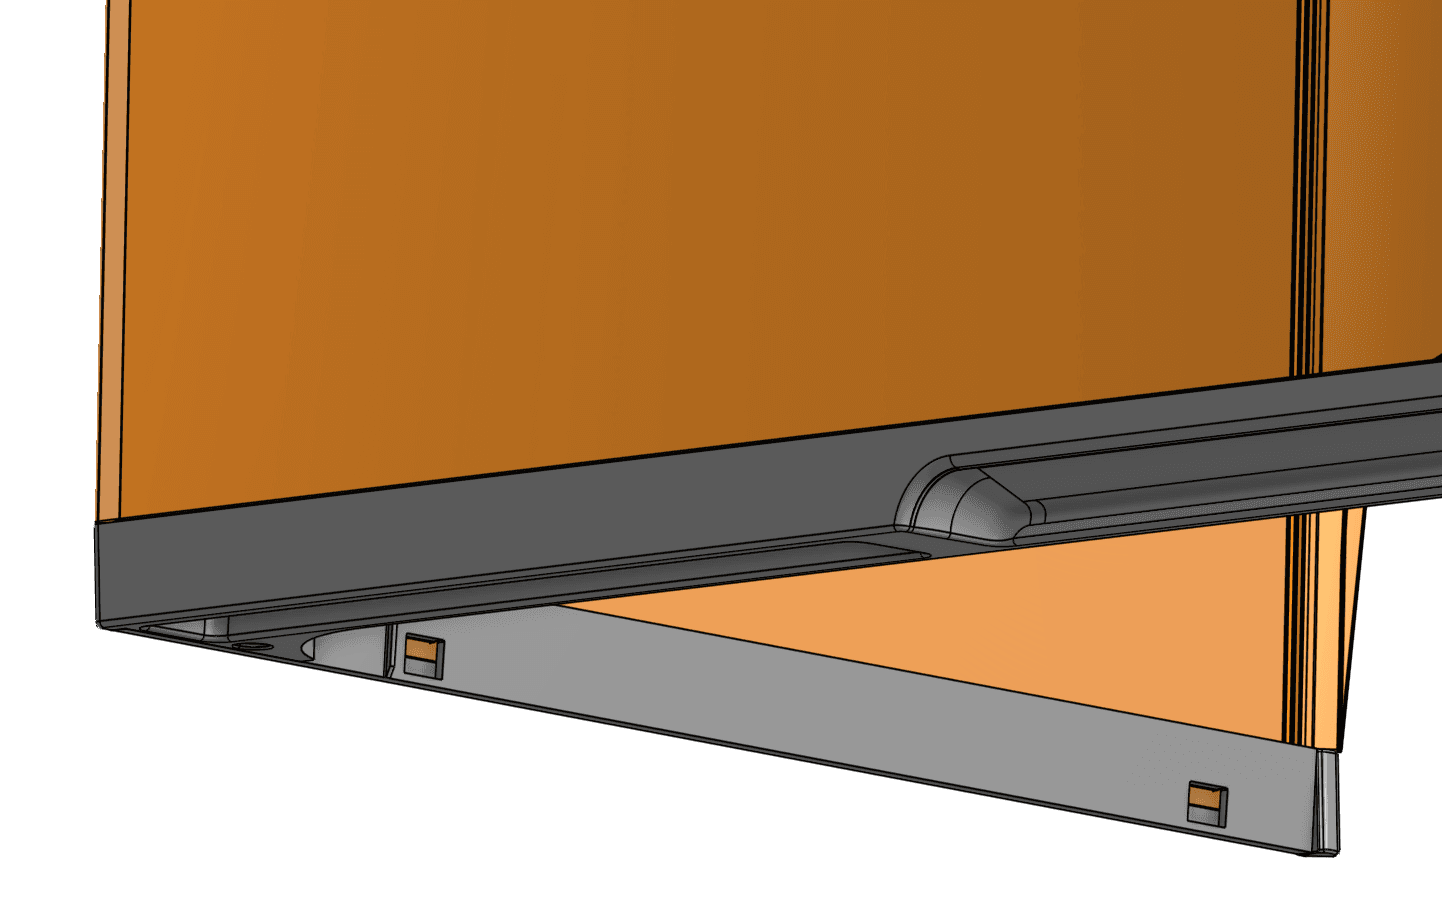
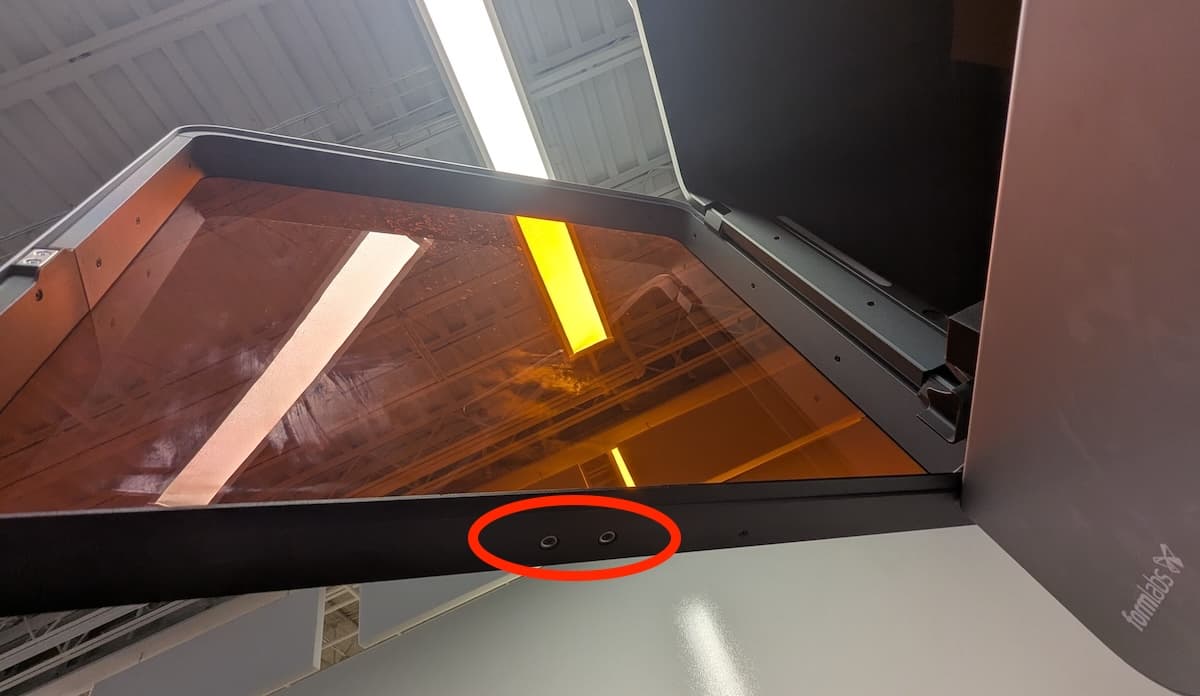
Si la impresora no se inicia al encenderla, asegúrate de que la cubierta está cerrada. Si está cerrada, abre la cubierta y comprueba si hay dos imanes redondos de bloqueo situados a lo largo de su borde inferior. Si uno de los imanes se ha desprendido de la cubierta, es posible que se haya adherido a la carcasa de la impresora o que se haya quedado atrapado debajo de uno de los pasadores del tanque de resina. Pega el imán a la cubierta con un adhesivo fuerte. Cuando el adhesivo se haya secado, cierra la cubierta para continuar.
Si el problema se repite, contacta con el servicio de asistencia de Formlabs o con tu revendedor autorizado para recibir ayuda. Si ambos imanes están presentes, reinicia la impresora, actualiza su firmware y vuelve a intentarlo.
Errores internos y otros errores
En raras ocasiones, la impresora puede mostrar el mensaje Internal Error (Error interno) con un código de error asociado. Si observas un error interno, carga los registros de diagnóstico de tu impresora y ponte en contacto con el servicio de asistencia de Formlabs para recibir indicaciones específicas.
Error 1.23.3
El Error 1.23.3 indica que la impresora ha encontrado un error de comunicación interna. Para resolver este problema:
Error 1.196.3
ElError 1.196.3 puede deberse a que el espacio de almacenamiento libre de la impresora es insuficiente. Elimina los trabajos de impresión antiguos de la cola de impresión y vuelve a intentar la impresión.
Error 1.225.1
ElError 1.225.1 indica que la impresora ha encontrado un error al conectarse a la red wifi seleccionada. Reinicia la impresora y el router wifi (si es posible) e inténtalo de nuevo.
Error 1.226.5: La impresora se ha reiniciado durante la impresión
ElError 1.226.5 indica que la impresora se ha reiniciado durante la impresión, probablemente debido a un problema de alimentación. Si se interrumpe la alimentación de la impresora durante una impresión, la impresora no reanudará la impresión cuando se reinicie. Para resolver este problema:
Error 1.240.5
ElError 1.240.5 indica que la impresora ha recibido un trabajo de impresión dañado. Esto puede ocurrir si ha habido problemas con tu conexión de red mientras enviabas el trabajo de impresión a la impresora. Vuelve a cargar el trabajo de impresión. Si el problema se repite, realiza la carga a través de una conexión más estable, como un cable USB.
Activación de la asistencia remota para la resolución de problemas
Durante la resolución de problemas, el servicio de asistencia de Formlabs puede necesitar información adicional de tu impresora o acceso a ella. Es posible que se te pida que actives la función de Remote Assistance (Asistencia remota) en tu máquina.
Para preparar tu impresora para la asistencia remota:
Activación de Analytics para la resolución de problemas
Durante la resolución de problemas, el servicio de asistencia de Formlabs puede necesitar información adicional de tu impresora o acceso a ella. Es posible que se te pida que actives la función de Analytics (Información analítica) en tu máquina.
Para preparar tu impresora para el registro en Dashboard:
Instrucciones para el restablecimiento de los ajustes de fábrica
En algunas ocasiones, un restablecimiento de los ajustes de fábrica puede corregir el comportamiento inusual de la impresora. El comportamiento inusual puede incluir mensajes de "unknown error" (error desconocido), actualizaciones incompletas del firmware, una pantalla táctil que no responde o problemas para conectarse a PreForm. Un restablecimiento de fábrica borra los ajustes personalizados, incluidas las impresiones guardadas en la cola de impresión y las conexiones de red.
Aviso:
Un restablecimiento de los ajustes de fábrica borra toda la información de las impresiones, la configuración personalizada y los registros de diagnóstico. Carga los registros de diagnóstico antes de realizar un restablecimiento de los ajustes de fábrica.
Para realizar un restablecimiento de los ajustes de fábrica:
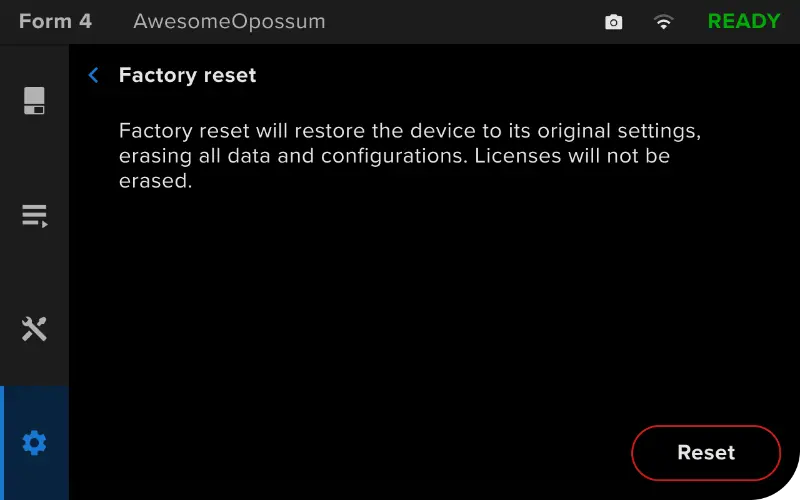
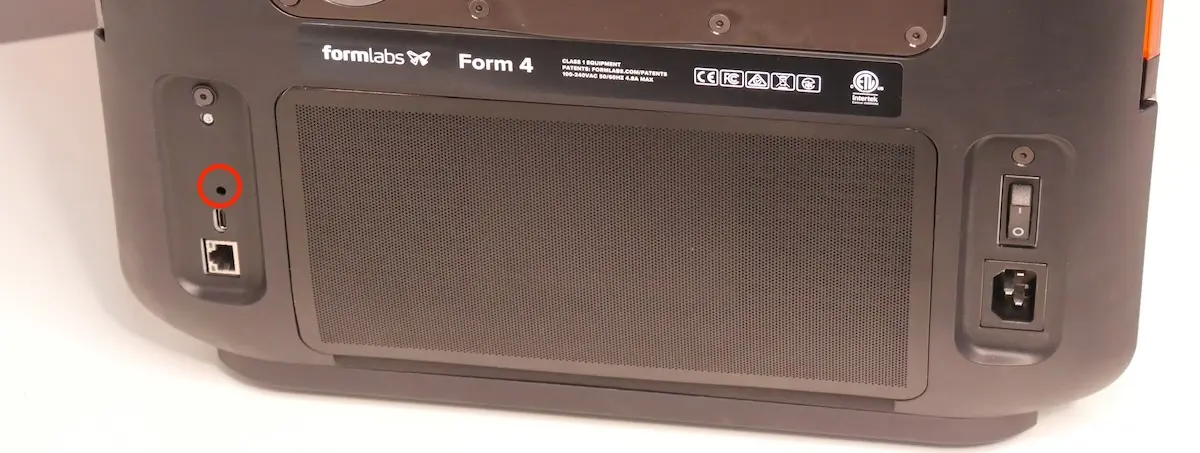
Si no puedes realizar un restablecimiento de los ajustes de fábrica mediante la pantalla táctil, utiliza el botón físico situado en la parte posterior de la máquina:
Para confirmar un restablecimiento con éxito de los ajustes de fábrica, pulsa Queue (Cola de impresión) en la pantalla táctil de la impresora. Después de un restablecimiento satisfactorio, la cola de impresión estará vacía. Si el restablecimiento no resuelve el comportamiento inusual, ponte en contacto con el servicio de asistencia de Formlabs o con tu revendedor autorizado.