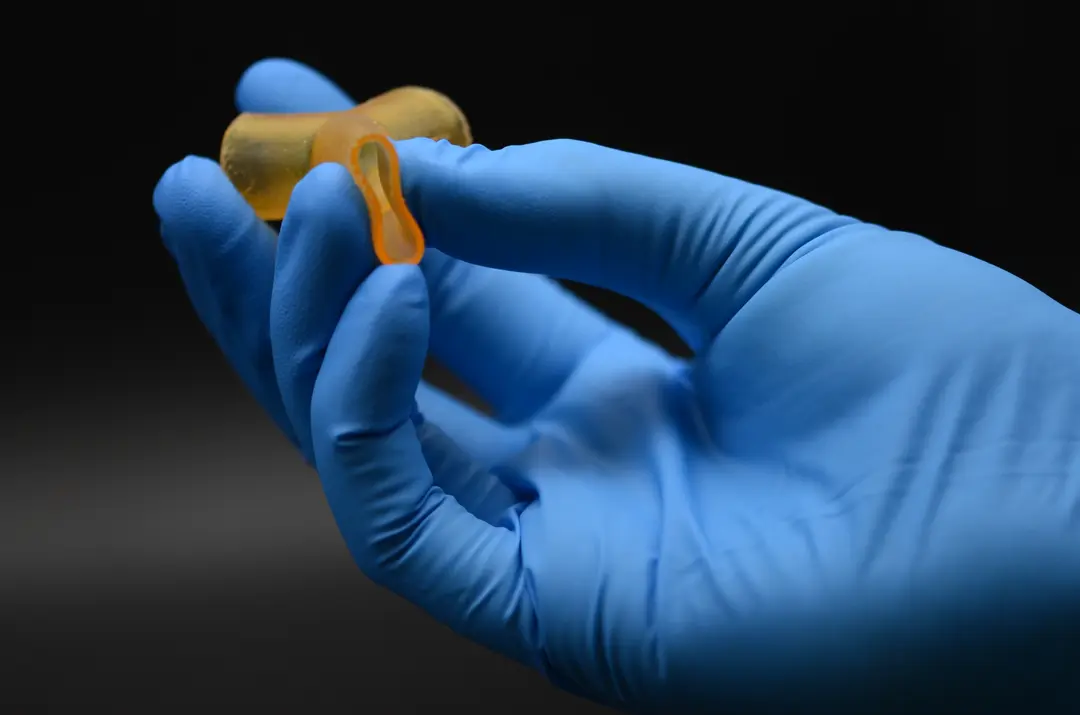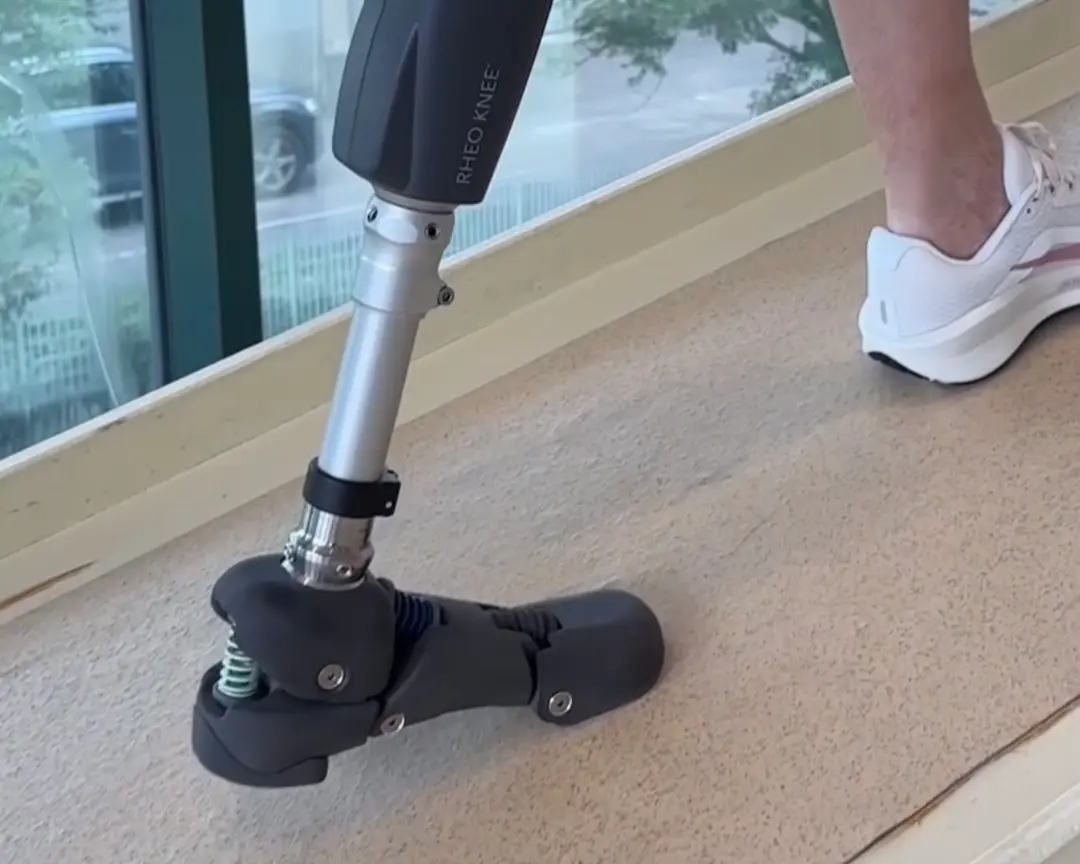
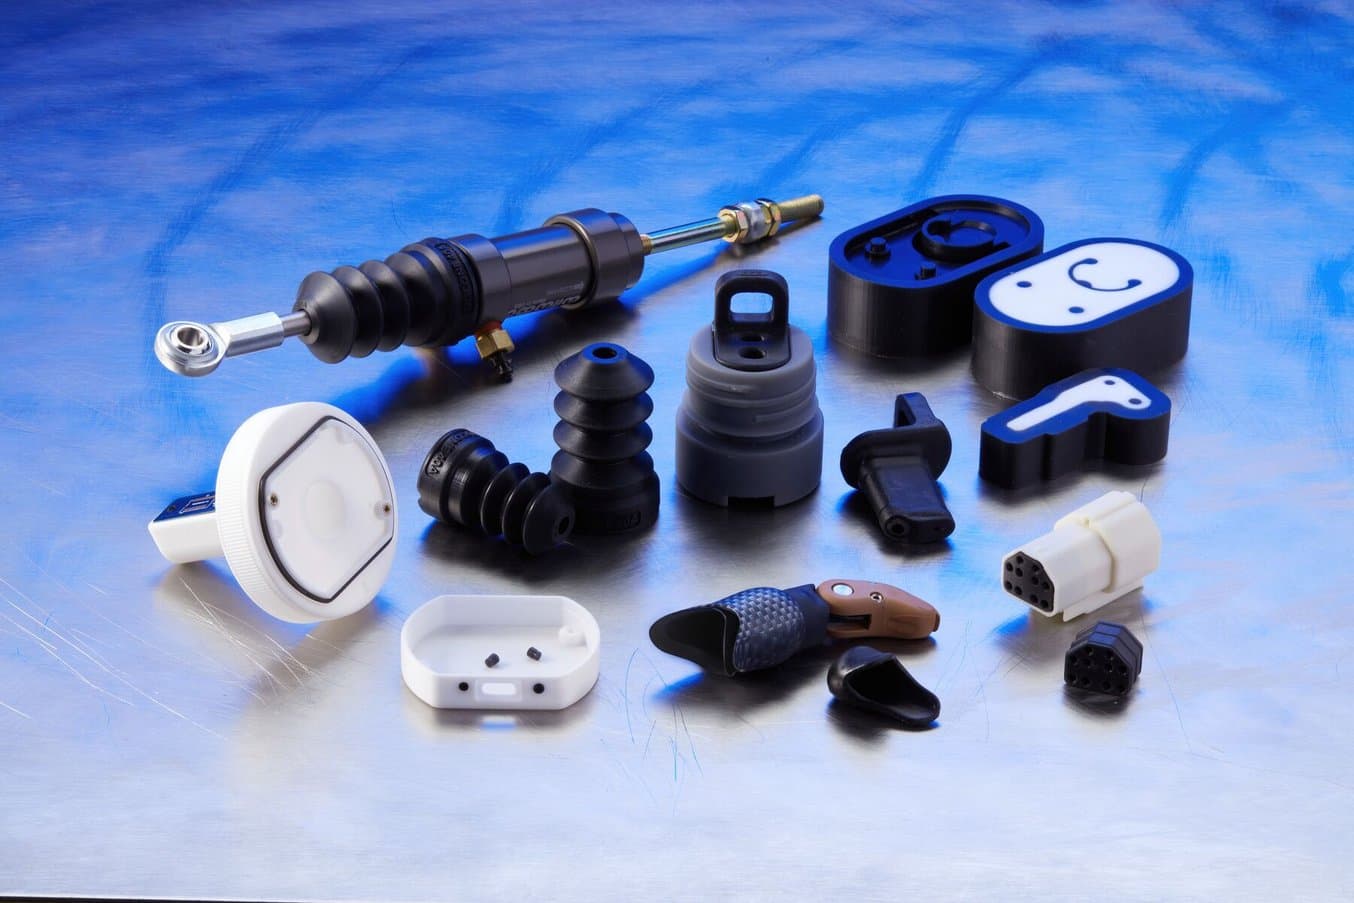
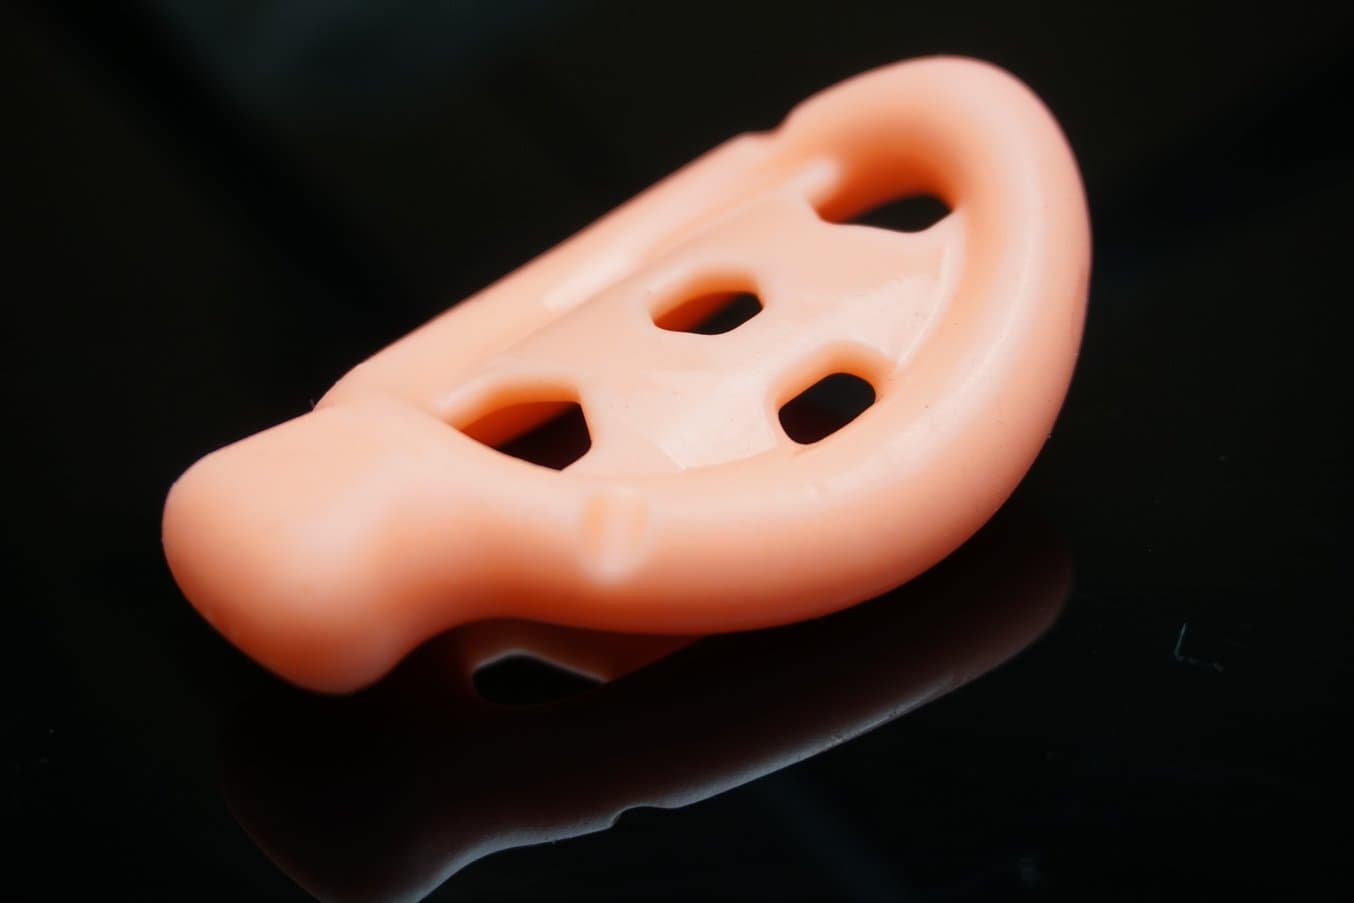
La gomma siliconica è un materiale versatile con proprietà meccaniche che la rendono particolarmente indicata per le applicazioni mediche, tra cui resistenza al calore e biocompatibilità. Il silicone è un materiale fondamentale per il settore sanitario e viene usato in un'ampia gamma di applicazioni, da apparecchi acustici personalizzati a maniglie e impugnature speciali di dispositivi medici, passando per modelli anatomici morbidi e protesi.
In questa guida illustreremo come l'ecosistema Formlabs può essere utilizzato per creare parti in vero silicone per applicazioni mediche. Per scoprire i workflow completi per la stampa 3D con la Silicone 40A Resin e per lo stampaggio in silicone con le stampanti 3D stereolitografiche (SLA) di Formlabs, scarica il nostro whitepaper.

Contatta i nostri esperti
Siamo qui per aiutarti a raggiungere i tuoi obiettivi, che si tratti di stampare strumenti chirurgici su misura per i pazienti o di creare il prototipo di un dispositivo medico cardiaco. Il team Formlabs Medical è composto da specialisti e specialiste che sanno esattamente come assisterti per soddisfare le necessità della tua azienda.
Produzione di parti in silicone
Le parti morbide e gommose hanno numerose applicazioni nel settore sanitario, dai modelli anatomici morbidi fino alle protesi e ad altri dispositivi indossabili. Al fine di aggiungere al proprio portfolio le parti robuste, flessibili e allungabili in vero silicone, i team di design possono utilizzare due metodi: la stampa diretta con la Silicone 40A Resin e lo stampaggio in silicone mediante attrezzature realizzate in 3D tramite SLA.
Il silicone è un materiale molto comune per la fabbricazione di dispositivi medici morbidi per utilizzo finale, nonché per la produzione di stampi morbidi per la colata di materiali rigidi, ovvero la realizzazione di stampi in silicone. Questa guida illustra soltanto la produzione di parti in silicone, che consente di realizzare componenti morbidi e gommosi stampando direttamente con la Silicone 40A Resin o colando il silicone in stampi realizzati in 3D. Maggiori informazioni sulla produzione di parti rigide tramite la realizzazione di stampi in silicone sono disponibili nella nostra guida.
Il nostro whitepaper include esempi di produzione di parti in silicone attraverso svariati metodi, tra i quali:
-
Stampa diretta in silicone: le parti in silicone vengono prodotte direttamente sulle stampanti 3D a resina Form 3/B/+ con la Silicone 40A Resin. Questo è il metodo migliore per la realizzazione di geometrie complesse impossibili da ottenere tramite stampaggio.
-
Stampaggio a compressione di mastice siliconico: un mastice siliconico a polimerizzazione rapida viene inserito nelle due parti di uno stampo realizzato in 3D, tenuti insieme con una morsa da banco. Questo metodo viene utilizzato spesso per realizzare prototipi di guarnizioni e riprodurre fedelmente le attrezzature impiegate nella produzione di massa.
-
Stampi a iniezione per silicone liquido: il metodo più diffuso per formare un unico prototipo continuo in silicone con uno stampo in due o più parti. In molti casi, lo stampo è configurato in modo che la gravità favorisca il processo di riempimento: il silicone viene iniettato in un canale nella parte superiore dello stampo, la cui cavità si riempie gradualmente a partire dal fondo. Infine, il silicone liquido fuoriesce dalle aperture e dai canali d'aria presenti nella parte superiore dello stampo.
-
Sovrastampaggio per incapsulamento completo o parziale di componenti elettronici nel silicone: il componente elettronico è sospeso in uno stampo in due o più parti. Il silicone liquido viene quindi iniettato nella cavità dello stampo, avvolgendo completamente o parzialmente il componente.
-
Stampo a guscio per prodotti in silicone personalizzati: lo stampo è una scocca di spessore inferiore a 1 mm che avvolge uniformemente la cavità di iniezione del silicone. Dopo la polimerizzazione del silicone, lo stampo a guscio realizzato in 3D viene rotto per estrarre la parte. Dato che si tratta di uno stampo usa e getta, questa tecnica viene utilizzata per creare una sola parte personalizzata. Una guida dettagliata alla produzione di stampi a guscio è fornita in questo whitepaper sui modelli auricolari in silicone.
I passaggi chiave dei metodi di progettazione, stampa e colata sono gli stessi anche nell'ambito di settori e applicazioni diversi. Leggi il whitepaper completo per un esempio dettagliato di progettazione di un sovrastampo a iniezione, corredato di consigli e buone pratiche da parte della nostra clientela.
Tipi di silicone
I siliconi sono una classe di polimeri che contengono silicio e ossigeno nella catena molecolare. Con la polimerizzazione, passano da uno stato gelatinoso o liquido a uno stato solido altamente flessibile e allungabile. Sono materiali versatili con proprietà ad alte prestazioni, come l'eccellente isolamento elettrico, la resistenza al calore, la stabilità chimica, l'alta resistenza alla lacerazione e la biocompatibilità, che li rendono adatti per i settori più esigenti, come quello sanitario.
Gli elastomeri siliconici dominano il mercato e si suddividono in tre categorie:
-
Le gomme siliconiche liquide (LSR) sono siliconi ad alte prestazioni solitamente impiegati per la produzione di parti tecniche resistenti con tolleranze ridotte, come guarnizioni o connettori elettronici. Vengono lavorate ad alte temperature, spesso mediante stampaggio a iniezione di liquidi, e utilizzate per la produzione di grandi volumi.
-
I siliconi vulcanizzati ad alta temperatura (HTV), detti anche gomme polimerizzate a caldo (HCR), sono molto resistenti alle temperature elevate e durevoli, il che li rende ideali per i cavi o gli isolanti nei dispositivi medici. Solitamente sono polimerizzati con un catalizzatore al platino e modellati mediante estrusione o stampaggio a compressione con vulcanizzazione tramite applicazione di pressione e calore. Scopri come SIOCAST, azienda esperta di silicone, forma stampi in silicone HTV sulla base di modelli master stampati in 3D.
-
I siliconi vulcanizzati a temperatura ambiente (RTV) sono relativamente più facili da lavorare e hanno ottime proprietà meccaniche e termiche per guarnizioni e dispositivi medici, nonché per l'incapsulamento di componenti elettrici e la realizzazione di stampi. Sono tradizionalmente modellati a temperatura ambiente tramite stampaggio a iniezione, stampaggio a compressione o colata per gravità.
In questo report viene illustrato l'utilizzo dei siliconi vulcanizzati a temperatura ambiente (RTV) e vengono descritte tecniche implementabili in-house in qualsiasi laboratorio di prototipazione o sviluppo di prodotto. Tra le forme specifiche dei siliconi RTV possiamo citare:
-
Silicone 40A Resin: si tratta di una resina in silicone RTV monocomponente per la produzione di parti in silicone al 100% con eccellenti elasticità, resistenza alle sostanze chimiche e stabilità termica. Le parti vengono stampate direttamente con la Form 3/3B e sottoposte a post-elaborazione usando una miscela di alcool isopropilico e acetato di n-butile, quindi acqua, calore e raggi UV.
-
Silicone liquido RTV: tipicamente, i siliconi liquidi includono uno o due componenti e una piccola quantità di catalizzatore aggiuntivo. Vi sono due categorie generali disponibili sul mercato. I siliconi catalizzati al platino hanno un costo più elevato, ma offrono una maggiore stabilità dimensionale a lungo termine e garantiscono un restringimento molto ridotto una volta che la polimerizzazione è completa. I siliconi catalizzati allo stagno hanno un costo inferiore, ma sono meno stabili nel tempo e tendono ad avere maggiori tassi di restringimento. Il tempo di polimerizzazione può variare da dieci minuti a diverse ore.
-
Polidimetilsilossano (PDMS): un tipo di silicone liquido RTV diverso dal punto di vista chimico e contiene gruppi metilici sulla catena polimerica silicio-ossigeno. Il polimero liquido è spesso utilizzato come lubrificante o additivo viscoso nella produzione di beni di consumo e industriali. In quanto gomma polimerizzata, il PDMS è impiegato in diverse applicazioni nel campo della ricerca. Data l'elevata trasparenza ottica e la capacità di riprodurre finiture superficiali e canali di dimensioni microscopiche, è ideale per la microfluidica e la soft-litografia. Molte formule di PDMS si polimerizzano a temperatura ambiente nell'arco di 48 ore o in meno di un'ora a temperatura elevata.
-
Mastice siliconico: si tratta di un mastice i cui due componenti vengono miscelati insieme a mano in volumi uguali. Il tipo descritto in questo report ha una durezza Shore 40A (si veda la scala di seguito), simile a quella di una gomma per cancellare. Questo tipo di silicone si può acquistare presso fornitori di gioielleria, in quanto viene comunemente utilizzato per la produzione di master in cera per la fusione dei metalli. A ogni modo, il silicone stesso si presta bene a simulare guarnizioni o sigilli realizzati mediante stampaggio a compressione.
Sicurezza per pelle, mucose e alimenti
Alcune applicazioni richiedono più cautela rispetto ad altre, in quanto comportano il contatto con il corpo o con alimenti. Controlla sempre la scheda dati di sicurezza fornita dall'azienda produttrice del silicone per accertarti che il materiale sia sicuro per la tua applicazione. Considera che, in genere, i siliconi liquidi bicomponente valutati come sicuri per la pelle sono catalizzati al platino.
La Silicone 40A Resin è attualmente in fase di valutazione come dispositivo per il contatto con la pelle conforme alla norma ISO 10993-1 per i seguenti endpoint di biocompatibilità: ISO 10993-5:2009, 10993-23-2021:2021, ISO 10993-10:2021.
Scala di durezza
I materiali gommosi, come le gomme siliconiche, possono essere formulati a diversi gradi di durezza, da quelli molto morbidi a quelli estremamente duri, secondo un valore specifico sul durometro Shore. I materiali più morbidi vengono misurati sulla scala Shore A e quelli più duri sulla scala Shore D. La tabella riportata di seguito fornisce un confronto utile con articoli comuni di uso domestico.

Scelta tra stampa e stampaggio
La scelta tra la stampa diretta e lo stampaggio in silicone dipende dai requisiti specifici di ciascuna applicazione e workflow. Riportiamo di seguito alcune caratteristiche da tenere in considerazione per ogni processo:
-
Geometrie complesse: non tutte le geometrie possono essere realizzate tramite stampaggio. In questi casi, è preferibile utilizzare la stampa diretta.
-
Colore: la Silicone 40A Resin è nera, quindi non adatta alle applicazioni che richiedono trasparenza o parti colorate, per le quali è preferibile utilizzare lo stampaggio in silicone.
-
Tempistiche: il tempo necessario per la progettazione di parti da sottoporre alla stampa diretta è inferiore a quello richiesto dalla progettazione degli stampi. Inoltre, si impiega molto meno tempo a stampare una singola parte in silicone che a realizzare uno stampo in 3D e poi riempirlo con silicone. Quando il tempo è un fattore rilevante, generalmente è meglio optare per la stampa diretta.
-
Odore: l'odore delle parti stampante con la Silicone 40A Resin impiega tempo a svanire. È possibile accelerare questo processo polimerizzando la parte stampata in una miscela di acqua e Febreze HD, ma lo stampaggio in silicone è comunque preferibile per le applicazioni in cui l'odore del materiale è di immediato interesse.
-
Biocompatibilità: ogni tipo di silicone ha il proprio livello di biocompatibilità. La Silicone 40A Resin è attualmente in fase di valutazione come materiale sicuro per il contatto con la pelle conformemente alla norma ISO 10993-1. Lo stampaggio in silicone può essere preferito per le applicazioni con requisiti di biocompatibilità più ampi.
-
Esposizione ai raggi UV: una prolungata esposizione ai raggi UV conduce al deterioramento delle proprietà meccaniche della Silicone 40A Resin. Per applicazioni che richiedono lunghe esposizioni alla luce solare diretta, lo stampaggio in silicone è di norma preferibile.
Per le applicazioni mediche che richiedono parti gommose per le quali il silicone non è adatto, si possono considerare elastomeri alternativi di Formlabs, come la BioMed Elastic 50A Resin per la stampa SLA o la TPU 90A Powder per la stampa SLS.
| Materiale | Stampante | Carico di rottura a trazione | Sollecitazione ad allungamento del 100% | Allungamento a rottura |
|---|---|---|---|---|
| Silicone 40A Resin di Formlabs | Form 4/B Form 3/B/+ | 7,2 MPa | 4,5 MPa | 135% |
| BioMed Elastic 50A Resin | Form 4/B Form 3/B/+ | 2,3 MPa | 1,3 MPa | 150% |
| BioMed Flex 80A Resin | Form 4/B Form 3/B/+ | 7,2 MPa | 4,5 MPa | 135% |
| TPU 90A Powder | Fuse 1+ 30W | 8,7 MPa (X/Y) 7,2 MPa (Z) | 7,2 MPa (X/Y) 7,0 MPa (Z) | 310% (X/Y) 110% (Z) |
Panoramica sulla stampa con la Silicone 40A Resin
La Silicone 40A Resin utilizza la Pure Silicone Technology™, una tecnologia in attesa di brevetto che consente di produrre in-house parti in silicone al 100% nel giro di poche ore utilizzando l'ecosistema di stampa stereolitografica (SLA) di Formlabs. È ideale per le applicazioni che richiedono flessibilità, robustezza e resistenza a cicli ripetuti di allungamento, flessione o compressione.
| Proprietà del materiale | Silicone 40A Resin |
|---|---|
| Durometro Shore | 40A |
| Allungamento a rottura | 230% |
| Resistenza alla lacerazione | 12 kN/m |
| Resilienza | 34% |
| Intervallo di temperatura | Da -25 °C a 125 °C |
La Silicone 40A Resin si presta a svariate applicazioni, tra cui prototipazione rapida, test beta e fasi di convalida nello sviluppo dei prodotti, nonché produzione a costi accessibili di parti per utilizzo finale personalizzate o in volumi ridotti. Questo materiale è anche adatto alla fabbricazione di dispositivi medici, protesi su misura, componenti del settore dell'audiologia e parti con geometrie complesse difficili da realizzare con i metodi tradizionali.
La stampa 3D in silicone diretta con la Silicone 40A Resin è ideale per un'ampia gamma di applicazioni, dalla prototipazione rapida ai supporti di produzione, alle attrezzature, fino alla produzione di parti personalizzate o in volumi ridotti.
L'introduzione della Silicone 40A Resin permette di affrontare problematiche da sempre associate ai metodi tradizionali di stampa 3D in silicone, tra le quali i costi elevati e le limitazioni tecniche. La stampa immediata con la Silicone 40A Resin consente di risparmiare tempo ed eliminare la necessità di progettare e fabbricare gli stampi per poi versare e colare il silicone. Apre inoltre la strada a nuove possibilità di progettazione, consentendo di creare geometrie complesse difficili da realizzare con i metodi tradizionali. Questa soluzione accessibile permette alle aziende di creare parti per utilizzo finale eccezionali senza scendere a compromessi su prezzo, qualità o rapidità.
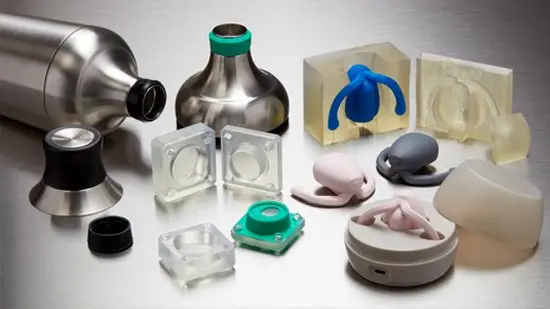
Panoramica sulle attrezzature stampate in 3D per lo stampaggio in silicone
Gli stampi tradizionali per la produzione di parti in silicone sono realizzati con la lavorazione meccanica CNC a partire da blocchi di alluminio o acciaio. Tra questi ci sono gli stampi a iniezione da due o più parti per le gomme siliconiche liquide (LSR) o quelli a compressione a cavità singola, utilizzati con uno strato di gomma siliconica polimerizzata a caldo (HCR) che viene polimerizzata sotto pressione e ad alta temperatura. Solitamente questo tipo di stampi metallici viene utilizzato per la produzione di massa, ma quando viene impiegato per la prototipazione, i tempi di realizzazione di diverse settimane e i costi iniziali per le attrezzature, che variano da centinaia a migliaia di euro, limitano la capacità dei team di design di implementare e testare piccole modifiche sul design dello stampo.
La stampa 3D desktop è un'ottima soluzione che consente di produrre questi strumenti in modo rapido e a basso costo. Richiede un'attrezzatura molto limitata, il che consente al personale di concentrarsi su attività ad alto valore. Con la stampa 3D in-house, aziende produttrici e designer di prodotto possono introdurre la creazione rapida di attrezzature nel processo di sviluppo dei prodotti per validare le scelte di design e materiali prima di passare alla produzione di massa. Possono eseguire iterazioni rapide, accelerare lo sviluppo del prodotto e lanciare sul mercato prodotti migliori. Le attrezzature stampate in 3D con le resine SLA Formlabs offrono molti vantaggi ai team di design di prodotto per la prototipazione e la produzione di piccoli lotti o di parti personalizzate. Con le attrezzature stampate in 3D, i siliconi RTV bicomponente vengono iniettati in uno stampo a uno o più parti oppure un mastice siliconico RTV viene pressato tra le sezioni di uno stampo a compressione realizzato in 3D. Le attrezzature stampate in 3D consentono ai team di design di avere a disposizione un'ampia gamma di siliconi polimerizzati con stagno e platino con scale di durezza, colori e gradi di trasparenza diversi, oltre a caratteristiche specifiche come la sicurezza in caso di contatto con la pelle.
Produzione di parti in silicone con strumenti stampati in 3D
Questo report contiene indicazioni dettagliate sulla stampa 3D di attrezzature per la produzione di parti in silicone, buone pratiche e casi di studio su clienti reali.
La tecnologia di stampa 3D stereolitografica (SLA) è un'ottima scelta per la creazione di attrezzature per lo stampaggio in silicone. La parti stampate in stereolitografia sono caratterizzate da una finitura superficiale liscia e da un'elevata precisione. Le gomme siliconiche RTV catturano i dettagli superficiali più minuti, difetti inclusi, per cui la qualità della superficie dello strumento si riflette sulla finitura superficiale della parte finale. Ad esempio, uno stampo realizzato con una stampante a modellazione a deposizione fusa (FDM) lascerebbe impronte visibili delle linee degli strati sulla parte in silicone.
Al contrario, la stampa 3D SLA con la BioMed Clear Resin o la Clear Resin di Formlabs permette di controllare visivamente il processo di iniezione del silicone, consentendo ai team di design di verificare la formazione di bolle e vuoti e individuare le aree in cui è necessario smussare gli angoli o aggiungere ulteriori sfiati. La stampa 3D SLA permette anche di realizzare design complessi; uno stampo realizzato in 3D consente ai team di design di sfruttare sottosquadri o altre geometrie complesse che con la lavorazione meccanica CNC avrebbero costi proibitivi o sarebbero addirittura impossibili da produrre.
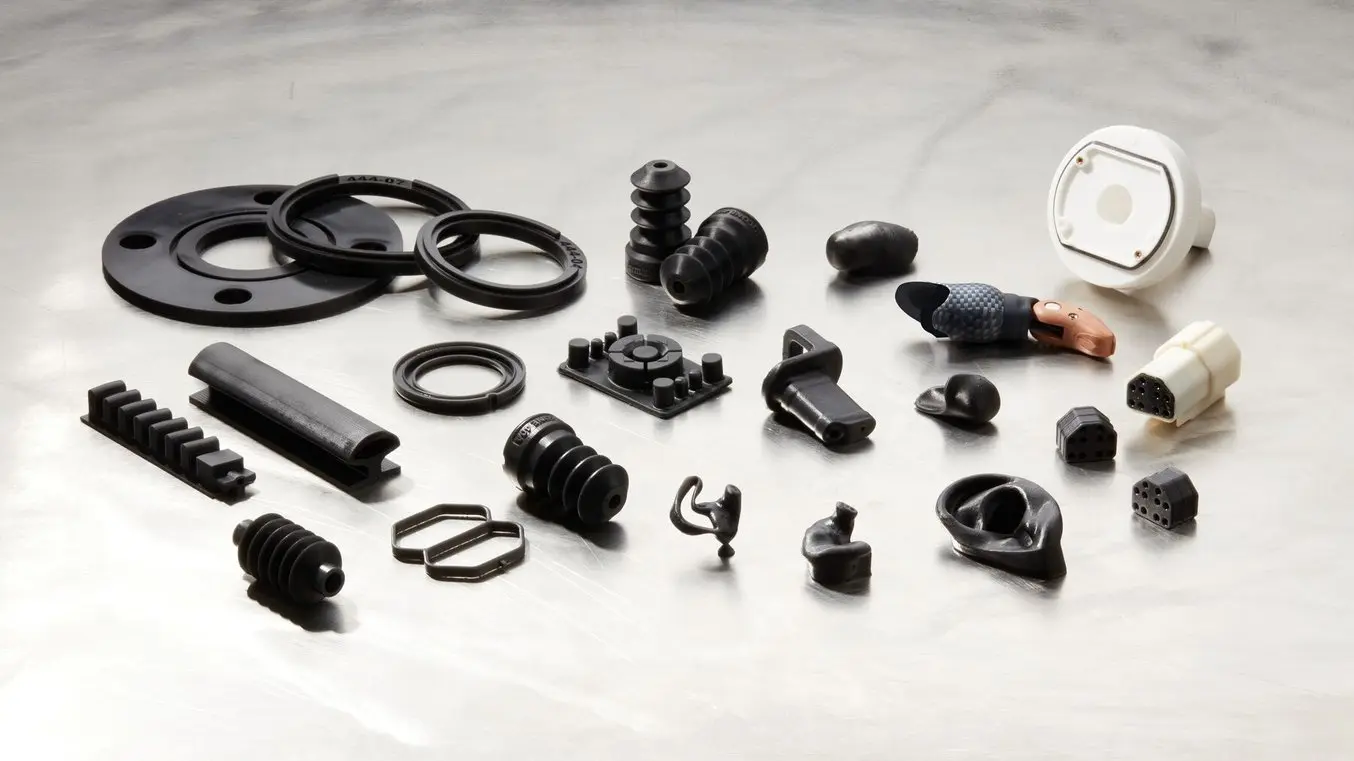
PSYONIC incapsula le dita della Ability Hand utilizzando il sovrastampaggio in silicone. Alcuni stampi includono un inserto in Tough 2000 Resin per ancorare la componente strutturale "ossea" incapsulata nello stampo.
La BioMed Clear Resin e la Clear Resin di Formlabs offrono anche prestazioni meccaniche piuttosto versatili. Questi materiali si possono utilizzare sia per realizzare stampi a guscio molto sottili e facili da rompere per produrre parti in silicone personalizzate, sia per stampi a compressione robusti utilizzabili più volte per produrre guarnizioni. Infine, l'utilizzo di un sistema di produzione economico da banco riduce i tempi di realizzazione: il personale addetto al design può stampare la geometria di uno stampo e iniziare a iniettare il silicone il giorno successivo.
Quando viene utilizzata con gli stampi realizzati in 3D, la gomma siliconica RTV è in grado di riprodurre i dettagli superficiali più minuti, tra cui le scritte goffrate. Inoltre, la maggior parte dei siliconi da colata non sono chimicamente adesivi e dopo la polimerizzazione si staccano dalla superficie dello stampo. Si può raggiungere il fissaggio meccanico colandoli su superfici molto porose come tessuti intrecciati, e in alcuni casi si può stimolare il fissaggio chimico con leganti speciali.
Il silicone RTV non richiede calore o pressione elevati, quindi può essere facilmente lavorato con attrezzature limitate in un laboratorio di prototipazione, riducendo i costi di avvio necessari per inserire parti morbide nel portfolio di design di un'azienda. Nel whitepaper completo si trovano le linee guida per produrre in-house volumi ridotti di parti in silicone in modo rapido ed economico.
Compatibility of 3D Printing Resins and Silicones
Anytime a castable material such as silicone comes into contact with a printed mold, we must consider the chemical interaction between the two materials. When casting platinum-catalyzed silicones in SLA molds, one particular challenge arises: the resin monomer can inhibit the silicone curing process, leaving an uncured gummy surface. However, high-quality platinum-catalyzed silicone parts can be produced by making sure SLA molds are fully cleaned and cured, and by applying protective coatings and mold releases.
There are many possible combinations of silicone, resin, protective coating, and mold release that you can try. We asked customers from a variety of industries to report on their successful workflows, and their responses are summarized below. We considered many of these insights when developing our own step-by-step process.
| Settore | Applicazione | Tipo di stampo | Silicone | Resina | Best Practices |
|---|---|---|---|---|---|
| Product Design | Beta prototypes Skin contact | Sovrastampo | Unspecified (Pt cure) | Clear Resin | Paint on Vaseline as mold release |
| Product Design | End-use | Eggshell mold | Smooth-On Mold Max (Tin cure) | Clear Resin | No mold release used; mold is sacrificial / one-time use |
| Product Design | Prototypes | Compression mold | Castaldo Quick-sil (putty) | Clear Resin | General purpose mold release from Smooth-On |
| Product Design | Prototypes skin contact | Injection filled mold | Unspecified (Pt cure) | LT Clear Resin Clear Resin Grey Resin | Any general purpose mold release |
| Product Design | Prototypes Skin contact | Injection filled mold Overmold | Smooth-On Dragon Skin 20 (Pt cure) | Clear Resin | Krylon Crystal Clear Acrylic spray + Ease Release 200 |
| Manufacturing / Healthcare | End-use | Injection filled mold Overmold | Smooth-On Dragon Skin 20 (Pt cure) | Clear Resin | No mold release needed |
| Manufacturing / Healthcare | End-use Mucous membrane contact | Eggshell mold | Unspecified (Pt cure) | Biomed Amber Resin | No mold release used; mold is sacrificial / one time use |
| Audiology / Healthcare | End-use Skin contact | Eggshell mold | BioPor AB 40 by Dreve | Clear Resin Biomed Clear Resin | No mold release used; mold is sacrificial / one time use |
| Intrattenimento | Models and props Skin contact | Injection filled mold Open mold | Smooth-On FX Pro (Pt cure) | Black Resin >br>Grey Resin | Mold release not always needed |
| Intrattenimento | Models and props Part reproduction | Open mold Silicone mold | Variety of Pt and Tin cure by Smooth-On | Crear Resin Grey Resin | XTC-3D High Performance 3D Print Coating |
| Intrattenimento | Models and props Part reproduction | Silicone mold | Unspecified (Pt cure) | Cler Resin | SEM Flexible Primer Surfacer spray coating |
| Intrattenimento | Models and props Skin contact | Injection filled mold | Platsil Gel-25 by Polytek (Pt cure) | Rigid 10K Resin | Smooth-On Super Seal coating and Ease Release 200 |
| Hobby | art reproduction | Open mold Silicone mold | Smooth-on OOMOO 30 (Tin cure) | Grey Resin | General purpose mold release from Smooth-On |
While the combination of materials clearly varies, our customers aligned on the following:
- Make sure your parts are fully washed and cured. The 3D printed mold must be washed thoroughly in clean IPA, such that surfaces are not tacky after the mold dries. The mold should also be cured completely to reduce the amount of unreacted monomer on the SLA parts. For this process, the Form Cure is a great option. Clear Resin parts will develop a yellow tint, which is a good indicator that your mold is fully cured.
- Try a protective coating. There are many acrylic or epoxy coatings available that are applied as an aerosol spray in a single step (e.g. Krylon Crystal Clear acrylic coating), or as a two-part brush- on material (e.g. XTC-3D from Smooth-On). Using very little material, both types of coatings will leave a glossy, glass-like finish on the internal surfaces of the mold. Multiple applications may be needed. Check the manufacturer’s instructions for drying or curing times.
- Use a mold release anytime silicone contacts another material. This will ease the de-moldingstep, and eliminate silicone residue inside the mold, making it easier to reuse it for multiple castings. In many cases a generic or “general purpose” mold release from your silicone brand is sufficient (e.g. Stoner Dry film e408). A light mist of mold release is enough. Once again, check the manufacturer's instructions for recommended drying times.

Introduzione alla Form 4B: produzione più rapida, maggiore precisione e conformità alle normative
Scopri come la Form 4L e la Form 4BL possono aiutarti a raggiungere nuovi livelli di produttività e innovazione grazie alla loro velocità, accuratezza e affidabilità senza pari.
Additional Best Practices
Some silicone formulas, such as PDMS, are more susceptible to cure inhibition than others when they come into contact with SLA 3D printed tooling. We have listed further troubleshooting steps provided by Formlabs users, which build off of our general guidelines for RTV liquid silicones.
- Rinse with acetone. Spraying the 3D printed mold with an acetone squeeze bottle can help to remove residual solvent and any debris after the standard IPA washing step.
- Over-cure the mold. For tooling printed in Clear Resin, increase the curing time from 15-20 minutes to 60-120 minutes at 60 °C.
- Wait 24-48 hours after post-processing. Allow the mold to sit in ambient temperature and light before applying coatings and casting the silicone. It is helpful to expose the mold surfaces to open airflow during this step.
- Use an epoxy coating. A two-part epoxy sealant can act as an effective barrier between the silicone and the 3D printed mold.
- Use a higher concentration of catalyst. When using two-part silicones, we suggest adding a bit of extra catalyst component. If a small proportion of the catalyst is inhibited by the mold surface, the extra catalyst can help compensate for this and prevent formation of a tacky silicone surface.
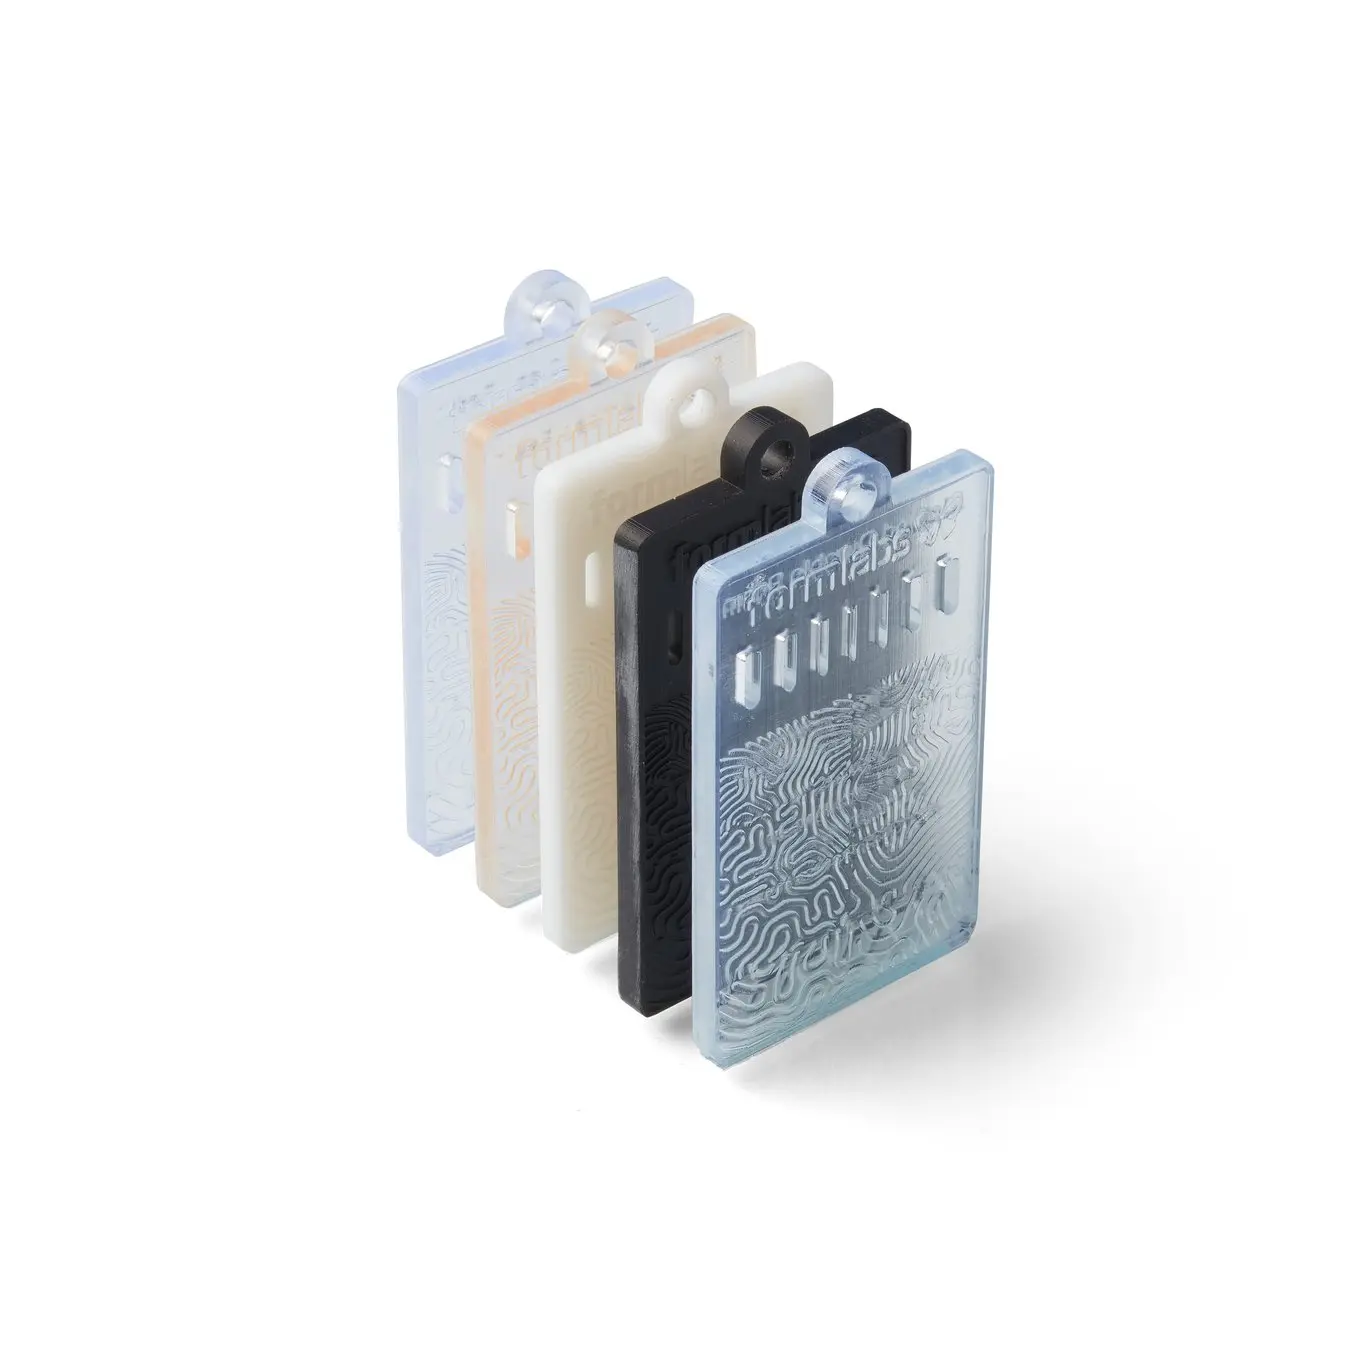
Campioni di resine BioMed
Ogni campione realizzato con una resina BioMed presenta design goffrati e incisi, sezioni di taglio con spessori di 0,5-2,0 mm, nonché informazioni normative specifiche di tale resina.
Selecting a Mold Type
Per quanto il risultato di ogni processo di stampaggio possa sembrare simile, ci sono alcuni criteri che consigliamo di seguire per la scelta del tipo di stampo. Tra questi ci sono la geometria della parte finale e la possibilità di inserire nel design sottosquadri e fori, la scala della produzione e i materiali da colare. Nella tabella seguente riportiamo alcune linee guida.
| Tipo di stampo | Geometria delle parti | Materiali | Scala della produzione |
|---|---|---|---|
| Stampo a compressione | Nessun sottosquadro | Mastice siliconico a durezza elevata | Decine di colate |
| Stampo a iniezione | Piccoli sottosquadri | Two-part liquid silicones | Decine di colate |
| Sovrastampo | Encapsulate internal hardware, minor undercuts | Two-part liquid silicones | Decine di colate |
| Stampo a guscio | Can accommodate large | Two-part liquid silicones | Uso singolo |
Silicone Molding Step-By-Step
The Formlabs team has developed a step-by-step process for creating a silicone product prototype by combining different aspects of our customers’ successful workflows. One project presented below is a molded silicone keychain with an embedded Apple AirTag device. The other is a gasket designed by OXO. The design guidelines cover all critical steps from importing a reference geometry to adding alignment features for encapsulated hardware. We also used the novel silicone filling method employing an epoxy gun with a 1:1 volume mixing nozzle recommended by Dame Products.
Many of the steps and best practices shared are common across mold types. Each step of the tutorial indicates its relevance to injection filled molds, overmolds, or compression molds.
For information about eggshell molds, the Formlabs audiology white paper 3D Printing Custom Silicone Ear Molds provides a step-by-step guide.
WHAT IS REQUIRED?
From Formlabs:
- Formlabs BioMed Clear Resin or Clear Resin
- Compatible Formlabs SLA printer with up-to-date firmware
- PreForm software (most recent version)
- Compatible Build Platform
- Compatible Resin Tank
- Form Wash, Form Wash L, or Finish Kit
- Form Cure or Form Cure L
| Articolo | Supplier | Note |
|---|---|---|
| High-gloss acrylic spray | Krylon | Protective coating |
| Ease Release 200 | Mann Release Technologies | Mold Release |
| Apple AirTag | Encapsulated hardware | |
| Dragon Skin 20 | Smooth-On | Two-part RTV Silicone, Platinum Cure |
| Silc Pig | Smooth-On | Colored pigment |
| Stirring sticks | ||
| Epoxy cartridge | McMaster-Carr | 1:1 ratio |
| Epoxy dispensing gun | McMaster-Carr | |
| Mixing nozzle | McMaster-Carr | |
| C-clamp or spring clamps | ||
| Duct tape | ||
| Vacuum chamber and pump (optional) | Amazon | |
| Pressure pot (optional) | Amazon |
Molding Process: Compression Mold
| Articolo | Supplier | Note |
|---|---|---|
| Ease Release 200 | Mann Release Technologies | Mold release |
| Castaldo QuickSil | Castaldo | |
| Tabletop vice |
WHAT IS REQUIRED?
Overmold
- Import the Reference If you are planning to overmold or encapsulate another object with silicone, import your reference object or substrate in the CAD software of your choice. In this example, we imported a digital replica of an Apple AirTag.
Injection Filled Mold, Overmold, or Compression Mold
- Design the Silicone Part Together, the silicone and any encapsulated items form the base volume. For overmolded parts, aim for a minimum silicone shell thickness of 2 mm. In our compression mold example, the object has a complete through-hole. We recommend defining a core as a separate object. The silicone part plus core can be thought of as your base volume.
- Design the Mold Stock Create a block around your base volume that extends at least 1 cm beyond the outer shell of your part.
- Split the Mold For a basic two-part mold, you will be splitting your base volume into two parts along a defined surface based on a parting line. Start by using draft analysis to define the parting line. Consider how the two halves of your mold will come apart, to ensure that the silicone part can be easily released from the mold. To avoid undercuts, the parting line might be a contour instead of a straight line. Next, extrude the parting line into a surface and use this surface to split your mold. For complex molds that require more than two parts, this process can be repeated multiple times to generate the number of mold parts required.
- Remove Base Volume From the Mold Stock Use boolean subtract in your CAD software to carve out the mold cavity from the solid block. In the case of our compression mold, the individual core component is added back with a boolean addition to one side of the mold, in effect creating two parting lines.
- Check Draft Angles It is a good idea to pause here and consider how your mold bodies will come apart after you inject the silicone. Our customers recommend using at least a 2° draft angle for silicone product prototypes. However, this aspect of silicone mold design is quite forgiving. Because the silicone rubber can generously deform during de-molding, many angles can be handled including 90° angles or slight undercuts. We recommend using the Draft Analysis tool in your CAD program at this step to analyze and edit any areas shown in red beyond the threshold draft angle.
Injection Filled Mold, Overmold
- Design the Gate If you are relying on gravity to fill the recesses of the mold cavity, place the entrance of your gate high on the mold block and then, using a U-shape with a generous bend radius, connect the gate to the mold cavity at the lowest possible point. Filling at this location prevents air bubbles from forming. Boolean subtract the gate from the mold stock. Typically, the central axis of the fill gate is located on the parting line. Another configuration would be a short fill gate that directly connects to a point on your mold cavity; the main air vent will be located on the opposite side.
- Define Air Vents Air is displaced when filling silicone into an enclosed space, so it is natural to place an air vent at the point of the mold that is last to fill. In our example, this is placed at the top of the mold stock. To place additional air vents, it is helpful to think about areas where air is likely to be trapped, and connect vents specifically to points such as sharp turns, corners, or areas where two liquid flow fronts connect. Typically air vents will be cylinders (~0.5-2 mm in diameter) that connect areas of your cavity to the top of the mold. Like the fill gate, it is helpful to align the axis of any air vent on the parting line. Once placed, boolean subtract these features from the mold stock.
Injection Filled Mold, Overmold, or Compression Mold
- Add Mating Features These features align and constrain separate parts of the mold stock to each other. Leave a ~ 0.1 mm offset gap between complementary mating features.
Overmold
- Add Alignment Pins for Encapsulated Devices If you are overmolding or encapsulating a part in silicone, the part must be fully constrained in the mold so it does not shift during silicone casting. Use as few alignment pins as necessary to constrain the part and aim for a pin diameter of ~1.25 mm. Pins should be pointing in the direction of draw, or perpendicular to the parting line of the mold. Note that alignment pins do leave small holes in the surface of the silicone part. If needed, these can be patched after de-molding using a small dab of liquid silicone which is then allowed to cure.
Injection Filled Mold, Overmold
- Add More Mold Features One additional mold feature is a fill trough. A trough is used for overflow of the silicone at both the fill gate and vent locations, and can be designed as a single continuous well that covers all gate and vent features. The trough also contains a reservoir of liquid silicone that can enter the mold during the curing process by freely seeping into the mold cavity to displace bubbles and voids, or to compensate for silicone that enters the interface between mold parts during cure. In this particular example, our trough is 10 mm deep.
-
Add a Syringe Inlet We also recommend adding a syringe inlet feature that matches the geometry of your syringe. We made ours slightly oversized, with a 6° angle to fit a variety of syringe and mixing nozzle types.
-
Add Pry Points Pry points can be added to assist with disassembly of the mold after curing. These are small rectangular cutouts along the parting line that allow a flathead screwdriver or another tool to be used to separate the mold parts. Our example cutouts extend 5 mm into the mold edge.
-
Add Fillets or Chamfers Add fillets or chamfers to angled mold features This is usually the final step after the mold geometry is locked. Adding fillets to soften the edges of the mold can also aid the 3D printing process. When printing a mold stock directly on the build platform, beveling any external corners eases part removal after printing and reduces the amount of resin flash that can accumulate around sharp corners.
Printing the Mold
Injection Filled Mold, Overmold, or Compression Mold
- Select the Resin Many resins work, however Clear Resin or Biomed Clear Resin are great options for visualizing the flow of silicone while casting your part.
- Print the Mold We recommend printing with a 50 microns layer height for a good balance between smooth surface texture and fast printing time. Since silicone picks up fine details on the surface, including layer lines, 25 microns layer height might be needed for some aesthetic applications. Orient your parts on the build plate so that critical interior surfaces are free of support marks. Placing the mold stock flat on the build platform can work in some cases.
- Wash and Post-Cure the Mold It is critical to thoroughly wash excess resin off of the mold stock with clean IPA because uncured resin can inhibit curing of silicone. The mold should also be cured completely to reduce the amount of unreacted monomer on the SLA parts. For Clear Resin, the recommended settings are 15 minutes at 60 °C. For BioMed Clear Resin, the recommended settings are 60 minutes at 60 °C. The preset time and temperature settings on Form Cure work well. The outer surface can be polished to a highly transparent finish. Adding mineral oil to the exterior surfaces is one option to help fill in surface scratches and provide an extremely clear window into the silicone filling process.
Printing the Mold
Injection Filled Mold, Overmold
- Apply Coatings and Mold Release Apply coatings and mold release. Consider using mold release anytime two different materials come into contact with each other. This includes embedded hardware that you plan to insert and remove from an overmolded silicone sheath. Consult our customer workflow table for recommendations. Follow the guidelines on your material packaging, and wait for the coatings to fully cure or dry before moving on to the next step.
- Insert Internal Parts/Hardware Alignment pins help to orient the part that will be encapsulated.
- Close and Clamp the Mold Carefully clamp the mold starting in the direction of the draw, making sure that the mold stock and any encapsulated objects remain in alignment. In our example, we used a 3D printed replica of an Apple AirTag, fabricated in Rigid 10K Resin.
Printing the Mold
Injection Filled Mold, Overmold
If you are incorporating a pigment, mix the pigment into Part B before moving on to the steps below.
A frequent concern when casting silicone is trapping small air bubbles in the mold. This results in voids in the final casted part. A couple of supplemental methods are recommended to manage air bubbles, including degassing liquid silicone in a vacuum chamber prior to mold filling. As a general guideline, check the viscosity of your liquid RTV silicone formula. If it is over 18,000 cps (centipoise) degassing is recommended. If it is below this threshold, a degassing step may not be necessary. Another recommended technique is placing the filled mold in a pressure chamber during silicone curing in order to collapse and shrink any entrained bubbles. A great prototype can be produced without degassing the silicone or curing under pressure, but you can achieve a nearly perfect part using these supplemental methods.
Vat Method
- Degas parts A and B separately under vacuum, if needed.
- Mix parts A and B together vigorously. Typically the two silicone components are mixed in equal volumes. Allow the mixture to degas under vacuum again, or to gently degas in air.
Mixing Nozzle Method
- Degas parts A and B separately under vacuum, if needed.
- Fill each side of an epoxy cartridge system with one part (A or B), using separate syringes to transfer the liquids. Pouring the silicone high above the cartridge in a thin stream will help to avoid remixing air into the silicone.
- Degas parts A and B. Stand upright and allow the silicone to gently degas in air. Because silicone parts A and B remain separate, the filled cartridge can remain for days before you use it.
Stampo a compressione
- Mix Parts A and B Thoroughly Mix together equal volumes of parts A and B of the silicone putty and knead by hand. The silicone rubber begins to cure after 90 seconds, so the parts should be kneaded for the minimum time necessary to generate a uniform color.
Stampo a compressione
Injection FIlled Mold, Overmold
Vat Method
- Draw the degassed silicone mixture into a syringe. Next, invert the syringe so the nozzle faces up. Allow any air pockets to rise to the top. Depress the plunger to expel the air and extrude a small amount of your silicone to ensure no air bubbles remain in the syringe. Insert into the fill gate and slowly fill the mold until silicone exits from the air vents. If your model has an overflow trough feature, continue filling this area of the mold.
Mixing Nozzle Method
- Assemble the epoxy gun. Insert the cartridges into the gun and screw on the mixing nozzle. It’s helpful to squeeze a little bit of liquid out of the nozzle tip at this stage to make sure the epoxy is properly mixed.
- Fill the mold. Insert the epoxy gun nozzle into the fill gate and slowly fill the mold until silicone exits from the air vents. Again, fill up the trough feature if your mold includes one.
Use a Pressure Pot (optional)
- As an optional step, place the mold in the pressure pot and add your silicone manufacturer’s recommended air pressure to the pot (e.g. ~ 30 psi). This shrinks any bubbles trapped in the mold and forces the material in the trough down into the mold. Let the silicone cure under pressure according to the manufacturer's instructions.
Compression Mold
- Stuff Silicone Into the Mold The silicone should be compacted into both sides of the mold, being sure to catch all details and crevices. Any excess material will simply spill outside the edges of the mold.
- Squeeze Mold Together The mold should be squeezed perpendicular to the parting line. In compression molds, the mating surfaces don’t completely touch until pressure is applied. Close the clamp gently until it does not close further. The recommended Castaldo Quick-Sil silicone rubber cures completely in 20 minutes.
Stampo a compressione
Injection Filled Mold, Overmold, Compression Mold
The cure time can range from 10 minutes to several hours depending on the silicone chemistry.
- Define Mold Orientation With a gravity-filled configuration, like our example, the mold can remain oriented upright without an extra sealing step as the silicone cures. With an end-to-end filling configuration, we would experience a backflow of silicone if the filled mold was set on our workbench. After filling, we recommend sealing the gate with duct tape. The compression mold should remain clamped in a tabletop vise while curing.
- De-Mold and Trim the Silicone Part It is normal to develop some flash within and around the parting line. Remove excess silicone from the exterior of the mold first. Pry open the mold by inserting a flat head screwdriver or another flat tool into the pry point and gently twisting to break the seal. Remove the silicone part, being mindful that some silicone may need to be gently trimmed away from any air vents. After removing the silicone part from the mold, use a sharp razor or flush cutters to trim the vent and gate features from the part. Residual bumps can be removed gently with wet fine grit sandpaper. Finally, you can wash the part with soap and water to remove sandpaper and mold release residues.
- Prepare for the Next Casting Molds can be reused multiple times. You may need to clean out vents with a sharp tool and/or reapply mold release before filling with silicone again. It is common to accumulate incompletely cured silicone in the narrow surface between mold blocks. This can be wiped away with a clean cloth.
- Iterate Design It is normal to go through a couple of mold design iterations after trying the full end-to-end workflow. A few design changes you might need to consider include increasing the offset distance between mating features, moving alignment pins to ensure that encapsulated objects are fully constrained, or adding air vents in areas that tend to trap air bubbles during filling.

Dame Products use 3D printed molds for overmolding.
Stampo a compressione
Mold material: Production molds are typically made from machined aluminum or steel.
Alignment pins for overmolding: The alignment pins for overmolding are oriented within the plane of the mold’s main parting line, rather than perpendicular to it. These are also designed to retract in and out of the mold, resulting in a silicone layer that does not have dimples and holes created by alignment pins.
Draft angle: Our customers recommend using at least two degrees draft angle for silicone products. While the prototype or short-run production molds presented in this report can handle deep undercuts, these types of silicone geometries must be carefully pried from the mold, and would be difficult to replicate by an automated injection system.
Injection molding configuration: Gravity-fill molds are highly reliable mold configurations for benchtop prototyping. For rapid mass production methods, inlet and outlet geometries are on opposite sides of the mold.
Silicone materials: While silicone chemistry used in production is quite similar to the RTV materials presented in this white paper, both liquid silicone rubbers (LSR) for injection moldingnand heat cured rubbers (HCR) for compression molding typically enter the mold at low temperature, and are then cured at elevated temperature.
Silicone Printing Step-By-Step
WHAT IS REQUIRED?
From Formlabs
- Formlabs Silicone 40A Resin
- Compatible Formlabs SLA printer with up-to-date firmware
- PreForm software (most recent version)
- Compatible Build Platform
- Compatible Resin Tank
- Form Wash, Form Wash L, or Finish Kit
- Form Cure or Form Cure L
From Third-Parties
- IPA (99% or higher): To make wash solvent blend for washing Silicone 40A parts
- N-Butyl Acetate (purchase in the US; purchase in EU): To make wash solvent blend for washing Silicone 40A parts
- Glass Beaker (at least 500 mL in size): To submerge Silicone 40A parts inbwater during the post-cure steps
- Febreze HD (optional): For masking of odor of printed Silicone 40A parts
- 1.5 Gallon Glass Jar (optional): For storing wash solvent and washing printed Silicone 40A parts if not using a Form Wash
- Ultrasonic Cutting Knife (optional): For removing support nubs on Silicone 40A parts
1. Progettazione
1.1. Design your parts with the Silicone 40A Design Guidelines in mind.
2. Stampa
2.1. Import File
Check that your version of PreForm is up to date by going to Help, then Check For Updates in the upper left-hand corner. Import or open your part file by dragging them into PreForm, or by going to File and then Open in the upper right hand corner.
2.2. Select Material
Select Silicone 40A by clicking the Printer Type box in the Job Info menu on the right-hand side. Select “Silicone” from the materials grid.
2.3. Orient
PreForm can auto-orient based on Formlabs best practices. To auto-orient, select your part and click Orientation on the left side of the screen. Then, click Auto-Orient Selected.
For best results, you may orient manually using the red, green, and blue actuators surrounding your part. Consider orientating so that areas where a smooth surface texture is most important are facing away from the build platform.
Print directly on the build platform whenever possible. Try to keep the bulk of the part’s weight as close to the build platform as possible and orient long parts parallel to the front edge of the build platform.
2.4. Add Supports
To auto-generate supports based on material properties, select your part and go to Supports on the left side of the screen and select Auto-Generate All.
For optimal results, we recommend manually editing auto-generated supports, or manually placing supports until the part is sufficiently supported (indicated by a green thumbs-up beside Supports in the Job Setup menu). PreForm will indicate in red what areas might require additional support.
If surface texture or post-processing time is a major concern, you may want to consider designing custom supports using CAD software. Guidelines for adding tearaway supports can be found here.
2.5. Layout
Set your part’s location on the build platform by clicking and dragging, using the red green and blue actuators surrounding your part, or by clicking Layout, then Layout All on the right side of the screen. It’s best to place parts in the center of the build platform. When printing multiple parts, space on the build platform can be optimized and material can be saved by overlapping rafts.
2.6. Send to the Printer
Send your job to the printer by clicking the orange Upload Print button on the bottom right. When the Print dialogue box opens, select the printer that you would like to use.
2.7. Set Up the Printer
Shake the Silicone 40A cartridge and then insert it. When using a new cartridge, double check that the silicone bite valve is opening successfully by squeezing it with a gloved finger. Insert a build platform and a compatible resin tank into the printer.
Begin printing by selecting your print job from the printer’s touch screen. Follow any prompts or dialogues shown.
Attention: For full compliance and biocompatibility, Silicone 40A requires a dedicated resin tank and build platform. Only use the Form Wash with other Formlabs biocompatible resins.
3. Post-elaborazione
3.1. Remove the Part
Remove the part from the build platform by wedging the part removal tool or a scraping tool under the part raft and rotating the tool. Parts can also be washed directly on the build platform in the Form Wash.
3.2. Wash
Place the part in the Form Wash filled with an 80/20 mixture of 99% isopropyl alcohol (IPA) and n-butyl acetate. Do not wash with IPA or n-butyl acetate alone. Wash using the recommended setting for Silicone 40A (20 minutes).
If the model is hollow or has internal channels, ensure liquid resin is thoroughly flushed out from these features. This can be done using a syringe filled with the mixture from the Silicone 40A wash. Allow parts to fully dry before post-curing.
3.3. Remove Supports
For rest results, remove supports after washing but before post-curing.
To remove supports, pull gently at the support structure. On thicker parts, just pulling may be sufficient. On thinner parts, consider using flush cutters, or sliding a sharp hobby knife along the part’s surface, being careful not to damage the part itself. An ultrasonic cutter can also be used here for greater precision.
3.4. Post-Cure
Post-cure your part to achieve optimal mechanical properties. Fully submerge the part in a beaker (or other UV-transparent container) of water, and place the beaker of water containing your part into the Form Cure. Use the recommended settings for Silicone 40A (45 min at 60 °C).
Mask the odor of Silicone 40A by adding Febreze HD to the water in the glass beaker before post-curing. For every 500 mL of water, use 12.5 g of Febreze HD. If not treated, this odor will dissipate over time.
3.5. Additional Post-Processing
A miniature, mounted Scotch Brite wheel can be used with a rotary tool to grind down support marks on parts either before or after curing.
Before applying any adhesives, ensure that the part has been thoroughly washed, is dry, and the surface is not tacky or dusty. Formlabs recommends using a primer such as DOWSIL 1200 series or a medical primer. After a primer has been applied, use a silicone adhesive such as DOWSIL 734. Do not use cyanoacrylate glues as they are brittle and leave a crust on the silicone.
Medical Customer Case Studies
Direct Printing with Silicone 40A Resin
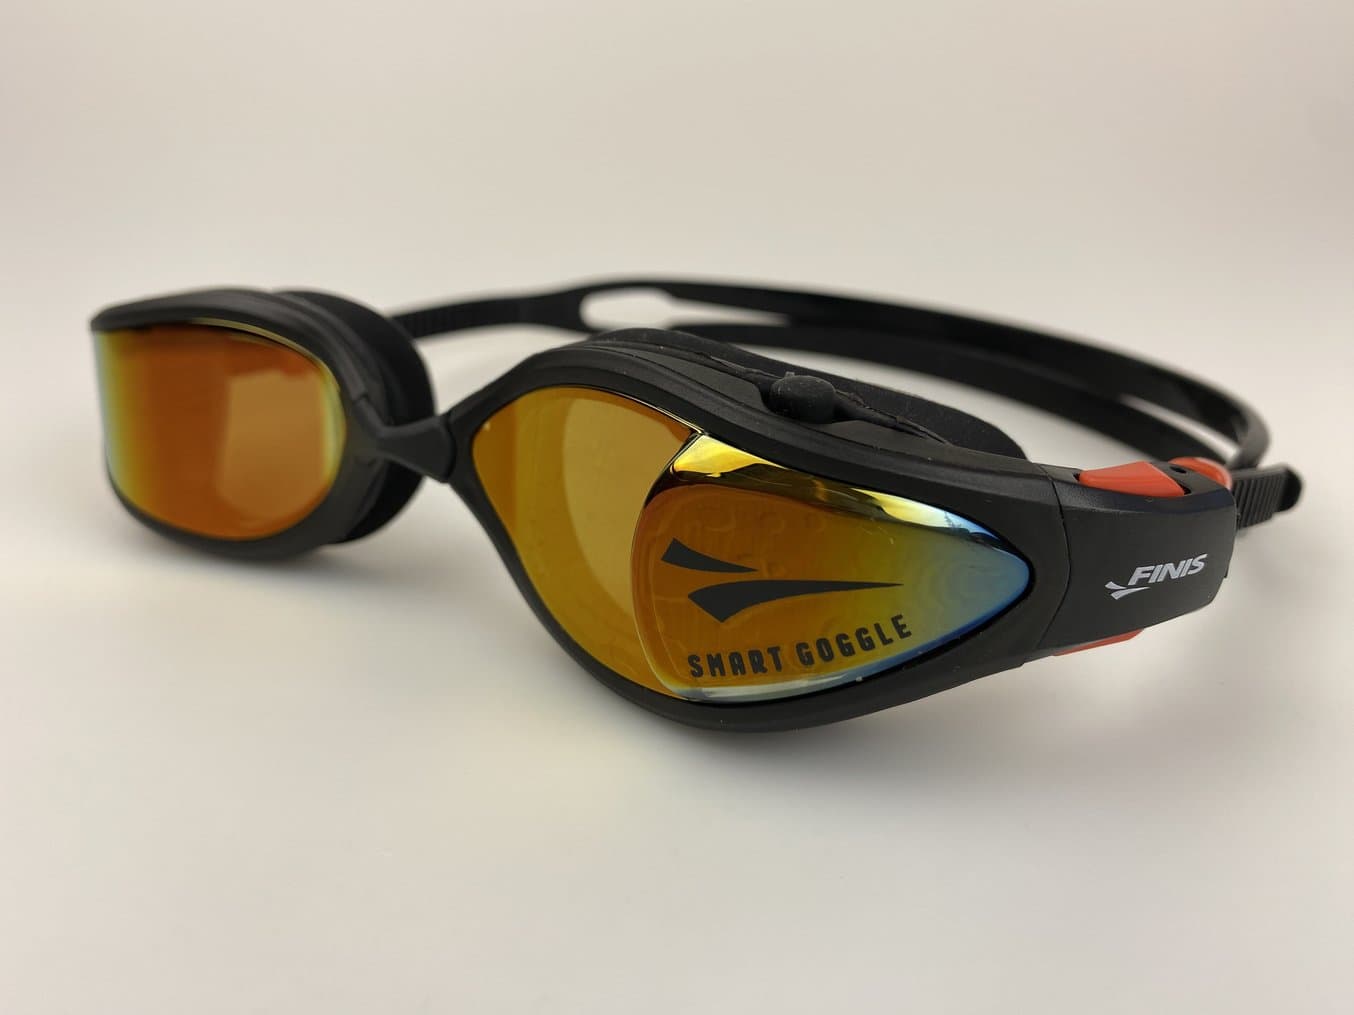
FINIS, Inc. è un'azienda specializzata nello sviluppo di attrezzature per il nuoto e gli sport acquatici, tra cui dispositivi all'avanguardia come gli occhialini da nuoto intelligenti Smart Goggle Max.
FINIS, Inc., a California-based company renowned for its innovative swim-related products, prioritizes quality and performance to meet the evolving needs of swimmers of all skill levels. Led by senior designer David Beittel, the product development team initially used filament 3D printing for rapid prototyping but sought more detailed and isotropic parts. That’s when they transitioned to Formlabs Form 3+ Stereolithography (SLA) 3D printers and Silicone 40A Resin. This resin proved invaluable for swift adjustments, overnight functional prototype printing, and achieving characteristics close to final production materials.
Historically, FINIS relied on labor-intensive silicone casting in traditional molds, leading to long production lead times. With the introduction of the Form 3+ 3D printers and Silicone 40A Resin, the team overcame challenges associated with mass-producing silicone parts. They were able to produce production-quality parts in a mere eight hours for just $10 a piece. This is a significant undercut to outsourced urethane casting, which has the usual expenditure of over $1,000 and a three-week timeline. The 3D printed silicone gaskets successfully underwent rigorous water tightness assessments within a swimming pool environment and demonstrated elasticity closely mirroring final production characteristics. Silicone 40A has become an essential tool for refining designs and ensuring optimal performance throughout FINIS, Inc.’s development process.
Injection Filled Molds for Product Prototyping With Glassboard
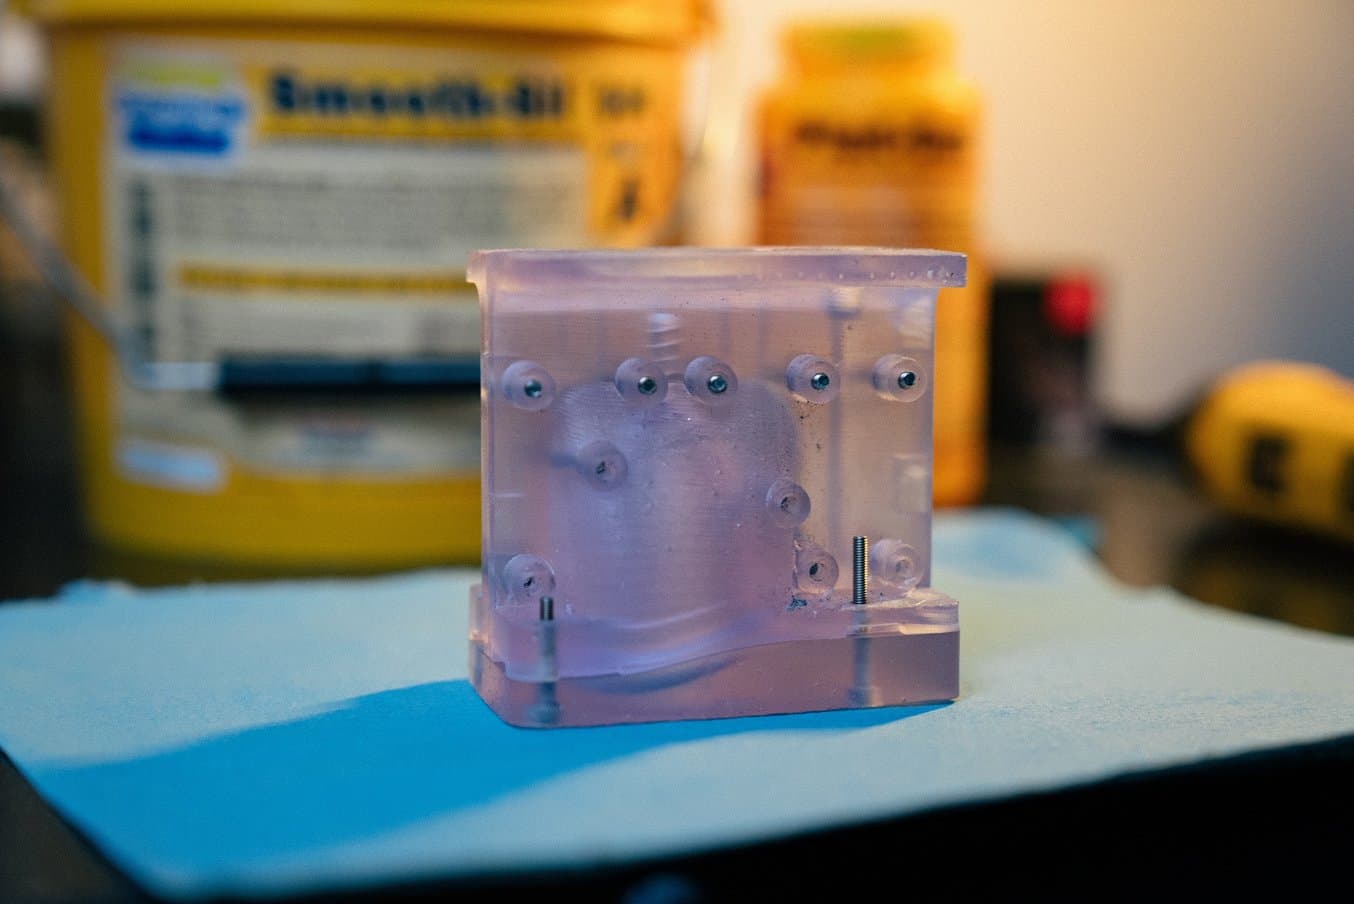
BioMed Clear Resin is used to create transparent molds which can be inspected for air bubbles or other imperfections.
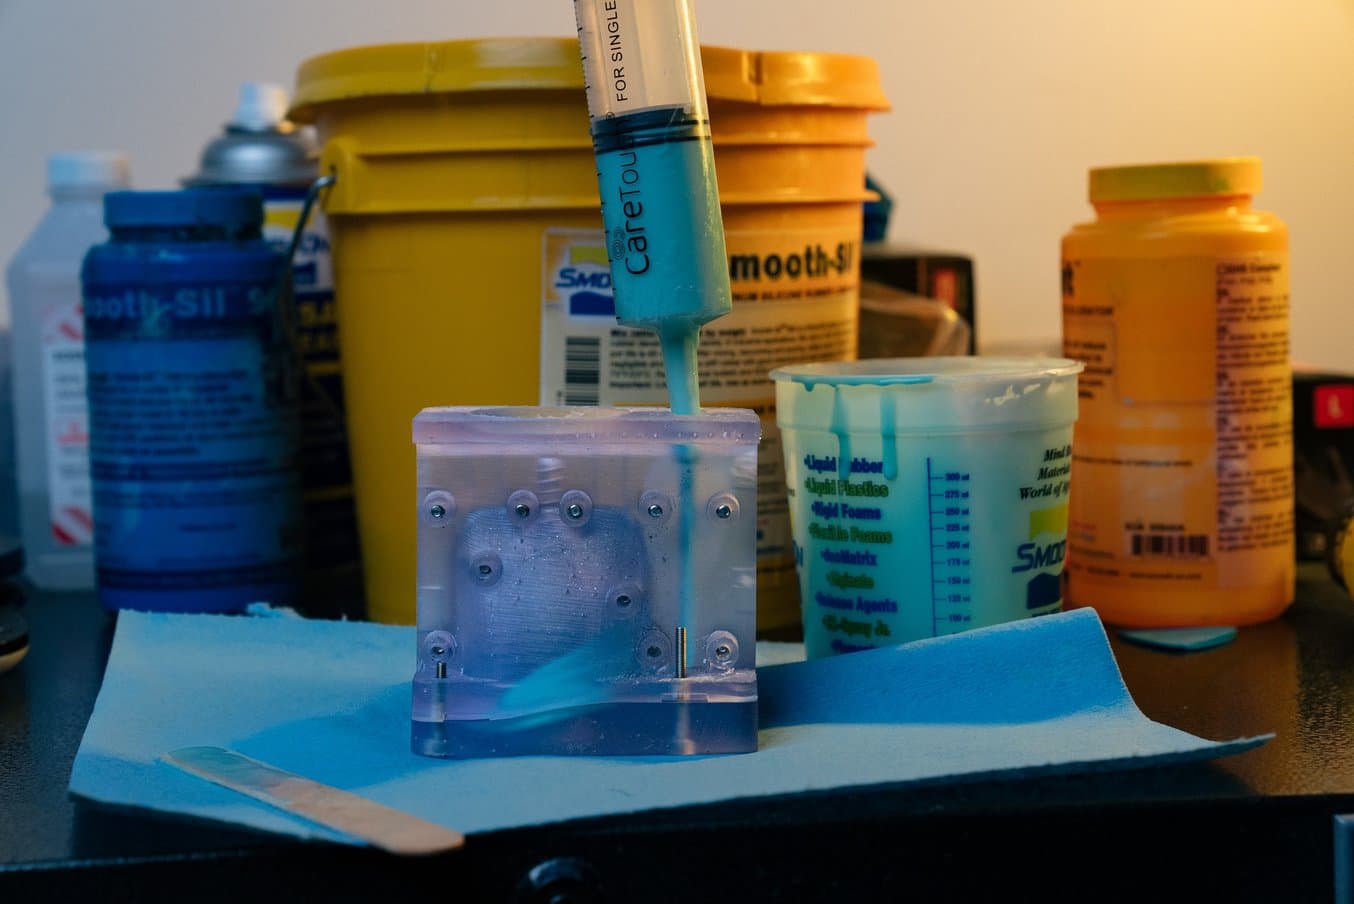
Glassboard is a product design consulting firm in Indianapolis, IN. Their design team uses silicone in molds for a very wide variety of prototyping applications from silicone menstrual cups, to custom fittings and overmolds, to seals, gaskets, and o-rings. Glassboard typically uses molds that are made of multiple parts that can be disassembled to remove the casted silicone and then reused for multiple castings.
A typical mold design at Glassboard, such as the one used for the Sunny Menstrual Cup, is an injection filled mold aided by a gravity-fill configuration. Liquid silicone is injected through a port at the top of the mold, runs down a channel to enter the bottom of the mold cavity, gradually fills to the top of the cavity, and exits via narrow air vents at the top of the mold.
An innovative feature of Glassboard mold design is a trough reservoir at the top of the mold. Troughs are used to contain the overflow of the silicone at both the gate and vent locations. Another purpose of the trough is to allow excess silicone to enter into the mold after filling to displace voids created by collapsing air bubbles or by silicone seeping into the narrow surface between mold blocks.
Silicone Overmolding of Customer Beta Prototypes With Dame Products

Dame Products employs an overmolding method to produce customer beta prototypes with embedded hardware. Their mold is printed in Clear Resin.
Dame Products is a Brooklyn-based startup that designs products for the health and wellness industry. Their product line incorporates complex ergonomically shaped hardware that is fully encapsulated in a layer of skin-safe silicone in vibrant colors. The team employs silicone overmolding with 3D printed molds to produce customer beta prototypes.
Each 3D printed mold stock is a two or three part injection filled mold that has anchoring features for small internal hardware. Parts A and B of a platinum-catalyzed liquid silicone are loaded into two sides of a 50:50 ratio epoxy cartridge, and attached to an epoxy gun with a mixing nozzle. This innovative method simultaneously mixes the silicone components while gradually forcing the liquid silicone into the mold.
Dame engineers can prototype dozens of overmolded devices in one day by rotating through three or four SLA printed molds. While the silicone rubber from one prototype is curing, the next can be de-molded and prepared for the next fill. Trimming and cleaning of prototypes happens in parallel. When prototype hardware is returned to the company, the beta device is bleached, the thin silicone layer removed, and the internal hardware is reused in a new prototype.
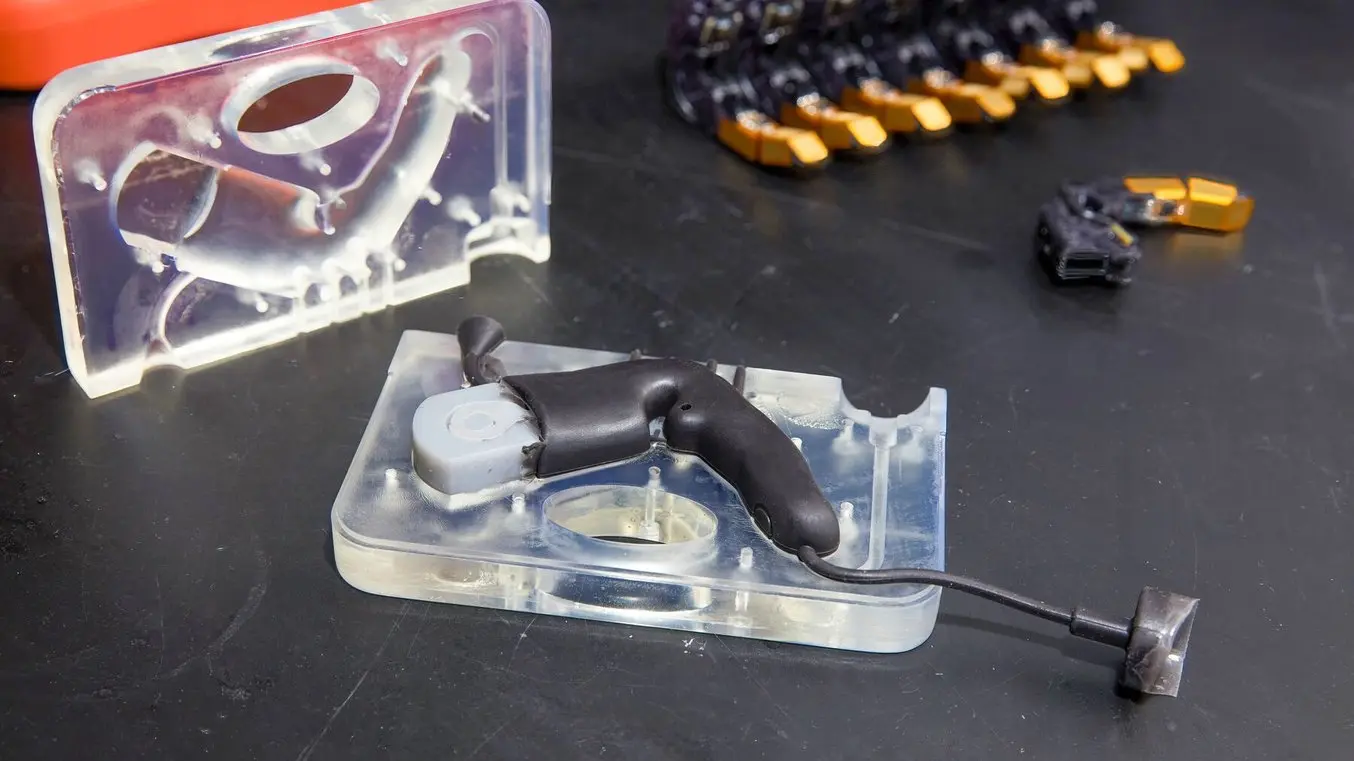
End-Use Overmolded Grippers With PSYONIC
PSYONIC encapsulates the Ability Hand fingers using a silicone overmold configuration. Some molds include a Tough 2000 Resin mold insert to anchor the encapsulated “bone” feature in the mold.
California-based PSYONIC is reinventing limb prosthetics with the world’s first touch-sensing bionic hand. The team uses 3D printing as a critical step in manufacturing almost every component of their device. This includes mechanical fingers that are encapsulated with silicone using an SLA 3D printed mold.
The molds are produced by taking the inverse of the finger or thumb shape, subtracting it from the mold stock, and adding inlets and air vents for injection of two-part platinum cure silicone. The mold also accommodates the structural “bone” component of the finger, which is fabricated using an FDM 3D printer.
Designers at PSYONIC are able to use each mold dozens of times before it wears out, and when this happens they can simply print a new mold and start injecting silicone again the next day. The team also directly contrasts Formlabs Clear Resin to their previously used fused deposition modeling (FDM) thermoplastic molds, namely referring to the upgrade in surface quality. Silicone picks up any texture or defect in the mold cavity, including 3D printing layer lines, so the smooth surface quality of Formlabs resins has been beneficial.
Silicone Injection Molding of Custom Makeup Effects With Dreamsmith
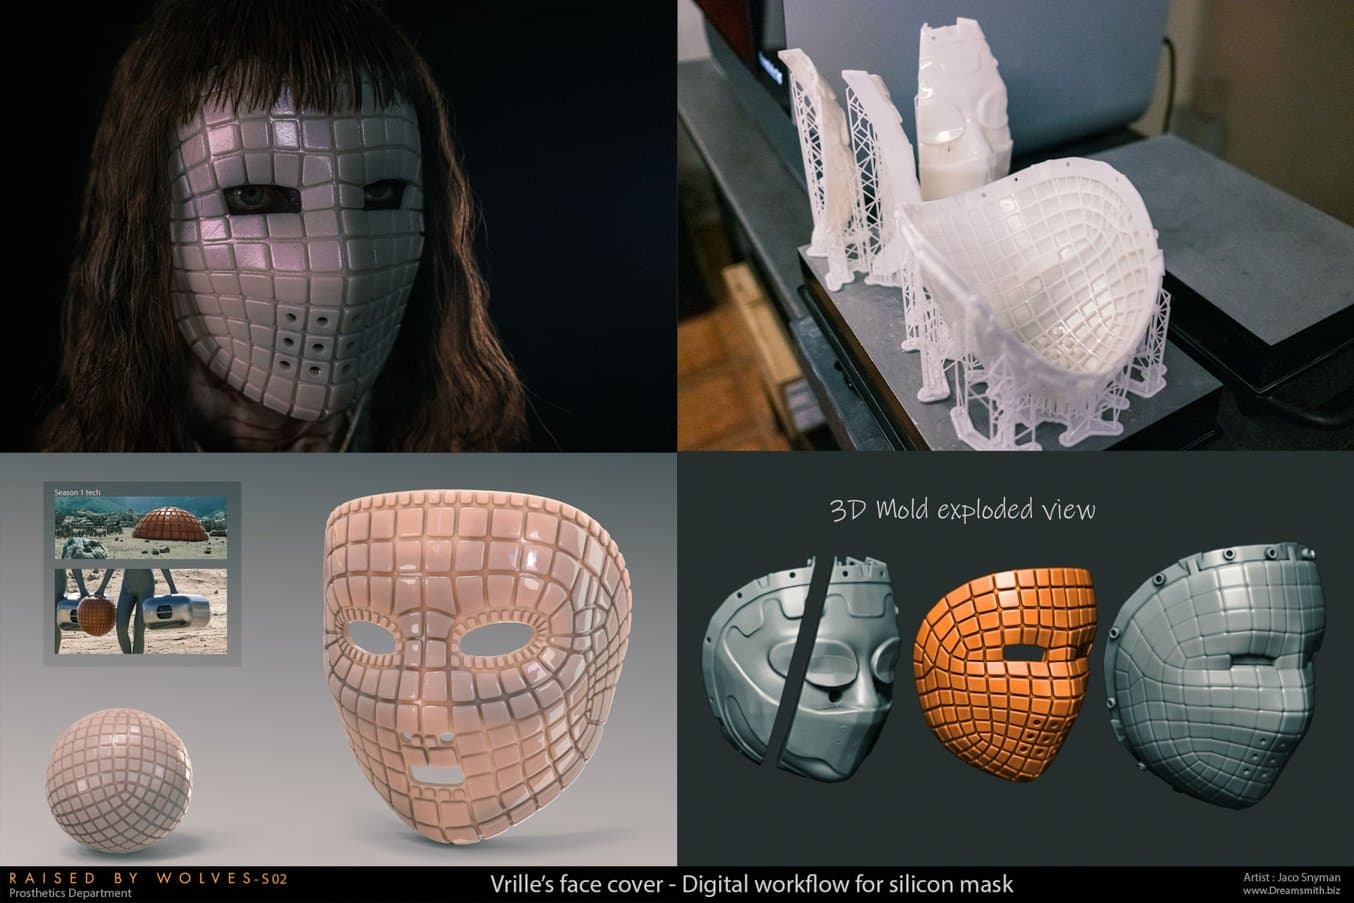
Designing and printing a complex shape and highly-detailed silicone mask with 3D printing.
Dreamsmith is an entertainment props and makeup effects firm based in South Africa. Their team has worked on designs for popular shows like Raised By Wolves, in which one particular effect needed was a silicone face mask incorporating a highly geometric exterior and an interior that conformed to the face of their actor.
Using the Form 3L, their team printed a mold that utilized optical scan data from the actor’s face for one interior surface, and a sharp geometric tile pattern for the other. While their design looks quite different from some of the product design examples in this report, the Dreamsmith team had many of the same material concerns, including ensuring compatibility of their mold material with skin-safe platinum cure silicone. They ultimately selected Formlabs Rigid 10K Resin for its high precision.
Eggshell Mold for Custom Medical Devices With Cosm
Cosm employs eggshell molds to produce custom silicone medical devices. Their thin-walled mold is printed with Biomed Amber Resin.
Cosm is a medical device company revolutionizing treatment for uterine prolapse, a common but often overlooked medical condition, with patient-specific silicone pessaries. The pessary is a non-surgical treatment approach in which a small support device is inserted below the uterus by a doctor. However standardized designs require fit by trial and error, and patients often give up on treatment before finding the proper fit.
The Cosm team’s approach utilizes data from a novel ultrasound technique to design a custom device tailored to a patient’s own anatomy. The Cosm team turned to Formlabs SLA printers for their silicone tooling, developing an eggshell-style conformal mold that is filled with medical-grade silicone and then cracked away to reveal the patient-specific silicone implant. The moldsare made from Biomed Amber Resin printed on the Form 3B.
Inizia a creare dispositivi medici in silicone
Il silicone si presta a svariate applicazioni, tra cui prototipazione rapida, test beta e fasi di convalida nello sviluppo dei prodotti, nonché produzione a costi accessibili di parti per utilizzo finale personalizzate o in volumi ridotti. L'ecosistema Formlabs rende possibile la stampa 3D con la Silicone 40A Resin e la creazione di stampi in silicone per la fabbricazione di dispositivi medici, protesi su misura, componenti del settore dell'audiologia e parti con geometrie complesse difficili da realizzare con i metodi tradizionali.
Per le guide complete alla creazione di stampi 3D in silicone e alla stampa in silicone, scarica il whitepaper.