
In a vintage 1964 comic book, a “processing machine” creates three-dimensional busts of Superman’s friends using only their photos as input. This vision has now become an everyday reality in a series of algorithms known as photogrammetry.
From a set of overlapping photographs, point cloud data is derived and processed into a fully textured three-dimensional object without the need for complex workflows or dedicated training programs. The technology’s promise: ready-to-3D-print models with a few camera snaps and mouse clicks. Easy as it sounds, there remains a bit of an art and science to the photogrammetry workflow.
This guide will take readers through the basic steps of the photogrammetry workflow and offer several alternatives to consider in terms of photogrammetry software equipment.
3D Scanning and 3D Printing for Reverse Engineering and Other Applications
3D scanning and 3D printing workflows can be applied to replication and restoration, reverse engineering, metrology, and more. Download our white paper to explore these applications and learn how to get started.
What is Photogrammetry?
Photogrammetry literally means the act of deriving precise measurements from photographs. It involves taking a set of overlapping photos of an object, building, person, or environment, and converting them into a 3D model using a number of computer algorithms.
Photogrammetry Applications
Photogrammetry is used in numerous areas of application:
-
Architects use photogrammetry for site planning, construction monitoring, and visualization rendering.
-
Artists can document or convert a piece of an existing artwork, sculpture, or nature into something new.
-
Archeologists can virtually map out and explore undiscovered areas of the world’s lands and oceans.
-
Designers and engineers who need to reverse engineer an existing object or custom-fit new parts onto it.
-
Quality control in manufacturing processes is significantly aided by the use of photogrammetry.
-
Game developers can save time designing props and environments by using photogrammetry combined with semi-automatic 3D modeling workflows.
-
Paleontologists can capture fossils and bone beds and determine the best approaches to exhumation, jacketing, and preservation as well as document and share their findings. Detailed 3D maps of a site can more easily reveal fossil locations.
-
For cartographers, geologists, surveyors, and topographic mappers, photogrammetry radically speeds up the process of mapmaking.
-
Forensic researchers can capture crime scenes in three dimensions in order to gain more insight into issues such as bullet flight paths, car crashes, and witnesses’ lines of sight, or to create virtual training environments.
-
Therapists and other medical professionals may scan parts of a patient’s body for custom-fitting applications such as prosthetics and orthotics, shoes, and hearing aids.
-
In the field of cultural heritage, pieces and monuments can now be preserved forever and virtually reconstructed and renovated.
-
Museum curators can establish virtual collections to attract the public.
-
Meteorologists use photogrammetry to determine the speed of tornadoes.
-
Photographers now have an extra dimension to work with.
-
Companies that want to offer a service to 3D print models of most precious possessions, pets, or family members.
3D Scan to 3D Print: Rapid Reverse Engineering
Looking for a resin 3D printer to realize your 3D models in high resolution? Download our white paper to learn how SLA printing works and why it's the most popular 3D printing process for creating models with incredible details.
How Photogrammetry Works
Step 1: Take Images
Take a series of overlapping photos of the chosen object. An 8-megapixel smartphone camera will already produce acceptable results for applications without high accuracy requirements, but we recommended an 18 MP (and up) DSLR-type camera for best results. A wide-angle camera is best since it presents the least lens distortion. A fish-eye lens will not work, for example, unless working with software that can intelligently compensate for this.
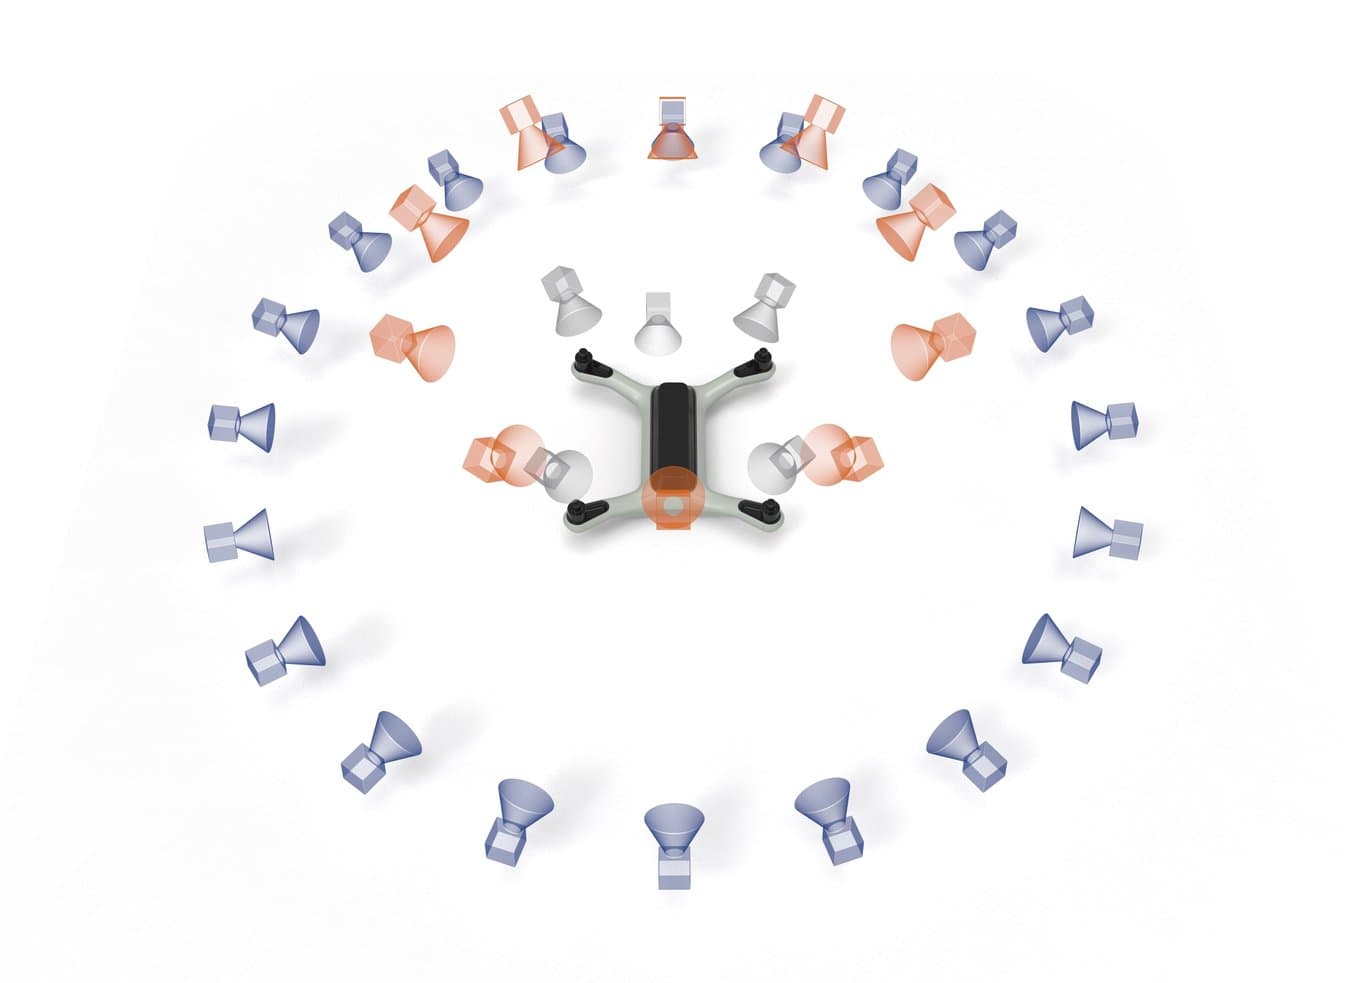
It is best to take the photos sequentially in a circle around the object. Start with a circle at a low angle, then do one more at a higher angle to capture the topmost surfaces. Aim for at least 50% overlap between each image; 60-80% is ideal. Lastly, make sure to take a few additional photos of areas that hold important details.
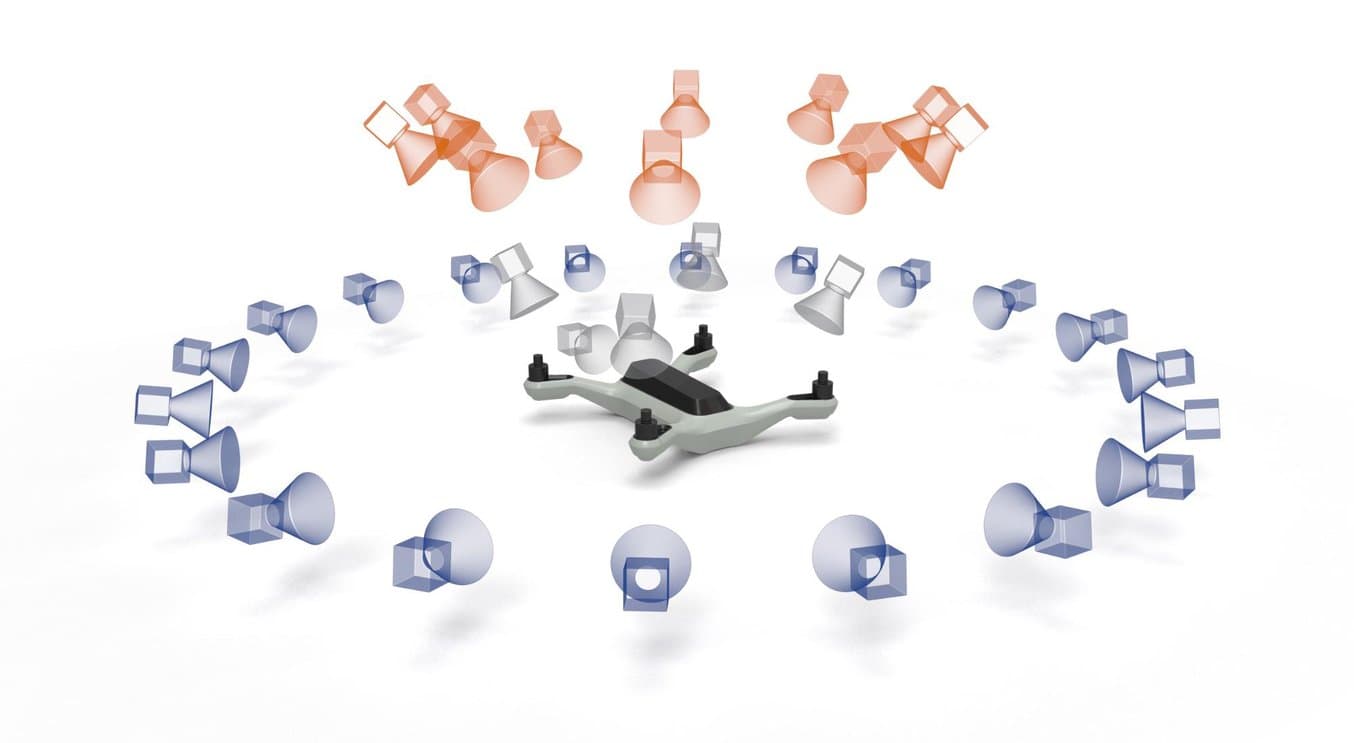
Since we are not using our drone for photogrammetry, we might as well reverse engineer it. Take photos in two bands of about 10 (blue) and 45 (orange) degrees of elevation, including some close-ups (grey).
Take the following additional guidelines into account:
-
Make sure the object has a matte surface. Transparent objects will not convert well. Reflective surfaces can be converted in matte using 3D scanning spray or dry shampoo spray.
-
Some software applications do not process featureless surfaces well. Shoe polish, sprayable chalk, painter’s tape, and stone effect spray paint all improve surface scannability.
-
The background of the photos needs to have sufficient color contrast with the object. A chroma-key backdrop works great, as does a newspaper as long as it does not show the same colors as present on the object.
-
Lighting has to be consistent throughout the shoot and is optimal on a cloudy day.
-
40-50 photos are typically enough for one object. The more photos, the better, as long as they are never taken from the same position.
-
The subject has to take up a significant portion of the image space.
-
Never move the object during the shoot.
-
Use as little depth-of-field (DOF) as possible and focus the camera exactly onto the object for each picture.
-
Use a tripod to reduce blurriness as well as for low-lit environments that require high exposure times.
-
Although they are rapidly getting faster, photogrammetry software algorithms can take hours or even to days to generate accurate results depending on the size of the dataset. Recommended is a computer with 16Gb of RAM and an Nvidia CUDA-enabled GPU.
Step 2: Upload
Open your photogrammetry software of choice and import the photos directly into the project library. This is usually a simple matter of drag-and-drop. For some programs, it is important to check the compatibility of the camera. They may check them with an internal database so the program can optimize its results based on aspects like focal length, principal point, and image sensor format. This generates a number of distortion parameters known as a bundle adjustment.
In the first step of the software pipeline, the photos will be checked on suitability to the photogrammetry process. For example, a green or red icon may appear next to or on top of the photo in the library. In case a significant portion of the photoset gets rejected, and shooting a new set is problematic, some Photoshop editing may do the trick. This happens commonly with white wall backgrounds. Creating a mask called a garbage matte for each image works to separate the foreground from the background more. Sharpening the photos may also improve results since the software will detect matching features better across photos if they are more equal in sharpness.
Step 3: Creating the 3D Model From Images in Photogrammetry Software
Most of the computational part of photogrammetry is done automatically in the background by the photogrammetry software, but advanced features can help improve the results.
Image Matching
Most photogrammetry software suites develop the photoset fully automatically into a 3D mesh. However, some take Image Matching, also known as Correspondence Search, as a separate step to be confirmed by the user. This allows alterations to the photoset before starting the more computationally intensive processes. In this step, the computer determines which photos are useful for further processing and finds overlapping areas in multiple images. It now stores how the images will stitch together, similar to putting together a 3D puzzle.
Feature Extraction
Again, in some programs, this is a fully automated part of the photogrammetry workflow. In other photogrammetry software programs, it is possible to separate this step for possible tweaks and iterations before continuing. In this step, the software scours the photos for features that can be uniquely recognized across multiple images. Several professional toolkits use coded markers for this, a very accurate method that even works on reflective, transparent, and otherwise featureless surfaces. Most tools, however, utilize the more generic Structure from Motion (SfM) technique which mostly looks for dense textures on objects, such as texts, wood grain, facial features, and other patterns. Other important features are edge points, lines, and corners. Some solutions further enrich the data with lighting and shading cues, an advanced technique known as Shape-from-Shading.
After all features have been found, they are internally verified to sift out erroneous detections in a step known as Geometric Verification. To ensure that the detected features fall onto the same scene point, the SfM engine creates a transformation that maps feature points between images. This is a highly complex set of algorithms based on projective geometry.
Some photogrammetry software such as COLMAP allows the user to watch the feature generation process happen as it takes place. In Meshroom, it is possible to stop the process in case the user sees important areas where little features have been found. Quality can be increased by amplifying keypoint sensitivity and matching ratio, changing presets, and switching the matching algorithm to A-KAZE or in some cases a brute force method.
Triangulation
In 1480, Leonardo Da Vinci devised a method to derive the painter’s location from a painting. Something similar happens in this core part of the SfM pipeline. 3D Coordinates of the surface points are estimated based on the output of the previous phase, the scene graph. Lines of sight from the camera to the object are reconstructed resulting in what is known as the ray cloud. The intersection of the numerous rays determines the ultimate 3D coordinates of the object.
Once global geometry has been established by means of a sparse point cloud, photogrammetry software looks at the lighting and texture of the scene to create a depth map. Like a wood carver, this works all the little details into the 3D model in order to make it come alive. Advanced programs use a process called delighting to even out the lit and shaded areas for more homogeneous lighting across the entire surface of the model. It is even possible to reverse-calculate and cancel out ambient occlusion effects. While a realistically lit model is often more desirable for on-screen visualization purposes, a delit model is better for full-color 3D printing.
Then, both the so-called dense reconstruction involving the depth map, and the sparse reconstruction that mapped out all visual features detected in the earlier stages, are combined into a 3D mesh format such as FBX, OBJ, PLY, or STL.
The triangulation phase takes place automatically. The user can increase quality by elevating settings such as Track Length, Nr. of Neighboring Cameras, and Maximum Points. Some photogrammetry programs also allow the user to determine the number of triangles present in the 3D mesh object which influences file size and ease of post-processing. Note that altering these settings needs to be done with care since they can rapidly multiply processing times.
Some professional photogrammetry software tools use additional machine learning techniques to classify detected objects such as foliage, buildings, and vehicles. They can filter out moving background objects such as birds and pedestrians, and establish enhanced shape data based on additional information like foreground silhouettes, reflectance, and irradiance. Thin shapes such as steel frameworks and power lines can automatically be recreated in 3D using so-called catenary curve fitting algorithms.
Book a Free Consultation
Get in touch with our 3D printing experts for a 1:1 consultation to find the right solution for your business, receive ROI analyses, test prints, and more.
Step 4: Post-Processing
While the computational part of photogrammetry is an involved process, it is actually the easiest part for the user, who often only has to drag in their images and push a few buttons. The real work starts when the 3D model has been generated. In no case does photogrammetry deliver a ready-to-3D-print, watertight mesh model. There are usually floating artifacts, background noise, holes, and irregularities to clean up. The object will also need to be reoriented and rescaled, which is done quite arbitrarily by photogrammetry software.
Some software packages have in-built post-editing tools, otherwise, a sound workflow is to do the necessary file conversions in Meshlab and the mesh cleanup, repairing, remeshing, and resculpting labor in MeshMixer. All of these programs are free for commercial use.
When this step is done and the file is saved into STL format, the object will be ready for 3D printing or import into a CAD environment.
For more information on mesh repair, visit our in-depth MeshMixer tutorial.
Introduction to 3D Printing With Desktop Stereolithography (SLA)
Looking for a professional 3D printer to realize your 3D models in high resolution? Download our white paper to learn how SLA printing works and why it's the most popular 3D printing process for creating models with incredible details.
Request a Free 3D Printed Sample Part
See and feel Formlabs quality firsthand. We’ll ship a free 3D printed sample part to your office.
Photogrammetry Software Comparison
In recent years, photogrammetry software has arrived that is easy to use, cost-effective, and results in models that actually resemble the original. Developers are making quick iterations to add the necessary features to optimize the meshing process and fix errors.
When the photography is done well, several free tools will suffice to meet the needs of basic photogrammetry projects. Then there are consumer-level tools based on a one-time purchase for a perpetual license that offers more advanced features and somewhat more reliable quality. Professional tools are priced exponentially higher but in return offer flawless results and advanced features such as AI-driven feature recognition and model reconstruction, laser scanning compatibility, video-based photogrammetry, unlimited dataset sizes, marker-based captures, and/or tools to enable drone-based aerial photogrammetry.
Each photogrammetry software has its own strengths, weaknesses, and is suitable for different applications and businesses. The following compatison table and the detailed overview below highlights some of the key characteristics and considerations.
| Quality | Speed | Features | User-Friendliness | Price | |
|---|---|---|---|---|---|
| 3DF Zephyr | ★★★★☆ | ★★★☆☆ | ★★★★★ | ★★★★☆ | ★★★★★ |
| Agisoft Metashape | ★★★★☆ | ★★☆☆☆ | ★★★★☆ | ★★★☆☆ | ★★★★☆ |
| Autodesk ReCap | ★★★★★ | ★★★☆☆ | ★★★☆☆ | ★★★★★ | ★☆☆☆☆ |
| COLMAP | ★★★★☆ | ★★★★☆ | ★★☆☆☆ | ★☆☆☆☆ | ★★★★★ |
| iWitness | ★★★★★ | ★★☆☆☆ | ★★★☆☆ | ★★★☆☆ | ★★☆☆☆ |
| Meshroom | ★★★★☆ | ★★☆☆☆ | ★★☆☆☆ | ★★☆☆☆ | ★★★★★ |
| Qlone | ★★☆☆☆ | ★★★★★ | ★★☆☆☆ | ★★★★★ | ★★★☆☆ |
| RealityCapture | ★★★★★ | ★★★★★ | ★★★★☆ | ★★★★★ | ★★☆☆☆ |
| Regard3D | ★★★☆☆ | ★★☆☆☆ | ★★☆☆☆ | ★★★☆☆ | ★★★★★ |
| VisualSFM | ★★★☆☆ | ★★★☆☆ | ★★☆☆☆ | ★★★☆☆ | ★★★★★ |
Autodesk ReCap
Autodesk’s ReCap software is the most sophisticated in its class, and originally stems from an application they acquired in the early 2000s called RealViz Image Modeler. They transformed it into the free Project Photofly, which later became the cloud-based 123D Catch. After a few years, Autodesk decided to monetize their software in the form of Autodesk Remake, which got rebranded and remonetized with the latest launch of ReCap.
Autodesk’s photogrammetry algorithms are almost unparalleled in the industry and prove to be at the top of delivering directly 3D printable scans. The automatic cleanup function is exceptional and several mesh editing tools are available to rapidly prepare models for AR/VR platforms. For game developers there is the nifty option to directly output bump and displacement maps. The user interface feels like an easy-to-use app even though there are still a few small flaws such as the lack of a progress indicator bar while waiting. While delivering cutting-edge results, given the price point and restriction to cloud-based processing, Autodesk ReCap is not an obvious choice for the starting photogrammetrist.
RealityCapture
RealityCapture is a great solution that delivers highly accurate scan results. What sets it apart from the others most is its mercurial processing speed. Where other solutions fail or leave the user with substantial waiting times, RealityCapture consistently delivers lightning fast results, even with enormous datasets. It is also less heavy in using RAM resources than other software. The price for a perpetual license is on par with that of other professional solutions, even though the version that includes laser scanning is much more costly. An alternative is a PPI (pay per input) plan, which lets the user access all functionality for free, until they want to save the results.
The user interface feels like a professional editing environment and provides many options, grouped per stage of the photogrammetry pipeline. The tab and panel-based, fully configurable user interface will feel very familiar to the mainstream customer and seems to have derived its inspiration from Windows and Autodesk software platforms. There are clever gizmos and selection tools, more being added with every update. Novice users are offered a one-click approach, while there are plenty of options for the budding specialist. The optimization and direct export to Sketchfab is a handy addition. One flaw is that while it repairs meshes quite well, the user has no control over hole patching other than that all holes are automatically patched by the program. For additional levels of control the user will have to reside to external tools such as Netfabb or MeshMixer. For mechanical objects that include flat surfaces, RealityCapture tends to produce somewhat noisy results and to compensate offers a Smoothing tool. The algorithms lend themselves best for scanning organic objects without planar features.
Agisoft Metashape
Agisoft is a Russian enterprise and while on the surface their software looks substandard with a dated Windows-style user interface design, the results are highly reliable and comparable to those generated by Autodesk ReCap. For scanning mechanical objects with flat surfaces, Metashape produces slightly less noisy mesh results than RealityCapture, but can also result in less detailed meshes even though it takes three times as long. It also has the most problems with directional rim lighting which can result in substantial holes. The advice to shoot only in cloudy conditions is of paramount importance here.
The standard version of Metashape costs under $200 and already enables photosets of up to 1,024 images which is only unsuitable for projects of stellar scope such as capturing entire building interiors or geographical settings. Price-wise, the professional version lies in the same range as other solutions, and offers detailed depth mapping, marker-based scans, manual photo alignment, machine learning-assisted geometry generation, and cloud processing. Nonetheless, the standard version’s options are surprisingly comprehensive. Even though they are nothing advanced, several options for hole patching and mesh repair are present. There are possibilities for video data import, batch processing, panorama, and flythrough video creation. The program is not restricted to NVIDIA CUDA-enabled GPUs like RealityCapture is. The UV-unwrapping of textures is performed very logically, making textures Photoshop-editable unlike with most other photogrammetry solutions. There is a 2.5D-mode, which offers a great speed boost for scanning surface textures compared to the regular photogrammetry procedure.
To top it off, Metashape is one of the few environments that allows external mesh editing and the subsequent re-importing of the model into the photogrammetry studio. Whereas it offers no retopologize or sculpting tools like ReCap does, it is entirely workable to do advanced mesh cleanup, repairing, remeshing, and resculpting labor in MeshMixer. For more advanced sculpting options use the free Sculptris or its professional cousin Zbrush.
AliceVision Meshroom
Meshroom is a free and open-source photo-to-solid solution that relies on an advanced computer vision framework called AliceVision. The nodular interface is somewhat obscure and takes a while to master. Once the user learns which parameters to alter in the submenus and how to reroute certain nodes, it is relatively easy to produce meshes of progressively more refined quality. Instead of a linear pipeline, multiple SfM modules can be run in parallel and later combined for a more robust mesh. This offers the benefit of additional control over the final mesh quality. While professional users get the full under-the-hood view, novice users benefit from simply hitting the Start button after photo upload, and letting the computer do the rest. The program gets slow only at the highest settings.
All in all, Meshroom is one of the best free-and-open-source (FOSS) solutions to photogrammetry and generally produces good quality meshes. It offers no mesh editing tools so the user needs to rely on third-party offerings here. Also it tends to reject a substantial percentage of camera positions so it is paramount to adhere to proper photography guidelines. A nice feature is that photos can be shot and added on the fly to improve scan results. Every time the Meshing module is activated, an OBJ format 3D model is automatically generated in the output folder. This enables rapid iteration cycles.
3DF Zephyr
Zephyr by 3Dflow is a renowned editing studio with a professional toolset and user interface. For those starting with photogrammetry it offers a wizard that guides users through the process according to their level of expertise and type of photogrammetry project (close-range, urban, human body, or aerial). The free version works with a maximum of 50 photos which is an acceptable amount for single-object photogrammetry. The affordable Lite version shoots that number up to 500, while the full version offers an unlimited photoset size.
Zephyr is not a fast solution. A default scan takes about two hours and for a high-quality scan count on an overnight wait. For ultimate quality, there is an ‘Ultra’ option under ‘Settings’ which is hidden for the mainstream user because of potential computer lock-ups. Zephyr is full of handy features such as texture sharpening, hole capping, retopology, smoothing, Sketchfab upload, video import, and a manual masking tool called ‘Masquerade’ that aids separating the foreground object from the background in challenging projects. The Pro version provides the options of coded targets, batch processing, laser scan alignment, and outputs STL and Collada files besides the regular OBJ and PLY formats. 3DF Zephyr runs on any Windows PC with DirectX.
Colmap
Colmap is a free photogrammetry solution originally developed for research purposes. Combining a GUI with command-line operation, it is mostly geared to the professional user. For starting users the technicalities can seem intimidating, however the Automatic Reconstruction mode is there to help out. Colmap is suitable for both close-range and large-scale projects, and will require external software for mesh repair operations. It is Windows-only and will require an NVIDIA graphic card. The upside is that Colmap offers many advanced options in order to generate high-quality meshes.
Regard3D
Regard3D is a free little program that takes users through a series of Windows-style user interface panels that guide them through the photogrammetry pipeline. Several settings are available in each step, which is further explained on the Regard3D website. It includes several different procedures such as structure from motion, multi-view environment, and surface reconstruction. It is up to the user to experiment with these and generate optimal scan results. Note that Regard3D will only work with cameras known to its database, which excludes some older smartphones. Crashes are uncommon but can occur with large datasets or too advanced settings. The software exports either a point cloud in PLY format or a triangulated mesh in OBJ format.
VisualSFM
VisualSFM is a photogrammetry solution that is free for non-profit purposes, and was written by a Google engineer. The densification algorithms that convert feature matches into point clouds are similar to those used by Regard3D. The user interface is operated either through a command-line interface or icon-based buttons which requires some prior knowledge. A nice feature of VisualSFM is its zoomable user interface that lets the user browse through large photosets very easily. The user is also able to watch a live point cloud reconstruction, with every camera individually selectable and visually linked to its original photograph. It makes waiting for results a bit more bearable. There are tons of tweaking options for the advanced user, while for beginners it suffices to just press four buttons. Note that VisualSFM’s output is a point cloud in PLY format which needs further conversion into a mesh by external tools such as Meshlab.
iWitness
iWitness is a professional photogrammetry suite developed by Australian enterprise Photometrix. Because it can incorporate Ground Control Points (GCPs), for instance derived from GPS data, it is especially suited for large-scale applications in architecture, surveying, accident reconstruction, and forensic investigation. The algorithms are very precise and can result in three-dimensional point clouds that are mapped to the photoset with single pixel precision. iWitness is also useful for close-range photogrammetry and reverse engineering. With the right preparations, it is possible to scan objects as small as coins in full detail. The learning curve is fairly low as beginning users can obtain a full 3D scan using only five toolbar buttons of its Windows-style user interface.
The standard version of iWitness costs around a thousand US dollars and includes all major functionality. The main drawback is that it only allows users to process up to forty images. This number jumps to unlimited in the PRO version which costs well over twice the amount as the classic version, but also offers retroreflective coded target support as well as cloud computing. It also has a feature that automatically generates a network of 3D curves and polylines for direct export to CAD environments using the DXF file format. Alternatively, this feature allows one to scan a two-dimensional drawing on paper, and convert the result to DXF for CNC routing or laser cutting.
Photomodeler
Photomodeler is a high-end software package that offers a myriad of tools. It is highly suited for CAD integration and includes a Rhinoceros plugin. There are tools for pattern digitization towards CNC or soft goods manufacturing for fashion, boat sails, or upholstery, to name a few applications. Several manual modeling tools can directly produce mesh surfaces to match geometry such as cones, cylinders, rectangular features, and lofted surfaces. The automatic point cloud generation process is based on the MVS algorithm which results in accurate textured results that can be exported to many different file formats.
Setting up a project is done by means of a wizard that offers the right options at the right stage. Photomodeler’s Standard version comes at a price just under a thousand US dollars. The premium version triples that amount and offers more smart features, better dense surface modeling, as well as UAV/drone support.
Photomodeler is not strictly a photogrammetry editor though, since it relies on an entirely different method for object reconstruction. It is based on taking a small set, three or four, images at perpendicular angles to an object, and using coded markers and manual input in order to reconstruct the object rather than an automated photo-to-solid workflow. It will only be suited for specific professional applications, not for reverse engineering.
Qlone
This overview wouldn’t be complete if it did not include a mobile photogrammetry app. It is there in the form of Qlone. Given that mobile photogrammetry platforms are in their infancy, Qlone does a decent job. Users can see the results being generated within a few minutes, which subsequently can be exported for view in Sketchfab, embedded into AR applications, or converted to a 3D printable model and directly transmitted to an online 3D printing service provider. There is a free version that produces low-resolution models. The premium version and in in-app purchases add high-resolution scans and unlimited exports to OBJ, STL, X3D, and PLY, as well as AR viewing.
To convert a smartphone into a working photogrammetry unit does require an outstanding camera, plenty of GPU processing power, and sufficient internal storage. Models are best photographed on a Qlone-specific scanning mat. To beautify mesh results, Qlone offers remeshing, sculpting, and smoothing tools. A extra feature is automatic GIF creation for sharing animations of the object on social media. Note that the iOS-app includes more functionality compared to the Android version.
Case Study: Photogrammetry for Reverse Engineering
This section will focus on close-range photogrammetry for reverse engineering in the context of product design and development.
Reverse engineering is a powerful way to create digital designs from a physical part, and can be a valuable tool in the prototyping workflow alongside technologies like 3D modeling and 3D printing. It is increasingly used to retrofit parts and installations to boat decks, aircraft, cars, kitchen cabinets, swimming pools, stairs, piping, and industrial machinery. The major advantage of photogrammetry here is the fast non-contact workflow as well as the low expertise and low-budget equipment needed. Since designers will at times want to scan an object for derivative purposes, we will show here how it works for a generic computer mouse. This is a challenging object to scan and generate a highly precise model because its surfaces are mostly organic and featureless.
Preparation
After weeding out unsharp images, the final photoset consists of 41 photos, shot with a Motorola G9 Play smartphone in fully overcast daylight. Since a featureless matte surface fails to generate any workable results, the object was covered with marble effect spray paint. This speckles the object, rendering it perfect for photogrammetry, more so than other methods. As an underlay we found a feature-rich illustration on a matte paper with contrasting colors and clear reference shapes to work best.
We selected the most promising photogrammetry software tools based on their suitability for reverse engineering, automated workflow, high-quality results, affordability, and direct mesh export: 3DF Zephyr, RealityCapture, COLMAP, Meshroom, and Regard3D. We have also used the Qlone app to try a mobile focused solution.
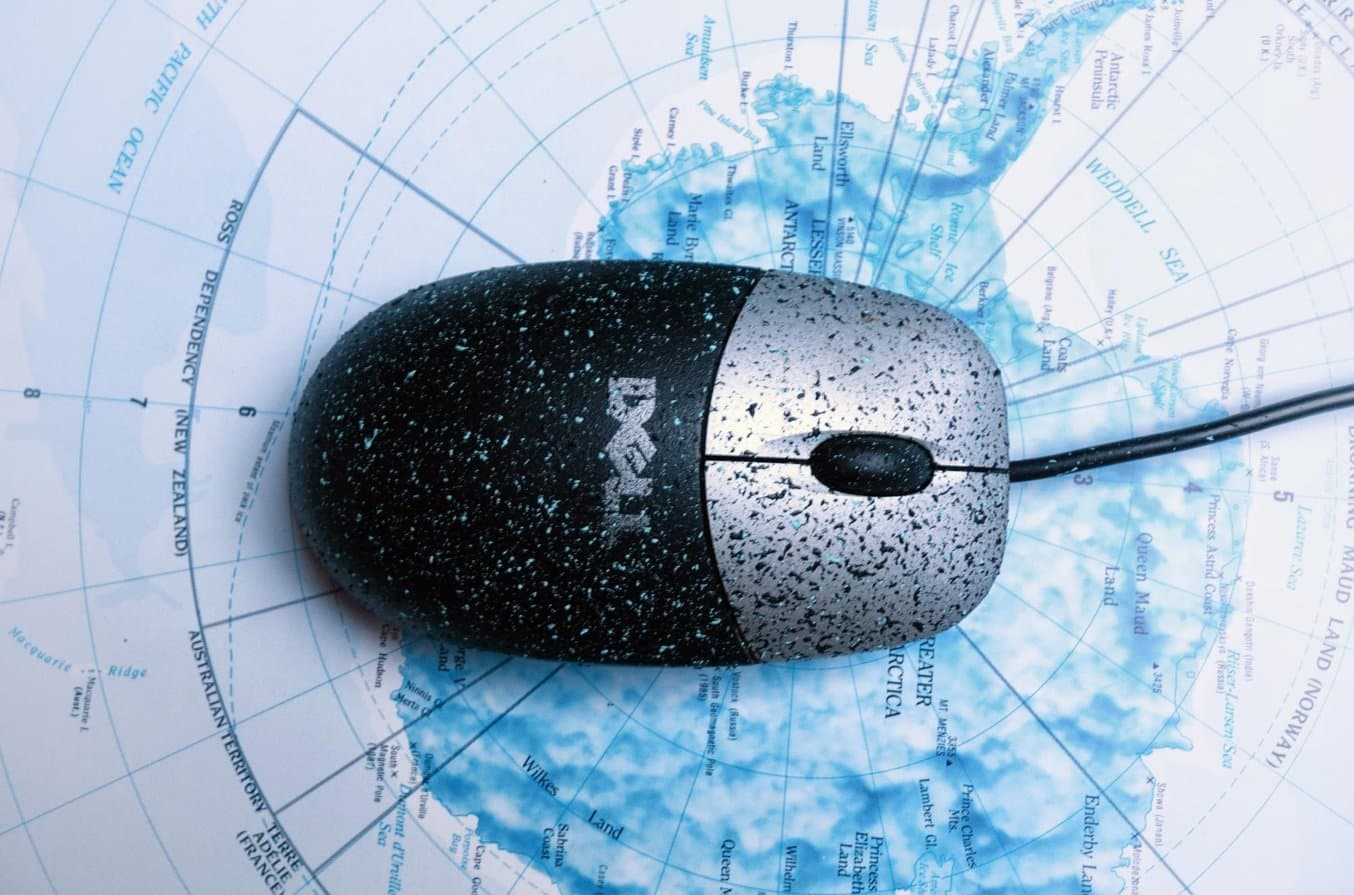
Our object of photogrammetry, a Dell M-UVDEL1 Wired Optical Mouse, prepared with marble spray paint and positioned on an underlay of the Antarctic continent.
Results
In all the software suites, we selected the preset or setup that is generally regarded to deliver high quality results. We have also tried a few of the Ultra setups such as offered by Meshroom and Colmap, but these improved the results only marginally while increasing processing time by up to 400%.
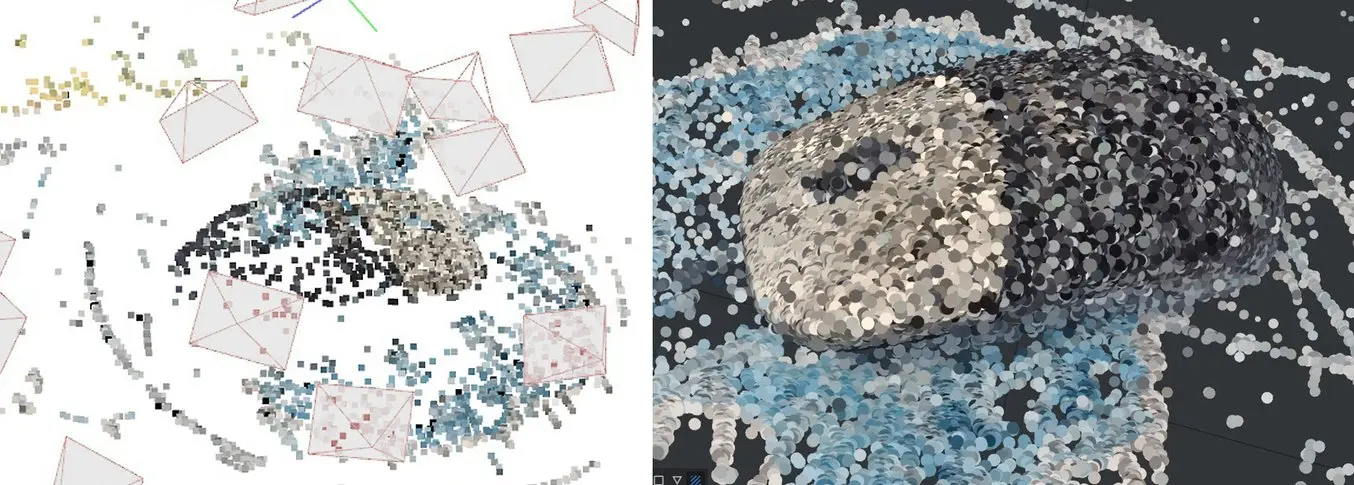
Left: feature matches found by Colmap. Right: feature extraction by Meshroom.
Meshroom finds significantly more feature matches than other software systems and delivers precise results. Once familiar with setting the parameters, it is easy to tune the quality to specific wishes. The downside is that the High preset took 76 minutes, which is slow in comparison, yet still very workable. The Ultra setting is best planned for an overnight session but does yield somewhat better output. Results can come out a bit glitchy, which requires some experimenting with proper settings and algorithms. In the High preset, the shape is compiled completely and accurately when it comes to overall dimensions. Low-lit areas are sufficiently reconstructed. The resulting mesh is relatively coarse when it comes to detail and quite grainy in terms of surface texture. The cord was missing entirely, and the mouse wheel came out a bit jumbled. Of all programs tested it does come in second place for best rendering the overall shape, which will be relevant for reverse engineering parts with complex or organic surfaces.
For generating workable results fast, Colmap is the best solution. It generated a high quality mesh in just 14 minutes. Details and edges are clearly visible although performance in low-lit areas turned out more problematic. There were some erroneous protuberances in the resulting mesh object here and there, but nothing that can’t be fixed.
Regard3D took 23 minutes to produce a less detailed rendering of the computer mouse. The mesh came out with a number of dimpled areas, and the environment contained a multitude of floating alien bodies —not literally, of course. This effect became less noticeable after increasing the quality to a higher setting, although the computer mouse stayed more or less the same. Apart from the mouse itself, it did render the cord almost completely, and while on a higher quality setting the processing speed tripled, the quality of the periphery increased significantly. It appears to us that Regard3D excels at scanning spaces rather than individual objects.
3DF Zephyr scored reasonably decent in all regards. After just 20 minutes of processing, the overall shape shows up entirely, surfaces are only slightly dimpled, most details are present yet somewhat coarse, and the ground plane and cord are rendered very well. When checking the hidden ‘Ultra’ setting, processing time quadrupled without any visible improvements to the mesh when compared to the one generated in ‘High Quality’ mode. This mesh was over 500Mb, more than five times heftier than the other programs’ results. Since the surface is relatively smooth, it will be easy to decimate the mesh towards a smaller file size though. Low-lit areas are rendered exceptionally sharply, which may work best when photo-scanning objects with deep cavities and crevices.
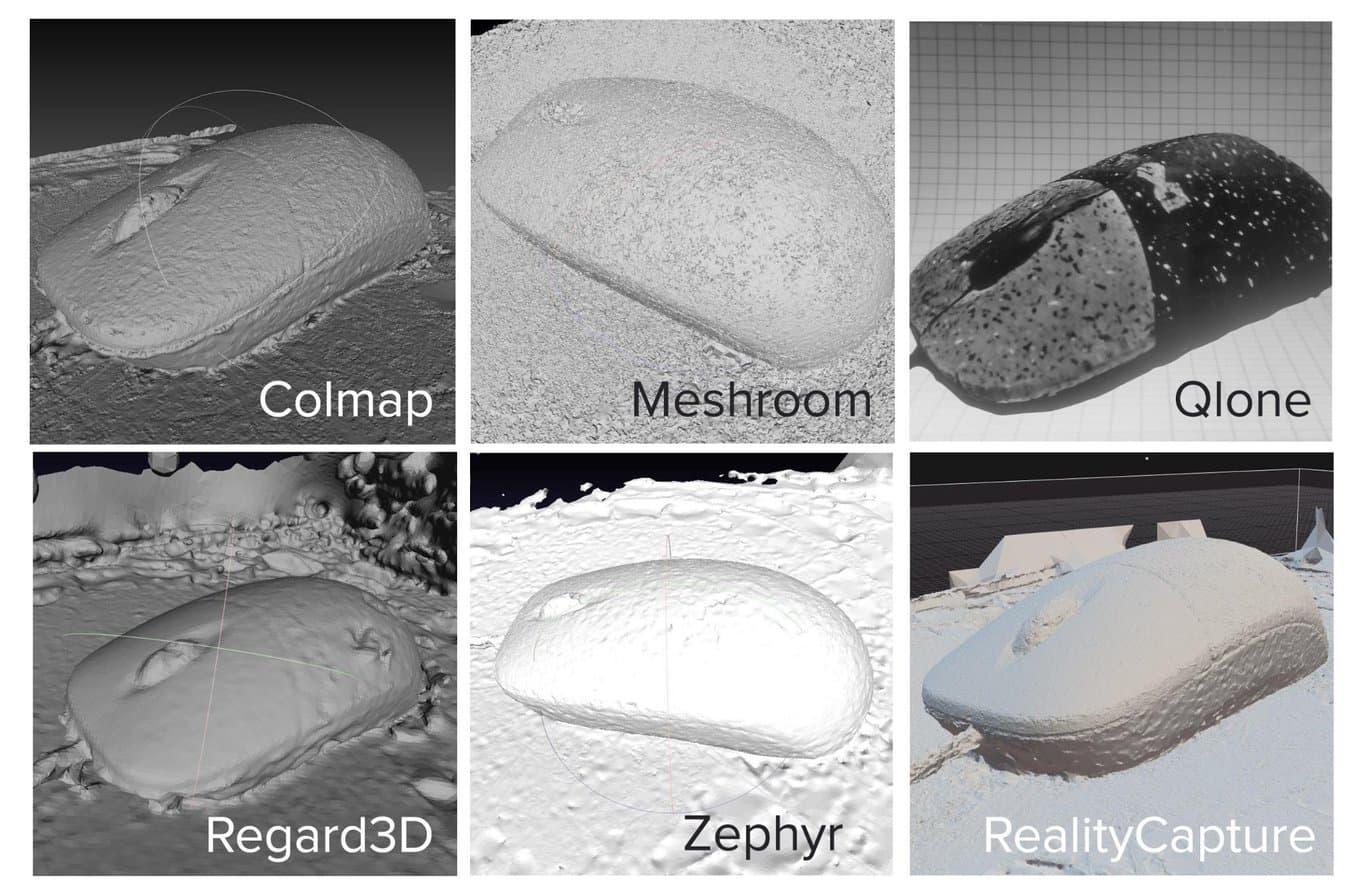
Resulting meshes from the chosen photogrammetry solutions Colmap, Meshroom, Qlone, Regard3D, 3DF Zephyr, and RealityCapture.
Unsurprisingly, the Qlone app scored relatively poorly. The scanning process takes approximately five minutes, with subsequent processing absorbing about 20 minutes and a quarter of the phone battery. When judging by the untextured results the shape is only accurate in its footprint outline. The topmost area became more pyramidal than smoothly curved. While the mouse wheel vanished entirely, the cord bit was there. The app will work best for small figurines that need to be converted into game assets. Qlone relies on the use of a scanning mat that contains a square grid. Like voxels, the grid squares are extruded to the appropriate height and in the end a smooth surface is ‘drawn’ over the voxel grid akin to a canopy. It is nice that Qlone lets the user watch the surface generation process while scanning, but it is not suitable for reverse engineering.
The photogrammetry-scanned computer mouse, polished up in MeshMixer and ready for CAD import.
Best results came from RealityCapture, bar none. Its results are the ultimate proof of quality differences in photogrammetry solutions, and of the fact that on a low budget, high-quality photogrammetric scans are possible. The overall shape came out just as good as in Meshroom or Zephyr, but all details were present and in nearly full detail. Edges were reproduced markedly sharp, still more so than with Colmap; even the part lines and low-lit areas came out sharp. There are no floating artefacts in the output mesh which makes post-processing a breeze. With a bit of cutting and polishing, such a mesh is ready for direct import into a CAD environment for resurfacing and reverse engineering. The catch vs. a free open-source software solution is that RealityCapture requires customers to pay a small per-model fee on export. Without question, the quality improvements are well worth the investment.
| Shape Fidelity | Details | Noise | Floating Area | Low-Lit Areas | Overall Performance | |
|---|---|---|---|---|---|---|
| 3DF Zephyr | ★★★★★ | ★★★☆☆ | ★★★☆☆ | ★★★☆☆ | ★★★★★ | ★★★★☆ |
| Meshroom | ★★★★★ | ★★★☆☆ | ★★☆☆☆ | ★★☆☆☆ | ★★★★☆ | ★★★☆☆ |
| Regard3D | ★★★☆☆ | ★★★☆☆ | ★☆☆☆☆ | ★★★☆☆ | ★★☆☆☆ | ★★☆☆☆ |
| COLMAP | ★★★★☆ | ★★★★☆ | ★★★☆☆ | ★★★★☆ | ★★★☆☆ | ★★★☆☆ |
| RealityCapture | ★★★★★ | ★★★★★ | ★★★★☆ | ★★★★☆ | ★★★★☆ | ★★★★★ |
| QLone | ★☆☆☆☆ | ☆☆☆☆☆ | ★★★★★ | ★★★★☆ | ★★★☆☆ | ★☆☆☆☆ |
Conclusion
Photogrammetry is a worthy alternative to 3D scanning that requires only a digital camera or smartphone and a software package. It radically lowers the barrier-to-entry for those wanting to create detailed digital 3D models and recreate them using a 3D printer.
It takes a bit of experience and most likely a few tries per project in order to create a workable photoset. The object to be digitized will likely also need some alterations like matting or texturing to make it scannable. This guide also evaluated a multitude of photogrammetry offerings currently on the market. We have seen substantial differences in quality, user-friendliness, operating speed, affordability, and smart features. Even though we have excluded aerial applications from the article, some programs such as iWitness and Qlone are clearly targeted towards specific user groups and areas of application while others such as 3DF Zephyr, Autodesk Recap, and RealityCapture offer a more generic set of tools useful across many areas of application.
When 3D printing digital models using a high resolution 3D printer, such as stereolithography printers from Formlabs, the detail level embedded into the scan will be the critical factor, since the printer will exactly reproduce all minute details. Processing speed and user friendliness are secondary factors that determine how well the software can be built into the pipeline. Some special features will enable key applications, for example conversion into CAD data for further customization, alignment with laser scanner data, 2/2.5D pattern digitization modes, object detection, and the ability to reproduce flat and cylindrical surfaces. The direct incorporation of mesh optimization features into the photogrammetry pipeline is of lower importance since these can conveniently be handled by a plenitude of freely available tools.
Photogrammetry can be a valuable low-budget tool for reverse engineering. There will be some deviations in the order of 0.1-0.5 mm and unwanted artefacts in the mesh. But with a bit of post-processing and trial-and-error, it will be viable for many reverse engineering projects for objects of low and medium geometric complexity. To obtain higher precision, laser 3D scanning or a hybrid approach with photogrammetry remains the best choice.
Not sure which 3D printing solution fits your business best? Book a 1:1 consultation to compare options, evaluate ROI, try out test prints, and more.