Anmerkung:
Trennen Sie Ihren Drucker nicht vom Netz, solange der Upload in Bearbeitung ist.


Nachdem Sie ein Modell ausgerichtet und Stützstrukturen generiert haben, verbinden Sie Ihren Drucker über USB, Ethernet oder WLAN mit dem Internet. Stellen Sie sicher, dass Ihr Drucker mit demselben Netzwerk wie Ihr Computer verbunden ist, und senden Sie dann einen Druckauftrag an den Drucker.
Beim Upload eines Druckauftrags auf den Drucker zeigen PreForm und der Touchscreen des Druckers an, dass der Upload der FORM-Datei in Bearbeitung ist. Sobald sie übertragen wurden, müssen Druckaufträge auf dem Touchscreen des Druckers bestätigt werden , um den Druck zu starten.
Upload eines Druckauftrags auf einen Formlabs-SLS-Drucker
So laden Sie einen Druckauftrag von PreForm auf einen Formlabs-SLS-Drucker hoch:
Wenn gerade ein Druckauftrag läuft und Sie eine lokale Verbindung zu Ihrem Drucker haben, können Sie möglicherweise neue Teile zu Ihrem laufenden Druckauftrag hinzufügen. Aktivieren Sie Add to Running Job (Zu laufendem Druckauftrag hinzufügen), richten Sie Ihren Druck ein und klicken Sie auf Add to Job (Zum Druckauftrag hinzufügen).
Anmerkung:
Trennen Sie Ihren Drucker nicht vom Netz, solange der Upload in Bearbeitung ist.
Hochladen eines Druckauftrags auf einen Formlabs-SLA-Drucker (Form 3 und höher)
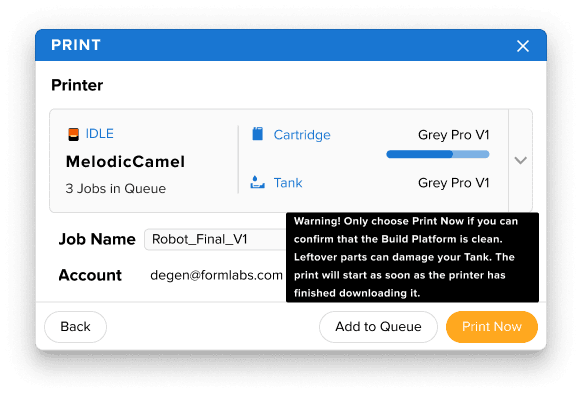
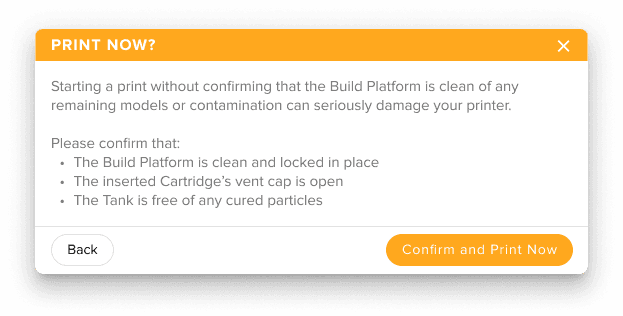
So laden Sie einen Druckauftrag von PreForm 3.29 oder höher auf einen Formlabs-SLA-Drucker (Form 3 und höher) hoch:
Anmerkung:
Trennen Sie Ihren Drucker nicht vom Netz, solange der Upload in Bearbeitung ist.
Upload eines Druckauftrags auf alle anderen Formlabs-Kunstharzdrucker
So laden Sie einen Druckauftrag hoch, wenn Sie Folgendes verwenden:
Anmerkung:
Trennen Sie Ihren Drucker nicht vom Netz, solange der Upload in Bearbeitung ist.
Drucken oder in Warteschlange hochladen ist in PreForm nicht verfügbar
Die Option Print Now (Jetzt drucken) ist nur verfügbar, wenn Sie einen Druckauftrag an einen einzelnen Drucker senden, dessen Status Ready to Print (Druckbereit) ist und dessen eingesetzte Harzkartusche und Harztank mit dem Harztyp für Ihren Druckauftrag übereinstimmen. Andernfalls zeigt PreForm Upload to Queue (In die Warteschlange hochladen) an. Wenn die Schaltfläche Print Now (Jetzt drucken) in PreForm nicht verfügbar ist:
Wenn die Schaltfläche Upload to Queue (In Warteschlange hochladen) nicht auswählbar ist, vergewissern Sie sich, dass Sie einen Drucker ausgewählt haben. Fügen Sie den Drucker bei Bedarf manuell zu PreForm hinzu.
Fehler Upload Failed (Upload fehlgeschlagen)
In einigen Fällen scheint PreForm eine Druckdatei erfolgreich an den Drucker zu senden, aber der Drucker zeigt die Fehlermeldung Upload Failed (Upload fehlgeschlagen) an. So beheben Sie diesen Fehler:
Setzen Sie Ihren Drucker auf die Werkseinstellungen zurück.
Starten Sie PreForm neu, erstellen Sie die FORM-Datei neu oder ändern Sie sie und senden Sie sie an den Drucker. Senden Sie nach Möglichkeit nicht dieselbe Datei erneut, die den Fehler verursacht hat.
Wenn der Fehler weiterhin besteht, deinstallieren Sie PreForm und installieren Sie es erneut. Versuchen Sie es dann erneut.