Giuseppe Guerini’s passion for the renowned Stuttgart automaker began twenty years ago when he bought his first Porsche. “I’ve had about sixty altogether, and I own three at the moment–1951, 1952, and 1958 models–as well as engines, spare parts, and documentation.”
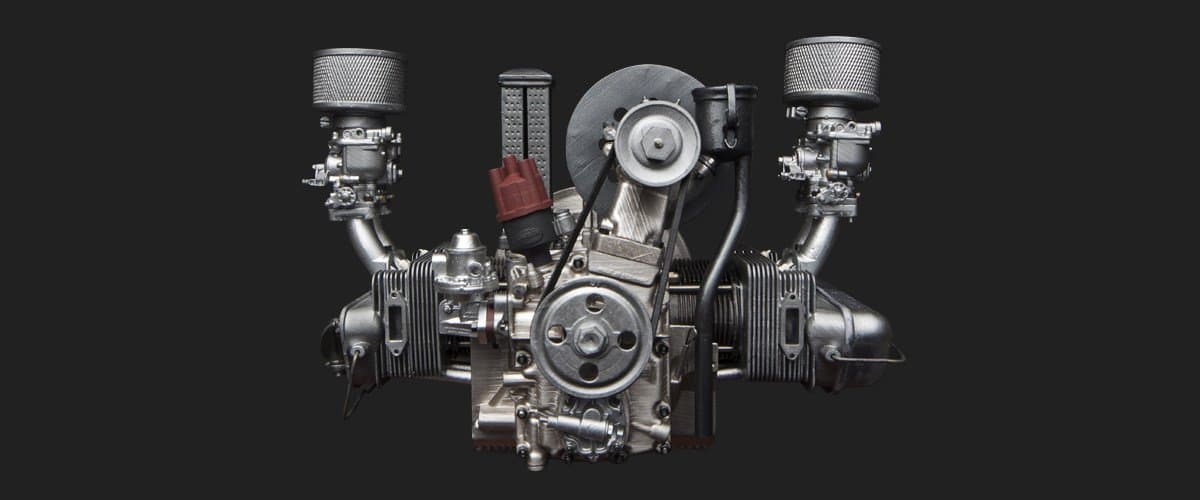
As an avid 3D printing user, Guerini decided to connect his two passions and create a 1:4 scale model of one of his favorites, the engine of a vintage 1952 Porsche 356, the first production automobile of the German company. This was far from an easy undertaking. It required disassembling the engine, scanning each component, and modeling and printing hundreds of parts.
Images of the model spread quickly in maker community, and requests started flowing in, prompting Guerini to start creating replicas to sell to collectors all over the world. What started out as a hobby might soon turn into a job.
Read on to learn about Guerini’s journey, and discover how to transform a real-life engine into a digital model, choose the right materials, and convert a 3D print into a work of art.
Turning a Vintage Car Engine into a Digital Model
It’s hard to imagine automotive design without digital tools, but the ‘52 Porsche 356 was built during an age when computers barely existed, let alone computer-aided design (CAD).
Guerini kicked off the project by disassembling the Porsche’s engine and scanning each component individually using a David Laser Scanner, which reproduced all details quickly and easily. Then he turned to the popular CAD tool Rhino to remodel each part, adjust their sizes, and define tolerances, practically reverse engineering the entire engine from 3D scans. Once the 3D models were ready to go, Guerini made small modifications to the meshes using Autodesk’s Meshmixer to optimize the models for the next step, 3D printing.
Choosing the Right 3D Printer and Materials
The intricacy and small size of the engine parts required a 3D printer that could reproduce fine details with precision and dimensional accuracy. After a first, unsuccessful attempt using a fused deposition modeling (FDM) printer, Guerini turned to desktop stereolithography (SLA).
“Having worked for more than 35 years in the laser industry, I knew all about SLA printers. The issue was the price, which was absolutely out of range for hobbyists. Then, a year ago, I first heard about a desktop SLA printer that was affordable both in terms of the machine and the resins. It was the Formlabs Form 2.”

Another added benefit of stereolithography was the wide range of materials. Just as the components of real engines are made from various materials, the scale model also required parts with different properties. “I used Clear Resin, and, to a lesser extent, Castable and Flexible Resin.”
Most of the engine components were made using Standard Clear Resin. The formulation of this material is ideal for reproducing very detailed parts and gives them a perfectly smooth and transparent finish. “Given the complexity of the pieces, I find it easier to work with pieces that are transparent when it comes to the finishing stage. It helps me, for example, with threading some of the holes.“
Formlabs’ Castable Resin was used to construct the engine’s support frame. This part consists of thin wires and needs to hold the entire weight of the engine as it connects it to the stand. To obtain a part with the right mechanical properties, Guerini settled on aluminum. The Castable 3D prints were used to produce the master model, which was then burned out by a specialist company and cast into aluminum.
Engine mounts and belts were printed using Flexible Resin, a rubber-like material designed for producing elastic parts.
From 250 Parts to Finished Assembly

Given their small size, many of the engine's components could be batched together for 3D printing. Manufacturing the 250 pieces–using three different resins, in five separate print jobs–took 45 hours altogether.
Once thoroughly washed and carefully separated from the support structures, all of the parts were post-cured. The most time-consuming part of the post-processing was reworking the tiny holes in some of the pieces. Many of these are threaded for M1.6, M2, M2.5 screws, while others are bored out, so the parts fit together perfectly.
Before painting, the surfaces of the parts were sanded to remove the attachment points of the support structures. Guerini then used specialized modeling metallic paints (AK Xtreme Metal and Vallejo Acrilics) to airbrush parts and achieve a color as close as possible to the original Porsche components.
Then, it was time for the last step: assembly. It took four hours to piece together the 250 delicate parts.
1952 Porsche 356 Engine Scale Model Specifications
| Engine Components | 250 |
| Estimated Print Time | 45 hours, 5 print jobs |
| Size Assembled | 205 x 100 x 130 mm |
| Model Weight | 300 g |
| Resin Used (including support structures) | 650 mL |
| Smallest Component | 2 x 1.3 x 0.5 mm, 1.85 mL |
| Largest Component | 60 x 70 x 40 mm, 60 mL |

“I can highly recommend the Form 2 to anyone who is passionate about modelmaking. With some patience, time, and a sound knowledge of the mechanics, you can create pieces of any complexity. Beware though, it’s a hungry beast craving for 3D models.”
We’d like to thank Formlabs’ Italian partner Creatr for supporting Giuseppe Guerini throughout the process and advising on materials. Contact Mr. Guerini directly (in Italian), or find more information on the scale model on this website.