
青銅器時代の武器から現代の消費者製品まで、職人たちはあらゆるものの製作に成形型を使用してきました。初期の成形型は石で作られていることが一般的でしたが、現代科学の発展により、シリコンのように加工がはるかに容易な材料が登場するようになりました。
ノートパソコンのゴム足から人間工学に基づくハサミのグリップまで、ほとんどの市販品に軟質部品が使われています。ポリウレタン、シリコン、ネオプレン、ラテックスなどのゴム状材料は、屋根材から医療器具に至るまで、さまざまな製品への活用が可能です。特にシリコンを鋳造することで、3Dプリント製部品の材料特性を最大限に活かし、ハードウェア店やアート・ジュエリー販売代理店、その他小売業などにおいて、容易に入手できる材料を使って曲げ伸ばしが可能な部品の製作が可能になります。
本記事は、シリコン成形の実用的なガイドとして、用途に応じたシリコンの選定や3Dプリントで成形型を製作する際の重要形状の設計方法に関するベストプラクティスなど、製造開始にあたって必要な基礎を解説します。
Formlabsへのお問合せ
試作品の高速製作も、実製品用部品の製造も、どのようなニーズにもお応えします。Formlabsは専門のスペシャリスト集団として、お客様や企業のニーズを的確にサポートします。
シリコンとは
シリコンは分子鎖にケイ素と酸素を含むポリマーの一種で、触媒との化学反応により液体(シリコン)から高い柔軟性・伸縮性をもつ固体(シリコンゴム)へと変化します。
鋳造や成形といったプロセスでは、室温加硫シリコンゴムはエンボス加工など表面の細かいディテールを表現できます。加えて、鋳造可能なシリコンのほとんどは化学的に粘着性が無いため、硬化後に3Dプリント製の型から簡単に剥がすことができます。機械的結合は、織布のような多孔質の表面に鋳造することで実現でき、場合によっては専用バインダーにより化学的結合を促進できます。
液状シリコン:液体タイプは、少量の触媒を加える二液型または一液型が一般的です。一般的に入手しやすい区分は2種類あります。プラチナ触媒シリコンは高価ですが、長期間の寸法安定性に優れ、完全に硬化した後の収縮が極めて小さいことが特長です。スズ触媒シリコンは低コストである一方、経時的な安定性に劣り収縮率が高い傾向があります。硬化時間は約10分~数時間です。
シリコンパテ:等量の2成分を手練りで混合する二液型パテです。主な用途としてはジュエリー業界向けの成形型が挙げられますが、シリコン自体は圧縮成形によるガスケットやシールの製作に適しています。デュロメータ硬度ショア40A(以下の尺度を参照)で消しゴムに近い硬さを持ち、二次硬化が20分以内と早く、収縮率も0%です。
皮膚・粘膜接触、食品安全性:人体や食品との接触に関しては、用途によってより厳格な基準が求められる場合があります。必ずメーカーの材料安全データシート(MSDS)を確認し、目的の用途に対する安全性を確認してください。
デュロメーター評価スケール:シリコンゴムを含むゴム状材料は、非常に柔らかいものから非常に硬いものまで配合が可能で、その硬さはショア硬度で表されます。柔らかい材料はショアA、硬い材料はショアDの尺度で評価します。

Meridian Laboratoryより引用
シリコン成形型を選ぶ理由
シリコンが有力な選択肢となっているのは、多くの利点を備えている材料だからです。シリコン成形であれば、カスタムデザインを簡単に形にすることができます。シリコンで作った成形型はかなり頑丈なので、繰り返し使っても壊れる心配はあまりありません。有機材料であるゴムなどと違って、シリコンは無機物で構成している材料であるため、高熱や極寒環境、化学物質への暴露、さらにはカビに対しても強いという特性を持っています。シリコン成形型には、以下のような特長があります。
自由度
シリコンは柔軟性があるため、加工がしやすい材料です。シリコン成形型は、プラスチックのような硬い材質に比べてしなやかで軽く、成形後の取り外しも容易です。シリコンは柔軟性が高いので、成形型も加工品も壊れにくく、欠けにくいのが特徴です。複雑な工学部品から、ホリデーシーズンをテーマにしたアイスキューブやお菓子まで、特注のシリコン成形型を製作すればあらゆるものを成形することができます。
安定性
シリコンは、-65℃から400℃°までの温度に耐えることができます。さらに、配合によっては700%の伸び率を実現することも可能です。シリコン成形型は、オーブンに入れても、冷凍しても、取り出す時に伸ばしても、高い安定性を発揮します。
耐久性
多くの場合、シリコン成形型は何度も使い回しが可能です。しかし、成形型の寿命はものによって大きく異なることもあるので注意が必要です。鋳造の頻度が高いほど、また、デザインが複雑で細かくなればなるほど、成形型の劣化が早くなる可能性があります。シリコン成形型を最大限活用できるようになるためには、中性洗剤と水で洗浄し、十分に乾燥させ、積み重ねずに平らにして保管してください。
制約事項
シリコンを使うことで得られるメリットはたくさんありますが、注意しなければならない制限もいくつかあります。
-
シリコンは、ラテックスや有機ゴムに比べてコストが高く、Amazonで比較すると、1ガロンのシリコンは最高で100ドルが通常価格で、ラテックスのほぼ2倍です。
-
シリコンは弾力性がありますが、伸ばしすぎると破れることもあります。
-
すべてのシリコンが同じように調合されているわけではありません。シリコンや製造用材料を買う時は、必ず信頼できるサプライヤーから購入してください。
シリコン成形型の一般的な用途
シリコン成形型は、その汎用性と使いやすさから、ホビイストからプロフェッショナルまで幅広く利用されています。ここでは、シリコン成形型を作って製品を生産している業界や用途の例をいくつかご紹介します。
プロトタイピング
シリコン成形は、幅広い産業分野でプロトタイピングや製品開発用試作品の製作に活用されています。射出成形などの従来の製造工程で使用されるハードツーリングに比べてコストが大幅に低いため、製品設計検討用の試作品や新製品に対する市場や消費者の反応をテストするためのベータユニットの製作に最適です。3Dプリンタは1点物のパーツを素早く作るのに向いていますが、シリコン成形型やウレタン鋳造は少量生産のパーツに適しています。
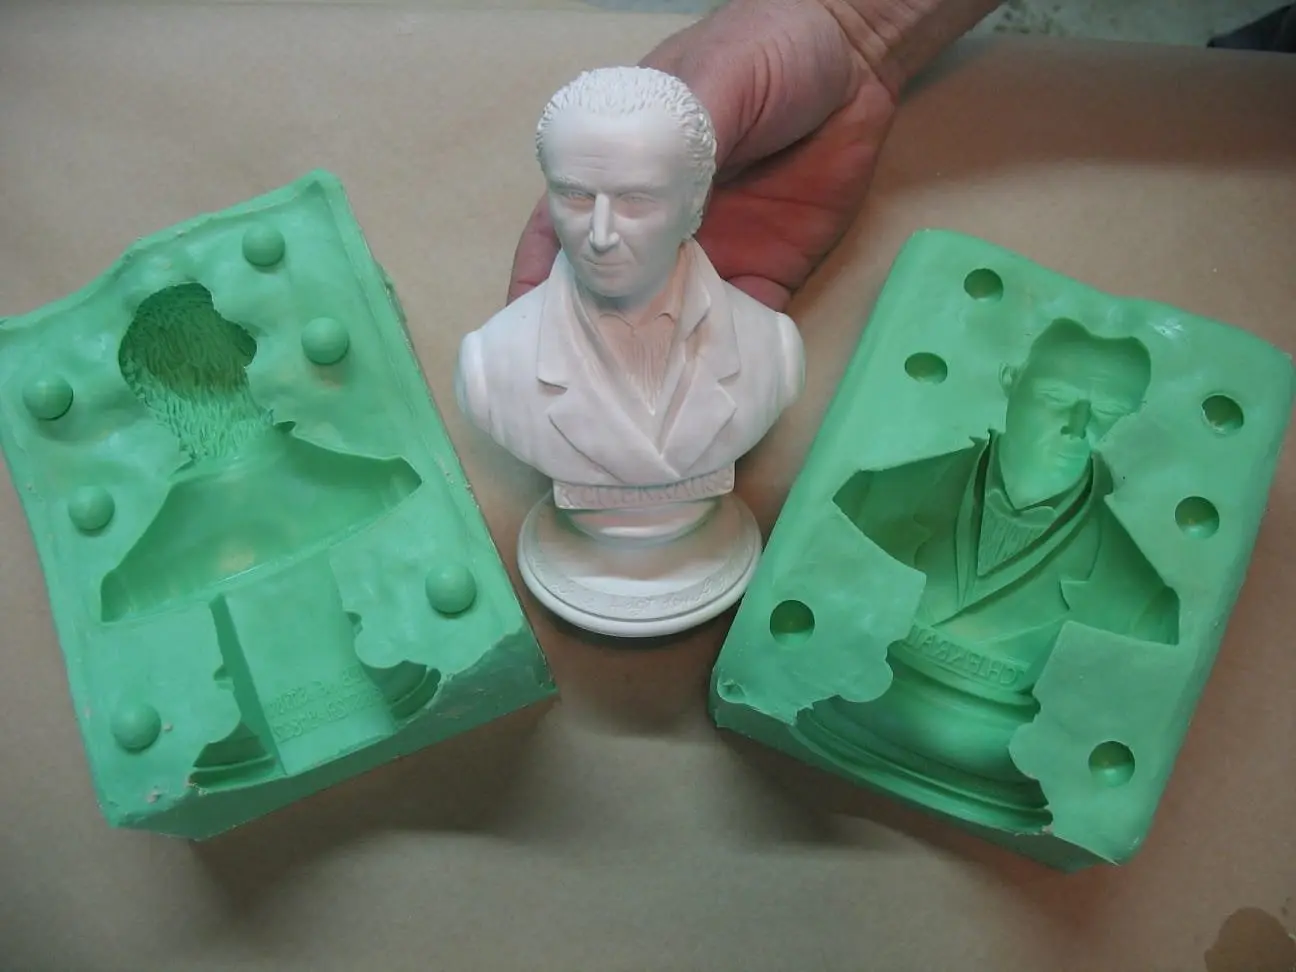
ジュエリー
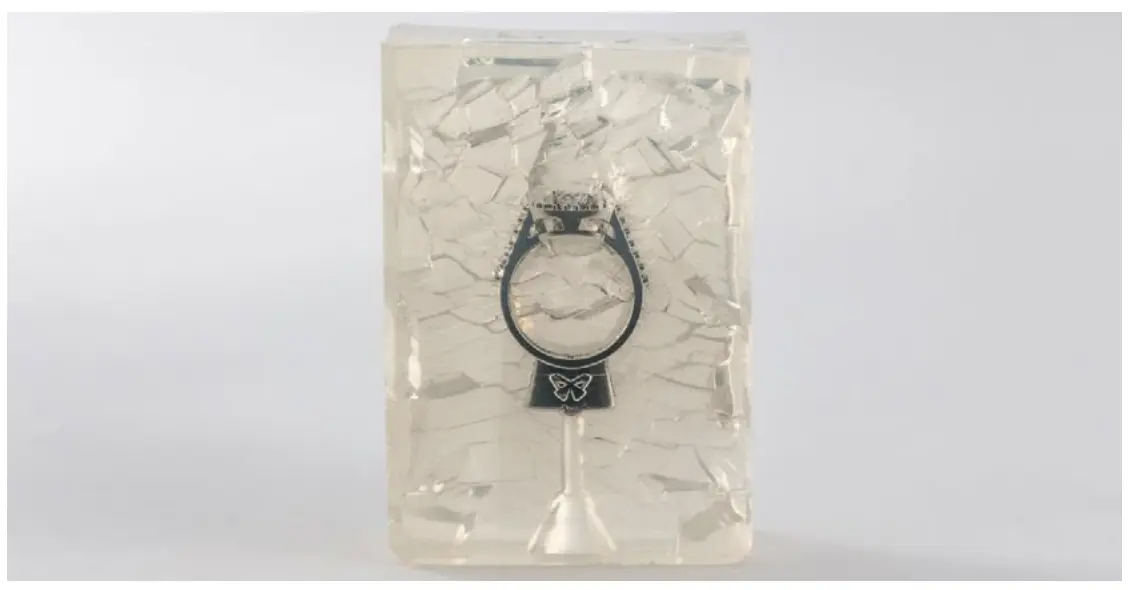
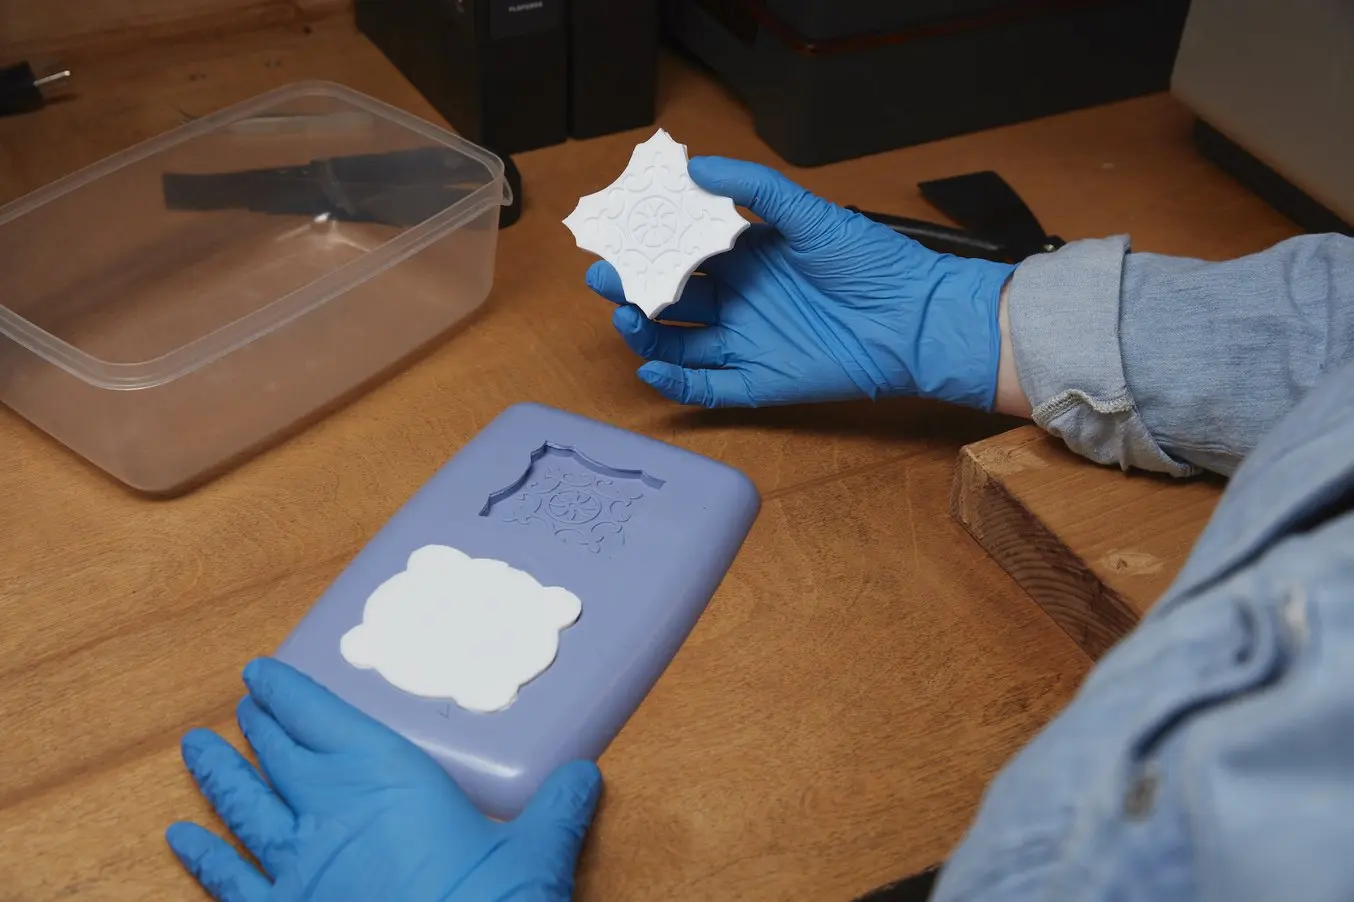
宝石商は、手彫りや3Dプリント製の原型をワックスで複製するために、特注シリコン成形型を使用します。これにより、新しい作品を作るたびにワックス彫りの原型を作成するという時間のかかる作業を段階的に減らすことができますし、ワックスからの鋳造も継続できます。これで連続生産の可能性が大きく開け、インベストメント鋳造を大規模に行うことも可能になります。シリコン成形型は細部まで再現できるため、華やかなディテールや複雑な形状の製品を作ることができます。
3Dプリント製原型の周りにRTV(室温加硫)シリコン成形型を形成。
3Dプリント製の成形型で加硫ゴムを成形
高機能材料を使った3Dプリントにより、デザイナーや鋳造職人たちが生産工程でデジタル技術を活用できるようになります。ここでは、3Dプリンタで小型な金属部品を製作する方法について説明します。
消費者製品
シリコン成形型は、石鹸やキャンドルなど、手作り感のあるオリジナリティあふれる数多くの商品の製造に活用されています。学用品メーカーでも、チョークや消しゴムなどの成形にシリコン型がよく使われています。玩具や収集品のメーカーでも、この技術を使って高品質・高精度なミニチュアやカスタムフィギュアを製作しています。
例えば、SiOCASTは3Dプリント製の原型を使ってシリコン型を作り、3Dプリントとシリコン成形、射出成形を組み合わせたユニークな工程で生産を行っています。SiOCASTの技術は、小規模なスタジオからMonster Fight Club(The Witcher、Cyberpunk RED)、Reaper Miniatures(Bones)、Warlord Games(Blood Red Skies、Bolt Action)など業界最大手のミニチュアメーカーまで、すでに幅広く採用されています。
食品や清涼飲料
食品用シリコン成形型は、チョコレート、アイスポップ、ロリポップなど、あらゆる種類のお菓子作りに活用されています。シリコンは400℃の熱に耐えられるので、それで作られた成形型は料理にも使えます。マフィンやカップケーキなどの小さな焼き菓子は、シリコン成形型で焼くときれいに膨らみます。
DIYプロジェクト
独立したアーティストやDIYを趣味にする方々は、よくシリコン成形技術を使ってユニークな作品を創作しています。バスボムから犬用おやつまで、シリコン成形型で成形・再現できるアイテムはほぼ無限大です。子供向けには、自分の手のライフキャストを作る楽しいシリコン成形プロジェクトなどがあります。その際、肌に触れても安全なシリコンを選ぶようにしてください。
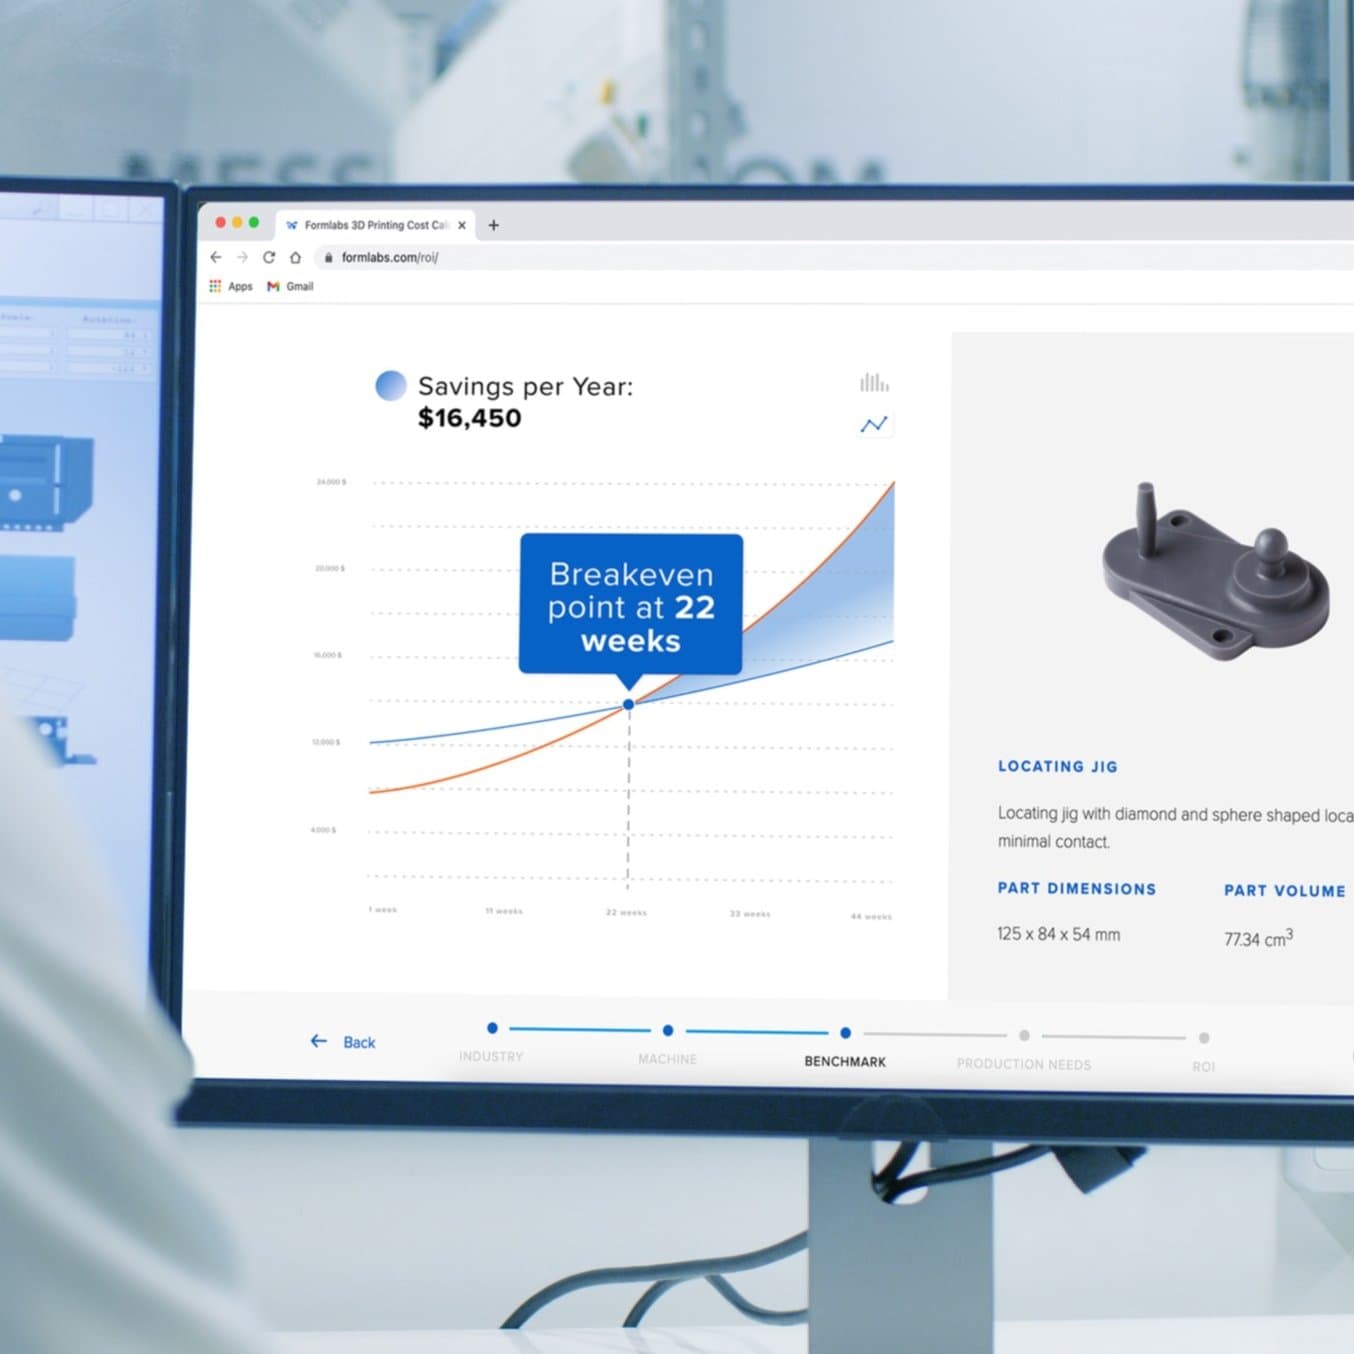
削減可能なコストと時間を算出
Formlabsの3Dプリンターでどれだけのコストと時間が削減できるのか、FormlabsのインタラクティブなROI計算ツールで是非ご確認ください。
シリコン成形用の原型の作り方
原型とは、シリコン成形型の凹面を精密に作るための型です。既存のオブジェクトを単に複製するのであれば、そのオブジェクトを原型として使用することが理にかなっているかもしれません。その際、成形型製作の工程に耐えられるものであることを確認するようにしてください。
新しいデザインやプロトタイプを作るには、まず原型を製作する必要がありますが、これにはいくつかのオプションがあります。シリコン成形用原型の作り方を、以下でいくつかご紹介します。
-
彫刻:粘土を使って原型を作ることができます。この方法は、彫刻の才能がある人だけでなく、比較的簡単なデザインを作りたいと思っている人でも容易に活用できます。原型を彫る作業は、子供たちにとっても楽しいプロジェクトになりますし、DIYをする人にとってはコストパフォーマンスの高い製作方法の一つです。
-
カービング:木から原型を作ることができます。木彫りの原型は、タイルやフラットなデザインを作るのに適しています。
-
3Dプリント:プロフェッショナルや商業デザイナーの多くは、3Dプリント製の原型を選びます。デスクトップ型3Dプリンタは、CADソフトにおけるデザインの自由度や、高い精度、試作品の修正のしやすさ、そして納期の短縮等、多くのメリットが得られます。
原型ができたら、シリコン成形型の製作に取りかかれるようになります。
シリコン型作りの基礎知識
シリコン成形型を作るために必要となる基本的な備品は、以下のとおりです。
-
原型
-
液状シリコン(Smooth-On OOMOO 30など)
-
成形型ハウジングのための箱または無孔性の容器
-
Smooth-Onのような汎用離型剤
-
ワックス、レジンまたはその他のエンドユース用材料
ワンピース型 vs 二つ割シリコン成形型
成形型の製作を始める前に、どのような型を作るかを決めておく必要があります。
ワンピースのシリコン型は、角氷の製氷皿のようなものです。型の中に液状の材料を充填し、固まるのを待ちます。しかし、角氷の製氷皿には面が平らなキューブ状の氷しかできないのと同じように、ワンピースの成形型は面が平らなデザインにしか対応できません。また、お使いの原型に深いアンダーカットがあると、シリコンが固まった後、原型や完成品を傷つけずに型から外すのが難しくなります。
そうしたことが気にならないのであれば、ワンピース型シリコン成形型は、原型の他のすべての面をシームレスに3Dで再現する理想的な方法だと言えます。
ワンピース型シリコン成形型は、側面が平らで、深いアンダーカットがないデザインに最適です。
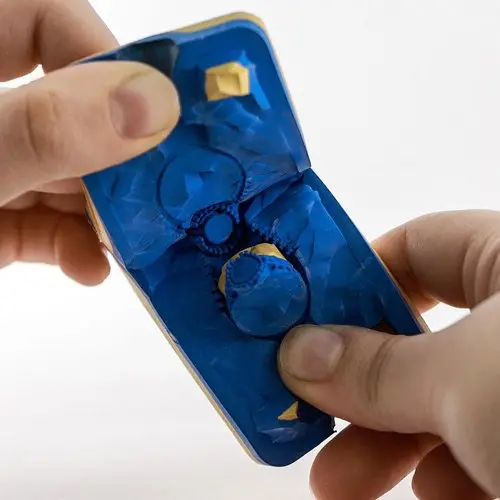
平らな面がない、あるいはアンダーカットが深い3D原型を再現するには、二つ割シリコン成形型が適しています。二つ割では、成形型が2つに分割され、再び結合して充填可能な3Dキャビティを形成します(射出成形の仕組みに似ています)。
二つ割シリコン成形型は、平らな面が残らず、一つ割型より作業しやすいところがあります。一方、製作するのが少々ややこしく、2つのパーツが完全に同一平面上にない場合、縫い目ができてしまう可能性があります。
二つ割シリコン成形型は、どんな原型デザインでも再現できます(画像出典)。
シリコン成形型を選ぶ理由
まず、一体型(一つ割)か二分割型(二つ割)のどちらを使うかを決める必要があります。これらの成形型を作る工程は似ていますが、二つ割の成形型を作るには少し時間が長めにかかります。以下のステップバイステップの手順を踏めば、オリジナルのシリコン成形型を作ることができます。
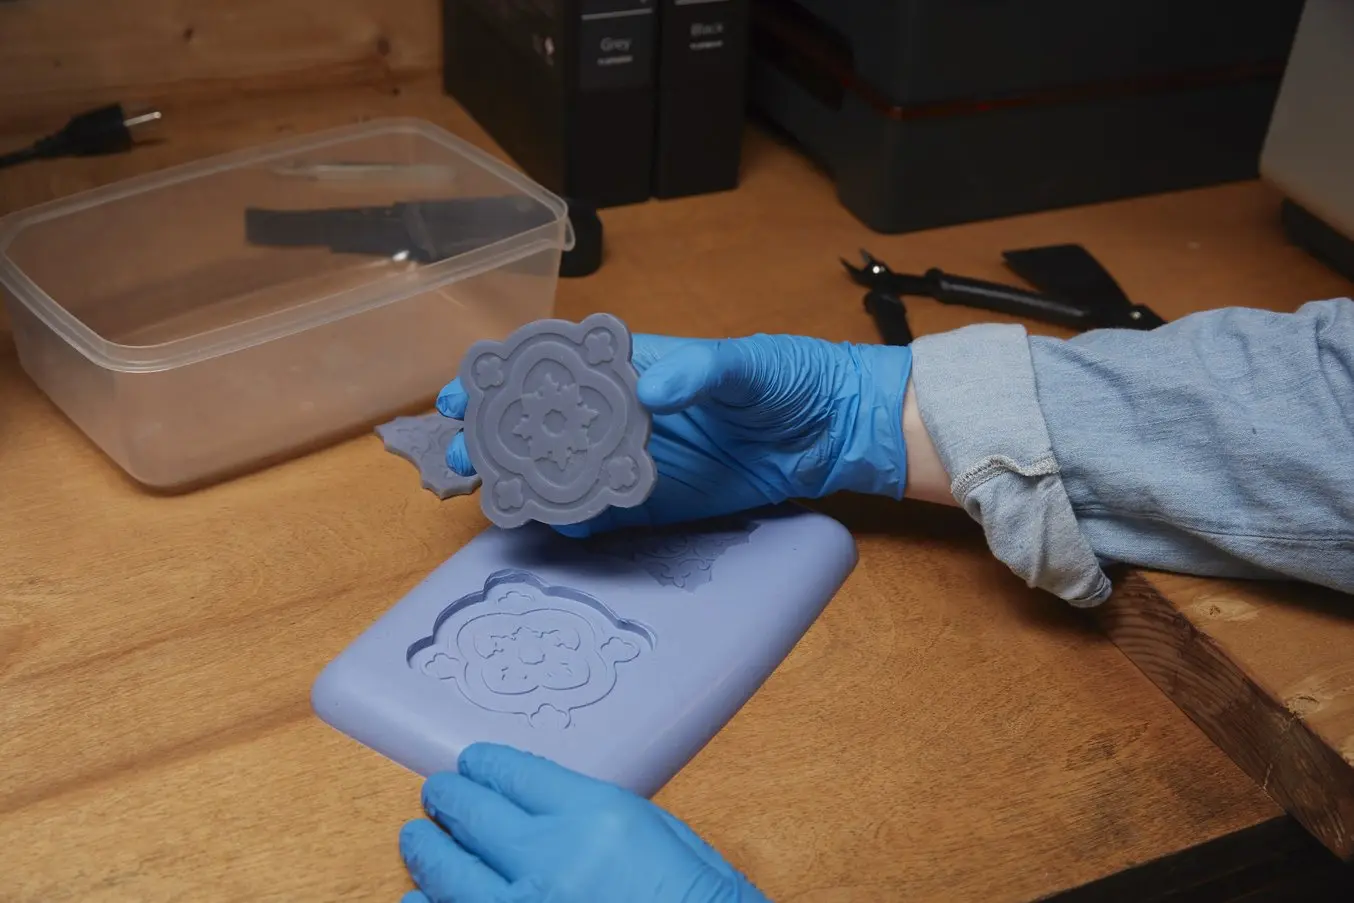
ワンピース型シリコン成形型
-
オリジナルの製品原型を製作します。製品原型とは、デザインが最終的に固まった確定版のことで、他の材料でそのデザインを形にしていきます。SLA光造形方式3Dプリンタ で3Dプリントする場合は、レイヤー高さ50ミクロンの汎用レジン を使用してください。細かなディテールがある面は、サポート材の痕が残らないようにしてください。造形品をIPAで念入りに洗浄します。表面に粘り気が残っていると、シリコン成形に影響が出る恐れがあります。
-
成形型のハウジングを製作します。シリコン成形型のハウジングを造る材料としては、コーティングされたMDFが一般的ですが、既製のシンプルなプラスチック容器でも十分です。無孔質で底が平らなものを探してください。
-
原型を広げて置き、離型剤を塗布します。まず、成形型のハウジングの内側に軽く離型剤を吹き付けます。原型をハウジングの中に敷き詰めます。並べる際、ディテールの凝った面を上にして置きます。ここでも離型剤を軽くスプレーします完全に乾くまで10分程度かかります。
-
シリコンを準備します。シリコンゴムをパッケージに記載されている方法で混ぜます。ハンディタイプの電動サンダーなどの振動装置を使えば、気泡を取り除くことができます。
-
成形型のハウジング内にシリコンを流し込みます。混合したシリコンゴムをハウジングにゆっくりと細めに流し込みます。まず、箱の一番低い部分(底面)を目指し、徐々に3Dプリント製の原型の輪郭に近づけていきます。1cm以上のシリコンで覆うようにします。硬化プロセスの長さは、お使いになるシリコンの種類やブランドによって異なりますが、だいだい1時間から1日程度で十分硬化します。
-
シリコンを離型します。硬化が完了したら、シリコンをハウジングから剥がし、原型を取り出します。これが最終製品を鋳造する時に使用する製氷皿スタイルの成形型になります。
-
鋳造作業を開始します。ここでも、シリコン成形型に軽く離型剤を吹き付け、10分ほど乾燥させると良いでしょう。キャビティに実製品用の材料(ワックスやコンクリートなど)を流し込み、硬化させます。
-
次の鋳造用の成形型を準備します。このシリコン成形型は複数回使用できます。ここまでのプロセスを繰り返したい時は、ステップ7まで戻り、そこから処理を再開します。
Best Practices
レジン選択:Formlabsでは、成形型への材料注入時の視認性の高さから、Clearレジンをお勧めしています。滑らかな表面品質を保ちながら高速造形を実現するには、積層ピッチを50μmに設定することをおすすめします。ビルドプラットフォーム上で造形品の向きを調整し、重要な内側の表面にサポート痕が残らないようにします。
位置決め機構:成形型の四隅にある4つの円筒形の凸凹は、成形型の両側を正しく配置するための位置決め機構として使用されます。Formlabsのパートナーは、位置決め機構に0.1mmのクリアランスを追加することを推奨しています。
このガスケットのような回転対称の物体では、位置決め機構はいずれも同一形状・配置にすることが可能です。つまり、成形型の上部を90度や180度回転させても、ガスケットの形状に影響はありません。不規則な形状の場合、「鍵と鍵穴」の方法を取ることができます。この場合、位置決め機構の形状と配置は一意の方法でのみ噛み合わせることが可能になります。
開放ポイント:成形型の端に斜めの溝を追加しておくことで、成形型を開放しやすくなります。成形型を開く際は、この溝にFormlabs Finish Kitに付属しているヘラやマイナスドライバーを入れ、型をこじ開けます。
成形型の設計:最初に考えるべきフィーチャーの一つに、成形型の分割線があります。分割線は、二つ割の圧縮成形型のそれぞれがどう組み合わされ、どう離れるかを定義するものです。
二つ割シリコン成形型
二つ割の成形型を作るには、まず上記の最初の2つのステップ、つまり原型の作成と成形型の筐体の製作から始めます。その後、下記のプロセスを通じて二つ割の成形型を作成していきます。
-
粘土の中に原型を敷き詰めます。この粘土を使って、最終的に成形型の半分になるものを作っていきます。粘土を成形型の筐体の中に入れ、原型の半分が粘土からはみ出るようにします。
-
シリコンを準備して注入します。シリコンのパッケージに記載されている方法に従って、シリコンを準備し、成形型のハウジングにゆっくり注ぎ、粘土と原型の上をシリコンで覆います。このシリコンの層が、二分割のうちの1ピース、つまり成形型の半分を構成します。
-
成形型の筐体からすべて取り出します。最初のピースが一旦硬化したら、成形型のハウジングからそのピース、原型や残りの粘土を取り出す必要があります。抽出時に層が分離しても大丈夫です。
-
粘土をきれいに取り除きます。粘土をすべて取り除くと、最初のシリコン成形型と原型が現れます。原型と既存の成形型が完全にきれいになっていることを確認してください。
-
成形型と原型を成形型のハウジングに戻します。既存のシリコン成形型と原型(成形型にセットされている)の両方を、成形型のハウジングに上向きに挿入し直してください。
-
剥離剤を塗布します。原型と既存のシリコン成形型の上部に離型剤を薄く塗ると、脱型が容易になります。
-
成形型の2つ目のピースに使うシリコンを準備し、流し込みます。先ほどと同じ要領で、準備したシリコンを成形型のハウジングに流し込んで、成形型の2つ目のピースを作ります。
-
成形型の2つ目のピースが硬化するのを待ちます。時間をかけて成形型の2つ目のピースが硬化するのを待ちます。硬化するまでは、成形型のハウジングから取り外そうとしないでください。
-
パーツを離型します。成形型のハウジングからシリコン成形型の両ピースを取り出し、ゆっくりと引き離します。

OXOは、二つ割の成形型を使用して写真のカクテルシェーカーのガスケットを試作した。OXOの圧縮成形プロセスの詳細はこちら。
Best Practices
レジンの選定:Greyレジンのようなスタンダードレジンは、表面のディテールを高度に捉えます。シリコンは積層痕など表面の細かなディテールをそのまま映し出すため、積層ピッチ50ミクロンでの造形は滑らかな表面と造形速度のバランスを取るには良い選択肢ですが、外観や審美性が重要視される用途では積層ピッチ25ミクロンでの造形が適しているかもしれません。
離型剤:シリコン成形型の製作、実製品用部品の鋳造など、成形プロセスの両方の段階で重要な要素です。Smooth-Onブランドの多目的離型剤は、ほとんどの用途に使用できます。
抜き勾配:シリコン成形のプロセスはかなり寛容なため、90度の直角や軽微なアンダーカットにも対応できます。成形型を何度も使用する予定がある場合は、成形品を取り出す際に成形型を曲げたり伸ばしたりする量をできるだけ少なくするか、引裂強さの高いシリコンゴムを使用してください。
シリコンオーバーモールド

Dame Productsはシリコンオーバーモールドによる量産で顧客向けベータ品の内部装置を封入している。
オーバーモールドは、2つ以上のコンポーネントを互いに重ねるようにして成形するプロセスの一つです。オーバーモールドは、2ステップのプロセスを踏むことからツーショットモールディングとも呼ばれます。まず、ベースとなる部品を製作し、その上に別の材料を材料を被せて成形していきます。オーバーモールドは、ゴム製のハンドルがついたプラスチック製品などの製造によく使われます。例えば、歯ブラシを2ショットのオーバーモールドで作る場合、持ち手となるプラスチック製の部分をまず基板として成形し、(歯ブラシを握るときに滑らないように)その上からゴム材を重ねて整形します。
シリコンのオーバーモールドの詳細については、以下から完全ガイドをご確認ください。
シリコン成形技術で広がる可能性
製品作りにおいて、唯一正しい方法、というものは存在せず、最良の結果を得るために様々な生産方式を組み合わせることが一般的です。それぞれ独自の長所と短所をすべて理解しておくと、プロジェクトにとって最適な決断が下しやすくなります。
Formlabs SLA光造形プリンタの導入を検討されている場合、または製品の詳細情報をお求めの場合は、お気軽にFormlabsまでお問い合わせください。