
Caution:
Due to its size and weight, do not move or reposition the Fuse Blast alone.

This guide illustrates the Fuse Blast components, the initial setup, and how to media blast printed parts. Review the unboxing and setup support article for more detailed instructions on how to unbox, install, and connect your Fuse Blast.
Read and understand the instruction manual and its safety instructions before using the Fuse Blast.
Product components
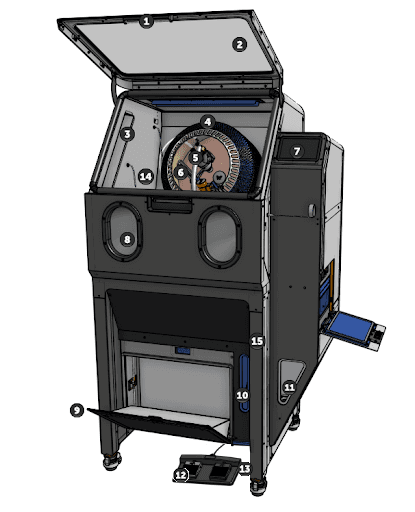
Fuse Blast front
① Door latch: Secures the blasting chamber.
② Blasting chamber door: A tempered glass window prevents powder and debris from leaving the Fuse Blast’s workspace and provides access to the tumbler basket and blast gun.
③ Blast lights: Provides light to the Fuse Blast’s workspace.
④ Tumbler basket: Rotates to agitate parts and ensure even coverage during automated media blasting.
⑤ Blast gun: Blasts printed parts with media and then cleans them with forced ionized air.
⑥ Blast arm: Holds blast gun in position for assisted manual blasting or an automatic blasting cycle.
⑦ Touchscreen: The LCD capacitive touch user interface displays cleaning cycle information, settings, and error messages.
⑧ Blast gloves: Allows users to manipulate and clean items while the Fuse Blast chamber doors are secured.
⑨ HEPA filter door: Sealed and interlocked door for accessing the HEPA air filter.
⑩ Media hopper window: Allows for visual check of blasting media level in the hopper.
⑪ Waste hopper window: Allows for visual check of waste level in the hopper.
⑫ Foot pedals: Manual controls for the air rinse and media blasting.
⑬ Media hopper valve: A knife valve used to close and open the media hopper.
⑭ Work surface: A grate in the interior of the blasting chamber allows media and powder to drain into the chamber chute. Place parts here during manual blasting.
⑮ Grounding strap plug: A plug for attaching the included anti-static wrist strap to protect users and electronics from static electricity build up. Recommended for manual mode.
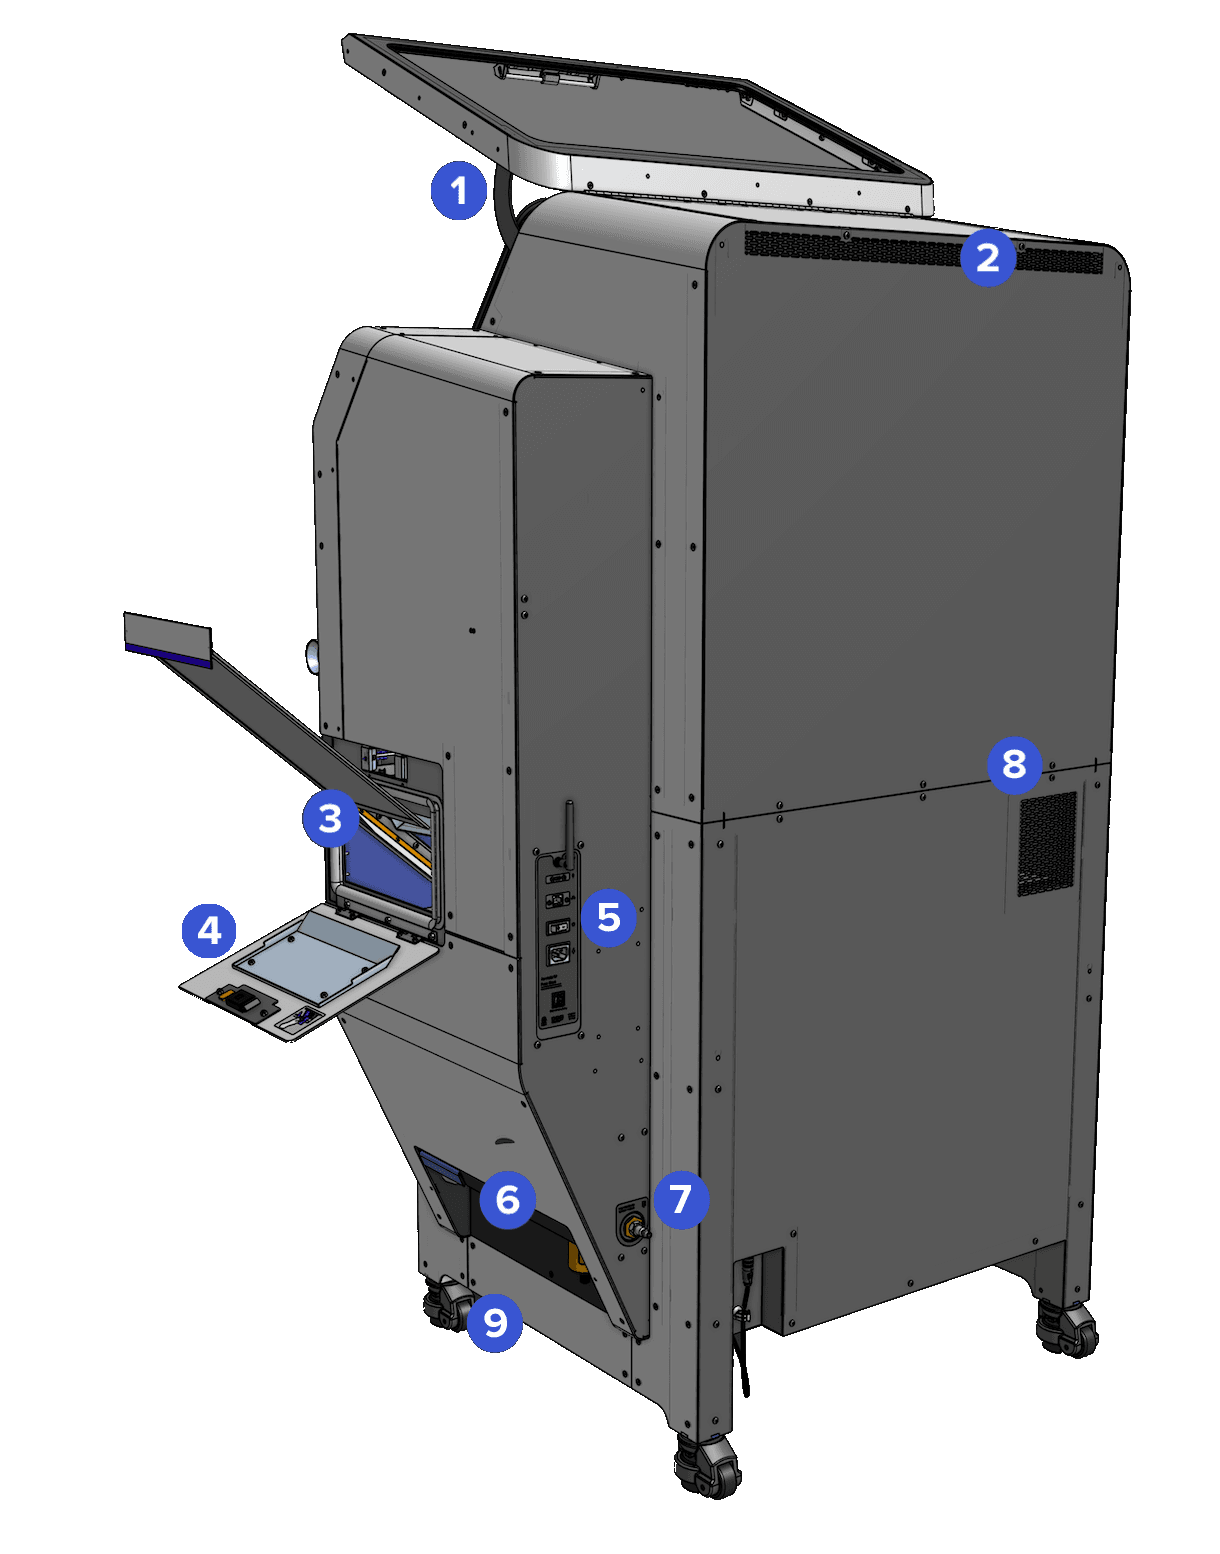
Fuse Blast side and rear
① Door spring: Holds the blasting chamber door open.
② Air inlet: Provides ventilation to the workspace.
③ Media filter mesh: Separates powder and degraded blasting media and recycles good media into the media hopper.
④ Waste hopper door: Sealed and interlocked door for accessing the waste hopper.
⑤ I/O panel: Panel for power supply, Wi-Fi antenna, and Ethernet connection.
⑥ Waste hopper valve: A knife valve used to close off and open the waste hopper.
⑦ Compressed air inlet: A 1/4" quick disconnect hose coupling for the air compressor.
⑧ Air exhaust: Blows circulated air out of the Fuse Blast.
⑨ Caster wheels: Allows users to move the Fuse Blast and lock it into position.
Unboxing
Caution:
Due to its size and weight, do not move or reposition the Fuse Blast alone.
Step 1: Position the packaging near the designated area and stand the Fuse Blast upright.
Step 2: Cut and remove the outer strapping.
Step 3: Remove the clips securing the exterior cardboard shell.
Step 4: Remove the lid and the two C-shaped shells from the left and right sides.
Step 5: Remove the protective foam inserts.
Step 6: Locate and remove the ramp from the package.
Step 7: Attach the ramp to the pallet.
Step 8: Remove the bottom protective foam core support and the accessory box.
Step 9: Rotate the wheel nuts clockwise to raise the rubber feet.
Step 10: With another person assisting, carefully roll the machine off the pallet and into its workspace.
Step 11: Lock the casters on the leveling feet.
Step 12: Remove additional wrapping and packaging.
Installing
Step 1: Open the blasting chamber door and remove the tumbler basket from the packaging. Slide the tumbler basket onto the tumbler basket shaft.
Step 2: Place the foot pedals underneath the Fuse Blast and attach the cable. The right foot pedal controls the blasting media stream, while the left foot pedal controls the ionized air stream.
Step 3: Reposition the blast gun and arm so that the nozzle points toward the tumbler basket.
Step 4: Remove the grounding strap from the accessories box and attach it to the grounding strap plug.
Step 5: Attach your air compressor to the Fuse Blast using the 1/4" quick disconnect hose coupling at the rear of the unit.
Step 6: Connect the machine to power.
Step 7: Screw the Wi-Fi antenna onto the jack on the I/O panel to the rear of the machine.
Step 8: Check whether the media hopper valve is closed. If it is open, gently push the knife valve in to close it.
Step 9: Check whether the waste hopper valve is closed. If it is open, gently push the knife valve in to close it.
Step 10: Flip the breaker switch on the back of the Fuse Blast to the ON position to turn on the machine.
Step 11: Follow the instructions in the Fuse Blast on-screen onboarding guide.
Note:
Early versions of the Fuse Blast may have a media metering valve that needs to be calibrated. If your unit has this valve, see the support article Tuning the Fuse Blast media metering valve for instructions.
Next steps