
Michael Trøst and his team have been involved in product development and consultancy for more than 15 years. When their colleague Martin, an avid diver, saw a gap in the market between the all-round action cameras and the high-end diving cameras, they decided it was an opportunity.
Months of research, development, and several iterations followed. Using a Form 2 stereolithography (SLA) 3D printer, they created astonishing prototypes that look, feel, and work like the final product–and what’s more, survived depths of 150 m and saltwater testing.
Using these prototypes to create their marketing materials, they turned to crowdfunding to recruit a devoted group of beta testers, and raised $468,470 from 1,153 backers. But one challenge remained: arranging for the manufacture of the camera in Asia.
Now on the verge of shipping their test units, we sat down with Michael to learn about the Paralenz dive camera's road from prototype to production.
A peek into the design and development process at Paralenz, featuring fully 3D printed prototypes of the dive camera and its accessories created using a Form 2.
How does one end up developing a diving camera for 200+ meters below sea level?
We founded our company in 2000, doing commercials, special effects for movies and stop-motion movies. Gradually, we added 3D scanning, CNC, and 3D printing - I think we got our first 3D printer 15 years ago. Since then we’ve progressed more and more into engineering, and right now we have mainly design engineers and engineers doing product development.
My colleague Martin wanted to develop a diving camera, claiming that there was a gap in the market. GoPro and other all-round action cameras are not really made for diving, and price-wise there's a leap to high-end cameras where you have an aluminum housing, flashlights - altogether a much larger and more expensive setup. He was looking for an easier, cheaper way to capture his own dives.
How did you get such realistic prototypes?
Once the parts come out of the printer they are cleaned, sanded and painted - it’s all a matter of practice. The lens is cast, we 3D printed a master first, then made a silicone mold to cast the part in. The logos are printed on an inkjet printer that can fit taller parts. The Form 2 saves us man hours, because it's closer to being finished straight out of the machine. FDM models take about 3 times as long to get a high-end finish, and with a lot of parts you cannot even get the same finish on those models, regardless of the amount of work.

Learn the ins and outs of post-processing with our tutorials on priming, painting, and assembling SLA 3D printed parts.
How did having these high fidelity prototypes help you when you were moving into manufacturing?
When we went to the initial meetings with all the different companies in China who were supposed to manufacture it, we made prints of the parts they were supposed to produce so that we could show them, “This is the product. This is what you're supposed to do.” If they had to make something that had to fit into something else, we also made prints for them to show, “Your part needs to fit into this part.” Instead of just 3D models, they’d get the actual physical part.
Sometimes really unexpected errors arise in China due to communication, especially when we’re talking about in-depth technical details. And these errors are costly. Even the smallest thing can set back development by a week - critical ones most likely by weeks. With this camera we have 17 different suppliers who all make custom parts, so it is vital to that we’re all on the same page. Having the actual parts makes it much easier for people understand the product in the first place.

Actually we had one meeting where it took some time before they understood what we wanted, because they thought the camera we gave them was the final product. They were saying, “You want us to make this, but you already have it. Why do you need…” and then we would explain that “It's not real. It's a prototype.”
We’re now thinking of buying another Form 2 and setting it up in China so that we can save time on the next products we're planning to develop. We have a colleague living in China to whom we can just send the files, and have the parts printed within a few hours both in our home office and on spot, so he can take the them directly to the manufacturers. Currently, shipping parts from our office to China takes 2-5 days depending on how much you pay for freight, so that's going to speed up the process even more.
How did 3D printing support you in the development process?
We use 3D printing for everything we do. We prototype a lot, and we do it really early. First, we started by talking to a lot of divers and charting all the gathered information. This showed us which features were most important to them, so we could narrow down the list to the must haves for our product.
First we did 3-4 different basic designs, before settling on one. Then we did a lot of size testing as well, we printed models with 4 different sizes to evaluate the volume and weight, how they handled, and we asked divers to select the one they liked best. We made lots of different versions of the button, and tested them wearing gloves, before we settled on the one that worked best. Altogether, we went through seven or eight different designs, which we all printed.
At this point, we drew up all the parts. With such a compact product your design freedom is limited, so we spent a lot of time figuring out how to optimise the design, while making sure that it accommodates all the required features. As we developed the internals, many things changed. The battery is a bit smaller than the one we started out with, because we changed the sensor, the lens, and some other parts. There's a lot of back and forth involved. All of the changes we made in the camera, we made 3D prints of - altogether iterating about 20-25 housings on the Form 2 in a matter of a few months.

Eventually we did the final prototypes, the ones we painted, tested and used in the campaign video as well. For the campaign on Kickstarter, if we didn't have this, if we had no physical products that looked like the real camera, then it would have been almost impossible to raise the money.
Besides allowing for rapid iterations in the development process, working with the Form 2 has saved us quite a lot of money. We used to have a large budget for SLA models - for this project alone, we’d have spent $15,000 on SLA parts. Buying a Form 2 and all the materials was less than third of that, so it has already paid back the initial investment multiple times.
How has having the the Form 2 influenced your productivity?
Before we had the Form 2, we’d start three machines just to make sure that one of them worked. You would come in the day after you needed the part, but it was not finished because the machine failed in some way. The Form 2 is the first 3D printer we dare rely on. So far we have had maybe one failed job out of more than 200. We print every day, often more than once, and it runs continuously on many different projects, from 3D scan files to large parts as well as smaller precise parts. It just runs. I'd say the best thing for us is that we can count on it to finish - this is the first time we've had a 3D printer like that. Our other machines also require a lot of maintenance, you have to do cleaning and take them apart every so often. The Form 2 is easy to use - close to the perfect 3D printer, I'd say.
Then there’s also less misfit of parts, which happened a lot with other printers. If you make something that's round in CAD, it’ll come out round when printed. If we split into different pockets, it fits and even the threads fit. We design for manufacturability, so it's crucial that our prototyping tool can emulate the manufacturing process we will finally use, without us having to modify the parts for 3D printing. Our parts are drawn with the right angles for the specific manufacturing process in mind, whether they’re meant to be extruded from aluminum, milled or injection molded. Having tested all parts for form and fit gave us confidence moving into manufacturing.
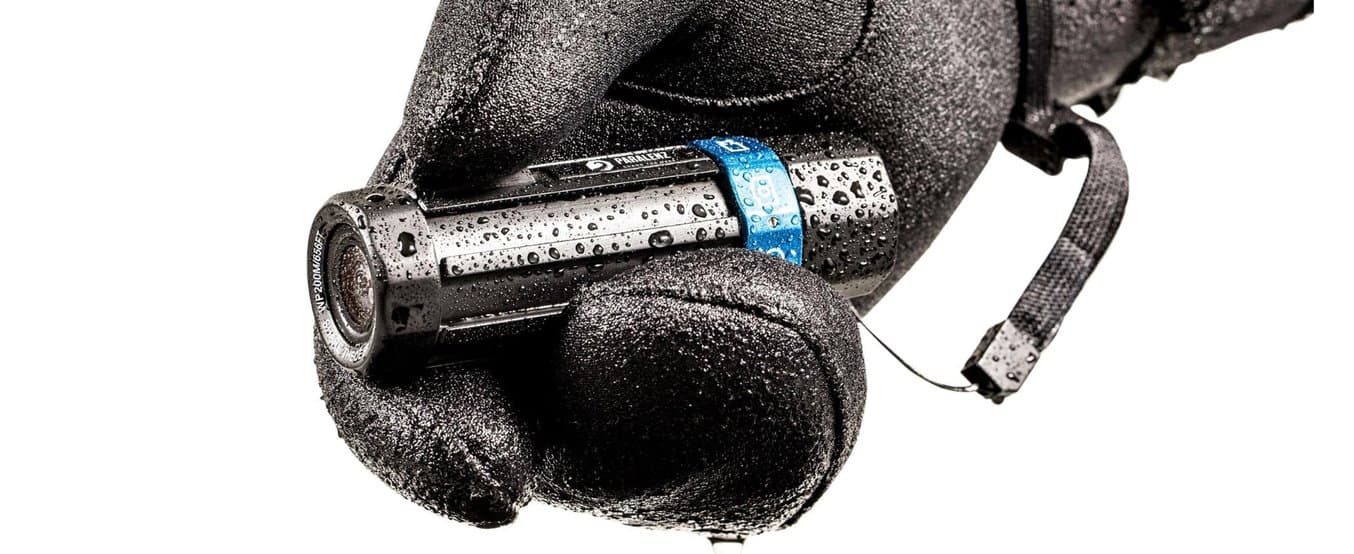
We even used the prototypes for the tests in the pressure tank and real-life tests diving in the sea. If we could make a prototype that survives the depth, then the final product would have no problems either. The 3D prints were tested to 150 m/492 feet without any problems and with the final machined aluminum product we are now at almost 400 m/1312 feet.
Does access to desktop 3D printing make the barrier to entry into hardware development lower?
The Form 2 is a fantastic machine, and it saves you a lot of time. Before we’d have to do lot of tasks by hand or by CNC milling, which both required additional skills. It’s easier now, but even if you have really good pencil, you still need to be able to draw. You need to have the right idea and craftsmanship to model parts for the machine. But it simplifies and speeds up the process, because you don't have to learn to use a CNC milling machine and a lot of other tools.
Even better, it's something that kids can use. We've had some projects with schools as well, teaching high school students to model in 3D. Some of them amazed us with their skills, in only half a year they would start doing stuff that we thought really wasn't possible.
What are the next steps, now that you're doing production?
We are almost finished with production of the first batch to our beta testers, which we’re planning to ship before the end of this year, but we’re still working on some accessories. One of them is a third-person viewer, which we’re also prototyping on the Form 2. It works like a selfie stick but with pontoons (flotation devices) so that it floats behind the diver.

Now we have 250 beta testers signed up in 37 countries, so we're going to make a trial run of the cameras and send them all around the world to get them tested in a lot of different environments and types of use. We have all sorts of divers; cave divers from Finland and Mexico, free divers from Belgium and Florida, technical divers from Australia and Canada, spear fishers from Hawaii and Africa - we even have cameras going to Antarctica and Alaska. We’re going to collect feedback hopefully find all of the errors that you normally have in a first generation product before we actually launch the final product around February.