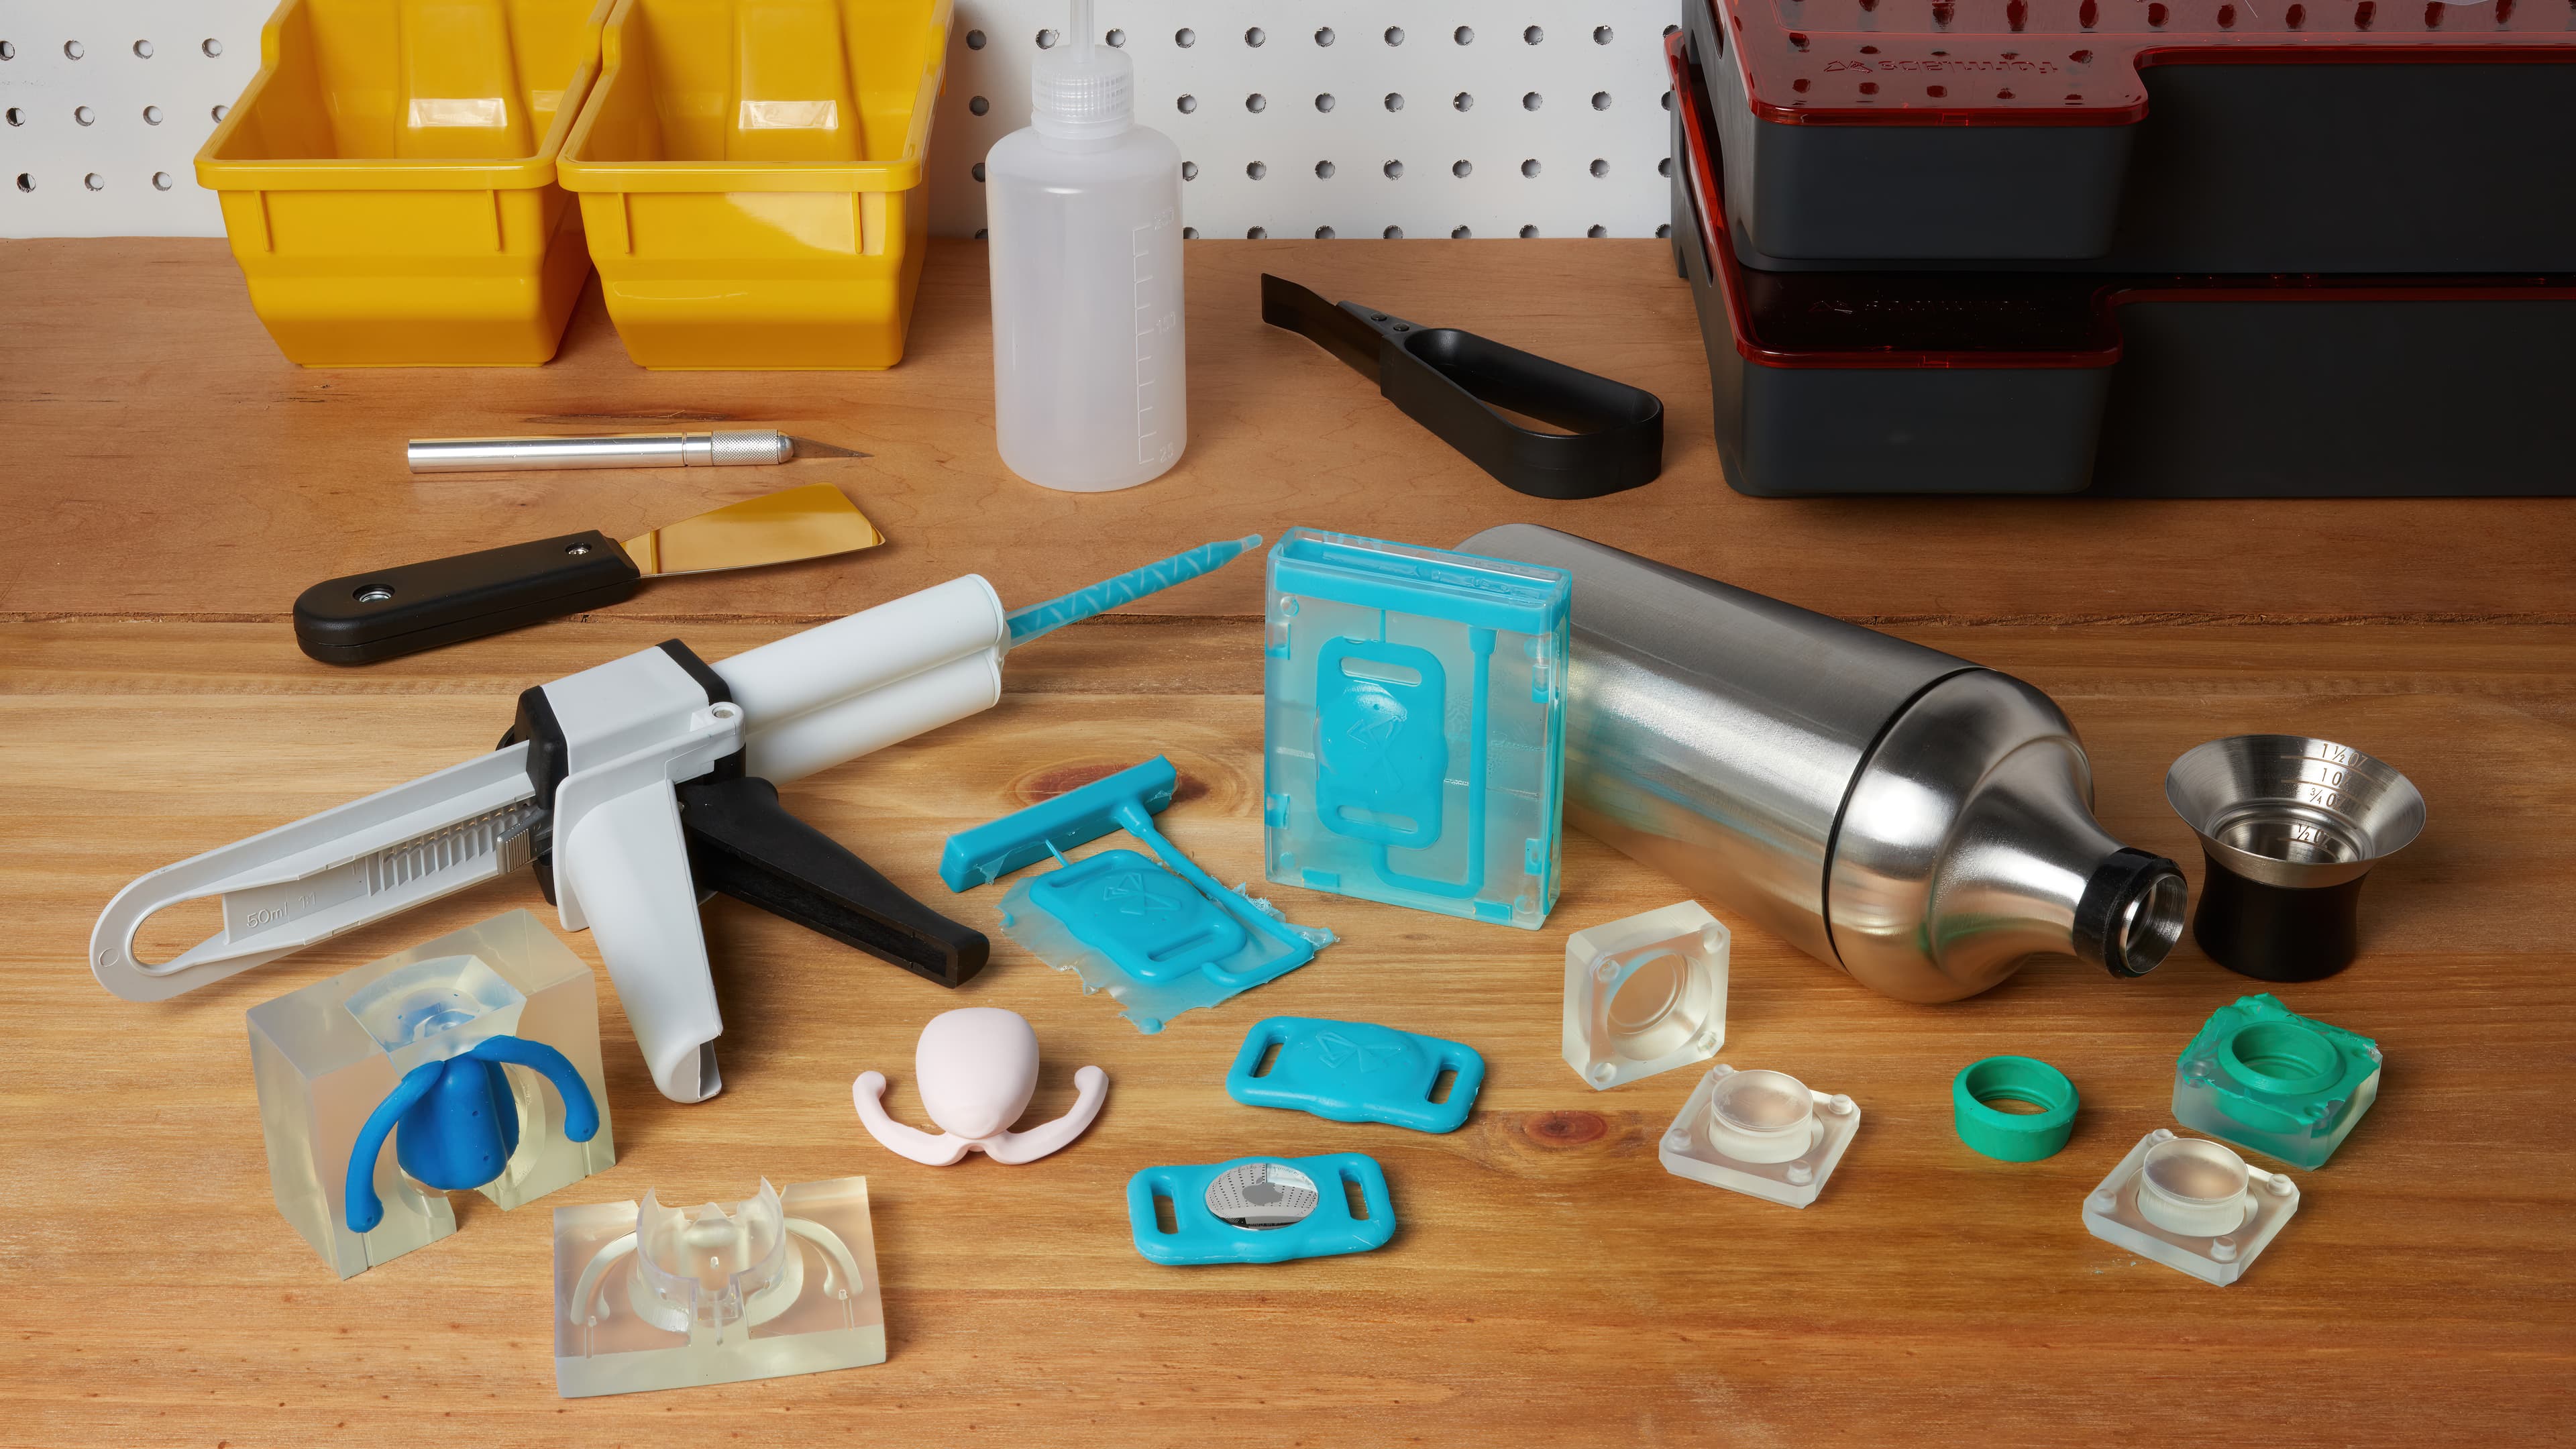
Silicone Part Production With 3D Printed Tools
Silicone rubber has many applications, from hearing aids to handles and grips on consumer goods. This report provides an overview of 3D printed tooling for silicone part production, including two part injection molds, overmolds, compression molds, and eggshell molds. These methods can be employed for the prototyping of soft silicone products, small-batch production of customer beta units, or production of custom end-use goods.
A step-by-step guide is provided for producing a silicone keychain with an encapsulated Apple AirTag, employing mold design best practices from several Formlabs product design customers. We also present information about successful material workflows from Formlabs users, including silicone-resin compatibility and recommended mold releases for both tin and platinum cure silicones.
Silicone Part Production With 3D Printed Tools

Silicone rubber has many applications, from hearing aids to handles and grips on consumer goods. This report provides an overview of 3D printed tooling for silicone part production, including two part injection molds, overmolds, compression molds, and eggshell molds. These methods can be employed for the prototyping of soft silicone products, small-batch production of customer beta units, or production of custom end-use goods.
A step-by-step guide is provided for producing a silicone keychain with an encapsulated Apple AirTag, employing mold design best practices from several Formlabs product design customers. We also present information about successful material workflows from Formlabs users, including silicone-resin compatibility and recommended mold releases for both tin and platinum cure silicones.
Introduction
Soft rubbery parts have applications across many industries, from custom hearing aids, to entertainment props and prosthetics, to handles and grips on consumer goods. Designers can incorporate robust, bendable and stretchable true silicone parts into their portfolios using SLA 3D printed tooling and silicone rubbers readily accessible from hardware stores, art and jewelry supply resellers, and other common suppliers.
Silicone is a popular material to fabricate soft end-use parts as well as produce soft molds for casting rigid materials. In fact, silicone “molding and casting” terminology is broadly used to reference any multi-step method that employs silicone rubbers. Here we differentiate between two processes: “silicone mold making” and “silicone part production.”
In silicone mold making, sometimes also called silicone molding, castable silicone is used as a mold material for replicating a rigid master model. Silicone rubber is poured around a 3D printed master, and then the cavity in the silicone mold is filled with another castable material. This is often a rigid material that begins as a liquid and then cures upon cooling or a chemical reaction, such as thermoplastics, resins, cement, wax, or plaster, and in some cases expanding materials such as polymer foams.
This guide covers silicone part production, which employs a 3D printed mold to contain castable silicone for the production of soft, rubbery end products.
This report includes examples of silicone part production from consumer brands OXO and Dame Products, limb prosthetic innovator PSYONIC, product design firm Glassboard, entertainment effects company Dreamsmith, and medical device company Cosm. Each brand employs a different variation of silicone part production to achieve different results. These include:
-
Compression molding of silicone putty: A fast-curing silicone putty is packed into two sides of a 3D printed mold, which is clamped together with a benchtop vise. This method is often used for gasket prototypes and closely mimics tooling used in mass production.
-
Injection filled mold for liquid silicone: This is the most common method used to form a single continuous silicone prototype using a two-part or multi-part mold. In many cases the mold is configured such that gravity aids the silicone filling process. Silicone is injected into a channel at the top of the mold, and the mold cavity gradually fills from the bottom. Liquid silicone is finally released through outlets and air channels at the top of the mold.
-
Overmolding for complete or partial silicone encapsulation of hardware: Hardware is suspended in a two-part or multi-part mold. Liquid silicone is then injected into the mold cavity, either completely or partially conforming around the hardware.
-
Eggshell mold for custom silicone goods: The mold is a thin (<1 mm) shell that conformally envelopes the target silicone injection cavity. After the silicone is cured, the 3D printed shell-like mold is cracked away to reveal a silicone part. Since this is a sacrificial mold that cannot be reused, this technique is used to create one single custom part.
Design, printing, and casting methods share fundamental steps even across different industries and applications. We will walk you through a detailed design example for an injection filled overmold, taking into account advice and best practices provided by our featured customers.
Five Things You Will Learn
1. Selecting a silicone for your application
2. How to encapsulate hardware using overmolding
3. Best practices for designing critical features of 3D printed molds
4. Tips for silicone-resin compatibility
5. Key differences between prototype and production tooling
Book a Consultation
Get in touch with our 3D printing experts for a 1:1 consultation to find the right solution for your business, receive ROI analyses, test prints, and more.
About Silicones
Silicones are a class of polymers that contain the elements silicon and oxygen in their molecular chain, and transform from a gel or liquid to a highly flexible and stretchable solid after curing. They are versatile materials with high-performance properties such as excellent electric insulation, heat resistance, chemical stability, and high tear strength, making them attractive for demanding industries from automotive and construction to electronics.
Silicone elastomers dominate the market and can be divided into three categories:
-
Liquid Silicone Rubbers (LSR) are high performance silicones usually employed for producing strong, technical parts with tight tolerances such as seals or electronic connectors. They are processed at high temperatures often through liquid injection molding and are selected for large volume production. Read our documentation on injection molding to learn how Formlabs users are 3D printing short run molds for desktop and industrial injection molding machines, in preparation for moving to mass production.
-
High Temperature Vulcanized (HTV) silicones, also called Heat Cured Rubber (HCR) silicones offer great temperature and aging resistance ideal for cables or insulators in automotive, electronics and healthcare industries. They generally employ a platinum-cure chemistry, and are shaped by extrusion or compression molding with vulcanization under pressure and heat. Discover how the silicone expert SIOCAST forms HTV silicone molds around 3D printed master patterns.
-
Room temperature vulcanized (RTV) silicones are relatively easier to process, with great mechanical and thermal properties. They are popular in various industries from gaskets and medical devices, to encapsulation of electrical components, as well as mold making. However, they usually require long cycle times and manual labor, and are better suited for smaller runs. They are commonly shaped at room temperature by injection molding, compression molding, or gravity casting.
This report covers applications of room temperature vulcanized (RTV) materials in the silicone family. It describes techniques that can be used in-house with limited equipment in any prototyping or product development lab.
RTV liquid silicone: Liquid-type silicones are typically two part or single-part with a small amount of catalyst added. There are two general categories that are readily available. Platinum-catalyzed silicones are higher cost but offer superior long-term dimensional stability and very low shrinkage after full cure. Tin-catalyzed silicones are lower cost but less stable over time, and tend to have higher shrinkage rates. Curing time ranges from 10 minutes to several hours.
Polydimethylsiloxane (PDMS): PDMS is a chemically distinct type of RTV liquid silicone that contains methyl groups on the silicon-oxygen polymer chain. The liquid polymer is very commonly used as a lubricant or viscous additive in consumer and industrial goods. As a cured rubber, PDMS is used in a number of research applications. Its high optical transparency and ability to capture micro-scale surface textures and channels make it ideal for microfluidics and soft lithography. Many PDMS formulas will cure at room temperature over a period of 48 hours, or cure in less than one hour at elevated temperature.
Silicone putty: This is a two-part putty in which components are blended together in equal volumes by hand. The type featured in this report has a durometer rating of Shore 40A (see scale below), or a similar hardness to a pencil eraser. This type of silicone can be purchased from jewelry suppliers as it is commonly used for producing wax masters for metal casting. However the silicone itself is also a good mimic for compression molded gaskets and seals.
Skin, Mucous Membrane, and Food Safety
Some applications require more sensitivity than others when it comes to contact with the body or contact with food. Always check the materials safety data sheet (MSDS) from the silicone manufacturer to make sure the material is safe for your application. Note that two part liquid silicones that are rated for skin safety tend to use a platinum catalyst.
Durometer Rating Scale
Rubbery materials, including silicone rubbers, can be formulated to a range of hardnesses from extremely soft to extremely firm, as indicated by a specific Shore durometer number. Softer materials are measured on the Shore A scale, and harder materials on the Shore D scale. The table shown below provides a helpful comparison to common household goods such as rubber bands, or car tires.

Forming Silicone With 3D Printed Tooling
Traditional molds for silicone part production are CNC machined from blocks of aluminum or steel. These include two-part or multi-part injection molds for liquid silicone rubbers (LSR), or single cavity compression molds used with a heat cured rubber (HCR) silicone sheet that is cured under pressure and high temperature. Normally these types of metal molds are used in mass production, however when employed for prototyping, lead times of several weeks and hundreds to thousands of dollars in upfront tooling cost limits a designer’s ability to implement and test small changes in a mold design.
Desktop 3D printing is a powerful solution to fabricate tools rapidly and at a low cost. It requires very limited equipment, enabling skilled operators to focus attention on other high-value tasks. With in-house 3D printing, manufacturers and product designers can introduce rapid tooling into the product development process to validate design and material choices prior to transitioning to mass production. They can iterate quickly, accelerate product development, and bring better products to market.
3D printed tooling using Formlabs SLA resins offers many advantages to product designers across prototyping, small-scale production runs, and custom part production. Using 3D printed tooling, RTV 2-part silicones are injected into a two-part or multi-part mold or an RTV silicone putty is squeezed between sections of a 3D printed compression mold. Using 3D printed tooling, a broad range of tin cure and platinum cure silicones are available to designers, including a wide range of durometer ratings, colors and degrees of transparency, as well as special functions such as skin safety.
Stereolithography (SLA) 3D printing technology is a great choice for silicone mold tooling. SLA parts are characterized by a smooth surface finish and high precision. RTV silicone rubbers capture fine surface details including defects, so the quality of the tool surface directly translates to the surface quality of the final part. A mold printed with fused deposition modeling (FDM) style printers, for example, would leave visible impressions of printer layer lines in the silicone part. Formlabs Clear Resin (or other transparent resins such as BioMed Clear Resin) also allow visualization of the silicone injection process, enabling designers to assess bubble and void formation and identify areas where corner fillets or additional air vents should be added. SLA 3D printing also offers an advantage for design complexity; a 3D printed mold allows designers to take advantage of undercuts or other complex geometries that may not be possible or would be prohibitively expensive to produce with CNC machining.
Formlabs Clear Resin is also quite versatile in its mechanical performance. The same material can be used for an extremely thin eggshell mold that cracks away easily from a custom silicone part, or for a robust compression mold that is used multiple times to produce gaskets. Finally, using affordable benchtop scale fabrication reduces lead times; a designer can print a mold geometry and start injecting silicone the next day.
When used with 3D printed molds, RTV silicone rubber captures fine surface details, including embossed text. In addition, most castable silicones are not chemically adhesive and will peel away from the mold surface after curing. Mechanical bonding can be achieved by casting onto highly porous surfaces like woven fabric, and in some cases, chemical bonding can be promoted with specialized binders.
Because processing RTV silicone does not require high heat or pressure, it can easily be formed with limited equipment in a prototyping lab, reducing the startup cost needed to introduce soft parts to any company's design portfolio. This report provides guidelines for manufacturing silicone parts at low volume in-house, quickly, and affordably.
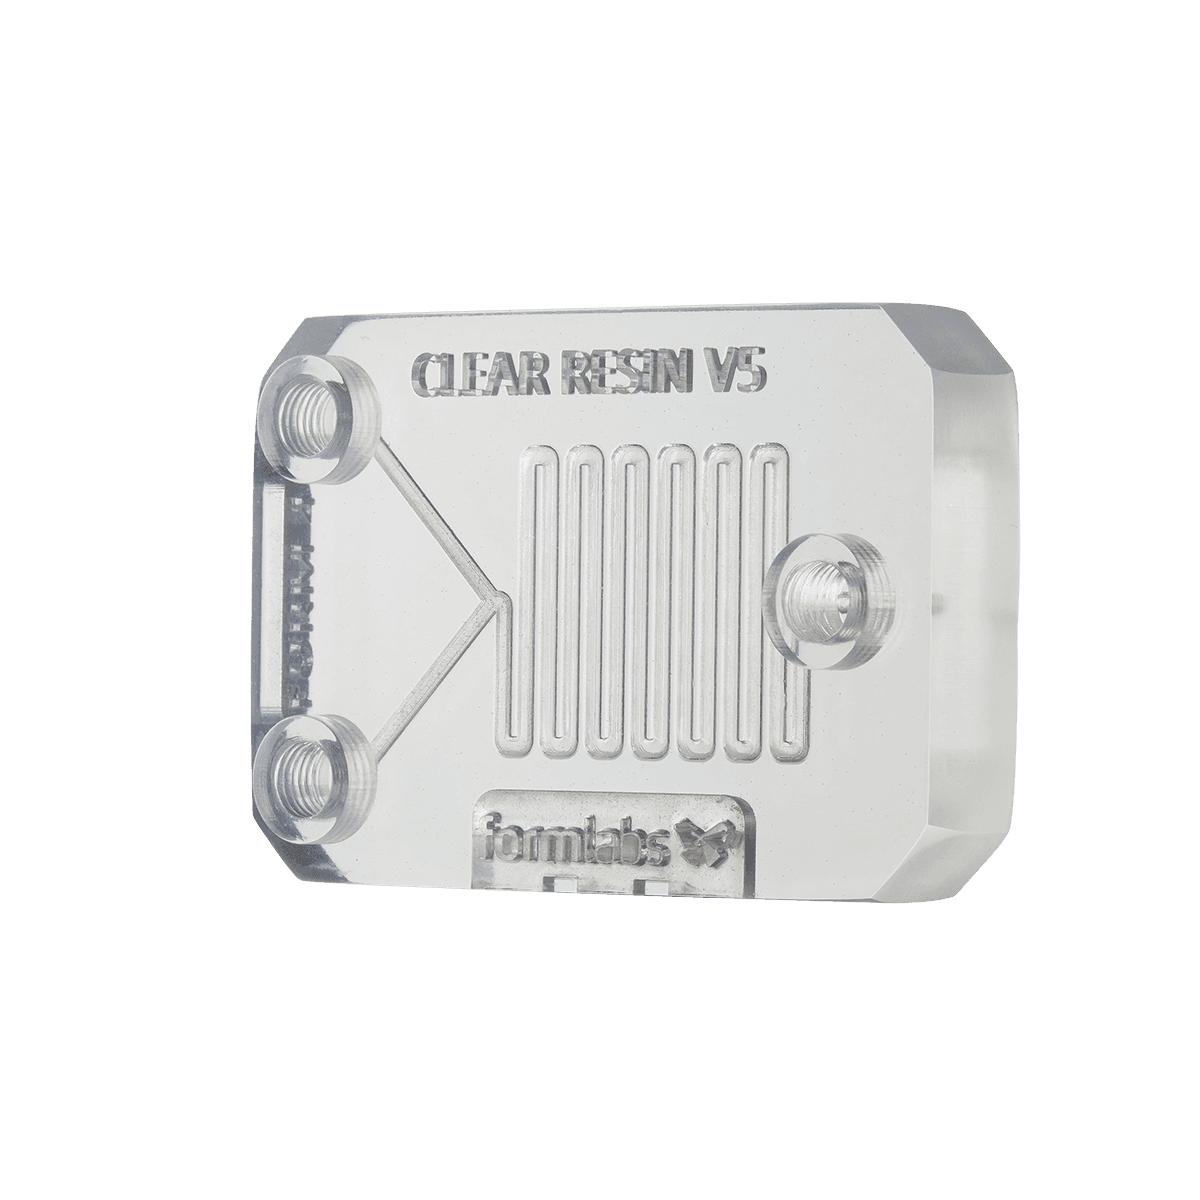
Request a Free Sample Part
See and feel Formlabs quality firsthand. We’ll ship a free 3D printed sample part to your office.
3D Printing Resins and Silicones Compatibility
Anytime a castable material such as silicone comes into contact with a printed mold, we must consider the chemical interaction between the two materials. One particular challenge arises when casting platinum-catalyzed silicones in SLA molds: the resin monomer can inhibit the silicone curing process, leaving an uncured gummy surface. However, high-quality platinum-catalyzed silicone parts can be produced by making sure SLA molds are fully cleaned and cured, and by applying protective coatings and mold releases.
There are many, many possible combinations of silicone, resin, protective coating, and mold release that you can try. We asked customers from a variety of industries to report on their successful workflows, and their responses are summarized below. We considered many of these insights when developing our own step-by-step process.
|
Industry |
Application |
Mold Type |
Silicone |
Resin |
Best Practices |
|
Product Design |
Beta prototypes Skin contact |
Overmold |
Unspecified (Pt cure) |
Clear Resin |
Paint on Vaseline as mold release |
|
Product Design |
End-use |
Eggshell mold |
Smooth-On Mold Max (Tin cure) |
Clear Resin |
No mold release used; mold is sacrificial / one time use |
|
Product Design |
Prototypes Gaskets |
Compression mold |
Castaldo Quick-sil (putty) |
Clear Resin |
General purpose mold release from Smooth-On |
|
Product Design |
Prototypes Skin contact |
Gravity filled injection mold |
Unspecified (Pt cure) |
LT Clear, Clear, Grey |
Any general purpose mold release |
|
Product Design |
Prototypes Skin contact |
Gravity filled injection mold |
Smooth-On Dragon Skin 20 (Pt cure) |
Clear Resin |
Krylon |
|
Manufacturing / Healthcare |
End-use |
Gravity filled injection mold Overmold |
Smooth-On Dragon Skin 20 (Pt cure) |
Clear Resin |
No mold release needed |
|
Manufacturing / Healthcare |
End-use Mucous membrane contact |
Eggshell mold |
Unspecified (Pt cure) |
Biomed Amber Resin |
No mold release used; mold is sacrificial / one time use |
|
Audiology / Healthcare |
End-use Skin contact |
Eggshell mold |
BioPor AB 40 by Dreve |
Clear, Biomed Clear |
No mold release used; mold is sacrificial / one time use |
|
Entertainment |
Models and props Skin contact |
Injection mold Open mold |
Smooth-On FX Pro (Pt cure) |
Draft, Black, Grey |
Mold release not always needed |
|
Entertainment |
Models and props Part reproduction |
Open mold Silicone mold |
Variety of Pt and Tin cure by Smooth-On |
Clear, Grey |
XTC-3D High Performance 3D Print Coating |
|
Entertainment |
Models and props Part reproduction |
Silicone mold |
Unspecified (Pt cure) |
Clear Resin |
SEM Flexible Primer Surfacer spray coating |
|
Entertainment |
Models and Props Skin contact |
Injection mold |
Platsil Gel-25 by Polytek (Pt cure) |
Rigid 10K Resin |
Smooth-On Super Seal coating and Ease Release 200 |
|
Hobby |
Part reproduction |
Open mold Silicone mold |
Smooth-on OOMOO 30 (Tin cure) |
Grey Resin |
General purpose mold release from Smooth-On |
While the combination of materials clearly varies, our customers aligned on some general insights:
-
Make sure your parts are fully washed and cured. The 3D printed mold must be washed thoroughly in clean IPA, such that surfaces are not tacky after the mold dries. The mold should also be cured completely to reduce the amount of unreacted monomer on the SLA parts. For this process, the Form Cure unit is a great option. Clear Resin parts will develop a yellow tint, which is a good indicator that your mold is fully cured.
-
Try a protective coating. There are many acrylic or epoxy coatings available that are applied as an aerosol spray in a single step (e.g. Krylon Crystal Clear acrylic coating), or as a two-part brush-on material (e.g. XTC-3D from Smooth-On). Using very little material, both types of coatings will leave a glossy glass-like finish on the internal surfaces of the mold. Multiple applications may be needed. Check the manufacturer’s instructions for drying or curing times.
- Use a mold release anytime silicone contacts another material. This will ease the de-molding step, and eliminate silicone residue inside the mold, making it easier to reuse it for multiple castings. In many cases a generic or “general purpose” mold release from your silicone brand is sufficient (e.g. Stoner Dry film e408, Smooth-On Super Seal Ease Release 200). A light mist of mold release is enough. Once again, check the manufacturer's instructions for recommended drying times.
Get Started with 3D Printing
Formlabs' complete, easy-to-use ecosystem makes it simple to get started with 3D printing. Explore our 3D printers and materials to find the right fit for your needs.
Additional Best Practices
Some silicone formulas, such as PDMS, are more susceptible to cure inhibition than others when they come into contact with SLA 3D printed tooling. We have listed further troubleshooting steps provided by Formlabs users, which build off of our general guidelines for RTV liquid silicones.
-
Rinse with acetone. Spraying the 3D printed mold with an acetone squeeze bottle can help to remove residual solvent and any debris after the standard IPA washing step.
-
Over-cure the mold. For tooling printed in Clear Resin, increase the curing time from 15-20 minutes to 60-120 minutes, at 60°C.
-
Wait 24-48 hours after post-processing. Allow the mold to sit in ambient temperature and light before applying coatings and casting the silicone. It is helpful to expose the mold surfaces to open airflow during this step.
-
Use an epoxy coating. A two part epoxy sealant can act as an effective barrier between the silicone and the 3D printed mold.
-
Use a higher concentration of catalyst. When using two part silicones, we suggest adding a bit of extra catalyst component. If a small proportion of the catalyst is inhibited by the mold surface, the extra catalyst can help compensate for this and prevent formation of a tacky silicone surface.
Selecting a Mold Type
While the outcome of each molding process may look similar, there are a few criteria that we recommend for selecting a mold type. These include target part geometry and the ability to accommodate undercuts and holes in the design, your scale of production, and the materials that you intend to cast. We name a few guidelines in the table below.
|
Mold type |
Part geometry |
Materials |
Production Scale |
|
Compression Mold |
No undercuts |
High-durometer, silicone putty |
Dozens of casts |
|
Injection Filled Mold |
Minor undercuts |
2-part liquid silicones |
Dozens of casts |
|
Overmold |
Encapsulate internal hardware, minor undercuts |
2-part liquid silicones |
Dozens of casts |
|
Eggshell Mold |
Can accommodate large undercuts and holes |
2-part liquid silicones |
Single use |
Customer Case Studies
Compression Molding Silicone for Gasket Prototypes With OXO
OXO is a US-based brand that creates ergonomic and practical items for the home, including many iconic kitchen gadgets. At OXO, 3D printing is used for form and function prototyping, and hybrid methods are essential for prototyping soft components such as watertight gaskets. After testing many available silicone rubbers, OXO engineers determined that compression molding two-part silicone putty Castaldo Quick-Sil was ideal for creating a prototype that mimics a production gasket.
To produce a gasket prototype for a cocktail shaker, a two part compression mold is printed in Clear Resin. To prepare the silicone putty, parts A and B are kneaded together by hand quickly; there is only a 90 second working time before the material starts to cure. Next, the putty is stuffed into both sides of the mold, and the mold is compressed shut with a benchtop vise. Upon demolding and some quick finishing, the silicone gasket is ready for testing.
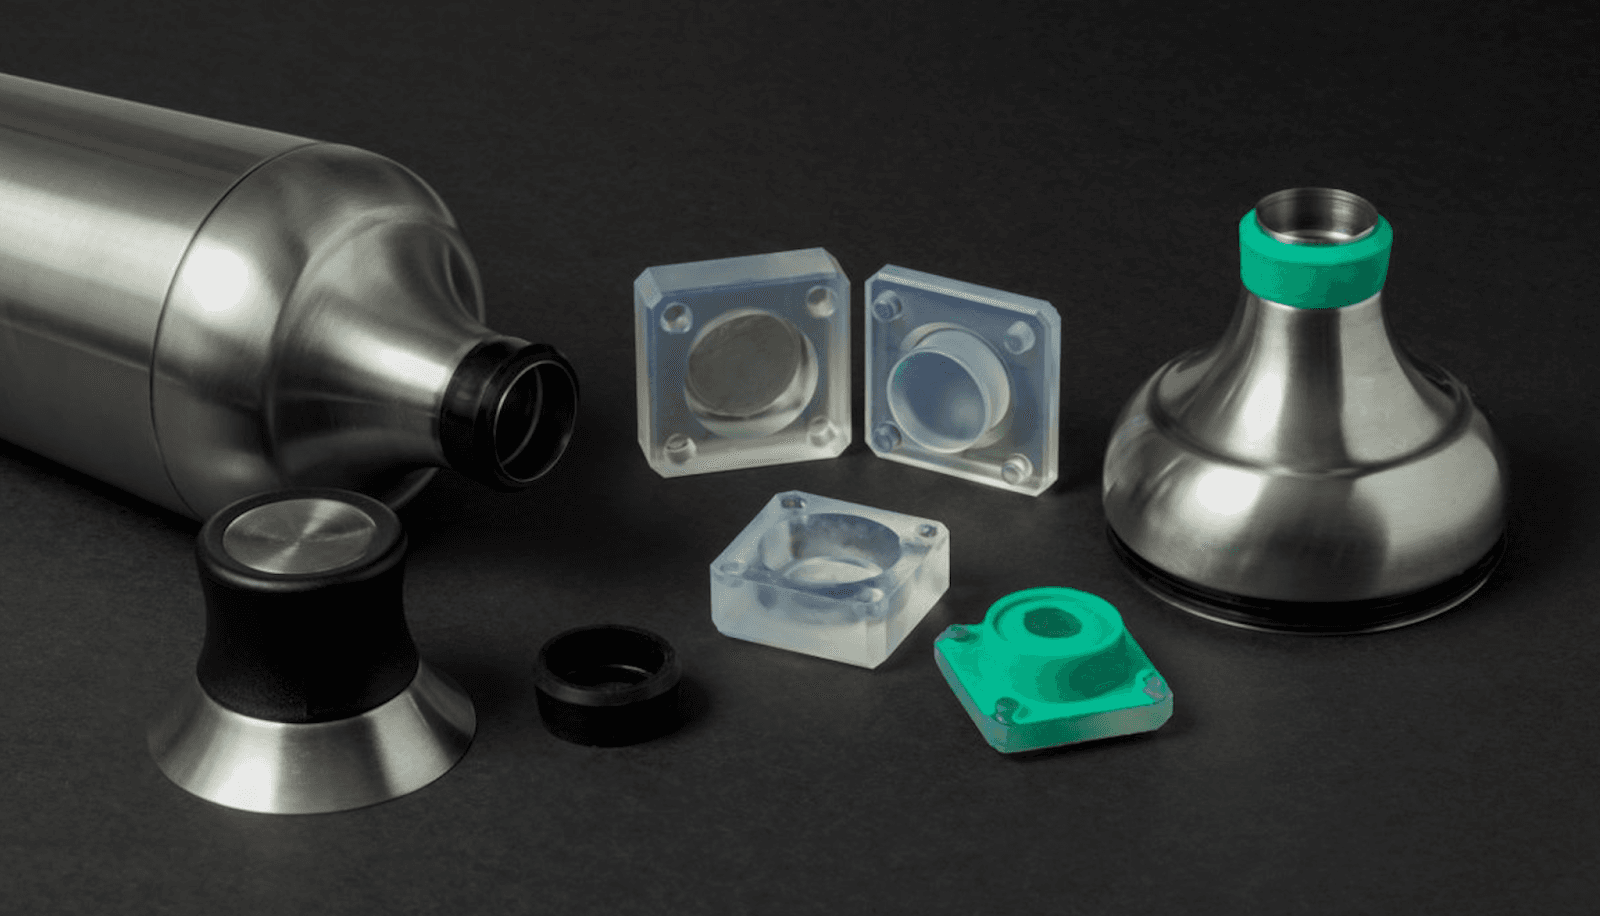
OXO’s compression mold for a prototype cocktail shaker gasket was printed in Clear Resin.
Injection Filled Molds for Product Prototyping With Glassboard
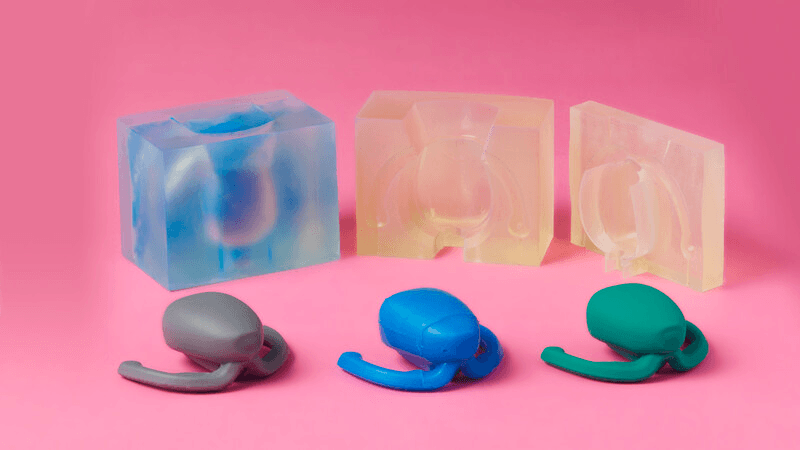
Glassboard is a product design consulting firm in Indianapolis, IN. Their design team uses silicone in molds for a very wide variety of prototyping applications from silicone menstrual cups, to custom fittings and overmolds, to seals, gaskets, and o-rings. Glassboard typically uses molds that are made of multiple parts that can be disassembled to remove the casted silicone and then reused for multiple castings.
A typical mold design at Glassboard, such as the one used for the Sunny Menstrual Cup, is an injection filled mold aided by a gravity-fill configuration. Liquid silicone is injected through a port at the top of the mold, runs down a channel to enter the bottom of the mold cavity, gradually fills to the top of the cavity, and exits via narrow air vents at the top of the mold.
An innovative feature of Glassboard mold design is a trough reservoir at the top of the mold. Troughs are used to contain the overflow of the silicone at both the gate and vent locations. Another purpose of the trough is to allow excess silicone to enter into the mold after filling to displace voids created by collapsing air bubbles or by silicone seeping into the narrow surface between mold blocks.
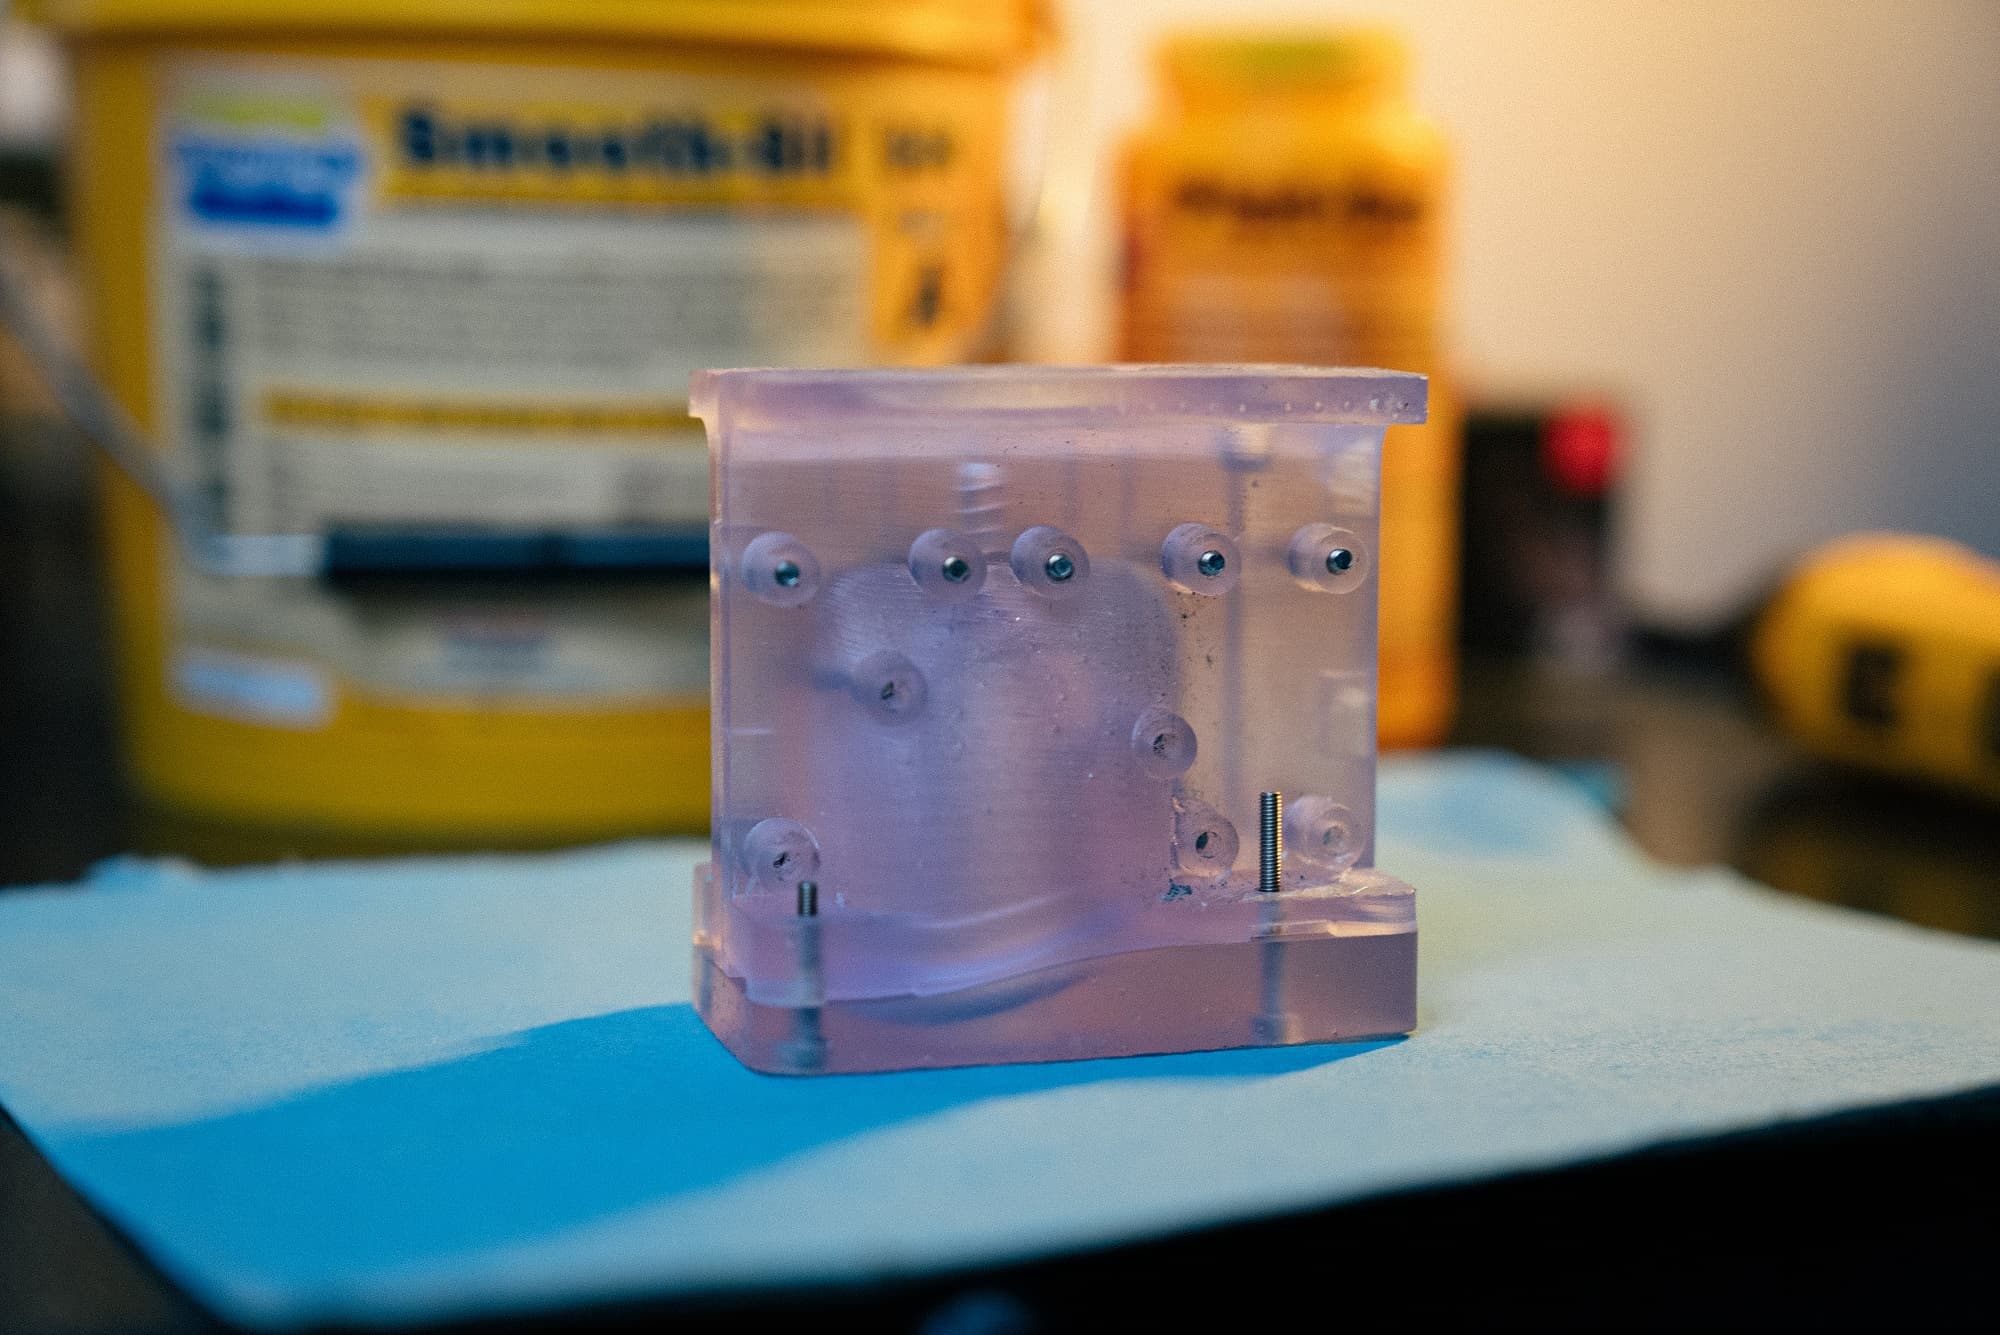
Glassboard’s prototype of the Sunny Cup was created with a silicone gravity-filled injection mold, printed in Biomed Clear Resin.
Silicone Overmolding of Customer Beta Prototypes With Dame Products
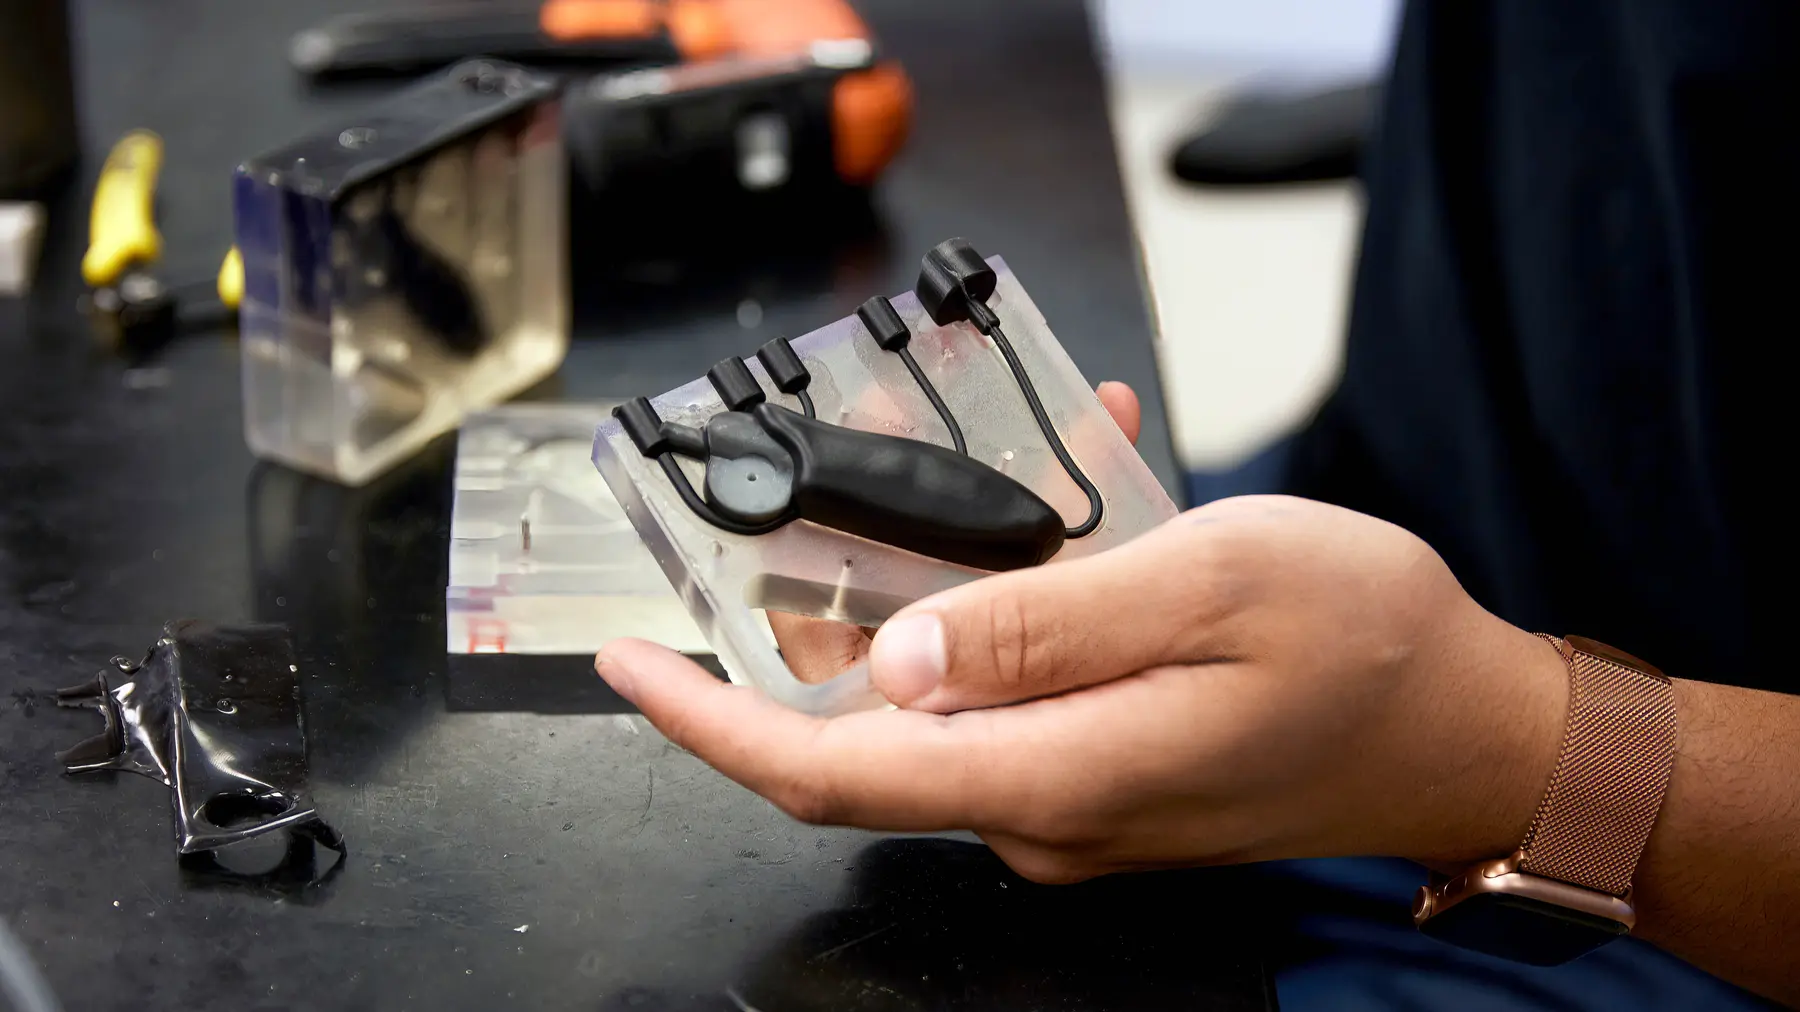
Dame Products is a Brooklyn-based startup that designs products for the health and wellness industry. Their product line incorporates complex ergonomically shaped hardware that is fully encapsulated in a layer of skin-safe silicone in vibrant colors. The team employs silicone overmolding with 3D printed molds to produce customer beta prototypes.
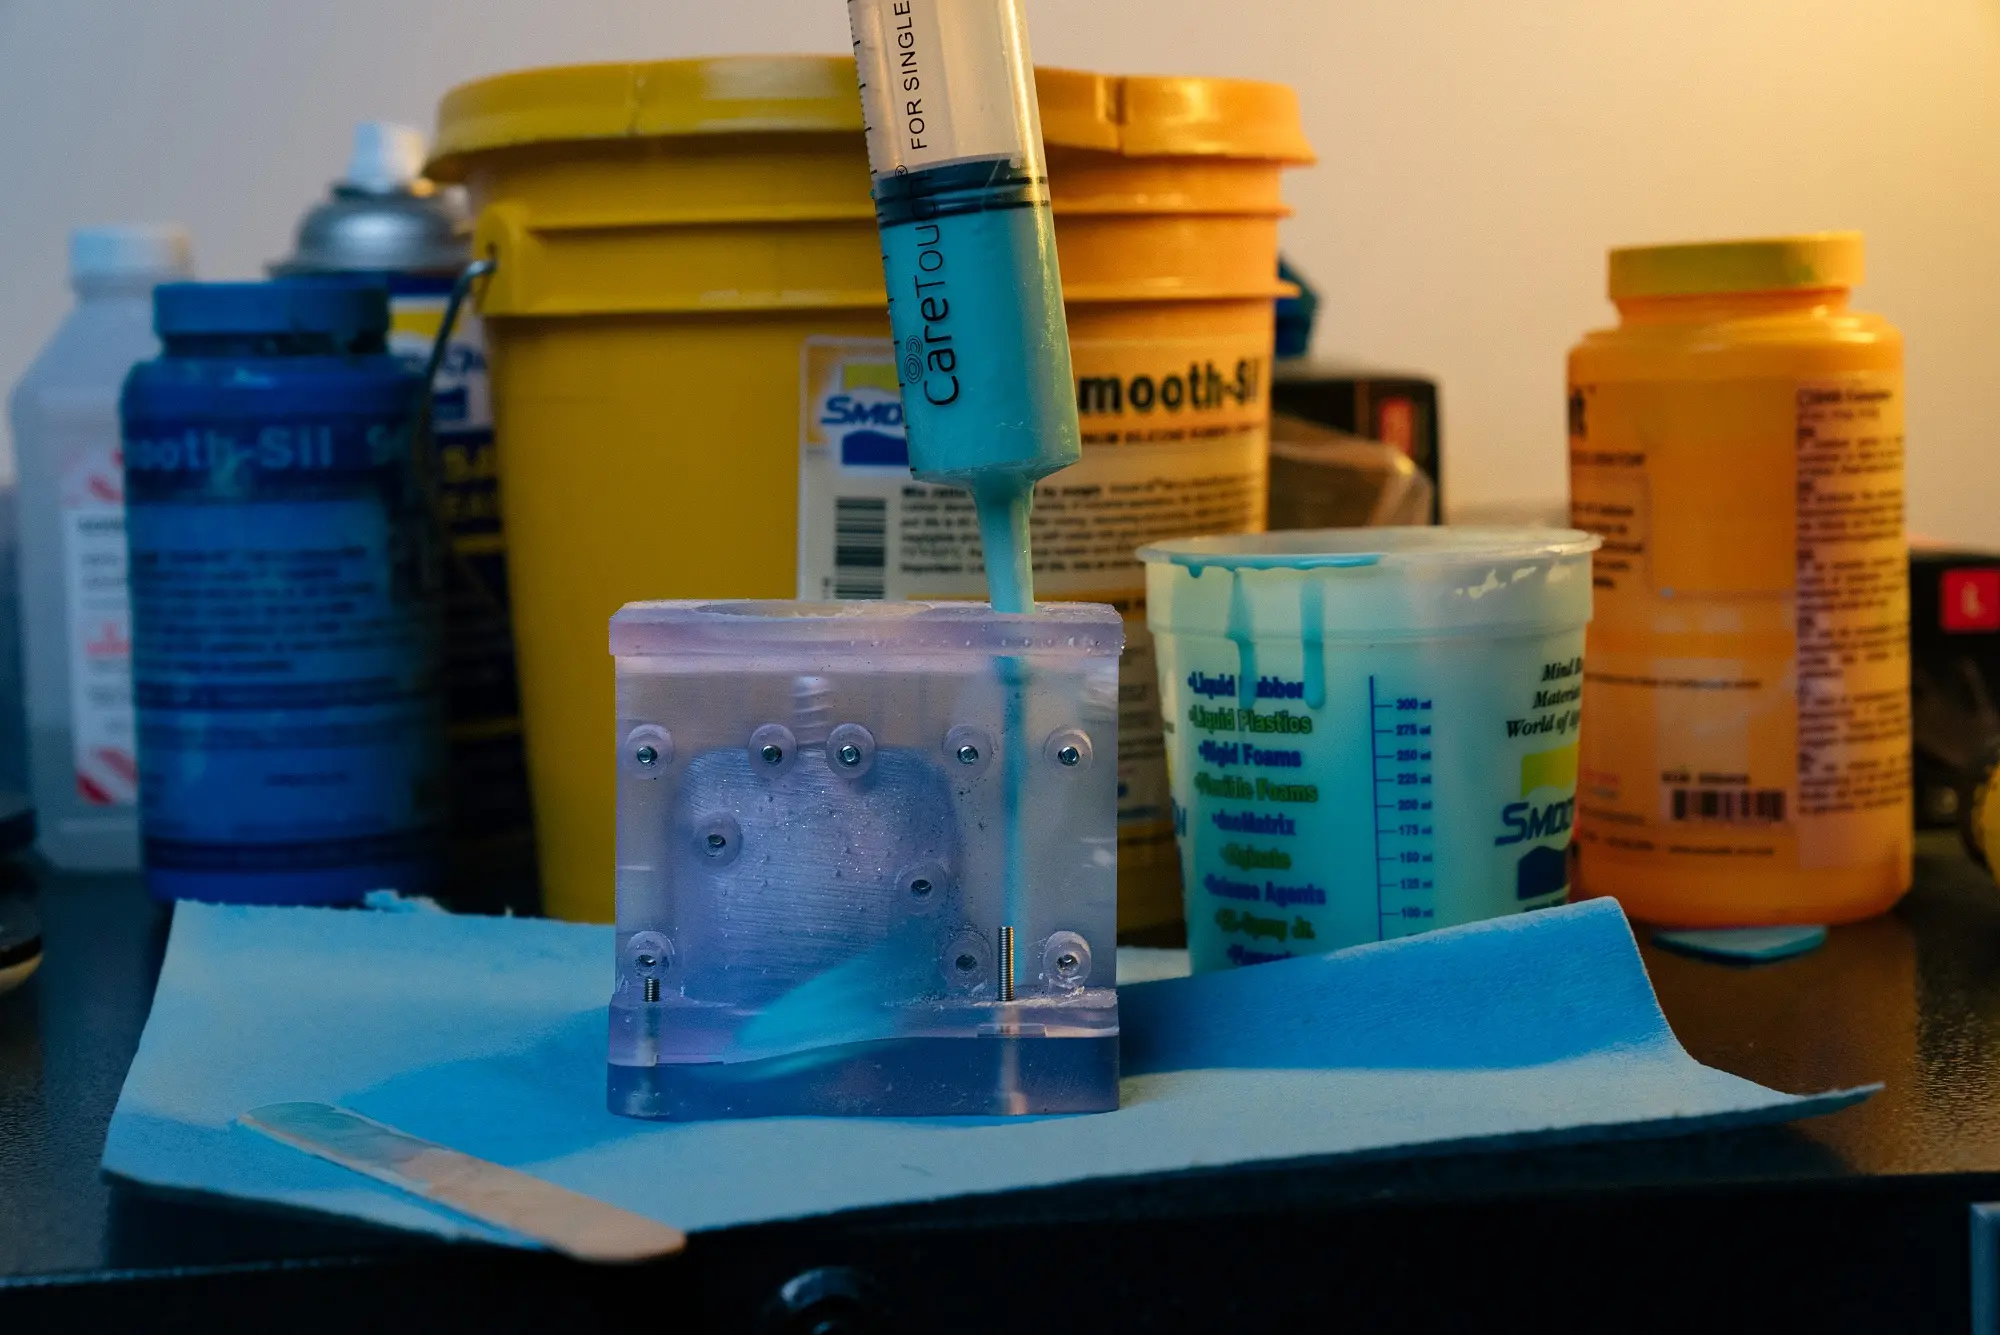
Each 3D printed mold stock is a two or three part injection filled mold that has anchoring features for small internal hardware. Parts A and B of a platinum-catalyzed liquid silicone are loaded into two sides of a 50:50 ratio epoxy cartridge, and attached to an epoxy gun with a mixing nozzle. This innovative method simultaneously mixes the silicone components while gradually forcing the liquid silicone into the mold.
Dame engineers can prototype dozens of overmolded devices in one day by rotating through three or four SLA printed molds. While the silicone rubber from one prototype is curing, the next can be de-molded and prepared for the next fill. Trimming and cleaning of prototypes happens in parallel. When prototype hardware is returned to the company, the beta device is bleached, the thin silicone layer removed, and the internal hardware is reused in a new prototype.
Dame Products employs an overmolding method to produce customer beta prototypes with embedded hardware. Their mold is printed in Clear Resin.
Silicone Injection Molding of Custom Makeup Effects With Dreamsmith
Dreamsmith is an entertainment props and makeup effects firm based in South Africa. Their team has worked on designs for popular shows like Raised By Wolves, in which one particular effect needed was a silicone face mask incorporating a highly geometric exterior and an interior that conformed to the face of their actor.
Using the Form 3L, their team printed a mold that utilized optical scan data from the actor’s face for one interior surface, and a sharp geometric tile pattern for the other. While their design looks quite different from some of the product design examples in this report, the Dreamsmith team had many of the same material concerns, including ensuring compatibility of their mold material with skin-safe platinum cure silicone. They ultimately selected Formlabs Rigid 10K Resin for its high precision.
To achieve custom film and TV props and makeup effects, Dreamsmith produces silicone injection molds with Rigid 10K Resin. One side of the mold is designed using optical scan data of the actor’s face.
End-Use Overmolded Grippers With PSYONIC
California-based PSYONIC is reinventing limb prosthetics with the world’s first touch-sensing bionic hand. The team uses 3D printing as a critical step in manufacturing almost every component of their device. This includes mechanical fingers that are encapsulated with silicone using an SLA 3D printed mold.
The molds are produced by taking the inverse of the finger or thumb shape, subtracting it from the mold stock, and adding inlets and air vents for injection of 2-part platinum cure silicone. The mold also accommodates the structural “bone” component of the finger, which is fabricated using an FDM 3D printer.
Designers at PSYONIC are able to use each mold dozens of times before it wears out, and when this happens they can simply print a new mold and start injecting silicone again the next day. The team also directly contrasts Formlabs Clear Resin to their previously used fused deposition modeling (FDM) thermoplastic molds, namely referring to the upgrade in surface quality. Silicone picks up any texture or defect in the mold cavity, including 3D printing layer lines, so the smooth surface quality of Formlabs resins has been beneficial.
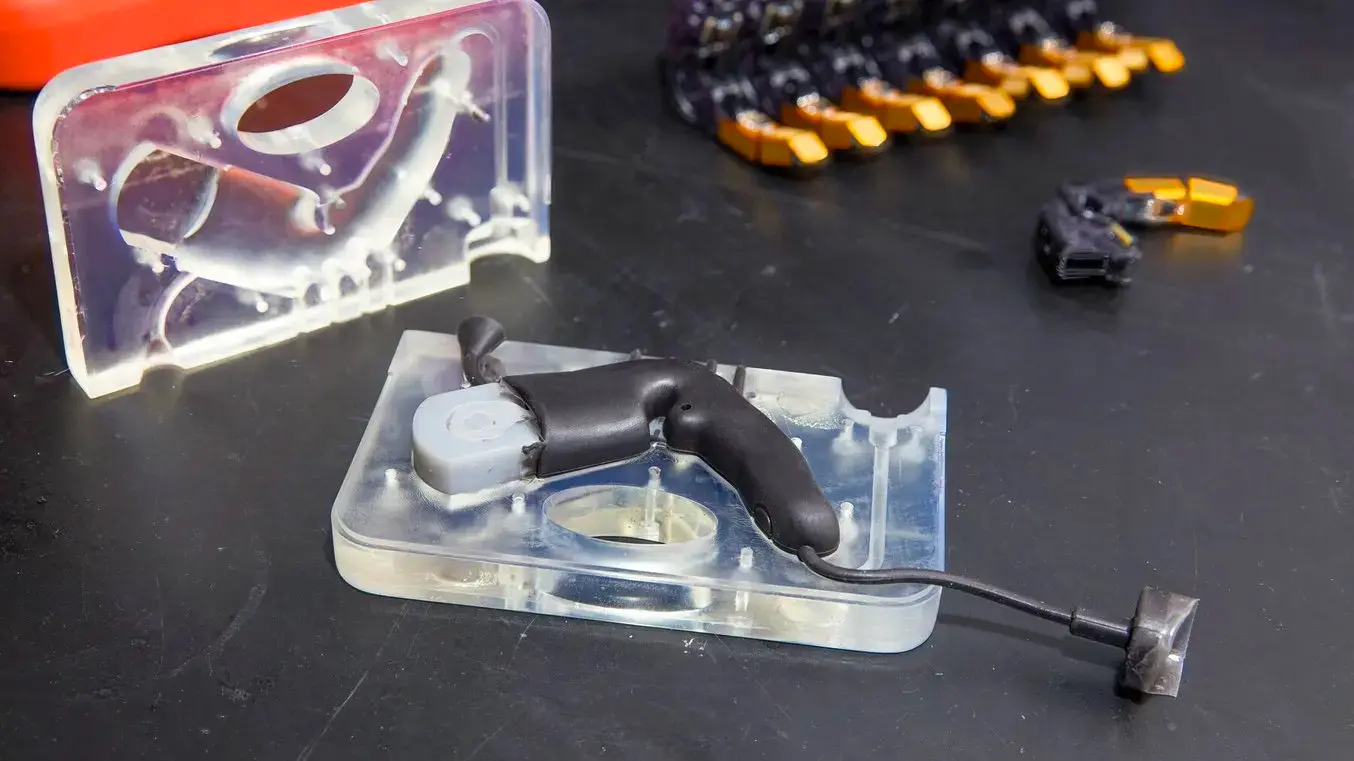
PSYONIC encapsulates the Ability Hand fingers using a silicone overmold configuration. Some molds include a Tough 2000 Resin mold insert to anchor the encapsulated “bone” feature in the mold.
Eggshell Mold For Custom Medical Devices With Cosm
Cosm is a medical device company revolutionizing treatment for uterine prolapse, a common but often overlooked medical condition, with patient-specific silicone pessaries. The pessary is a non-surgical treatment approach in which a small support device is inserted below the uterus by a doctor. However standardized designs require fit by trial and error, and patients often give up on treatment before finding the proper fit.
The Cosm team’s approach utilizes data from a novel ultrasound technique to design a custom device tailored to a patient’s own anatomy. The Cosm team turned to Formlabs SLA printers for their silicone molds, developing an eggshell-style conformal mold that is filled with medical-grade silicone and then cracked away to reveal the patient-specific silicone implant. The molds are made from Biomed Amber Resin printed on the Form 3B.
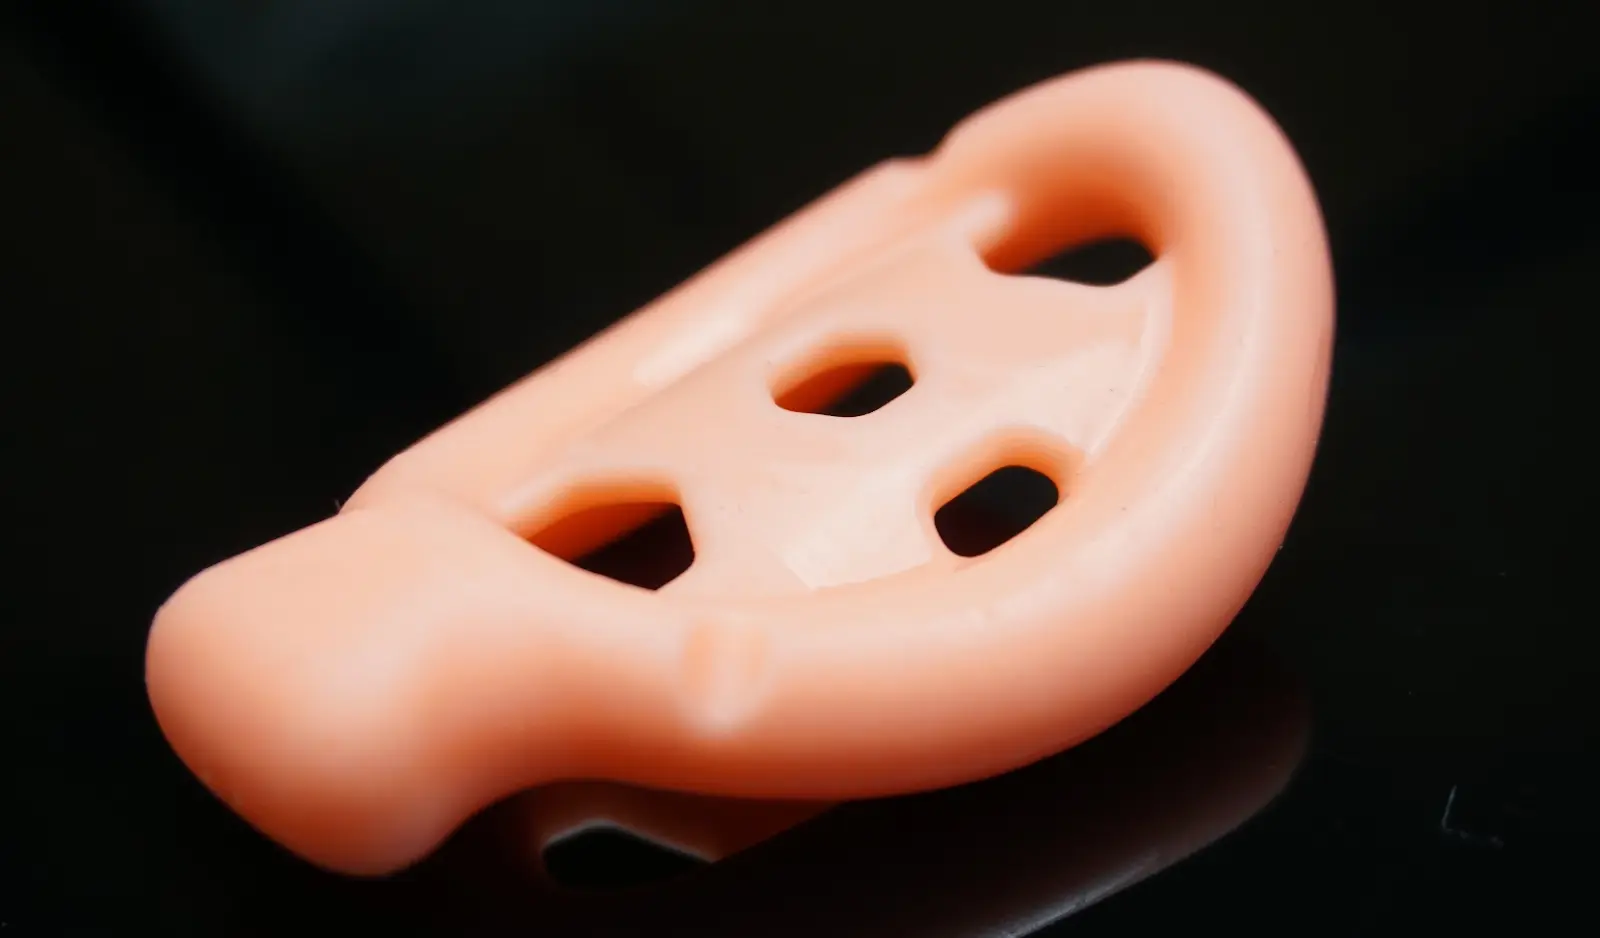
Cosm employs eggshell molds to produce custom silicone medical devices. Their thin-walled mold is printed with Biomed Amber Resin.
Step-by-Step Guide
The Formlabs team has developed a step-by-step process for creating a silicone product prototype, by combining aspects of our customers’ successful workflows. One project presented below is a molded silicone keychain with an embedded Apple Airtag device. The other is a cocktail shaker gasket designed by OXO. The design guidelines cover all critical steps from importing a reference geometry, to adding alignment features for encapsulated hardware. We also used the novel silicone filling method employing an epoxy gun with a 50:50 volume mixing nozzle recommended by Dame Products.
Many of the steps and best practices shared are common across mold types. Each step of the tutorial indicates its relevance to injection filled molds, overmolds, or compression molds.
For more information about eggshell molds, the Formlabs audiology white paper 3D Printing Custom Silicone Ear Molds provides a step by step guide.
Materials and Equipment
|
Molding process |
Equipment |
|
Injection mold or Overmold |
|
| Compression mold |
|
Mold Design
Overmold
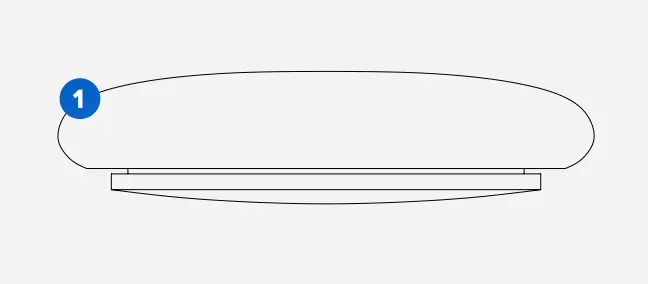
1. Import your reference object or substrate in the CAD software of your choice, if you are planning to overmold or encapsulate another object with silicone. In this example, we imported a digital replica of an Apple Airtag.
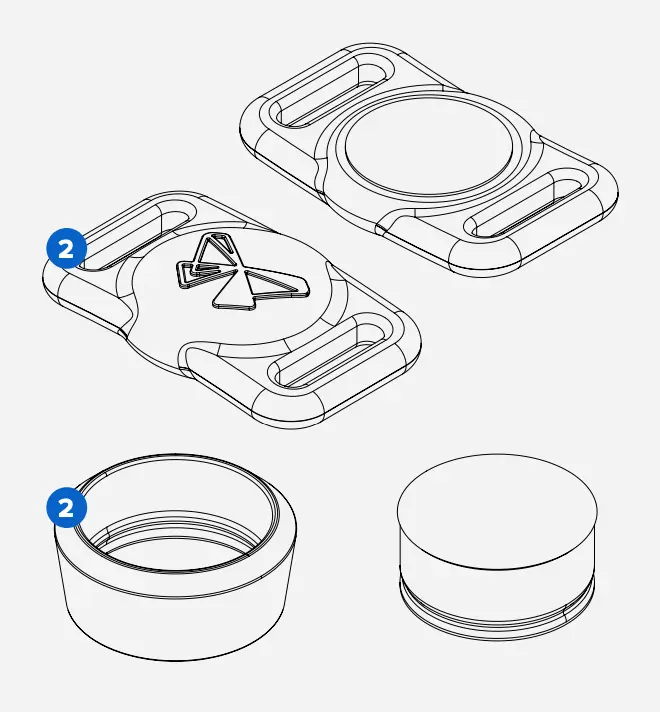
Injection filled mold, overmold, or compression mold
2. Design your silicone part. Together, the silicone and any encapsulated items form the base volume. For overmolded parts, aim for a minimum silicone shell thickness of 2 mm. In our compression mold example, the object has a complete through-hole. We recommend defining a core as a separate object; the silicone part plus core can be thought of as your base volume.
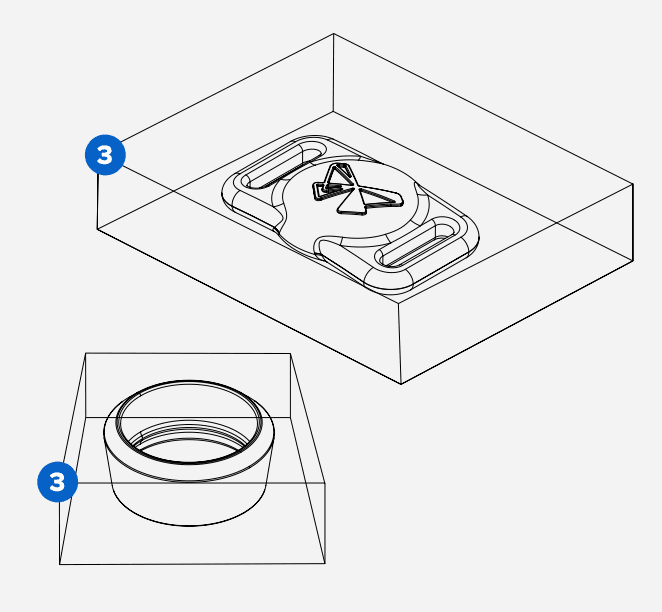
3. Design your mold stock. Create a block around your base volume that extends at least 1 cm beyond the outer shell of your part.
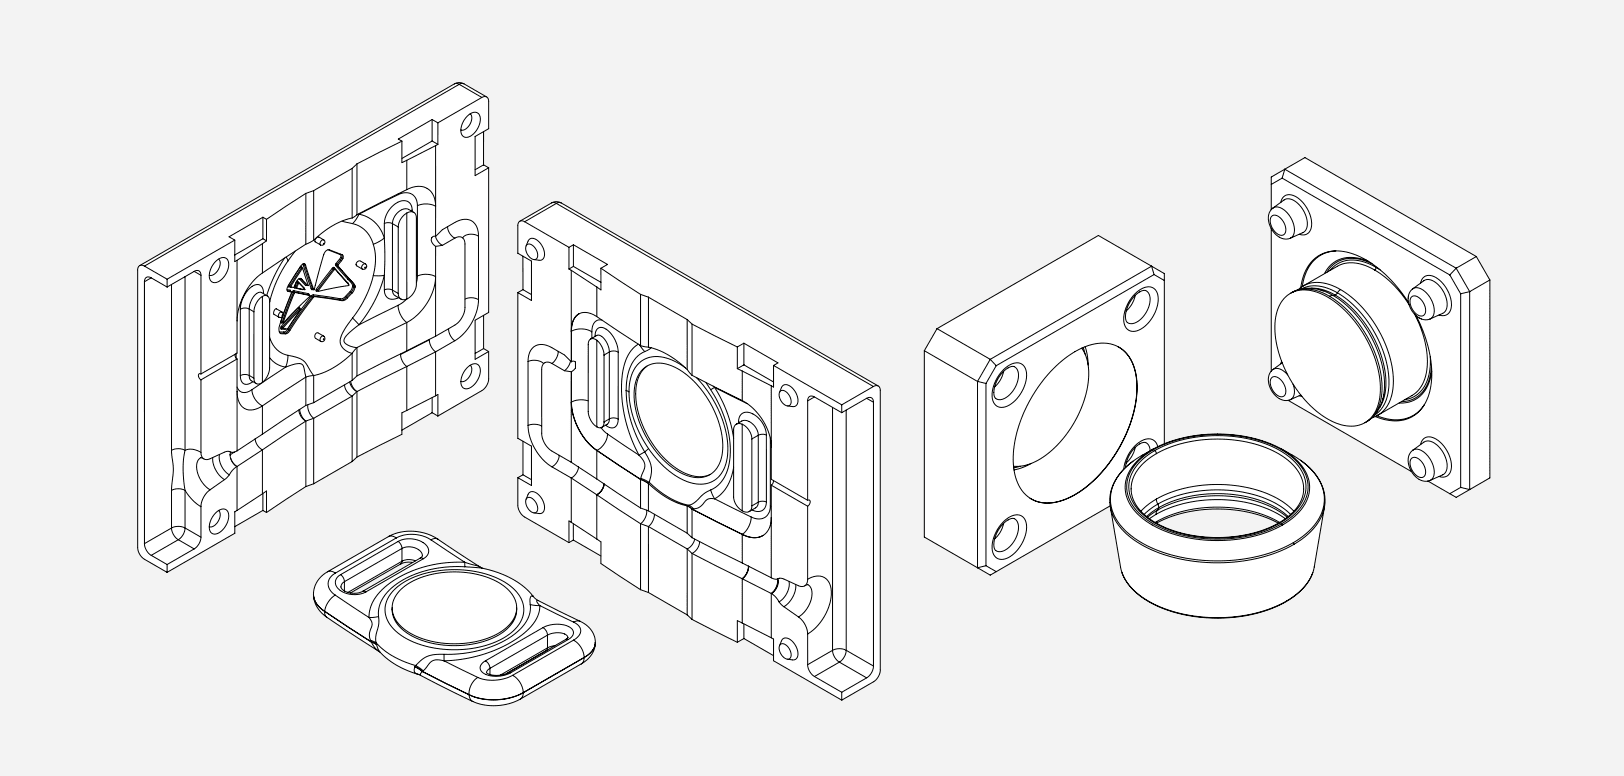
4. Split the mold. For a basic two-part mold, you will be splitting your base volume into two parts along a defined surface based on a parting line. Start by using draft analysis to define the parting line. Consider how the two halves of your mold will come apart, to ensure that the silicone part can be easily released from the mold. To avoid undercuts, the parting line might be a contour instead of a straight line. Next, extrude the parting line into a surface and use this surface to split your mold. For complex molds that require more than two parts, this process can be repeated multiple times to generate the number of mold parts required.
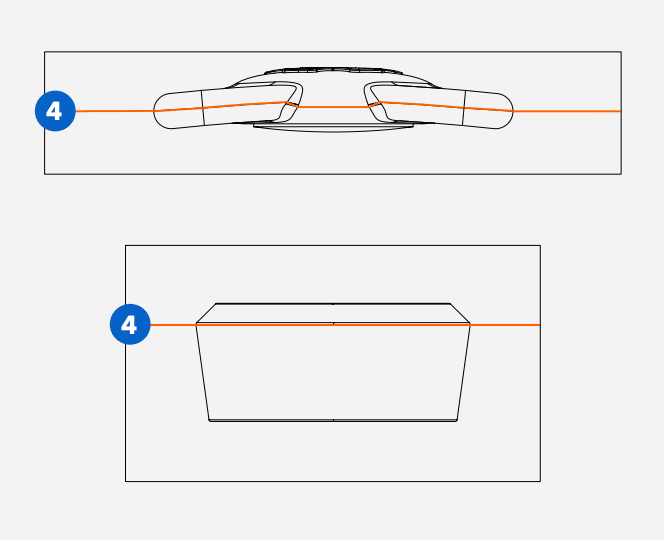
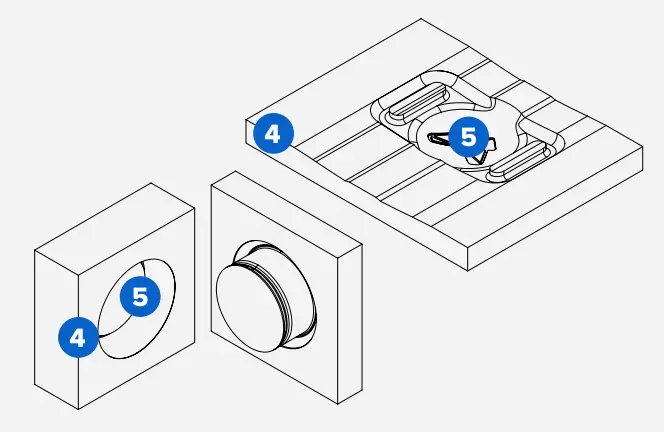
5. Remove base volume from the mold stock. Use boolean subtract in your CAD software to carve out the mold cavity from the solid block. In the case of our compression mold, the individual core component is added back with a boolean addition to one side of the mold, in effect creating two parting lines.
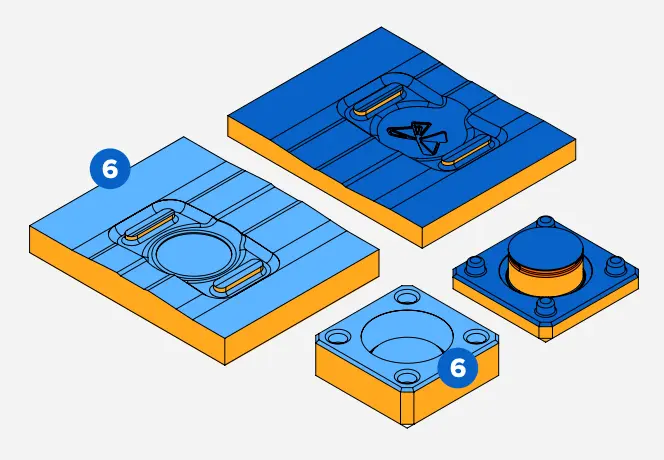
6. Check draft angles. It is a good idea to pause here and consider how your mold bodies will come apart after you inject the silicone. Our customers recommend using at least a two degree draft angle for silicone product prototypes. However, this aspect of silicone mold design is quite forgiving. Because the silicone rubber can generously deform during de-molding, many angles can be handled including 90 degree angles or slight undercuts. We recommend using the Draft Analysis tool in your CAD program at this step to analyze and edit any areas shown in red, beyond the threshold draft angle.
Injection filled mold, overmold
7. Design your gate. If you are relying on gravity to fill the recesses of the mold cavity, place the entrance of your gate high on the mold block and then, using a U-shape with a generous bend radius, connect the gate to the mold cavity at the lowest possible point. Filling at this location prevents air bubbles from forming. Boolean subtract the gate from the mold stock. Typically the central axis of the fill gate is located on the parting line. (Another configuration would be a short fill gate that directly connects to a point on your mold cavity; the main air vent will be located on the opposite side.)

8. Define your air vents. Air is displaced when filling silicone into an enclosed space, so it is natural to place an air vent at the point of the mold that is last to fill. In our example we place this at the top of the mold stock. To place additional air vents, It is helpful to think about areas where air is likely to be trapped, and connect vents specifically to points such as sharp turns, corners, or areas where two liquid flow fronts connect. Typically air vents will be cylinders (~ 0.5 - 2 mm in diameter) that connect areas of your cavity to the top of the mold. Like the fill gate, it is helpful to align the axis of any air vent on the parting line. Once placed, boolean subtract these features from the mold stock.
Injection filled mold, overmold, or compression mold
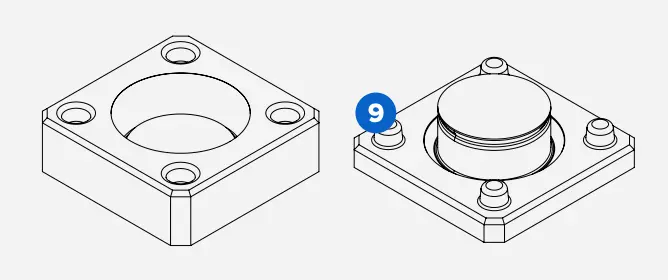
9. Add mating features to your mold. These features align and constrain separate parts of the mold stock to each other. Leave a ~0.1 mm offset gap between complementary mating features.
Overmold
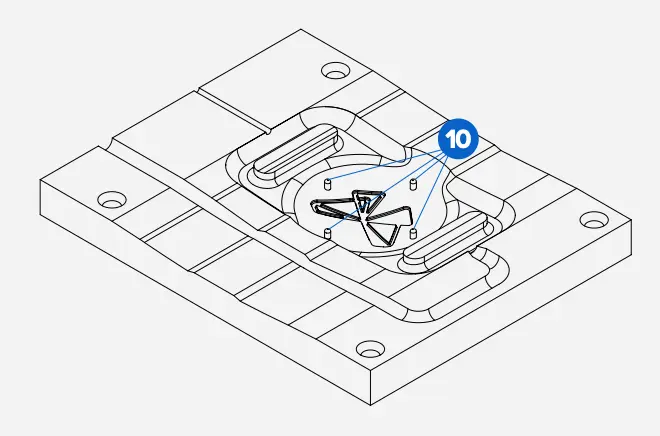
10. Add alignment pins for encapsulated devices. If you are overmolding or encapsulating a part in silicone, the part must be fully constrained in the mold so it does not shift during silicone casting. Use as few alignment pins as necessary to constrain the part, and aim for a pin diameter of about 1.25 mm. Pins should be pointing in the direction of draw, or perpendicular to the parting line of the mold. Note that alignment pins do leave small holes in the surface of the silicone part. If needed, these can be patched after de-molding using a small dab of liquid silicone, then allowing to cure.
Injection filled mold, overmold
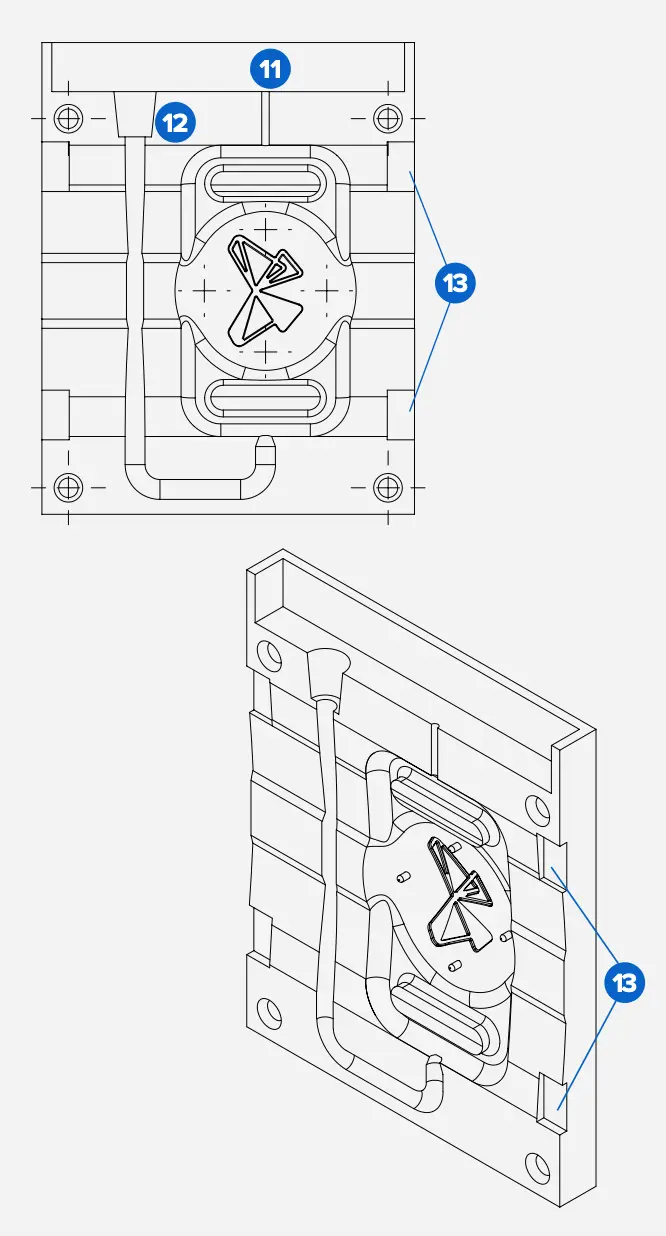
11. Add more mold features. One example is a fill trough. A trough is used for overflow of the silicone at both the fill gate and vent locations, and can be designed as a single continuous well that covers all gate and vent features. The trough also contains a reservoir of liquid silicone that can enter the mold during the curing process, by freely seeping into the mold cavity to displace bubbles and voids, or to compensate for silicone that enters the interface between mold parts during cure. In this particular example, our trough is 10 mm deep.
12. We also recommend adding a syringe inlet feature that matches the geometry of your syringe. We made ours slightly oversized with a six degree angle to fit a variety of syringe and mixing nozzle types.
13. Pry points can be added to assist with disassembly of the mold after curing. These are small rectangular cutouts along the parting line that allow a flathead screwdriver or another tool to be used to separate the mold parts. Our example cutouts extend 5 mm into the mold edge.
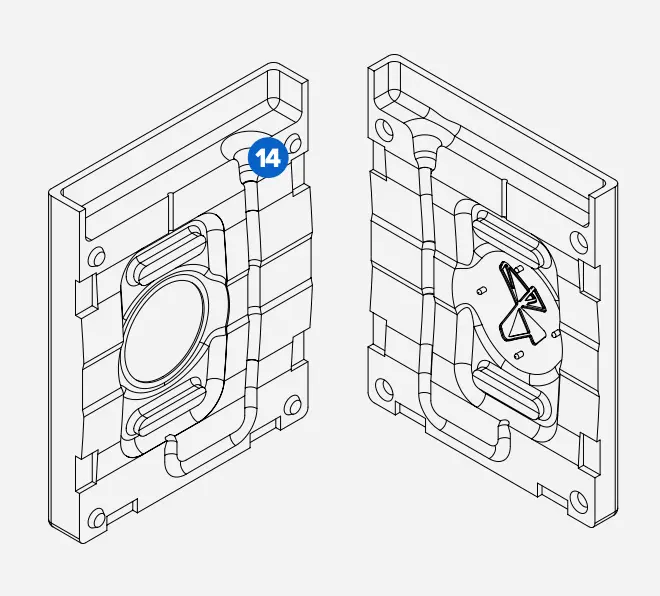
14. Add fillets or chamfers to angled mold features. This is usually the final step after the mold geometry is locked. Adding fillets to soften the edges of the mold edges can also aid the 3D printing process: when printing a mold stock directly on the build platform, beveling any external corners eases part removal after printing, and also reduces the amount of resin flash that can accumulate around sharp corners.
Mold 3D Printing
Injection filled mold, overmold, or compression mold
1. Select your resin. Many resins work, however Clear Resin or Biomed Clear Resin are great options for visualizing the flow of silicone while casting your part.
2. Print the mold. We recommend printing with a 50 μm layer height for a good balance between smooth surface texture and fast printing time. Since silicone picks up fine details in the surface, including layer lines, 25 micron layer height might be needed for some aesthetic applications. Orient your parts on the build plate so that critical interior surfaces are free of support marks. Placing the mold stock flat on the build platform can work in some cases.
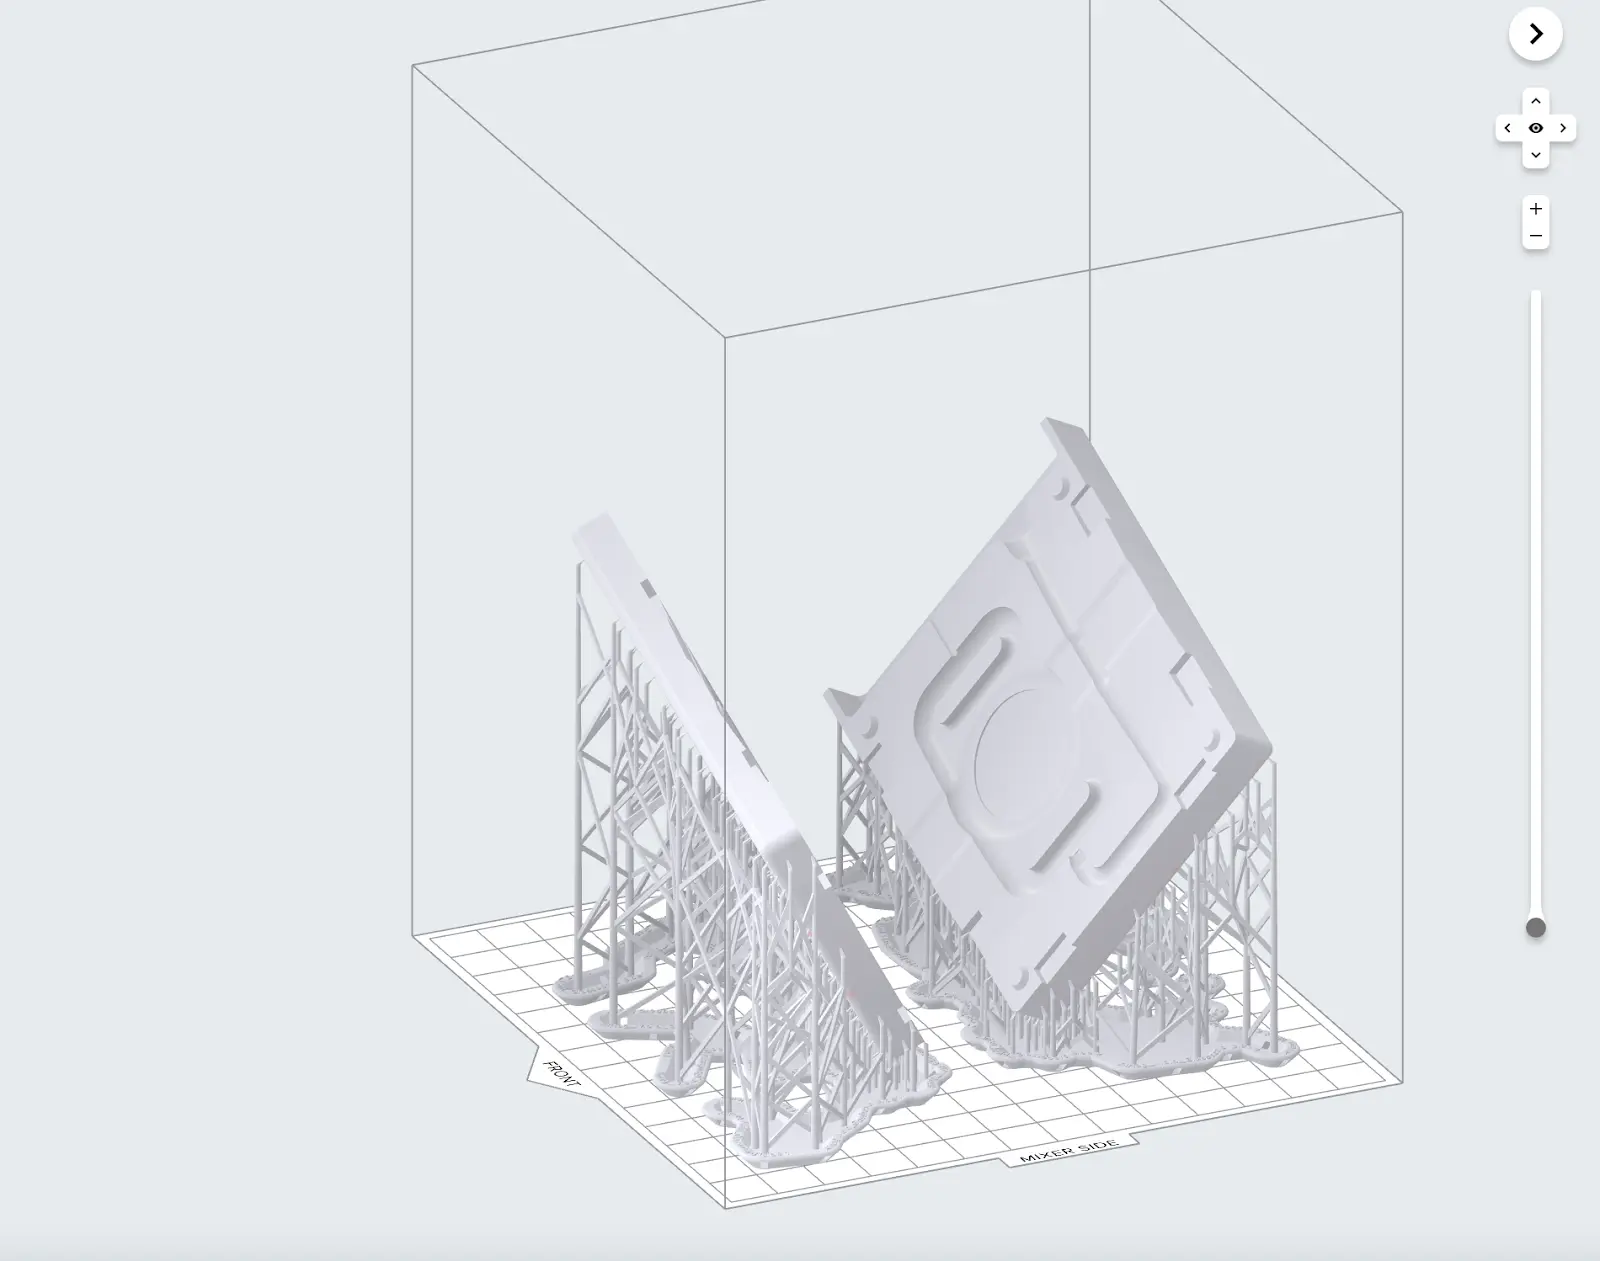
3. Wash and post-cure the mold. It is critical to thoroughly wash excess resin off of the mold stock with clean IPA because uncured resin can inhibit curing of silicone. The mold should also be cured completely to reduce the amount of unreacted monomer on the SLA parts. The preset time and temperature settings on Form Cure work well. For Clear Resin, the recommended settings are 15 minutes at 60°C. Clear Resin parts will develop a yellow tint, which is a good indicator that your mold is fully cured. The outer surface can be polished to a highly transparent finish. Adding mineral oil to the exterior surfaces is one option to help fill in surface scratches and provide an extremely clear window into the silicone filling process.
Mold Preparation
Injection filled mold, overmold
1. Apply coatings and mold release. Consider using mold release anytime two different materials come into contact with each other. This includes embedded hardware that you plan to insert and remove from an overmolded silicone sheath. Consult our customer workflow table for recommendations. Follow the guidelines on your material packaging, and wait for the coatings to fully cure or dry before moving on to the next step.
2. Inset internal parts/hardware. Alignment pins help to orient the part that will be encapsulated.
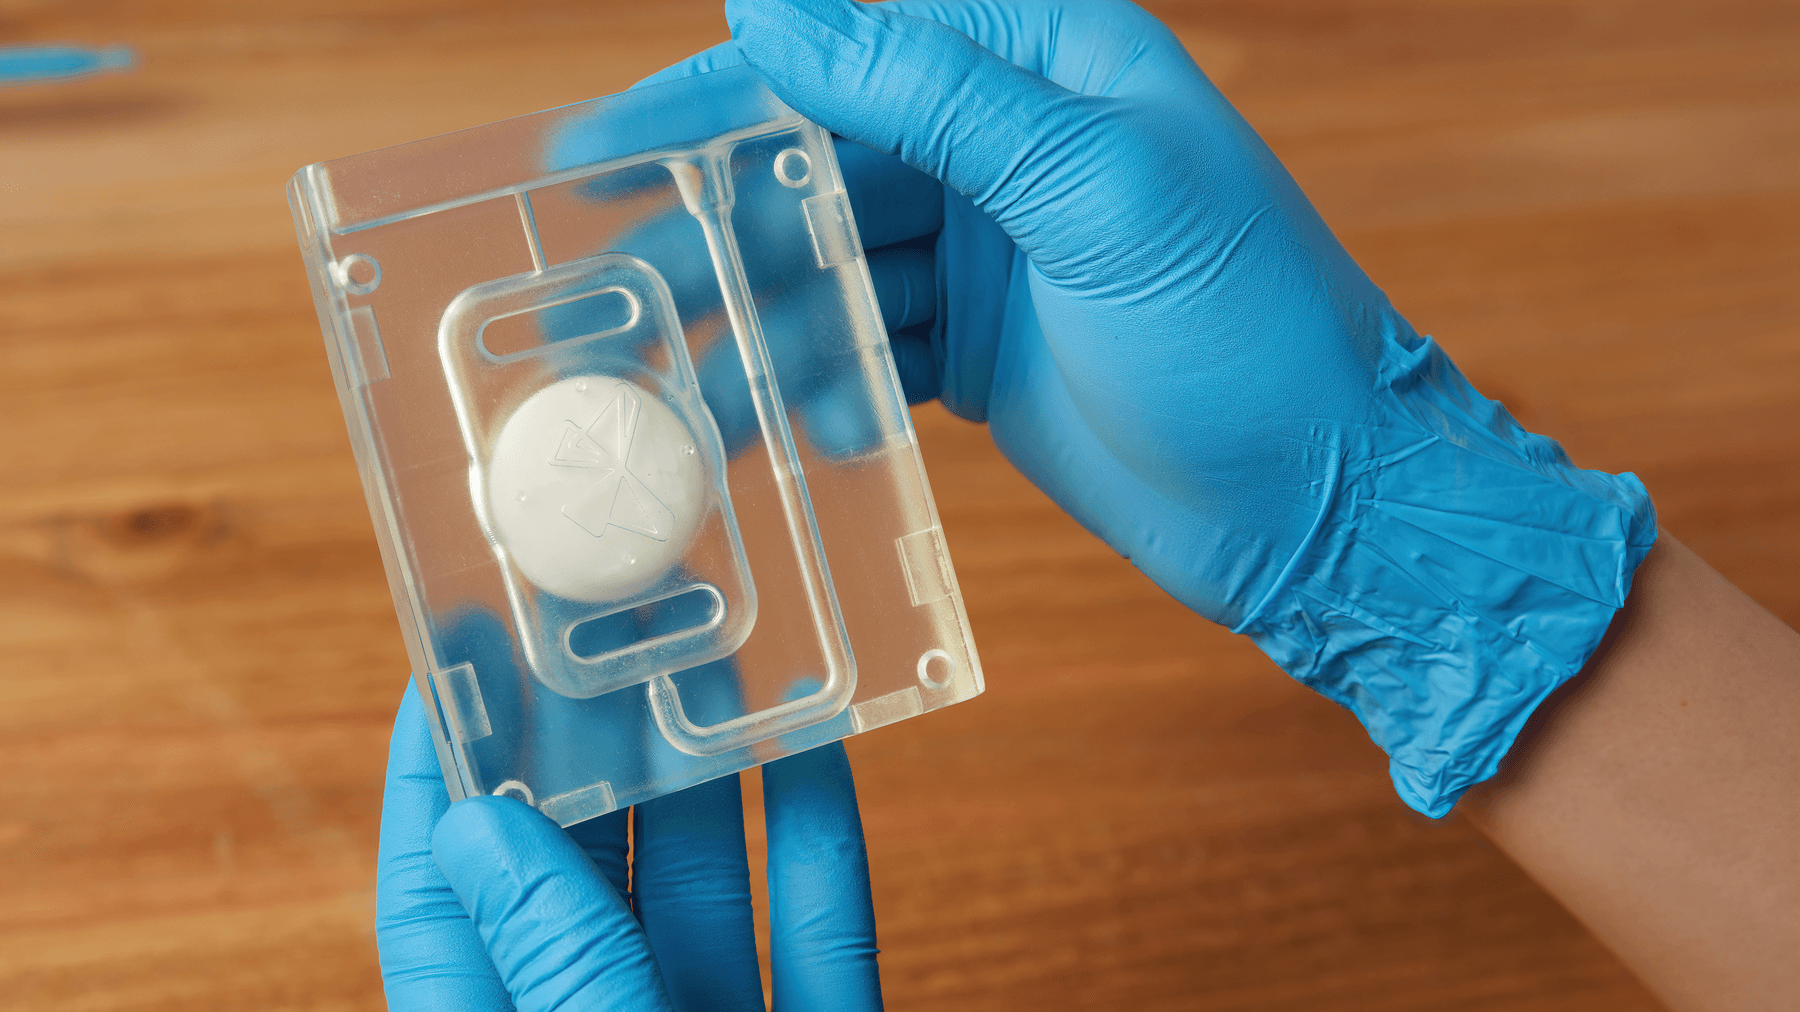
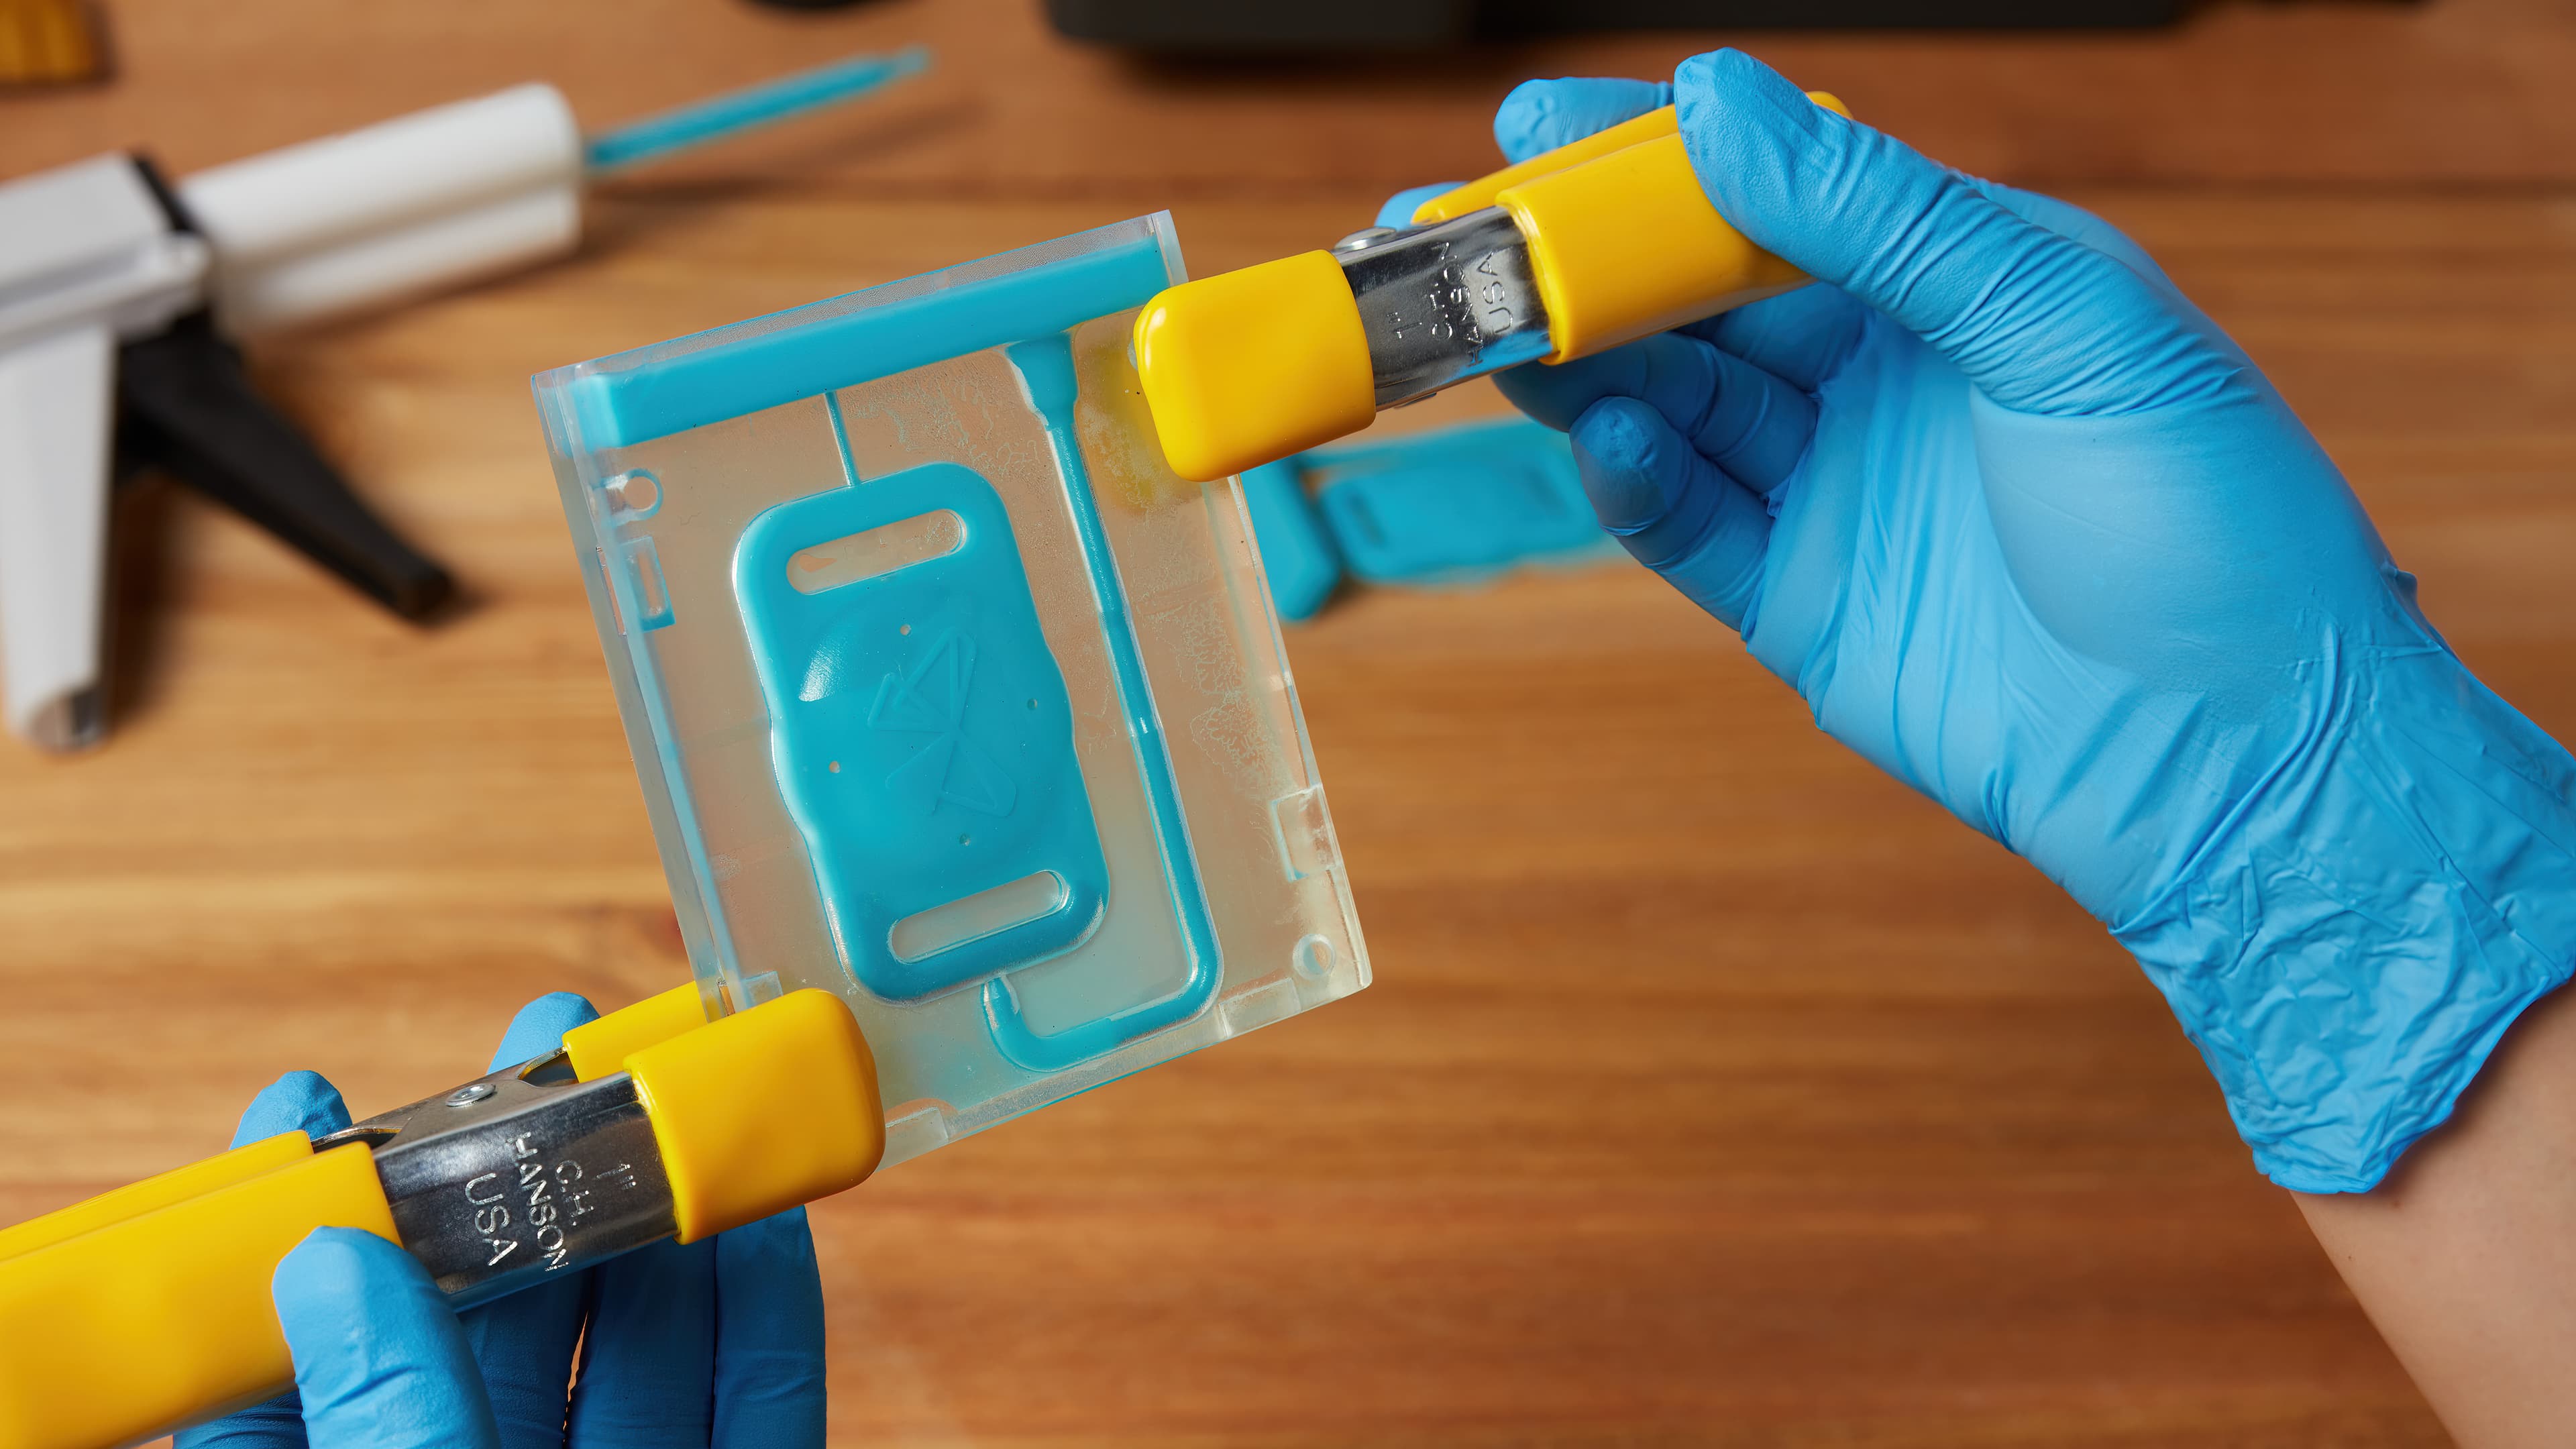
3. Close and clamp the mold. Carefully clamp the mold starting in the direction of the draw, making sure that the mold stock and any encapsulated objects remain in alignment.
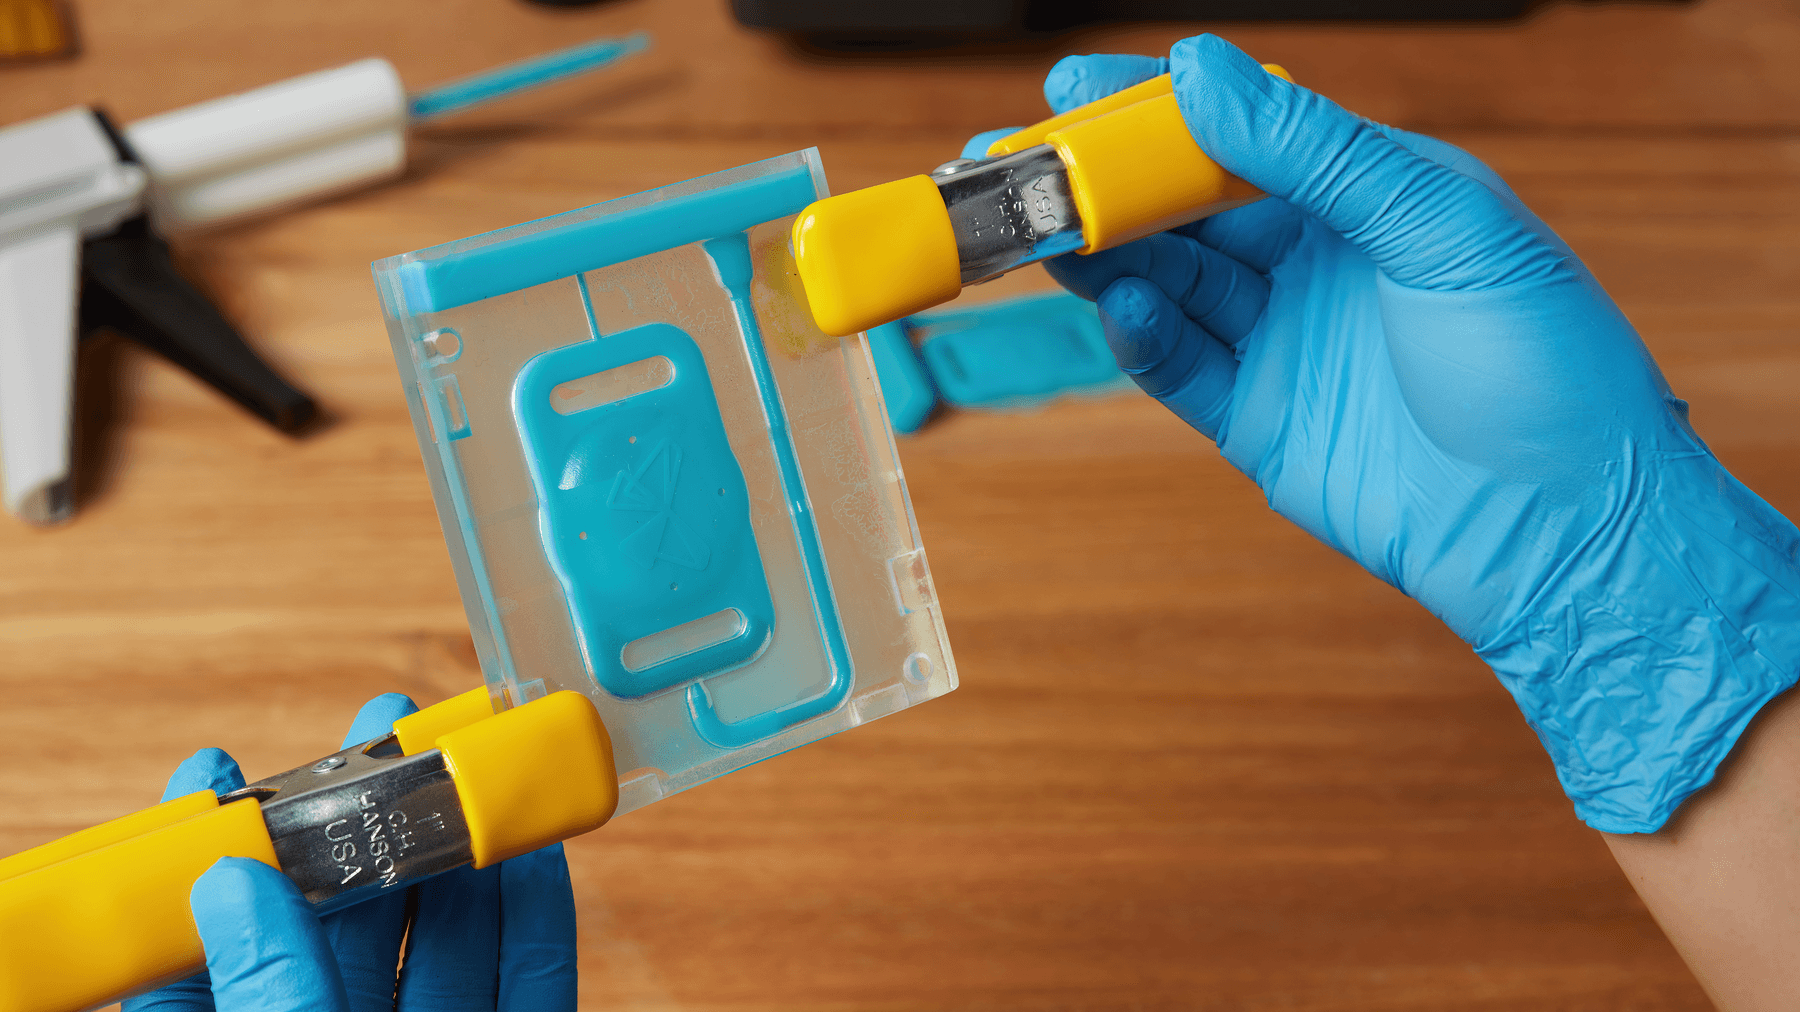
Silicone Preparation
Injection filled mold, overmold
If you are incorporating a pigment, mix the pigment into Part B before moving on to the steps below.
A frequent concern when casting silicone is trapping small air bubbles in the mold, resulting in voids in the final casted part. A couple of supplemental methods are recommended to manage air bubbles including degassing liquid silicone in a vacuum chamber prior to mold filling. As a general guideline, check the viscosity of your liquid RTV silicone formula. If it is over 18,000 cps (centipoise) degassing is recommended. If it is below this threshold, a de-gassing step may not be necessary. Another recommended technique is placing the filled mold in a pressure chamber during silicone curing in order to collapse and shrink any entrained bubbles. A great prototype can be produced without degassing the silicone or curing under pressure, but you can achieve a nearly perfect part using these supplemental methods.
1. Vat method
-
De-gas parts A and B separately under vacuum, if needed
-
Mix parts A and B together vigorously. Typically the two silicone components are mixed in equal volumes. Allow the mixture to degas under vacuum again, or to gently degas in air, usually three to four minutes.
2. Mixing nozzle method
-
De-gas parts A and B separately under vacuum, if needed.
-
Fill each side of an epoxy cartridge system with one part (A or B), using separate syringes to transfer the liquids. Pouring the silicone high above the cartridge in a thin stream will help to avoid remixing air into the silicone.
-
De-gas parts A and B. Stand upright and allow the silicone to gently de-gas in air, or under vacuum. Because silicone parts A and B remain separate, the filled cartridge can remain for days before you use it.
Compression mold
1. Mix parts A and B thoroughly. Mix together equal volumes of parts A and B of the silicone putty, and knead by hand. The silicone rubber begins to cure after 90 seconds, so the parts should be kneaded for the minimum time necessary to generate a uniform color.
Silicone Forming
Injection filled mold, overmold
1. Vat method: Draw the degassed silicone mixture into a syringe. Next, invert the syringe so the nozzle faces up. Allow any air pockets to rise to the top. Depress the plunger to expel the air and extrude a small amount of your silicone to ensure no air bubbles remain in the syringe. Insert into the fill gate and slowly fill the mold until silicone exits from the air vents. If your model has an overflow trough feature, continue filling this area of the mold.
2. Mixing nozzle method:
-
Assemble the epoxy gun. Insert the cartridges into the gun and screw on the mixing nozzle. It’s helpful to squeeze a little bit of liquid out of the nozzle tip at this stage to make sure you are getting proper mixing.
-
Fill the mold. Insert into the fill gate and slowly fill the mold until silicone exits from the air vents. Again, fill up the trough feature if your mold includes one.
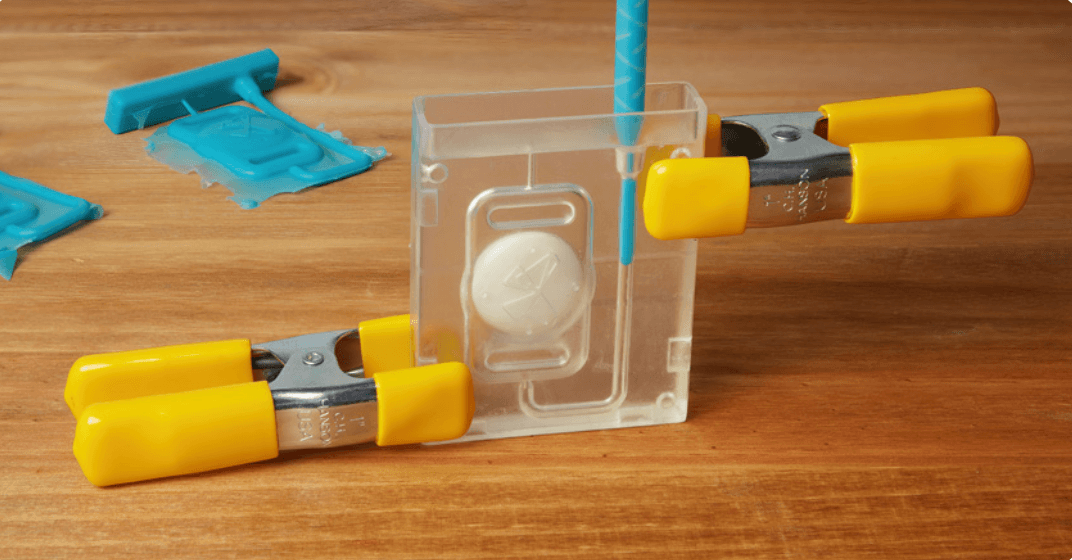
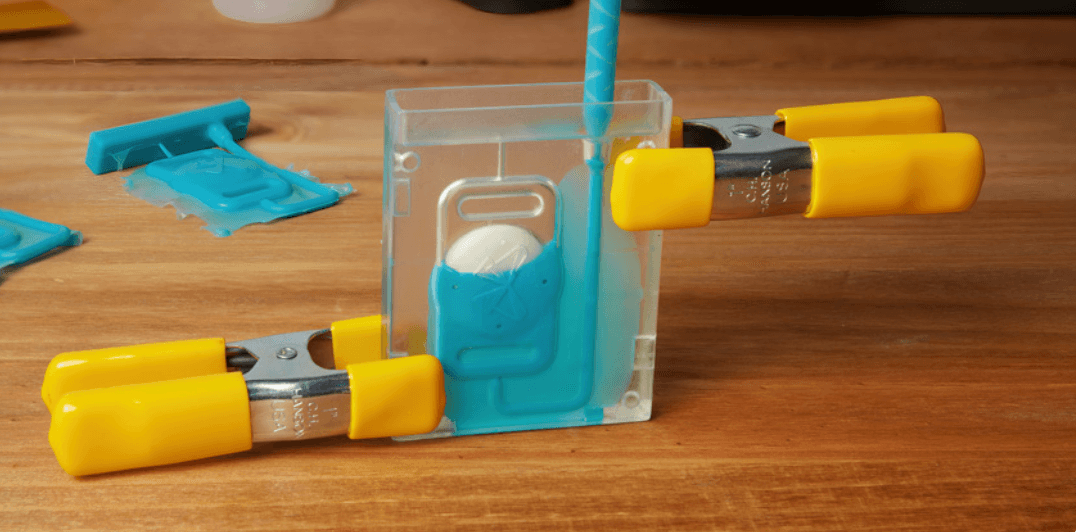
3. As an optional step, place the mold in the pressure pot and add your silicone manufacturer’s recommended air pressure to the pot (e.g. ~30 psi). This shrinks any bubbles trapped in the mold and forces the material in the trough down into the mold. Let the silicone cure under pressure according to the manufacturer's instructions.
Compression mold
1. Stuff silicone into the mold. The silicone should be compacted into both sides of the mold, being sure to catch all details and crevices. Any excess material will simply spill outside the edges of the mold.
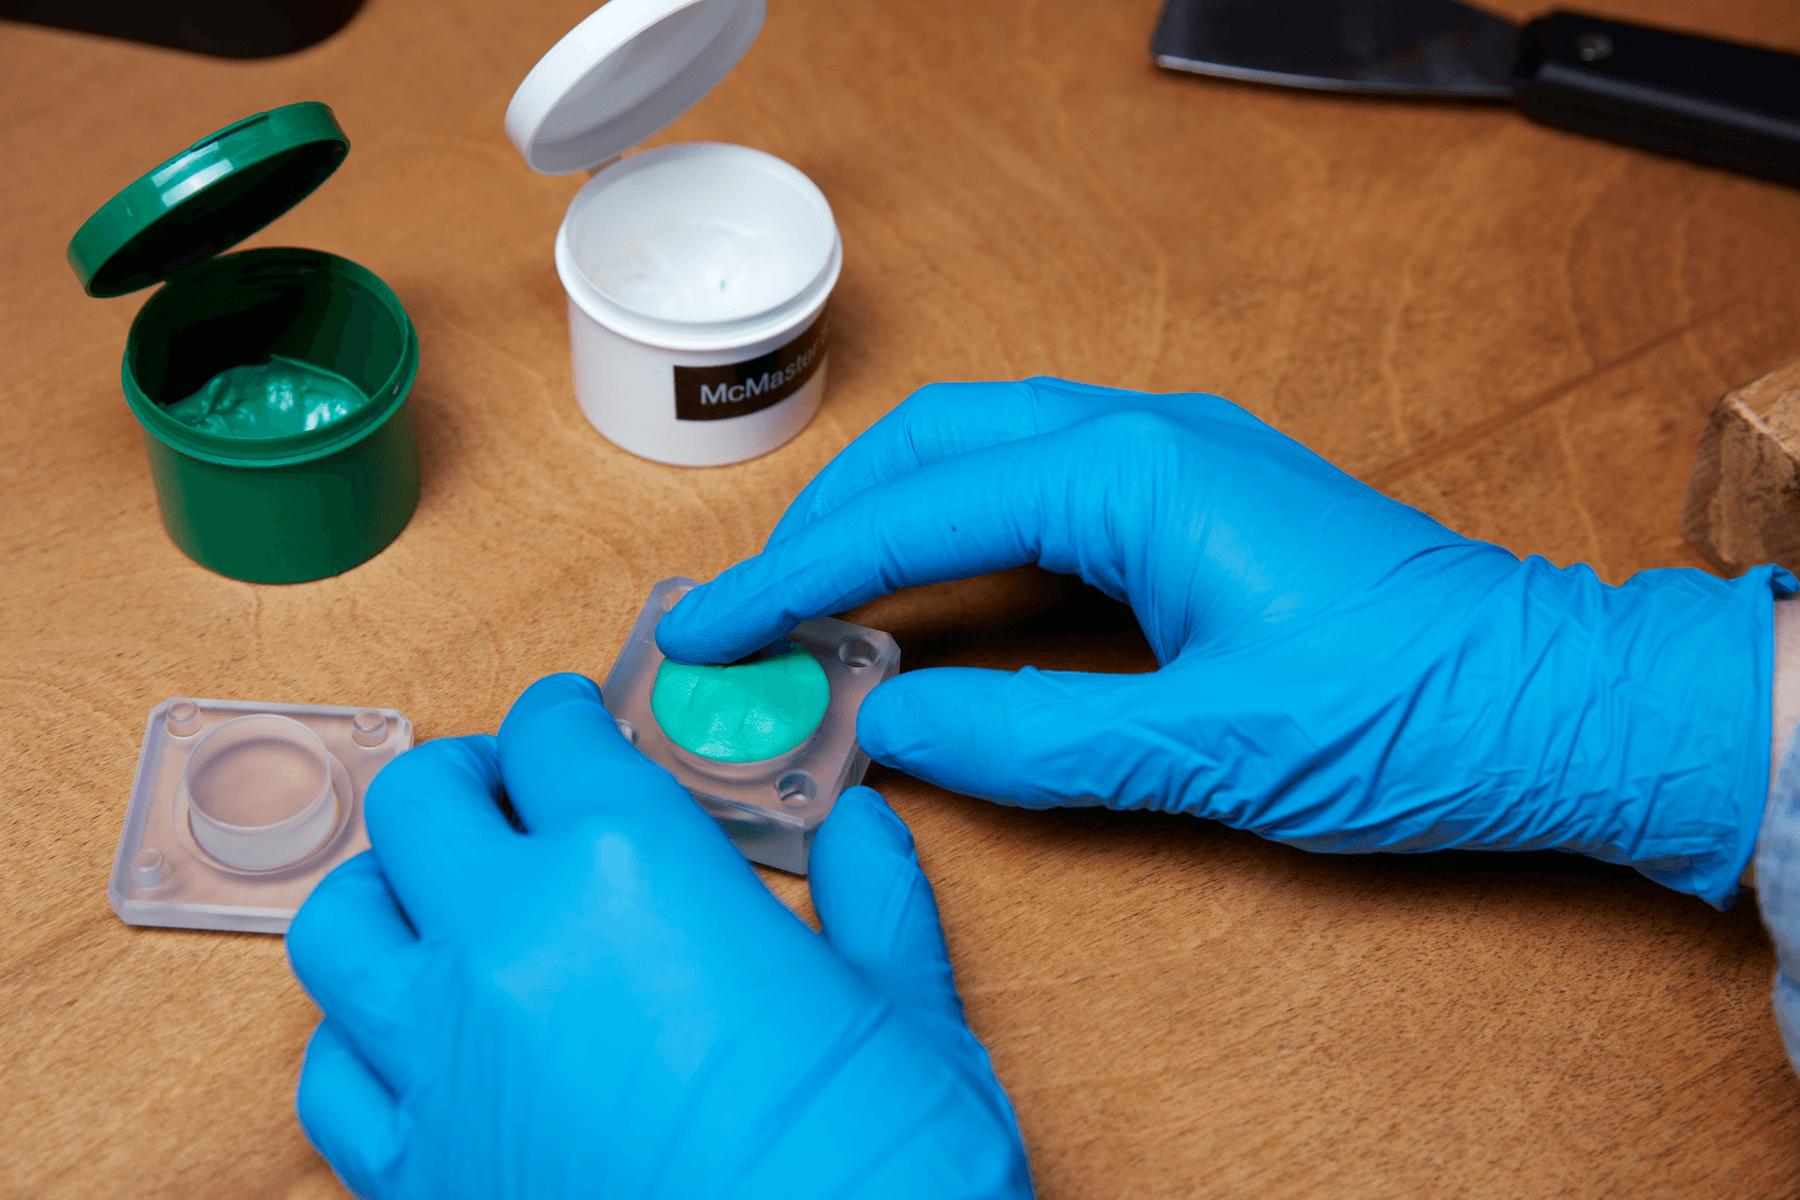
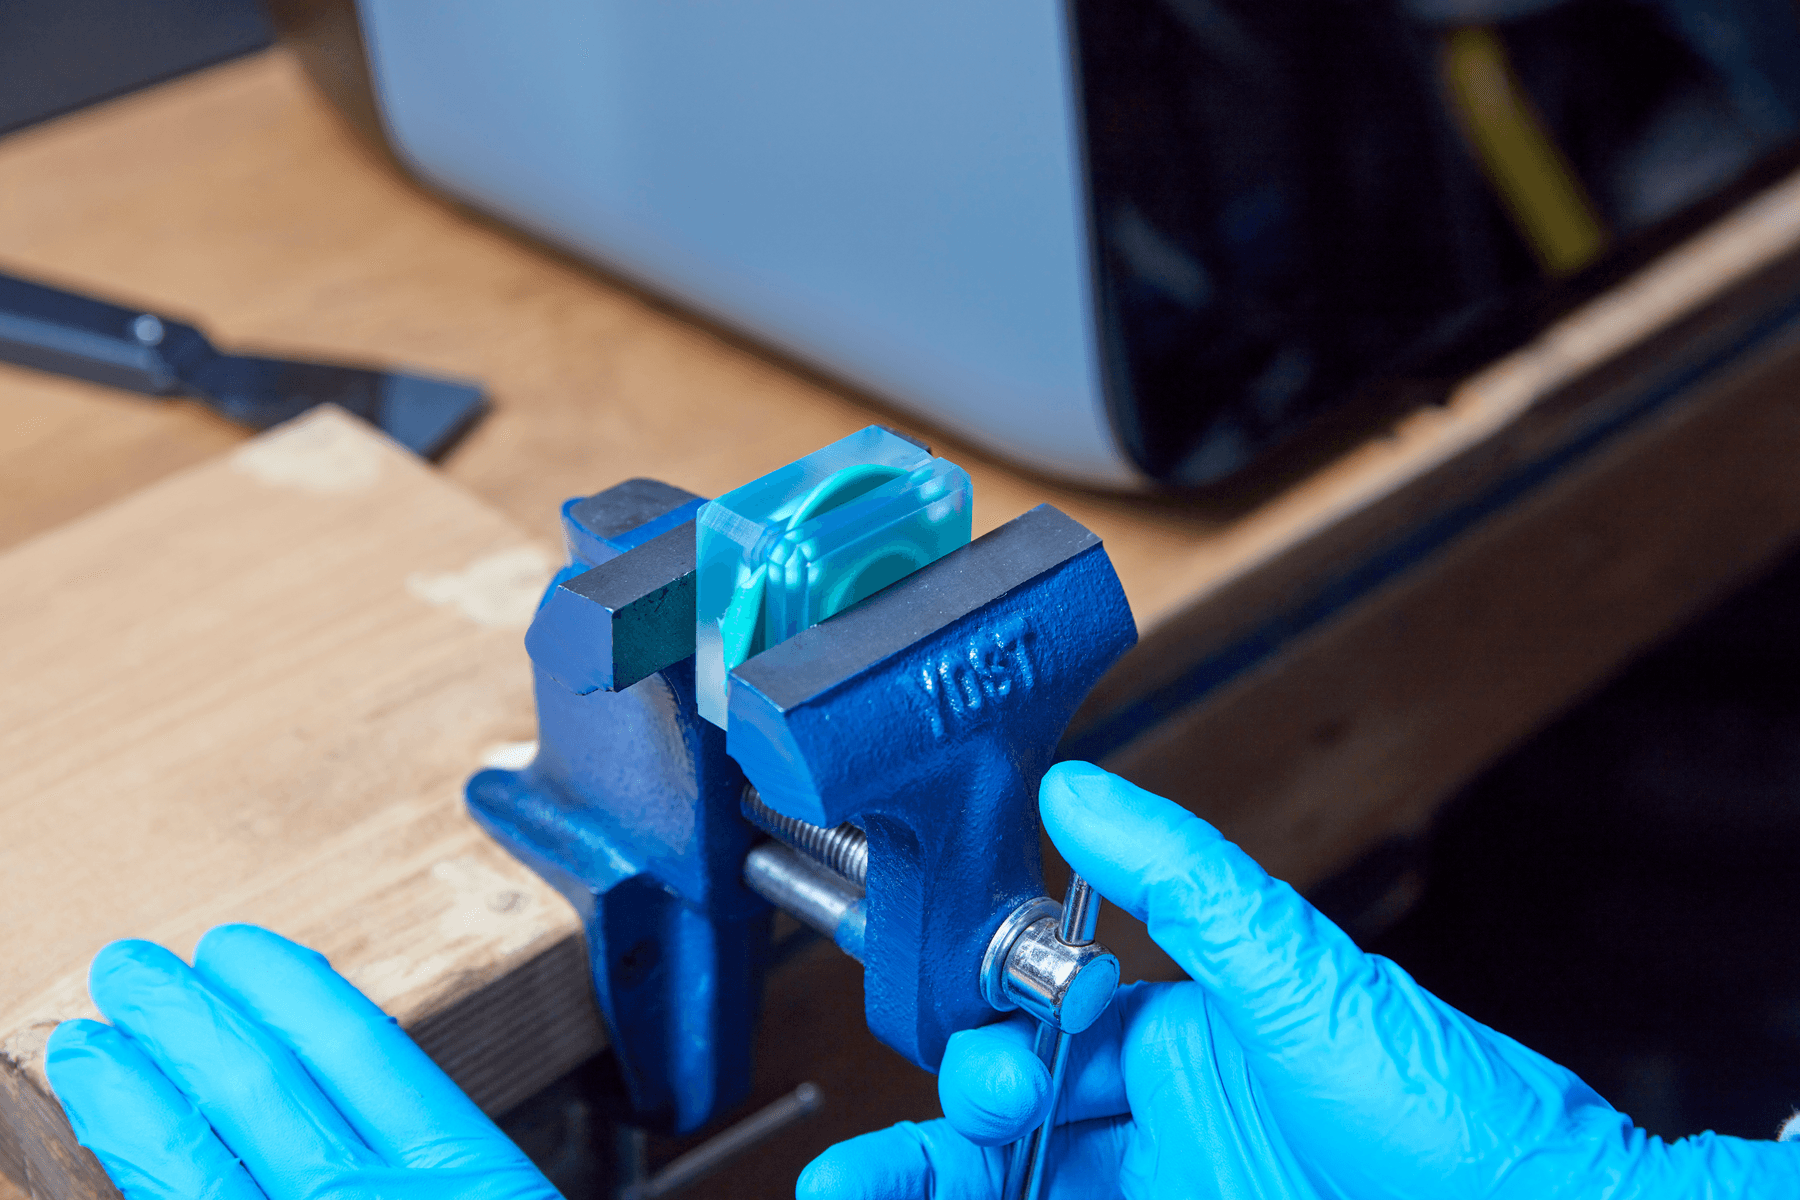
2. Squeeze mold together using a tabletop vise. The mold should be squeezed perpendicular to the parting line. In compression molds, the mating surfaces don’t completely touch until pressure is applied. Close the clamp gently until it does not close further. The recommended Castaldo Quick-Sil silicone rubber cures completely in 20 minutes.
Silicone Curing and Part Finishing
Injection filled mold, overmold, compression mold
The cure time can range from 10 minutes to several hours depending on the silicone chemistry.
1. Define mold orientation. With a gravity-filled configuration, like our example, the mold can remain oriented upright without an extra sealing step as the silicone cures. With an end-to-end filling configuration, we would experience backflow of silicone if simply setting the filled mold on our workbench. After filling, we recommend sealing the gate with duct tape. The compression mold should remain clamped in a tabletop vise while curing.
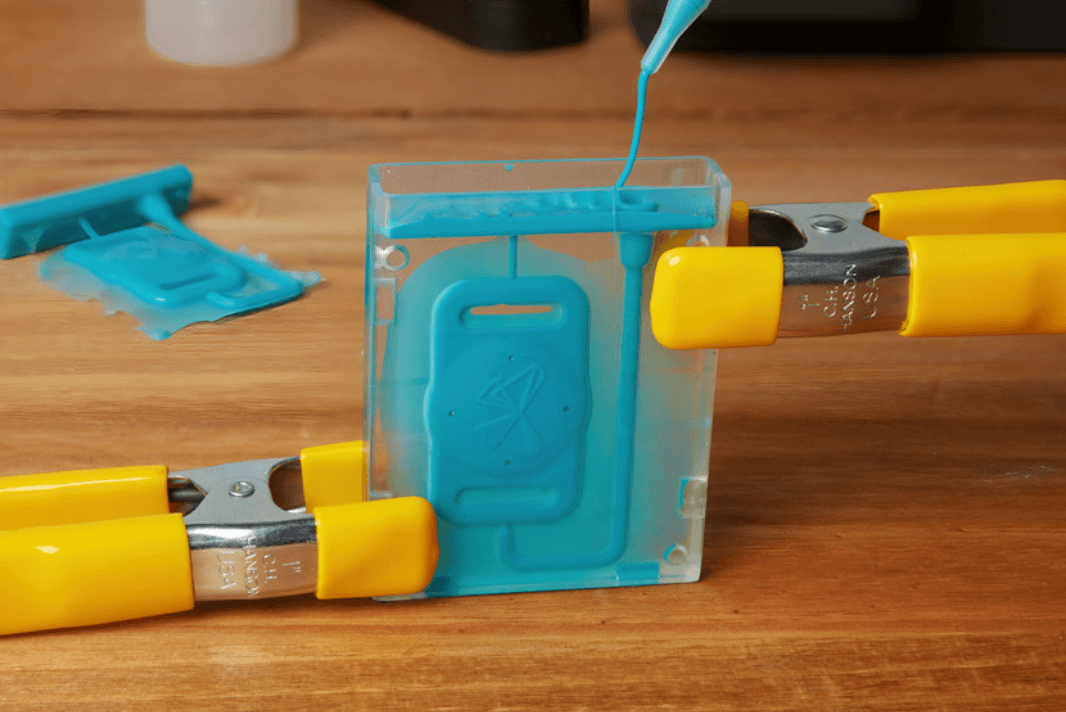
2. De-mold and trim the silicone part. It is normal to develop some flash within and around the split plane. Remove excess silicone from the exterior of the mold first. Pry open the mold by inserting a flat head screwdriver or another flat tool into the pry point and gently twisting to break the seal. Remove the silicone part, being mindful that some silicone may need to be gently trimmed away from any air vents. After removing the silicone part from the mold, use a sharp razor or flush cutters to trim the vent and gate features from the part. Residual bumps can be removed gently with wet fine grit sandpaper. Finally, you can wash the part with soap and water to remove sandpaper and mold release residues.
3. Prepare for the next casting. Molds can be reused multiple times. You may need to clean out vents with a sharp tool and/or reapply mold release before filling with silicone again. It is common to accumulate incompletely cured silicone in the narrow surface between mold blocks. This can be wiped away with a clean cloth.
4. Design iteration. It is normal to go through a couple of mold design iterations after trying the full end-to-end workflow. A few design changes you might need to consider include increasing the offset distance between registration features, moving alignment pins to ensure that encapsulated objects are fully constrained, or adding air vents in areas that tend to trap air bubbles during filling.
Moving From Prototyping to Manufacturing
Fast-moving, automated equipment used in mass production can lead to different design requirements for silicone part manufacturing, compared to a prototyping method with 3D printed molds.
1. Mold material. Production molds are typically made from machined aluminum or steel.
2. Alignment pins for overmolding. The alignment pins for overmolding are oriented within the plane of the mold’s main parting line, rather than perpendicular to it. These are also designed to retract in and out of the mold, resulting in a silicone layer that does not have dimples and holes created by alignment pins.
3. Draft angle. Our customers recommend using at least two degrees draft angle for silicone products. While the prototype or short-run production molds presented in this report can handle deep undercuts, these types of silicone geometries must be carefully pried from the mold, and would be difficult to replicate by an automated injection system.
4. Injection molding configuration. Gravity-fill molds are highly reliable mold configurations for benchtop prototyping. For rapid mass production methods, inlet and outlet geometries are on opposite sides of the mold.
5. Silicone materials. While silicone chemistry used in production is quite similar to the RTV materials presented in this white paper, both liquid silicone rubbers (LSR) for injection molding and heat cured rubbers (HCR) for compression molding typically enter the mold at low temperature, and are then cured at elevated temperature.
Conclusion
Formlabs' complete, easy-to-use ecosystem makes it simple to get started with 3D printing molds for silicone part production and adding soft rubbery components to your product or project portfolio. The methods outlined in this paper can be used directly, or elements from each can be borrowed for custom applications.
Do you have more questions about using SLA printing for silicone part production or finding the right 3D printing solution for your business? Set up a meeting with a Formlabs expert who can answer your questions.
Request a free sample part to see Formlabs 3D printed materials firsthand and contact our 3D printing specialist to find the right solution for your application.