WHITEPAPER
Formlabs Logo

Receiving and setting up the Form Wash L V1

Receiving and setting up the Form Wash L V1

Plan an appropriate location for the Form Wash L V1. The Form Wash L is a floor-based unit. Purchase additional finishing supplies, including a suitable washing solvent to ensure you can start using the Form Wash L when it arrives.

The Form Wash L is ready for use once the Wi-Fi antenna is installed, the machine is connected to a power source, and the wash bucket is filled with solvent.

Zusätzliches Zubehör

Prior to receiving the Form Wash L, purchase at least 43 L of your preferred solvent.

Purchase the following additional supplies to finish post-cured parts: 

  • Powder-free, chemical-resistant disposable gloves (nitrile or neoprene)
  • Sandpaper
  • Mineral oil
  • Primer and paints

Einrichtung des Arbeitsbereichs

Review the technical specifications to determine the best location for the Form Wash L.

The Form Wash L has the following dimensions: 78 × 46 × 67 cm (30.7 × 18.1 × 26.4 in). The Form Wash L unit weighs 56.7 kg (125 lbs) without solvent.

Reserve the following minimum dimensions for the most convenient access:

  • Width: 100 cm (40 in)
  • Depth: 120 cm (48 in)
  • Height: 120 cm (48 in)

Operate the Form Wash L in a well-ventilated room with a temperature of 18–28 °C (64–82 °F). Follow safety considerations for the Form Wash L.

Unboxing the Form Wash L

The Form Wash L ships in a cardboard carton protected by foam inserts above and below the unit. The packaging contains the accessories, the power supply, and the Form Wash L Safety Booklet (English only). During unboxing, inspect the Form Wash L for any damage or missing items. In the case of damage or missing items, contact Formlabs Support or your authorized reseller.

Tip:

Keep the packaging for transportation or shipping.

The machine’s power cord is included on top of the foam inside the box. If you cannot locate the power cable, be sure to check all boxes in your shipment, as it may have been packed separately.

To unbox the Form Wash L:

  1. Position the packaging near a designated workspace, leaving enough room for two people to comfortably maneuver throughout the area. Stand the packaging upright to ensure it is level.
  2. Lift the outer cardboard box off of the lower carrier tray.
  3. Open the lid of the machine and remove the accessories box.
  4. Remove the foam inserts found at the top of the machine.
  5. Use the provided handles on the carrying slings to lift the machine out of its carrier tray.
  6. Carefully move the machine to its workspace.

Caution:

If you need to move the Form Wash L, use the carrying slings to move the machine. Do not pick up the Form Wash L without the carrying slings.

  1. Tilt each side of the machine up slightly to remove the carrying slings.

Notice:

Remove all packaging material before connecting the Form Wash L to a power source. Retain all packaging and inserts for warranty service. Refer to the manual for the repackaging instructions.

Form Wash L components

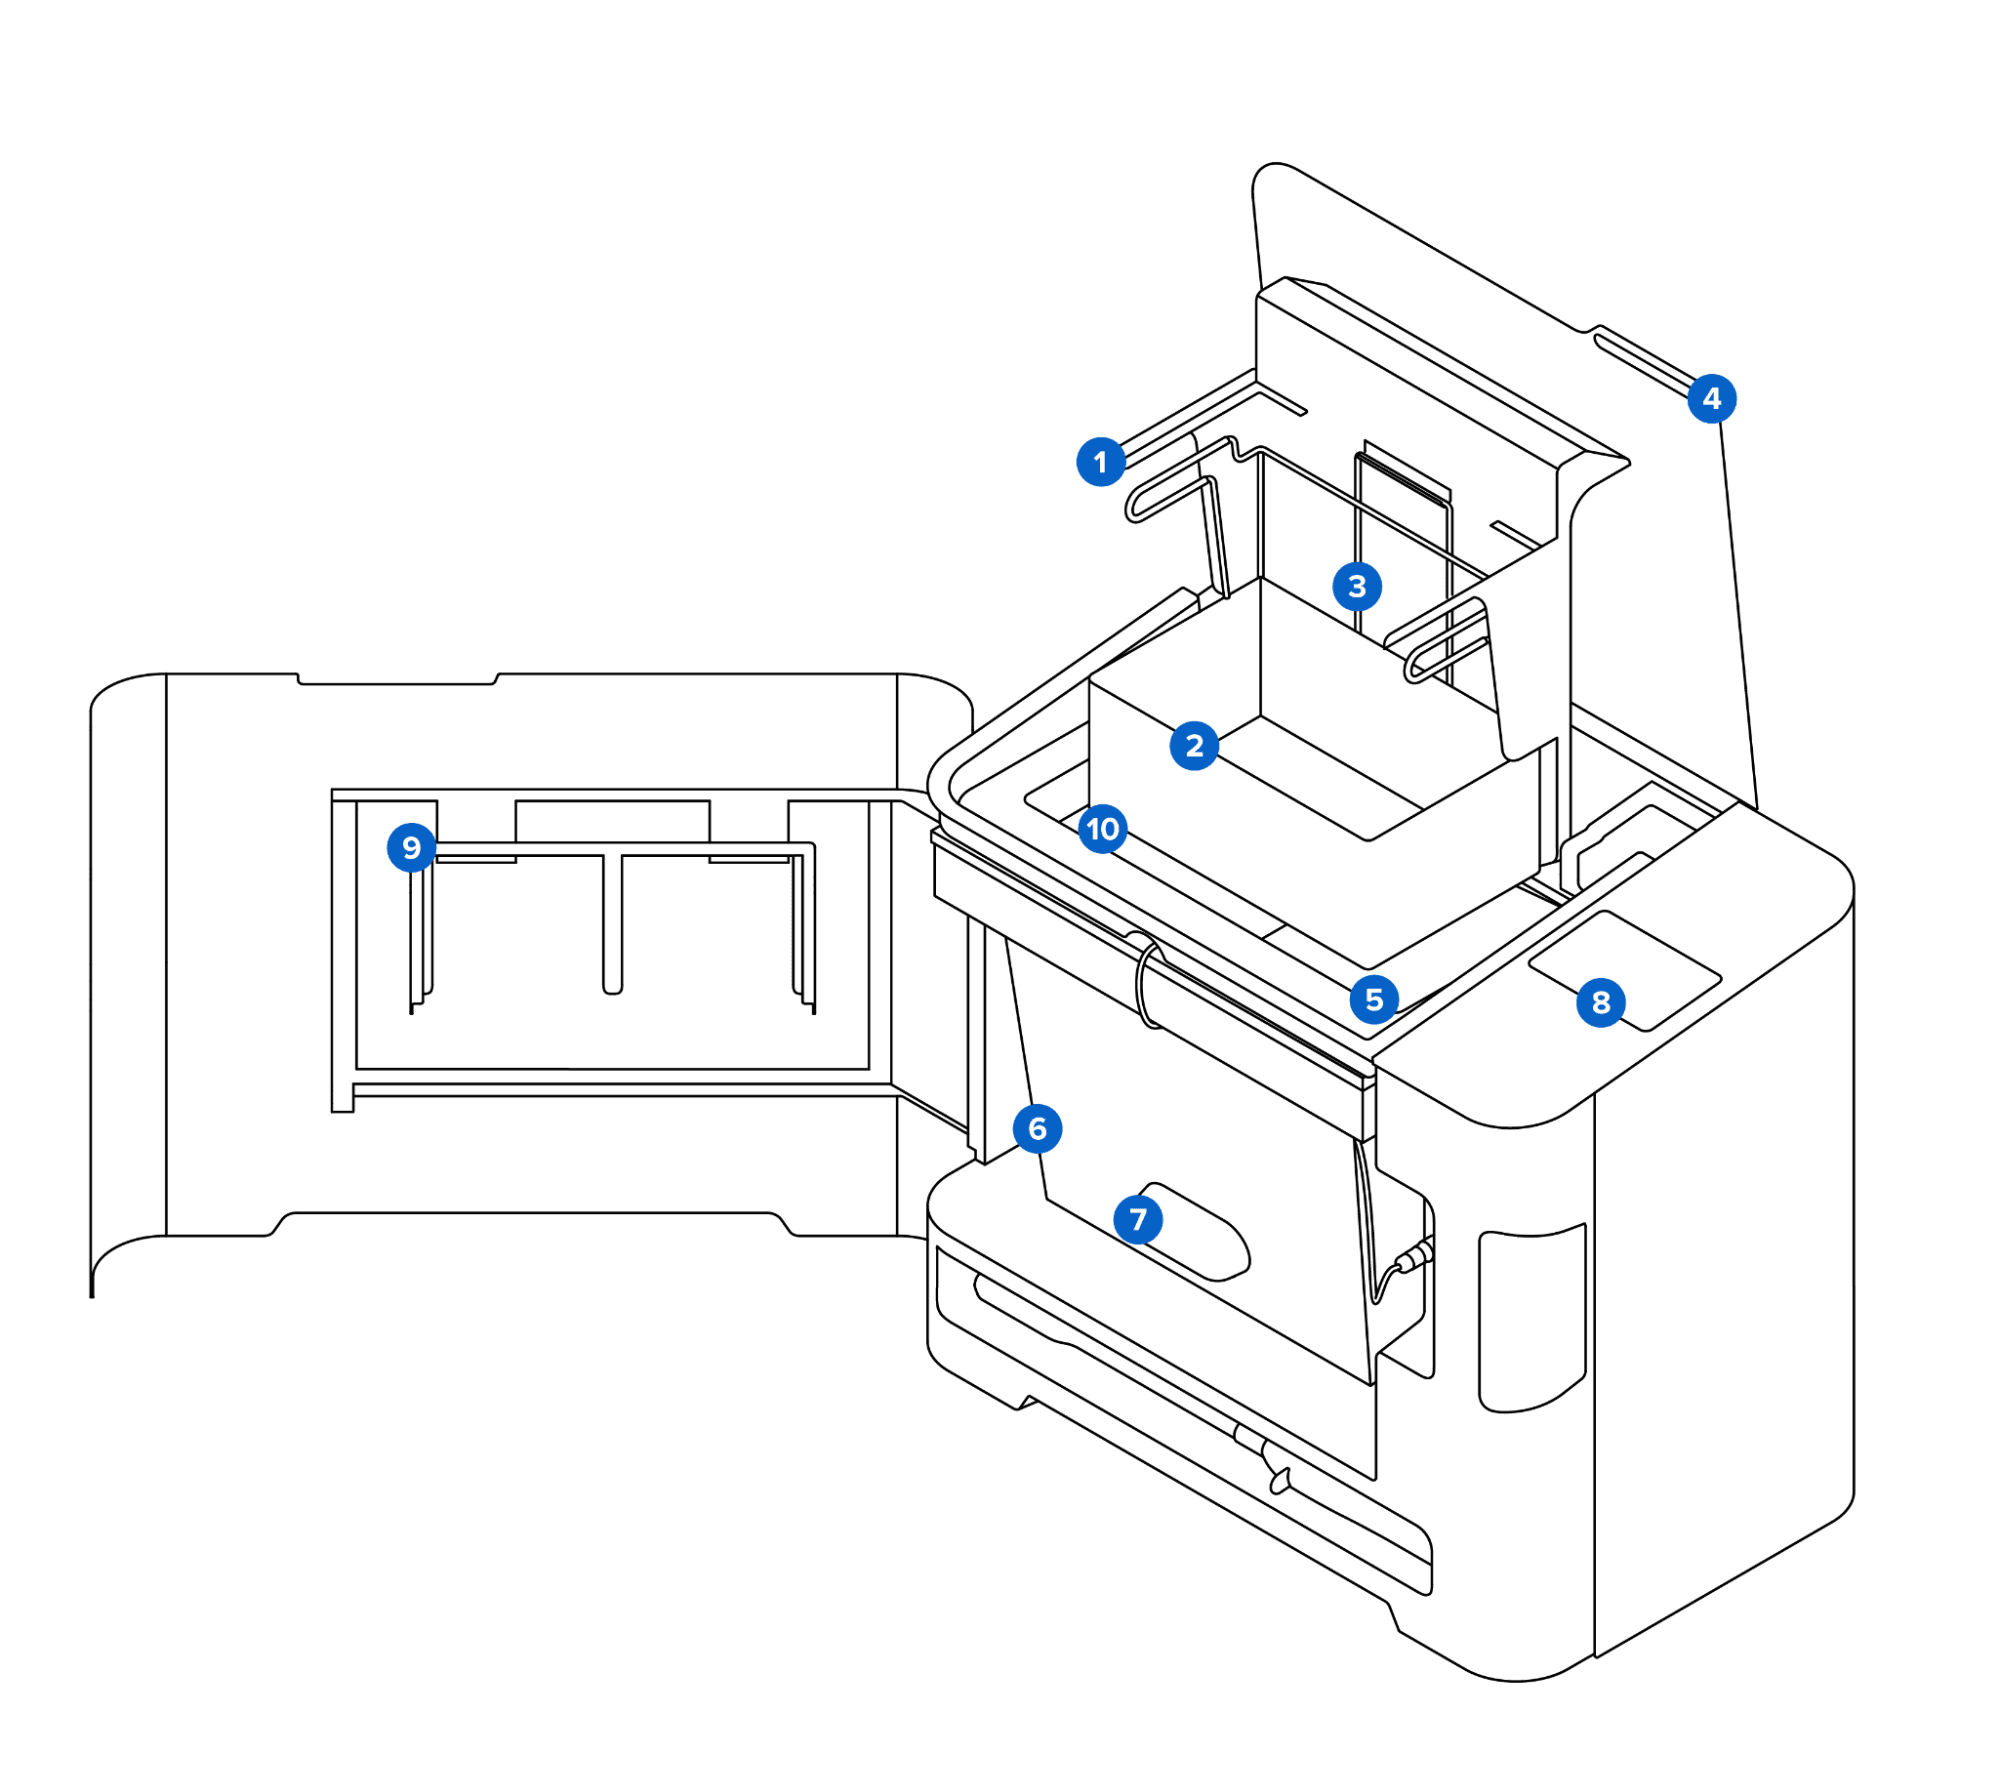
alttext
  1. Platform mount: Holds the build platform when washing parts on the platform.
  2. Basket: Removable container holds parts to wash without the build platform.
  3. Basket mount: A single hook secures the basket to raise and lower.
  4. Outer lid: Limits solvent evaporation.
  5. Inner lid: A hinged, secondary lid opens and closes to contain solvent while allowing parts to be lowered or raised from the bucket.
  6. Wash bucket: Removable container holds a maximum of 43 L (11.4 US gal) of solvent. A rotating impeller at the bottom of the wash bucket circulates the solvent.
  7. Solvent monitor: A sensor measures the amount of resin dissolved in the solvent, allowing the Form Wash L to determine when the solvent needs to be replaced.
  8. Touchscreen: The LCD capacitive touch user interface displays wash cycle information, settings, and error messages.
  9. Platform mount adapter: An adapter that can be placed on the platform mount so that two Form 3 Build Platforms can be washed at the same time.
  10. Solvent: Not included. Dissolves liquid resin from printed parts’ surfaces.

Form Wash L tools and storage

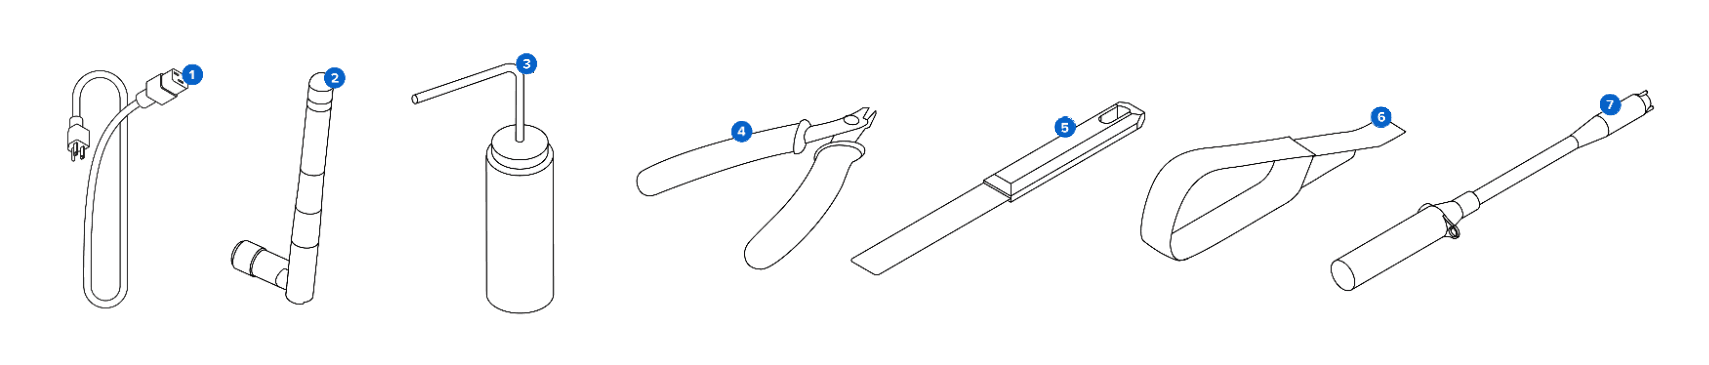
Form Wash L additional tools diagram
  1. Power cable: Provides power to the Form Wash L.
  2. Wi-Fi antenna: Allows the machine to connect to a network via Wi-Fi.
  3. Rinse bottle: Remove resin trapped in cavities and internal channels of prints. Use clean solvent.
  4. Flush cutters: Snip to separate prints from their supports. Cut with the flat side on the prints’ surface for minimal support marks.
  5. Scraper: Remove prints from the build platform. Do not use the scraper to clean the resin tank interior.
  6. Removal tool: Pry under the raft to remove prints from the build platform. Do not use the removal tool to clean the resin tank interior.
  7. Electric siphon pump: A battery-powered siphon pump for moving solvent into and out of the wash bucket. The pump has a dedicated storage slot underneath the wash bucket.

Installing the Form Wash L

Place the Form Wash L on a clean, level surface with a nearby power source. Plug the included power cable into the power port on the back of the unit and connect the power cable to a circuit. Flip the breaker switch on the back of the unit to the ON position to power on the machine.

The Form Wash L requires an internet connection in order to receive firmware updates.

To install the Wi-Fi antenna, screw the Wi-Fi antenna into the jack on the back of the unit.

For Ethernet, connect the machine to your LAN with an Ethernet cable. Refer to Connecting the Form Wash L and Form Cure L via USB, Ethernet, or Wi-Fi for more information.

As the Form Wash L initializes, the Formlabs logo with a progress bar appears on the touchscreen, followed by the onboarding screen. Follow the on-screen prompts to finish setting up the machine by removing any remaining packaging, filling the Form Wash L with solvent, and installing the solvent monitor. Be sure to set your solvent type, either during the onboarding process or by tapping the Solvent card on the home screen.