WHITE PAPER
Formlabs Logo

Non-adherence

Non-adherence

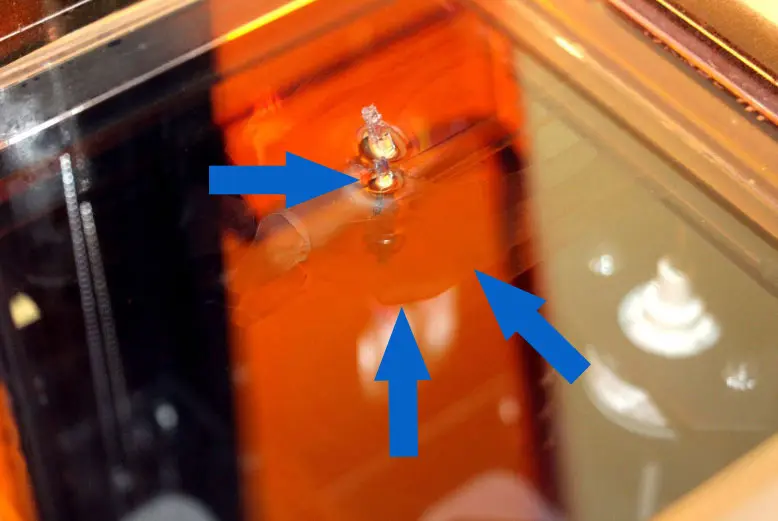
“Non-adherence” describes a print defect in which prints are either partially or completely detached from the build platform. This occurs when the initial layers of a print fail to adhere to the build platform.

Left: Print missing completely from the build platform.

Right: Arrows point to remains of a part left inside the resin tank.

Visual symptoms

  • Complete non-adherence (at print start):
    • The print is missing from the build platform and there is a flat area of cured resin on the bottom of the resin tank.
  • Partial non-adherence:
    • The print’s raft partially separates from the build platform.
  • Complete non-adherence later in print:
    • The print has formed partially, but has fallen into the tank during the print, leaving nothing on the build platform.

Note:

If the layers of the print are separating from each other within the part, and the raft is still attached to the build platform, the printer’s likely experiencing another print defect. For more information, refer to the support article Delamination.

Common causes

Any of the following factors, or a combination of them, can cause non-adherence in prints:

  • Printing without a raft, when the part has no suitable flat surface to grip the build platform.
  • The first layer of the part on the build platform is too small to withstand peel forces.
  • Debris/clouding/damage in the resin tank weakening the printer’s laser.
  • Contaminated optical surfaces weakening the printer’s laser.
  • Excessive space between the build platform and the elastic layer or the flexible film in the resin tank.

Troubleshooting steps

Successful troubleshooting identifies symptoms and systematically narrows down the root cause of an issue. Follow the troubleshooting steps below to check for possible causes, beginning with the most likely cause of the print defect.

Note:

Make sure that your firmware and PreForm versions are up to date. To check your printer’s firmware version, refer to the support article Checking the firmware version for Formlabs SLA printers. To update your PreForm version, refer to the FAQ article How do I update PreForm?.

Step 1: Check the model’s supports in PreForm

Printing with a raft helps parts adhere to the build platform. Generate supports in PreForm when setting up your model.

Check if the print detached at the point of contact between the model and the supports.

Step 2: Check the model’s orientation in PreForm

If the surface area of the initial layers is too small, the suction from the peel process may pull the part off the build platform.

Check the model in PreForm for orientation issues:

  1. Orient the model so that the surface area in contact with the build platform is not too small proportional to your part.
  2. If printing directly on the build platform, make sure that the part has a large, flat side in direct contact with the platform.
  3. When printing on a Form 2, check that parts are oriented with their longest side parallel to the front of the printer. Parts oriented in this way can better resist the lateral forces from the peel process between layers.

Step 3: Check the resin tank

Any damage or debris in or on the resin tank can block the laser at that location, preventing the resin directly above it from curing. Inspect the inside and underside of the tank for dirt, dust, and/or fingerprints. The bottom of the tank must be clean for the best print results.

Keep resin tanks clean and well-maintained between prints for reliable and successful printing.

Form 4 and Form 4L generation

  1. Inspect the resin tank for debris with the plastic scraper that comes with the Finish Kit or a similar tool. Apply minimal force to remove the cured resin. Avoid using the corners of the tool to dig under the print. Do not use metal tools to inspect the resin tank.
  2. Remove any failed prints and cured resin by printing a cleaning sheet.
  3. Filter the resin to remove any contamination or cured resin.
  4. Inspect the film at the bottom of the resin tank for scratches or wear. Excessive wear means the resin tank needs to be replaced.
  5. Inspect the underside of the film for dirt, dust, or fingerprints. Clean it with Formlabs recommended steps and supplies.

Form 3 and Form 3L generation

  1. Inspect the resin tank for debris with the tank tool.
  2. Remove any failed prints and cured resin using the tank tool.
  3. Alternatively, remove any failed prints and cured resin by printing a cleaning mesh.
  4. Filter the resin to remove any contamination or cured resin.
  5. Inspect the flexible film at the bottom of the resin tank for scratches or wear. Excessive wear means the resin tank needs to be replaced.
  6. Inspect the underside of the flexible film for dirt, dust, or fingerprints. Clean it with Formlabs recommended steps and supplies.

Form 2

  1. Inspect the resin tank for debris with a scraper.
  2. Remove any failed prints and cured resin with the scraper, being careful not to gouge or cut the elastic layer at the bottom of the tank.
  3. Filter the resin to remove any contamination or cured resin.
  4. If using Resin Tank LT, skip this step. Inspect the elastic layer of the standard resin tank for clouding. Severe clouding means a standard resin tank needs to be replaced.
  5. Inspect the acrylic tank window on the underside of the resin tank for dirt, dust, cured resin, or fingerprints. Clean it with Formlabs recommended steps and supplies.

Step 4: Check the printer's optical surfaces

Any contamination, dust, or debris on the printer’s optical surfaces can cause the laser light to diffuse or weaken, resulting in a print failure. Contamination is most likely to occur on an exposed optical surface in the printer.

Form 4 and Form 4L generation

The optical surface most likely to be contaminated is the release texture, the top face of the Light Processing Unit (LPU). It prevents suction from forming between the resin tank film and the LPU, reducing peel forces between layers. Any contamination on the release texture can cause the backlight to diffuse or weaken, resulting in print defects.

  1. Remove any inserted consumables from the printer.
  2. Inspect the release texture for contamination.
  3. Follow the instructions for cleaning the release texture.
  4. The underside of the LPU can also become contaminated, particularly if the LPU fan filter is clogged. If you suspect that the underside of the LPU is contaminated rather than the release texture, test the LPU and Backlight Unit, then clean the LPU and LPU fan filter based on the results.

Form 3 and Form 3L generation

The optical surface most likely to be contaminated is the glass optical window, which sits atop the Light Processing Unit (LPU).

  1. With the printer plugged in and powered on, tap the wrench icon to access the Settings screen, then tap Maintenance > Motor Moves. The Motor Moves screen appears. Tap and hold Left (<) to move the LPU housing to the middle of the printer cavity. Other controls on this screen fully sweep the LPU housing across the printer cavity and control the build platform carriage.
  2. When prompted by the touchscreen, disconnect the power cable before continuing with maintenance.
  3. Inspect the optical window for contamination.
  4. Follow the instructions for cleaning the glass optical window.
  5. If streaks are difficult to remove, contact Formlabs Support or your authorized reseller.

Form 2

The optical surface most likely to be contaminated is the glass optical window beneath the resin tank that protects internal components from contamination.

  1. Inspect the optical window on the Form 2 or for contamination.
  2. Follow the instructions in the support article Cleaning the glass optical window (Form 2). If streaks are difficult to remove, contact Formlabs Support or your authorized reseller.


Notice:

Follow the optical surface cleaning guides exactly. Failure to follow instructions could damage the printer.

Step 5: Adjust the build platform

Form 4 and Form 4L generation

If you are experiencing non-adherence on a Form 4 or Form 4L generation printer after following Steps 1–4, refer to the support articles Fine tuning (Form 4 and Form 4L generation) and Aligning the build platform (Form 4 and Form 4L generation) to mitigate model adherence issues.

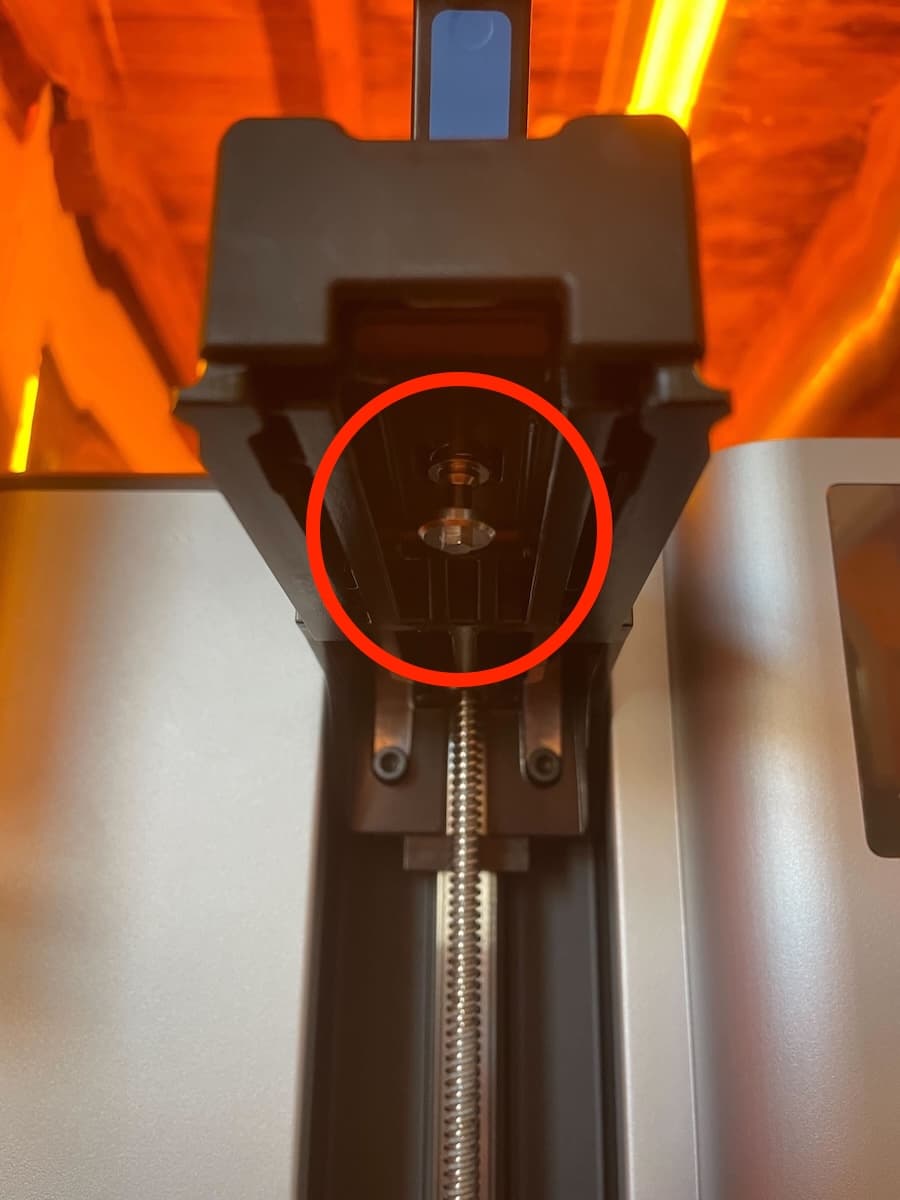
On Form 4 generation printers, the build platform mounts on the build platform dovetail assembly, which includes the build platform latch. Any issues with the dovetail assembly may cause alignment issues for the build platform and the LPU surface.

  1. Use a 4 mm wrench or other suitable tool to tighten the drawbar on the underside of the build platform dovetail assembly by a half turn.
  2. Insert a build platform, lower the build platform latch, and try moving the build platform by hand to see if it is loose.
    • If the build platform is still loose, tighten the drawbar another half turn and test the build platform again.
    • If the build platform latch is too tight to fully close, loosen the drawbar slightly and test the build platform again.
  3. Align the build platform before trying another print.
  4. If the issue persists, particularly if it was temporarily resolved by tightening the build platform dovetail, replace the dovetail assembly. Replacement dovetail assemblies are available for purchase on the Formlabs Store. Follow the guide Replacing the Form 4 build platform dovetail assembly to replace the component.
Form 4 build platform dovetail mount drawbar

Form 3 and Form 3L generation

If you are experiencing non-adherence on a Formlabs LFS printer (Form 3 and Form 3L product lines) after following Steps 1–4, refer to the support article Fine Tuning Formlabs LFS printers to mitigate model adherence issues.

Form 2

If you are experiencing non-adherence after following Steps 1–4, refer to the support article Fine Tuning the Form 2 to mitigate model adherence issues.

Contacting Formlabs Support

If the troubleshooting steps above do not resolve the print defect, contact Formlabs Support or your authorized reseller.
To help us provide the fastest and most effective response to your issue, please follow these steps:

  1. Upload diagnostic logs
  2. Serial name of the printer
    • The serial name is on the back panel of the printer in the format AdjectiveAnimal or Machine-AdjectiveAnimal.
    • Form 4 or Form 4L generation printer: Tap Settings > General > About this printer
    • Form 3 or Form 3L generation printer: Tap the printer icon on the Home screen.
    • Form 2: Tap the printer icon on the home screen. The Your Printer screen appears.
  3. Troubleshooting steps attempted
    • Example: “I reoriented the model in PreForm. I inspected the resin tank and did not notice any damage, clouding, or debris.”
  4. Resin formulation and lot number
  5. Layer thickness
    • Form 2: Tap the queue icon on the home screen. The Jobs screen appears.
    • Other Formlabs SLA printers: Tap the queue icon on the printer's touchscreen. The Queue or Jobs screen appears.
  6. Relevant FORM files
    • If available, attach FORM files of the model to the support request.
  7. Previous attempts to print the part and any successful prints
    • Example: “I printed the file part2.form three times previously. The first and second were successful. The third one failed.”