Hinweis:
Beim Zurücksetzen auf Werkseinstellungen werden alle Druckauftragsinformationen, benutzerdefinierten Einstellungen und Diagnoseprotokolle gelöscht. Laden Sie die Diagnoseprotokolle hoch, bevor Sie auf die Werkseinstellungen zurücksetzen.


Der Touchscreen des Druckers zeigt Fehlermeldungen mit etwaigen Details an, wenn der Drucker auf Unregelmäßigkeiten stößt.
Konfigurieren Sie die Dashboard-Einstellungen, um SMS- oder E-Mail-Benachrichtigungen für die in diesem Artikel aufgeführten Fehler und andere Druckereignisse zu erhalten.
Diagnoseprotokolle
Die Drucker von Formlabs legen Diagnoseprotokolle an, um detaillierte Informationen zum Drucker bereitzustellen. Fügen Sie diese Diagnoseprotokolle zusammen mit anderen relevanten Beobachtungen und Details bei, wenn Sie den Formlabs-Kundenservice oder Ihren autorisierten Vertriebspartner kontaktieren, um die Lösung zu beschleunigen.
Für Drucker, die über eine aktive WLAN- oder Ethernet-Verbindung mit dem Internet verbunden sind:Tippen Sie auf das Druckersymbol auf dem Startbildschirm des Druckers.
Für Drucker, die nicht mit dem Internet verbunden sind:
Erfahren Sie mehr über die Optionen mit und ohne Netzwerkverbindung.
Abgabefehler Kartusche
Der Drucker zeigt einen Kartuschenabgabefehler an, wenn er versucht, Harz abzugeben, aber nichts aus der Kartusche kommt. Normalerweise bedeutet dies, dass die Kartusche leer ist. Jede Kartusche enthält einen Liter Harz und kann diesen zuverlässig abgeben. Entsorgen Sie die Kartusche, nachdem der gesamte Liter abgegeben wurde, und fahren Sie mit einer neuen Kartusche fort.
Falls die Kartusche nicht leer ist, der Drucker aber trotzdem kein Harz ausgibt, liegt womöglich ein Problem mit der Kartusche vor.
Niedriger Kartuschenfüllstand
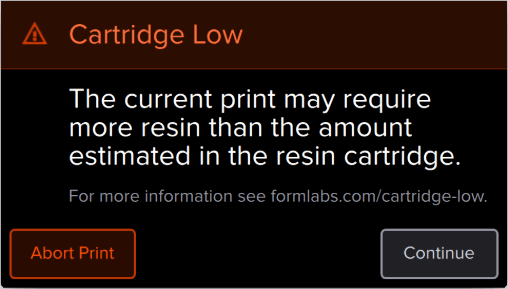
Der Drucker überprüft die geschätzte Harzmenge in der Kartusche, bevor er mit einem Druck beginnt. Wenn die geschätzte Harzmenge nicht ausreicht, um das Teil fertigzustellen, zeigt der Drucker Cartridge Low (Kartusche leer) an.
Tippen Sie auf dem Touchscreen auf Ignore (Ignorieren), um fortzufahren. Sollte dem Drucker jedoch mitten im Druck das Harz ausgehen, hält er an, bis eine neue Kartusche eingesetzt wird. Lange Druckpausen können auf Druckteilen eine horizontale Linie hinterlassen. Tauschen Sie eine Kartusche mit niedrigem Füllstand vor Beginn des Druckvorgangs gegen eine volle Kartusche aus. Oder überwachen Sie den Druck genau und setzen Sie eine neue Kartusche ein, sobald die aktuelle Harzkartusche verbraucht ist.
Harztank überbefüllt
Ist der Harztank überbefüllt, zeigt der Drucker diesen Fehler an. Die Harztanks des Form 2 sind mit Mindest- und Höchstfüllstandslinien markiert. Der Harzpegel im Tank sollte immer zwischen diesen beiden Linien liegen.
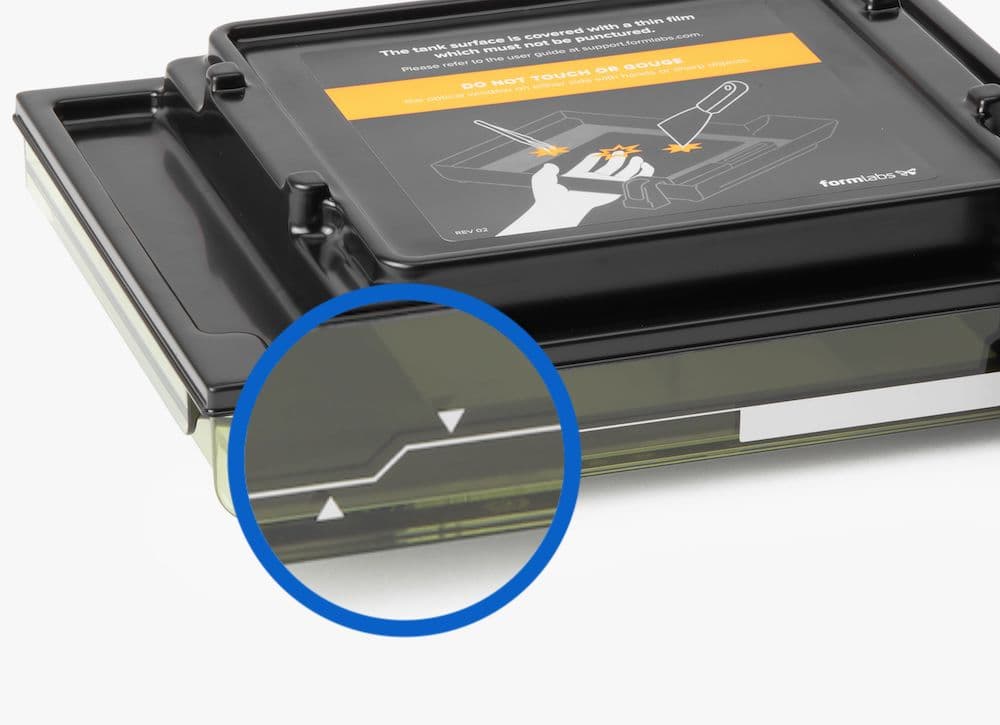
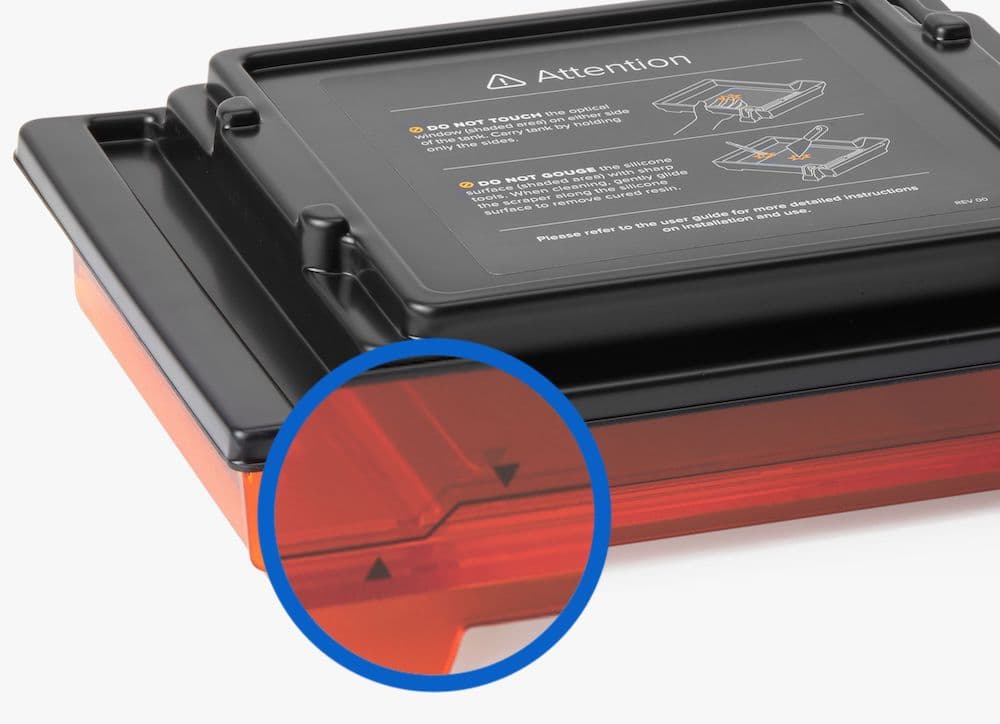
Verwenden Sie eine Spritze oder einen kleinen Einwegbecher, um kleine Mengen Harz zu entfernen, und gießen Sie es in einen separaten Behälter. Wenn der Drucker fälschlicherweise vor einer Überfüllung des Harztanks warnt, überprüfen Sie die LevelSense-Platte auf Beschädigungen.
Fehler: Fehlender Harztank / Fehlende Kartusche
Erkennt der Drucker keinen eingesetzten Harztank oder keine eingesetzte Kartusche, überprüfen Sie den ID-Chip am Harztank bzw. an der Kartusche, um sicherzustellen, dass der Chip vorhanden und sauber ist. Ein verschmutzter oder fehlender Chip kann verhindern, dass der Drucker den Harztank bzw. die Kartusche erkennt.
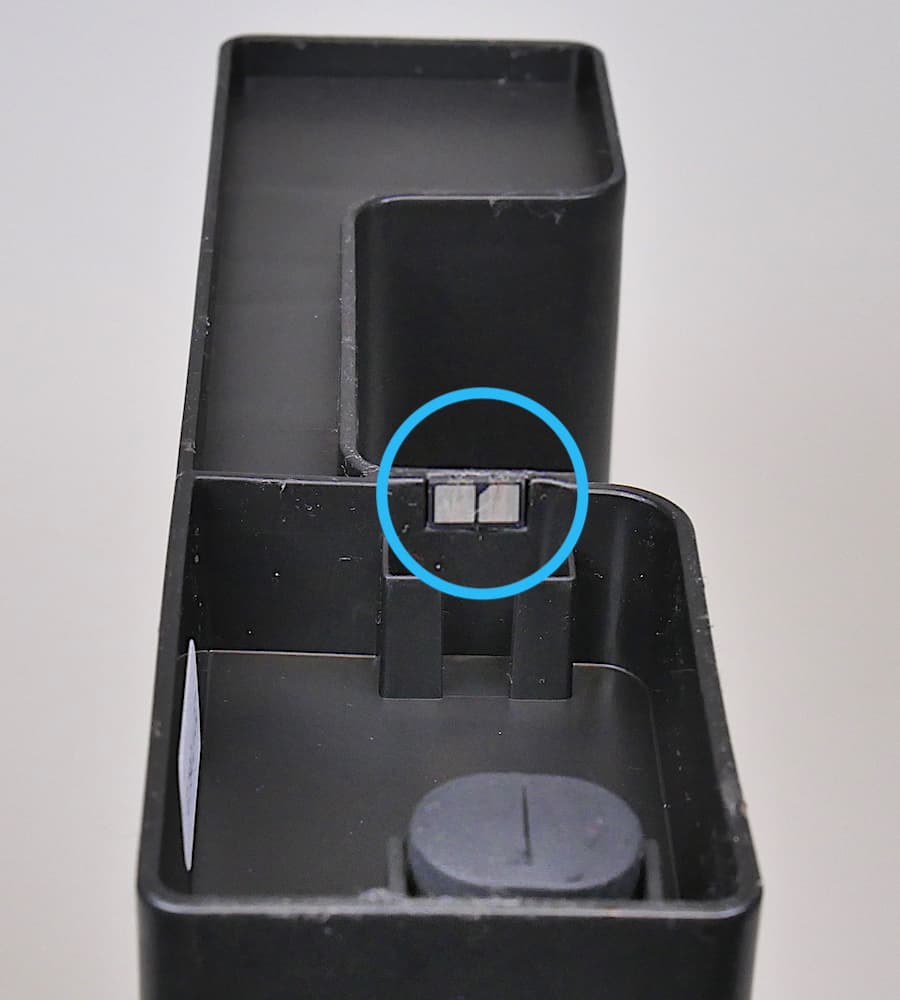
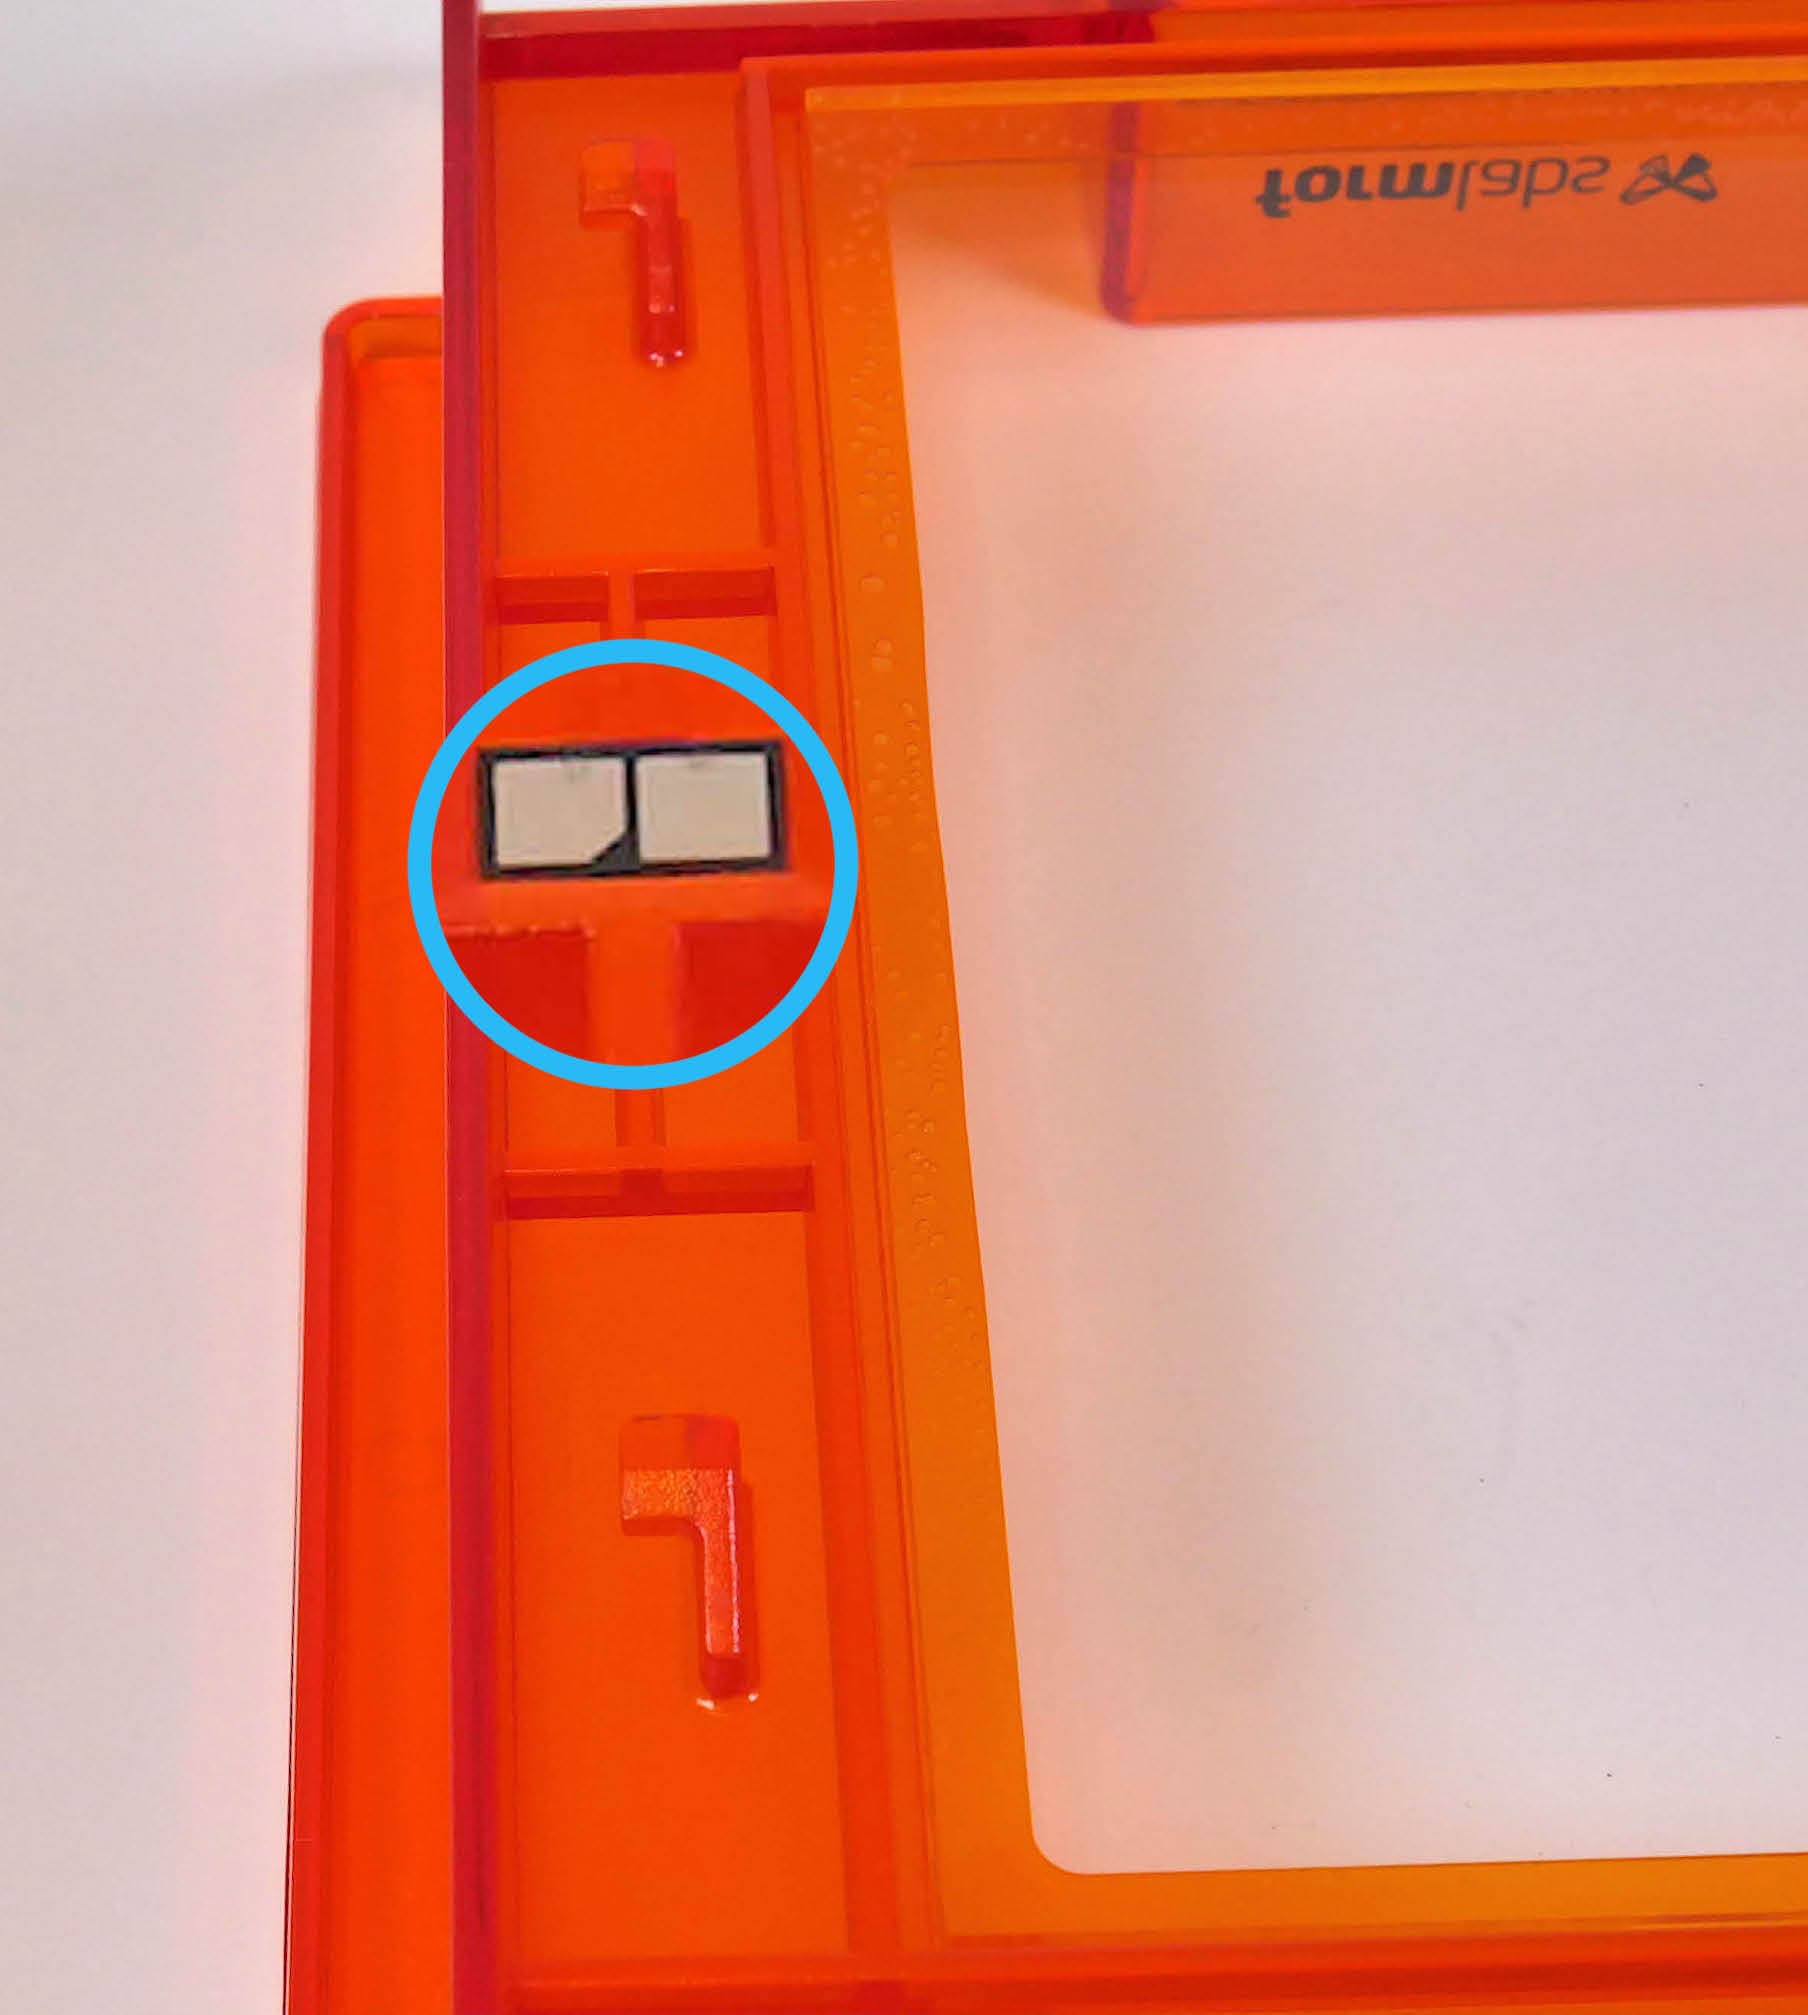
Entfernen Sie den Harztank bzw. die Kartusche vollständig und setzen Sie ihn bzw. sie wieder ein. Die Oberseite einer eingesetzten Kartusche sollte bündig mit der orangefarbenen Abdeckung abschließen, und die Vorderkante eines eingesetzten Harztanks sollte an der Vorderkante des Tankträgers anliegen.
Harztank- und Kartuschenwarnung
Der Drucker überprüft den Harztyp im Tank und in der Kartusche, um sicherzustellen, dass er mit dem aktuellen Druckauftrag übereinstimmt. Wenn sie nicht mit dem im Druckauftrag angegebenen Harztyp übereinstimmen, zeigt der Drucker Resin Tank and Cartridge Warning (Warnung: Harztank und Kartusche) an und fordert Sie auf, einen Tank und eine Kartusche einzusetzen, die mit den Druckauftrags-Einstellungen übereinstimmen.
Harztankwarnung
Wenn die Harzkartusche zuerst eingesetzt wird, zeigt der Drucker Resin Tank Warning (Harztank-Warnung) an, wenn der Harztyp im Tank nicht mit der Kartusche übereinstimmt. Entfernen Sie den Harztank und ersetzen Sie ihn durch einen, der zur Harzkartusche passt.
Um einen neuen Harztyp mit einem Harztank zu verwenden, leeren und reinigen Sie den Tank und tippen Sie dann auf Ignore (Ignorieren), um den Harztyp des Tanks neu zu programmieren.
Kartuschenwarnung
Wenn der Harztank zuerst eingesetzt wird, zeigt der Drucker Cartridge Warning (Kartuschenwarnung) an, wenn der Harztyp in der Kartusche nicht mit dem Tank übereinstimmt. Entfernen Sie die Kartusche und ersetzen Sie sie durch eine, die zum Harztank passt.
Motoren blockiert
Sensoren verfolgen die Motorbewegungen des Druckers. Wenn ein Motor nicht innerhalb der vorgegebenen Zeit in seine ursprüngliche Position zurückkehrt, zeigt der Drucker Motors Jammed (Motoren blockiert) an.
Bei Hindernissen im Weg des Wischers oder Tanks kann sich der Motor eventuell nicht richtig bewegen. Öffnen Sie die Abdeckung, um die Konstruktionsplattform, den Harztank und den Wischer zu untersuchen. Beseitigen Sie Obstruktionen, entfernen Sie dann die Konstruktionsplattform, den Wischer und den Harztank und setzen Sie sie wieder ein.
Fehler des Heizelements
Der Drucker beendet das Heizen, wenn er nach 60 Minuten die Zieltemperatur von 30 °C (86 °F) nicht erreicht hat. In kalten Betriebsumgebungen braucht der Drucker eventuell mehr als einen Heizzyklus, um die gewünschte Temperatur zu erreichen. Starten Sie den Druck neu, um den Heizvorgang erneut zu beginnen. Weitere Informationen finden Sie im Supportartikel Harztemperatur aufrechterhalten.
Kartusche verbraucht
Jede Kartusche enthält einen Liter Harz und kann diesen zuverlässig abgeben. Nachdem der gesamte Liter abgegeben wurde, entsorgen Sie die Kartusche und fahren Sie mit einer neuen Kartusche fort. Starten Sie den Druckvorgang neu, sobald die leere Kartusche ersetzt wurde.
Um manuell mit Nicht-Formlabs-Kunstharzen zu drucken, nutzen Sie den Open Mode des Form 2.
Fehler Harztanksensor
Die LevelSense-Platte befindet sich direkt hinter dem Harztank. Der Drucker zeigt möglicherweise Resin Sensor Error (Harzsensofehler) an, wenn sich der Harztank zu nah oder zu weit entfernt befindet oder wenn der Sensor oder der Tank verunreinigt sind.
Wenn der Drucker einen Resin Sensor Error (Harzsensofehler) anzeigt, führen Sie die folgenden Schritte aus, um zu sehen, ob der Fehler behoben wird:
Drucker geneigt
SLA-Drucker von Formlabs funktionieren am besten, wenn sie perfekt nivelliert sind. Bei Bedarf fordert Sie der Touchscreen auf, den Drucker zu nivellieren. Tippen Sie auf dem Touchscreen auf Settings (Einstellungen) > Printer Leveling (Drucker nivellieren), um den aktuellen Nivellierungsstatus anzuzeigen.
Follow the touchscreen prompts and use the leveling tool to level the printer.
Zurücksetzen während des Druckvorgangs
Wird die Stromversorgung des Druckers während eines Druckauftrags unterbrochen, setzt der Drucker den Druckauftrag beim Neustart nicht fort. Auf dem Touchscreen wird Reset While Printing (Zurücksetzen während des Drucks) angezeigt. Wenn die Zurücksetzung unerwartet war, wenden Sie sich an den Formlabs-Kundenservice oder Ihren autorisierten Vertriebspartner.
Druck konnte nicht gestartet werden
Die Fehlermeldung Failed to start print (Druck konnte nicht gestartet werden) erscheint, wenn der Drucker nicht feststellen kann, warum der Druck nicht ordnungsgemäß gestartet werden konnte. In einigen Fällen kann dies auf eine Beschädigung der Hauptplatine hinweisen, die eine ordnungsgemäße Verbindung mit dem Lasercontroller oder den Motoren verhindert. So beheben Sie dieses Problem:
Wenn diese Fehlermeldung wiederholt auftritt, wenden Sie sich an den Formlabs-Kundenservice oder Ihren autorisierten Vertriebspartner.
Print error code: 41 (Druckfehler-Code: 41)
Der Drucker zeigt Druckfehlercode: 41 auf dem Bildschirm für Druckaufträge an, wenn er einen ungewöhnlichen Stromverbrauch der Galvanometer feststellt. Dies ist eine Sicherheitsmaßnahme, die eine Beschädigung des Druckers verhindert, wenn sich die Galvanometer unerwartet verhalten. Dieses Verhalten kann durch lose Kabel an den Galvanometern entstehen. Wenn Sie auf diesen Fehler stoßen, wenden Sie sich an den Formlabs-Kundenservice oder Ihren autorisierten Vertriebspartner.
WLAN-Fehler
Je nach Reaktion des WLAN-Zugangspunkts auf den Verbindungsversuch zeigt der Drucker spezifische Fehlermeldungen an. Informationen zum Einrichten einer Verbindung über WLAN, USB oder Ethernet finden Sie im Supportartikel Verbinden mit Ihrem Drucker. Prüfen Sie immer mit einem Netzwerkadministrator, dass das WLAN für eine Verbindung mit dem Drucker konfiguriert ist. Befolgen Sie für ein Windows-Betriebssystem die Anweisungen von Apple, um sicherzustellen, dass Bonjour ordnungsgemäß installiert ist. Dieser Dienst wird zur Herstellung einer Verbindung benötigt. PreForm muss für drahtlose Uploads mit demselben Netzwerk verbunden sein wie der Drucker.
Ungültiger Netzwerkschlüssel
Das Passwort wurde nicht korrekt eingegeben. Überprüfen Sie das Netzwerkkennwort. Prüfen Sie mit einem Netzwerkadministrator, dass das WLAN für eine Verbindung mit dem Drucker konfiguriert ist.
Verbindung fehlgeschlagen
Der Drucker konnte die drahtlose Verbindung nicht konfigurieren und konnte keine Verbindung zum Netzwerk herstellen. Prüfen Sie mit einem Netzwerkadministrator, dass das WLAN für eine Verbindung mit dem Drucker konfiguriert ist.
Fehler 8
Fehler 8 zeigt an, dass ein unerwarteter Fehler aufgetreten ist, während der Drucker eine FORM-Datei gelesen hat. Um dieses Problem zu beheben, löschen Sie alte Druckaufträge aus dem Drucker und versuchen Sie einen weiteren Druck. Aktualisieren Sie PreForm und die Firmware auf die neueste Version. Wenn das Problem weiterhin besteht, führen Sie einen Werksreset durch. Ein Zurücksetzen auf Werkseinstellungen kann ein beschädigtes Dateisystem oder Fehler im Dateisystem beheben.
Fehler 23
Fehler 23 zeigt an, dass der Drucker einen Fehler festgestellt hat, als er versuchte, seine Motoren zu bewegen. Um dieses Problem zu beheben, löschen Sie alte Aufträge aus dem Drucker und versuchen Sie einen weiteren Druck. Aktualisieren Sie PreForm und die Firmware auf die neueste Version. Wenn das Problem weiterhin besteht, führen Sie einen Werksreset durch. Ein Zurücksetzen auf Werkseinstellungen kann ein beschädigtes Dateisystem oder Fehler im Dateisystem beheben.
Anweisungen zum Zurücksetzen auf Werkseinstellungen
In manchen Fällen kann ein Zurücksetzen auf Werkseinstellungen die Unregelmäßigkeiten korrigieren. Zu solchen Unregelmäßigkeiten zählen unbekannte Fehler, unvollständige Firmwareupdates, Funktionseinschränkungen des Touchscreens oder Probleme bei der Verbindung mit PreForm. Ein Zurücksetzen auf die Werkseinstellungen löscht benutzerdefinierte Einstellungen, einschließlich Feinabstimmung, einschließlich in der Warteschlange gespeicherter Drucke und Netzwerkverbindungen.
Hinweis:
Beim Zurücksetzen auf Werkseinstellungen werden alle Druckauftragsinformationen, benutzerdefinierten Einstellungen und Diagnoseprotokolle gelöscht. Laden Sie die Diagnoseprotokolle hoch, bevor Sie auf die Werkseinstellungen zurücksetzen.
So setzen Sie das Gerät auf die Werkseinstellungen zurück:
Tippen Sie auf Queue (Warteschlange) auf dem Touchscreen, um das erfolgreiche Zurücksetzen zu prüfen. Bei erfolgreich wiederhergestellten Werkseinstellungen ist die Druckerwarteschlange leer. Wenn das Zurücksetzen das Verhalten nicht behebt, wenden Sie sich an den Formlabs-Kundenservice oder Ihren autorisierten Vertriebspartner.