WHITEPAPER
Formlabs Logo

Fuse Sift error messages

Fuse Sift error messages

The Fuse Sift’s touchscreen displays error messages if the machine encounters any abnormalities and displays more details about the error. Configure Dashboard settings to receive SMS or email notifications for the errors listed in this article and for other print events.

Dati di diagnostica

The Fuse Sift maintains diagnostic logs to provide detailed information about the machine’s functionality. Include these diagnostic logs with other relevant observations and details when contacting Formlabs Support or your authorized reseller to speed up resolution.

For machines connected to the internet over an active Wi-Fi or Ethernet connection:

  1. Tap the wrench icon on the bottom left of the Fuse Sift’s Home screen. The Settings menu appears.
  2. Tap System. The System menu appears.
  3. Tap Upload Diagnostic Info. A confirmation message to upload diagnostic information appears.
  4. Tap Next to start the upload. A confirmation message appears when the upload is complete.

To upload diagnostic logs via PreForm:

  1. Open the latest version of PreForm.
  2. Click File > Accessories in the menu bar. The Accessory List window appears.
  3. Select the Fuse Sift’s serial name. The Device Details window for the selected Fuse Sift appears.
  4. Click Download Logs. A confirmation window appears.
  5. Click Browse to download the diagnostic logs to a preferred location on your computer.
  6. Click OK. The diagnostic logs save and appear in the encrypted FORMLOGS format.
  7. Attach the file when contacting Formlabs Support or your authorized reseller.

Cartridge drawer icon colored red

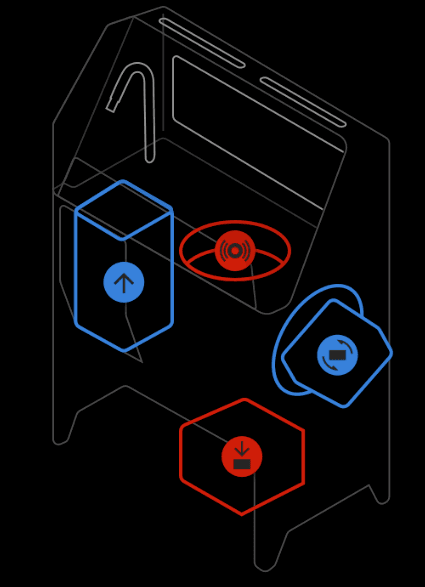
The Fuse Sift touchscreen shows the build chamber, sifter, mixer, or cartridge drawer in red to indicate an issue with the component or an associated action. A variety of issues may cause the cartridge drawer to persistently be shown in red and may or may not prevent you from filling a powder cartridge. To resolve the issue, check the specific message on the Fuse Sift touchscreen when you try to fill a powder cartridge:

Fuse Sift touchscreen showing red cartridge drawer icon
  • Powder Warning, when accompanied by a red-colored Refresh Rate, indicates that the selected refresh rate is lower than the recommended value for your current powder. Check Choosing the right powder for the recommended refresh rate for each Formlabs SLS powder and adjust as needed.
  • Powder Warning, when accompanied by a red-colored bar in the Powder Hoppers section of the screen, indicates that either the fresh powder hopper or used powder hopper has less than 2 kg of powder. Check the indicated hopper and add more powder as needed.
  • Drawer Open indicates that the cartridge drawer is open. Close the cartridge drawer to continue. See the Drawer open section below for detailed troubleshooting steps.
  • Cartridge Not Present indicates that the Fuse Sift cannot detect a powder cartridge in the cartridge drawer. Place an empty powder cartridge in the drawer and close the drawer to continue. See the Cartridge not present section below for detailed troubleshooting steps.
  • Cartridge Weight Error indicates that the Fuse Sift encountered an issue while weighing the powder cartridge. See the Cartridge weight error section below for detailed troubleshooting steps.
  • Fresh Hopper Empty or Sifted Hopper Empty indicates that one of the hoppers is not dispensing powder during the filling operation. Check the indicated hopper and add more powder as needed. See the Fresh Hopper Empty/Sifted Hopper Empty section below for detailed troubleshooting steps.

Vent filter not seated

The Vent Filter Not Seated error indicates that the vent blower could not be turned on because the filter interlock did not detect a filter. Ensure that the filter and grate are both properly installed and all thumb screws are in place.

Chamber error

The Chamber Error message indicates that an error occurred when trying to move the build chamber motor or that the motor stopped moving because it detected an obstruction. To resolve this issue:

  1. Check the build chamber and the work surface for anything that would prevent the motor from moving properly.
  2. Check if the issue also occurs when the build chamber is inserted into your printer.
  3. Test your Fuse Sift with another build chamber, if one is available.
  4. When inserting the build chamber into the Fuse Sift, be sure to firmly push it towards the back of the unit before closing the build chamber latch to ensure that the coupling mates securely.
  5. Update or reflash the unit’s firmware.
  6. If the problem persists, the Z-drive motor assembly may need to be replaced. Replacement motor assemblies are available for purchase on the Formlabs Store. Follow the instructions in the guide Replacing the Fuse Sift Z-drive assembly to replace the component.
  7. If you see this error message repeatedly, contact Formlabs Support or a certified service provider.

Mixer Error (Errore del miscelatore)

The Mixer Error message indicates that an error occurred when trying to move the mixer motor or that the motor stopped moving because it detected an obstruction. To resolve this issue:

  1. Check for and clear any obstructions blocking the mixer.
  2. Remove the mixer, following the instructions in the guide to replace the mixer assembly.
  3. The sides of the mixer assembly are open. Clean out any powder that may be jamming the mixer, reinstall it, and try running the mixer again.
  4. If the problem persists, the mixer may need to be replaced. Replacement mixer assemblies are available for purchase on the Formlabs Store. Calibrate the mixer after replacing it.

Mixer stalls

If the mixer encounters an issue while in motion, such as the powder cartridge disengaging from the mixer, the Fuse Sift displays Error 279 or PR_ERROR_SIFT_MIXING_DEVIATION. This issue generally occurs with a full powder cartridge as opposed to a partially-full or empty powder cartridge. To resolve this issue:

  1. Retry with a different powder cartridge, if one is available.
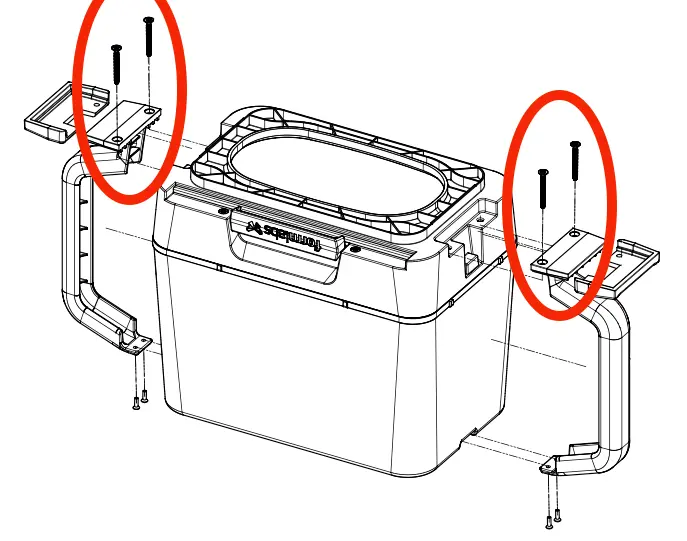
  2. Check how securely the powder cartridge latches onto the mixer. If the tabs on the powder cartridge do not securely engage with the mixer tabs, use a T20 Torx driver to loosen the four screws securing the tabs to the powder cartridge body. Gently pull the tabs away from the powder cartridge body while retightening the screws to increase the distance between the tabs.
  3. Examine the mixer for damage. If the mixer plate is misaligned, it can rotate off-center and collide with the exterior paneling or the inner frame of the Fuse Sift. If the mixer is damaged, it may need to be replaced. The Fuse Sift mixer assembly is available for purchase on the Formlabs Store. Contact Formlabs Support or a certified service provider for additional assistance.
    • Note that the mixer assembly requires calibration after replacement. Starting with firmware version 1.7.0, the Fuse Sift has a built-in mixer recalibration function. Calibrate the mixer after installing it.
Adjusting the tabs on a powder cartridge

If the problem persists, contact Formlabs Support or a certified service provider.

Doser stalls

During operation, powder dispensed from either hopper accumulates around the doser assembly and settles in between the gear teeth. Over time, the doser and motor gears compact the powder, eventually causing slipping and doser stalls. The Fuse Sift may display Error 284 PR_ERROR_SIFT_FILLING_VALVE_DEVIATION or Error 285 PR_ERROR_SIFT_FILLING_VALVE_DEVIATION_OPEN, as well as spilling powder during the filling process. To resolve this issue:

  1. Clean the doser assembly. Formlabs recommends repeating this process every 100 dosing cycles to prevent powder accumulation.
  2. If the error recurs or you cannot clean the gears, the doser assembly may need to be replaced. The Fuse Sift doser assembly is available for purchase on the Formlabs Store. Contact Formlabs Support or a certified service provider for additional assistance.
    • Note that the doser assembly requires calibration after replacement. Starting with firmware version 1.7.0, the Fuse Sift has a built-in doser recalibration function. Calibrate the doser after installing it.

If the problem persists, contact Formlabs Support or a certified service provider.

Fill error

The Fill Error message indicates that one of the following occurred while filling a cartridge:

  • The cartridge weight could not be measured due to an error with the load cell in the cartridge drawer.
  • An error occurred when trying to move the valve motor.
  • The valve motor stopped moving because it detected an obstruction.
  • An unspecified error occurred while filling a cartridge.

Check that the valve above the cartridge drawer is not blocked, that the valve has closed, and that the Fuse Sift is not currently dispensing powder. If directed by a message on the touchscreen, empty the cartridge back into the Fuse Sift and restart the powder dispensing process. If you see this error message repeatedly, contact Formlabs Support or a certified service provider.

Hood light error

This message indicates that an error occurred when turning the Fuse Sift’s light on or off. This might indicate a software bug or hardware failure. If you see this error message repeatedly, contact Formlabs Support or a certified service provider.

Vacuum error

This message indicates that an error occurred when turning the vacuum on or off. This might indicate a software bug or hardware failure. If you see this error message repeatedly, contact Formlabs Support or a certified service provider.

Sifter error

This message indicates that an error occurred when turning the sifter on or off. This might indicate a software bug or hardware failure. If you see this error message repeatedly, contact Formlabs Support or a certified service provider.

Sifter motor malfunctions

The Fuse Sift uses a motor to vibrate a sieve to separate printed parts from unsintered powder. Even if the motor turns on and the Fuse Sift does not display a Sifter error, it can still malfunction, leading to any of the following symptoms:

  • Weaker sifting
  • Unusual shaking of the entire unit
  • Noisier operation during sifting

To resolve this issue:

  1. Remove the surface grate to expose the sieve underneath.
  2. On the lip the surface grate had been sitting on, locate eight round stickers. Each of these stickers covers a rivet.
  3. Peel the stickers back to expose the rivets underneath.
  4. Press the Sift button on the control panel or turn on the sifter using the touchscreen.
  5. Watch and listen to the rivets to determine if any are damaged or have loosened.
    1. If any of the rivets are loose, use an adhesive like a silicone caulk to fix them in place.
    2. If none of the rivets are loose, replace the Fuse Sift vibration motor. Replacement motors are available for purchase on the Formlabs Store. Note that there are different part numbers for 120 V and 230 V Fuse Sift units:
      • 120 V: RP-FS1-120-VB-01
      • 230 V: RP-FS1-230-VB-01
Fuse Sift sifter flange rivet locations

If the problem persists, contact Formlabs Support or a certified service provider.

Vent fan error

This message indicates that an error occurred when turning the vent blower on or off. This might indicate a software bug or hardware failure. If you see this error message repeatedly, contact Formlabs Support or a certified service provider.

Error 93/4

Error 93/4 indicates that one of the motors in the Fuse Sift or build chamber could not move properly. This is most commonly caused by the bevel gear in the back of the build chamber not meshing properly with the corresponding gear in the Fuse Sift. Remove and reinsert the build chamber. If you see this error message repeatedly, manually rotate the bevel gear at the back of the build chamber before reinserting it into the Fuse Sift.

Cartridge not present

The Cartridge Not Present message indicates that an error occurred when detecting the powder cartridge. The Fuse Sift uses a Hall effect sensor to detect a magnet embedded in the powder cartridge. As a result, this error is most commonly caused by an improperly seated powder cartridge, but can also be caused by a firmware issue, a missing powder cartridge magnet, or a faulty sensor. To resolve this issue:

  1. Reseat the powder cartridge.
  2. Try again with another powder cartridge, if one is available. If a different powder cartridge works, replace the faulty powder cartridge.
  3. Power cycle the unit, update the firmware, and upload diagnostic logs before performing a factory reset.
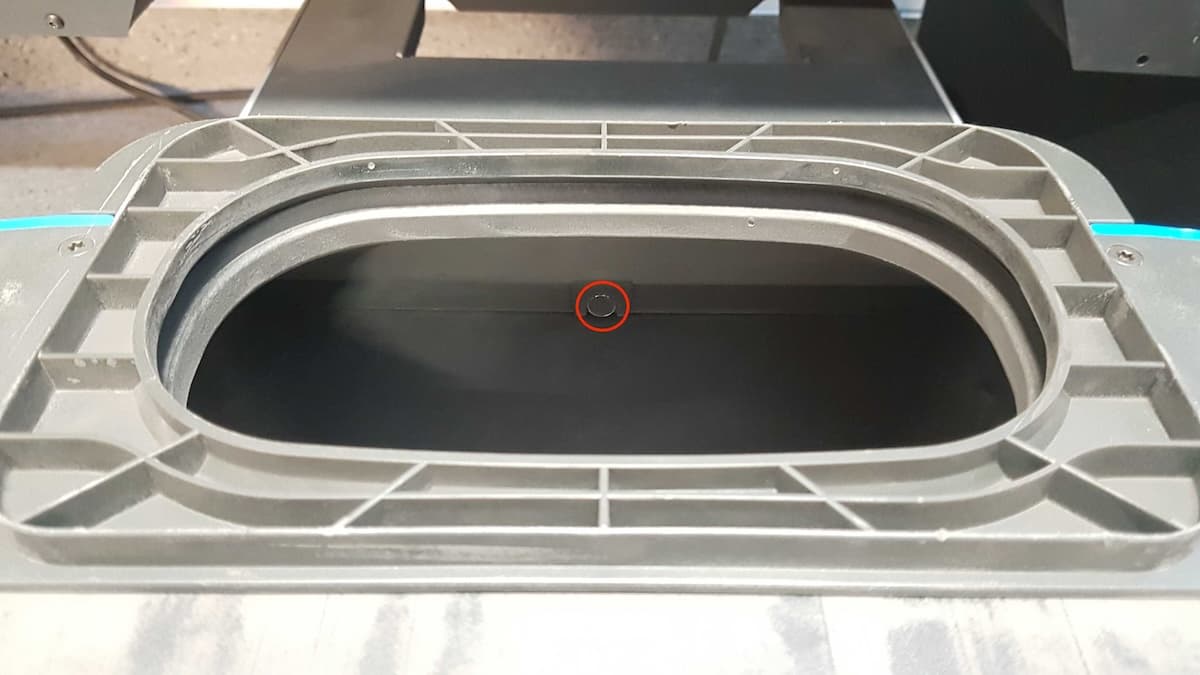
  4. Check to see if the magnet is still present in the powder cartridge. Inspect the inner wall of the powder cartridge, opposite the valve handle. If the magnet is missing, replace the cartridge.
Magnet location in a Fuse Series powder cartridge
  1. If the magnet is present, check if it attracts a ferric object. If the magnet has been demagnetized or is otherwise faulty, replace the powder cartridge.
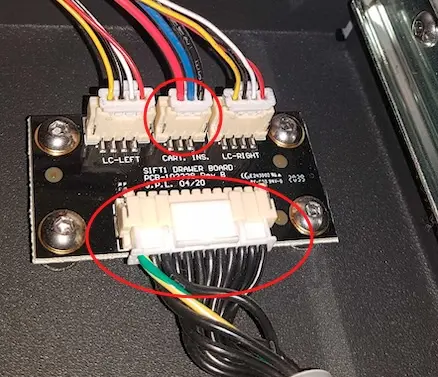
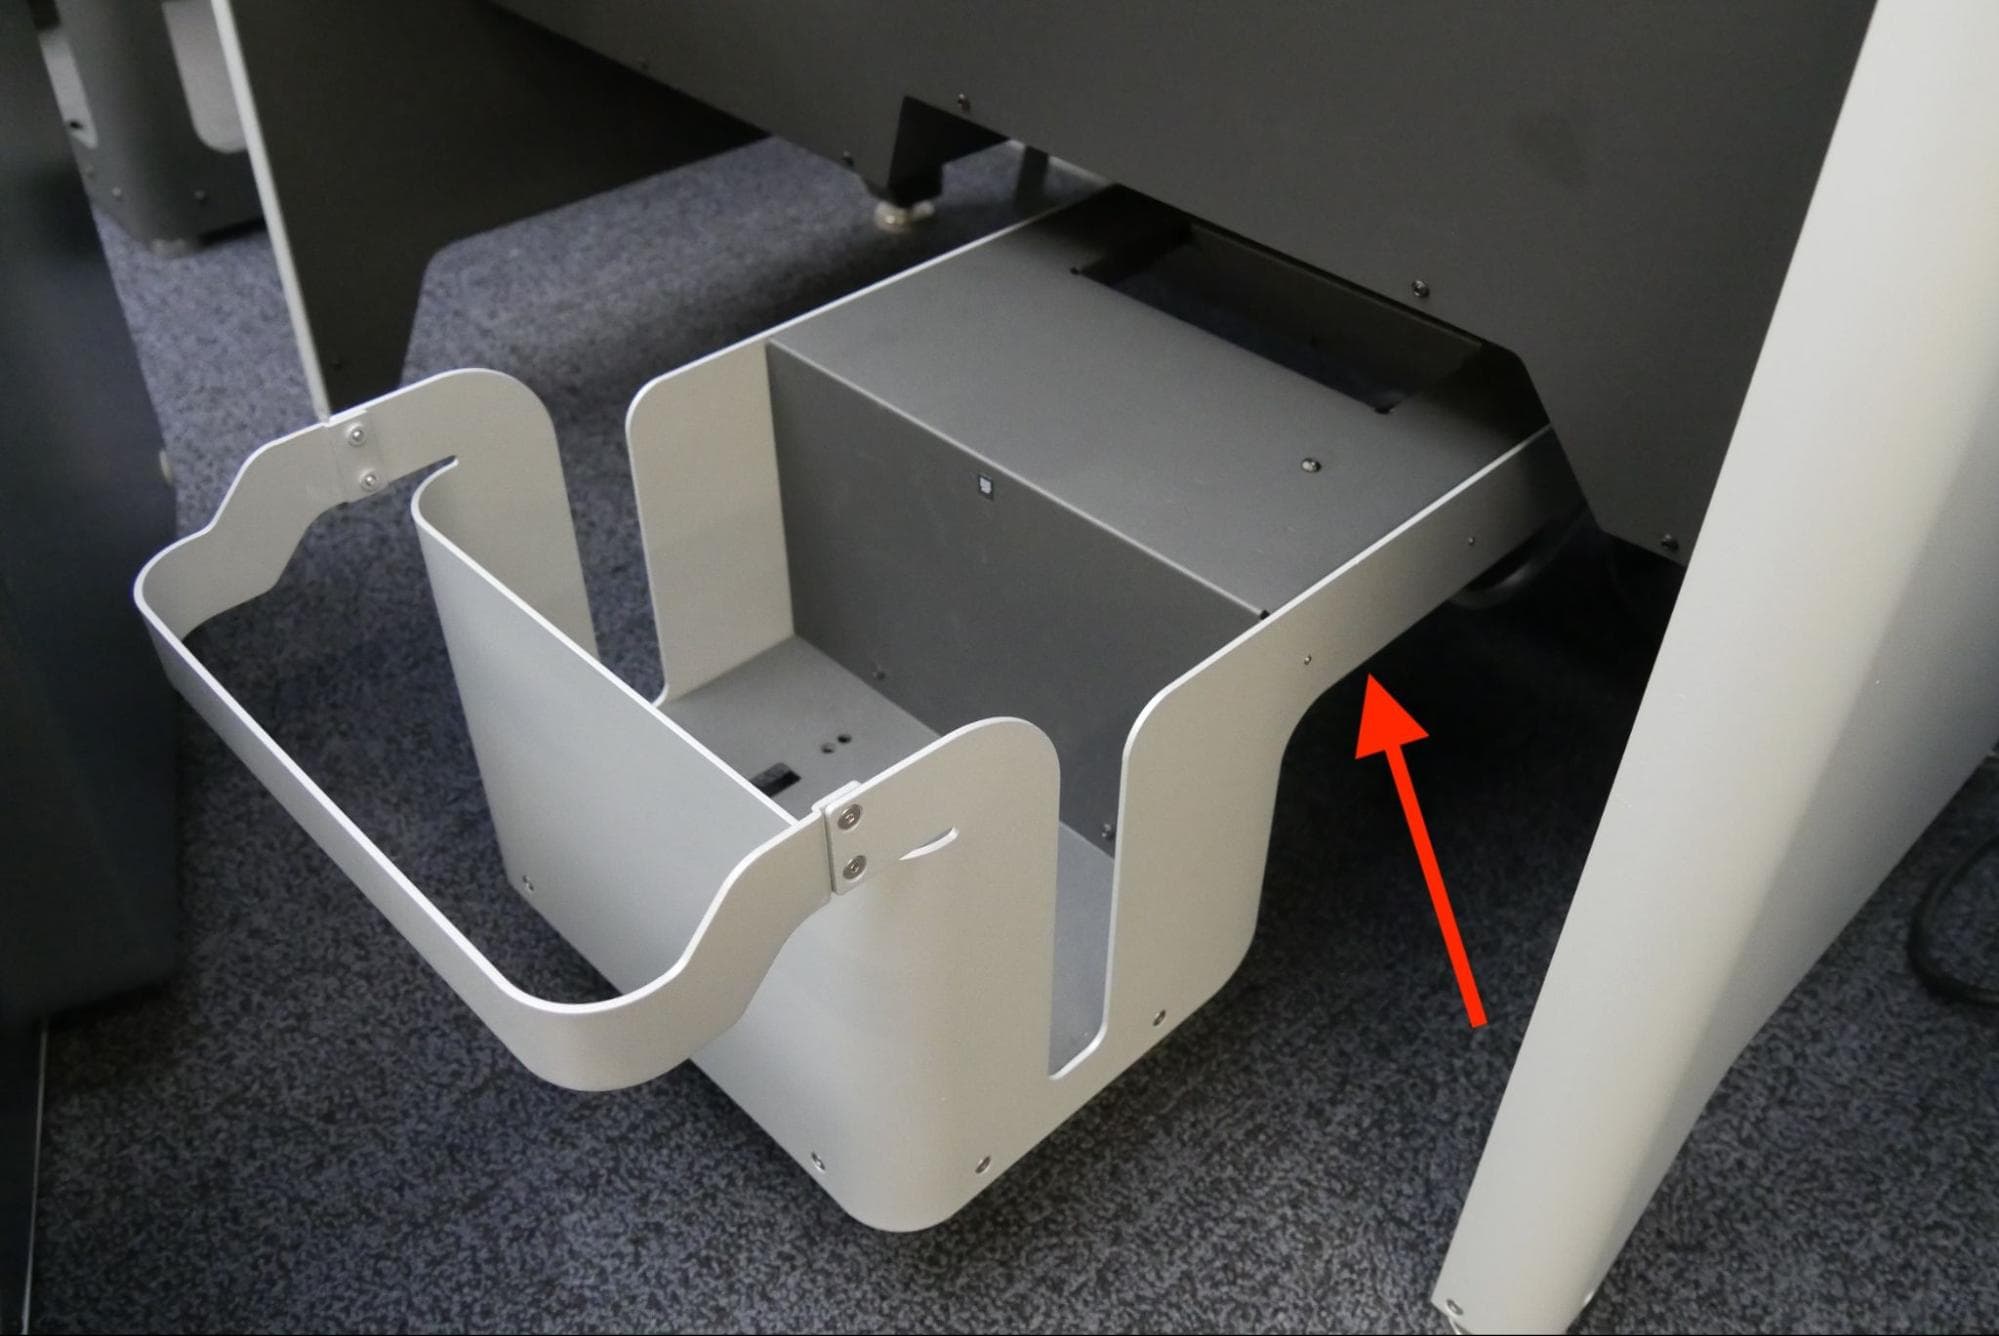
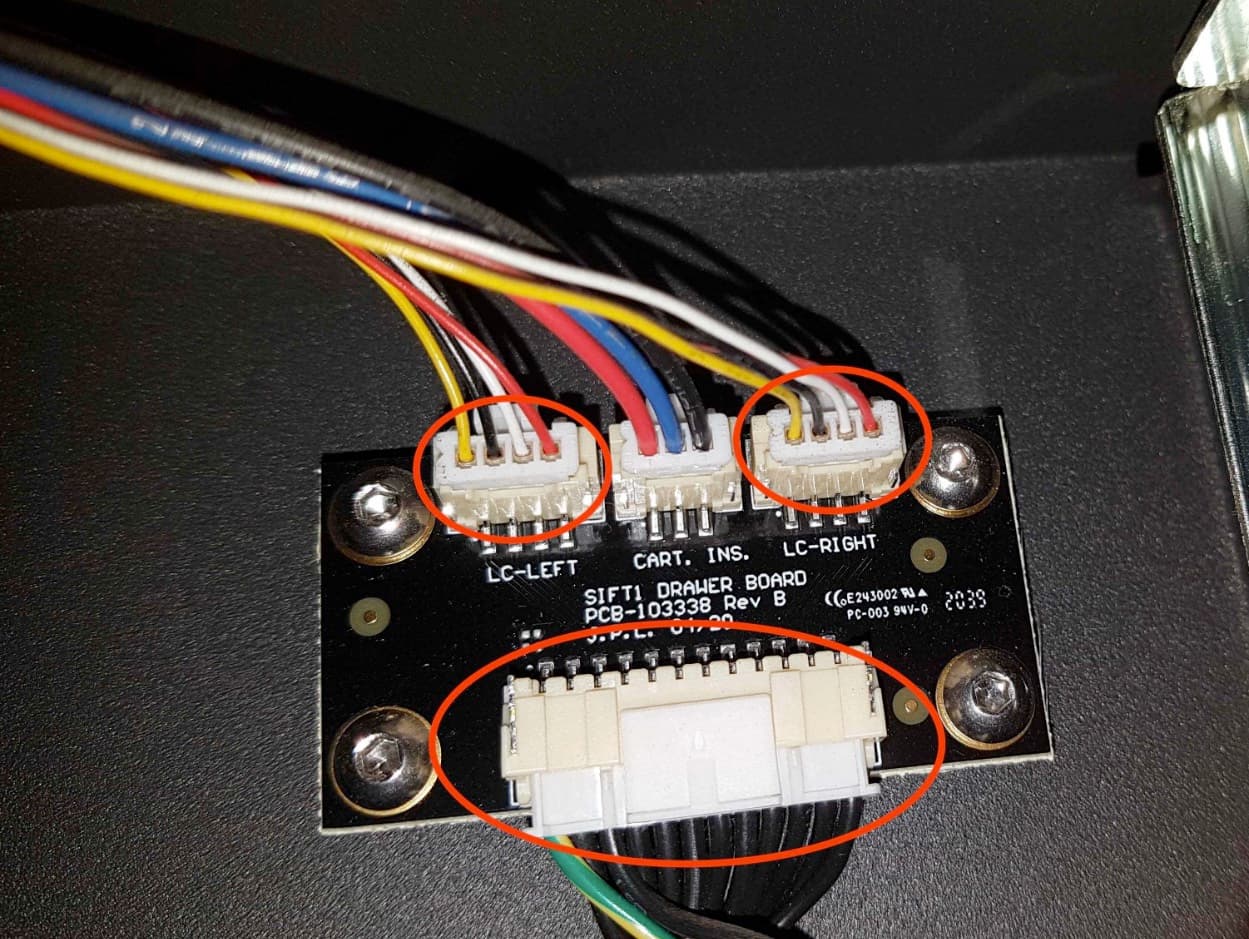
  2. Open the cartridge drawer and locate the board located behind the cartridge seat. Reseat the connector labeled CART. INS. and the large cable connector.
Location of the Fuse Sift cartridge drawer board
Cables to reseat when troubleshooting the Cartridge Not Present error message on a Fuse Sift

Se il problema persiste, contatta l'Assistenza Formlabs o un fornitore di servizi certificato.

Cartridge weight error

The Fuse Sift weighs the powder cartridge before filling it using two scales in the drawer. If the scales are not tared properly or are faulty, the Fuse Sift shows a Cartridge Weight Error.

alttext

If you see this error message repeatedly, power cycle the unit, update the firmware, and upload diagnostic logs before performing a factory reset.

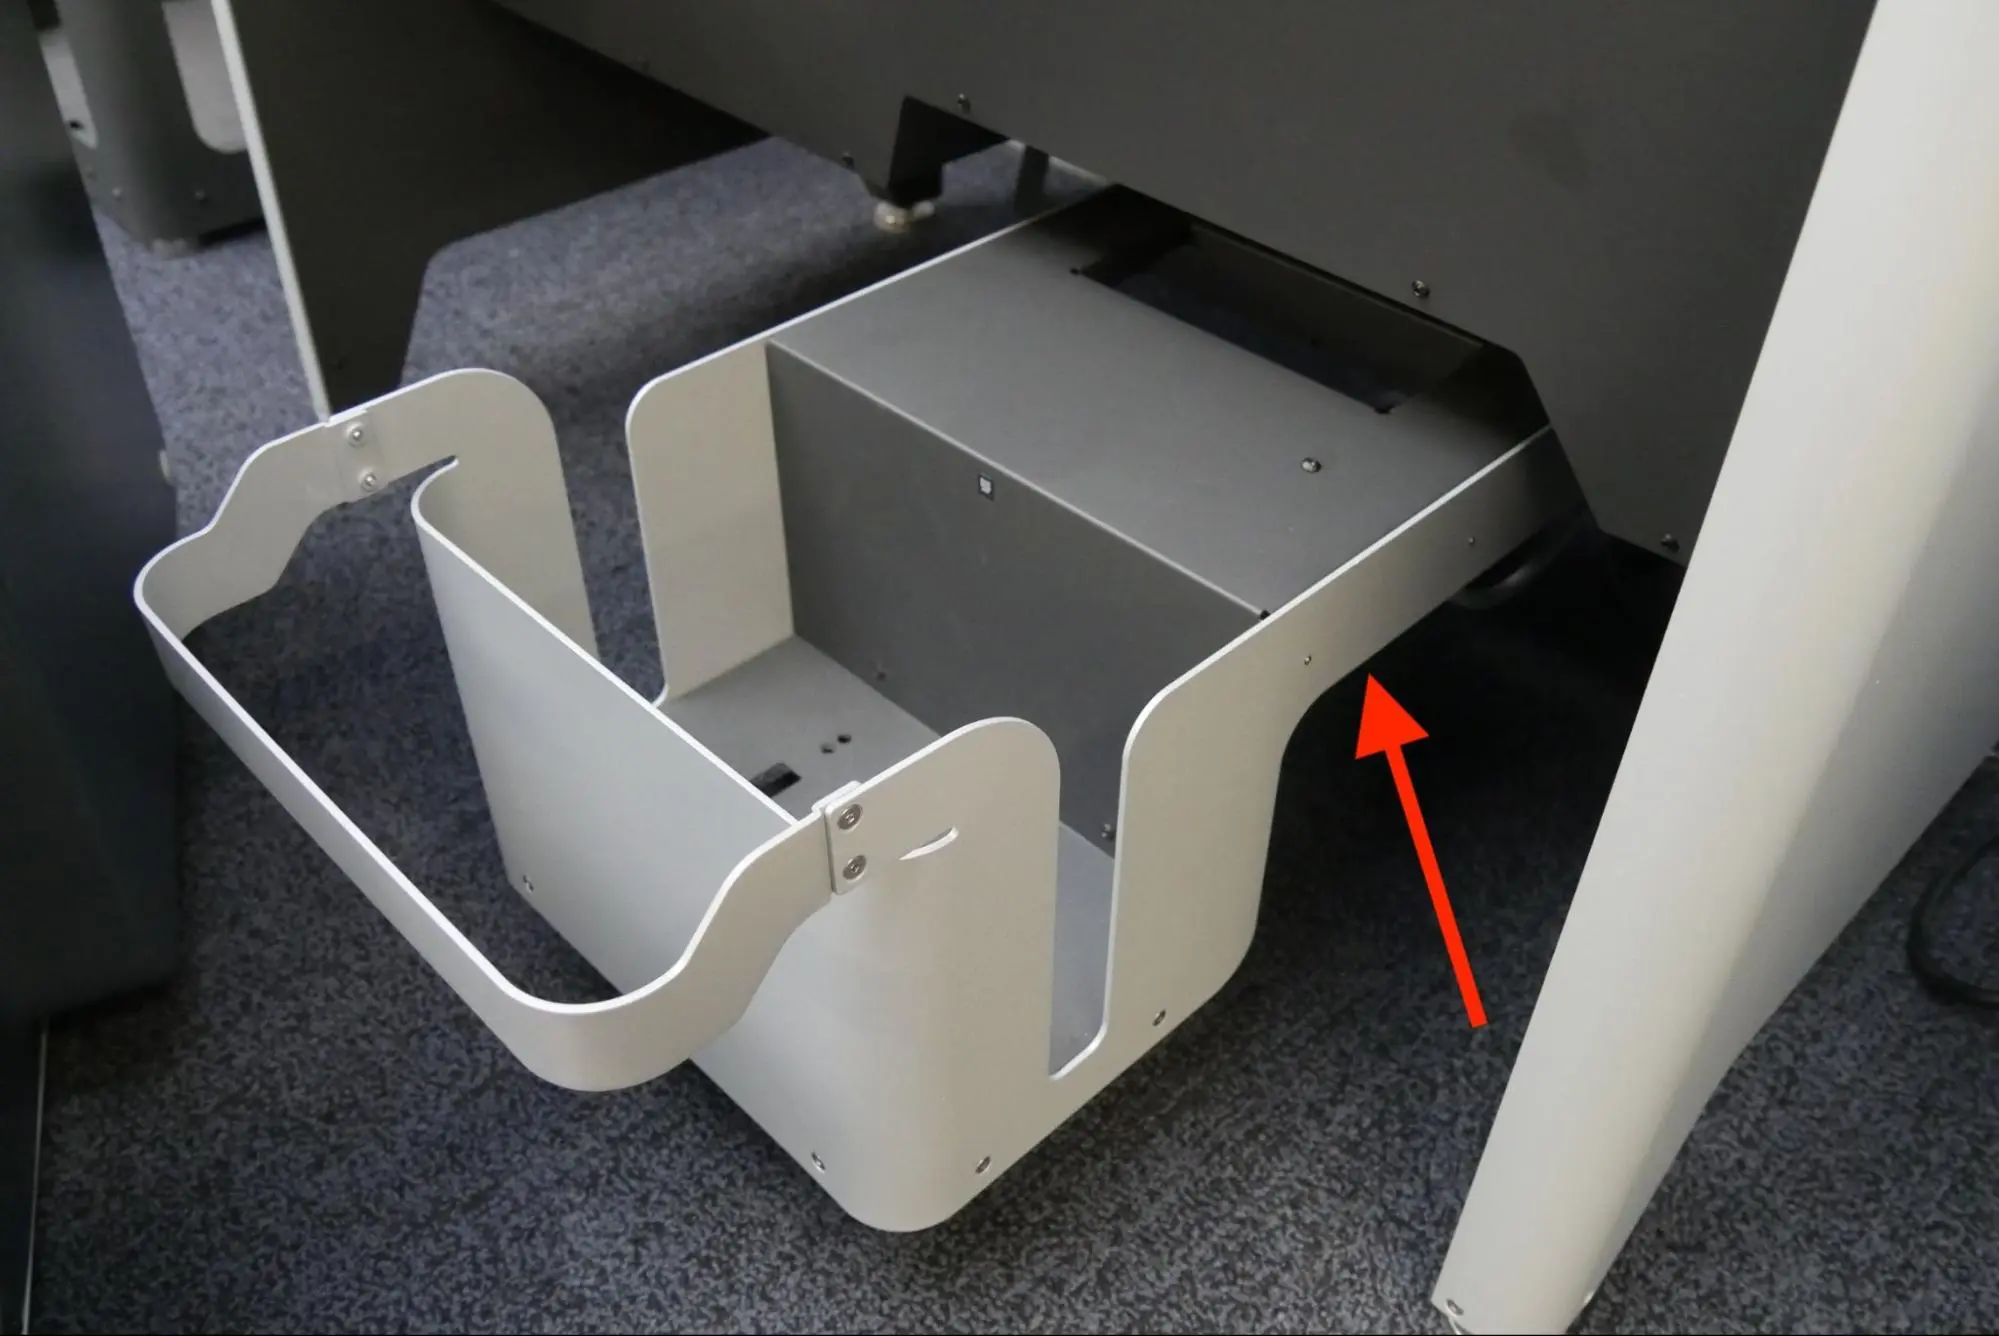
Fuse Sift cartridge drawer open
Fuse Sift cartridge drawer board with connectors annotated

Fresh Hopper Empty/Sifted Hopper Empty

The Fresh Hopper Empty and Sifted Hopper Empty error messages indicate that an error occurred when filling the powder cartridge. This can be caused by an empty hopper, sensor issues, a malfunctioning doser, or firmware. To resolve this issue:

  1. If this error occurs while you are not filling a powder cartridge, a powder sensor may be malfunctioning.
  2. Check both hoppers to ensure there is sufficient powder to fill a cartridge. Stir the powder in the hopper indicated in the error message to check for any clumps that may prevent powder from flowing normally into the powder cartridge.
  3. Power cycle the machine and try again.
  4. Update the Fuse Sift’s firmware.
  5. Perform a factory reset.
  6. Check the scale readings both when an empty cartridge is inserted and when the cartridge drawer is completely empty.
    1. Open the cartridge drawer, insert an empty powder cartridge, and close the cartridge drawer.
    2. On the touchscreen, tap Settings > System > Cartridge Scale Readings. The left and right scales should register between 500–600 g (+/- 100 g) when an empty powder cartridge is in the cartridge drawer.
    3. Remove the empty powder cartridge.
    4. On the touchscreen, tap Settings > System > Cartridge Scale Readings. The left and right scales should register 0 g when the cartridge drawer is empty.
  7. If the weight measurements are not correct, remove the powder cartridge from the cartridge drawer and tare the load cells. On the touchscreen, tap Settings > Maintenance > Tare Fill Scales and follow the onscreen instructions.
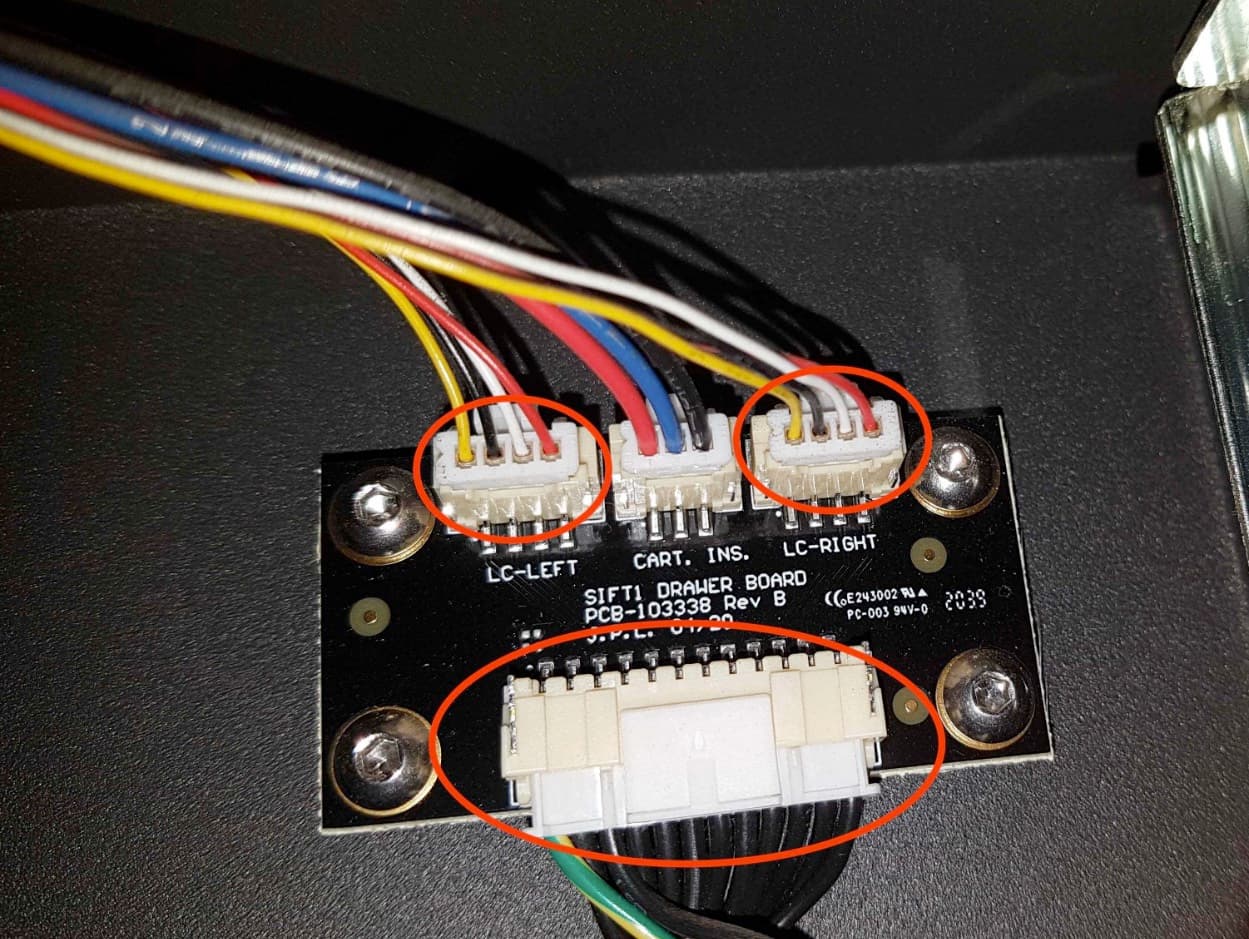
  8. Switch off the Fuse Sift and unplug it. Wait five minutes before proceeding. Open the drawer and locate the board located behind the cartridge seat. Reseat the large connector and the two connectors named LC-LEFT and LC-RIGHT.
Fuse Sift cartridge drawer open
Fuse Sift cartridge drawer board with connectors annotated
  1. If the weight measurements are still incorrect after reseating the cables, switch the connections between LC-LEFT and LC-RIGHT and try again.
    1. If the weight measurements are still incorrect, contact Formlabs Support or a certified service provider.
  2. Empty the fresh powder hopper and the used powder hopper. Check that nothing is blocking the flow of powder (e.g., packaging from powder containers) and that the doser is moving properly during the filling process.
  3. Clean the four powder sensors in each hopper. Powder often collects on top of the sensors and falsely triggers them.
    1. While the hoppers are empty, check if the powder sensors are actually reporting good measures. If you cover the powder sensors with your hands or another object, the touchscreen should report different powder levels.
  4. If the doser is not moving properly or if any doser stalling error appears on the touchscreen, follow the relevant troubleshooting steps for that issue.
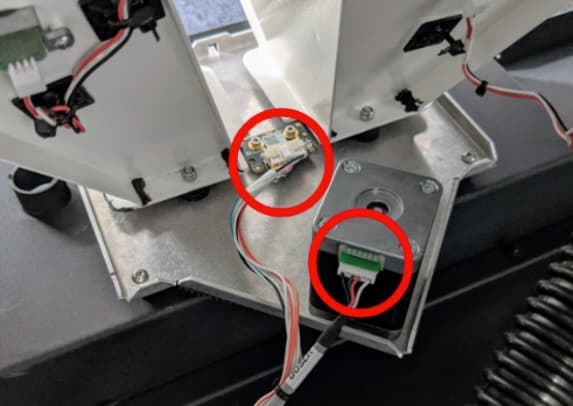
    1. If the doser is still not working, switch off the Fuse Sift and unplug it. Wait five minutes, then remove the back panel and reseat the two cables highlighted below.
Fuse Sift doser cables

Se il problema persiste, contatta l'Assistenza Formlabs o un fornitore di servizi certificato.

Drawer open

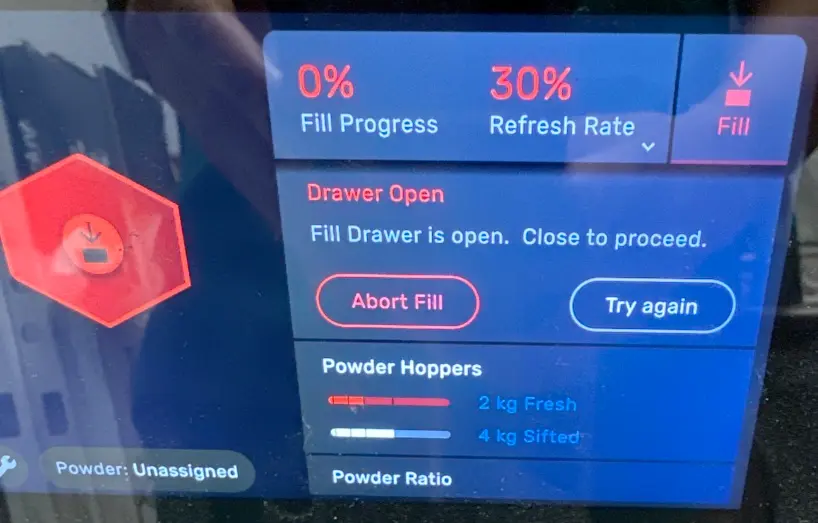
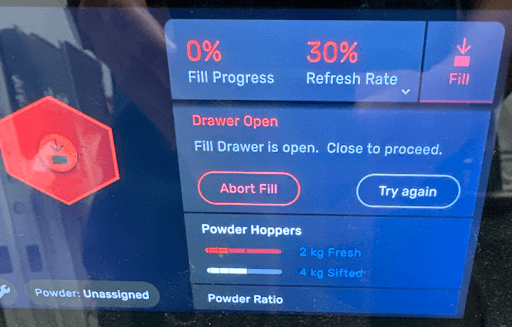
If the drawer of the Fuse Sift is not closed properly, the machine stops and displays the Drawer Open resolution request.

Fuse Sift touchscreen showing the Drawer Open message

If you see this message:

  1. Make sure the drawer is fully pushed into the latch. You should hear a click when the drawer is seated properly.
  2. Reboot the machine by disconnecting and reconnecting the power cable.
  3. Update or reflash the firmware.
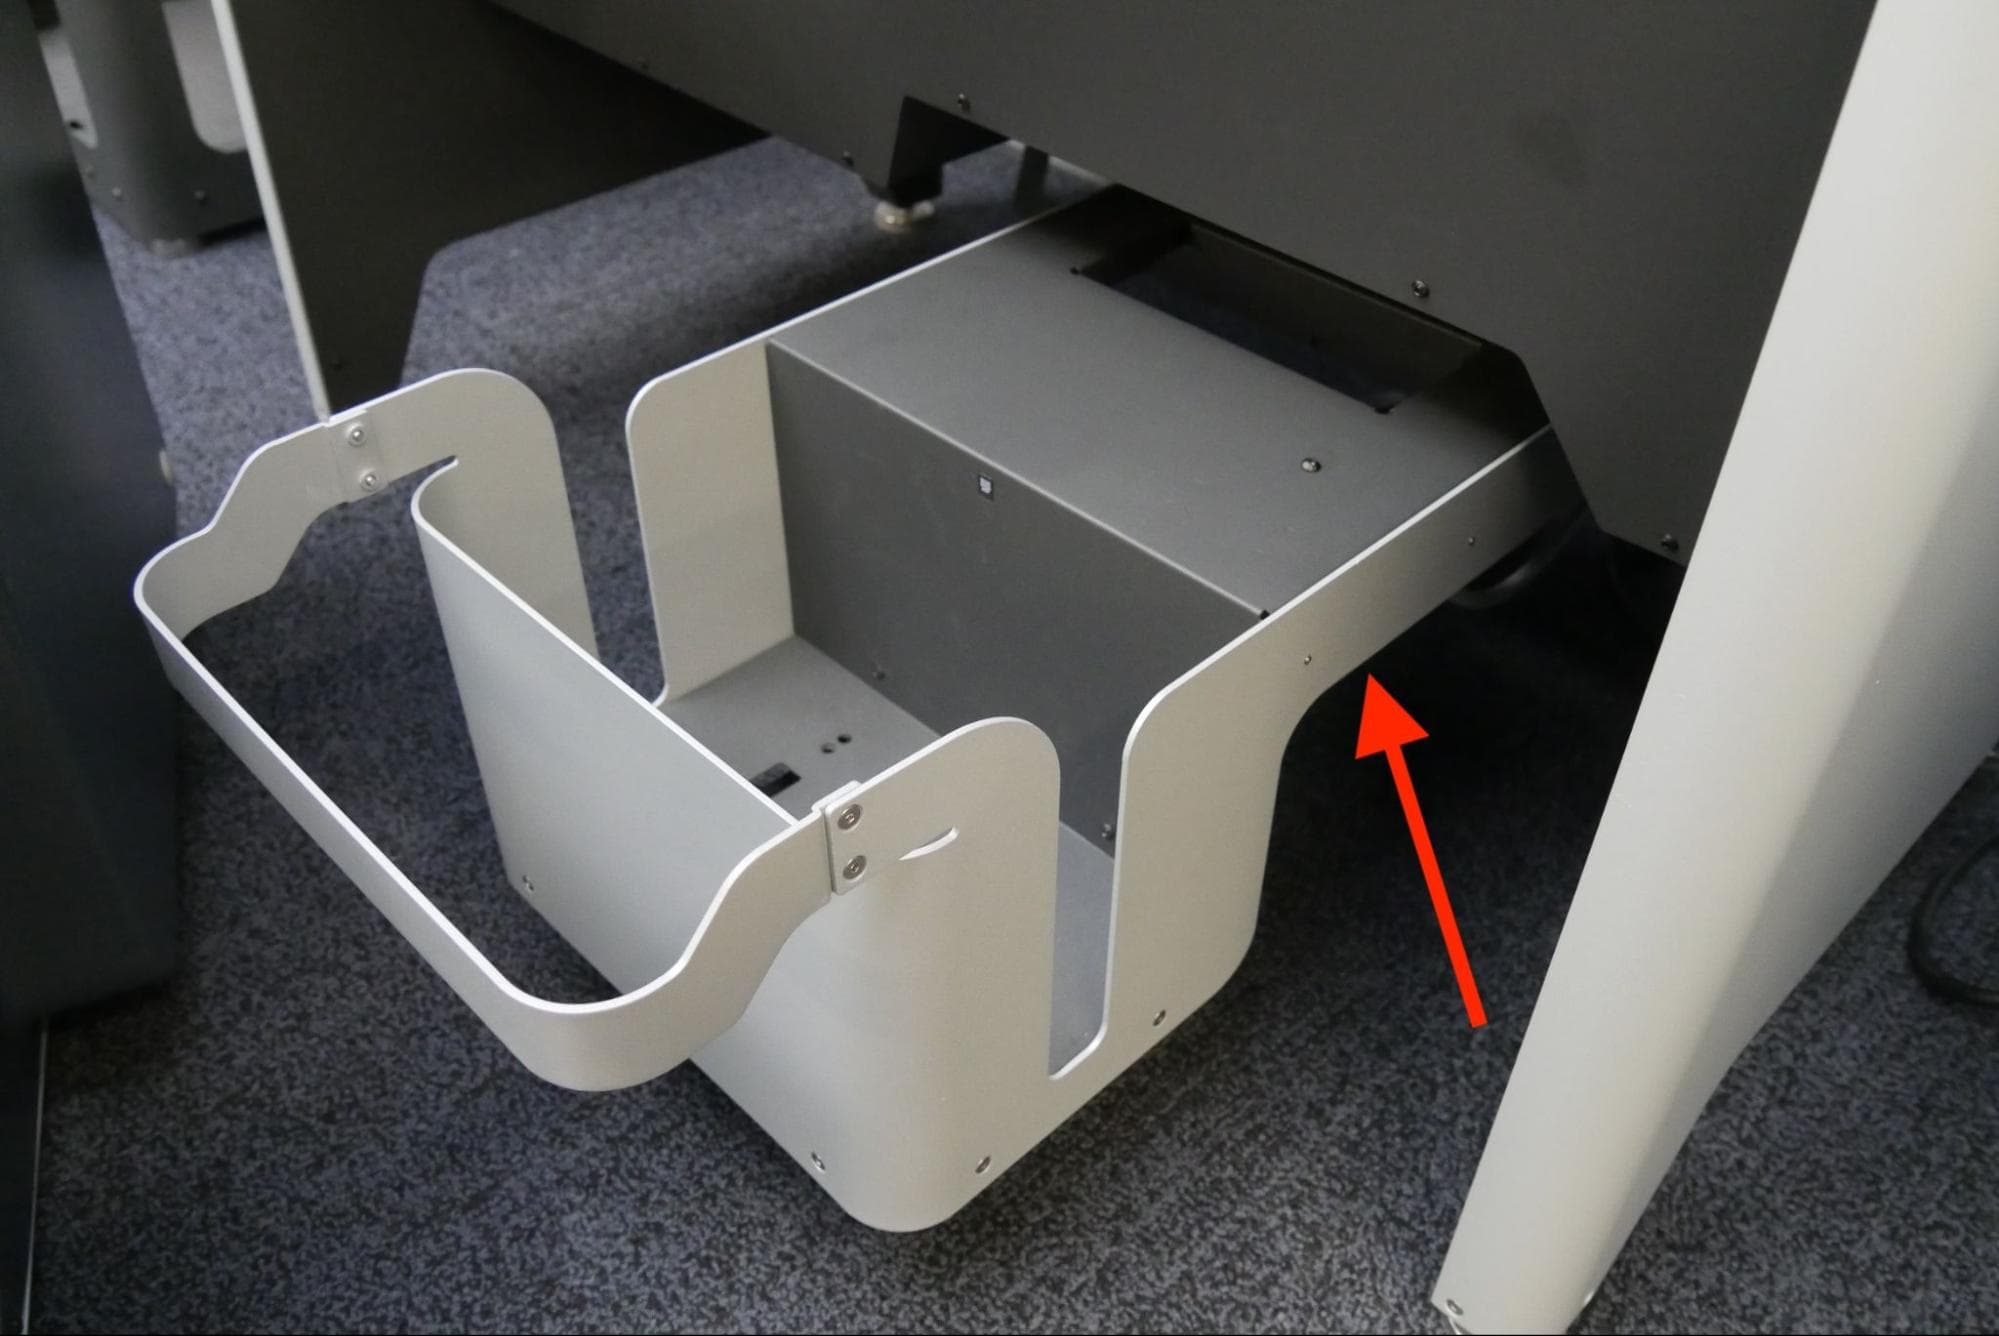
  4. Inspect the rails and latch for damage. If there is damage, contact Formlabs Support or a certified service provider.
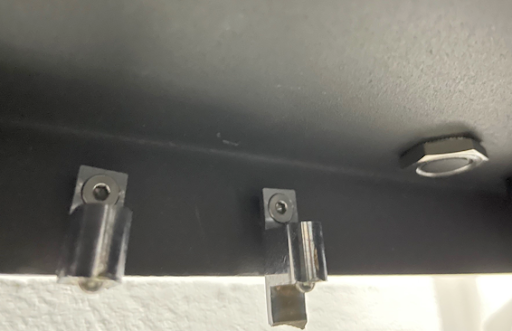
    Fuse Sift drawer latch showing damage
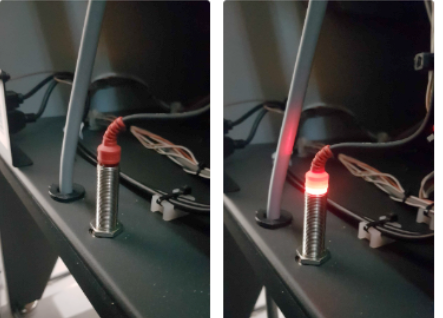
  5. The Fuse Sift uses an inductive sensor to check that the drawer is fully closed. Check that the inductive sensor is working.
    1. Using a 2.5 mm hex driver, loosen and remove the 14 screws securing the electrical box cover. Set the screws and cover aside. The sensor is located on the left side, below the electrical box.
    2. The light indicator should turn red when the drawer is closed or when metal is placed beneath it.
      alttext
    3. If the inductive sensor is not working, power off the machine and check that it is properly connected to the motherboard.
    4. Using a 2.5 mm hex driver, loosen and remove the eight screws securing the electrical box cover. Set the screws and cover aside.
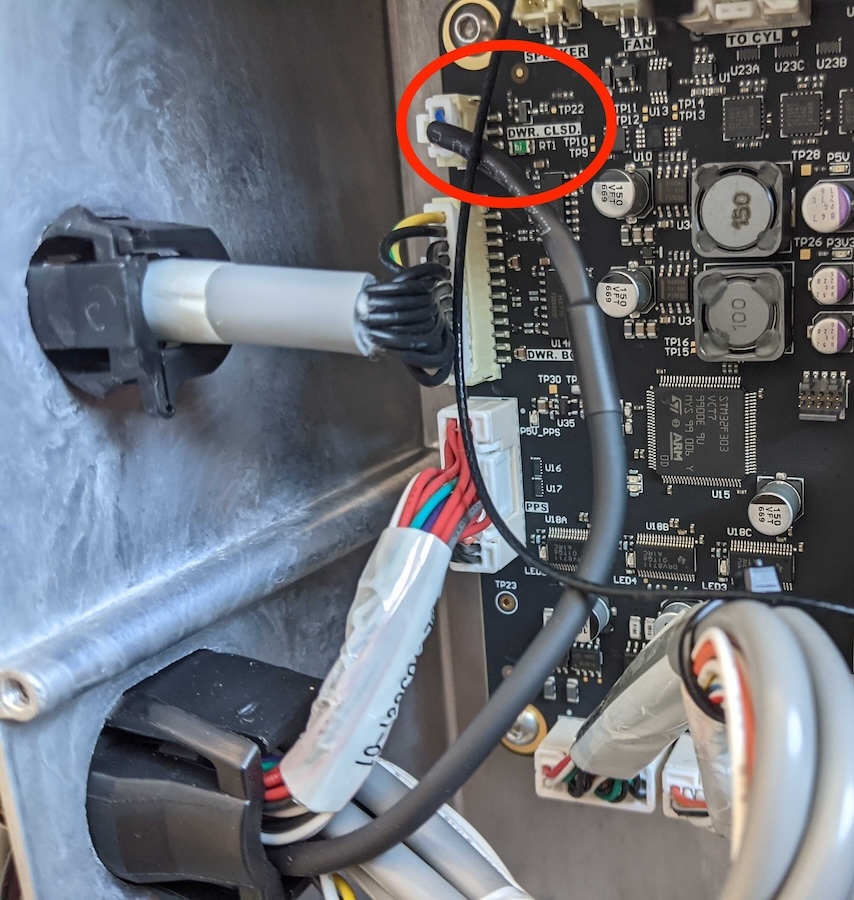
    5. The inductive sensor should be connected to a plug at the top-left corner of the motherboard. If it is connected, try reseating the connector.
    6. Close and secure the electrical box and the back panel of the Fuse Sift before powering the machine back on.
      Fuse Sift motherboard with the inductive sensor cable circled
    7. If the problem continues, you may need to replace the inductive sensor. Contact Formlabs Support or a certified service provider.

Ripristino delle impostazioni di fabbrica

On some occasions, a factory reset may correct unusual Fuse Sift behavior. Formlabs troubleshooting steps for certain error messages, such as Cartridge not present, include initiating a factory reset. Formlabs Support or a certified service provider may also ask you to perform a factory reset while helping you with a Fuse Sift issue.

Notice:

A factory reset erases all saved network connections and diagnostic logs. Upload diagnostic logs before performing a factory reset.

To perform a factory reset, tap the wrench icon to access the Settings menu. Tap System > Factory reset and follow the onscreen instructions to perform a factory reset. The touchscreen displays Factory reset complete before initializing the Fuse Sift.

If you cannot perform a factory reset due to a touchscreen issue, you can force a factory reset using a button on the motherboard:

  1. Turn off the Fuse Sift using the breaker switch at the back of the machine, leaving the power cable connected to the rear panel.
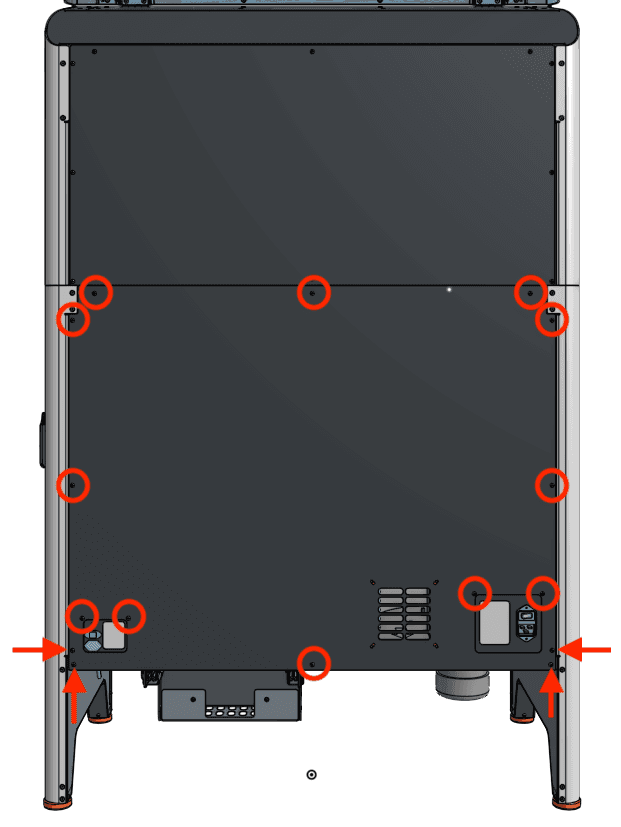
  2. Use a 2.5 mm hex driver to remove the 16 black 8.0 mm M4 screws securing the rear panel to the Fuse Sift. Set the rear enclosure panel aside.
Fuse Sift rear panel screws
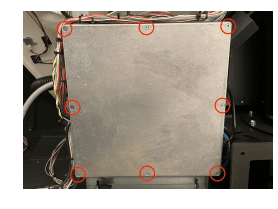
  1. Locate the square motherboard cover on the rear of the machine. Using a #2 Phillips driver, loosen and remove the eight countersunk screws securing the cover onto the motherboard enclosure. Set the screws and cover aside.
alttext
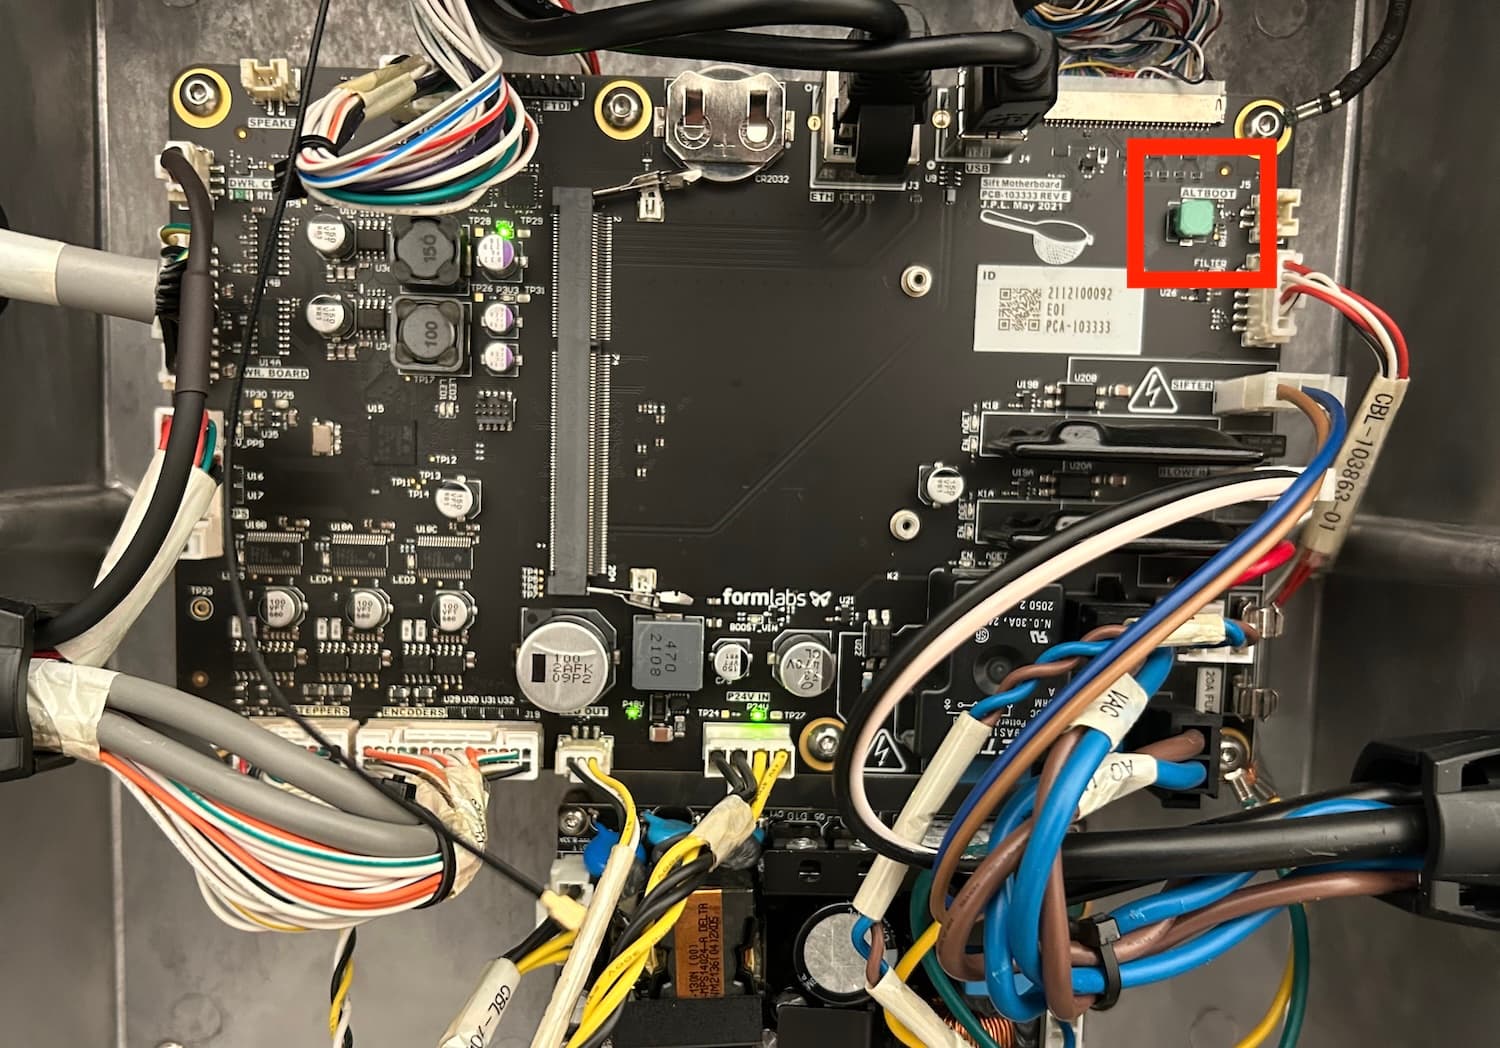
  1. Locate the green button labeled ALTBOOT, positioned at the top-right corner of the motherboard.
  2. Turn the machine on using the rear breaker switch, then immediately hold down the green button.
  3. After the message Performing Factory Reset appears on the touchscreen, release the green button.
  4. Allow the machine up to five minutes to complete the factory reset. The machine may reboot during the reset process.
Fuse Sift reset button
  1. Place the motherboard cover onto the motherboard enclosure, aligning the screw holes in the cover with the corresponding one around the edge of the enclosure. Thread one mounting screw into each of the eight screw holes, then use a #2 Phillips screwdriver to tighten until snug.
  2. Mount the rear panel onto the Fuse Sift. Thread one 8.0 mm M4 button screw into each of the 16 screw holes in the rear panel. Use a 2.5 mm hex driver to tighten until snug.
  3. After the machine reboots, the onboarding process will start on the touchscreen. Follow the instructions to complete the reset process.