WHITE PAPER
Formlabs Logo

Form 3L/Form 3BL error messages

Form 3L/Form 3BL error messages

The printer’s touchscreen displays error messages if the printer encounters any abnormalities and displays more details about the error.

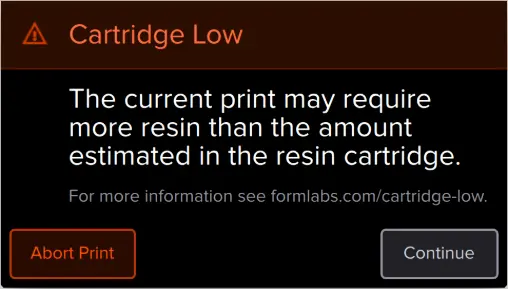
Cartridge Low error message

Configure Dashboard settings to receive SMS or email notifications for the errors listed in this article and for other print events.

Diagnostic logs

Formlabs printers maintain diagnostic logs to provide detailed information about the printer. Include these diagnostic logs with other relevant observations and details when contacting Formlabs Support or your authorized reseller to speed up resolution.

For printers connected to the internet over an active Wi-Fi or Ethernet connection:

  1. Tap the wrench icon on the bottom left of the printer's Home screen. The Settings menu appears.
  2. Tap System. The System menu appears. 
  3. Tap Upload Diagnostic Info. A confirmation message to upload diagnostic information appears.
  4. Tap Next to start the upload. A confirmation message appears when the upload is complete.
  5. If the printer displays an error message indicating that it cannot upload the logs, there may not be enough storage space on the printer for the upload. Delete print jobs from the Queue to clear enough storage space to upload the diagnostic logs.
  6. Restart the printer and try again.

For printers not connected to the internet:

Formlabs SLA printers maintain diagnostic logs to provide detailed information about the printer. Include these diagnostic logs with other relevant observations and details when contacting Formlabs Support or your authorized reseller to speed up resolution.

  1. Open PreForm.
  2. Click Edit Job Setup. The Job Setup window opens.
  3. Select the printer’s serial name.
  4. Click Download Logs. A confirmation window appears.
  5. Click Browse to download the diagnostic logs to a preferred location on your computer.
  6. Click OK. The diagnostic logs save and appear in the encrypted FORMLOGS format.
  7. Attach the file when contacting Formlabs Support.
  8. If PreForm displays the message ERROR_BAD_STATE, there may not be enough storage space on the printer for the upload. Delete print jobs from the Queue to clear enough storage space to upload the logs.
  9. Restart the printer and try again.

Learn more about options for network and non-network connections.

Cartridge dispense error

The printer displays Cartridge Dispense Error if it tries to dispense resin but nothing comes out of the cartridge. Usually, this means the cartridge is empty. Each cartridge contains and can reliably dispense one liter of resin. After the full liter dispenses, dispose of the cartridge and continue printing with a new cartridge.

If a single cartridge is empty or jammed, your print continues until both cartridges can no longer dispense resin. If both cartridges are empty or jammed, your print continues until the resin tank is empty. The printer displays the Replace Cartridge message and indicates which cartridge is empty. Please replace one or both cartridges to continue printing.

The printer may also fail to fill the resin tank or get stuck during the filling process without displaying an error. If that happens, troubleshoot the printer as you would for a Cartridge Dispense Error. Follow the steps for resolving a Resin Level Sensor Error if the issue persists.

If a cartridge is not empty but the printer is unable to dispense resin, an issue with the cartridge may be preventing resin from dispensing:

  1. Update the printer's firmware.
  2. Check that the cartridge vent cap is open. Check the inside of the cap to ensure the vent is not blocked. Consider loosening the cap. Check the bite valve on the underside of the cartridge to make sure it opens when squeezed.
  3. Check the inside of the vent cap to ensure the vent is not blocked.
  4. Consider loosening the vent cap.
  5. Check the bite valve on the underside of the cartridge to make sure it opens when squeezed.
  6. If the printer does not continue the print, manually pour a small amount of resin into the resin tank and try again. Remove the resin cartridge, unscrew the vent cap, pour the resin into the resin tank, replace the vent cap, and reinsert the resin cartridge. Only add a small amount of resin so as to not overfill the tank.


Cartridge low

The printer checks the estimated amount of resin in the cartridge before starting each print. If the estimated resin supply isn’t enough to complete the part, the printer displays Cartridge Low.

Tap Ignore on the printer's touchscreen to continue the print. However, if the printer runs out of resin in the middle of a print, it pauses until a new cartridge is inserted. Long print pauses can cause a horizontal line across printed parts. Consider swapping the low cartridge for a full cartridge before starting the print, or monitor the print closely and insert a new cartridge as soon as the current cartridge runs out of resin.

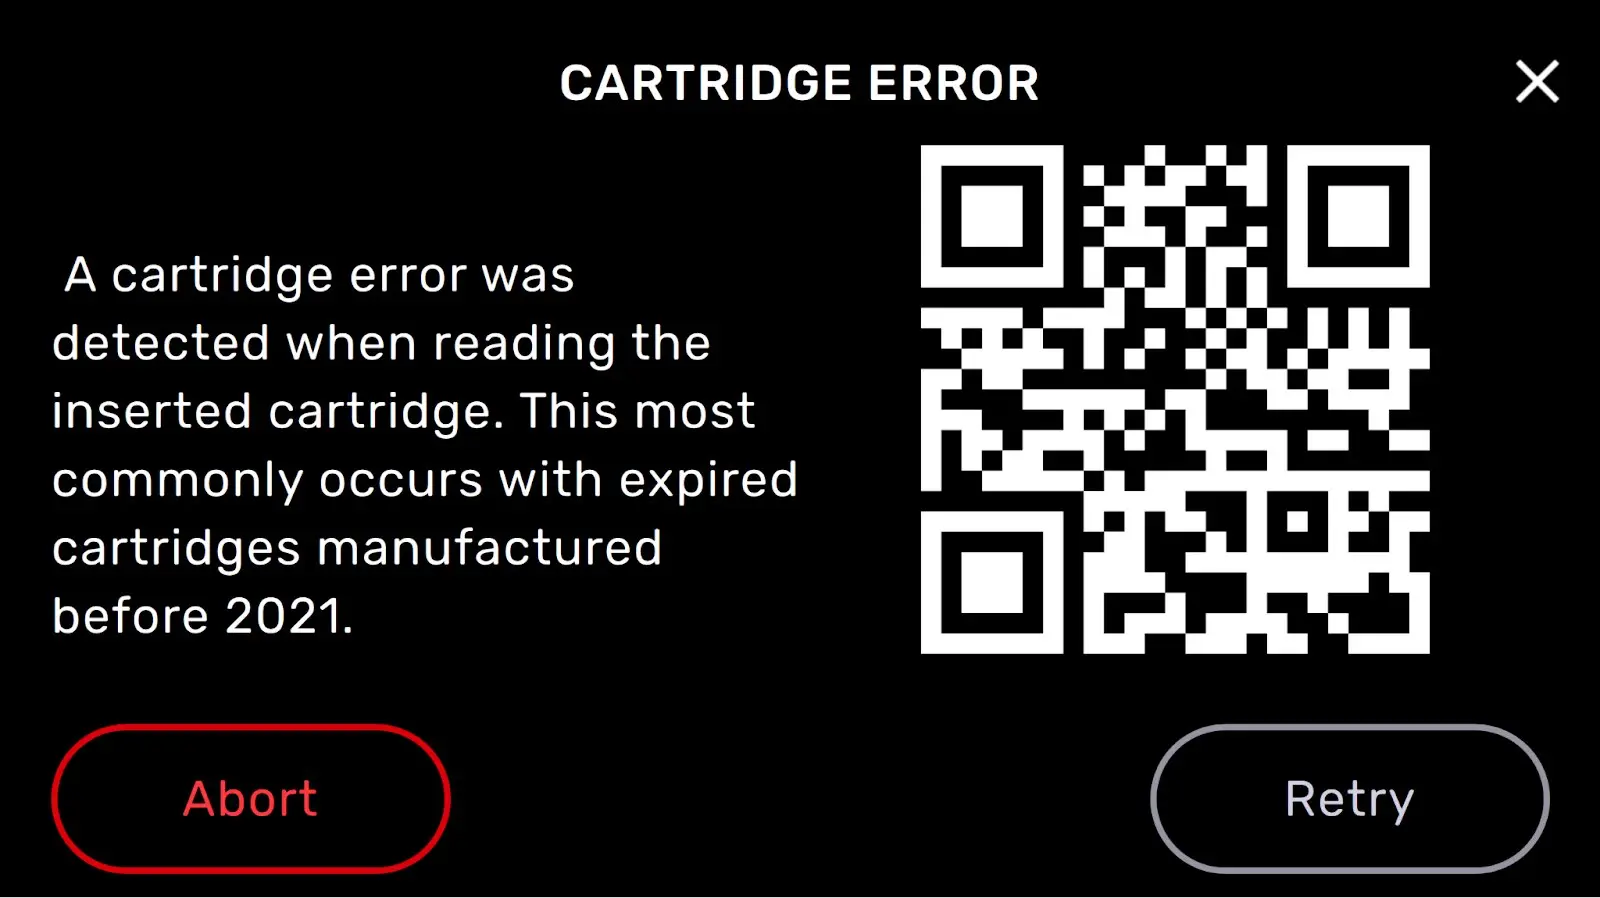
Cartridge error

Cartridge Error message on a Form 3 or Form 3L generation printer

The printer displays Cartridge Error before the preprint cycle when attempting to read and write to the EEPROM chip on older, expired resin cartridges. Check the resin expiration and manufacturing dates on the sticker on the bottom of your cartridge. If the resin has expired, dispose of the cartridge and continue printing with a new cartridge. If the resin has not expired, contact Formlabs Support or your authorized reseller.

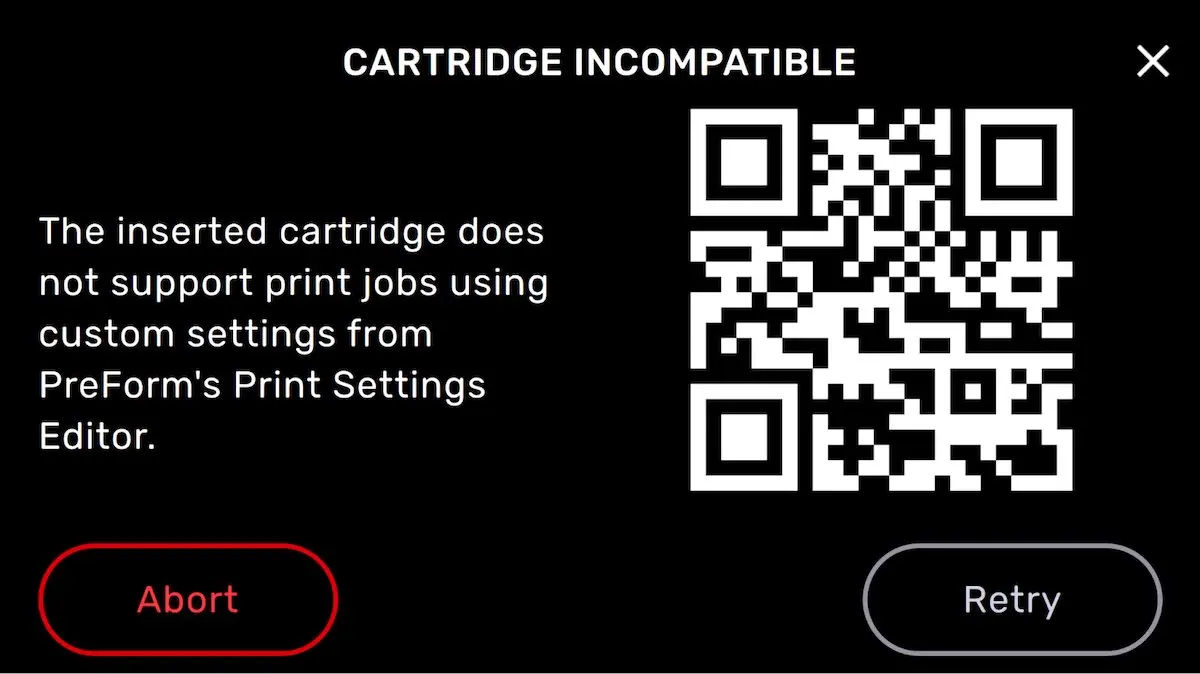
Cartridge incompatible

Cartridge Incompatible message on a Form 3 or Form 3L generation printer

The printer displays Cartridge Incompatible if you attempt to print using custom print settings with most resin cartridges manufactured before 2021. Check the resin expiration and manufacturing dates on the sticker on the bottom of your cartridge. If the resin has expired, dispose of the cartridge and continue printing with a new cartridge. If the resin has not expired, contact Formlabs Support or your authorized reseller.

Resin tank overfilled

If the resin tank is overfilled, the printer will show this error. Use a syringe or small disposable cup to remove small amounts of resin, and pour it into a separate container. If the printer incorrectly warns of a resin tank overfill, check that the tank is free of debris or other obstructions.

Missing resin tank and missing cartridge errors

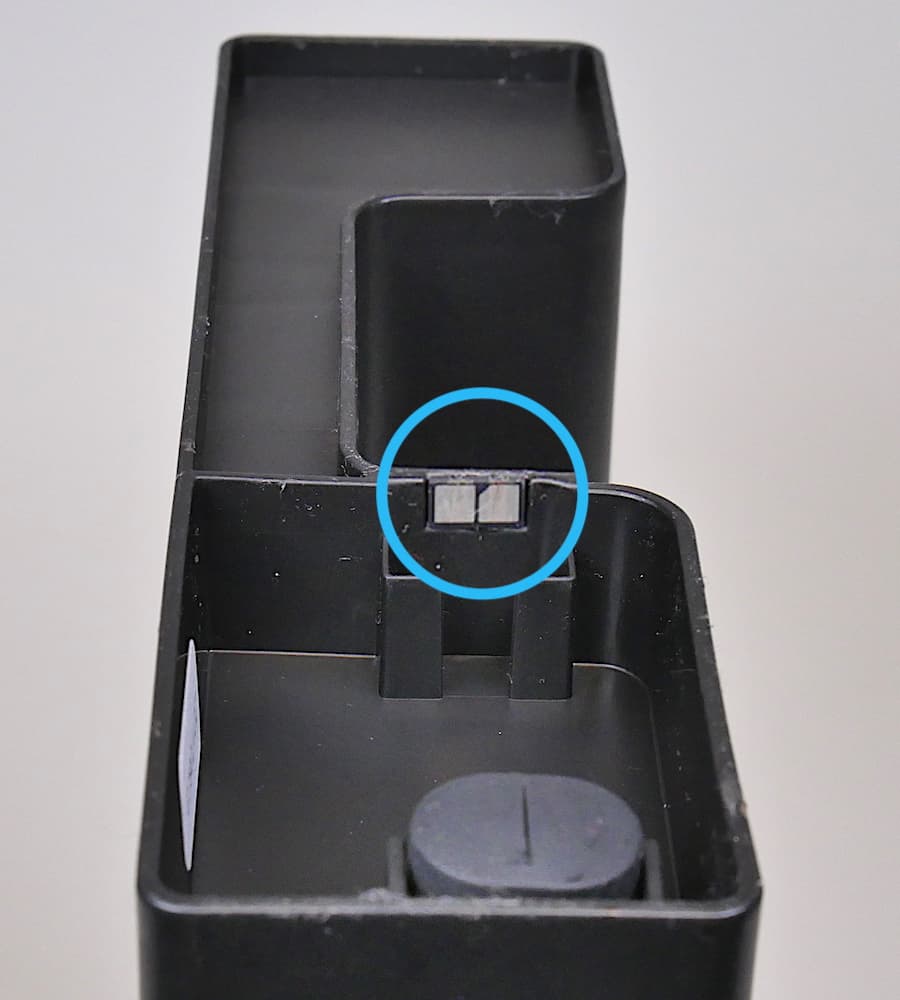
If the printer does not detect a cartridge, check the ID chip on the cartridge to ensure the chip is present and clean. A dirty or missing chip can prevent the printer from detecting the cartridge.

Resin Cartridge EEPROM chip

If the printer does not detect a resin tank, remove it from the printer and reinsert it, making sure to push the resin tank in until it hits a hard stop at the back of the machine.

Resin tank and cartridge warning

The printer checks the resin type in the tank and cartridges to ensure they match the current print job. If they do not match the resin type identified in the print job, the printer displays Resin Tank and Cartridge Warning and prompts you to insert a tank and cartridges that match the print job settings.

Resin tank warning

If the resin cartridge is inserted first, the printer displays Resin Tank Warning when the type of resin in the tank does not match the cartridges. Remove the resin tank and replace it with one that matches the inserted resin cartridges.

If the resin tank is unused and clean but has been programmed with the incorrect resin type, tap Ignore to reprogram the tank's resin type.

Cartridge warning

If the resin tank is inserted first, the printer displays Cartridge Warning when the type of resin in the cartridges does not match the tank. Remove the cartridges and replace them with the type of resin that matches the tank.

Cartridge empty

The printer may display Cartridge empty even when a resin cartridge is not empty and resin is dispensing properly into the resin tank. This error usually indicates an issue with one or both of the load cells, which are weight sensors that measure the amount of resin in the cartridges.

If the printer’s touchscreen displays Cartridge empty, follow these steps:

  1. Ensure that your printer’s firmware is up to date.
  2. Upload your printer’s diagnostic logs.
  3. If resin is not dispensing from the cartridge, inspect the bite valve to make sure it is not sealed.
  4. Tare, or reset, the cartridge sensor:
    1. On the touchscreen, tap the wrench icon. The Maintenance screen appears.
    2. Scroll down and tap Calibration > Tare Cartridge Sensor.
    3. Tap Next.
    4. Remove any inserted resin cartridges from the printer when prompted by the touchscreen.
    5. After removing the resin cartridges, tap Tare.
    6. Tap Done when taring is complete.
    7. If the taring process fails, ensure that nothing is touching the cartridge floor and tap Retry.

If Cartridge empty persists after trying the troubleshooting steps above, you may need to replace the affected cartridge floor. Contact Formlabs Support or your authorized reseller for further assistance.

Motors jammed

Sensors track the printer's motor movements. If a motor does not return to its original position in the right amount of time, the printer displays Motors Jammed. Anything in the path of a moving part may prevent the motor from moving properly. To resolve this issue:

  1. Open the cover to inspect the build platform and Light Processing Units (LPUs).
  2. Look inside the printer cavity and remove obstructions along the rails, then remove and reinsert the build platform and resin tank.
  3. Clean and lubricate the X-axis ball screw or Z-axis lead screw, depending on which motor jammed.
  4. Contact Formlabs Support or your authorized reseller for further assistance. Provide a video showing the error with sound.

Anything in the path of a moving part may prevent the motor from moving properly. Open the cover to inspect the build platform and Light Processing Units (LPUs). Look inside the printer cavity and remove obstructions along the rails, then remove and reinsert the build platform and resin tank.

Heater error

The printer stops heating if it cannot reach the target temperature of 30 °C (86 °F) after 60 minutes. In a cold operating environment, the printer may require more than one heating cycle to reach the desired temperature. Restart the print to begin heating again. For more information, read the support article Maintaining resin temperature.

If the printer cannot reach its target temperature after repeated tries or after moving the printer to a warmer environment, one or both of its two air heaters may need to be replaced. Replacement Form 3L generation heaters are available for purchase on the Formlabs web store, with installation instructions available on the Formlabs Support site:

Contact Formlabs Support or your authorized reseller for further assistance.

Force sensor timeout

Formlabs LFS printers use a force sensor on the Z-axis to determine when each layer has peeled off the resin tank film. If that force sensor is not responding properly, the printer peels each layer more slowly to prevent damage to the resin tank or print. As of Form 3 generation firmware version 1.13.3 and Form 3L generation firmware version 1.6.3, the printer displays Force Sensor Timeout to notify you if the force sensor is unresponsive. This message does not stop the print. To resolve this issue:

  1. Update the printer’s firmware.
  2. If Force Sensor Timeout messages persist, check and reseat the force sensor cable. Follow the instructions in the guide Reseating the Form 3L Z-axis force sensor cable [EN] [DE] [ES] [FR] [IT] [JA] [ZH].

Error 1

Error 1 is a general error message that can have multiple causes. If you encounter this error:

  1. Power cycle the printer.
  2. Update PreForm and your printer’s firmware.
  3. Perform a factory reset on your printer.
  4. Reupload and retry the print.
  5. Try another resin tank, particularly if the one previously in use was past its maximum lifetime.

If the error persists, upload your printer’s logs and contact Formlabs Support of your authorized reseller for further assistance.

Error 4

This error indicates that the printer was unable to communicate with the LPU housing motors. This can be resolved by restarting the printer and ensuring the firmware is up to date. If the issue persists, upload diagnostic logs and perform a factory reset. If you see this error message repeatedly, contact Formlabs Support or your authorized reseller.

Error 61

Every print job is uploaded to the printer from PreForm. If the printer is unable to read the job file, the touchscreen displays Error 61. This error is usually caused by incompatible PreForm and printer firmware versions. It is also possible that the file was corrupted due to a poor wireless connection while it was uploaded from PreForm.

If the printer displays Error 61:

  1. Update the printer’s firmware and PreForm to the latest version.
  2. Adjust the print job in PreForm. Rotate or shift the model and regenerate supports to create a new print file.
  3. Send the new print job to the printer via USB if possible.
  4. Try to rerun the print job. If you see the same error, continue with the troubleshooting steps below.
  5. Upload diagnostic logs.
  6. Perform a factory reset.
  7. Run the LPU replacement routine without replacing or removing the LPUs. This routine is done only to fix calibration issues. Follow the steps below:
    1. Tap the wrench icon on the printer’s touchscreen. The Maintenance screen appears.
    2. Tap LPU Replacement. The LPU moves from its storage position to the right side of the printer into its maintenance position.
    3. When prompted by the touchscreen, disconnect the power cable before continuing.
    4. Reconnect the power cable. The printer initializes, moves the LPU back to its home position, and calibrates the LPU.

If the issue persists, contact Formlabs Support or your authorized reseller for further assistance.

Error 67 and 68

These errors are caused by the printer being unable to communicate with the LPU.

  1. Upload diagnostic logs.
  2. Perform a factory reset.
  3. If the errors continue, contact Formlabs Support or your authorized reseller for further assistance.

Error 131

The LevelSense board monitors the amount of resin in the resin tank based on the height of the liquid resin. Printer firmware updates sometimes include updates to firmware for specific components, such as the LevelSense board. Error 131 relates to issues with reprogramming the LevelSense board. This issue can usually be resolved by updating your printer’s firmware to the latest version.

It is also possible that one of the ribbon cables in the Light Processing Units (LPUs) is unseated. Follow the instructions in the repair guide Replacing the Form 3L Light Processing Unit [EN] [DE] [ES] [FR] [IT] [JA] [ZH]. Complete the guide up to step 4 in the section Removing the LPU to access and reseat the ribbon cables.

If you see this error message repeatedly, contact Formlabs Support or your authorized reseller.

Error 147

This error indicates that the printer was unable to move the tensioner system. Usually caused by a software issue, this can be resolved by restarting the printer and ensuring the firmware is up to date. If you see this error message repeatedly, contact Formlabs Support or your authorized reseller.

Error 148

Error 148 indicates that the printer is unable to move the resin tank tensioner system. To resolve a tensioner error:

  1. Try another resin tank, if any are available.
    • If the resin tank cannot be removed because the tensioner has not released, follow the guide Manually releasing the Form 3L tensioner motor [EN] [DE] [ES] [FR] [IT] [JA] [ZH].
  2. Restart the printer.
  3. Update your printer’s firmware.
  4. Reseat the tensioner sensor cable following the instructions in the guide Reseating the Form 3L tensioner sensor cable [EN] [DE] [ES] [FR] [IT] [JA] [ZH].
  5. If the error persists, you may need to replace the tensioner motor. The Form 3L generation tensioner motor is available from the Formlabs Store. Replace the part following the guide Replacing the Form 3L tensioner motor.

If you see this error message repeatedly, contact Formlabs Support or your authorized reseller.

Error 186

During a print, Formlabs LFS printers tension the flexible film at the bottom of the resin tank to create a flat, even surface for printing. This stretches the film over time. To account for this, the printer applies tension slowly until the slack in the film is removed before pulling with a specified target force. If this tensioning process takes too long, the printer displays Error 186 or PR_ERROR_TENSIONER_FAIL_TO_SLACKOUT. This may mean that the resin tank is old and the tank film has reached the maximum allowable amount of stretch, or that the tensioner has malfunctioned. To resolve this issue:

  1. Update your printer’s firmware.
  2. Retry your print with another resin tank, if one is available. If the replacement tank works, your original tank’s flexible film has reached the maximum allowable amount of stretch and should be disposed of. In most cases, resin tanks become unusable due to damage or reach their maximum lifetime before the tank film stretches this much.
  3. It is possible that the printer’s tensioner motor cable is unseated. Follow the instructions in the repair guide Reseating the Form 3L tensioner sensor cable [EN] [DE] [ES] [FR] [IT] [JA] [ZH]. Reseat the tensioner motor cable and reinstall the rear shell.
  4. If the error persists, you may need to replace the tensioner motor. The Form 3L generation tensioner motor is available from the Formlabs Store. Replace the part following the guide Replacing the Form 3L tensioner motor.

If the issue persists, upload your printer’s diagnostic logs, then contact Formlabs Support or your authorized reseller for further assistance.

Error 246

Error 246 or PR_ERROR_WHIPPET_ERROR_FUSE indicates a communication issue between the printer and the LPU. This could be due to an improper command to the galvanometer in the LPU, a power issue, incorrect LPU calibration, or a software bug. To resolve this issue:

  1. Open the printer shell and check the flex cables that connect to the Light Processing Units (LPUs) for damage. Reseat the flex cables and check using the guide Replacing or reseating the Form 3L LPU ribbon cable [EN] [DE] [ES] [FR] [IT] [JA] [ZH].
    1. If any of the ribbon cables are damaged, they may need to be replaced. Both the main ribbon cable and shorter ribbon cable are available on the Formlabs Store. Contact Formlabs Support for additional assistance.
  2. Run the LPU replacement routine without replacing or removing the LPUs. This routine is done only to fix calibration issues. Follow the steps below:
    1. Tap the wrench icon on the printer’s touchscreen. The Maintenance screen appears.
    2. Tap LPU Replacement. The LPU housing moves from its storage position to the right side of the printer into its maintenance position.
    3. When prompted by the touchscreen, disconnect the power cable before continuing.
    4. Reconnect the power cable. The printer initializes, moves the LPU housing back to its home position, and calibrates the LPUs.

If the issue persists, you may need to replace one of the LPUs. Replacement LPUs are available on the Formlabs Store. Contact Formlabs Support for additional assistance.

Error 292

Error 292 indicates the tensioner did not de-tension correctly or release the resin tank. This error is usually related to an issue with the tensioner motor but can also be caused by a software bug.

If the printer’s touchscreen displays Error 292, follow these steps:

  1. Ensure that your printer’s firmware is up to date.
  2. Upload your printer’s diagnostic logs.
  3. Try other resin tanks, if available, to confirm the issue is not related to a resin tank fitting improperly.
  4. Perform a factory reset
  5. It is possible that the printer’s tensioner motor cable is unseated. Follow the repair guide Reseating the Form 3L tensioner sensor cable [EN] [DE] [ES] [FR] [IT] [JA] [ZH]. Reseat the tensioner motor cable and reinstall the rear shell.
  6. If the error persists, you may need to replace the tensioner motor. The Form 3L generation tensioner motor is available from the Formlabs Store. Replace the part following the guide Replacing the Form 3L tensioner motor.

If Error 292 persists after trying the troubleshooting steps above, contact Formlabs Support or your authorized reseller for further assistance.

Error 293: Reset While Printing

If the printer restarts unexpectedly while in the middle of a print job, it will show Error 293 when it turns back on. This is a generic error that displays when the printer does not finish a print job normally. This error is usually caused by a power outage or a loose power cable. If the problem persists after trying another outlet, contact Formlabs Support or your authorized reseller. If your area has frequent power outages or brownouts, consider purchasing and plugging your printer into an uninterruptible power supply (UPS).

Error 310 and Error 311

Error 310 and Error 311 indicate that the printer encountered an issue while running the Z-axis calibration procedure. The intent of the calibration is to measure the exact pitch of the build platform in relation to the LPU housing, so the printer can compensate for any tilt during the first few layers or a print. The printer lowers the build platform repeatedly as it moves the LPU housing across the build platform. With each move, it measures how far down the build platform has to travel to make contact with the roller holder. The printer displays an error if the left and right sides of the build platform have travel distances that differ by at least 0.4 mm. This can be due to:

  • Resin cured on the build platform or underneath the print surface (e.g., on the Build Platform 2 or Build Platform 2L)
  • A slight tilt in the angle of the build platform
  • A slight tilt in the angle of the LPU housing or roller holder

To resolve this issue:

  1. Make sure your build platform is completely clean. If you are using a Build Platform 2 or Build Platform 2L, remove the print surface and clean both the underside of the print surface and the body of the build platform. When reassembling the build platform, make sure that the print surface is correctly seated.
  2. After cleaning, run the calibration again.
  3. Try a different build platform, if one is available.

If the calibration continues to fail, contact Formlabs Support of your authorized reseller for further assistance.

Error 345

Error 345 indicates that the print couldn't start because of an unexpected error. To resolve this issue:

  1. Perform a factory reset on your printer.
  2. Reupload and retry the print.

If the error persists, upload your printer’s logs and contact Formlabs Support or your authorized reseller for further assistance.

Cartridge worn out

Each cartridge contains and can reliably dispense one liter of resin. After the full liter dispenses, dispose of the cartridge and continue printing with a new cartridge. Restart the print once the depleted cartridge has been replaced.

Resin Level Sensor Error

The LevelSense board is located directly above the back-right corner of the resin tank. It determines the amount of resin in the resin tank based on the height of the liquid resin. The printer may display Resin Level Sensor Error if there is an issue with the LevelSense board.

If the touchscreen displays Resin Level Sensor Error, follow each step to see if that step resolves the error:

  1. Ensure that the printer is level.
  2. Ensure that your printer’s firmware is up to date.
  3. Inspect the resin tank:
    1. Remove the resin tank.
    2. Reinsert and push the tank all the way back. The touchscreen displays a confirmation message when the resin tank is properly seated.
  4. Inspect the LevelSense board:
    1. Remove the resin tank.
    2. Inspect the LevelSense board. Contact Formlabs Support or your authorized reseller if you see damage.
  5. If the resin tank is completely empty, prime the resin tank by pouring in some resin from a resin cartridge.
  6. If the printer still displays the error, try a different resin tank. If the error does not occur with a different tank, the problem may be with the resin tank.
  7. If the error happens with all resin tanks, contact Formlabs Support or your authorized reseller.

Mixer error

At the start of each print, the LPU housing pulls the tank mixer back and forth across the tank film several times. This motion mixes the resin in the tank while also checking for cured resin on the film and on the build platform. If the mixer encounters cured resin blocking its path, its magnets decouple from the magnets in the LPU housing and the printer pauses the print. This is the designed behavior of the mixer and is intended to protect the tank film and prevent further print failures.

Warning:

Resin may cause skin irritation or an allergic skin reaction. Wear gloves when handling liquid resin or resin-coated surfaces. Wash skin with plenty of soap and water. Do not wash skin with products containing alcohol, like hand sanitizer, or any other solvents.

If the printer displays Mixer Error, follow these steps:

  1. Update the printer’s firmware.
  2. Remove the build platform and inspect it for cured resin or other debris.
  3. Remove the resin tank and place it in its case.
  4. Restart the printer.
  5. Using the tank tool, inspect the resin tank film for cured resin or other debris.
    1. If you find any cured resin, remove it using the tank tool.

Notice:

Do not use the part removal tool, scraper, flush cutters, or any other metal tool to inspect the resin tank or remove cured resin from the tank. Such tools may damage the tank film, leading to failed prints and/or a resin spill.

  1. Reinsert the resin tank and build platform.
  2. On the printer touchscreen, tap the wrench icon. The Settings screen appears.
  3. Tap Maintenance. The Maintenance screen appears.
  4. Tap Calibration. The Calibration screen appears.
  5. Tap Calibrate Tank Mixer Sensor and follow the onscreen prompts to calibrate the tank mixer sensor.
  1. Restart the print.

If the resin tank is new and unused:

  1. Remove the resin cartridge from the printer.
  2. Unscrew and remove the vent cap at the top of the resin cartridge.
  3. Carefully pour a small amount of resin from the resin cartridge into the resin tank, lightly coating the flexible film.
  4. Replace the vent cap.
  5. Insert the resin cartridge into the printer.
  6. Restart the print.

Notice:

Do not use the part removal tool, scraper, flush cutters, or any other metal tool to inspect the resin tank or remove cured resin from the tank. Such tools may damage the tank film, leading to failed prints and/or a resin spill.

Printer tilted

Formlabs SLA printers operate best when perfectly level. The touchscreen prompts you to level the printer when necessary. Tap Settings > Printer Leveling on the printer's touchscreen to view the current level status.

Follow the touchscreen prompts and use the leveling tool to level the printer.

Reset while printing

If power to the printer is interrupted during a print job, the printer does not resume the print job when it restarts. The touchscreen displays Reset While Printing. If the reset was unexpected, contact Formlabs Support or your authorized reseller.

Failed to start print

The Failed to start print error message appears if the printer is unable to determine why the print failed to start properly. In some cases, it can indicate damage to the motherboard that prevents proper connection to the laser controller or motors. To resolve this issue:

  1. Power cycle the printer.
  2. Update PreForm and your printer’s firmware.
  3. Perform a factory reset on your printer.
  4. Delete the FORM file from your computer and delete the print job from the printer.
  5. Remake the print job, reupload it to the printer, and retry the print.
  6. Check your printer’s connection to the computer. Reupload the print job via another connection method, if possible.
  7. Try another resin tank, particularly if the one previously in use was past its maximum lifetime.

If you see this error message repeatedly, contact Formlabs Support or your authorized reseller.

Flex cable errors

A printer must maintain uninterrupted communication with the Light Processing Units (LPUs) to print. If the connection is interrupted, the printer may throw one of these errors:

  • 13 PR_ERROR_GALVOS_ERROR
  • 29 PR_ERROR_GALVOS_RTKB_OPEN
  • 40 PR_ERROR_GALVOS_SAMPLE_RATE_MISMATCH
  • 42 PR_ERROR_GALVOS_RTKB_UNEXPECTED
  • 43 PR_ERROR_GALVOS_RTKB_TOO_MANY_UNDERRUNS
  • 44 PR_ERROR_GALVOS_RTKB_TOO_MANY_OVERRUNS
  • 56 PR_ERROR_GALVOS_STREAMING
  • 57 PR_ERROR_GALVOS_RTKB_READ
  • 58 PR_ERROR_GALVOS_RTKB_WRITE
  • 67 PR_ERROR_GALVOS_RESPONSE_TIMEOUT
  • 83 PR_ERROR_DBUS_CALL_GENERAL

To resolve these errors:

  1. Open the printer shell and check the flex cables that connect to the Light Processing Units (LPUs) for damage.
  2. Reseat all three cables and check using the guide Replacing or reseating the Form 3L main LPU ribbon cable [EN] [DE] [ES] [FR] [IT] [JA] [ZH].
  3. For Error 56 or Error 83: Update to firmware version 2.5.2 or later.

If these steps do not resolve the flex cable error, contact Formlabs Support or your authorized reseller.

Could not execute lasers: Bulk Transfer: LIBUSB_ERROR_IO

This error indicates that the internal USB control system has encountered an issue. To resolve this error, replace the X-hub board. The part is available for purchase on the Formlabs Store.

Wi-Fi errors

The printer displays specific error messages depending on the Wi-Fi access point's response to the connection attempt. Refer to the support article Connecting to your printer to set up a connection via Wi-Fi, USB, or Ethernet. Always check with a network administrator to ensure that the wireless network is configured to allow the printer to connect.

PreForm 3.57.2 or earlier: For a Windows operating system, follow Apple's instructions to ensure that Bonjour is properly installed. This step is required to connect.

PreForm must be connected to the same network as the printer for wireless uploading.

Invalid network key

The password was not entered correctly. Check the network password. Check with a network administrator to ensure that the wireless network is configured to allow the printer to connect.

Connection failed

The printer failed to configure the wireless connection and could not connect to the network. Check with a network administrator to ensure that the wireless network is configured to allow the printer to connect.

EnablingRemote Assistancefor troubleshooting

During troubleshooting, Formlabs Support may need additional information from or access to your printer. You may be asked to enable Remote Assistance and Dashboard Logging on your machine.

To prepare your printer for remote assistance:

  1. Tap the gear icon to access the Settings screen. The Settings screen appears.
  2. Tap System. The System screen appears.
  3. Tap Remote Assistance. The toggle turns blue when it is enabled.

To prepare your printer for dashboard logging:

  1. Tap the gear icon to access the Settings screen. The Settings screen appears.
  2. Tap Connectivity. The Connectivity screen appears.
  3. Tap Dashboard Logging. The toggle turns blue when it is enabled.

Factory reset instructions

On some occasions, a factory reset may correct unusual printer behavior. Unusual behavior may include unknown error messages, incomplete firmware updates, an unresponsive touchscreen, or trouble connecting to PreForm. A factory reset erases custom settings, including prints saved in the Queue and network connections.

Notice:

A factory reset erases all print job information, custom settings, and diagnostic logs. Upload diagnostic logs before performing a factory reset.

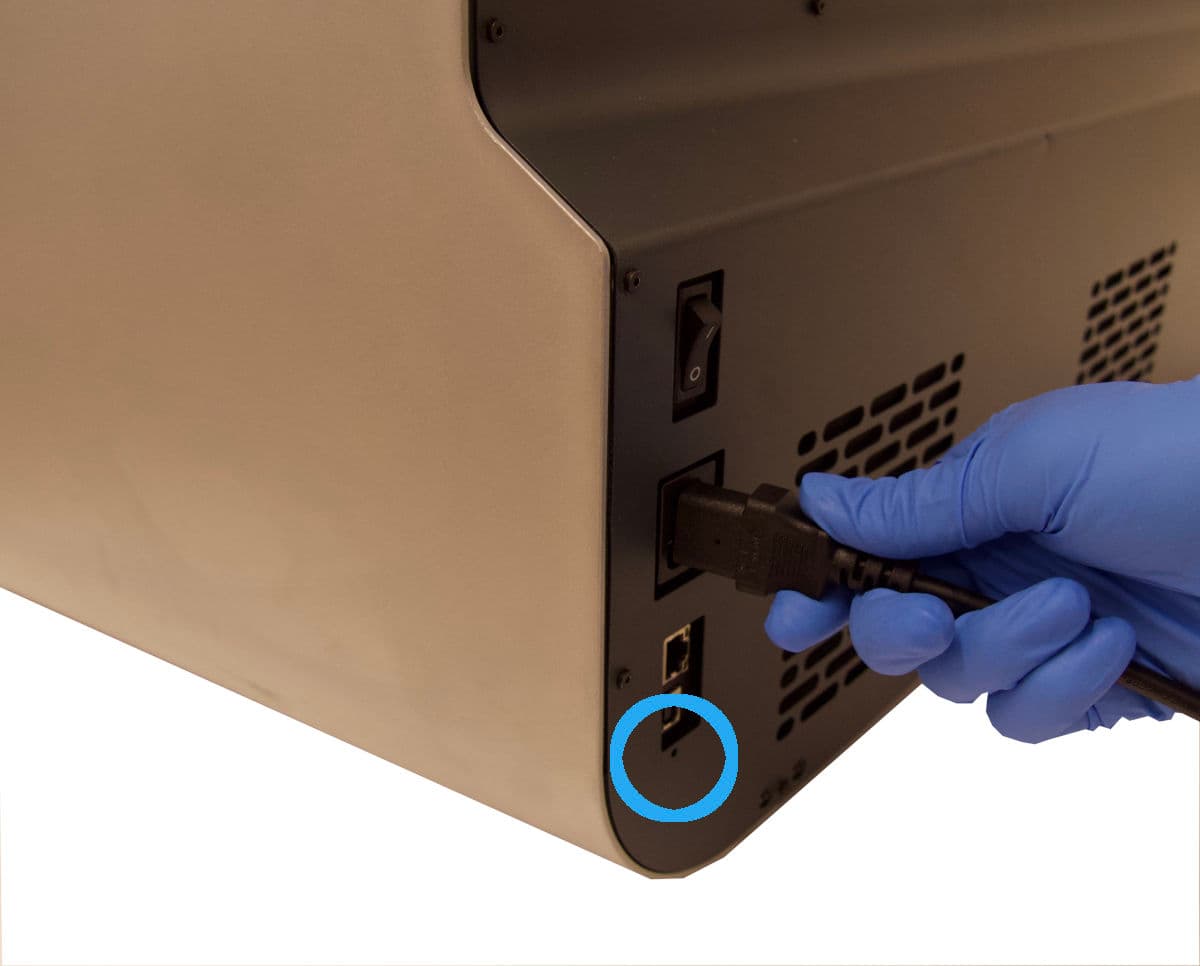
To perform a factory reset:

  1. Power cycle the printer by either:
    • Turning the printer off and back on using the power switch on the back of the machine
    • Disconnecting and reconnecting the power cable with the power switch in the ON position
  2. Reconnect the printer power cable.
  3. When the Formlabs logo appears on the touchscreen, push and hold the reset button located underneath the USB port in the rear of the printer until Resetting to factory defaults appears on the touchscreen. You may need to use a paperclip or other small tool to push the reset button.
  4. Release the button.
  5. The touchscreen displays Factory reset complete before initializing the printer.
Form 3L/Form 3BL reset button

To confirm a successful factory reset, tap Queue on the printer's touchscreen. After a successful reset, the print queue is empty. If the reset does not resolve the behavior, contact Formlabs Support or your authorized reseller.