
The BOM or Bill of Materials is a comprehensive list of parts, items, assemblies, and other materials required to create a product. It is also known as a Product Structure, Assembly Component List, Material Take-Off (MTO) in the case of technical production drawings, or Production Recipe in the case of process manufacturing industries such as foods, drugs, plastics, and chemicals.
The BOM has a leveled, hierarchical structure. It contains crucial information about all parts, including a unique code, description, lifecycle status, approval status, quantity, pricing, minimum order quantity, vendor information, manufacturing process, etc. The BOM provides the primary data in product costing, Materials Requirements Planning (MRP), Enterprise Resource Planning (ERP), and Manufacturing Execution Systems (MES).
When smartly utilized, the BOM will drive down material and logistics costs. As we will see in this article, it is an essential document for supporting the assembly and supply chain planning process.
What is a Bill of Materials (BOM)?
Consider the BOM as a shopping list for a new product. Especially for complex products that are globally sourced from different vendors such as contract manufacturers (CM), original equipment manufacturers (OEM), and original design manufacturers (ODM), companies need to manage from where specific parts are sourced, manufacturing processes, tooling costs, quantities needed, prices, lead times, and whether the components are used in the company’s other products.
How to Choose a 3D Printing Technology
Having trouble finding the best 3D printing technology for your needs? In this video guide, we compare professional 3D printers across popular buying considerations.
Who Uses the Bill of Materials?
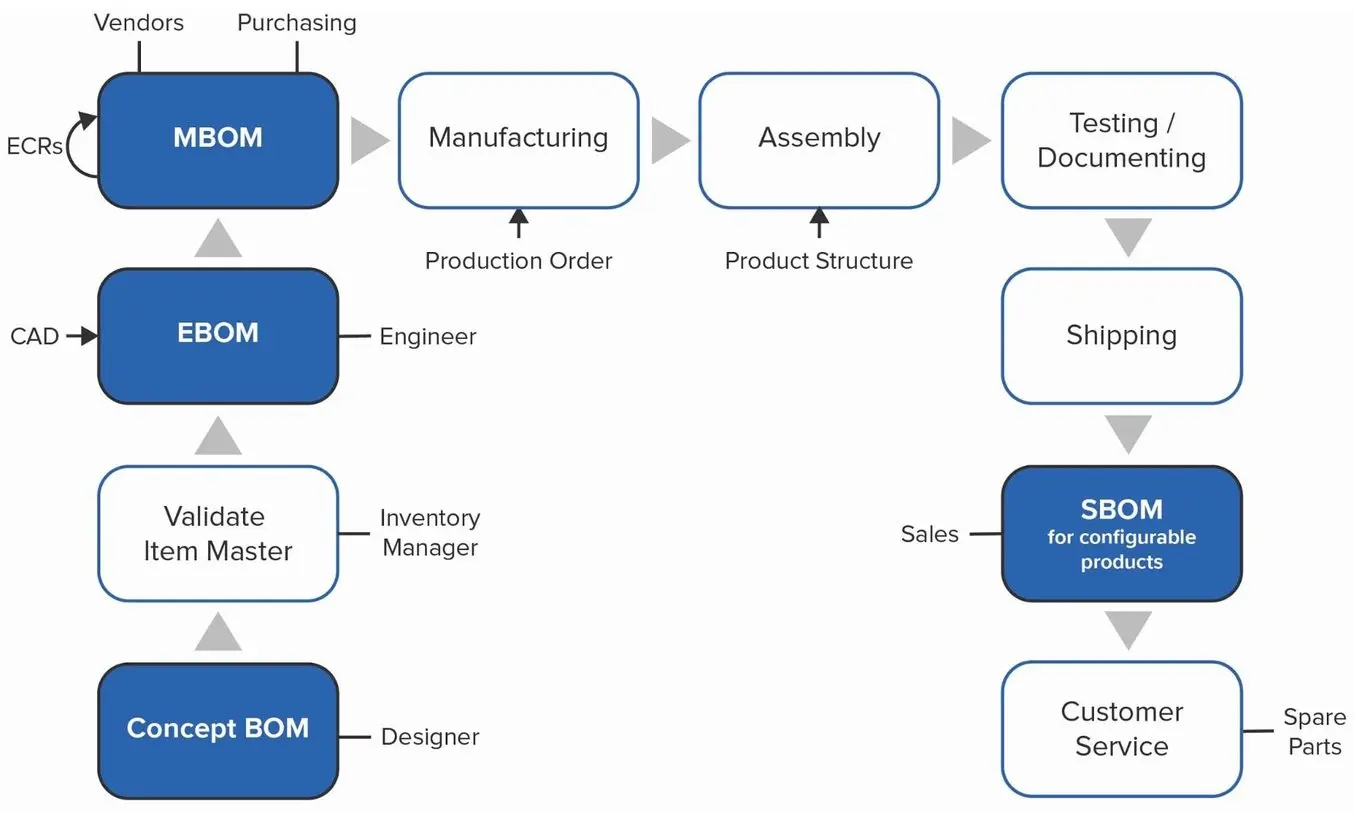
All people involved in the processes of designing, engineering, planning, assembly, and shipment of a product make use of the BOM at some point. Based on design concepts for a new product, engineers typically start by setting up an initial concept BOM that specifies the parts needed and provides an overall cost estimate. Design, engineering, as well as research and development teams then collaborate to refine the design in order to optimize the implementation of components. This results in a detailed BOM used by the purchasing, sourcing, and planning departments to negotiate with different vendors, who can assign parts, prizes, contact persons, and production processes to each component. The manufacturing planner refers to the BOMs to create the company’s vendor list.
In collaboration with manufacturers, the BOM evolves further towards a complete product structure for a shippable end product. On the shop floor—either internally or externally at subcontractors and factories—machine operators will refer to the BOM and its appended design drawings to manage their operations. The assembly team subsequently utilizes this product structure for their work instructions.
The people involved in quality control, testing, and documenting the product, such as developing a user manual, also refer to the BOM. People responsible for the stockroom, such as accountants and inventory managers use the BOM for maintaining inventories and catalogs. And finally, the sales department may use it to create their version of a BOM in case of products that are configurable by the end-customer.
A Brief History of the BOM
Before computers dominated the industry, manufacturing planners and inventory managers would look for the most economic order quantity (EOQ) to minimize storage and ordering costs. Before World War II, engineers were already working with early versions of BOMs to specify components within a technical drawing. This was originally driven by the surge in material management methods during World War I, a time of material scarcity where large orders of war goods had to be rapidly fulfilled.
More comprehensive approaches to production planning emerged in the 1960s when Toyota developed their Just-In-Time (JIT) paradigm, which would later evolve into Lean Manufacturing. In the United States, a similar approach was invented: Material Requirements Planning (MRP). It was first adopted by Black & Decker in 1964 and tech giants such as IBM and Royal Philips Electronics followed suit. By 1975, MRP had been implemented by 700 companies, which grew to 8,000 in 1981, with over 600 available MRP solutions. Now, companies could plan for needed material based on a master production and purchasing schedule based on the parts outlined in the BOM. This reduced inventories, ensured timely deliveries, and better-matched material availability with manufacturing and market requirements.
In the 1980s, the system was further expanded to include financial analysis, marketing, human resources, and accounting aspects. It was called MRP II, Manufacturing Resources Planning. A truly integrative solution evolved in the 1990s with Enterprise Resource Planning for the the current day and age, that is characterized by digital transformation, on-demand manufacturing, globalization, high product complexity and customization, as well as the rapid emergence of novel high-performance materials and production processes. Large organizations use complex software systems to manage inventories, new product development processes, and production planning across their entire product offerings. Yet, they still revolve around the same MRP calculation kernel.
The BOM is still the central document alongside the master schedule and inventory records file, but includes much more detailed information in a hierarchical, multi-leveled structure that is increasingly interlinked with other product structures. Sophisticated CAD systems can extrapolate and export actual quantities of materials and components required to complete the system directly from the CAD drawing. This information can be exported as a simple spreadsheet or as a database file to be imported into MRP or ERP systems for material ordering, order processing, material traceability, costings, and resource planning.
The Value of a BOM
There are multiple advantages to creating a BOM:
-
It helps planning raw materials purchases
-
It provides a cost estimate
-
It allows tracking and planning of material requirements
-
It ensures the accuracy of records such as design drawings, vendor lists, and material datasheets
-
By combining multiple BOMs, purchasing departments increase their power to reduce logistics and delivery costs when buying in bulk
-
Companies gain control over their inventory
-
It ensures a robust supply chain
-
It reduces production errors as well as waste
For these reasons, even a small product comprised of only a few components will benefit from having a BOM. After all, the product will undergo revisions and may be followed up with derivative designs using similar components, which the company will benefit from tracking. Yet, there is no need to force development teams to come up with a complete Bill of Materials right from the project’s start. There are multiple types of BOMs fit for various phases of a project, as discussed in the next section.
Types of BOMs
The initial or concept BOM is an early list of components and their suppliers with ballpark price estimates, MOQs, and lead times. This gives the development, management, and production planning teams a rough idea of the overall product complexity and price.
The product configuration and all its components are fleshed out during the design and engineering process, and in parallel, the BOM evolves to include detailed information. This forms the Engineering Bill of Materials (EBOM), which specifies the product from a functional perspective at the end of its design stage and is sent out for quotations towards selected suppliers.
As manufacturing teams evaluate the EBOM, they will come up with reliable pricing, as well as additional requirements for packaging, shipping, post-processing, assembly, tooling, and possible engineering change requests (ECRs). Components may go through different iterations as they’re optimized for manufacturing (DFM) and new suppliers may be sought. The resulting Manufacturing Bill of Materials (MBOM) is the final specification for a complete sellable product, including all subassemblies, the packaging box, insert, and user manual, non-manufactured consumables such as glue, screws and fasteners, paint, coatings, lubricants, labels, and wires, mold materials, packaging dies, assembly jigs, pad printing cliches, etc.
Totally unrelated to the BOMs created internally to the company’s product development processes is the Sales Bill of Materials (SBOM). This occurs whenever a product is configurable by the customer at the sales stage. For example, a customer visits a shoe store to get a custom foot impression and then create a customized shoe using in-store configurator software on a large touchscreen. The sales order document then would first list the parent-level item (let’s call it Shoe X) and underneath it the components as separate child-level items: the custom 3D printed insole that provides an optimized fit based on the customer’s footprint, the fabric and the shoelaces in the colors specified by the customer, etc.. This is an example of an SBOM, in this case, a Configurable Bill of Materials (CBOM).
BOM vs. CoGS
Even though the MBOM is very detailed, it still cannot represent the final cost of the sold goods (COGS). If your total price per unit is $25, you can’t realistically expect to sell it for $35 and make a profit. It is more accurate to multiply that number by three or four even.
It is crucial to be aware of the hidden costs not taken into account in the BOM: import duties and tariffs, shipping, SKU storage costs, test fixtures, failed and returned products, plus most importantly, research and development, marketing, sales, customer service, and labor costs internal to the company itself. Also, consider that it is likely that there will be extra units left for parts due to the minimum order quantities. For example, if the product requires steel panels that are sold to you by the ton, the production batch requires only 8,100 kg, which will leave you with an excess 900 kg of steel panel, the equivalent of 10% of the total order.
Elements of a BOM
Given that we need to set up a BOM for every product, the question is: what should it contain? As much as possible, BOMs have gotten increasingly detailed to store more and more information about design, vendors, materials, and processes. The setup of a Bill of Materials varies per industry, company, and product category. For example, when a product contains circuit board subassemblies, the BOM typically includes a reference designator to state where the parts fit onto the PCB.
BOMs should include the following items for all industries involved with production processes:
- Project Description
- Person who prepared the BOM
- Revision number and date to ensure traceability and up-to-date information
- Component name, number, and description. Numbers can be assigned serially or according to a so-called intelligent or significant numbering system, for example, LNT-M3H5-0003 can specify a locknut with thread diameter 3mm, and 5mm height, type 3.
- Quantity needed of each component
- Unit of measure. For example, pieces, inches, feet, millimeters, ounces, metric tons, or drops.
- Criticality (Yes/No). This indicates whether or not the component can exclusively be sourced from one vendor.
- Phase. Indicates a component’s maturity level, for example, Unreleased, In Design, or In Production.
Additional information often supplied in the BOM is:
- Vendor information such as company, contact persons, lead times, MOQs, payment, and delivery terms.
- Supplier approval status: a Yes or No indicating if the supplier has approved the part for manufacturing
- Quality standards
- Prices for units, tooling, samples, and totals
- Procurement type. This states how a product is made, for example, Off-the-Shelf or Made-to-Spec.
- Where-used information. This states in which other products the component has been implemented.
- Notes, follow-up actions, and open questions keep everyone on the same page about the project.
- ECRs. These are requests for changes from the engineering teams.
Then the rows containing the components are grouped into:
- Off-the-shelf components
- Custom made-to-spec parts. This typically adds an extra column to incorporate fixed investment costs such as for tooling molds, dies, jigs, and/or fixtures.
- LOP (Labor, Overhead, and Profit) charged by the manufacturer. Also known as FVA (Factory Value Add), it can be as much as 30% of the product but usually decreases with higher production quantities.
- Scrap percentage (units manufactured that do not make it through quality control)
- Packaging costs
- Shipping costs
BOM Template (Free Download)
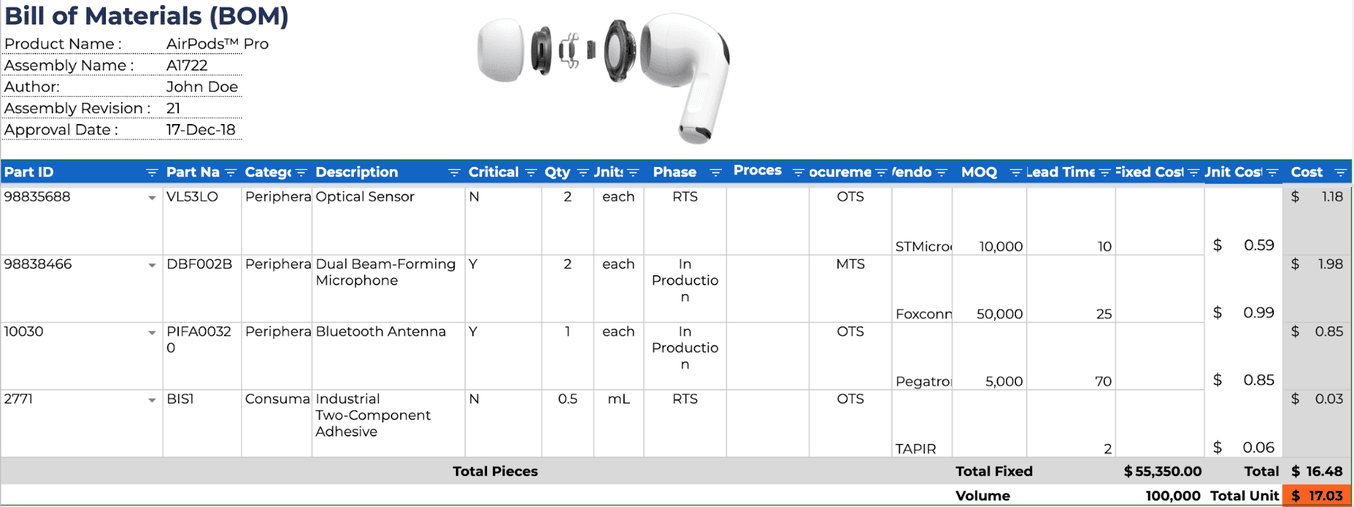
Theory is good, but it’s more tangible to look at a real-life BOM example to see how it works in practice. We created a faux BOM with a selection of the parts and assemblies that could be used to create a well-known product, the Apple AirPods Pro.
Rather than creating a BOM from scratch, you can use this template as the starting point when you create a BOM for your product. Just click on “Use Template” in the top right corner to duplicate it, delete any unnecessary info, and modify the sheets and the columns according to your needs.
Note that while the BOM is largely based on actual data pertaining to the product, as a corporate document, it is entirely fictive.
How to Compare Pricing Estimates With a BOM
A BOM can be a valuable tool for comparing different manufacturing processes. You can list the options for making a part as separate rows under the same Part ID and activate one at a time towards the final cost estimation. In Google Sheets, this can be done using the Hide Row function. But how do you estimate the cost of a part at the stage of a concept BOM without having received any quotations from suppliers?
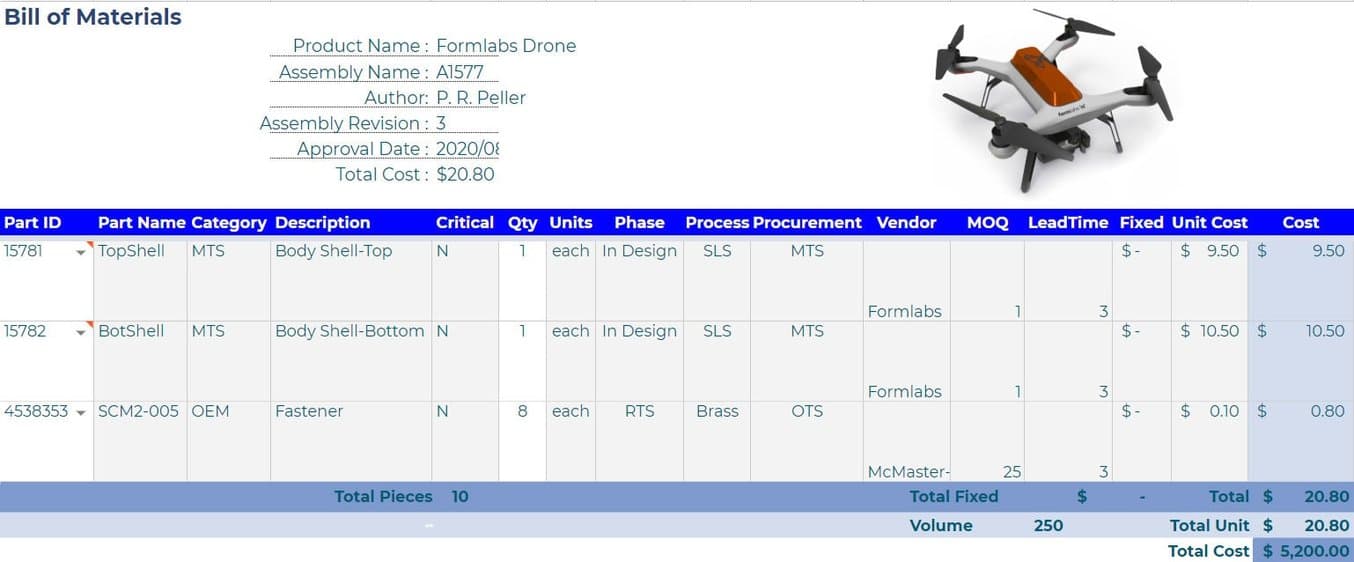
Let’s say we want to develop our own Formlabs drone that would look something like this:
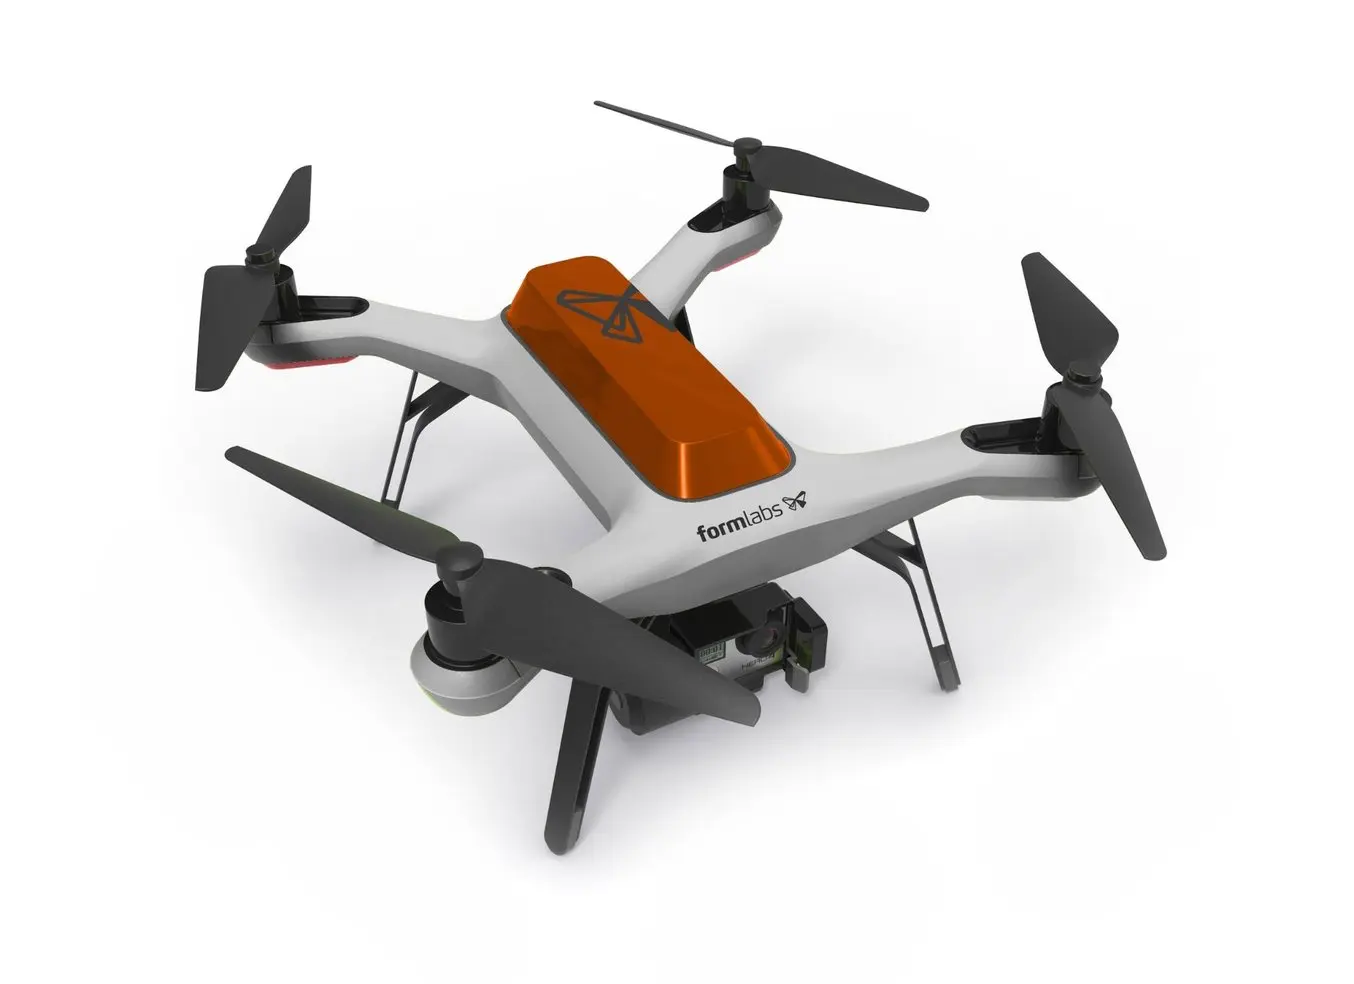
Original drone design: Solo by 3DR.
It will be a limited edition series of 250 pieces as a giveaway to promote the Fuse 1 selective laser sintering (SLS) 3D printer. We want to compare different manufacturing processes to see whether it is cost-effective to 3D print some of the components: for example, the shell in the strong and durable nylon. For traditional manufacturing techniques, we selected vacuum forming and injection molding as alternatives.
As explained in our guide about manufacturing processes for plastics, vacuum forming is a common process for creating simple parts, with low tooling costs compared to other molding techniques. Injection molding is the most widely used process for mass manufacturing of plastic parts, but molds are highly complex and expensive. 3D printing doesn’t require tooling, but due to the higher variable costs, it becomes less competitive at medium and higher volumes.
The advantage of 3D printing is that by enabling unlimited geometrical possibilities, developers can eliminate the need for certain components such as fasteners, since they can be integrated into the design. It also allows the integration of complex internal structural reinforcements such as ribbings and lattice structures, allowing a reduction or even complete integration of the chassis. This will in turn simplify the BOM, production planning, and assembly process.
Cost estimation for an SLS 3D printed part is fairly straightforward: take the raw material costs per cubic centimeter and multiply it by the part volume. Then, add a small amount of compensation for the labor required to clean and post-process each part, material waste, as well as the machine’s power consumption. In our example, we have excluded these hidden costs since the injection molded and vacuum formed drone housings will have extra labor time because of the higher number of components that need to be assembled. Additionally, factories calculate LOP fees that will cancel out the hidden costs associated with a 3D printed solution.
We will adhere to the same part volume for both 3D printing and injection molding in ABS, since whereas the injection-molded parts will require slightly thicker walls, 3D printing will compensate for this with its requirement for extra material in the internal structure.
Thanks to the integration of components, the drone will only require eight fasteners beyond two 3D printed shells. This is the (simplified) BOM for 3D printing the drone body using the Fuse 1:
The costing procedure for an injection molded part entails enough parameters to write a thesis about. Important factors here are mold material, labor costs, surface quality, amount of through-holes, undercuts, side-action cams required (calculate with $1,000 - $2,000 added tooling cost per cam), collapsible cores, cooling time (largely dependent on wall thickness and gate points), ejector pins, parting surface complexity, and dimensioning tolerance. A simple single-part injection mold just a few inches in outer dimension will cost anywhere between $2,000 and $5,000, whereas a complex multi-cavity mold for a large part can cost over $100,000. A steel mold lasts up to 10 million cycles while an aluminum mold is cheaper, but typically lasts for 50,000 to 200,000 shots.
With injection molding, it’s more economical to divide the shells and the chassis, which results in more components in the BOM. Here’s the BOM for the same product, using the design optimized for injection molding:
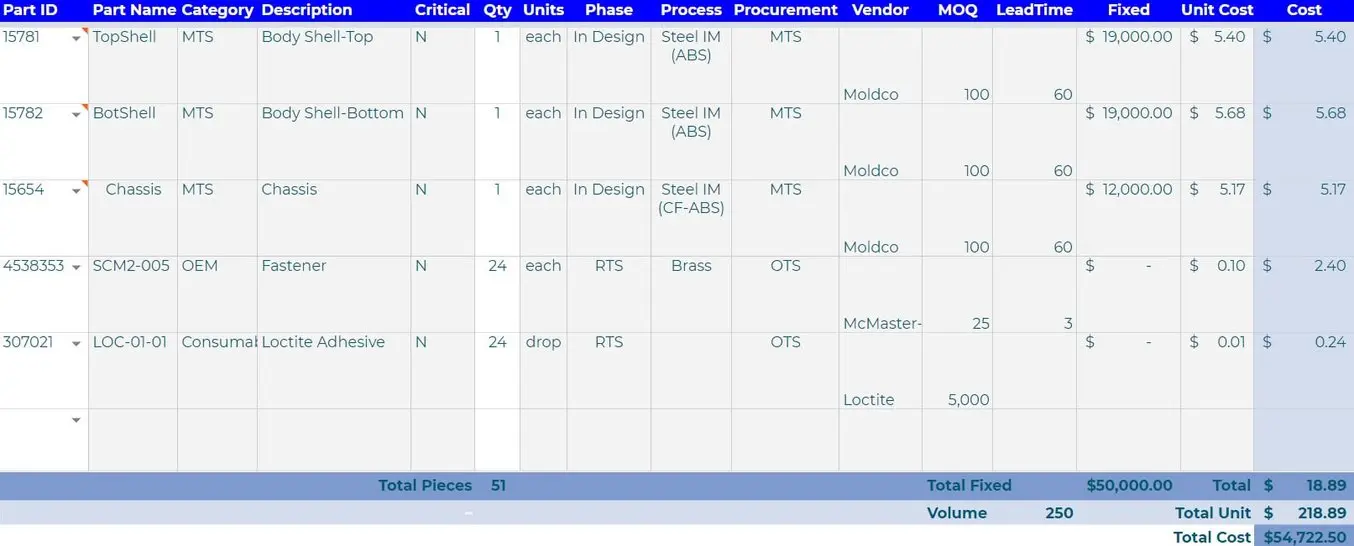
The price is well over ten times more than its 3D printed counterpart. Even if we can drive mold costs down by opting for rapid tooling and creating the mold out of aluminum, the prices will not enter a neck-and-neck race before production numbers reach 5,000+ units.
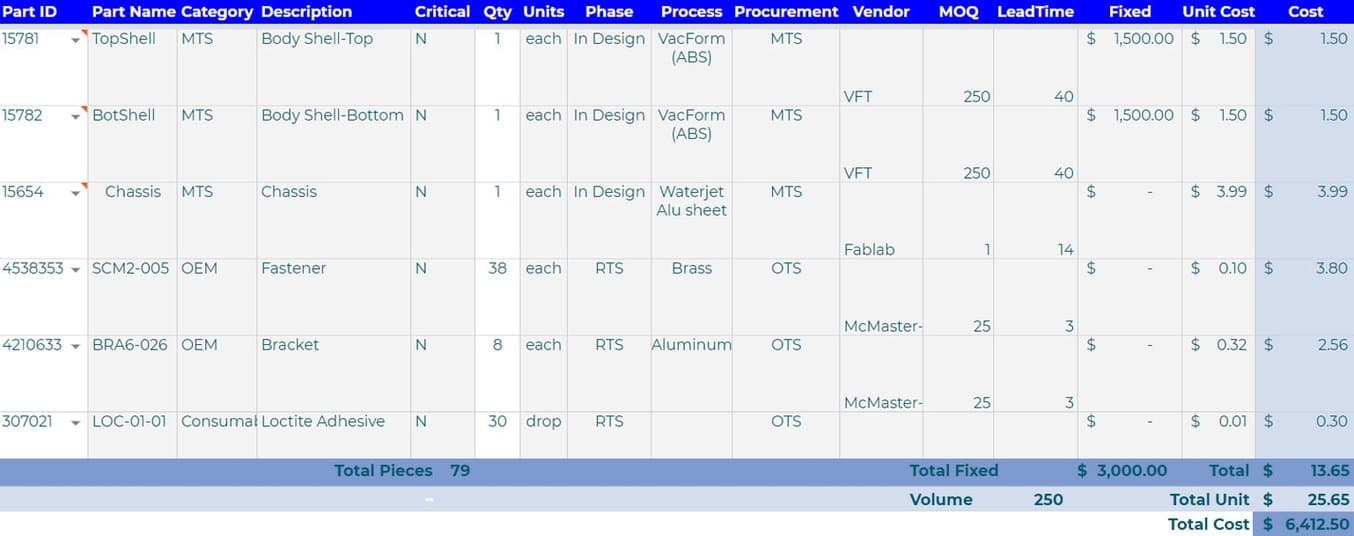
A thermoformed shell is more competitively priced and will break even with 3D printing at a batch of around 500 parts in our example. However, note that because geometry is further simplified, the part will have no structural or mounting features integrated, which will require additional components and assembly time. The following BOM shows a solution with a waterjet-cut aluminum chassis connected with brackets to the thermoformed body shells.
SLS 3D Printing vs. Injection Molding: When to Replace Molded Parts With 3D Printing?
This white paper showcases the cost-dynamics for real-life use cases, and presents guidelines for using SLS 3D printing, injection molding, or both.
Summary
The Bill of Materials impacts multiple departments from the early phases of new product development all the way to the sales stage, evolving from a simple list as a concept BOM to a detailed EBOM, a complete MBOM, and optionally an SBOM/CBOM. Nowadays, a BOM is expected to be as interlinked, multi-leveled, appended, and detailed as possible to streamline production management company-wide.
Just like the BOM, 3D printers are also valuable tools in all stages of the product development process. By making it easy and affordable to produce prototypes rapidly in order to evaluate form, fit and function, design and engineering teams can test and implement changes quickly, allowing a product to reach the market faster.
Learn more about industrial 3D printers and explore how leading manufacturers leverage 3D printing to save money and shorten lead times from design to production.